Warm-ups, Cool-downs, and Stretching
Let’s check back in with our Primal rockstar, Grokette. Yes, she was super fit, I promise you that, but how do I know? Consider this: her fitness was literally a matter of life or death. She and her family had to hunt for meals, gather fruits and vegetables, collect firewood, run from predators, and travel by foot wherever they wanted to go. Thanks to Grokette and the rest of our ancestors, the human body has evolved to move in amazing ways. Believe it or not, you’re a natural athlete! However, when you get too caught up in a modern lifestyle, you can become lazy and out of shape, and fall into a sedentary routine.
What this means for the modern day Grokette is that you need to make a special effort to not only get enough exercise, but to also get the right kinds of exercise that your body depends on to be healthy. Obviously, you don’t need to do the exact same activities your Primal ancestors engaged in. I mean do you really want to spend your Friday night getting chased by a saber-toothed tiger or lifting rocks to build a shelter after a long day of scrounging for food? Yeah, that’s not exactly how I like to start my weekend either. But here’s the cool part—you can model your exercise in the spirit of your ancestors and choose workouts that have a similar effect on your body. The benefits of Primal-style exercise include:
You may be thinking, “My friends all have workout DVDs and do hours of cardio; is that what I should be doing?” Sure, if you want to spend hours in agony doing “chronic cardio,” be my guest! Conventional wisdom probably has you fooled into believing that you need to spend a chunk of your day on a treadmill or in an aerobics class to achieve your physical goals. (Don’t feel bad…I was victim of this crap too!) When in doubt, ask yourself WWGD? (What would Grokette do?) Do you think she worked herself to death to get in shape? Of course not! Working out at those levels would have exhausted her, made her easy prey, and prevented her from being able to hunt/gather her next meal. She stayed in shape naturally because she allowed her genes to function the way they were meant to by eating and being naturally active.
Unlike gung-ho fitness peeps today that push themselves too hard due to peer pressure or maybe a psycho coach, gym teacher, or personal trainer screaming in their ears, those who practice natural exercise stay aligned with their attitudes and motivation levels. That’s right, I hereby give you permission to rest your body when you’re tired, feeling a little under the weather, or simply don’t feel like doing your typical workout routine. I know it sounds too good to be true, but it’s not!
Chronic cardio (doing workouts at medium-to-high intensity that last too long and are done too frequently with insufficient rest in between) can do more damage than good. Yup, over-exercising could be worse for you than sitting on your couch. Scientists have observed countless drawbacks from chronic cardio, including:
But don’t chuck your workout DVDs or cancel your monthly gym membership just yet. You should only get rid of exercise endeavors you’re not approaching in a Primal manner or that you just can’t stand doing. Is that DVD over an hour of high intensity, non-stop jumping, kicking, and punching? Then maybe it’s time to replace it with something shorter and more realistic. Is your gym membership really an hour and a half of you sitting on a stationary bike catching up on your favorite gossip magazines? Then it’s definitely time to refocus your time (and your money…even if it’s your parent’s!) into something that’s actually going to give you results. So what the heck are you supposed to do? Oh, I’m so happy you asked!
The answer is way easier than you think:
Seem to easy? Let me break it down for you.
Be honest here, how active are you? If your days currently consist of hours of sitting at school, followed by hours of lounging at home, and ending with hours of laying in bed, the answer is: NOT ENOUGH. It’s time to spice things up! I’m not talking about high intensity, run until your legs fall off every single day kind of effort; instead your goal should be to reach 55 to 75 percent of your maximum heart rate a couple hours every week. If you’re not up to speed with heart rate training, the 55 to 75 percent range is actually super easy to get into. If you aren’t all that fit right now, you can get there just by walking briskly. No joke, a walk can actually be considered a workout, and one that is healthier than the crazy intense, music-blasting group classes at the gym!

That’s not so tough now, is it? Try incorporating some of these ideas:

Incorporating just a couple of those simple ideas, you will easily be able to hit your goal of two to five hours of moderate movement per week. Not sure you’re getting enough? Check out the app store on your phone. Search “walk” and literally thousands of apps will pop up. These apps can help you track your time, distance, speed, route, and more—but only if you want to keep track of all those little details.
Aren’t you sick of hearing all the boys brag about lifting? I know I am…so I decided to join them. Lifting isn’t just for guys and it certainly won’t bulk you up like a bodybuilder since you likely lack the high levels of male hormones in your bloodstream that cause muscles to get huge. Lifting heavy things helps you build sleek, toned muscles to make you stronger and leaner, and to energize you more than any energy drink could.

Picture yourself 10,000 years ago. If you needed something heavy moved, you moved it. Grokette didn’t have equipment or machines to do it for her. If she needed something substantial relocated, she put forth great effort for a short period of time, then rested once the task was accomplished. This is the same type of Primal movement you should incorporate into your lifestyle. You don’t need to run outside and pick up boulders anytime soon (unless you’re into that kind of thing!), but just lifting heavy objects (your own body weight included) a couple times a week will give you the muscle and definition to be in the best shape of your life. These workouts can be totally sporadic and 30 minutes or less of all out effort. I’ve outlined some really simple moves you can incorporate into your routine in the section “Fitness Essentials” that I know you’ll love!
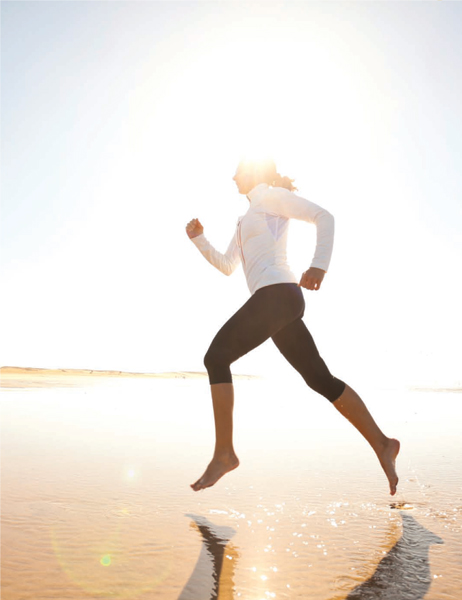
Sprinting is the final piece to the Primal fitness puzzle. All it takes is a sprint once a week (or two to three times per month) to create positive and noticeable effects in your fitness plan. By the sheer fact that they are something different, sprints have helped me through dreaded fitness slumps and always spice up my weekly routine. Since I don’t do them too often, they’ve served as my “it’s time to switch this up” go-to exercise. Sprinting is seriously amazing at:
Depending on your fitness and comfort level, you can start out as basic or advanced. The goal is to sprint with all-out effort for as long as you can—probably anywhere between 10-30 seconds. (Yes, you read that right, I said seconds!) Then, just taper down to a walking or “cool down” pace until you feel ready to sprint again. Beginners may want to start with three or four sprints, while more advanced runners could choose up to six.
No matter how fit you are, you don’t need to do too many sprints to get the intended benefit. Of course if you are really athletic, you will do your sprints faster than someone who’s out of shape, but you never need to do any more sprint repetitions. If your gym teacher says different, please give them this message from me: “Dude, you’re wrong!” Sprint workouts are all about quality, not quantity. Doing too many can put you in that horrible “chronic exercise” category and totally ruin the intended benefits of the workout. Listen to your body! If you wake up the morning after a sprint workout sore and tired, make a note to self to take it a little easier next time and build the difficulty of your workouts gradually and naturally. I don’t care what anyone says—pain is not gain.

If you’ve ever played sports, taken any kind of fitness class, or worked out using an exercise DVD, you have spent time warming-up, cooling-down, and stretching. But is all this necessary? If a bear was chasing down Grokette, do you think she’d ask the bear to hang on a sec while she stretched out her hamstrings? Doubtful. Homegirl RAN! Not only did she run, but she did so effortlessly—with no cramps or pulled muscles afterward.

So what does this have to do with you? Bears certainly aren’t chasing you down anytime soon, but can’t you just take off in a full sprint like that and not feel any pain while running, or experience sore or tender muscles once you’ve stopped? Well, that depends on your fitness level, but there’s a good chance the answer right now is—you can’t. (If that’s true, I can help you change this!)
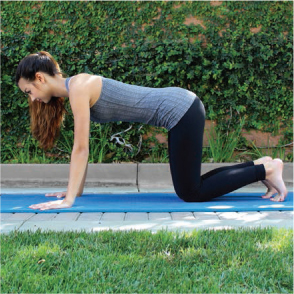
Most likely, Grokette took a good morning stretch, and an occasional post-nap stretch, with a whole lot of squatting in between. Squatting for Grokette was the natural position for sitting, relaxing, and just hanging out. You know she wasn’t sitting in a chair or lounging on the couch like most of us do today. Sitting is actually an unnatural position, especially as much as we do it, and causes more problems than you probably realize, such as:
Squatting is a movement you can easily reintroduce into your lifestyle (I say reintroduce because you used to do it when you were a kid—we all did—that’s how natural of a movement it is) with just a little practice. Years of sitting and forcing your body to adapt to bad habits may have you a little out of squat-shape, but we’ll get you back in perfect squat form in no time! I’ve detailed the steps for you in the “Fitness Essentials” section coming up.
Feel like you’re not ready to incorporate focused stretching into your daily routine? That’s okay! You can simply start by performing smaller versions of your workout to warm up the specific muscle groups you’re going to use. For example:
Of course, there are many different activities you’ll find yourself partaking in, but based on these examples, you probably have a pretty good idea of how to make modifications to get your muscles ready for the full movement.
If you think you’re up for the challenge of adding stretching to your life, the most time I’m going to ask of you is 10 minutes! Seem too good to be true? Well, it’s not. Since you’re starting young, you don’t have years of damage to overcome. You can do a world of good for your muscles, joints, and body in less time than it takes to get ready in the morning!
As promised, I’ve included my five favorite stretches. These moves have been hand selected just for you and your lifestyle. Make sure to perform them in the order that they appear in the book. These stretches are a progression that will run you through specific muscle groups focused to combat issues you probably face every day: sitting for hours in class, exhibiting poor posture, and wearing high heels or other clunky shoes that may look great but don’t feel so good. That means you’ll be focusing on your chest, shoulders, back, butt, hips, hamstrings, quadriceps, and calves. For every move, I’ve explained the area of the body worked, why it needs to be worked, and how to perform the movement.
Run through this progression twice, once for your right side and once for your left. Spend about a minute on each stretch and the entire sequence is about 10 minutes long. Some of these have multiple holds, and depending on your mobility, a few might be a little tougher than others. It’s important to listen to your body and NOT to stretch any muscle beyond its limit. Remember, the goal here is to help your body, not harm it. It’s also crucial to pay attention to your form. If you can, do these moves in front of a mirror (or any reflective surface like a patio door or a TV with the power off) to be sure your form is correct. Sometimes what feels like the right position isn’t actually right at all. You’ll want to nail the form the first time so that you’re not training your body to move incorrectly or develop bad mobility habits. Consider finding a workout buddy, like a friend or family member. Sometimes a good partner in crime can improve your workout and make it a lot more fun too!
If you ever do “Stretching Essentials” on the same day as “Fitness Essentials” be sure to do the stretches after fitness and not before. These are deep, static stretches that could be a little too intense to perform with cold muscles. Before doing any rigorous stretches or exercises, do some simple dynamic stretching. The difference between static stretches and dynamic stretches is this: static moves are done when the body is at rest and not in motion, stretching a muscle to its extended range of motion and holding the position for 30 seconds or up to 2 minutes. Dynamic moves are done while in full motion, using momentum to propel your muscles to their extended range of motion. Examples of dynamic stretching that you can implement as a warm-up before any kind of workout include efforts like:
If you have any physical limitations or preexisting injuries, you’ll want to talk to a parent, gym teacher/coach, or doctor before performing any of the stretches or exercises in this book.
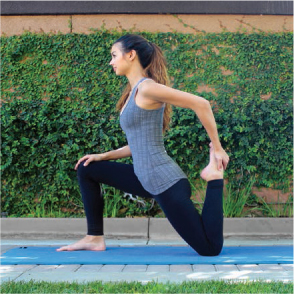
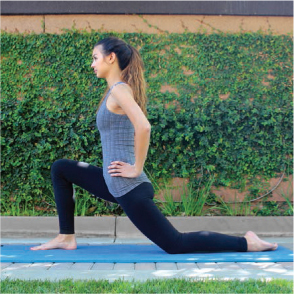
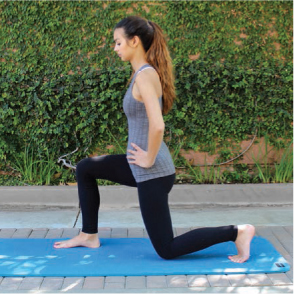
The Low Lunge stretches and improves the mobility of your hip flexors, hamstrings, calves, and quadriceps.
Let’s be real for a minute. Even if you wanted to stop sitting so much, odds are you have no choice. Our culture is one that has fully embraced sitting while performing everyday tasks. You’re probably sitting while you read this book—bonus points if you aren’t! Because of the crazy amount of sitting you do, I’m focusing a lot of your efforts on hip mobility. When you sit too much, your hip flexors tighten and can even shorten over time. This diminishes your range of motion, preventing you from doing something as simple as squatting, and can also cause some serious lower back pain. If you take care of your hips now, you will reap the benefits for the rest of your life.
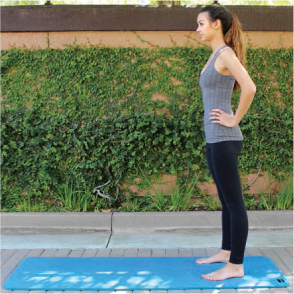
 Stand with your feet hip width apart and hands on your hips.
 Go into a lunge by stepping forward with your right foot to the point where your right knee aligns over your right ankle, keeping your right knee at a 90-degree angle. Your shin will be perpendicular to the ground and your thigh will be parallel to the ground. Your left knee will also be bent 90 degrees, with your left shin parallel to the ground and your thigh perpendicular to the ground.
 Place your left knee on the ground and come off the ball of your foot; lay your left leg flat on the ground. Keep your upper body tall with your shoulders back (don’t curl them forward). Sink the hips forward and down. Focus on breathing deeply and at a steady pace; never hold your breath. Hold this position for about a minute.
Stand tall
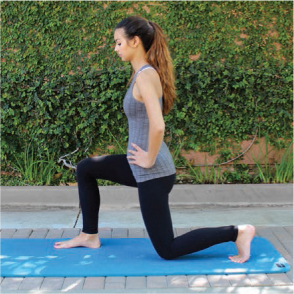
Lunge forward

Sink deep
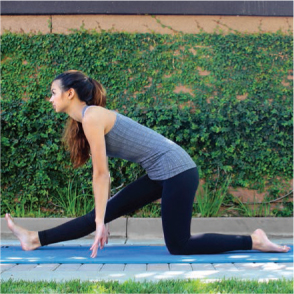
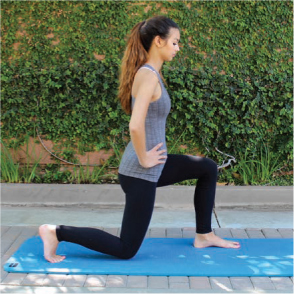
The Kneeling Hip Stretch stretches and improves the mobility of your hips and thighs.
Like I explained with the Low Lunge, because of the amount of time you are required to sit, I’m going to make sure you work those hips! As part of your core, your hips contain much of your strength, so it’s essential to keep them in tiptop shape.
 Start from the Low Lunge position.
 With your left hand, carefully lean back to grab your left foot and place your right hand on your right knee. Pull your left foot in towards your body as closely as you can, trying to make your left shin perpendicular to the ground. Be sure not to twist the spine, keep both shoulders facing forward, and do not arch your lower back. Continue breathing, and hold this position for about a minute.

Raise foot
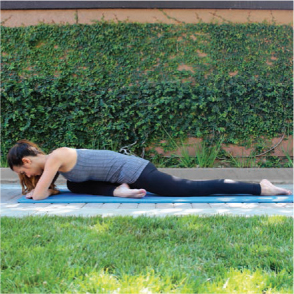
The Half Split stretches and improves the mobility of your calves, hamstrings, and glutes.
In addition to being boy crazy, you’re probably starting to become a little shoe crazy too—am I right? While I could sit here and preach about how horrible high heels are for your back, legs, and feet, I’ll spare you the lecture (for now) and instead share some stretches that will help you out after a night of teetering on four-inch heels. While heels may help you look taller and lengthen your legs, they’re actually doing more damage than you realize. In the name of beauty, you’re compromising your posture and damaging joints and muscles…from your shoulders all the way down to your toes. (More on that later!) To counter the destruction to your calf muscles, be sure to stretch them, specifically after nights in your newest sparkly heels.
 Start from the Kneeling Hip Stretch position.
 Release your left foot back to the ground; keep your toe pointed and leg flat. Shift your weight back and straighten your right leg, with your heel on the ground and your ankle flexed so that your toes point up. Reach to the ground with your fingertips if you are having trouble maintaining your balance.
 Bend your upper body forward, extending your forehead towards your right ankle. Place your hands flat on the ground (or as close as you can get without straining) and extend your head as low to the ground as you can without bending your right knee. Continue breathing, and hold this position for about a minute.
Shift back
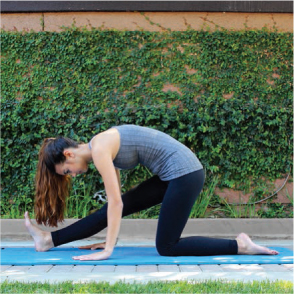
Bend forward
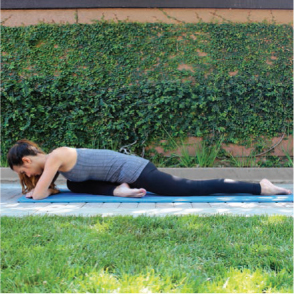
The Pigeon Pose stretches and improves the mobility of your hip flexors and hip rotator muscles.
You’re starting to notice a trend here, huh? Like the Low Lunge and the Kneeling Hip Stretch, I’m sneaking one last hip stretch in here because you likely sit too much.
 Start from the Half Split position.
 Bring your upper body upright, and shift your weight forward going back to a Low Lunge position.
 Lower your hands in front of you and shift your right knee onto its right side and extend it forward until it touches your right wrist, keeping your right thigh in line with your body. Slowly pull your right ankle towards you until your right foot is directly below your left hip. Straighten your left leg directly behind you so it’s entirely on the ground, and place your right hand on your right knee and your left hand on your right foot.
 Extend your torso forward, coming down onto your elbows, making sure to keep your hips level. If the stretch feels too intense, come up from the ground as much as you need to and use your arms to support more of your weight. Continue breathing, and hold this position for about a minute.

Low lunge

Tuck leg
Extend forward
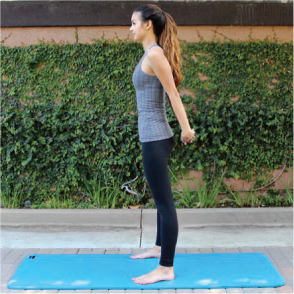
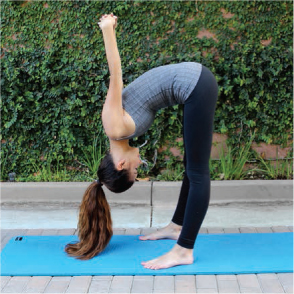
The Tip Over Tuck stretches and improves the mobility of your chest, shoulders, hamstrings, and lower back.
If you’ve ever looked at a fashion magazine, watched red carpet coverage, or snooped your favorite celeb’s social media page, you’ve seen it: the slouch. This iconic stance consists of hips thrusted out, lower back arched, hands on hips, and shoulder curled forward. This posture—or lack thereof—became popular back in the 1920s. It served as a form of rebellion; girls back then started listening to jazz music, danced all night, and strayed as far from the “prim and proper” look as they could. While this look was effortlessly cool, it accounts for the poor posture and hunchbacks we see today. The next time you’re in class, take a look around. Are most of your classmates at their desks, hunched over with curved backs and shoulders that curl forward? When your back and shoulders lack strength and mobility, you force the curve of your spine to hold your weight up. This can cause all kinds of damage, but you can correct your posture if you’re able to get your shoulders back in a natural position.
 Start from the Pigeon Pose position.
 Bring your body upright, and push yourself up into the Low Lunge position.
 Stand all the way up on your feet, keeping your feet shoulder width apart. Reach your arms behind you and interlace your fingers.
 Lean your chest forward and lift your hands up overhead as you fold your torso toward your thighs. Make sure you’re lengthening through your spine by reaching the top of your head toward the floor. Continue breathing, and hold this position for about a minute.
Low lunge
Stand Tall
Hinge forward
If this is your first run through Stretching Essentials, go back to the beginning and start the Low Lunge leading with your left foot. If you’ve just completed both sides, you’re done with stretches for the day!
Remember when I said I would spare you the lecture on wearing heels? Well the time has come…here’s the scoop! I will not argue with you—heels make you look amazing and feel like a million bucks, at least for the first 15 minutes. I do wear heels for special occasions, but I’m not like a lot of girls who consider heels a part of their daily ensemble. Why? Well, to be honest, I just can’t hang. My little size five-and-a-half feet are aching before I leave the house! Some of my friends assure me that if I just wear heels more often, I’ll “break my feet in” and “get used to them,” but to be honest, that’s the last thing I want. Let’s take a closer look at all the damage heels can do to your body:

Now that you have a solid understanding of the Stretching Essentials, what each movement can do for you, and the difference between static and dynamic stretches, let’s move on to some fitness moves that will increase your strength. Just like the Stretching Essentials, the Fitness Essentials are to be followed in the order they appear in this book. Depending upon your fitness level, you may wish to run through the circuit two to four (or maybe more) times. However, if this is your first time, once might be enough! Again, everything I stated before in the stretching section applies to fitness. Let’s quickly go over those fundamentals again to be sure you don’t forget anything.
Warm-up with some dynamic stretches like those listed in Stretching Essentials on page 45. Form is everything! Find a mirror or a buddy to ensure you’ve got the right form. Don’t push beyond your limit, and listen to your body. It knows better than I do about what you can and can’t handle. We’re all built differently, and just because I can do something or your friend loves a certain move, doesn’t mean it will feel the same to you. With that said, if you have any physical limitations or preexisting injuries, talk to a fitness pro before attempting any of the stretches or exercises in this book.
Push-ups strengthen your upper/lower body and core.
Push-ups are as close to a perfect workout as you can get—when performed correctly. They work your entire upper body, including your chest, shoulders, and triceps, while also strengthening your lats and traps (which are the large muscle groups in your back). Push-ups use your abs to stabilize and engage your lower back, legs, and glutes—a total body workout! Their awesomeness is often overlooked purely because of how simple they are, but push-ups are truly beneficial to any exercise routine, no matter what your fitness level is.
There are three levels of difficulty to push-ups: Wall Push-ups; Incline Push-ups; Floor Push-ups. Choose one that suits your current fitness level, working your way toward the most difficult variation.
Breathing Technique: Inhale each time you lower yourself down towards the wall, bench, or ground, and then exhale on the effort when you push yourself up.
 Smarty Pants:
If you’ve ever seen “modified” push-ups that are performed from the knees as opposed to the toes…that is not a push-up! People tend to think push-ups from the knees are a simplified version of the exercise, but the truth is that the bend in your knee disengages almost all of your efforts. Instead, if you’re looking for something a little easier, perform your push-ups with the same form against a wall or bench. This will ensure the same muscle groups stay engaged, and you will still reap all the benefits of a traditional floor push-up.
Stand about one to two feet (or the appropriate distance which allows you to achieve proper form) away from a wall. Place your hands shoulder width apart against the wall. Align your body to be perfectly straight, with core and glutes tight and head facing straight ahead, and then go up onto your toes.
Keep your body in perfect alignment (don’t push your butt out or sag your hips down), and lower your upper body towards the wall, bending at the elbows and keeping the arms in tight next to the body—don’t let them fly out to the sides. Then come back up to starting position. That counts as one repetition (rep); do as many reps as you can for one minute while maintaining proper form. Movements should be slow and controlled.
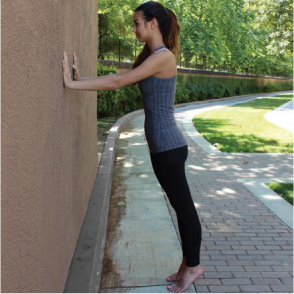
On wall
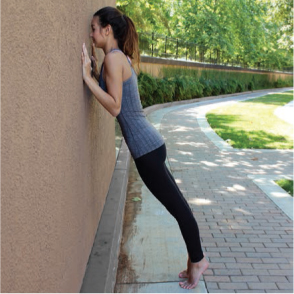
Lower yourself
Stand about one to two feet (or the appropriate distance which allows you to achieve proper form) away from a sturdy bench or other object elevated from the ground. Assume the same position previously mentioned: body perfectly straight, core and glutes tight, head facing straight ahead, and go up onto your toes.
Keep your body in perfect alignment, and lower your upper body towards the bench, bending at the elbows and keeping the arms in tight next to the body—don’t let them fly out to the sides. Then come back up to starting position. That counts as one rep; do as many reps as you can for one minute while maintaining proper form. Movements should be slow and controlled.
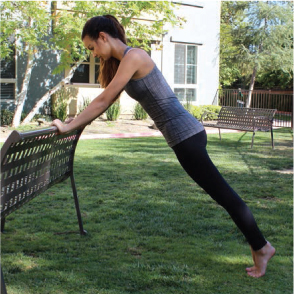
On bench
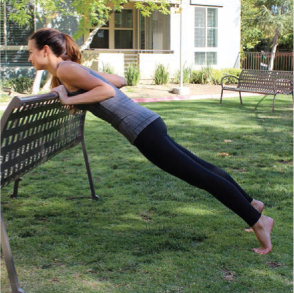
Lower yourself
Starting from the floor, assume the same position previously mentioned: body perfectly aligned, core and glutes tight, head facing straight ahead, go up onto your toes and on your hands.
Keep your body in perfect alignment, and lower your upper body towards the ground, bending at the elbows and keeping the arms in tight next to the body—don’t let them fly out to the sides. Then come back up to starting position. That counts as one rep; do as many reps as you can for one minute while maintaining proper form. Movements should be slow and controlled.
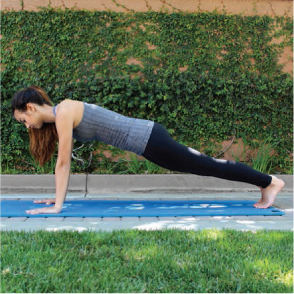
On floor

Lower yourself
Squats strengthen your lower body, glutes, and core.
Not only will squatting strengthen your core and lower body, but it will also improve your mobility. If you’re having trouble squatting properly, it’s likely due to shortened hip flexors and hamstrings from sitting too much. Think back to all the hip flexor and hamstring stretches you did in the previous section—this is where those stretches will pay off.
There are three levels of difficulty to squats: Assisted Squats; Half Squats; Full Squats. Choose one that suits your current fitness level, working your way toward the most difficult variation.
Breathing Technique: Inhale each time you lower yourself down towards the ground, and then exhale on the effort when you push yourself up.
Stand tall about a foot (or the appropriate distance which allows you to achieve proper form) away from a sturdy pole or support object and grab ahold of it. Place feet shoulder width apart, with toes pointed forward or naturally pointed out slightly.
Keep your core tight and your chest tall. Sit back by hinging at your hips, lowering yourself between your knees by extending your butt out and bringing your thighs parallel or below parallel to the ground. Pause momentarily, then return to a standing position, squeezing your butt on the way up. Make sure your knees stay in line with your feet. That counts as one rep; do as many reps as you can for one minute while maintaining proper form. Movements should be slow and controlled.

Hang on
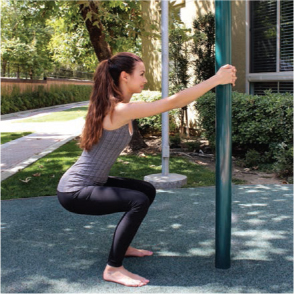
Squat deep
Assume the same position previously mentioned: feet shoulder width apart, with toes pointed forward or naturally pointed out slightly. Extend arms straight out in front of you for balance.
Keep your core tight and your chest tall. Sit back by hinging at your hips, lowering yourself between your knees by extending your butt out and bringing your thighs above parallel with the ground, about 45 degrees. Pause momentarily, then return to a standing position, squeezing your butt on the way up. Make sure your knees stay in line with your feet. That counts as one rep; do as many reps as you can for one minute while maintaining proper form. Movements should be slow and controlled.
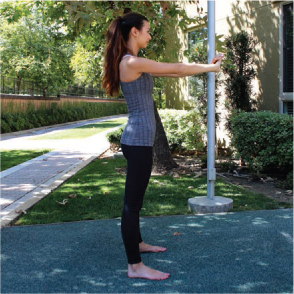
Arms out

Squat shallow
Assume the same position previously mentioned: feet shoulder width apart, with toes pointed forward or naturally pointed out slightly. Extend arms straight out in front of you for balance.
Keep your core tight and your chest tall. Sit back by hinging at your hips, lowering yourself between your knees by extending your butt out and bringing your thighs parallel or below parallel to the ground. Pause momentarily, then return to a standing position, squeezing your butt on the way up. Make sure your knees stay in line with your feet. That counts as one rep; do as many reps as you can for one minute while maintaining proper form. Movements should be slow and controlled.

Arms out
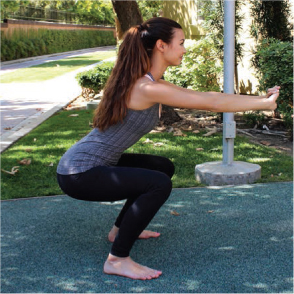
Squat deep
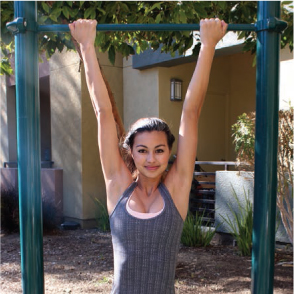
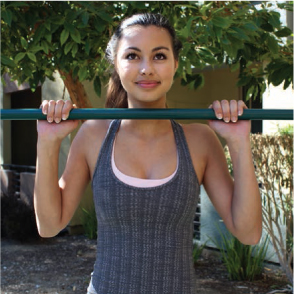
Pull-ups strengthen your upper body, back, and core.
Anytime you do an exercise that makes you “push” (like push-ups), you need to counter that effort with a move that makes you “pull” (like pull-ups). And just like push-ups, pull-ups engage your entire upper body, especially the muscles in your back, as well as your abs and biceps.
There are three levels of difficulty to pull-ups: Chin Hold; Chin-ups; Pull-ups. Choose one that suits your current fitness level, working your way toward the most difficult variation.
Breathing Technique: Inhale each time you slowly lower yourself down from the bar, and then exhale on the effort when you pull yourself up. If doing a chin hold, breathe deeply at a steady pace and never hold your breath.
Place a sturdy chair beneath a pull-up bar. Step up onto the chair and hold the bar with your palms facing towards you, shoulder width apart.
Secure your chin above the bar. Keep your elbows tight, grip the bar, and pull your legs off the chair. (Let them hang or cross your feet at the ankles.) Hang from the bar in this position as long as you can, then slowly lower yourself back toward the ground. This part is crucial, as it will help you build strength.
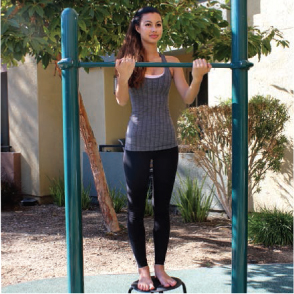
Grip bar

Hang tight
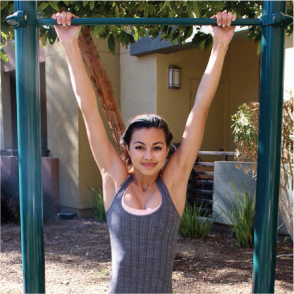
Hang (legs straight down or crossed at the ankles) beneath a pull-up bar, and hold the bar with your palms facing towards you, shoulder width apart.
Keep your elbows tight, chin tucked, and shoulder blades retracted to protect the spine. Lead with the chest and raise your chin over the bar. Gradually lower all the way back down to starting position. That counts as one rep; do as many reps as you can while maintaining proper form. Movements should be slow and controlled.
Under Grip

Raise up
Hang (legs straight down or crossed at the ankles) beneath a pull-up bar, and hold the bar with your palms facing away from you, shoulder width apart.
Keep your elbows tight, chin tucked, and shoulder blades retracted to protect the spine. Lead with the chest and raise your chin over the bar. Gradually lower all the way back down to starting position. That counts as one rep; do as many reps as you can while maintaining proper form. Movements should be slow and controlled.
Over grip
Raise up
Lunges strengthen your lower body, glutes, and core
Similar to squats, lunges work your hips and force you to find balance. Performing moves that engage your balance encourages you to tighten large muscle groups and focus on stability.
There are two versions of lunges: Forward Lunge; Reverse Lunge. They are the same level of difficulty when it comes to strength, although some people find forward lunges easier than reverse lunges when it comes to balance. Since they work different muscle groups, work on technique for both.
Breathing Technique: Inhale each time you lower yourself down towards the ground, and then exhale on the effort when you push yourself up.
 Stand with your feet hip width apart and your hands on your hips.
 Go into a lunge by stepping forward with your right foot three to four feet. Bend your right knee 90 degrees, keeping it directly above your right ankle. Be careful to never let your knee pass your ankle; it could strain your knee and cause injury. Your shin will be perpendicular to the ground with your thigh parallel to the ground. Your left knee will also be bent 90 degrees, with your left shin parallel to the ground and your thigh perpendicular to the ground. Spring back to starting position by returning your right foot next to your left foot. Then repeat this move leading with your left foot. Both moves together count as one rep; do as many reps as you can for one minute while maintaining proper form. Movements should be slow and controlled.
Stand tall
Lunge forward
Stand with your feet hip width apart and your hands on your hips.
Go into a reverse lunge by stepping backwards with your right foot three to four feet. Bend your right knee 90 degrees, with your right shin parallel to the ground and your thigh perpendicular to the ground. Your left knee will also be bent 90 degrees, with your left shin perpendicular to the ground and your thigh parallel to the ground. Be sure to keep your left knee in alignment directly above your left ankle. Spring back to starting position by returning your right foot next to your left foot. Then repeat this move leading with your left foot. Both moves together count as one rep; do as many reps as you can for one minute while maintaining proper form. Movements should be slow and controlled.

Stand tall
Lunge backwards
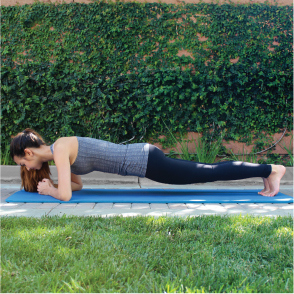
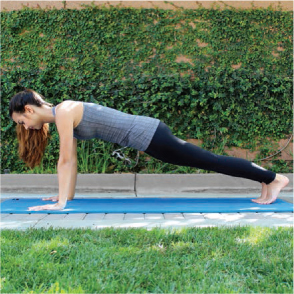
The plank strengthens your upper/lower body and core.
Performing a plank engages your entire body. Don’t let this move fool you—it’s tougher than it looks. Just clear your mind, focus on your breathing, and you will master this move in no time.
There are two levels of difficulty to the plank: Forearm Plank; Hand Plank. Choose one that suits your current fitness level, working your way toward the most difficult variation.
Breathing Technique: Breathe deeply at a steady pace and never hold your breath.
 Starting from your knees, place your elbows on the ground, aligned directly beneath your shoulders. Keep hands flat on the floor in front of you, or cup hands for a bit more stability.
 Extend your legs behind you, and rise onto your toes with the body perfectly horizontal (don’t push your butt out or sag your hips down). Continue to breathe and hold this position as long as you can up to one minute while maintaining proper form.

Elbows down
Align body
Starting from your knees, place your hands on the ground, aligned directly beneath your shoulders.
Extend your legs behind you, and rise onto your toes with the body perfectly horizontal. Continue to breathe and hold this position as long as you can up to one minute while maintaining proper form.
Hand down
Align body
If this is your first run through Fitness Essentials, go back to the beginning and start another circuit until you’ve done the appropriate amount of sets for your fitness level. If you’ve just completed all of your sets, you’re done with fitness for the day!
Primal fitness ditches conventional wisdom’s love of chronic cardio, and instead encourages you to focus on three simple fitness principles: move everyday, lift heavy things, and sprint once a week.
It’s time to get off the couch and start moving. There are a lot of easy ways to include movement into your everyday life, like walking to and from school. A simple way to keep track of movement goals is to download an app and set goals for your time, distance, or even speed. Remember, the goal is two to five hours per week.
Lifting heavy things will not make you bulky. Instead it builds lean muscle, making you stronger and more fit. Heavy weights include your own body weight, and strengthening exercises only need to last 30 minutes at most a couple times per week.
Sprinting workouts are the shortest workouts you will perform, sometimes lasting as little as five minutes. Your goal is once a week, but two to three times per month is good enough if you’re keeping up with moving and lifting heavy things. Not only are sprints great for your body, but they can also help you bust through annoying weight loss or fitness plateaus.
Our ancestors may not have needed to stretch before physical activity, but they were naturally in optimal physical health. Since you likely are not in the same shape they were in, it’s beneficial to your muscles, bones, and joints to warm up and stretch before and/or after physical activity.
The five Stretching Essentials include: Low Lunge, Kneeling Hip Stretch, Half Split, Pigeon Pose, and Tip Over Tuck. This progression of stretches has a big focus on your hips, and also target your core, upper, and lower body.
High heels might make you look amazing for the night, but they can cause real damage to your body over time affecting your posture, knees, calves, Achilles tendon, heels, ankles, and toes. Ouch!
The five Fitness Essentials are Push-ups, Squats, Pull-ups, Lunges, and Plank. Together, these moves cover a full body workout, focusing on upper/lower body, core, stability, and balance. Every stretch and exercise can be accomplished without the use of any equipment or weights, and you are encouraged to speak to a parent, gym teacher/coach, or doctor if you have any questions, physical limitations, or preexisting injuries.