

SETUPOLOGY IS THE SKILL of setting up properly for trouble shots. It’s the first skill of Damage Control because setup comes before the backswing, downswing, or follow-through of any trouble shot, and a bad setup affects everything that follows. Whether they’re caused by an unusual stance on difficult terrain, tree limbs that inhibit the golfer’s stance or swing, or “stuff” around the ball, trouble lies require different setups than normal shots do. And setting up poorly is often the first mistake golfers make when they’re in trouble.
Research shows that awkward stances and improper setups dramatically increase the odds of creating bad swings and errant shots. But data also indicate that when golfers understand and internalize good Setupology, they significantly improve their ability to escape from trouble.
Setting up in bad posture for a trouble shot is like tying one hand behind your back before trying to swing. Even from perfect lies on level tees, bad setups make swinging properly difficult. But from a trouble lie on difficult terrain with a bush limiting your backswing, setting up in the wrong posture is the golfer’s equivalent of shooting oneself in the foot.
2.1 The Fundamentals of Your “Normal” Swing
Before getting into Damage Control Setupology, I want to make sure you appreciate the concept of your “normal” swing. It’s what you think of as your golf swing, the swing you normally use on the golf course. Whether you’re trying to hit the ball long distances with a power swing, short and accurate distances around the green with finesse swings, or into the hole with putting strokes, these are the swings from normal lies you usually think of as your normal golf swing.
WE NORMALLY PRACTICE OUR NORMAL SWINGS
Every golfer tries to make perfect swings and hit perfect shots all around the golf course. When those swings and shots turn out to be not so perfect, we take lessons and practice to improve them. These lessons often deal with our posture, ball position, grip, or wrist hinge; the shape of our swing; or where we take divots. This is good and as it should be. Most of our practice shots are hit from near perfect lies on the flat and level practice ground of a practice range. This practice helps to refine and groove our normal swing for the normal shots we encounter most often on the course. Again: This is good.
But please beware: None of the above does anything to improve your Damage Control skills, which are the skills you need to extricate your ball from trouble.
IT’S DIFFICULT TO MAKE A GOOD SWING FROM A BAD SETUP
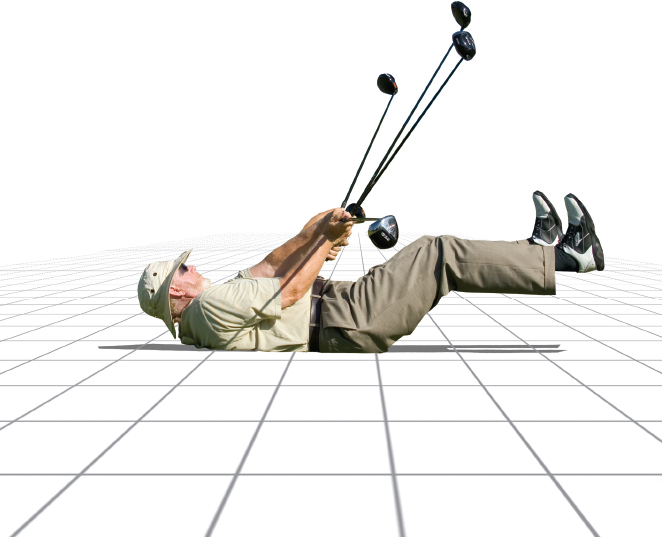
To make a good swing, one must be physically able to make good shoulder and hip rotations, arm swings, and wrist hinges, without being restricted by some internal (arthritic) or external (trees, bushes) interference. For example, your body can’t make a good swing while you’re lying on your back, because the ground won’t allow you to turn your shoulders or hips enough to create good motion, and there’s no room to swing your arms or club behind you (as I demonstrate by lying on the ground on my back for the “hands and wrists only” swing, Figure 2.1). These restrictions provided by the ground are even more obvious when you see them rotated into an upright position (Figure 2.2), a situation that a tree behind you might create. On the normal practice tee, however, there are no trees, and you can turn freely and make your normal driver swing (Figure 2.3). Good body rotation is crucial to a good golf swing.
2.1

2.2

2.3
It’s also difficult to make effective swings without good balance, because losing balance means moving your body in strange ways and getting into restrictive positions. Obviously, bad balance can destroy any golf shot (as Eddie learned trying to hit a shot from off a balance board, Figure 2.4).

2.4
When viewed face-on, the cocking of your wrists relative to your forearms increases gradually as you swing back away from the ball. The wrists don’t become fully cocked until you’re near the top of your backswing, but they should stay fully cocked in the downswing until shortly before impact. This difference in wrist-cock timing produces a larger radius for the arc of the clubhead in a normal backswing, as compared to the downswing (demonstrated by one of the best wedge players of all time, Tom Kite, Figure 2.5). It’s important to be aware of this difference in your normal swing radius, because it can be important when some kind of obstacle is crowding in behind your golf ball.

2.5
Every golfer’s swing has a low point, or “bottom,” relative to the ground, and this is where a normal divot is taken. Different players with different swing-timing and weight-transfer actions will have slightly different bottom positions on shots from level ground.
From a lie on level ground, the divot taken by most golfers starts near the middle of their stance, which means the center of their swing-arc bottoms out about two to four inches forward of their stance center (Figure 2.6). The precise location of where a player’s club first strikes the ground can be dramatically affected by the terrain of the lie, the stance, and the setup of the player. This can have a significant effect on where the ball should be positioned (forward or back) in the stance for a shot from trouble.

2.6
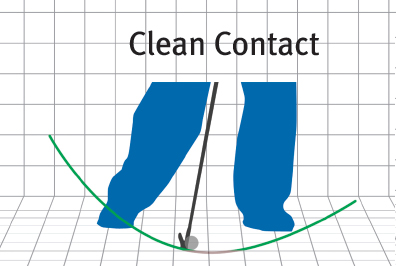
To ensure clean contact with the little ball (the golf ball) before contact with the big ball (the Earth), the little ball should always be positioned either exactly on or slightly behind where the golfer’s divot will commence (and this sometimes means the ball should not be in the middle of the stance).
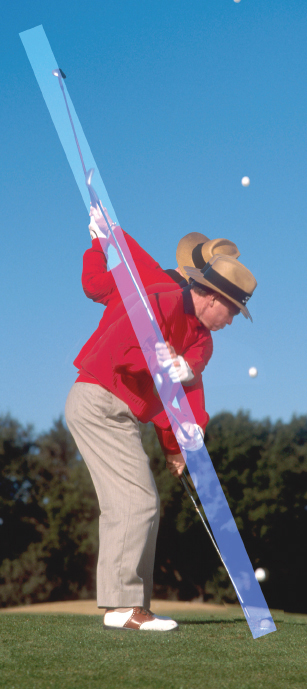
When you track a golfer’s clubhead (not the shaft or hands) and it travels in a single plane throughout the entire swing, the player is said to be swinging “in plane.” The angle measured between the plane and the ground is the player’s swing-plane angle. If you put a camera lens (or your eyes) at the right place behind a golfer’s in-plane swing, you’ll see something like Tom Kite’s swing (Figure 2.7).
2.7
Although most golfers try to swing their clubheads in the same plane on both their back- and through-swings, not too many actually do it. It is also true that most golfers address shots with their hands somewhat below this plane, and then the faster they swing and the more clubhead speed they generate through impact, the closer their hands come to moving up into their swing plane at impact.
Most golfers swing in two planes: one for their backswing, and then a different plane for their down-/through-swing. Some golfers have no distinct planes in their swings at all—they swing in a constantly changing loop of directions. Generally (although not always), the less complex and more in plane a golfer’s clubhead motion is, the more consistently solid and repeatable swings, and the higher the percentage of solidly hit golf shots will be.
SWING PLANE
 You can’t see if golfers are swinging “in plane” when you’re standing behind them, unless your eyes are in the swing plane (which they will not be, if you are standing on an extension of the ball-to-target line). This means you can’t tell if a golfer is swinging in plane from a photograph, unless you know the camera lens was precisely positioned in plane when the photo was taken.
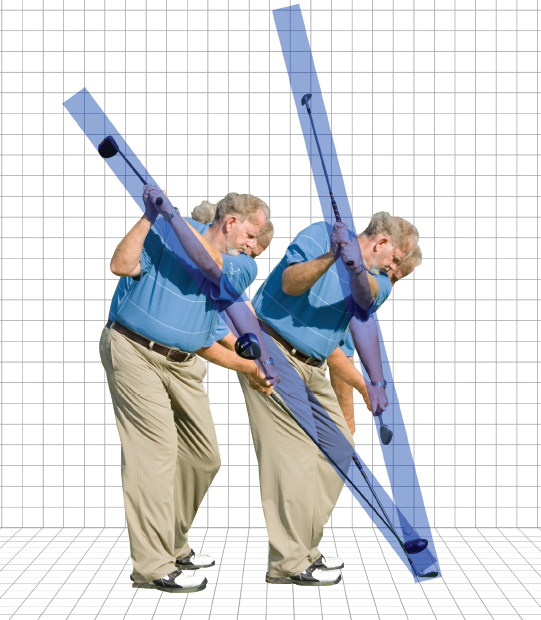
As club length changes, it forces the golfer’s swing-plane angle to change, as seen for my driver and wedge swings in Figure 2.8. Longer clubs require flatter (lower-angle) swing planes, while shorter clubs require more upright (larger-angle) swing-plane angles for any given golfer.
2.8
Your normal power swing is what it is, and it’s yours. Whatever swing characteristics you have, they are probably uniquely yours, and they’re almost certainly not perfect. But that’s not a problem—it’s just golf. You can improve your swing if you work on it, especially if you work on it consistently with an experienced golf professional.
While your normal setup and swing may not be perfect, you groove it on the practice range and in everyday play. You develop subconscious compensations to adjust for its deficiencies, and then incorporate them into your normal play. Your normal swing, including compensations, is the “heart” of your normal game.
An example of how a setup deficiency can be compensated for is when a golfer normally positions his ball too far forward in his stance. From good lies in the fairway he can learn to “chase after” the ball through impact and hit reasonable shots (Figure 2.9). Notice the dip of Eddie’s head (some golfers also employ a late-release wrist cock) through impact, as he demonstrates the “chase” move. Depending on how often you practice it, you can get reasonably proficient at hitting shots from level lies with a chase swing.

2.9
A chase swing ultimately limits a player’s game, however, because it becomes difficult to execute from sloping terrain lies (and even from level lies under pressure, when the hand and wrist muscles get tense and swing timing gets fast). Watch Eddie’s chase swing try to hit a ball from a severe downhill lie. With that same setup error (ball too far forward), the chase swing can produce a “flub” (Figure 2.10) of epic proportions. Who knows where this ball will go? For sure, it won’t fly dead to the target with good trajectory and backspin, as originally intended.

2.10
Different courses also present difficult setup challenges. Every time a golfer changes his normal setup posture—thereby putting his muscles, bones, and joints into different relative positions—his swing undergoes significant changes. Look at the obviously different setup positions that Ken Venturi gets into for shots from greenside moguls in Figures 2.11, 2.12, 2.13 (moguls by architect Pete Dye, TPC Sawgrass, Ponte Vedra, Florida). Just imagine the different swings and swing feels he has to make to successfully execute from these different setups.

2.11

2.12

2.13
TROUBLE LIES REQUIRE SPECIAL SWINGS
Golfers produce their normal shot patterns from perfect lies on level terrain. Add to this a non-level stance on uneven ground, and the quality of both their normal setups and swings degrades, causing the spread of their shot patterns to grow significantly. When you then add additional trouble around the ball (grass clumps, weeds, roots, or tree limbs) that gets in the way of their normal backswings or downswings where their shots will go becomes anybody’s guess.
This is exactly why normal swings—even the best normal swings—won’t work from trouble. Trouble-lie interference can cause bad swing planes, shot contact away from the sweet spot, and even the introduction of foreign substances between the clubface and ball at impact. Attempts to compensate for unique lies, stances, and setup positions, with never-before-practiced in-swing adjustments, lead to shot patterns that expand exponentially—often to disastrous proportions.
NORMAL SWINGS DON’T WORK FROM TROUBLE
I hope this picture of your “normal” swing, and what happens to it when your ball is in trouble, is clear to you. Your normal swing from your normal setup:
 Is not a circle
 Has a wider backswing than downswing arc when the clubhead is behind you
 Has an arc bottom that occurs just forward (toward the target) of the middle of the stance
 Moves the clubhead in your unique swing plane
 Has deficiencies and compensations that are grooved for good lies on level terrain
THE PROS MAKE IT LOOK EASY
 A number of trouble shots probably look easy when you see them played on TV from the proper Damage Control setup by the world’s best players. The swings look simple, the players escape with no penalty and save par, and you’re convinced to try the same shot the next time you find yourself in similar trouble.
The problem is:
1.You didn’t notice the setup change the pro made or the ball position he used before executing his escape swing; and
2.You don’t have a feel for how to make the swing, turn through the shot, or keep your balance. There is a chance you’ve never made such a swing before, never even once in your life. If you try this shot with no change in your normal setup or swing, you could very possibly unleash a badly off-line ball . . . and be looking at a chance for the disaster hole that ruins your round.
Understand that you set up and play with your normal swing from good lies on level terrain most of the time. No matter how good your normal swing is, however, it won’t help you get out of trouble when you can’t use it because of difficult stances, different postures, and obstructions around the ball.
Also, your normal swing thoughts, keys, feel, or balance don’t produce their normal results from trouble lies, because you can’t make normal swings from abnormal body positions. To see why all of this is true, it’s time to look at how changing your setup in terms of spine position, stance width, and ball position affects your swing and shot results. In other words, let’s look at Damage Control Setupology.
2.2 Spine Angles Influence Swing Mechanics
Your spine is the heart of your golf swing. It is the axis around which your golf swing turns.
While your posture may have been of little interest to you in the past, to play with Damage Control you need to understand how your spine angle affects your ability to swing. Having the proper spine angle is fundamental to Damage Control and critical to your swing performance from trouble.
YOUR SPINE-TO-SWING-PLANE ANGLE AFFECTS THE NATURAL EFFICIENCY OF YOUR SWING
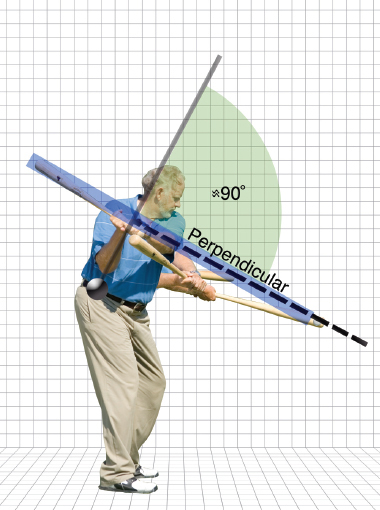
The power of a golf swing is similar—yet different—from a baseball swing. The swings are similar in one sense: In both movements, power is more natural and easier to generate when the clubhead (or bat) swings perpendicular to the spine (Figure 2.14). There is maximum and fairly consistent power around the perpendicular (90-degree) angle, but power decreases dramatically as the swing plane moves far away from perpendicular. The swings differ in that baseball swings are usually closer to perpendicular to the spine than golf swings (except when baseball players go after bad pitches). This is because golfers play with the ball on the ground, while a pitched baseball approaches a batter somewhere between the shoulders and knees.
2.14
If you don’t understand this, grab a golf club or a bat and make some swings as shown in Figure 2.15. In either game, as the clubhead (or bat) swings far above or below the perpendicular to the spine—the swing gets more difficult to make, and less powerful.


2.15
BENDING OVER OR STANDING UP AFFECTS THE SPINE-TO-GROUND ANGLE
Your spine-to-ground angle is measured (looking down-line from behind) as the angle between your spine and the ground. It can be made smaller by bending over closer to the ball, or increased by standing up straighter and moving your spine into a more vertical position (Figure 2.16).

2.16
On level ground, the more vertical the spine is, the easier it is to make flat swings, all other things being equal. As you can see, when a golfer stands upright with his spine nearly vertical, it’s easy to swing in a more horizontal (flatter) swing plane (Figure 2.17). When he bends over, putting his spine in a more horizontal position, the opposite is true. In this case a vertical swing becomes the more natural and easier swing to make (Figure 2.18).

2.17
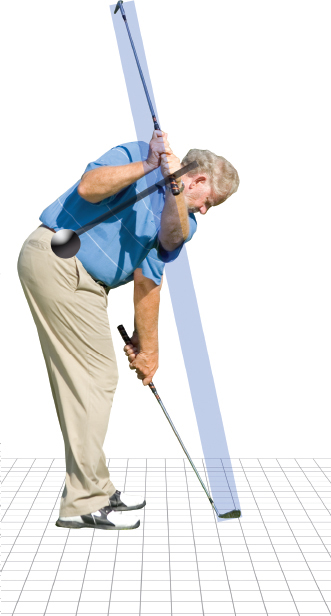
2.18
Applying this principle to a shot under tree limbs, it’s better to make a flat swing from “on your knees” (Figure 2.19, spine more vertical), than from a standing-but-bent-over position (Figure 2.20).

2.19

2.20
Your spine-to-ground angle, height, arm, and club length all influence your swing plane. The shorter you are, and the longer your arms and clubs are, the more upright you will stand and the flatter you will swing (Figure 2.21).

2.21
Upright swings require the opposite spine-to-ground-angle relationship that flat swings do. Bending over encourages a more horizontal spine and makes swinging a club vertically much easier. It also helps to use the shortest workable club (Figure 2.22) when making an upright swing.

2.22
THE SPINE-TO-TRUNK ANGLE AFFECTS HIP ROTATION
The spine-to-trunk angle is the angle between the spine and the lower body (hips and thighs), as seen looking down-line from behind a golfer. The closer to 180 degrees, or a straight line, this angle becomes, the more easily and powerfully the lower body can be rotated. Conversely, the more bent-over a golfer stands, the smaller this angle becomes, and the more difficult it is to rotate the hips and lower body.
Even when the spine is upright, the hips are difficult to rotate if the spine-to-trunk angle is small. Such a position is required if you must squat to hit a shot from under a tree limb (Figure 2.23). If you don’t believe this, try rotating your hips while swinging from a deep-squat position, sitting in a chair, or sitting on the ground.

2.23
TAKE YOUR SPINE ANGLES TO THE MIRROR
Now lay this book down, stand in front of a mirror, and internalize these three fundamentals of Setupology:
1. Standing up = vertical spine = flat swing. All other things being equal, the more vertically you position your spine, the flatter (more horizontal) your swing plane will become. Set up as you would for a “normal” swing with any club and watch yourself swing in a mirror. Notice the angle of your swing plane relative to the floor. Then stand up a little more vertically, imagine a ball on the side of a hill about a foot above your feet, and swing again. Notice that your swing plane gets flatter. Finally, stand perfectly straight up, imagine your ball in a bush at shoulder height, and see how easily and powerfully you can swing at it in a flat, almost horizontal swing plane (Figure 2.24a–c).

2.24a

2.24b

2.24c
2. Bending over = horizontal spine = upright swing. The more you bend over, the more horizontal your spine is, and the more naturally upright (vertical) your swing plane becomes. Start again from your “normal” address position and watch yourself in the mirror. As you bend over more, getting your spine closer to horizontal, your swing plane motion becomes more upright (Figure 2.25a–b).

2.25a

2.25b
3. Squat = locked hips = minimum power. The smaller the angle between your spine and trunk, the more difficult it will be to rotate your lower body during the swing, and the more upper-body power you must rely on in these conditions. To feel this, start from your normal address posture and swing in a flat swing plane with your eyes closed, concentrating on how easy and natural the swing feels. Then, keeping your spine-to-ground angle constant, squat lower to decrease your spine-to-trunk angle and swing again. Notice how the swing gets more difficult. Squat down even lower (making your spine-to-trunk angle even smaller) and repeat the same swing. Feel how much more restricted your hips feel, and how much less powerful your swing feels. Notice how it takes more effort to rotate your lower body and make a full swing back and through (Figure 2.26a–c). Now take the final step and sit on the ground. This will be your smallest spine-to-trunk angle, and it will surely create your most difficult lower-body rotation position, and least powerful swing.
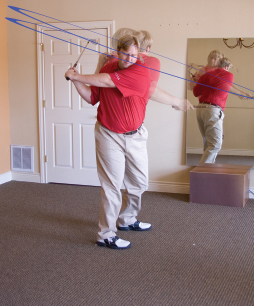
2.26a
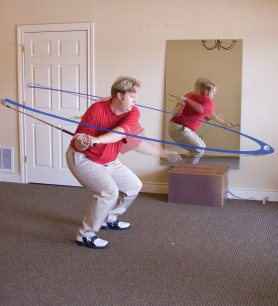
2.26b

2.26c
Spine tilt and lean angles refer to the angle of your spine forward or back (toward or away from your target) in a 90-degree different direction from your spine angle. Spine tilt is the side-to-side tilting of your spine toward or away from the target relative to your lower body, as seen from a face-on view (Figure 2.27). Spine lean occurs when a golfer leans his entire body forward or back along the target line, while maintaining zero spine tilt (Figure 2.28).
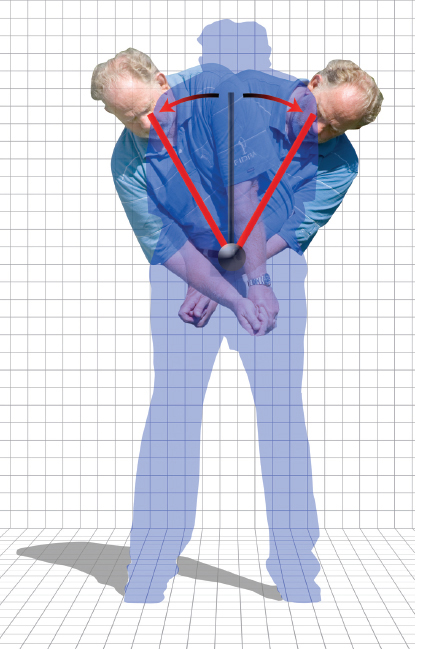
2.27

2.28
Spine tilt on level ground affects how the swing arc encounters whatever the ball is sitting on (Figures 2.29, 2.30), and is generally not recommended. There should be little or no spine tilt in your normal setup for shots with good lies on level terrain. Spine tilt also creates a second problem: The farther your spine tilts away from your lower body centerline, the more difficulty you will have rotating your lower body and producing power in your swing (Figure 2.31).

2.29
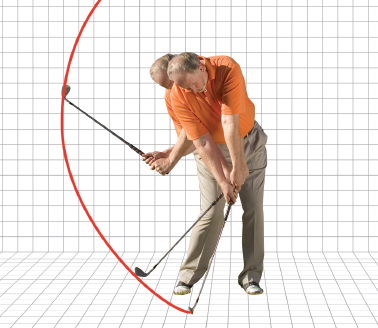
2.30
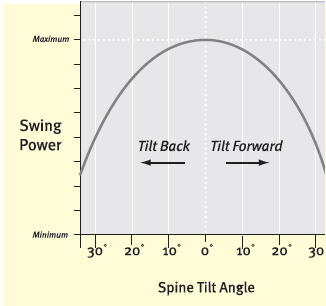
2.31
So for two reasons, spine tilt is not good when setting up your posture for a golf swing—in fact, it’s something to be avoided. Many golfers do it all the time, however, because for some it’s a natural and instinctive thing to do.
LEAN SPINE FORWARD ON DOWNHILL SLOPES
Golfers tend to lean back on downhill lies. Your head is heavy and your instinct for balance always influences you to keep your spine vertically under your head and balanced above your feet. Sometimes, however, you can’t hit good golf shots from the most balanced position. For example when your ball lies on a downhill slope, to keep your head in good balance you instinctively stand more vertically (Figure 2.32). This leans your spine away from being perpendicular to the ground, making it more likely you’ll hit the ground behind the ball.

2.32
The proper setup for downhill slopes is to spread your stance (feet) more than normal to provide a wider base, then lean forward to get your spine (and lower body) closer to perpendicular to the ground (Figure 2.33). This will also place a disproportionate and unusual loading on your forward leg, knee, and ankle, which makes keeping your balance as you swing a real challenge.

2.33
But just because this forward weight distribution is unusual doesn’t mean it’s wrong. In fact, for downhill trouble lies, it’s exactly what you need to maintain through impact to execute a successful shot (Figure 2.34). Of course, after impact you need to walk forward to catch your weight and balance.

2.34
There are exceptions to this setup, however. Setting your spine perpendicular to the ground is not always necessary. For some small hand- and arm-controlled wedge swings used for short pitch or chip shots, it may be more comfortable to use a normal (vertical spine) stance. A perfect setup illustrating this normal, vertically balanced posture for a short pitch is shown by short-game great Seve Ballesteros in Figure 2.35.
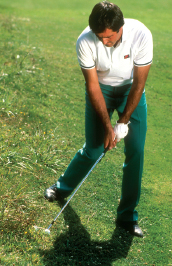
2.35
On uphill shots your instinct for good balance again wants your spine to be vertical (Figure 2.36). This is exactly the same as your instinct on downhill lies (except in the opposite direction), but if accommodated during setup, makes your swing arc dig straight into the ground at impact. Such impact can be very hard on the hands and wrists and is not conducive to good shotmaking.

2.36
If, however, you take an extra-wide stance and lean back so your spine is perpendicular to the ground (maintain your spine-tilt = zero) as shown in Figure 2.37 below, you can make a good escape swing. That is, you can make a good swing if you can keep from falling backward as you swing the club forward through impact. This is quite difficult to execute, because most of your weight is on your back foot in this setup, and a less-than-normal amount of weight will transfer forward onto your lead foot through impact (because of gravity), unless you force it to do so.

2.37
CHECK YOUR BALANCE IN THE MIRROR
Okay, now lay this book down again, stand up, grab a club (any club), and stand in front of a mirror. You need to make some swings so you can see, feel, and internalize the effects that spine lean and tilt can have on your swing mechanics. Consider it just another quick drill in your study of Setupology.
Spine tilt inhibits lower-body rotation. First, make a few of your normal swings from a level lie. Close your eyes and swing, focusing on the feel of your swings. Now tilt your spine forward (hold your lower body still) and swing. Then tilt it back from normal (again keeping your lower body still) and swing again. Can you feel the decrease in swing power produced as your spine tilt angle increases in either direction from zero?
Now find an object that’s about 6 inches high, and imagine that you’re going to hit a shot from a downhill lie. Place your back foot up on the 6-inch object, keep your spine vertical for good balance, imagine a ball in the middle of your stance on the severe downhill slope, and swing. Are you aware you would have hit 6 inches to a foot behind the ball with that swing (Figure 2.38)?

2.38
Next widen your stance and lean toward the target, to remove any spine tilt angle (Figure 2.39). This gets your spine perpendicular to the ground you’re standing on (and hitting from). Now swing again. Notice how bad this balance feels, but also notice how you would have hit the downhill shot solidly, without hitting the ground behind the ball. The key to remember here is to get your spine as nearly perpendicular to the ground (your shoulders parallel to the ground) as possible, so that your spine-tilt angle is close to zero.

2.39
Experience the uphill lie in the same way. This time put your forward foot on the 6-inch object—from an extra-wide stance you’ll have to lean away from the target instead of toward it, to avoid creating a bad spine angle with the ground (Figure 2.40). Again, feel how difficult it is to keep your balance in this posture, but how much better the swing feels (relative to hitting a good shot) if you force a good body turn through impact.
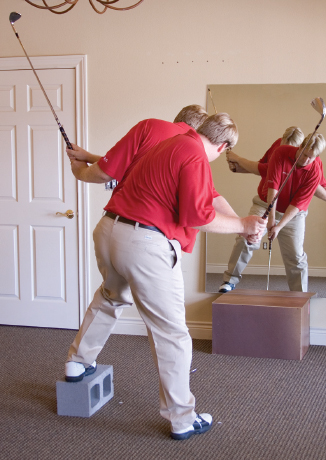
2.40
With these swings you should be getting the feel of putting your body into position (wide stance with minimum spine tilt) to make good solid swings from sloping lies. If so, you’ve become aware of an important fundamental of Setupology.
There is no perfect stance for all golfers for all golf shots, but there is a perfect stance for every golfer for every individual shot. This is especially true for shots from trouble. The perfect stance in each case is the one that balances your stability, power, and balance, while also making the swing easy enough for you to create the solid contact required to escape from the circumstances involved.
There are as many stances as there are lies, shots, and players in the game. Therefore, it would be essentially impossible to remember the exact perfect stance for every lie and shot, even if we could give them to you in this book. Instead, for good Damage Control, you need to learn the “principles of stance,” which will then serve you for the rest of your golf career (and all your escapes from trouble).
NARROW STANCES VS. WIDE STANCES
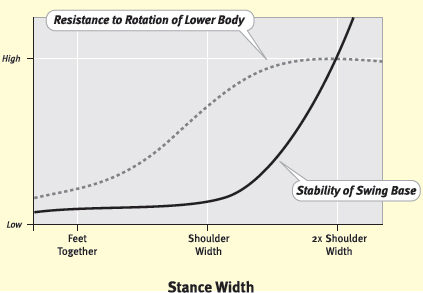
Turning or rotating your body around your spine is easy when your feet are close together. You can put your feet as close together as you want and feel almost no resistance to rotating your body. A very narrow stance may not be too stable, however, and won’t provide a good base to push against to produce maximum power.
As your feet get farther apart your stance becomes more stable and creates greater resistance to your lower-body rotation, until you get them too far apart (Figure 2.41). A stance that’s too wide limits your ability to turn your lower body, decreases your ability to generate power, and degrades your balance by restricting knee flexibility and your ability to maintain an athletic position. Also, the position of your toes and feet—either turned inward toward each other (pigeon-toed) or outward (duck-toed)—can have an effect on your ability to rotate your body around your spine.
2.41
The general rule is, the wider the stance, the more stable the swing base and the more power you can generate, up to a certain width (see Greg Norman in Figure 2.42a–b: very wide, stable, and powerful). Most golfers prefer a stance somewhere close to—but wider than—shoulder width for power shots. A less-than-shoulder-width stance usually feels better for short-game finesse shots. But because golfers differ so much in stature and every trouble lie is different, there is no specific rule for stance width in all situations.

2.42a

2.42b
Internalizing the effects your stance can have on your swing is easier to accomplish by feel than by reading about it in a book. For this reason I ask you to get up again, grab a club, and try the swing sequences described below in front of a mirror.
You need to feel the difference your stance width makes in a swing. There is no right or wrong here; no one stance is perfect or another bad. They’re just different—sometimes quite different from your normal stance on level lies. The important point is that one particular stance width will be best for every different trouble shot you encounter. What you want to do is internalize your stance fundamentals well enough so you’ll know when you’ve found the best stance once you’re in, and trying to escape from, trouble.
Stand with your feet together and a club across your shoulders as Eddie is doing in Figure 2.43. Swing (rotate) your body around your spine. Close your eyes so your attention is tuned completely to the feel of your rotation motion. Now feel how almost your entire lower body is swinging in rhythm with your upper body, back and through, back and through, as shown. There’s not much resistance to turning, but also not much of a base to generate power from.

2.43
Widen your stance in steps, and feel your lower body begin to provide resistance to your swing rotation as your stance gets wider. Imagine and feel the base that provides good lower-body resistance to coil against, and more power.
Then keep on widening your stance and swinging. When you get your feet far enough apart, you can hardly turn your hips at all. Your swing will then be essentially all upper body: not too bad, but not your most powerful. This feel of stance width versus power will now stay with you forever. It’s like riding a bicycle—once you feel it, you’ll never forget it. When you next get into trouble, move your feet between practice swings until you’ve found the width that gives you the best combination of balance and power.
This fundamental aspect of Setupology is to get your stance into the best “compromise” position to allow you to 1) make enough of a free swing to create solid contact with the ball; 2) keep your balance and stability through impact; and 3) generate enough clubhead speed to escape safely from the trouble you’re in.
2.5 Solid Contact, Ball Position, and Face Angle
One of the most important parts of a shot from trouble is the contact your club makes with the ball. Without clean clubface/ball contact, proper ball position relative to your swing arc bottom, and the proper clubface angle through impact, your shot is not likely to escape on the trajectory or with the velocity you desire. That is, if it escapes at all. While this may seem obvious, clean and solid contact is accomplished in surprisingly few trouble shots. It is often of no great concern to golfers—if it even enters their mind—before they swing at trouble shots.
IMPACT CONDITIONS ARE CRITICAL
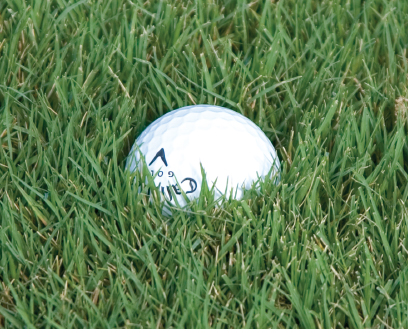
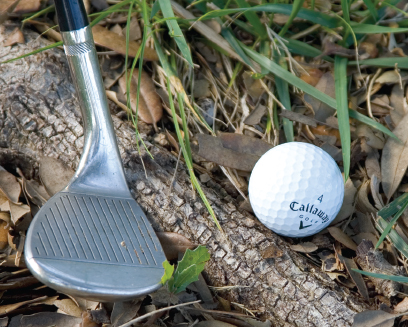
When something behind your ball prevents your normal swing from contacting the ball cleanly, you have a problem. This something could be a clump of grass, a bulging tree root, a ridge of sand, a bush, or any number of obstacles on the course (Figure 2.44a–e).
2.44a Golf balls and clubs

2.44b Golf balls and clubs

2.44c Golf balls and clubs
2.44d Golf balls and clubs

2.44e Golf balls and clubs
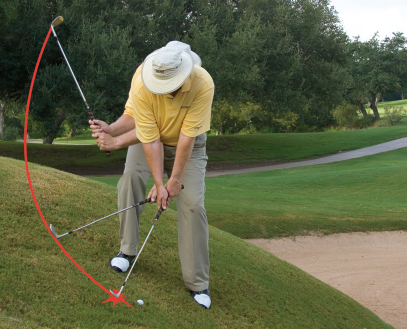
Your problem could even be the “big ball”: the Earth. On a downslope, with your back foot above your front foot (Figure 2.44f), it is incredibly easy to hit the big green ball before you make contact with the little white one. Even if you heed the advice offered in Section 2.3 (lean to match your shoulders to the slope, eliminating spine tilt), I still recommend setting up with the white ball a little back in your stance on downhill lies, to give yourself a safety margin against hitting the ground first. You will also need to take several clubs’ worth of extra loft to compensate for the slope and the fact that the ball is farther back in your stance.
2.44f Downslope
More importantly, however, if you don’t make solid contact with a trouble shot, you’re not likely to enjoy the result. It doesn’t matter what’s preventing you from hitting the ball solidly. You must figure a way to get around, under, over, or through it if you want to pull off a good escape shot.
At the Pelz Golf Institute we define forward versus back ball position as the position of the ball along your swing line, relative to the center of your stance (Figure 2.45). Golfers often ask us where they should position their ball for this or that shot off level ground, and we can answer them precisely once we’ve seen them swing.

2.45
But we can’t do this for Damage Control shots, which require you to play the ball far forward in some trouble lies and way back in others. The most important thing about ball position in any trouble shot (except sand) is that the ball should sit exactly where you can hit it (Figure 2.46) before you hit anything else or the ground. This means that no matter what stance you take, or the shape, plane, or path of your swing, your club will contact the golf ball before it hits the ground, and create the cleanest contact possible.
2.46
If your ball position is forward of where your club contacts turf, the fat shot that results will not be good (Figure 2.47). No matter where you think you have your ball positioned, if it is wrong for the trouble swing you are preparing to make, you’re looking for disaster.

2.47
VERIFY YOUR DIVOT . . . BEFORE YOU POSITION THE BALL
Awkward stances on uneven terrain don’t produce the same swing shapes as normal swings from level lies. Therefore, you can’t know exactly where your ball should be positioned on trouble shots until you’ve taken your stance and know what the shape of your swing will be.
The Damage Control system to accomplish ball position is simple: Verify the spot at which your club will contact the turf by making a good, realistic practice swing from your same setup position. Duplicate the exact same stance and setup you’re anticipating for the real shot in this practice swing. Then, look carefully and notice exactly where your divot starts (Figure 2.48).

2.48
Once you see the start of your practice-swing divot (that is, the back of the divot, not the center), move into position for the shot by moving your body position until your ball is exactly on or slightly behind that spot in your stance. This placement is important for solid contact, and will save you from many disaster holes in the future.
FACE ANGLE INFLUENCES BALL FLIGHT
Many golfers have been told that the golf ball starts on the swing-path line of the clubhead through impact, then spins and curves from that line based on the face angle of the clubhead at impact. As a result, these golfers spend their entire careers working on the path (and swing plane) of their club through the impact zone.
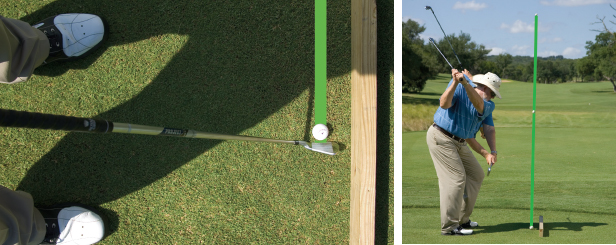
The truth is that the ball actually starts in the direction the face angle of your club is aimed at impact. You can demonstrate this to yourself on the practice tee by hitting a few shots in three different ways:
1. Down-the-line path, square face. First, set a two-by-four on edge and aim it at your target. This will allow you to make sure the clubhead is basically traveling along the two-by-four line through impact. Hit several 7-iron shots from your normal stance, with your normal grip and with the clubface aimed squarely at your target. This should be your normal down-the-line swing path that hits your normal shots toward your target. Hit enough of them to be assured that everything is behaving normally (Figure 2.49).
2.49
2. Down-the-line path, open face. Next take the same normal stance and grip position at address with the same club, but this time lay the clubface of your 7-iron open by 30 degrees to the right of the target (Figure 2.50) before you grip it. Double-check that the clubface is open when your grip is normal, then make the same normal swing along the two-by-four line as you did before (when your clubface was aimed at the target). Your shots will fly immediately to the right because the clubface was open at impact, not because your swing path went over there!

2.50
3. Down-the-line path, closed face. Now close the clubface at address (again using your same normal stance and grip) and make some more swings along the same two-by-four swing path. See how the shots fly to the left now because of the closed clubface, even though your swing path is still along the same two-by-four line direction (Figure 2.51)?

2.51
Understand this: Your clubface angle at impact controls your initial shot direction. This will be a tremendous asset when you’re planning and aiming escape shots from trouble (as you read this today, golfers all over the globe are hitting trouble shots straight into the trees in front of them, because they expect their ball to start on their swing-path line instead of where their clubfaces are aimed).
We’ve just shown you how clean contact, ball position, and face angle are important for successful escape shots. But you need to feel and internalize this importance, so you won’t forget it when you’re in the heat of battle.
To do this, address a ball in your normal setup position and pick a target off in the distance, but don’t swing. Imagine smacking the ball solidly and hitting a perfect shot at your target, with your normal square clubface position. Now loosen your grip and rotate the shaft with your right hand while not moving your left hand, so that the clubface is open by 30 degrees. Put your right hand back on the club and check to make sure your hands are in your normal grip position, but that the clubface is still 30 degrees open. Imagine how far right the shot would fly from a normal swing with this setup (Figure 2.52).

2.52
Imagining where your shot is going to fly off the clubface is something you should do before every trouble shot. Now try the opposite shot. Rotate the clubface closed, take your normal grip, and this time imagine how far left the shot would start from this impact position. This feeling of accurately knowing your shot starting line relative to your clubface position before every trouble shot is paramount to Damage Control.
While you have a club in your hand, I want you to learn to feel something else. Turn the clubface back to square (without moving your feet) and move the ball way back in your stance (away from the target) until it is opposite your back ankle. Now address an imaginary ball as if it were up in the middle of your stance. Imagine making a perfect swing at the imaginary ball, and imagine and feel the shot (Figure 2.53). You’ll probably either whiff completely, swinging right over the top of the ball, or hit just the top part of the ball and dribble it a few yards out in front of you. Now try to feel the kind of swing you would have to make to hit the real ball—which is sitting so far back in your stance—solidly without moving your feet. This is the kind of feeling you never want to have before a trouble shot.

2.53
If you’re ever standing over a trouble shot and feel you have to make a really weird swing like this to hit it—STOP! Step back and change your stance, ball position, spine angle—change something—to give yourself a good, solid swing feel. Then take another practice swing from your new position to ingrain this new feel before you swing at the shot.
The point is, before every trouble shot, you should feel as though you are set up to hit the shot with the easiest, most consistent, most powerful, swing you can muster under the lie conditions you are in.
Okay. By now I hope you understand how important your posture, spine angle, stance, ball position, and face angle are when you’re setting up to hit a trouble shot. I also hope you’re committed to getting all of these as good as you can before swinging at any future trouble shots. You need to understand that setting up for the best possible escape swing is two-thirds of the battle in escaping from trouble. You can’t make a good escape swing from a bad body position, and that’s a fact.
I also want to make sure you don’t think I’m trying to get you to swing a golf club like a baseball bat, or to change your normal swing in any way. It’s just that golf’s trouble shots are often played from extremely uneven terrain—the ball often sits on strange levels relative to your feet, the angles of your body parts may be in weird positions, and normal swing thoughts and normal swings won’t work in these conditions. We must contort our bodies, bend over, lean our spines, and position our joints into new and different positions during swings from trouble, in almost every round we play. And to play with Damage Control, you need to know how these changes will affect your ability to swing and hit shots.
None of the setups or postures in this chapter are impossible to swing from. They’re just different from the normal setups you practice and use from level lies. Once you learn to put your body in the best position to deal with the trouble you encounter, and then practice making such swings (which we’ll do later, in Chapter 7), you can execute them quite well.
So that’s it for Setupology for now. It affects how your setup and posture can influence your ability to swing, and you’ve experienced the feel of some of these changes. You’ll learn more and internalize more Setupology in Chapter 7 when you actually set up and hit shots from different lies and postures. And you’ll also feel and see how changing your stance, ball position, and clubface angle affects your impact and shot direction from real trouble swings in your own backyard.
As you develop the physical skills to become a Damage Control player, you will stand, bend, lean, imagine, and feel impact before every escape-shot attempt. You’ll always make a realistic practice swing to verify your ball position precisely at or behind the start of your divot, before every trouble shot. And you will always be aware of this fact: Your setup (Figure 2.54) will either enable . . . or prohibit . . . your escape-swing success.
2.54