
YOU’VE READ THE CONCEPTS of Damage Control, seen the skills, and thought about the mentality. But intellectual understanding will only take you so far. It’s time now to internalize the “feels” of Damage Control into your mind and body.
This can be accomplished in three steps. First, learn to physically make acceptable escape swings from trouble lies in your backyard. Then play practice rounds at your club to stimulate yourself mentally and to learn about your shot patterns and target-selection skills. And finally, play special Damage Control rounds with special rules, to optimize your ability to shoot lower scores.
Once you accomplish these three steps you will be prepared to avoid disaster scores and lower your handicap by somewhere between two and five strokes. You will have become a Damage Control player (Figure 7.1). The only remaining effort will be for you to fine-tune your Damage Control Mentality over time, as you return to playing normal golf for score. How you handle trouble in these rounds will identify how your skills and target selections should be balanced to optimize your scoring in the future.

7.1
7.1 Getting Started
Yes, you read correctly: You can practice the drills of Setupology, Swing Shaping, and Hand-Fire feel by hitting special practice balls at home in your own backyard. It’s convenient, effective, and won’t damage any cars or break any windows, and it’s the most efficient way to internalize the skills of Damage Control.
SELECT A DAMAGE CONTROL PRACTICE AREA
The first step in learning Damage Control is to find a space where you can swing safely and hit our special “Almost Golf” balls. These balls (Figure 7.2) are a product I have endorsed because I think they are so special. They’re very light, have one-third the core rating, and fly only about a third the normal distances of a real ball. Molded with dimple patterns for good aerodynamics, they come off your clubs realistically, except they don’t fly as far, break windows, dent cars, or hurt anybody.

7.2
Look at the side yard of our Pelz Golf Headquarters building in Austin, Texas (Figure 7.3). Do you have a space like this where you can swing in your backyard? If you have one, that’s great. If you don’t, try to find one nearby so it’s convenient to practice and you don’t have to waste time traveling back and forth.

7.3
When you’re learning these new skills you shouldn’t care at first where your shots go; you should care that you are learning to hit them solidly. In your backyard you can turn your attention inward and focus on the swings and feels of Damage Control, with no worries about lost strokes or score. I can’t overemphasize how important this is to your long-term success in playing with Damage Control.
You can’t just go out back and start swinging, however. You need to set up learning aids first, to simulate the difficulties of trouble lies and swing obstacles on the golf course. The items you need are shown in Figure 7.4 along with a corresponding “shopping list.” Don’t worry; gathering up these items will not be a big deal—they’re available at local Home Depot, Lowes, or other home improvement or sporting goods stores (except Almost Golf balls, which can be ordered from www.pelzgolf.com or www.almostgolf.com.

7.4
1.Target net (Dick’s, Edwin Watts, PGA Tour Superstore)
2.Platform
•Two 3' x 3' x ¾" plywood squares (Lowes, Home Depot)
•Two 3' x 3' pieces of synthetic turf (SYNLAWN.com) to hit shots from on the platform
•Heavy duty double-sided tape for attaching synthetic grass to wood platform (Home Depot, Lowes)
•Two 10" gate hinges (or any heavy duty hinge or hasp, Home Depot, Lowes)
3.Two cinder blocks (Home Depot, Lowes)
4.Bag of play sand (Home Depot, Lowes)
5.Fake rock (to make: spray foam onto cardboard in a swirling motion, then wait three days to dry)
•One can of foam insulation (Home Depot, Lowes)
•One 1' x 2' piece of cardboard
6.Plastic bucket to hold water or sand (hardware store)
7.Boot tray, low lipped plastic tray or lid (Home Depot, Lowes)
8.Almost Golf balls: 10 (almostgolf.com, pelzgolf.com)
9.Fake tree and limb (Home Depot, Lowes, Target)
•One 4'½" wooden dowel (one end sharpened)
•One 5' pool noodle
•One 5' x 1" diameter piece of pipe insulation
•One 4' piece of heavy copper ground wire (as limb support)
10.Chair (simulating large obstacle)
WARNING: SWINGING GOLF CLUBS CAN BE DANGEROUS
Practicing golf is just as dangerous as playing golf. You can slip from a platform, carpet, block, or chair, or swing and hit yourself or others; serious injury can occur. Equipment can be especially dangerous when wet. Please proceed with caution, at your own risk.
Please note: any of these items can be changed or substituted for per availability and your practice area needs.
Hand-Fire feel drills can have mulch, pine needles, peat moss, etc. added to water and/or sand when heavy resistance materials are required. Check our website (www.pelzgolf.com) in the future for further backyard practice area and equipment ideas and suggestions. We would also like to hear from you (email photos, plans, ideas, etc. to comments@pelzgolf.com) regarding the designs and construction of your Damage Control practice area and equipment.
NOTICE: DANGER WARNING . . . PRACTICE AT YOUR OWN RISK!
SET UP YOUR DAMAGE CONTROL LEARNING STATION
Remember: safety first! Make sure you’ve oriented your learning station so that no one can walk up behind you without your knowledge. Be especially careful around small children and pets. It’s your responsibility to make sure no one ever gets hit or hurt by a swinging golf club. Whether at the golf course or at home, please be careful when swinging a club.
You should also be careful to hit the Almost Golf balls away from people, even though the balls probably won’t hurt anyone seriously. These balls normally fly about a third the distance of a normal golf ball; that’s not too far for a wedge shot, but if you’re practicing with irons and woods, they can fly over a hundred yards (and scare or sting anyone hit).
Look again at our learning station at Pelz Golf with the learning aids in use (Figure 7.5). The backyard of my home is shown in Figure 7.6. As you can see, we have lots of room at Pelz Golf and can hit in virtually any direction. At home I have almost no space, no yard (only my SYNLawn putting green behind the pool), and must hit anything more than a pitch shot into the net. However, even this confined area is still a great place to practice and learn Damage Control techniques.

7.5

7.6
As you may have guessed, the authors of this book (me, my son Eddie, and Pelz Golf Institute staff member Joel Mendelman) are all enthusiastic students of the game (aka golf nuts). We all have Damage Control practice stations; mine is on my pool deck, Eddie’s is in his yard (Figure 7.7), and Joel’s is in his home (Figure 7.8). As you can see, Joel’s setup doesn’t take up much space, so we don’t want to hear any excuses about you not having enough room to learn the skills of Damage Control!
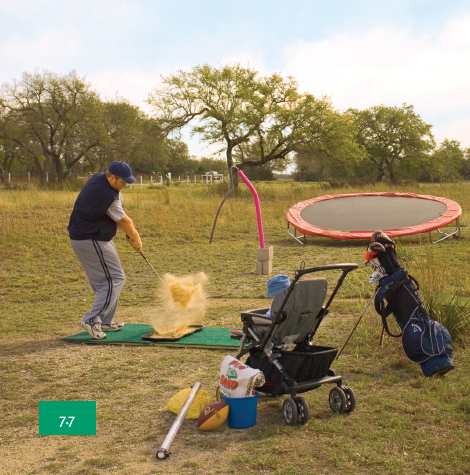
7.7
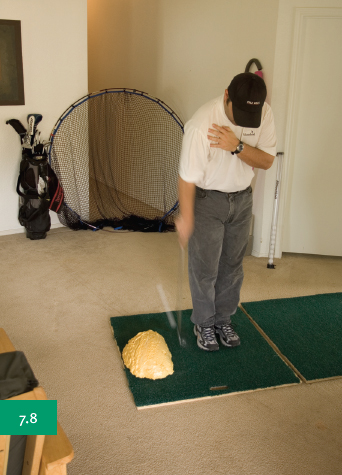
7.8
7.2 How to Prepare for Shots from Trouble
The best way to optimize the way you play golf is to optimize your practice. The easy way to make this happen is to be smart enough to practice like you’re going to play.
PRACTICE LIKE YOU PLAY
Every trouble shot you attempt is a new and unique experience. For each new trouble lie you encounter, you will set up in a slightly (sometimes radically) different way, with your body in a different position from the swings you normally make from safe lies on tees and level fairways. This is why it’s important to have a consistent approach to understanding (both physically and intellectually) the specific demands of trouble shots.
Each Damage Control drill in your backyard (and every on-course trouble shot) should begin with the Damage Control setup routine. This routine must become a habit, a part of your game for now and in the future. The Damage Control setup routine we recommend proceeds through three steps as follows:
SETUP ROUTINE
Step 1: Take a stance about 10 to 12 inches from your ball and check your posture for stability and balance. Use the principles of Setupology (Chapter 2) to position yourself to make a solid and in-balance escape swing. Then run a preliminary check for swing-shape clearance and swing balance by executing a stutter-step (9 position) practice swing (Figure 7.9a-i).

Focus on feeling how your body balance interacts with the lie and terrain of this trouble shot as you move slowly through the nine positions of the stutter-step swing. Also notice how much you will need to modify your swing shape away from normal to minimize contact with any surrounding obstacles.
Step 2: Repeat the stutter-step swing positions, but use a gradually increasing tempo and change your focus to the shape of the swing you’ll need to make. Check all obstacles for ample swing clearance as you make this second swing in slow motion, through the same nine positions of swing #1. During the slow-motion swing, concentrate on feeling your body move.
Next move slightly closer to the ball (same setup and stance) and take another swing at about three-quarter speed, somewhat faster than swing #2. Again feel your body move and your balance requirements as you make the swing. Keep your focus on feel as you also begin to notice where the clubhead brushes the ground (bottoms out).
Step 3: Check for final feel and correct ball position with a full speed “preview” swing. This gives you the exact feel and balance of the real swing you’re about to make, from as close to the ball as you feel comfortable (the closer the better without hitting or moving the ball). If you like this swing, look down before you move your feet and examine the exact position of where your divot occurred.
Would that swing have made clean ball contact, or would it have hit the ground behind the ball (as in Figure 7.10)? If it would have produced a “fat” shot, move forward and take another swing, until your practice swing makes a perfectly placed divot (Figure 7.11).

7.10

7.11
Now you’re ready to move in and hit the real shot. (Note: If your preview swing is not going to make a visible divot, you can still notice where your club starts to brush the grass [or whatever the ball is sitting in]. Always make sure your ball is positioned to be hit before anything else of significance.)
A key to executing successful escape shots is to make a good, solid swing that makes clean, solid contact with the ball. And a key to doing that is to start the swing from a perfectly adjusted setup position for the trouble you’re in. When you verify the perfect ball location for your shot, as judged by the location of your preview-swing divot (for the slope, stance, and swing obstacles you face), you’ve met an important requirement for this success.
IN CASE THERE’S NO SPACE
A second version of the setup routine must be used when obstacles restrict any swings other than those made from exactly the same position you need to play from. In this case, follow the exact same stutter-step and preview-swing concept, except execute all four swings from your real address position over the real ball. No other swing position would accurately duplicate the swing restrictions you are about to encounter. You must be careful not to move the ball or break any branches in any of these swings, and it is very difficult to make real speed swings under such conditions. In these cases, make slow-motion backswings and follow-throughs as realistically as possible, even if they must be made separately. Remember, the purpose of the pre-shot routine is to show your brain what you want to do, and how it will feel, before you have to do it for real.
When a Damage Control setup routine is successful, it provides the feel of the swing you can make in the space available, the balance you’ll need, and the perfect ball position for solid shot execution. Then you can duplicate the preview swing and execute the successful escape shot you have planned with confidence.
Use this setup routine during your backyard practice so it becomes a habit as you’re learning the skills of Damage Control. When it becomes familiar and natural to you, and you repeat it before trouble shots on the course, it will make executing these shots easier and more successful.
7.3 Take It to Your Backyard
Every golfer has their own unique physical problems, so consider your own specific limitations and proceed cautiously. Take it slowly. Stretch and warm up before any practice session, and be careful not to injure your back. Don’t swing and hit anything hard, brittle, or dangerous (Notice: We have used foam blobs to simulate rocks in the practice drills below).
Damage Control is a new concept. It involves new postures, positions and skills that you’ve never practiced before. Don’t overdo it. Proceed wisely and at your own risk.
DRILL ADVICE
1.Don’t worry about making bad swings. Your bad swings and learning errors don’t ruin any scores in your backyard.
2.Pay attention to your shot patterns, even with the Almost Golf practice balls. You can learn about your scatter directions; real balls on the course will give you different distance and size patterns, but they will be similar to the shot-pattern shape of the Almost Golf balls. Hit groups of ten shots at a time. Pay special attention to the shot-pattern created by your first group of ten versus your second group of ten. The first is usually your worst. Improvement will come with repetition and familiarity.
3.Pay attention to ball flight. Pay particular attention to your ball launch characteristics, ball-flight starting direction, and the in-flight curvature of your shots after impact. Note: Wind has a greater effect on Almost Golf balls than it does on real balls because the practice balls are so light. Therefore, the feedback they provide will not be good in windy conditions.
4.Have fun learning the skills of Damage Control. Remember, you’re not keeping score and you don’t have to hit Damage Control shots perfectly for them to be successful. Each drill should be approached in a relaxed fashion and with a sense of adventure. You’ll be attempting shots that you may have rarely (if ever) encountered before, so have fun with them and don’t worry about your results. These drills have not only been created for your instruction but also for your enjoyment. Enjoy and swing away!
DRILL 1: OBSTACLE OFF HEEL OF CLUB (Figure 7.12a–b)
Materials needed: Almost Golf balls, foam rock obstacle
Step 1: Take your normal address position and feel how you might shank the ball or hit the obstacle.
Step 2: Start your setup routine using spine-angle Setupology, crowd into the ball (move closer at address), bend over at the waist, and grip down on the shaft.
Step 3: Complete your routine to feel an upright swing and reduced swing power.
Step 4: Execute ten shots and observe the resulting shot pattern.
Points of emphasis:
•Create a more upright swing plane.
•Swing power is reduced because the shaft is shortened (you’ve gripped down).
•You should still be able to make an almost full shoulder turn with reasonable power.

7.12a

7.12b
DRILL 2: OBSTACLE OFF TOE OF CLUB (Figure 7.13 a–c)
Materials needed: Almost Golf balls, foam rock
Step 1: Take your normal address position and feel how normal impact might hit the obstacle.
Step 2: Start your setup routine using Setupology; set up slightly farther from the obstacle and play the ball off the toe of the club.
Step 3: Complete your routine and imagine the reduced power of the shot.
Step 4: Execute ten shots and observe the resulting shot pattern.
Points of emphasis:
•Expect a 25 percent loss in power due to toe impact.
•Try open- and closed-face swings to gain confidence in swinging close to an object and to understand shot curvature.

7.13a
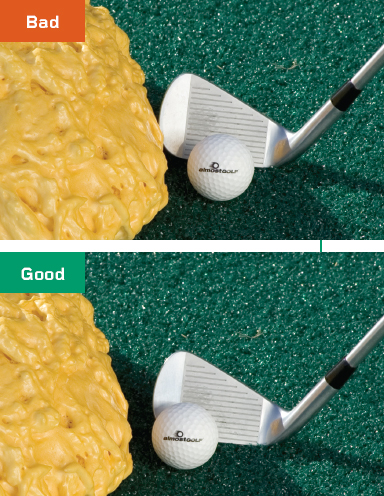
7.13b–c
DRILL 3: OBSTACLE IN FRONT OF BALL (Figure 7.14a–c)
Materials needed: Platform, Almost Golf balls, foam rock
Step 1: Take your normal address position and feel how your follow-through would hit the rock.
Step 2: Start your setup routine using spine-lean Setupology, play the ball back in your stance, and lean forward.
Step 3: Feel reduced power of setup and how the ground will stop the club before you hit the rock.
Step 4: Execute ten shots and observe the resulting shot pattern.
Points of emphasis:
•Take a club with more loft.
•Open the clubface to provide an extra margin of loft.
•Aim left of the target and release grip pressure as you reach impact.

7.14a

7.14b
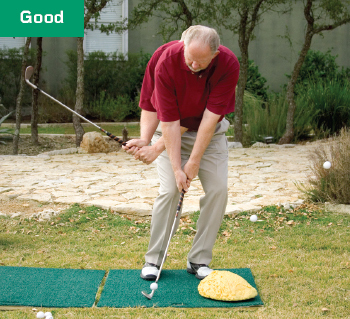
7.14c
DRILL 4: OBSTACLES CLOSE BEHIND BALL (Figure 7.15a–c)
Materials needed: Platform (standing on end in a V), Almost Golf balls
Step 1: Take your normal address position and feel how you would have no backswing.
Step 2: Start your setup routine using normal Setupology, but face the platform with a closed clubface and set the ball more toward the toe of club than normal.
Step 3: Complete your routine to feel a normal swing parallel to the platform.
Step 4: Execute ten shots hitting ball with closed (aimed left) clubface off toe of club, and observe low shot trajectories and shot pattern.
Points of emphasis:
•Use a club with lots of extra loft (to compensate for closing clubface).
•Shots will roll a long way because of zero backspin.
•Visualize a trajectory starting to the left, then hooking.

7.15a

7.15b

7.15c
DRILL 5: OBSTACLES AHEAD OF YOU (RESTRICTED FOLLOW-THROUGH) (Figure 7.16)
Materials needed: Platform, Almost Golf balls, foam tree
Step 1: Take your normal address position and feel how you would hit the limb with a full follow-through.
Step 2: Start your setup routine using normal Setupology.
Step 3: Complete your routine to find (and feel) the limit of your follow-through.
Step 4: Execute ten shots and observe the resulting shot pattern.
Points of emphasis:
•Try different heights for the tree limb.
•Try different distances from the limb.
•Learn how much extra room you require in your follow-through, because stopping the club is always harder than expected.

7.16
DRILL 6: OBSTACLE ABOUT 33" BEHIND BALL (Figure 7.17a–c)
Materials needed: Platform, Almost Golf balls, foam tree
Step 1: Take your normal address position and feel how you would hit the tree limb with your normal backswing.
Step 2: Start your setup routine using normal Setupology.
Step 3: Before initiating backswing, pre-cock wrists fully, move clubhead up toward your head then make stutter-step swing. Verify club clearance in all positions, including downswing.
Step 4: Execute ten shots and observe the resulting shot pattern.
Points of emphasis:
•Try it first with a wedge, then a 7-iron, then a 4-iron.
•This swing will become more comfortable over time.
•Backswing radius varies with the golfer’s physique, club length, and terrain; try this shot from several different slopes.

7.17a

7.17b

7.17c
DRILL 7: OBSTACLE ABOUT 36" BEHIND BALL (Figure 7.18)
Materials needed: Platform, Almost Golf balls, foam tree
Step 1: Take your normal address position and feel how your normal backswing hits the tree limb.
Step 2: Start your setup routine using normal Setupology, grip down on the shaft, and feel the club miss the tree.
Step 3: Complete your routine to verify swing clearance.
Step 4: Execute ten shots and observe the resulting shot pattern.
Points of emphasis:
•Any club you shorten will produce less carry distance than normal.
•Your swing arc will have a smaller radius by the amount you grip down.

7.18
DRILL 8: OBSTACLE 38" BEHIND BALL (Figure 7.19a–b)
Materials needed: Platform, Almost Golf balls, foam tree
Step 1: Take your normal address position and feel how you would hit the tree limb with your normal backswing.
Step 2: Start your setup routine using Setupology, and play the ball back in your stance.
Step 3: Complete your routine to feel swing clearance and the balance requirements of the swing.
Step 4: Execute ten shots and observe the resulting shot pattern.
Points of emphasis:
•Your club will have less effective loft.
•The shot will fly lower than normal.
•The swing radius of the clubhead will be normal, so distance will still be strong.

7.19a

7.19b
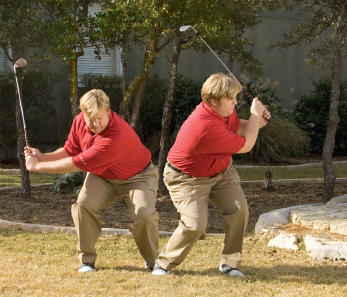
DRILL 9: OBSTACLES ABOVE YOUR HEAD (REQUIRING A FLAT SWING) (Figure 7.20a–b)
Materials needed: Platform, Almost Golf balls, foam tree
Step 1: Take your normal address position and feel how you would hit the tree limb in your backswing.
Step 2: Start your setup routine using spine-(trunk) angle Setupology by squatting down at address.
Step 3: Complete your routine to feel how low you need to squat (or go to knees) for swing clearance.
Step 4: Execute ten shots and observe the resulting shot pattern.
Points of emphasis:
•It is more difficult to rotate when squatting, so power will be limited.
•The lower the limb, the flatter your swing plane must be.
•Lower the height of the limb until it forces you to your knees. You’ll be surprised at the power you can still generate.
7.20a

7.20b
DRILL 10: BACKSWING LIMITATIONS REQUIRING AN UPRIGHT SWING PLANE (Figure 7.21a–b)
Materials needed: Almost Golf balls, foam tree
Step 1: Take your normal address position and feel how you would hit the tree with a normal swing plane.
Step 2: Start your setup routine using spine-angle Setupology, move closer to the ball, bend over more, grip down on the club (or use a shorter club), and feel your swing plane missing the tree.
Step 3: Complete your routine to feel your surprisingly powerful shoulder turn.
Step 4: Execute ten shots and observe the resulting shot pattern.
Points of emphasis:
•The more you bend over, the more upright the swing plane will be.
•You need to use a shorter club the more you bend over.

7.21a

7.21b
DRILL 11: BALL SITTING UP ABOVE GROUND (Figure 7.22)
Materials needed: Platform (standing in an inverted-V shape), Almost Golf balls, foam rock, long tee
Step 1: Start your setup routine using spine-angle (standing vertical) Setupology with the club 3 inches above the ball.
Step 2: Complete your routine to feel how heavy the club feels during the swing.
Step 3: Execute ten shots and observe the resulting shot pattern.
Points of emphasis:
•Try hitting shots at different heights to see the effect of club loft directing ball to the left.
•The more horizontal your swing and the farther away from your body the ball, the heavier the club will feel.
•A heavier club feel increases the tendency to hit below (under) the ball.
•The higher the ball, the flatter your swing and the more vertical your spine needs to be.

7.22
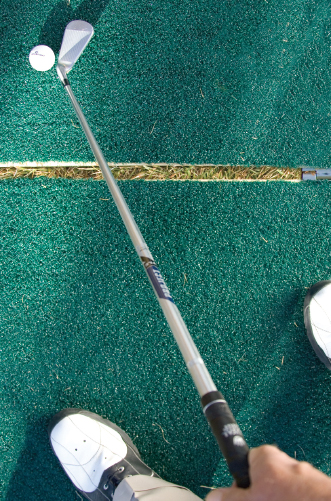
DRILL 12: FADING THE BALL AROUND A TREE (Figure 7.23a–b)
Materials needed: Platform, Almost Golf balls, foam tree
Step 1: Take your normal address position and feel how you would hit the tree with a normal shot trajectory.
Step 2: Start your setup routine using normal Setupology, aim two steps left of the tree, and open the clubface slightly.
Step 3: Complete your routine to visualize swinging along the setup line and the ball fading around the tree.
Step 4: Execute ten shots and observe the resulting shot pattern.
Points of emphasis:
•Start with short shots and slow swing speed.
•As tempo and distance increase, notice that the shots start on the same line, but that curvature increases.
•Opening the clubface starts the ball farther right, curves it more, and launches it higher with more backspin.
7.23a

7.23b
DRILL 13: DRAWING THE BALL AROUND AN OBSTACLE (Figure 7.24a–b)
Materials needed: Platform, Almost Golf balls, foam tree
Step 1: Take your normal address position and feel how you would hit the tree with a normal shot trajectory.
Step 2: Start your setup routine using normal Setupology, but aim two steps right of the tree and close the clubface slightly.
Step 3: Complete your routine and visualize the ball drawing around tree.
Step 4: Execute ten shots and observe resulting shot pattern.
Points of emphasis:
•Start with short shots (slow swing speeds) and then gradually increase swing tempo (notice that shots start on the same line, but curve more).
•Try aiming farther right and closing clubface more.
•Visualize the shot trajectory prior to shot execution (focus on learning how closing the clubface starts the shot farther left and creates more hook, a lower trajectory, and less spin).

7.24a

7.24b
DRILL 14: SIDEHILL TERRAIN, BALL ABOVE FEET (Figure 7.25)
Materials needed: Platform, cinder-blocks, Almost Golf balls
Step 1: Take your normal address position and feel how the club is too long and how the clubface aims left.
Step 2: Start your setup routine using spine-angle Setupology (stand more vertically), grip down on the shaft, aim right of the target.
Step 3: Complete your routine to feel normal hand (non-blocking) action.
Step 4: Execute ten shots and observe the resulting shot pattern.
Points of emphasis:
•Start with a half swing, then repeat ten-shot sessions with a full swing.
•Try sessions with different slope heights.
•Try sessions with different club lofts.
•Learn correlation: The greater the slope and club loft, the more right you must aim.

7.25
DRILL 15: SIDEHILL TERRAIN, BALL BELOW FEET (Figure 7.26a–b)
Materials needed: Platform, cinder blocks, Almost Golf balls
Step 1: Take your normal address position and feel that the club is too short.
Step 2: Start your setup routine using spine-angle Setupology, retain your normal spine angle to the ground, and squat down to reach the ball.
Step 3: Complete your routine to feel limited rotation and strain on balance.
Step 4: Execute ten shots and observe the resulting shot pattern.
Points of emphasis:
•The heel of the club hits the platform, the toe does not.
•Try different slopes, different shot distances.
•Aim directly at target (notice that the clubface does not aim right of target).

7.26a

7.26b
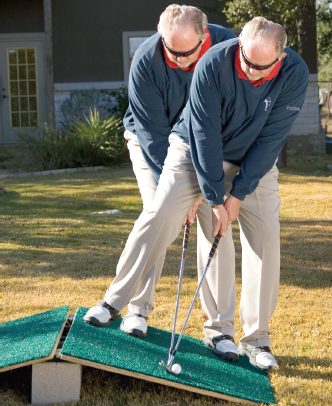
DRILL 16: DOWNHILL TERRAIN, FRONT FOOT BELOW BACK (Figure 7.27a–b)
Materials needed: Platform, cinder blocks, Almost Golf balls
Step 1: Take your normal address position (vertical spine); feel how your swing and the club bottom-out behind the ball, which would result in a fat shot.
Step 2: Start your setup routine using spine-lean and stance-width Setupology, play the ball back in your stance, lean forward to get your spine perpendicular to the slope, widen your stance for balance.
Step 3: Complete your routine to feel limited body rotation, pressure on your leading leg, imbalance on your follow-through, and to verify divot location.
Step 4: Execute ten shots (walk through each after impact) and observe resulting shot pattern.
Points of emphasis:
•Decreased effective loft and lower launch angle will make the ball bounce and roll farther than normal, especially on shorter shots.
•Learning exact divot location for ball position is paramount.
•Complete your swing past impact before walking through to catch your balance.
7.27a

7.27b
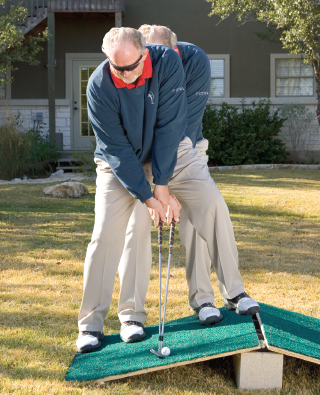
DRILL 17: UPHILL TERRAIN, FRONT FOOT ABOVE BACK (Figure 7.28a–b)
Materials needed: Platform, cinder blocks, Almost Golf balls
Step 1: Take your normal address position and feel how the club would dig into the ground after impact, possibly hurting your wrist.
Step 2: Start your setup routine using spine-lean and stance-width Setupology, lean back, get your spine perpendicular to the slope, and widen your stance for balance.
Step 3: Complete pre-shot routine to feel gravity fighting rotation through impact, pressure on your back leg, and the need to fall back to catch your balance after your follow-through.
Step 4: Execute ten shots, step back to catch balance after each swing, observe the resulting shot pattern.
Points of emphasis:
•Notice how increased effective loft launches shots higher and shorter (use a less lofted club to compensate).
•Focus on turning through impact before stepping back after impact to catch balance.
7.28a

7.28b
DRILL 18: BACKHAND SWING (Figure 7.29a–b)
Materials needed: Platform, foam tree, Almost Golf balls
Step 1: Start your setup routine with a backhand Setupology. Play the ball about 3 inches out in front of your toe line, put your free hand on your shoulder (to anchor pivot point during swing), and keep the clubface perpendicular to the target line.
Step 2: Complete your routine and feel surprising power; verify divot location.
Step 3: Move in and execute ten shots, then observe the shot pattern.
Points of emphasis:
•Grip the club with your arm hanging straight down under your shoulder.
•Place your finger on the shaft for added control of the clubface.
•Experiment with different clubs (for loft and distance changes).

7.29a

7.29b
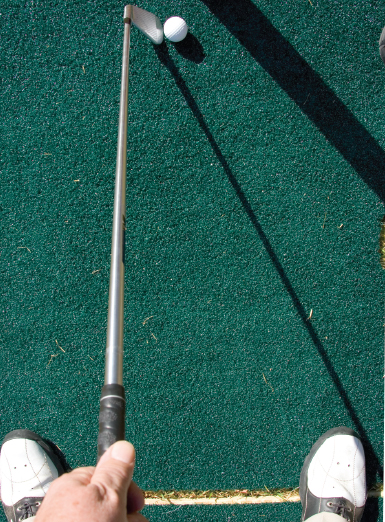
DRILL 19: OPPOSITE-WAY SWINGS (Figure 7.30a–b)
Materials needed: Platform, foam tree, Almost Golf balls
Step 1: Start your setup routine with normal Setupology, but take an opposite-from-normal grip and turn the club (use a 5-iron for this drill) upside down (toe down).
Step 2: Complete your preview swing with a feel of smooth, accelerating motion.
Step 3: Focus on repeating the preview-swing motion and feel to make solid contact with the ball.
Step 4: Move in and execute ten shots, then observe the shot pattern.
Points of emphasis:
•Take special notice of club loft versus shot height and direction.
•Opposite-way swings require many repetitions to eliminate the awkward feel.
•Try different clubs to find optimum trajectory for distance, then find the optimum club to produce lofted shots.
7.30a

7.30b
DRILL 20: HAND-FIRE FEEL: DEAD HANDS (Figure 7.31)
Materials needed: Platform, foam tree, Almost Golf balls
Step 1: Use the lowest possible grip pressure, zero hand action, and zero brute force.
Step 2: Swing ten times without, then ten times with, Almost Golf ball.
Step 3: Learn the feel of how lightly you can grip the club and swing without slippage.
Points of emphasis:
•Put your mind’s eye in your hands.
•Focus on the feel of “Death Hands.”

7.31
DRILL 21: HAND-FIRE FEEL: WRIST COCK VS. WRIST HINGE (Figure 7.32–7.33)
Step 1: Gradually cock your wrists to full cock at top of half backswing.
Step 2: Swing through the impact zone with smooth acceleration and to a full cock at half finish.
Step 3: Repeat the swing motion with your eyes closed to feel the wrist cock.
Step 4: Now try hinging your wrists to verify feel of what NOT to do.
Points of emphasis:
•Keep mind’s eye in hands.
•Feel wrist cock in backswing and follow through as good.
•Feel wrist hinge as bad.

7.32

7.33
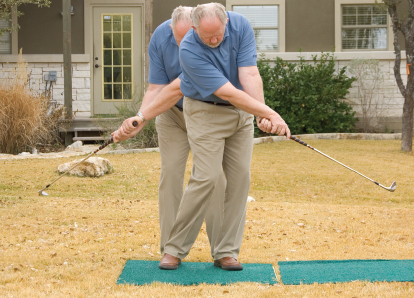
DRILL 22: HAND-FIRE FEEL: FOREARM ROTATION (Figure 7.34)
Step 1: Swing ten times without and ten times with an Almost Golf ball, overexaggerating the rolling over of your forearms.
Step 2: Hit shots while slowing down, then speeding up forearm rotation.
Step 3: Learn how forearm-rotation tempo is critical to shot direction—impact with clubface open-right; with clubface closed-left.
7.34
DRILL 23: HAND-FIRE FEEL: BRUTE FORCE (Figure 7.35)
Step 1: Set club into cement block as if to lift cement blocks as shown.
Step 2: Exert light pressure to feel the beginnings of brute force in your forearms and wrists.
Step 3: Exert more pressure to feel the demands in your arms and shoulders; ultimately, with maximum force, you should feel brute force into your chest and torso.

7.35
DRILL 24: A LITTLE SMOKE FOR A FRIED-EGG LIE (Figure 7.36a–b)
Materials needed: Tray, sand, Almost Golf balls
Step 1: In 2-inch-deep sand in tray, swirl ball in circles to create a fried-egg lie.
Step 2: Start your setup routine with normal bunker Setupology.
Step 3: Complete your preview swing (above ball), feeling more Hand-Fire than normal.
Step 4: Move in and execute ten shots, then observe shot pattern.
Points of emphasis:
•Slap sand through impact to apply Hand-Fire to fried-egg lie.
•Never preview your divot in a hazard on course (it’s a penalty to touch sand before impact).
•Ball position should be slightly forward, your clubface semi-open; aggressive acceleration is critical.

7.36a

7.36b
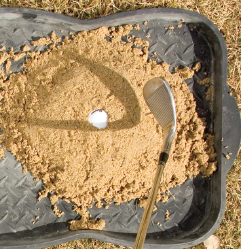
DRILL 25: SMOLDERING HAND-FIRE FOR BURIED LIE IN WET SAND (Figure 7.37a–b)
Materials needed: Tray, sand, water, bucket, Almost Golf balls
Step 1: Make some wet sand in the bucket, then pile the wet sand 3 inches deep in tray and create a buried lie.
Step 2: Start your setup routine with Setupology (position ball 1 inch forward of stance center, close the clubface).
Step 3: Complete your preview swing with a feel for applying brute force through impact.
Step 4: Move in and execute ten shots, then observe the shot pattern.
Points of emphasis:
•Ample hand, forearm, and wrist strength are required to prevent wrist breakdown after impact.
•Learn correlation of shot length to follow-through (long follow-through = long shot, short follow-through = short shot).
•Shot carry distance will be shorter, trajectory lower than normal.
•Expect zero backspin and extra-long roll-out on green.
7.37a

7.37b
DRILL 26: BLAST FURNACE FROM PACKED MUD OR WATER (Figure 7.38a–b)
Materials needed: Tray, sand, cedar mulch, bucket, water, Almost Golf balls
Step 1: Wet or mix the sand, mulch, and water in the bucket, then pile 4 inches deep and create a buried lie.
Step 2: Start your setup routine with Setupology (ball position in the center of your stance, clubface toed in).
Step 3: Complete your preview swing prepared to supply maximum Hand-Fire.
Step 4: Move in and execute ten shots, then observe shot pattern.
Point of emphasis:
BE CAREFUL: This shot requires strength. There is a potential for injury. Approach the shot wisely—if you doubt whether you can get the ball out when you’re on the course, take an unplayable lie.

7.38a

7.38b
DOUBLE-UP, TRIPLE-UP, COMBINATIONS OF PROBLEMS!
With the drills in this chapter, we’ve addressed a number of problems that you’ll encounter on the golf course, and how to practice them in your backyard. To experience and develop all of the swings suggested will take you a number of practice sessions, but if you do them, the results will be fundamental and meaningful to your game. Having said this, there is an additional and elevated level of Damage Control that you can achieve in your game.
Additional competence (and still lower scores) will come from developing the ability to hit shots from trouble lies that involve multiple difficulty factors. You’ve seen, for example, how we recommend handling a lie from behind a rock, or under a tree limb, or on a downslope. Now try to imagine how you might hit a shot with the ball above your feet, a tree in your backswing (Figure 7.39), and maybe a large rock in front of the ball, all at the same time.

7.39
The shots and skills of Damage Control are virtually endless. You can practice as many combinations of problems as you like in your own backyard, but you’ll never exhaust all the possibilities. You can set your platform high or low at any angle, move your phony tree limbs or rocks to any position, and lean or tilt your spine to as many angles as you can imagine. You will still not encounter a swing that some golfer hasn’t needed on a golf course somewhere before.
We’ve detailed lots of new concepts, shots, skills, and backyard practice drills so far, and I know they can help you improve your game consistently. I want to emphasize another point, however, that doesn’t directly relate to scoring: KEEP IT FUN!
Keep your backyard practice sessions fun by hitting funky shots from funky lies, and try miracle escape shots—all with your Almost Golf balls. How high can you loft shots? Over the house (Figure 7.40)? How low can you go? See and stretch your golf-skill boundaries. And have fun while you learn. The more fun it is, the more you’ll do it, and the more it’ll help your game!

7.40
Friendly competition is the best way to stay focused during practice sessions—it makes you try harder to hit every shot better to win the game. Play games with your family, your kids, or your friends. Create difficult lie conditions, pick targets—the closest to the target wins the point!
At this point it’s time for another quick status check. Earlier we showed you how to set up a practice facility and develop the skills of Setup-ology, Swing Shaping, and Hand-Fire feel at home in your backyard. Let’s assume that you’re going to do the drills we’ve suggested and hopefully learn to make the swings and hit reasonable shots from those circumstances. In fact, let’s assume you’re going to get really good at these first three skills of Damage Control.
It will then be time to play Damage Control practice-rounds with real balls, to real targets—that is, to “take it to the course.” Once you’ve learned to make the necessary swings to hit shots from trouble, you’ll need to learn where those shots are going to fly, and how they’re going to react once they get there. In other words, you need to learn your shot patterns, and you need some Red-Flag touch.
FIND TROUBLE AND PLAY FROM IT
The Damage Control practice round is a really fun round to play. There is no score involved, no specified number of holes or shots to hit, and no “rules of play.”
The point of the round is to locate the trouble spots that you normally get yourself into on the full 18-hole layout of your course, and then learn to play from there. I recommend doing this in the early morning or early evening, when the course is relatively empty (so you won’t bother those trying to keep serious score).
Here’s how a Damage Control practice round is played: Go to the first tee but don’t hit a shot. Look out and identify the trouble you normally drive your ball into. Then drive your cart straight there and throw ten balls into it. Make sure all the balls are in some kind of trouble, then choose a target and hit all ten as you would if you were really playing. You have to hit all shots according to the Damage Control principles you’ve learned in your backyard. Then look at your shot pattern and soak in some knowledge.
KEEP MOVING
This is a snapshot of what your shot pattern looks like from that trouble. It’s only ten shots, so it’s not your ultimate shot pattern. It’s a quick look, an initial indication, of what your shot pattern really looks like from that kind of trouble.
Just look at the pattern, then pick up your balls and move on. Don’t get hung up on the accuracy or inaccuracy of anything here. Just pick up the ten balls, get in your cart, and drive to the worst trouble you can find around the first green, and throw your ten balls there. Then repeat your “escape-from-trouble” scenario again: Choose your trouble spot, select a target; hit ten escape shots; observe your shot pattern, pick up your balls, and move on to the next hole.
KEEP YOUR FOCUS
Move around the course in your Damage Control practice round—play all 18 holes if you have the time—devoting your entire attention to finding and playing Damage Control shots from trouble. (Note: Make sure you don’t hold up any play.) And remember that you’re looking for all kinds of trouble: high grass, sand with deep lips, severe slopes, water edges, steep banks, shots from the rough on slopes over water (Figure 7.41), low-hanging tree limbs, or fences. Consider anything that’s given you trouble in the past or that you think may do so in the future.

7.41
Don’t forget: no scoring, no putting out, no normal-game shots—just relax and have fun. This is a Damage Control practice round; you’re looking at shot patterns and watching how shots behave with little or no backspin, to develop your Red-Flag touch. You’re also refining your Damage Control Setupology, Swing Shaping and Hand-Fire feel at the same time.
ESTABLISH “QUICK-VIEW” SHOT PATTERNS
After you play ten shots to establish a “quick view” of a shot pattern, look at it but don’t stress over it. Respect it because it has meaning. If your pattern is poor, recognize that and make a mental note to practice from this lie in your next backyard session. But don’t stay there all day hitting shots until you get them to be perfect. Don’t overanalyze or treat any particular trouble area as being overly important. Remember, there are an infinite number of them, and you only hit ten shots from that particular one.
The primary objective is to train your brain to imagine where your trouble shots are most likely to go. If you could hit a million shots from every trouble lie imaginable, your Damage Controller vision would know what your shot pattern is in each case. But ten shots at a time will give you an idea (Figure 7.42).

7.42
Exercise your brain. Teach it to imagine. Project an image in your mind’s eye, then hit ten shots and see the result. Compare your estimate with reality. Learn, study, grow, and stretch: This is the way poor players become better and good players become great. Prepare yourself for the situations you expect to get into and the results you expect to see as you’re getting out. As you develop the skills of shot-pattern recognition and Red-Flag touch, you’ll find that the rest of your Damage Control skills will coalesce and improve, and your confidence from trouble situations will soar.
While practicing funky shots from funky lies, try some miracle escape shots. Use old balls for really dangerous shots when you don’t have much chance of success. Have fun while you learn. Before you hit the shot, imagine the shot trajectory and how the ball will react after it lands. Then execute and see; is it what you expected? It’s okay to try shots that aren’t likely to succeed, because knowing the reality of your chances will help your target selection in the future.
Again, I remind you: Don’t hold up play. I don’t want to get you (or me) into trouble with your golf professional, fellow members, or the course ranger. Other golfers might think you’re a little crazy, or they’ll just be irritated by your practice on the course. I’ve been told many times to practice only in designated areas, never on the course. But you can’t practice Damage Control on perfectly flat driving-range tees, or from perfect fairway lies. You have to do it from real trouble on the course.
Let me ask one more favor. When you’re practicing Damage Control on course, please fix every pitch-mark you make on a green. If you’re practicing from a grassy creek bank and happen to fly eight out of your ten shots onto the green, please fix all eight of those marks. Your fellow members will appreciate your efforts, the condition of the greens and your putting will benefit, and you’ll be much less likely to get in trouble for your Damage Control practice.
PICK YOUR “TOP THREE”
After you’ve been doing this for a while, pick the three most likely areas to cause you trouble on the entire course and hit twenty-five escape shots from each. Make your selection after looking at every hole for its maximum trouble, and then combining that information with the way you tend to miss shots (Figure 7.43). If your bad shots are slices to the right, pay special attention to the trouble on the right side of the fairway. This evaluation will give you a better look at your true shot-pattern size, and will help you to be better prepared for the trouble you’re most likely to face in your next round.

7.43
FOCUS ON RED-FLAG TOUCH
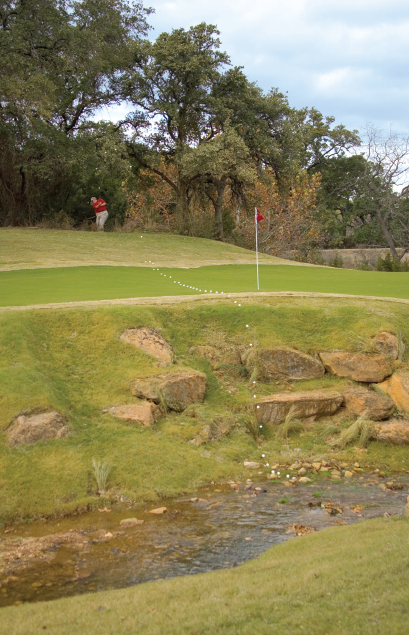
Be sure to pick some trouble spots near true Red-Flag landing areas, because launching good escape shots from trouble is only the first part of the equation. When a well-struck escape shot lands on the downhill slope of a firm green and rolls into water, you still have to count the disaster score. It doesn’t matter that you executed a good swing and played the shot exactly the way you wanted to (Figure 7. 44).
7.44
The best way to train your Red-Flag touch is to see enough well-struck shots end up perfectly, even though others may end up in trouble. This will teach you what caused the difference. Don’t hesitate to find extremely difficult trouble spots and hit shots from them repeatedly, even if your shots turn out disastrously. From this kind of practice, you’ll find that there’s usually a statistically best play. It may not be a 100 percent solution, but if it’s the best solution for a given situation, you need to know what it is. That’s the one you want to play from that spot in a tournament.
There are at least a few Red-Flag landing areas on essentially every course, and you need to learn to deal with the ones that affect your scores the most often. You should also realize there are areas on courses around the world that have much more severe and disastrous consequences than those you normally play from. And it’s important to note that the penalties for misjudgments in Red-Flag touch are magnified as the greens get firmer and faster every year. For this reason you should play at least a couple of Damage Control rounds every year to keep your Red-Flag touch sharp.
And don’t worry about getting “too good” at this. As you become a better player, you can always keep things interesting by finding courses that present more difficult challenges.
After you’ve played several Damage Control practice rounds, you need to go back to playing normal golf. Having learned to set up, shape your swings, use your hands, estimate shot patterns, and recognize Red-Flag areas when you find yourself in trouble, your game will be better. You’ll avoid most disasters and shoot somewhat lower scores right off the bat.
There is still one final step you can take, however, to optimize the effect of Damage Control on your game. That is to optimize the part of your Damage Control Mentality that makes shot choices and target selections, so that they optimally fit with the talent and skill level of the rest of your game. We suggest doing this by playing two very special Damage Control rounds on two consecutive days (so the state of your game will be reasonably constant for both rounds).
BE A “SUPER-GAMBLER”
Some golfers hesitate to devote a round of golf to an experiment, because the round might otherwise be the best round of their life. Knowing how remote the chance of this is, I suggest you devote two special rounds for the express purpose of optimizing your Damage Control Mentality. The chance of you then having a career best round will dramatically improve.
The first experimental round should be played with your Damage Control attitude set at the “extremely aggressive” end of the decision spectrum. We call this a Super-Gambler round. It means that you play every shot with the flagstick as your target. No matter what’s in your way, no matter how close a creek or a tree limb or an out-of-bounds stake is, you go for the flag (Figure 7.45).
This round takes no extra time and no extra effort—you simply need to be focused and aware of the choices you’re making on every shot. No matter what trouble you might get into, you just keep firing at the flag, all day long. No matter how narrow the fairway, go for it with a driver. Assume you’ll hit a perfect shot every time you swing, no matter what the consequences may be if you don’t.
That’s it, that’s all you do in your Super-Gambler round besides keep score. Don’t worry about anything—just play as hard as you can, let it fly, and see how you score.
PLAY A “SUPER-SAFE” DAMAGE CONTROL ROUND
The next day, completely change your attitude. Play your Damage Control round from the other end of the decision spectrum: Make every decision on every shot using a Super-Safe mentality.
Don’t try to do anything special or take any chances or gambles. Keep your focus all the way around the course on playing safe (choose all shots to targets that are 95 percent or more safe), just to see and feel the difference from the previous day’s strategy. Then see how this mentality affects your score.
THERE IS A BALANCE
I have yet to see a golfer who has played their best when playing every trouble shot Super-Safe. Likewise, I have never seen a golfer who played their best while gambling to the max every time. Everyone has a balance point in their aggression scale that is best for their overall scoring capability, and it always lies somewhere between the completely safe (0 percent gamble) and full-out, 100 percent gambling ends of the spectrum.
Where this balance point is for any particular golfer depends on their Damage Control skills. It can also change as the situation or need for a particular result changes. Although it’s all still new to us, from the results we’ve seen so far this balance point doesn’t change nearly as much as golfers expect it to.
FIND YOUR OWN BALANCE POINT
The point of devoting two special rounds to explore the extremes of Damage Control decisions is to see where the limits of aggression versus safety take your scores. As you analyze these two rounds after completion, you can begin to move toward striking a balance within your own game, so you’ll know how aggressively you should play to score your best. Did you waste a few strokes when you were playing too safe? You probably did. Did you waste several strokes by playing too aggressively? Again, you probably did.
For every golfer there is an optimum amount of aggression they should use when choosing targets from trouble lies. If you’re a numbers person, you’ll want to put a number on how aggressively you should play. For others a number will bother them, and they’ll be better off just “feeling” their way through this issue of aggressiveness.
Personally, I’ve settled on a low aggression level—I prefer to play to targets that I believe are in the 75 percent safety range. When I play from trouble at this level, I hit my best shots and my short game allows me to score my best.
You must base your level of aggressiveness on the state of your physical and mental Damage Control skills, with consideration given to how strong your short game and putting are. Are they at least good enough to save strokes 50 percent of the time when you put them in a position to do so?
So there you have it. This is our concept of Damage Control: five skills that will help you avoid disaster scores and disaster holes. You can learn the three skills of Setupology, Swing Shaping, and Hand-Fire feel in your backyard. You can play Damage Control practice rounds and refine those three skills while you learn what your shot patterns look like and develop your Red-Flag Touch. Then you can play special Super-Gambler and Super-Safe rounds, with your attention focused on optimizing your percentages and feeding your Damage Control Mentality.
Obviously, you can work in your backyard as often as you want. It will probably take you several Damage Control practice rounds to get a good feel for your shot patterns and Red-Flag Touch. And within a few months of normal play you should feel as though you’re honing in on an optimum Damage Control Mentality for your game and skill level.
Your scores should improve gradually during this time, and once you begin playing with an aggression level that fits your game, your scores will begin to drop consistently to a new level. That’s our goal . . . I hope you’ll make it yours.
Two quick thoughts here before you finish:
1.When you watch PGA TOUR or LPGA Tour pros on television, observe how they play (and execute) shots from trouble. With a focus toward optimizing your own Damage Control game, you can learn a few tricks of the trade from the experts.
2.As you practice and develop your own version of Damage Control in your backyard or on the course, please feel free to send us photos and descriptions of the new swings and learning aids you develop, plus any new Damage Control playing suggestions or evaluations you may happen to create along the way (send these to comments@pelzgolf.com).
The reason I ask for this is that the concept of Damage Control is new, and we don’t have all the answers. I’m sure we all have much to learn. I invite you to visit our Web site (www.pelzgolf.com) or my blog (www.pelzgolf.com) for the latest in Damage Control from our research and your feedback. I’ll blog about new developments as they come in over time, and I’ll post frequent updates on my Twitter account at dave_pelz.
I thank you in advance for your help, and I know that as you work on your Damage Control skills, you’ll begin to see two to five strokes per round disappear from your scores.
Good luck, and lower scores to you,
