17.4 Processing Vendor Invoices
AP accounting deals with business transactions that concern vendors and manages the payables of the business. These tasks are primarily associated with the administration and posting of the following business transactions:
- Invoices
- Credit memos
- Outgoing payments
The SAP component used to map AP accounting is FI-AP, and it’s closely interlinked with Purchasing (see Chapter 15). Within AP accounting, the Invoice Verification (MM-IV) component (in which you can post incoming invoices) is of particular interest. Outgoing payments are made based on the posted invoice.
Accounts that are kept in AP accounting and AR accounting are known as subledger accounts. The subledger accounts of AP accounting are referred to as vendor accounts. The prerequisites for these are the vendor master records in the vendor account, which you create via Transaction FK01 or the SAP Easy Access menu under Accounting • Financial Accounting • Accounts Payable • Master Records • Create. You can change the account via Transaction FK02.
[»] One-time Accounts
What happens if you post an invoice only once, and a payment must be made to the vendor? In this case, you create and post to a one-time account as a collective account for various one-time vendors.
Let’s now consider a sample scenario in AP accounting: You require a spare part for a company car at short notice. This spare part is available at a local dealer. Here, you don’t need to trigger a procurement process because the invoice can be entered directly in accounting. Before you buy this spare part from the dealer, you must check if this dealer exists as a vendor in the SAP system.
Follow these steps to check if the master data of the vendor is created in the SAP system:
- Enter Transaction FK03 in the command field or choose the Accounting • Financial Accounting • Accounts Payable • Master Data • Master Data • Display path in the SAP Easy Access menu.
-
Check whether vendor BALTUS30 is created in the system. In the initial screen of Transaction FK03, enter “BALTUS30” in the Vendor field and “1000” in the Company Code field, and select the Address checkbox.
The vendor exists in the Internet Demonstration and Evaluation System (IDES). If this isn’t the case, you must create the master record using Transaction FK01. You can use the vendor of Chapter 15 as a template. -
Enter the following information in the initial screen (Figure 17.8):
- Vendor: “BALTUS30”
- Company Code: “1000”
-
Activate the Address, Control, and Payment transactions checkboxes.
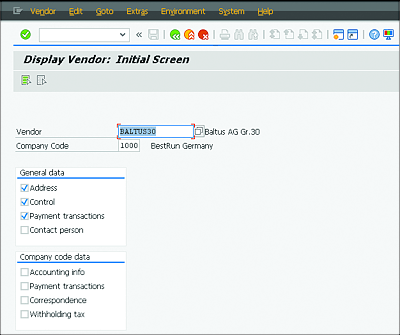
Figure 17.8 Display Vendor Screen
-
Press (Enter) or click the Next
 button to go to the next screen.
-
The Display Vendor: Address screen indicates that the vendor is created in the SAP system (Figure 17.9). If this wasn’t the case, you could picked another master record in the IDES and adapt it accordingly.
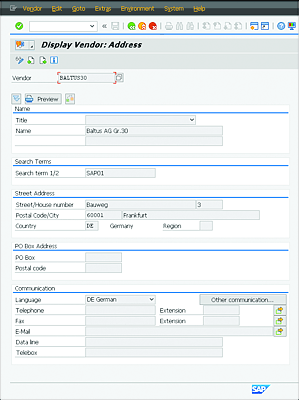
Figure 17.9 Define Vendor Address
Because the dealer is created as a vendor in the SAP system, you can purchase the urgently required spare part without any additional work. The vendor sends you the invoice for the spare part (Figure 17.10). You want to enter this invoice in the SAP system.
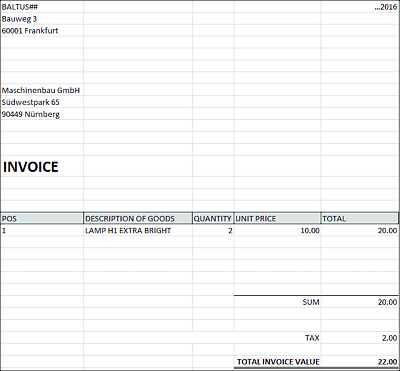
Figure 17.10 Invoice from Vendor
The invoice provides the following information:
- Invoice amount (total net EUR): 20.00 EUR
- Invoice amount (total EUR): 22.00 EUR
- Tax: 10% (input tax), 2.00 EUR
- Vendor: BALTUS30
- Company code: 1000
Follow these steps to enter the invoice in the SAP system:
- Enter Transaction FB60 in the command field, or choose the Accounting • Financial Accounting • Accounts Payable • Posting • Invoice • FB60 – Invoice path in the SAP Easy Access menu.
-
The initial screen for entering the vendor invoice opens. Enter the following information (Figure 17.11):
- Vendor: “BALTUS30”
- Reference (if selected as a mandatory field): any information to refer to the invoice
- Invoice date: Information from the invoice (today’s date)
- Amount: 22.00 EUR
- Calculate tax checkbox: Select
- Tax rate: 1I 1I (Input tax 10%)
- Text: “INVOICE LAMP” (optional)
- G/L acct: “890000”
- Amount (in document currency): “22.00” EUR
-
Cost center: “4100”
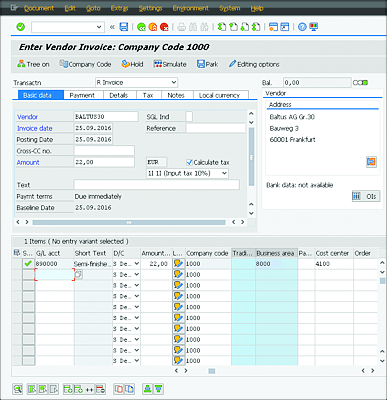
Figure 17.11 Entering the Vendor Invoice
-
If all entries are made, click Save
 . The invoice is now entered in the SAP system.
Before you pay the invoice, you may want to check whether any other open invoices exist for this vendor. Follow these steps:
- To display open invoices for a vendor, enter Transaction FK10N in the command field, or select Accounting • Financial Accounting • Accounts Payable • Account • Display Balances in the SAP Easy Access menu.
-
The system opens the balances of AP where you enter the following information in the open fields (Figure 17.12):
- Vendor: “BALTUS30”
- Company code: “1000”
-
Fiscal year: “2016”
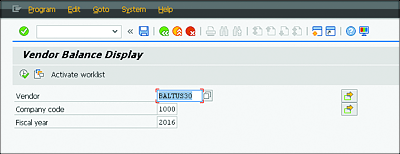
Figure 17.12 Creating a Vendor Balance Display
-
After you’ve entered the data in the initial screen, click the Next
 button or press (F8). The system then displays the balances for the selected vendor (Figure 17.13). The balance display shows the vendor’s open or settled receivables in an account presentation.
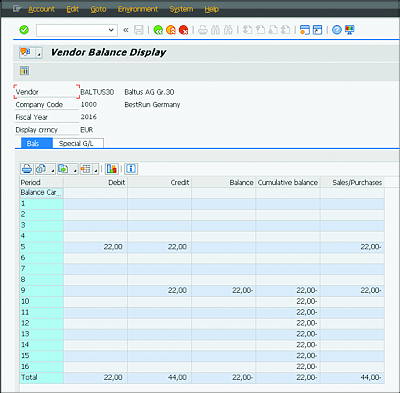
Figure 17.13 Vendor Balance
You now need to post the outgoing payment by following these steps:
- Enter Transaction F-58 in the command field, or choose the Accounting • Financial Accounting • Accounts Payable • Posting • Outgoing Payment • Posting+Form Printout path in the SAP Easy Access menu. Transaction F‐58 provides the option to print a check form.
-
Populate the following fields in the initial screen that now opens (Figure 17.14):
- Company Code: “1000”
- Payment method: “C” (check)
- House Bank: “1000”
- Check lot number: “1”
- Printer for forms: “LP01”
-
Activate the Calculate pmnt amnt checkbox.
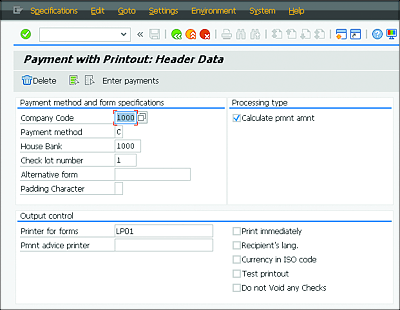
Figure 17.14 Creating Outgoing Payment
- After you’ve entered all necessary information in the initial screen, click Enter payments.
-
Enter the following data in the next screen (Figure 17.15):
- Vendor: “BALTUS30”
- Amount: “22.00” EUR
-
Click the Save button to confirm your entries and implement the posting. The fields highlighted in blue don’t need to be processed because this is only required for an alternative payee.
-
Finally, you want to check the balances for the vendor using Transaction FK10N. Populate the fields Vendor (“BALTUS30”), Company Code (“1000”), and Fiscal Year (“2016”).
In Figure 17.16, you can see that the balances are now cleared.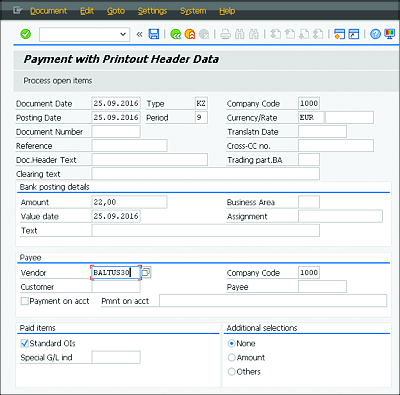
Figure 17.15 Entering Payments

Figure 17.16 Cleared Vendor Balance
Now that you know the most critical functions in AP accounting, we’ll now use similar examples to described AR accounting.