PROJECT 4
Flickering Firefly Wall Art
Make your own DIY switch in this interactive wall art project

 Tools
Tools
 Sharp scissors
 Ruler, ideally metal
Materials
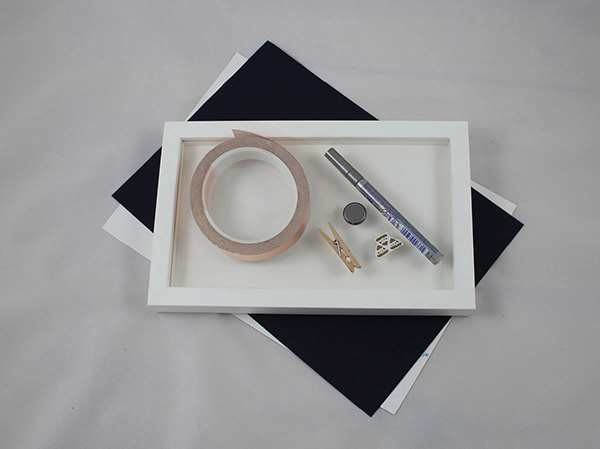
 One piece of navy or black A4 card
 One piece of thick white A4 card
 White photo frame
 Copper tape
 Marker with silver ink
 Two Chibitronics LED stickers
 One 3V battery and a wooden clothespin or small bulldog clip
One of my favorite insects is the firefly. However, I grew up in a cold, rainy country called Wales where fireflies don’t generally like to hang out. I was a very excited adult when I saw my first firefly, much to the amusement of all my friends! Here’s my firefly-inspired interactive wall art using one of my favorite paper circuit techniques: the flicker switch.
The first DIY paper circuit switch I ever made was from a template designed by Jie Qi. As you know, she invented the Chibitronics LED stickers that we’re using in this book. Of all of Jie Qi’s designs, the one that really captured my imagination was her flicker switch. Since I learned about it, I’ve used it in many different projects. This project is a remix of her original flicker switch adapted to add in an extra LED sticker using our first parallel circuit.
Preparing the Frame
Make sure that you’ve gotten all your tools and materials ready. Then prepare your card and frame. Open up your photo frame, and pull out the glass or transparent plastic at the front. Your art is made to be touched, so we are not going to be using the glass or plastic.
You should now have the back of the frame, the frame, and the card or paper insert that was between the back of the frame and the glass. You need to cut your white card to fit exactly where the glass went. The easiest way to do this is to carefully use a craft knife to cut around the glass, but if you’re not confident doing this, you can use the paper insert to trace an outline, and then cut the shape with scissors.
Make sure that your white background card fits securely and will not fall out of the frame. You may need to add extra cardboard “padding” behind the card to keep it securely in place.
Preparing Your Card
Next, you need to cut out the navy or black card. It should be smaller than your white card so that you can see the edges of the white card inside the frame. You’ll need to allow an extra bit of room at the bottom for a flap that will become the flicker switch. I’d recommend testing the sizing and folding with a bit of scrap A4 paper before cutting your card.
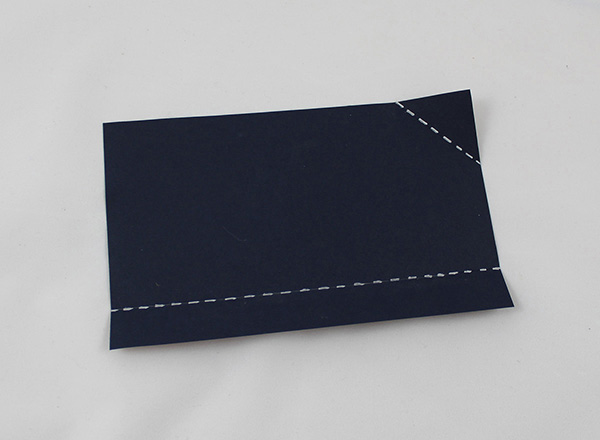
Once you’ve cut your card to the right size, you’ll need to make two folds. The first is for your 3V battery, in the top right-hand corner. Make sure that your battery fits first, and then fold over the corner and give it a good firm press to keep it in place. I’ve marked the fold positions in the picture.
Finally, fold the long flap at the bottom of your card as shown in the picture. You are now ready to start building your circuit.
If your navy card is thick and you want to get an extra precise fold, you can try a technique called scoring. The next section tells about this useful craft technique.
 How to Score Card
If you want to get an extra precise fold, you can try a technique called scoring. You’ll need a ruler and a butter knife (easy version) or a craft knife (expert level).

For the easy (butter knife) version, line your card up with a ruler wherever you want to make the inside of your fold. Hold your ruler firmly, and use the back of your butter knife (the nonserrated edge) to firmly push down along the length of your ruler in a sliding motion. Your card should now be firmly indented, making it easier to fold in a neat line.
For the more difficult (craft knife) version, flip your card over so that the outside of your fold is showing. Line up your ruler, and use your craft knife to very carefully make a light cut along the length of your fold.
You should only cut the card slightly, not go through the whole thickness of the card. Be careful not to cut too far through your material. When you flip the card back over and fold it in, the outside of the fold will now have more “give,” meaning that you’ll get a crisper-looking fold.
Starting Your Flickering Firefly Circuit
Prepare your copper tape. For our previous projects we have used 5-mm copper tape, but because this project looks better with thinner lines, I used scissors to cut the tape in half. If this is too fiddly for you, just use standard 5-mm copper tape. It will still look great on your wall. You’ll need to prepare two or three 12-inch lengths of thin copper tape for this project.
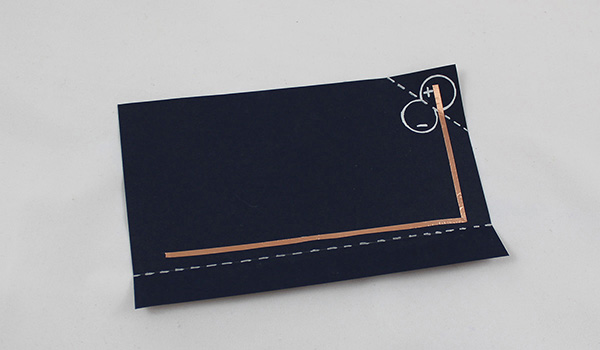
Start applying your tape to the circuit. Do your positive path first, starting from the battery circle and heading down to the fold. Make a neat left turn just before the fold (if you can’t remember how to make one, take a look back at “How to Work with Copper Tape” on page 10, and continue taping until you’re near the end of the card. Rip or snip off the end of your copper tape.
Next, we are going to make our first parallel circuit, which means that we can use two LED stickers in this project.
 How to Make a Parallel Circuit
As we found out earlier, there are two different ways to connect up more than one component. One of the ways we can make a project with more than one LED is to connect them in a parallel circuit.
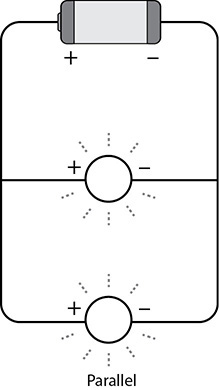
To make a parallel circuit, we use one path to connect all the positive bits of our components (in this case our LEDs) to the positive bit of the battery. We then use another path to connect all the negative bits of our components to the negative bit of the battery.
In a parallel circuit, if one component is faulty, the other parts of the circuit will still work. Another cool thing about a parallel circuit using LEDs is that all the lights will shine brightly, just as if we used only one LED. However, this means that our battery won’t last as long because we’re using up its power more quickly.
Making Your Parallel Circuit
Take another length of thin copper tape and start applying it from the middle of the negative battery circle. Carefully apply it all the way to where the top of your furthest-away bug is going to be. Rip or snip off the end of the copper tape.
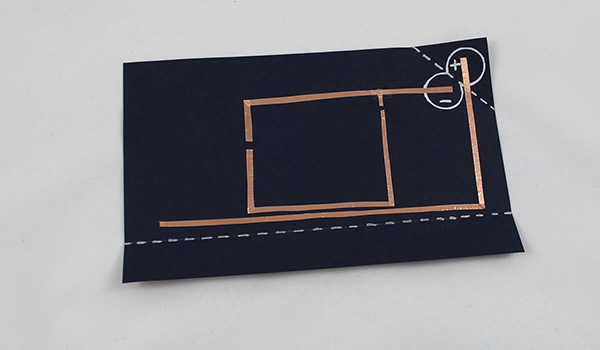
Take another bit of copper tape and apply it close to (but not touching) where you ended the last strip. This is where you are going to put your first LED sticker. Remember that the sticker needs to go on top of the copper tape to work.
Apply a second bit of copper tape in a path to the bottom of the place where your second bug is going to be. Rip or snip off the end of the copper tape. This will join the positive bits of the stickers together, so now we just need to join the negative bits as well by adding a new branch of the path coming from the positive side of the battery.
To do this, take a small bit of copper tape about double the length you need to connect the top of the second LED sticker bug. Fold the tape in on itself so that the two sticky sides stick together. Use a tiny bit of clear sticky tape to stick this down to your card on top of your original path, making sure that you leave enough exposed copper to connect the top of the sticker. Your circuit should look like the picture.
Finishing Your Flickering Firefly Circuit
Take your LED stickers and place them on top of your copper tape. The pointy sides of the stickers are negative, so they should connect with the path coming from the negative side of the battery. The flat sides of the stickers are positive, so they should connect with the positive path of the circuit.

But wait! You may have noticed that the positive path doesn’t actually connect with anything yet. This is where the flicker switch comes in.
Take three or four small bits of tape and stick them on the opposite side of the flap to the rest of the circuit, just as in the picture. These bits of tape should align with the part of the circuit where the positive and negative paths run parallel to each other.
When you fold over the flap and run your finger over the hidden bits of tape, they complete the connection in a flickery way as your finger moves. Once you’ve finished your flicker switch, add in a battery to test your circuit before making the finishing touches to your flickering firefly interactive wall art.
Decorate Your Flickering Firefly Circuit
Now that your circuit is completed, it’s time to finish the art. I used a beautiful metallic silver marker to draw in the wings and flight paths of my fireflies. Before you put your designs on your finished circuit, practice getting the effect you want on some scrap card first.
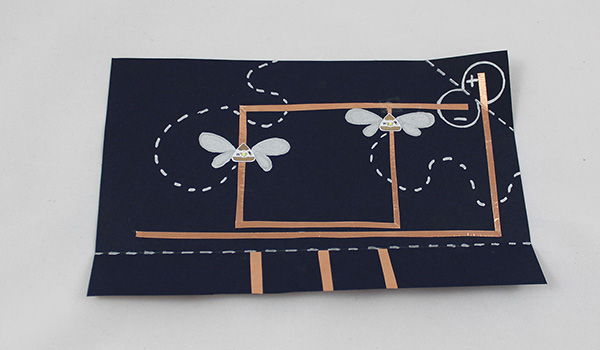
I’ve chosen a fairly simple decoration for my project, but you could choose to add a tinfoil moon, bright white stars, and some glittery accents or you may glue on some lace or mesh wings to finish off your flickering firefly wall art.
If you are using glitter, do make sure that you read the label. Most glitter these days is made from shiny plastic, but some specialty kinds of glitter (mainly the type of glitter used for makeup) are made with metal such as aluminum. If so, it may be conductive, meaning that the glitter could break your circuits! Tinfoil is also conductive, so make sure any foil stays well away from your circuit.
Frame Your Flickering Firefly Circuit
Circuit working? Art looking gorgeous? It’s time to frame your DIY electronics masterpiece. Put your white backing card securely inside the frame, and put the back on. The white card should not wiggle around when you touch it. If it does, add layers of paper or cardboard until it is firmly in place.

Flip your art over and apply glue to the back of the card, everywhere except for about a 1-inch margin around the clothespin that holds your battery in place. Carefully place your art onto the white background in the frame, and firmly press down. Keep the clothespin in place: when your battery runs out, you can carefully open the clothespin and replace the old battery with a new one. Finally, hang your art at touching height, and invite others to enjoy your creation.
 Fix It
Not working? Don’t worry! Follow these steps to figure out why, and fix it.
1. Check your power.
 Is your battery the right way around? Flip it over and see what happens.
 Has it run out of juice? Try another battery.
 Is your battery connecting into your circuit? Make sure that both the negative path and the positive path are connected to the correct side of the battery and that the positive and negative paths are not touching. If you’re using a clothespin to hold your battery in place, make sure that it’s pushing on all the way, not connecting at an angle.
2. Check your components.
 Are all your components the right way around? Remember that the negative side of the battery should be connected to the negative bits of your LEDs and the positive side of the battery should be connected to the positive bits of your LEDs via your flicker switch.
 Are all your components securely stuck in place? Loose connections mean that your circuit won’t work.
 Are any of your components on top of an unbroken bit of copper tape? Electricity likes to take the easiest route possible, so if you put a component on top of an unbroken bit of copper tape, the electricity will go through the copper tape instead of the component.
3. Check your wiring.
 Do your positive and negative paths touch? If they are touching, no matter how slightly, your circuit won’t work.
 Are all your paths complete? If your copper tape path has rips or tears in it, electricity may not be able to get through.
 Have you made your path by sticking one bit of copper tape on top of another? Even if your glue is conductive, this can lead to a faulty circuit.