After long hours spent tearing around from place to place, when we’ve finally got some time to ourselves what we often need is some movement that will settle us, ground us, and restore us. If we choose the right form of activity we can turn these five minutes into one of the most special and relaxing parts of our day.
For me, that means yoga. This is a practice that began over five thousand years ago, which makes it older than the Pyramids. It constantly blows my mind that I can have a direct connection with such an ancient people on an average rainy day in South Manchester, simply by slowing down, breathing, and stretching myself into some basic yogic postures, some of which can still be seen on precious time-worn wall carvings in northern India.
I completely understand if you have reservations about yoga. Countless patients of mine say it's not their cup of tea, but, almost always, I’ve managed to change their minds. I'd encourage you to put aside your preexisting ideas and trust me. The chances are, you’ll like it.
Modern science has only just begun catching up with what the ancients seemed to intuitively know—that yoga is great for us, body and soul. Over the last few years clinical research has found that yoga can reduce levels of stress and anxiety, help combat fatigue, is good for your heart, and helps you sleep better. There’s even evidence to suggest it can help alleviate serious psychological disorders, including depression and PTSD.
The reality is that yoga-based movements can be the perfect antidote to many of the stresses of the modern world. One of the things that makes yoga so effective is that it’s an amazing combination of stretching, focus, and breathing. I love it because it’s good for the whole system: mind, body, and heart. After a great yoga session you feel chilled and energized, which is not how you always feel after a hard session at the gym or a HIIT workout in your front room.
I’ve put together two simple yoga sequences, each of which should take no more than five minutes to complete.* You don’t need to be an expert to do them. You don’t even need a yoga mat, although many do like to practice with one. When you’re working through these sequences, I’d like you to really focus on slowing down and enjoying some time to yourself.
*Of course, I have checked both sequences with a qualified yoga teacher.

THE MORNING WAKE-UP FLOW
Wake up your body with this enjoyable, relaxing sequence.
This gentle sequence works especially well in the morning, helping your body to wake up. It’s super-simple and amazingly relaxing. Stay in each position for five deep breaths, which takes thirty seconds or so. This way, you won’t need to interrupt the flow by constantly checking your timer.
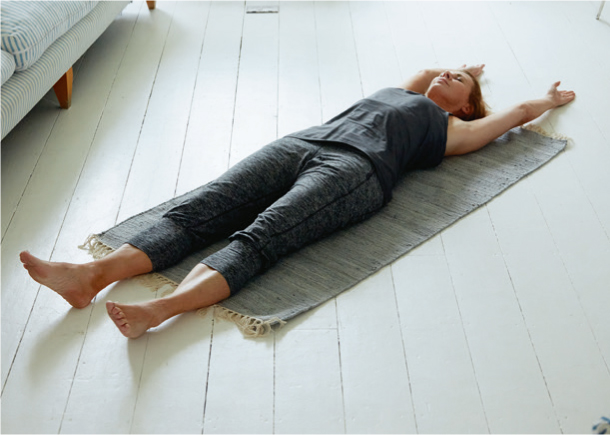
•Lie on your back with arms outstretched above your head. Take deep breaths for around thirty seconds—this is usually around five breaths.
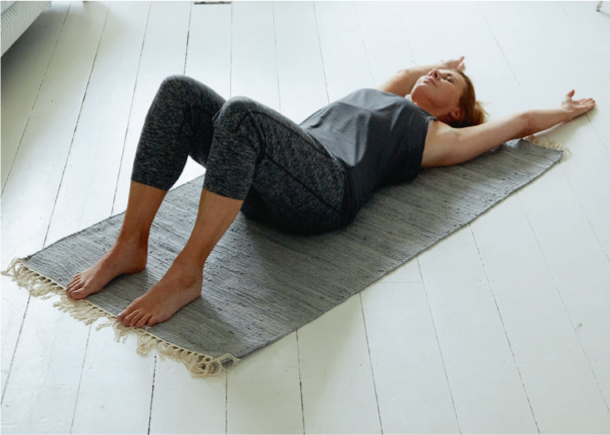
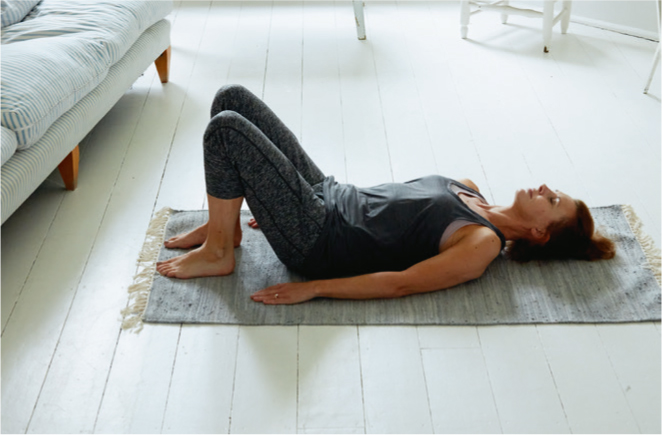
•Slowly bend your knees so that your feet are flat on the floor.
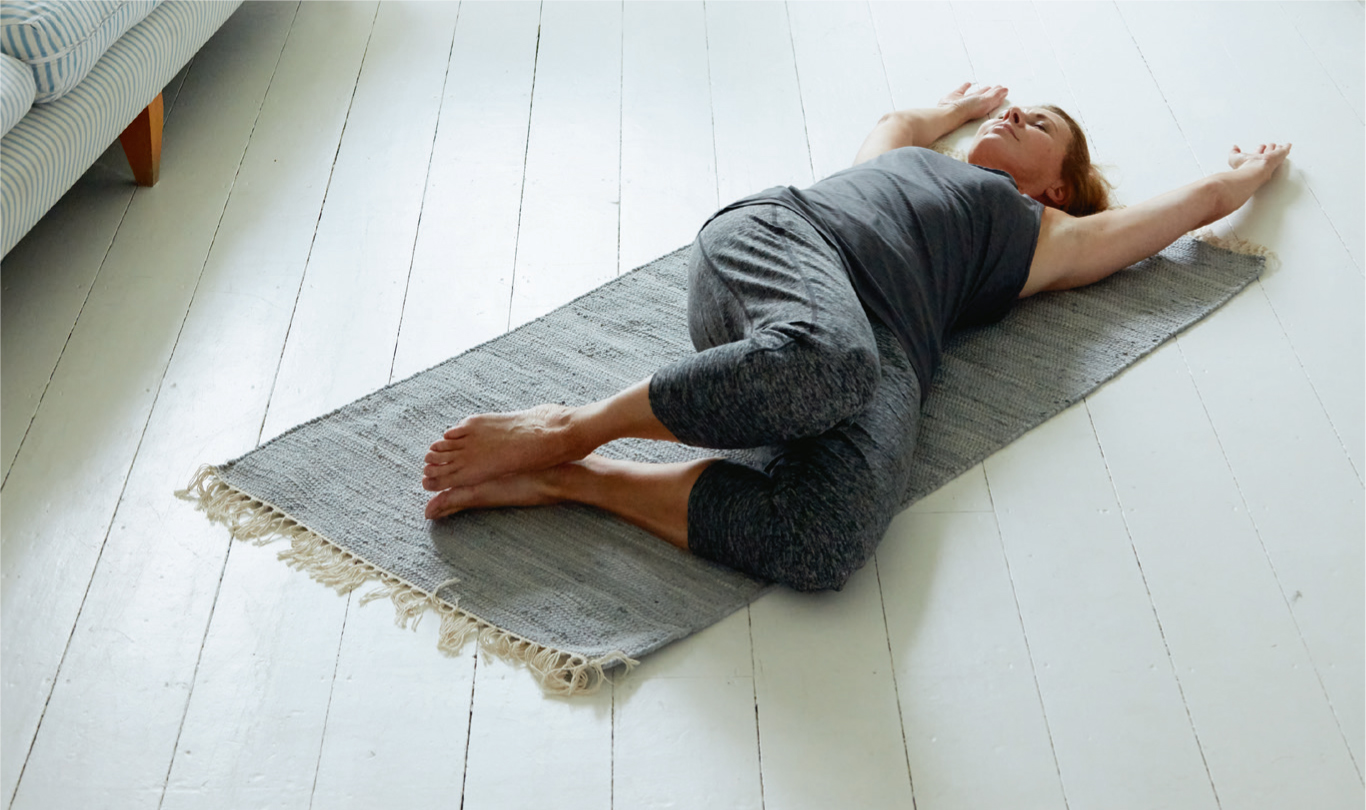
•Keeping your back on the floor and your arms outstretched above your head, move your knees over to the left. Breathe in and out deeply five times. On each exhale see if you can sink further and further into the stretch.
•Repeat on the other side for five breaths.
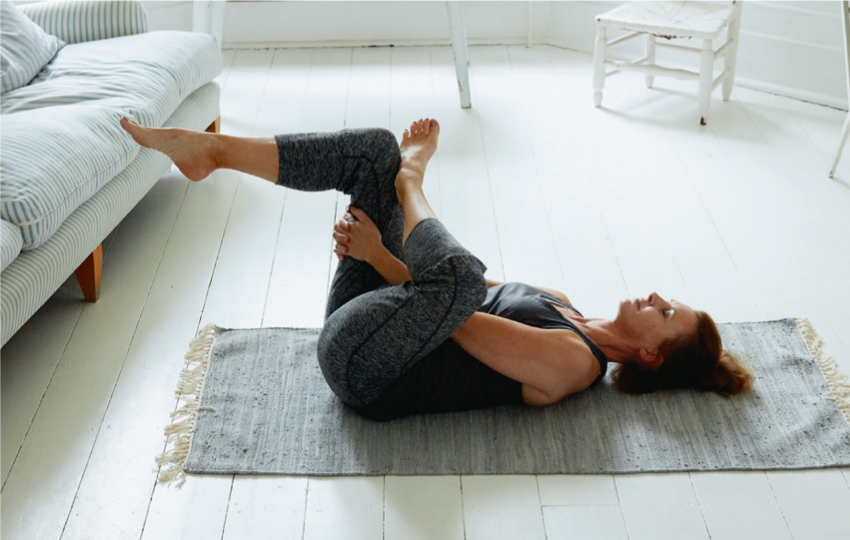
•Bring your left foot on top of your right knee. Clasp your hands behind your right knee and gently pull it towards your chest. You’ll feel a stretch in your left hip and glute.
•Take five deep breaths. With every out-breath try to sink a little further into the stretch.
•Repeat on the other side for five deep breaths.
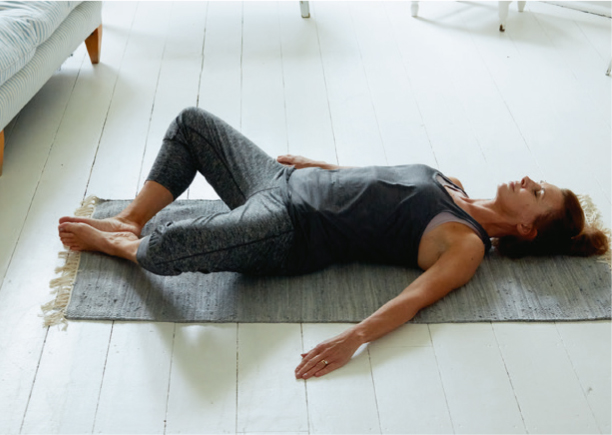
•Bring your feet back to the floor. Keep your knees bent and your arms relaxed by your side.
•Allow both knees to fall outwards to the side, trying to keep your feet together. If this stretch feels too much, put some pillows under each knee to lessen it. Take five deep breaths in this position. On each exhale see if you can sink further and further into the stretch.
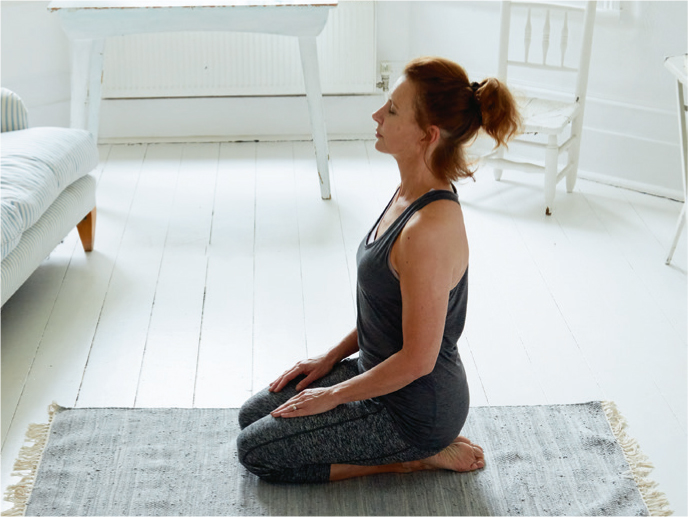
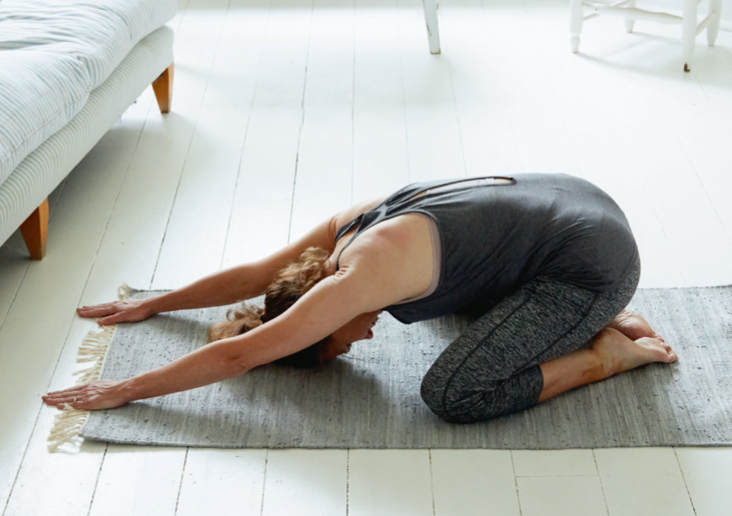
•Rise up from your lying position and sit down on your knees with your hips on your heels. If you need to, put a cushion between your hips and heels for comfort.
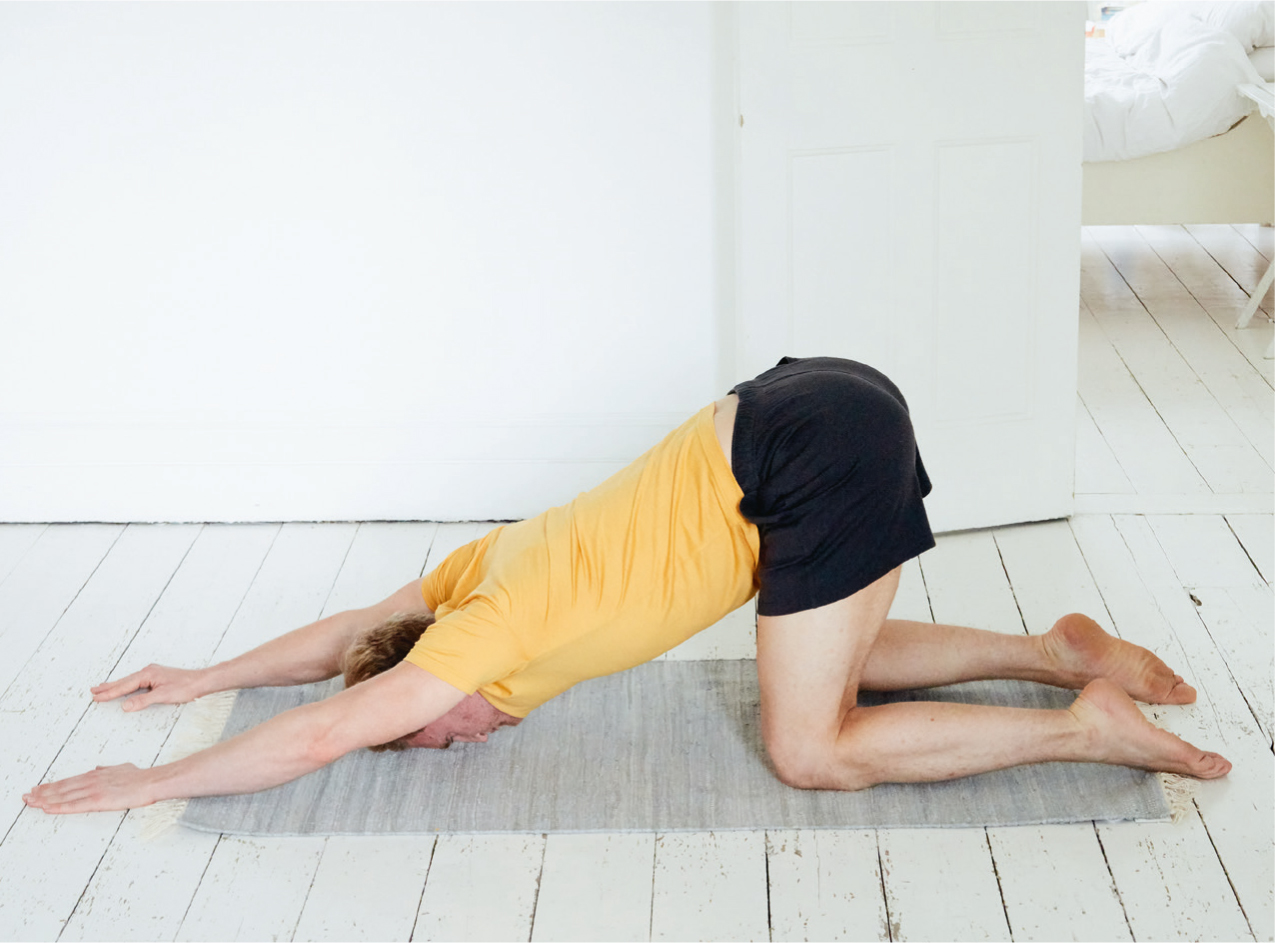
•Stretch both hands out in front of you, bringing your head to the floor. Take five deep breaths in this position.
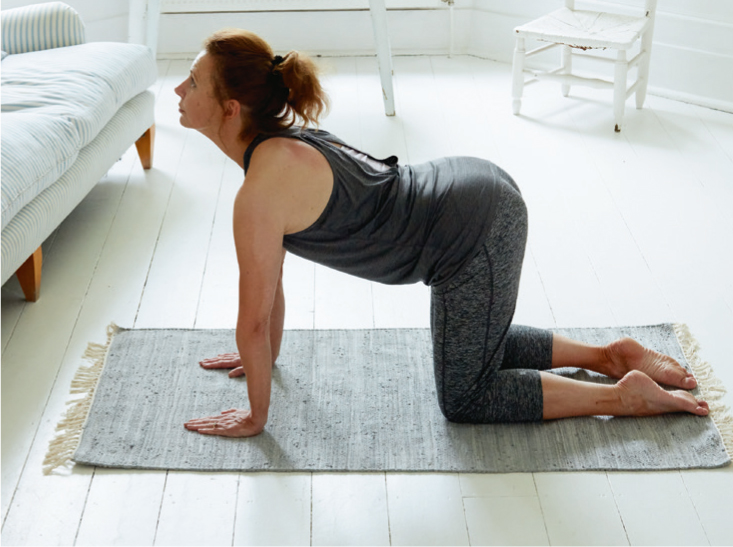
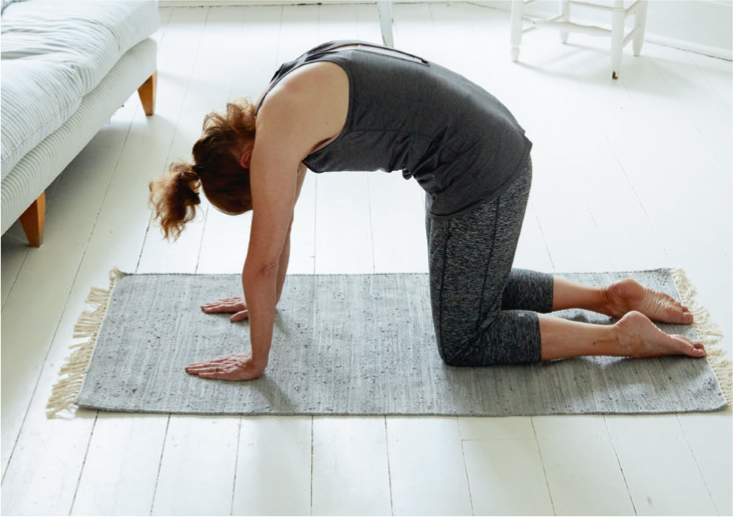
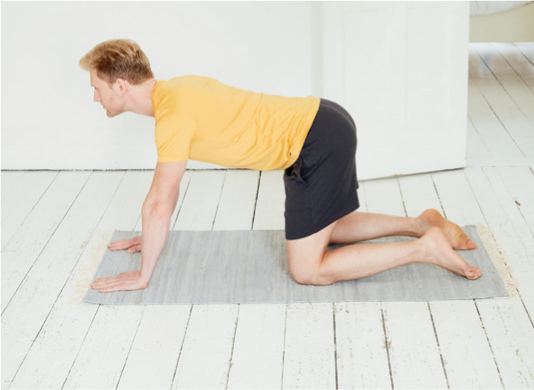
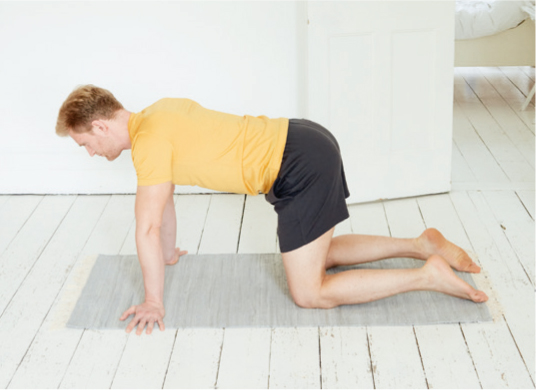
•Rise up on to all fours with your shoulders directly over your wrists and your hips directly above your knees. Try to keep your back fairly straight and feel that your stomach muscles are gently tensed.
•Take a deep breath. As you exhale, arch your back, let your stomach muscles relax and allow your head and tailbone to go towards the sky.
•As you inhale, round your back, tuck your chin in towards your chest, and feel as if your tailbone is facing the ground.
•Move in and out of these two positions five times, remembering to inhale as you round your back and exhale as you arch it.
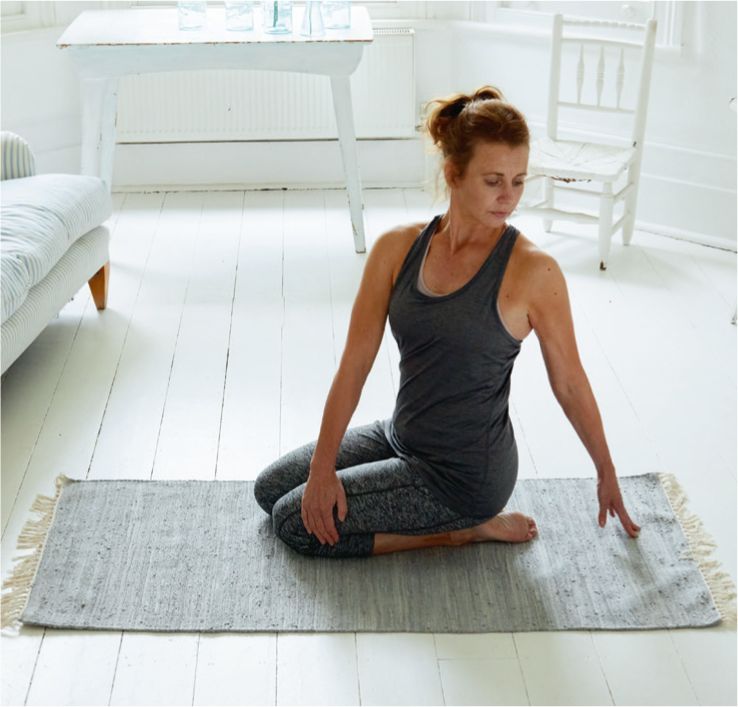
•On the final exhale bring your hips down to sit on top of your heels with both knees on the ground. Keep your upper body straight and upright.
•Take a deep breath. As you exhale, put your left hand behind you on the floor facing backwards—put it where it feels comfortable; it does not need to be flat on the floor.
•Bring your right hand to the outside of your left knee. Pull gently on your left knee and feel your chest turning outwards. You should feel a gentle stretch in your upper back. Hold for five deep breaths.
•Repeat on the opposite side.
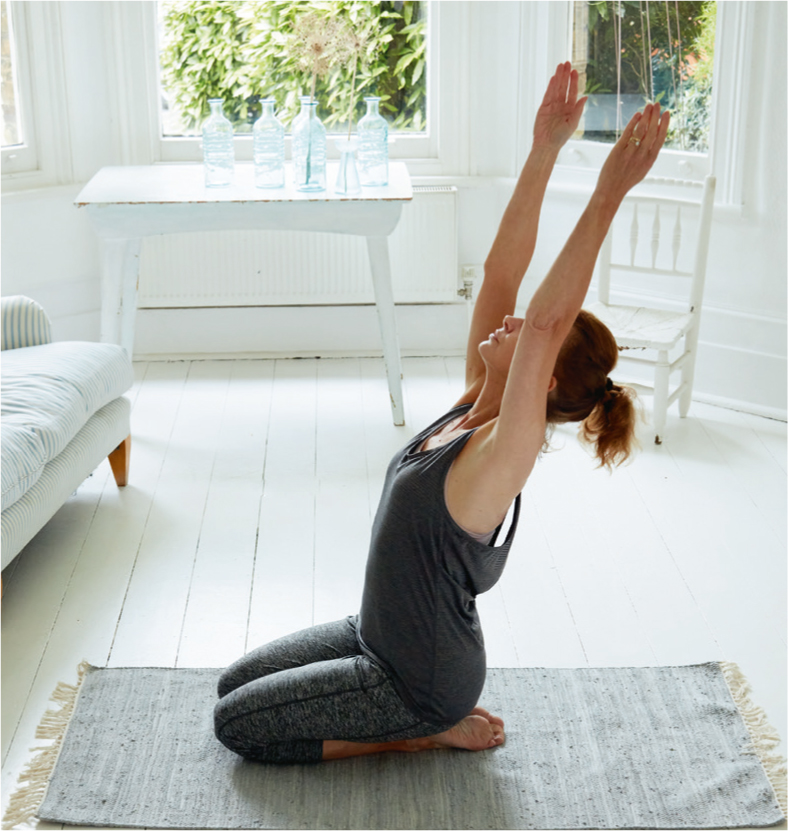
•To finish, stretch both arms overhead, feeling your back arch as you do a slight backbend.
This movement sequence is a fantastic way to start your day and many people find that when they do it they feel more relaxed, calmer, and less anxious for the entire day. Not bad for just five minutes first thing in the morning!
Of course, this movement flow can also be done at other times. It’s a great way to de-stress at the end of a busy work day or to unwind and relax just before bed to help promote deep, relaxing sleep.

THE DAY’S END RELEASE FLOW
Enjoy some calm with these relaxing moves.
This five-minute unwind sequence will help loosen you up and is particularly good if you tend to feel tight in your back and shoulders after a long day. It should feel calming and won’t leave you feeling out of breath. Don't get concerned if some of the moves feel tricky at first. Do what you can. The more you practice, the easier it will feel. The goal is to do each pose for roughly one minute.
THREAD THE NEEDLE
This pose will help open up your chest and work on relieving the tension that often builds up between your shoulder blades and in your back muscles after a long day in the office, a long commute, or running around after your kids.
•Start on all fours. Walk your hands forward a little so that they sit ahead of your shoulders.
•Pressing down through your left hand, breathe in and extend the right arm out and up towards the ceiling.
•As you exhale, slide your right hand under your left shoulder and stretch outwards as far as it will go. If you can, bring your right shoulder to the floor, bending the left elbow. Go as far as feels comfortable.
•Relax in this position and take five deep breaths. Every time you breathe out, try to deepen the stretch a little.
•On the final exhale, push through your left palm and replace your right hand alongside it, returning to the starting position.
•Repeat on the other side.
•Aim to do for thirty seconds on each side (around five deep breaths).
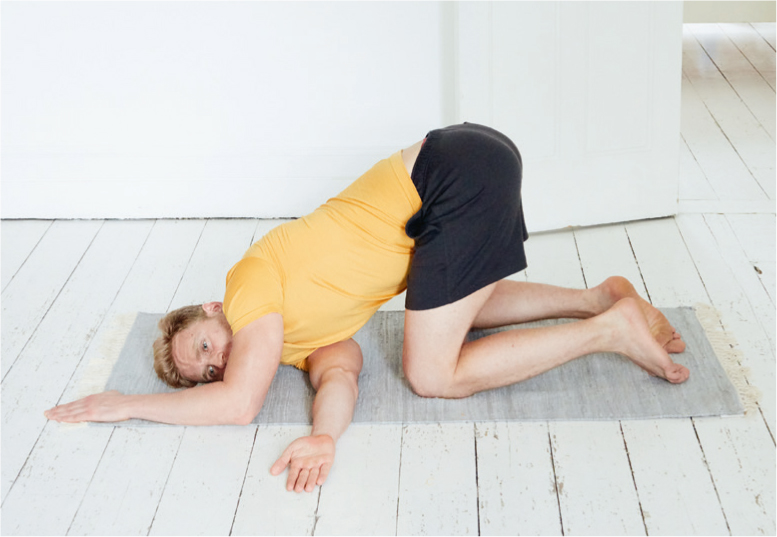
PUPPY-DOG STRETCH
This pose will help with tight shoulders and upper-back issues. If you’re just starting out and want to make it easier, try resting your forehead on a pillow or a folded blanket. This will take some of the tension out of the stretch.
•Start on all fours, with your hips over your knees and your shoulders over your wrists.
•Keeping your back straight, extend your arms forward, keeping your hips above your knees. As you do, feel your forehead moving towards the floor. Don’t worry if your forehead doesn’t reach it—go as far as you feel comfortable. You should feel a relaxing stretch in your shoulders and upper back.
•If you’re a little tight in your shoulders, move your hands outwards, as this will ease the stretch.
•Take deep breaths until your minute is up (around ten deep breaths).
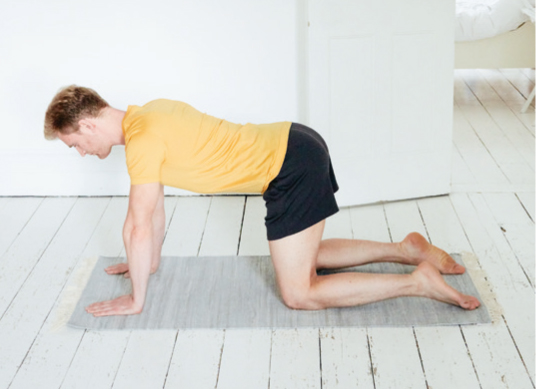
THE ABDOMINAL STRETCH
This is not a classical yoga pose—I learned it from an osteopath friend who believes that everyone should be doing it every single day. The first time I tried it, it felt amazing. I was stretching muscles I’d never stretched before. It’s great for toning your spine and helps to promote its natural curvature in those of us who spend a long time sitting at desks or behind a steering wheel.
•Start on all fours, with your hands beneath your shoulders and your knees beneath your hips.
•Turn both hands outwards so that your fingers are pointing away from your body and shuffle both knees back a little.
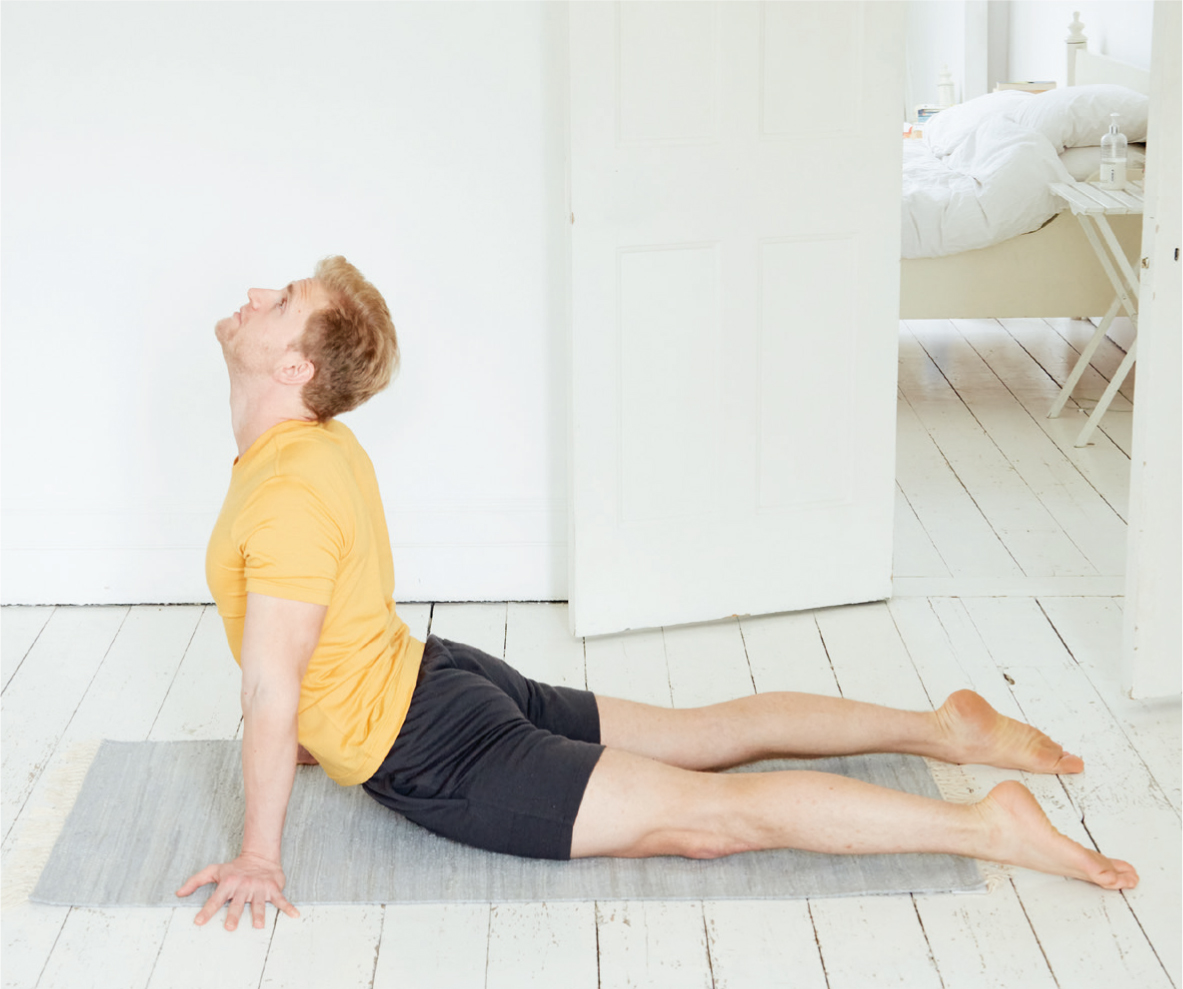
•Drop your hips as far as you can towards the ground and feel your back arching. You might have to play around a little to find the exact position you’re looking for. Ideally, you want to feel a light stretching sensation throughout the front of your body, especially in your abdominal muscles.
•You can up the ante by lifting your head and gazing up towards the sky. Stay in this position, breathing naturally until your minute is up (around ten deep breaths).
•If you feel this stretch is putting strain on your back, stop and repeat one of the other exercises instead.
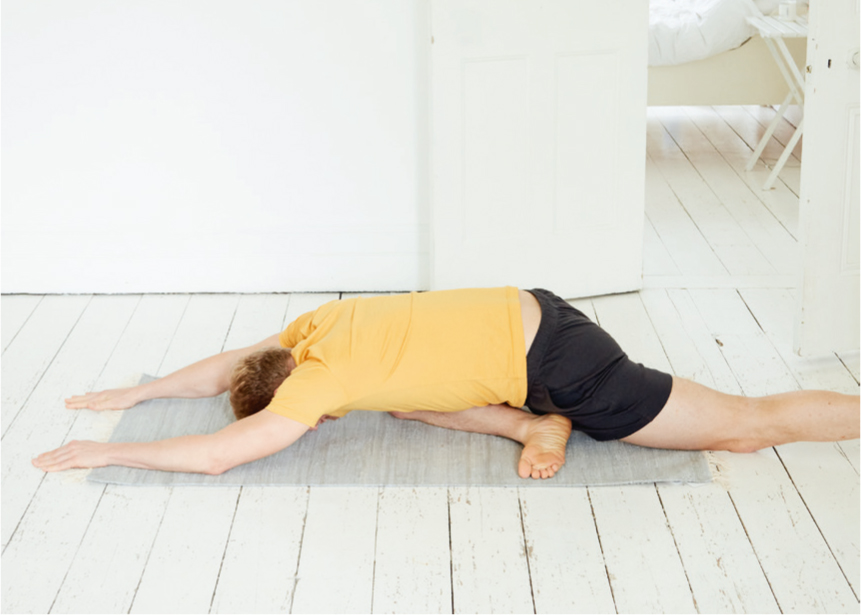
PIGEON POSE
This fantastic stretch really helps open up the hips and glutes. If you love it as much as I do, I would recommend going to a local yoga class to learn some of the more complex variations.
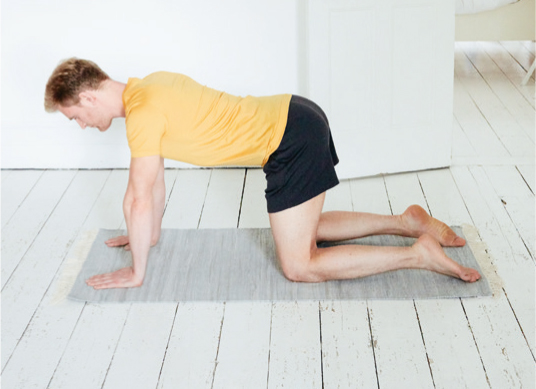
•Start on all fours, with your hands beneath your shoulders and your knees beneath your hips.
•Bring your right knee towards your right hand, then bring your right ankle as far as you comfortably can towards your left wrist.
•Extend your left leg outwards behind you, making sure your left knee and the front of your left foot are on the ground. If you need to, you can pop a cushion or a blanket underneath your knee.
•Try to make sure your hips are square to each other and facing forwards.
•Bend forward at the waist. As you do so, you will feel the stretch in your right glute start to deepen. Go as far as feels comfortable.
•If you want to alter the stretch, try to drape your chest over your front shin.
•In whichever position you find most comfortable, take five deep breaths (this will take about 30 seconds).
•To come out of the stretch, slowly walk your hands back towards you.
•Repeat on the other side.
Note: This can be a very intense pose and there are a number of variations you can try, depending on your current flexibility. If your hips are really tight, the angle of your front shin will probably point towards your opposite hip. That is fine. With time, the aim is to work towards bringing your front shin up and to get it as close as you can to being at right angles to your chest. It can feel quite challenging if you have never done it before. The more you practice it, the easier it will get.

TRIANGLE POSE
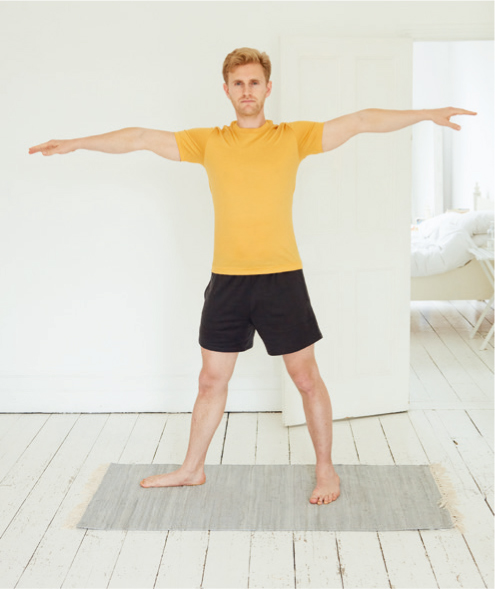
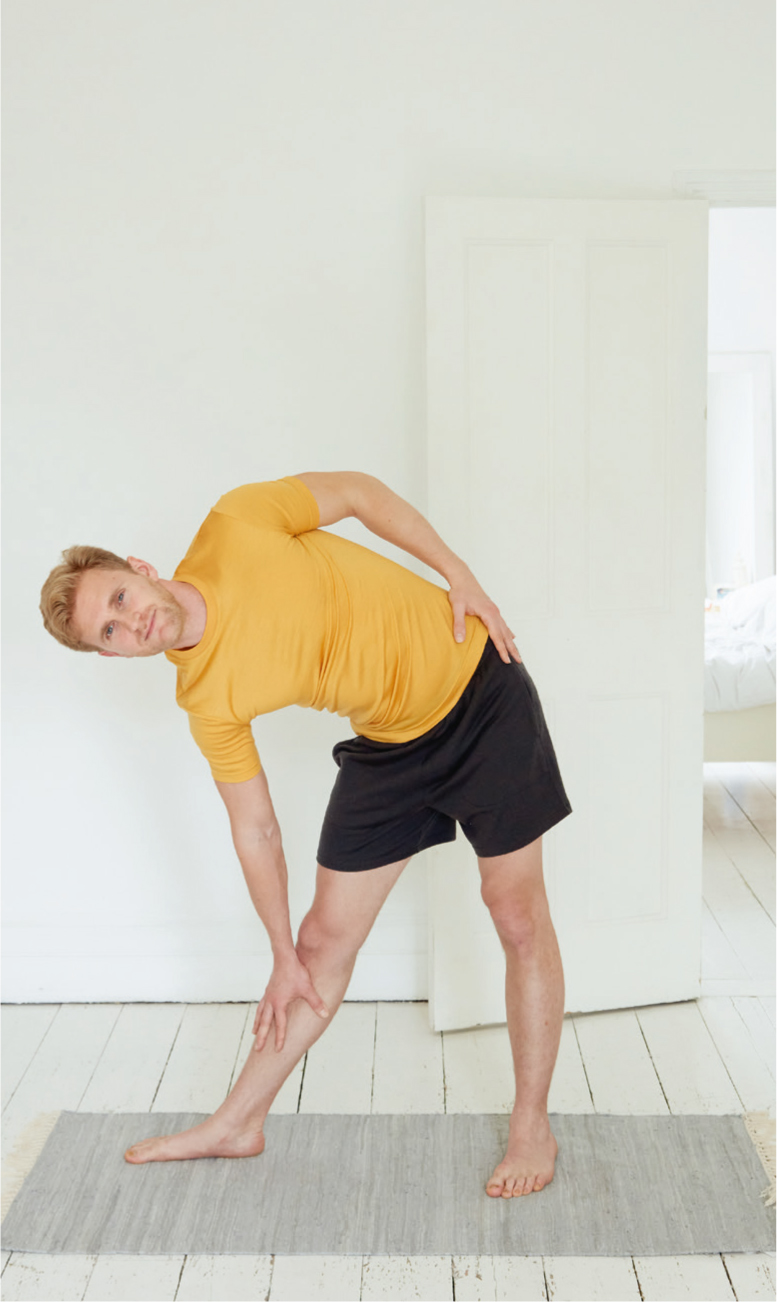
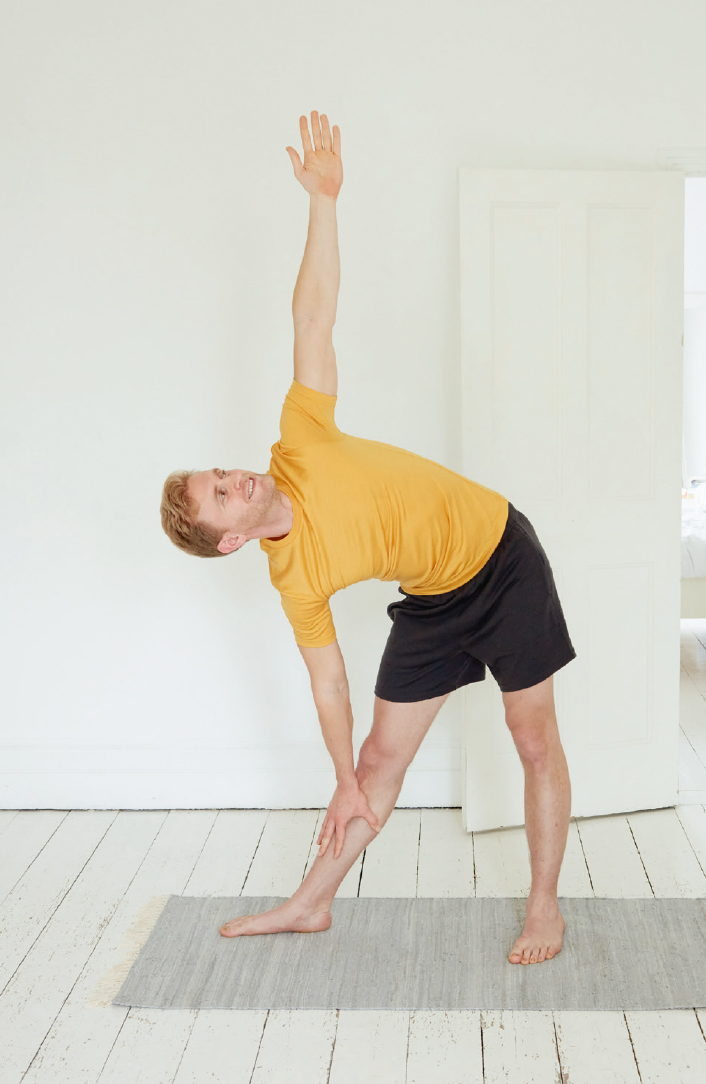
This is a brilliant stretch that opens up parts of the body that are often neglected, like our sides, groin, and waist. It is a pose that most people are able to do and helps make you more body-aware.
•Stand, then step your right foot out to the side. Rotate your right foot out to 90 degrees to your chest and turn in your left foot slightly. You may find it easier to practice this pose with your back against the wall. This helps to maintain good posture throughout.
•Raise your arms to shoulder height and take a deep breath in.
•As you exhale, reach and extend your chest over your right leg, keeping it in line with your body, and allow your right hand to rest on your right shin.
•Extend your left arm up overhead, stretching through your fingertips. Try to stack your shoulders on top of one another and look up towards your left palm.
•You may need to alter the position of your right hand on your right shin to find the level of stretch that is comfortable for you. Don’t place your right hand on your right knee as this can cause too much strain.
•Once in a comfortable position, take five deep breaths (this will take about thirty seconds).
•Repeat on the other side.
CASE STUDY
Brian used to love rugby, but one afternoon at a local match he sustained a serious knee injury that ultimately stopped him playing for good. His performance on the pitch had been of immense importance to his selfesteem and he rapidly became depressed. Matters worsened when the sudden drop in intense physical activity caused him to move less and snack on junk food and, as a result, put on weight. Brian began isolating himself and had come to my clinic with the expectation that I’d prescribe him an antidepressant.
Instead, I suggested yoga. The practice wouldn’t put much pressure on his knees but he would still feel that he was being physically challenged. I thought that, as well as working on his body, it would also help his mind calm down and improve his focus. I suggested that Brian join a local yoga class so he could learn the correct movements from an instructor. He wasn’t at all keen on this and looked embarrassed at the thought, so I decided to signpost him to a couple of YouTube yoga videos that I had previously used myself.
When I caught up with Brian a few weeks later I was encouraged to find that, when I asked how the yoga was going, his face visibly brightened. “I can't do a couple of these moves,” he said. “I thought it would be easy. I’ve been really getting into it and joined a local class. I’m absolutely determined to crack these moves.”
This was exactly the response I’d been hoping for. Brian was clearly experiencing that wonderful feeling of flow when he was doing his yoga. He was getting lost in the challenge. The pursuit of perfecting his moves seemed to be giving him back some of the purpose that had been missing from his life since his knee injury had taken him off the rugby pitch.
Even better, the Ripple Effect I’d hoped for had also appeared. Brian quickly realized that if he was going to get better at yoga more quickly he’d have to start looking after his diet. When he got in from work he used to treat himself to a packet of crisps or a glass of wine. Now he goes straight into his yoga session. He skipped the snack and had a wholesome but healthy evening meal earlier than he would have done before. Because the yoga made him feel so good he felt less of an urge to drink alcohol in the evening, which in turn helped him to sleep better. Within weeks, his mood had significantly improved.
I know I've said this before, but I really cannot emphasize it enough. I would strongly recommend that you stick your Body health snack on to a regular part of your daily routine. This will make it much more likely that you will consistently be able to perform it. The following times work really well:
AS SOON AS YOU WAKE UP
IN THE KITCHEN WHILE MAKING A HOT DRINK
IMMEDIATELY BEFORE YOU EAT YOUR LUNCH
AS SOON AS YOU GET HOME FROM WORK
JUST BEFORE DINNER
Initially, I would recommend that you do the same Body health snack every day. This helps to remove decision fatigue. If you have to decide each time which specific health snack to do, it can lead to indecision, which starts off the procrastination process, which often leads to doing nothing at all. If you learn one of the workouts and repeat it day after day, you start to lock in that new behavior and it is rewarding to see your progress.
Having said that, once you have found a regular time to do your Body health snack and it is starting to become automatic, you can change it up, depending on how you feel. For example, you may usually perform a Strength workout as soon as you get home from work, but you might be exhausted and feel like doing a restorative yoga flow instead. As you progress in the Feel Better in 5 program you will start to understand your body better and be able to personalize the program to your life.
