menu eleven
menu twelve
Rosemary and Scallion Focaccia
Sweet Pepper and Cauliflower Salad
Raviolone with Butternut Squash in Butter and Sage
menu thirteen
Platter of Jicama, Avocado, Radishes, and Oranges
Slow-Cooked Carne Adovada with Hominy
menu fourteen
Wild Mushroom Ragout with Ziti
menu fifteen
Hors d’Oeuvres Variés: Roasted Beet Salad, Julienned Carrot Salad, and Leeks Vinaigrette
Petit Salé with Braised Cabbage
menu eleven
When I cook American food, it’s a little like when I conjure up my inner Italian or inner Spaniard—it’s a bit of a masquerade. If I crave American food, I have to go into my pretend-citizen mode. It’s as if I’m doomed to travel the world in search of my real culture.
It’s not that I’m not American, it’s that I grew up in Ohio, where there’s no discernible regional cuisine—unless you count funnel cakes. Owing to that particular geographical spot and era, I gained my knowledge of American cooking through other people’s reminiscences. And the occasional foray into James Beard. There’s something odd about having nostalgia for something I never really knew.
It wasn’t until I got out into the world that I learned about corn bread and gumbo, Indian pudding, chicken and dumplings, sweet pickles, and fried green tomatoes.
There’s a lot of traditional American cooking with real depth. Let’s never get so cool that we write off the familiar. In any discussion of food, regional cuisine has value, no matter where the region. Especially in late summer and early autumn, the American bug bites. I might go elsewhere in my culinary travels in the winter, but at harvesttime, I want the last of the tomatoes, one more hit of good corn and cabbage, fresh American comfort food.
Among the best shrimp I ever tasted were from those little restaurants along the docks in Veracruz, where you used to get freshly boiled shrimp in the shell, to be eaten with salt and lime. They also served a magnificent shellfish creation made with all manner of shrimp, oysters, and crabmeat mixed with onion, chopped tomato, chiles, and cilantro. It was topped with a soupy tomato salsa and served in an ice cream soda glass. That’s the origin of this recipe, a better version of the all-too-often bland American-style shrimp cocktail.
Use fresh shrimp that you boil yourself, and take care not to overcook them.
2 dozen medium shrimp, shell on
for the boil
1 tablespoon salt
1 bay leaf
3 garlic cloves, sliced
1 teaspoon black peppercorns
1 teaspoon coriander seeds
1 teaspoon fennel seeds
1 teaspoon red pepper flakes
4 thyme sprigs
for the sauce
3 scallions, minced
1 large tomato, diced small
Salt and pepper
2 teaspoons finely diced jalapeño or serrano chile
2 to 3 tablespoons chopped parsley
2 to 3 tablespoons chopped cilantro
Juice of 2 limes
2 cups homemade or high-quality bottled tomato juice
Peel and devein the shrimp; keep them cold.
Bring 8 cups water to a boil in a large pot. Add the salt, bay leaf, garlic, black peppercorns, coriander seeds, fennel seeds, red pepper flakes, and thyme. Simmer for 5 minutes.
Toss the shrimp into the pot, bring back to a boil, and cook for 1 minute. Scoop the shrimp out and lay them on a platter to cool.
To make the sauce, put the scallions and tomato in a bowl, and salt and pepper them well. Add the diced chile, chopped parsley and cilantro, lime juice, and tomato juice and stir it all together. Taste for seasoning.
Fill each of 6 short thick-walled glasses with plenty of sauce, top each with 4 peeled shrimp, and refrigerate until well chilled. Or, better, stick the glasses into a big bowl of crushed ice and serve from there.

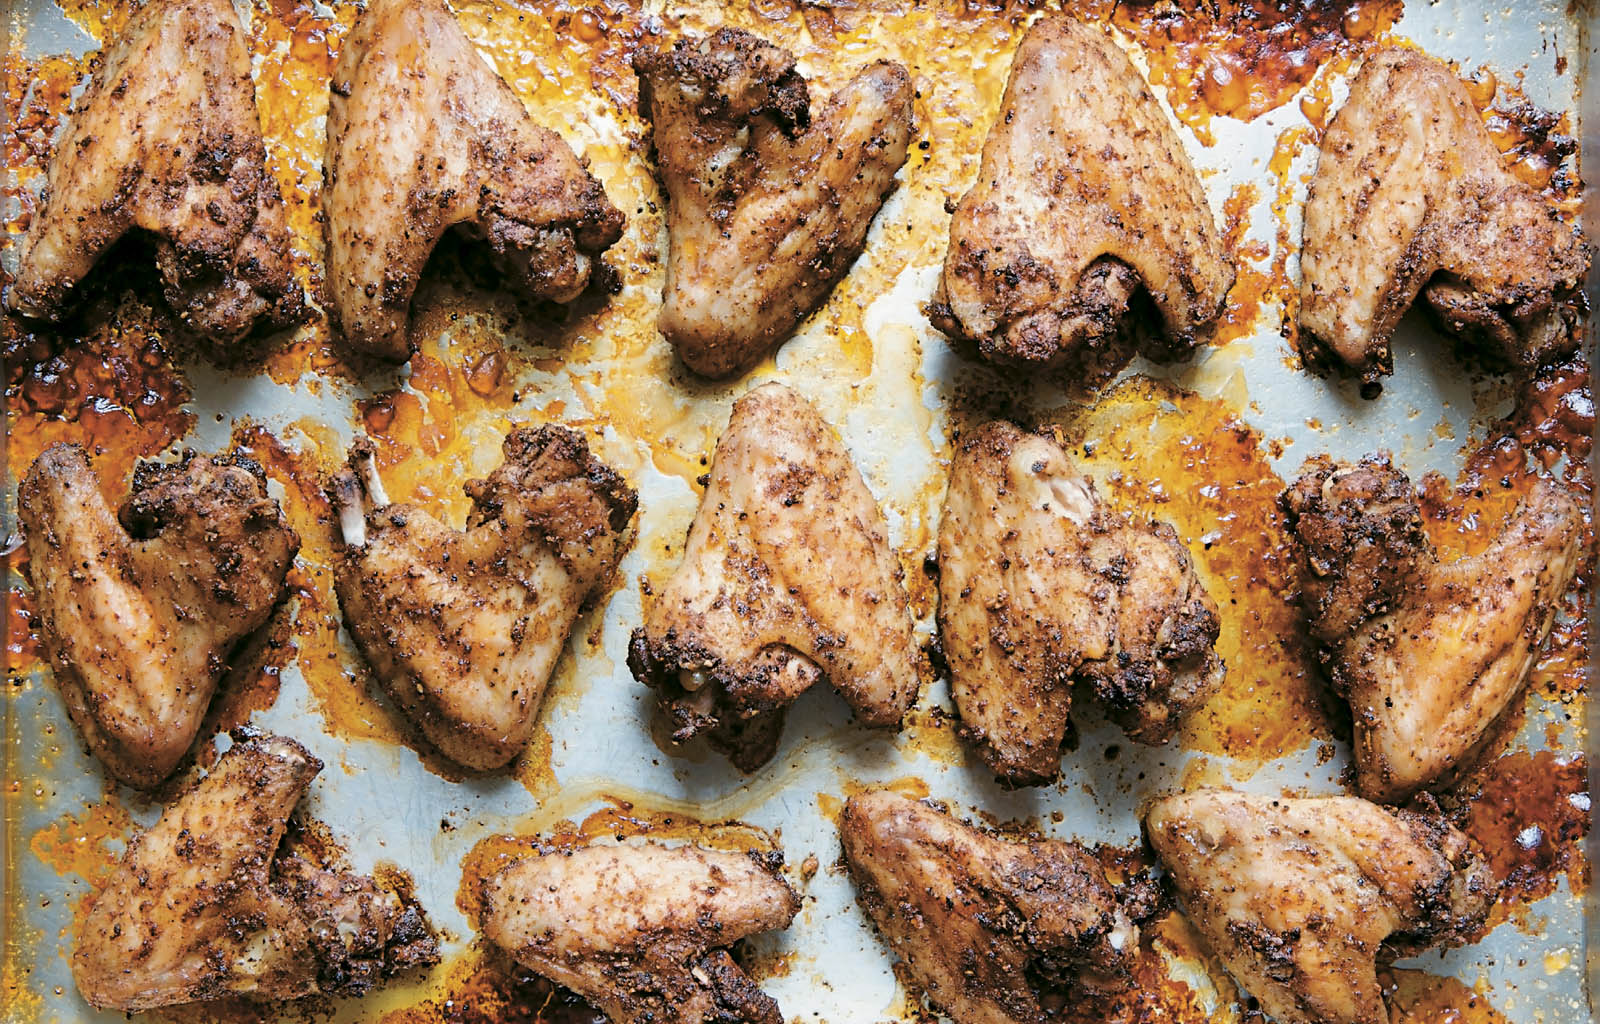
There’s something wonderful about a big pile of wings for a casual supper. Remove the wing tips (save them for stock), so that what you’re serving is the meatier part of the wing. You can use the same seasoning and technique for chicken thighs if you prefer.
5 pounds chicken wings, wing tips removed
Salt and pepper
2 teaspoons ground allspice
¼ teaspoon ground cloves
1 teaspoon cayenne
1 tablespoon sweet paprika
4 garlic cloves, smashed to a paste with a little salt
3 tablespoons olive oil
Lay the chicken wings out on a baking sheet and season well with salt and pepper. Transfer the wings to a big mixing bowl, add all the other ingredients, and give the wings a massage. Refrigerate for at least an hour, or as long as overnight.
Preheat the oven to 375°F. Put the wings in a roasting pan or baking sheet in one layer. Roast, uncovered, until nicely browned and crisp, about 1 hour. You can eat them hot, at room temperature, or cold.
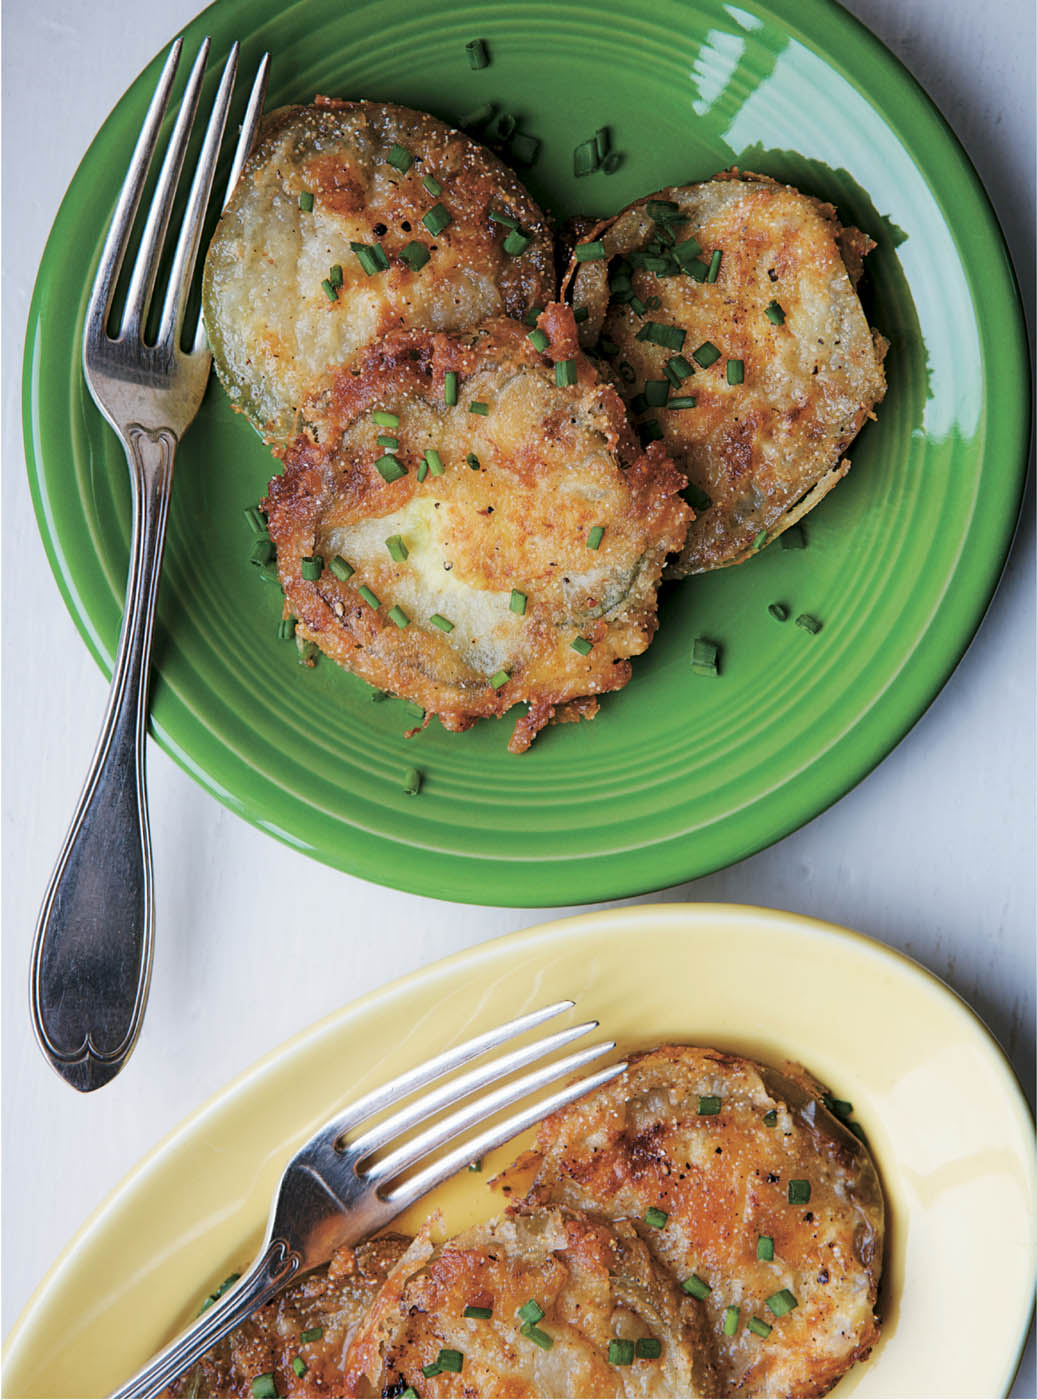
The end of summer is the time for those green tomatoes that will never ripen. You can pickle them, or turn them into green tomato pie. I like them best fried.
4 to 6 green (unripe) tomatoes
Salt and pepper
2 cups all-purpose flour
1 cup fine yellow cornmeal
1 teaspoon cayenne
Olive or vegetable oil for frying
Cut the tomatoes into ½-inch-thick slices and season on both sides with salt and pepper.
Mix the flour and cornmeal in a pie pan, add the cayenne and a generous amount of salt and pepper, and stir well.
Heat ¼ inch of oil in a large cast-iron skillet over medium-high heat. When the oil is hot, working in batches, dip the slices of green tomato into the flour mixture, turning to coat both sides, and carefully lay them in the pan; make only one layer. Cook the tomato slices on one side until they’re lightly browned, 2 to 3 minutes, then turn and lightly brown the second side. Sprinkle them with salt as soon as they come out of the pan. Keep them warm in a low oven while you fry another batch. Drain on paper towels.
Of the zillions of versions of coleslaw, I’m not a big fan of the sweet ones, or the mayonnaise ones either. This recipe is more like a refreshing cabbage salad.
1 small firm green cabbage, cored and shredded
1 small red onion, very thinly sliced
1 jalapeño or serrano chile, finely chopped
Juice of 3 limes, or to taste
Salt and pepper
Put the cabbage, onion, chile, and lime juice in a bowl, season with salt and pepper, and toss well. Cover and refrigerate for at least an hour.
After an hour, the cabbage will have wilted slightly. Taste for salt and lime juice, adjust the seasonings, and serve.
This old-fashioned corn dish combines the appeal of creamed corn with corn pudding.
2 tablespoons butter, plus more for buttering the dish and topping
1 small yellow onion, finely diced
Salt and pepper
2 tablespoons all-purpose flour
Pinch of cayenne
1½ cups half-and-half
Kernels from 6 ears sweet corn (about 3 cups)
2 egg yolks
½ cup fresh bread crumbs
Preheat the oven to 375°F. Butter a 10-inch baking dish.
Melt the 2 tablespoons butter over medium heat in a medium skillet, and soften the onion with a little salt, about 5 minutes. Sprinkle in the flour, season with salt and pepper and cayenne, and stir well with a wooden spoon.
Slowly add the half-and-half and stir well as the sauce thickens. Add the corn kernels and simmer for 2 minutes. Taste and adjust the seasoning. Remove from the heat.
Beat the egg yolks in a small bowl, and stir into the corn mixture.
Pour the corn mixture into the baking dish. Scatter the bread crumbs over the top and dot with butter. Bake for about 30 minutes, or until golden.
Molasses is a classic American ingredient, and so are pecans. Here they make a dessert that is a little like gingerbread.
8 tablespoons (1 stick) butter, softened, plus more for buttering the dish
1 cup packed dark brown sugar
2 eggs, separated
2 tablespoons molasses
½ teaspoon vanilla extract
½ cup all-purpose flour
1 teaspoon baking powder
½ teaspoon salt
½ cup chopped pecans, plus a handful of whole pecans for topping
Preheat the oven to 375°F. Butter and flour a 9-inch-square baking dish. Cream the 8 tablespoons butter and sugar in a mixing bowl. (An electric mixer is helpful.) Add the egg yolks, molasses, and vanilla and beat well.
Sift the flour with the baking powder and salt, and add to the mixing bowl, stirring well. Stir in the chopped pecans.
In another bowl, beat the egg whites until stiff. Gently fold them into the batter.
Spread the batter in the dish, and sprinkle the whole pecans over the top. Bake for 35 to 40 minutes. Check for doneness with a kitchen knife; when it comes out dry, the dessert is done. Cool in the pan and cut into 3-inch squares.
menu twelve
Rosemary and Scallion Focaccia
Sweet Pepper and Cauliflower Salad
Raviolone with Butternut Squash in Butter and Sage
Liguria Bakery has stood as a hole-in-the-wall temple to focaccia in San Francisco’s North Beach for a hundred years. Its premise is simple: focaccia and nothing but. I love their white scallion, and their red, stained with a thin tomato sauce. Although the bakery is open seven days a week, you’d better notice the tiny type that reads “Closed early if sold out.” They do, and they do, so get there early. You can have your focaccia in two sizes, a whole tray or a half tray. If you buy a whole tray, they’ll cut it in half all the same, wrap it in classic white butcher paper, and tie it with pure white butcher string. And you leave with that package under your arm one lucky customer.
Once you learn to make focaccia and it becomes part of your repertoire, making it becomes second nature when you’re inviting people over or making dinner for the family. What makes it relatively easy is the simple yeast dough—just a soft dough that’s enriched with olive oil—that you pat into a baking sheet and let rise.
Just before baking, you add the toppings, whether rosemary leaves and salt, stewed onions and scallions, thin tomato sauce and anchovies, or, for a spectacular autumn focaccia, wine grapes. After you’ve applied the topping, you delicately dimple the dough. Pushing your fingertips into the soft dough is primal and satisfying.
When it’s baked, the focaccia has its characteristic crisped exterior. Inside, it’s soft, rich, and savory.
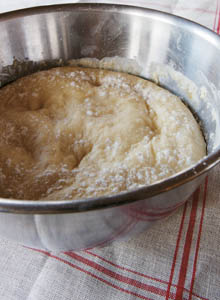
Focaccia dough works best if you mix it the night before. One recipe will make a lovely flat bread about 10 by 15 inches, the size of a standard baking sheet.
If you want it thinner, of course, you’ll use a bigger sheet; thicker?—use a smaller baking sheet. Focaccia, and its French cousin fougasse, are often made free-form on a baking sheet, which is also a very nice idea. Unlike pizza, focaccia needs to rise to achieve the proper texture.
For a simple yet voluptuous first course, I serve freshly baked focaccia with a platter of prosciutto, a bowl of olives, a little mild white cheese such as ricotta salata, and the Sweet Pepper and Cauliflower Salad.
1½ cups lukewarm water
1 tablespoon active dry yeast
3 cups all-purpose flour, plus extra for sprinkling
2 teaspoons fine sea salt
½ cup olive oil, plus extra for drizzling
½ cup roughly chopped scallions
1 tablespoon roughly chopped rosemary
Coarse salt for sprinkling
Put ½ cup of the warm water in a mixing bowl. Add the yeast and 3 tablespoons of the flour and stir together. Let the mixture sit until it gets bubbly, about 5 minutes.
Add the remaining 1 cup water, the rest of the flour, the salt, and olive oil. Stir with a wooden spoon until the mixture gathers into a rough, sticky mass. Sprinkle the dough lightly with a little more flour, and knead the dough in the bowl for a minute or so. Then turn the dough out onto the table and just give it a couple of turns with your hands.
Lightly oil a bowl large enough to contain the dough—it will rise a little bit in the fridge. Cover tightly with plastic wrap and refrigerate overnight.
The next day, remove the dough from the refrigerator and pat and press it into a generously oiled baking sheet. It might spring back a bit. Allow this to happen, and wait a few minutes. It will eventually relax and become more malleable.
Now the focaccia needs to rise in a warm place for about an hour, covered well with plastic wrap or wax paper.
Preheat the oven to 400° F. Scatter the scallions and rosemary evenly across the top of the dough and drizzle with olive oil. Poke little dimples evenly over the top of the focaccia, and sprinkle with coarse sea salt. Bake for 25 to 30 minutes, until it’s nicely browned on top and the bottom seems done. Cool to room temperature, if you can wait.
{other tasty toppings}
Instead of rosemary and scallions, sprinkle the dough with 2 teaspoons crushed fennel seeds, some red pepper flakes, and a generous amount of freshly ground black pepper. Or poke green olives or chopped pancetta into the dimples on top of the focaccia.
{variation} wine grape focaccia
In the autumn, a wonderful sweet and savory focaccia can be made with ripe wine grapes and caramelized onions. Replace the scallions with a cup of red onion caramelized in a little olive oil with salt and pepper, and poke wine grapes into the dimples you’ve made on the surface of the dough (you could also use fresh table grapes). Top it with the rosemary and salt.
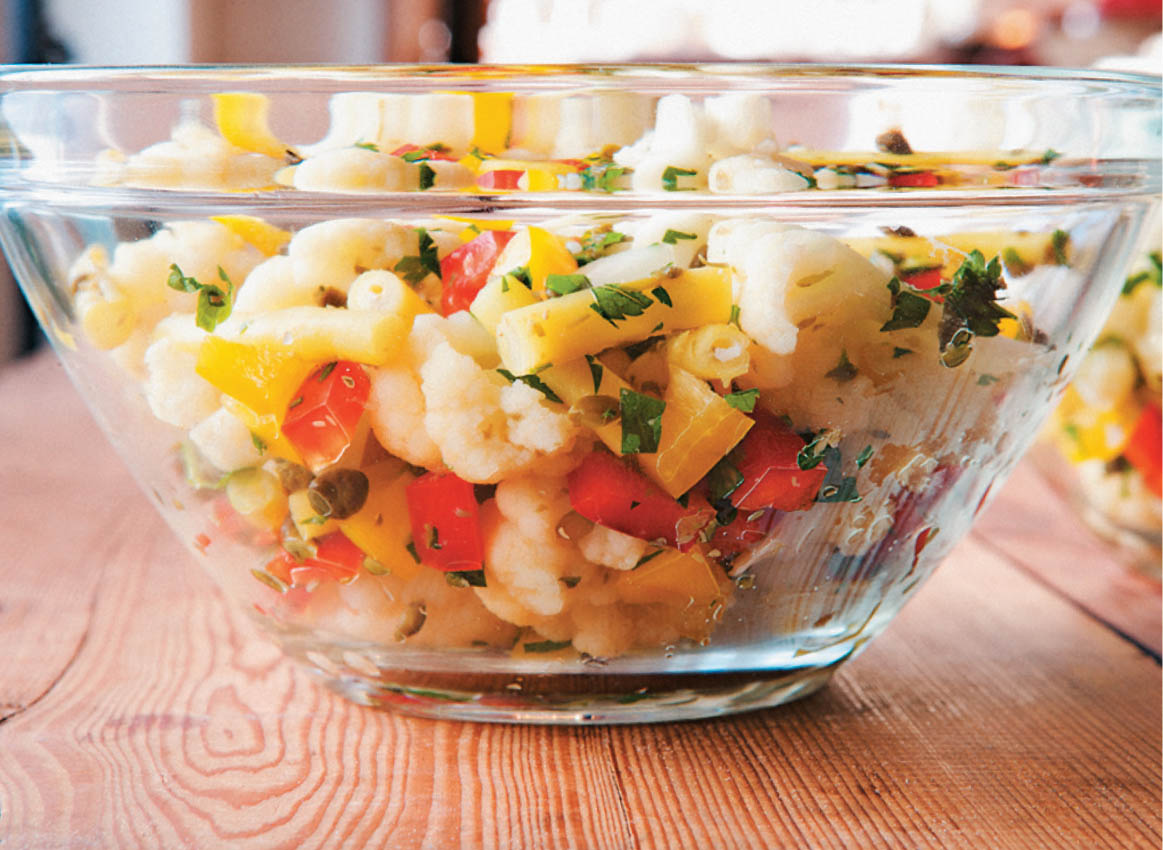
This is a version of the Italian giardiniera that’s typically made with any number of vegetables in a pleasantly tangy dressing.
1 small cauliflower
½ pound yellow wax beans, cut into 1-inch lengths
½ pound green beans, cut into 1-inch lengths
1 large shallot, finely diced
2 tablespoons red wine vinegar
1 tablespoon sherry vinegar
Salt and pepper
1 garlic clove, smashed to a paste with a little salt
1 teaspoon Dijon mustard
2 teaspoons roughly chopped capers
¼ cup olive oil
1 large sweet red pepper, cut into ½-inch dice
1 large sweet yellow pepper, cut into ½-inch dice
Basil and parsley leaves for garnish
Cut the cauliflower into the smallest florets possible. Bring a medium pot of salted water to a boil. Add the cauliflower and cook for a minute, then remove and spread it on a platter to cool to room temperature.
Do the same with the beans, though they might need a minute longer to cook. Let cool.
To make the dressing, in a small bowl, combine the shallot with the vinegars and a little salt and pepper. Let it sit for 5 minutes, then stir in the garlic, mustard, and capers. Whisk in the olive oil and check the seasonings.
Put the cauliflower, beans, and peppers in a large bowl. Season with salt and pepper and toss well. Now add the dressing and toss again to coat. Let the vegetables macerate for at least 15 minutes, or up to an hour.
Scatter basil and parsley leaves over the top.
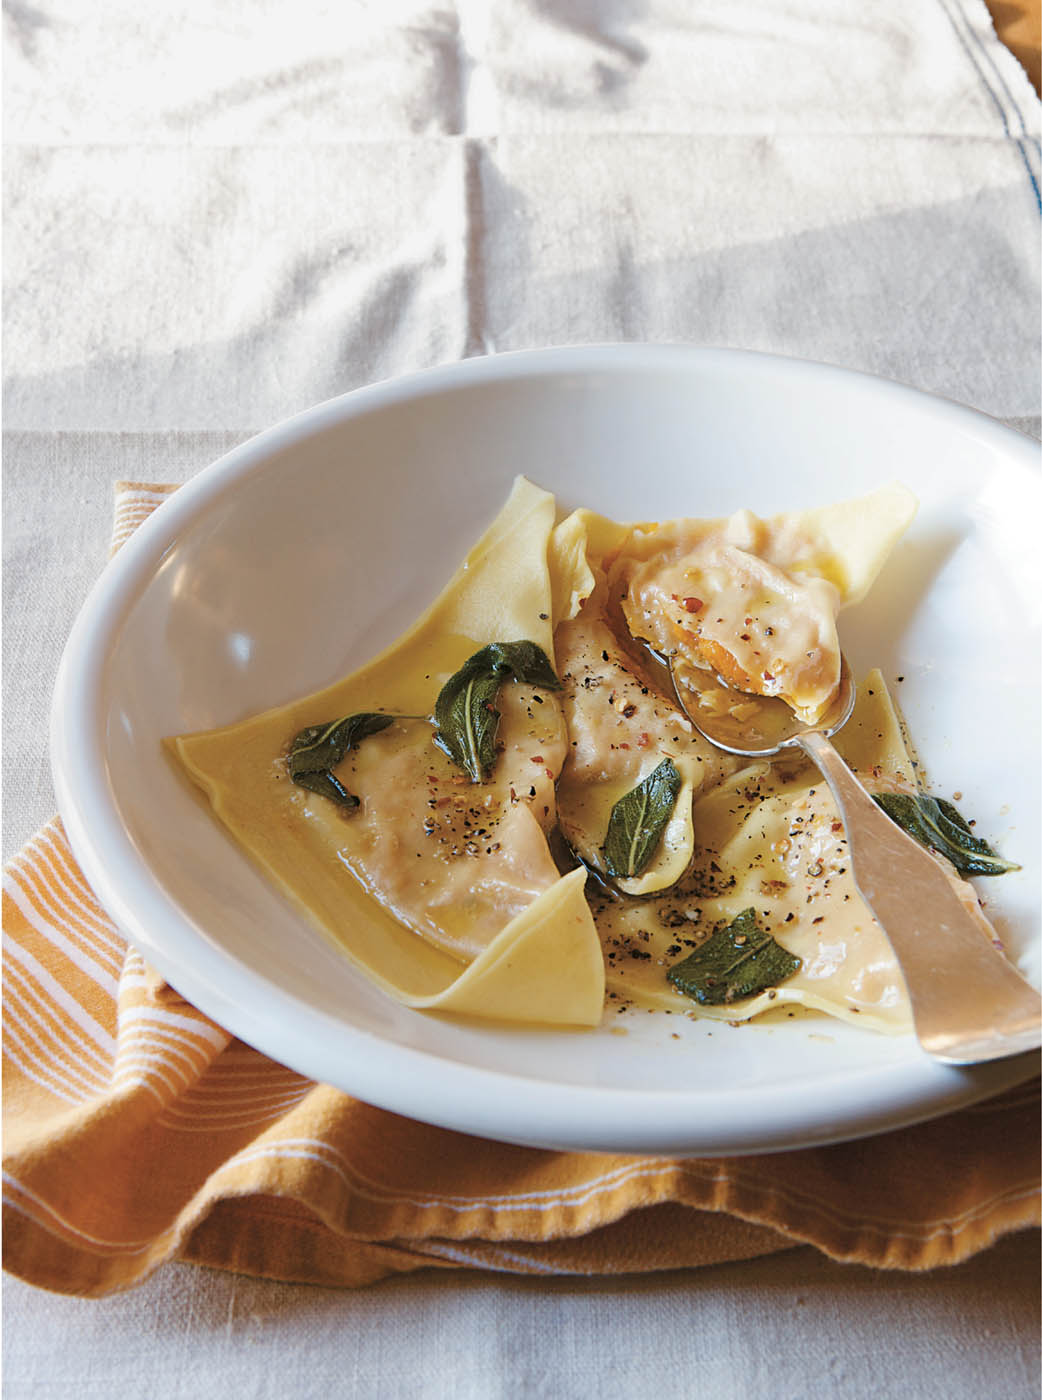
Fresh egg pasta is surprisingly easy to make, and the results are well worth it. In Italy, these raviolone would be stuffed with zucca, a tasty pumpkin, but here, a better choice is a firm-fleshed winter squash like butternut, because our pumpkin can be watery.
Both the filling and pasta dough can be made many hours ahead, say in the morning. Then roll out the pasta and stuff the raviolone an hour before the meal. Since raviolone are large, triangular ravioli, you need only about 3 per person. Use the same dough to make smaller ravioli if you’d prefer. serves 4 to 6
for the pasta
2 cups all-purpose flour
4 large eggs
Pinch of salt
2 tablespoons olive oil
for the filling
1 large butternut squash, about 2 pounds
Salt and pepper
2 tablespoons olive oil
½ cup freshly grated pecorino romano
Grated zest of 1 lemon
1 teaspoon red pepper flakes
Nutmeg for grating
for the sauce
4 tablespoons butter
A small bunch of sage (about 6 leaves per person)
Salt and pepper
1 garlic clove, smashed to a paste with a little salt
Juice of ½ lemon
A chunk of aged Parmigiano or ricotta salata for shaving
To make the pasta dough, put the flour in a bowl. In another bowl, beat the eggs with the salt and olive oil. Pour the eggs into the flour and stir until the dough comes together. It’ll look a little raggedy, but that’s fine.
Dump the dough out onto a lightly floured counter and knead for a few minutes, until it looks soft and smooth. Wrap the dough in plastic and set aside to rest for at least 1 hour, or up to several hours. (This allows the dough to relax and become stretchable, and the flour to absorb all the moisture.)
Meanwhile, to make the filling, preheat the oven to 375°F. Slice the squash lengthwise in half, scoop out the seeds, and put on a baking sheet, skin side up. Bake for about an hour, or until the flesh is tender when tested with a fork. Set aside to cool.
Scoop out the flesh of the squash and put it in a bowl. Season well with salt and pepper. Add the rest of the filling ingredients, including a little grated nutmeg, and stir well. Taste and adjust the seasonings—it should be rather highly seasoned to balance the sweetness of the squash.
Divide the pasta dough into 4 pieces, and flatten each piece. Roll each piece through your hand-cranked pasta maker all the way to the next-to-thinnest setting, placing the pieces on a floured counter as you work. You’ll end up with 4 sheets of pasta about 4 inches wide and 16 inches long.
To assemble the raviolone, cut 1 pasta sheet into 4 equal pieces. Put 2 tablespoons of the filling slightly off center on each square. With a pastry brush or fingertip, lightly moisten the edges with water, then fold each square over into a triangle. Repeat with the remaining 3 sheets. Pick up the triangles and place them in a single layer on a lightly floured towel. Cover loosely with plastic wrap and refrigerate, or leave at cool room temperature for up to 1 hour until ready to cook.
Put two large wide pots of well-salted water on the stove and bring to a boil. Add half the raviolone to the boiling water in each pot and cook for 3 to 4 minutes. To check for doneness, remove 1 triangle, put it on a cutting board, and slice off a corner of pasta to taste. When it’s done, with a big spider or slotted spoon, gently lift the cooked pasta from the water and put it on a warm deep platter.
Quickly make the sauce by heating the butter in a small skillet over medium-high heat. When the butter is melted, toss in the sage leaves, roughly chopped if you wish, season with salt and pepper, and let the sage sizzle a bit. Stir in the garlic, without letting it brown, then turn off the heat, squeeze in the lemon juice, and stir well. Pour the sauce over the raviolone. With a vegetable peeler, shave the cheese over the platter, and serve immediately.

Early autumn is your last chance for the sun-ripened fresh figs you find at a farmers’ market or pick off a friend’s venerable tree. Wash a couple of fig leaves, if you’re lucky enough to get them, lay them on a platter, and pile high with juicy, ripe figs.
The problem with grapes is that they are too much with us, imported from South America in all seasons, and usually not very tasty. Their very ubiquity has turned us away from the delights of table grapes in the peak of their season, but every region in this country has its own varieties of grape—the glorious last gasp of summer.
I particularly favor big fat floral muscats. I also like muscadines and scuppernongs in the South, the sweeter varieties of Concords in the Northeast, and the little green grapes with a bronze blush, inexplicably called Bronx, that we get on the West Coast. I love the shimmery dusting of fall grapes that almost look as if they’ve been sugared. After tasting such beauties, you’ll never be able to look those one-note supermarket grapes in the eye again.
Just put big bunches of grapes on a platter and pour little glasses of vin santo, a sweet fortified wine that’s aged in barrels like sherry. Its mellow flavors develop under the eaves in many a Tuscan attic, warmed by the afternoon sun.

menu thirteen
Platter of Jicama, Avocado, Radishes, and Oranges
Slow-Cooked Carne Adovada with Hominy
When I lived in New Mexico, I knew lots of people who grew their own red chiles, but hardly anybody could grind their own. So what you’d do is make an appointment with the chile grinder, and you’d take your dried chiles out to his place in the sparse, rocky Badlands. As soon as you arrived, he’d lead you out to an immaculate little barn, empty except for a mechanical grinder in the middle of the room. He’d power it by backing his tractor up to the barn and stretching a belt through the window from the tractor to the grinder. The aroma of those chiles as they were ground was so sweet, so pungent, and so red.
The old man and his wife lived alone out there, and he had been a chile grinder forever. When he was done, he unhooked the belt from the grinder, pulled his tractor away, swept out the barn, and went back inside his little house.
So many things can take me back to the aroma of that little barn: opening a jar of piment d’Espelette, the dried French Basque chiles, or a tin of smoky Spanish pimentón. If I get homesick enough, I’ll ask a friend to send me some new-crop red chiles.
esteeming the chile pepper
It was easy to fall in love with chiles. My initiation was with a bowl of spicy dumplings. The dumplings were swimming in a steaming sea of chicken broth, showered with an enormous handful of just chopped green chiles, scallions, and Chinese parsley. The first spoonful produced a scalp-tingling glow, and a craving was born.
Early travels to Mexico only fanned the fire, as did trips to southeast Asia. It didn’t hurt that my cooking pal Niloufer was always making incendiary green chutneys and serving me extraordinary piquant trotters with lentils. In Berkeley, there was (and still is) a Thai temple where food concessionaires gathered outside on Sundays; the food and attendant socializing were as much an attraction as the service inside. I loved to go there for an ultra-zingy green papaya salad, laced with pounded tiny chiles. Before long, I found myself living in Santa Fe, feasting on fresh roasted green chiles in the fall and dried red-chile-sauced tamales year-round. And I confess I rather like the look of dried chiles hanging from rafters and doorways.
People think chile peppers are just hot, but they’re much more. They have a vegetal sweetness, a richness. There’s a reason for that red sweetness: the chiles are red when they’re harvested because they’re allowed to ripen on the plant beyond the sharpness of their green pepper state.
Chiles are native to the Americas—the diminutive chile tepin grows wild still. But these days many varieties of spicy-hot capsicum pepper are grown all around the globe and featured in countless cuisines. The use of chiles can be quite restrained or quite assertive, depending on the whims of the cook. I’m always sneaking a bit into my cooking to heighten flavor and add brightness, even in delicate egg or pasta dishes.
It’s encouraging to note that fresh chiles are more and more available at supermarkets. Now you can almost always find fat jalapeños, slim serranos, little red Fresnos, pale yellow wax peppers, and dark glossy poblanos. Except for poblanos, which must be roasted and peeled, they’re all good finely diced, chopped, or slivered. Of course, other varieties of fresh hot chiles can be found in Latino, Indian, and Chinese groceries.
Larger leathery ruddy red dried chiles—such as New Mexico, ancho, and guajillo—are the ones to use for sauces, marinades, stews, and soups. Toasted lightly and seeds removed, they are then simmered before being blended into a paste. These can also be ground into a fine red chile powder, or coarsely crushed to make caribe, medium-size chile flakes.
Slipping a few chiles into the suitcase has become my habitual travel insurance. When I visited my old friend Sue, a larger-than-life actress in Los Angeles, she recoiled dramatically when I brought chiles to her table. Little by little, I wore her down. Now she proudly tells me she always chops up a jalapeño for her breakfast eggs. Forevermore beholden to the craving, she is happily spreading the gospel, too.

This is typical street food in Mexico, sold in market stalls, especially from fruit vendors, who cut up papayas, pineapples, oranges, and cucumbers and serve them with salt, chile, and a squeeze of lime. Beautiful powdered spicy red chile molido—ground chile—is mixed with salt and sprinkled over the fruit.
For me, it’s a short leap from that cart to the kitchen counter, where a platter of fresh fruits and vegetables translates perfectly to a stand-up appetizer with drinks. Use any combination that appeals to you. For the best red chile powder, visit your Latino or Indian grocery.
1 small jicama, peeled and thinly sliced
2 avocados, peeled, pitted, and sliced
1 large bunch radishes, trimmed
3 navel oranges, sliced into thick rounds
2 small cucumbers, peeled and quartered lengthwise
A few Mexican or Key limes
Salt
Good-quality red chile powder
Arrange all the fruits and vegetables beautifully on one huge platter (or on a banana leaf if you happen to have one handy), and surround with halved limes.
In a small serving bowl, mix equal parts salt and chile powder. Or do this to taste—you can make the mix saltier or spicier. Dip a lime half in the chile mix, rub on the spices, and squeeze the lime juice over the fruit and vegetables.
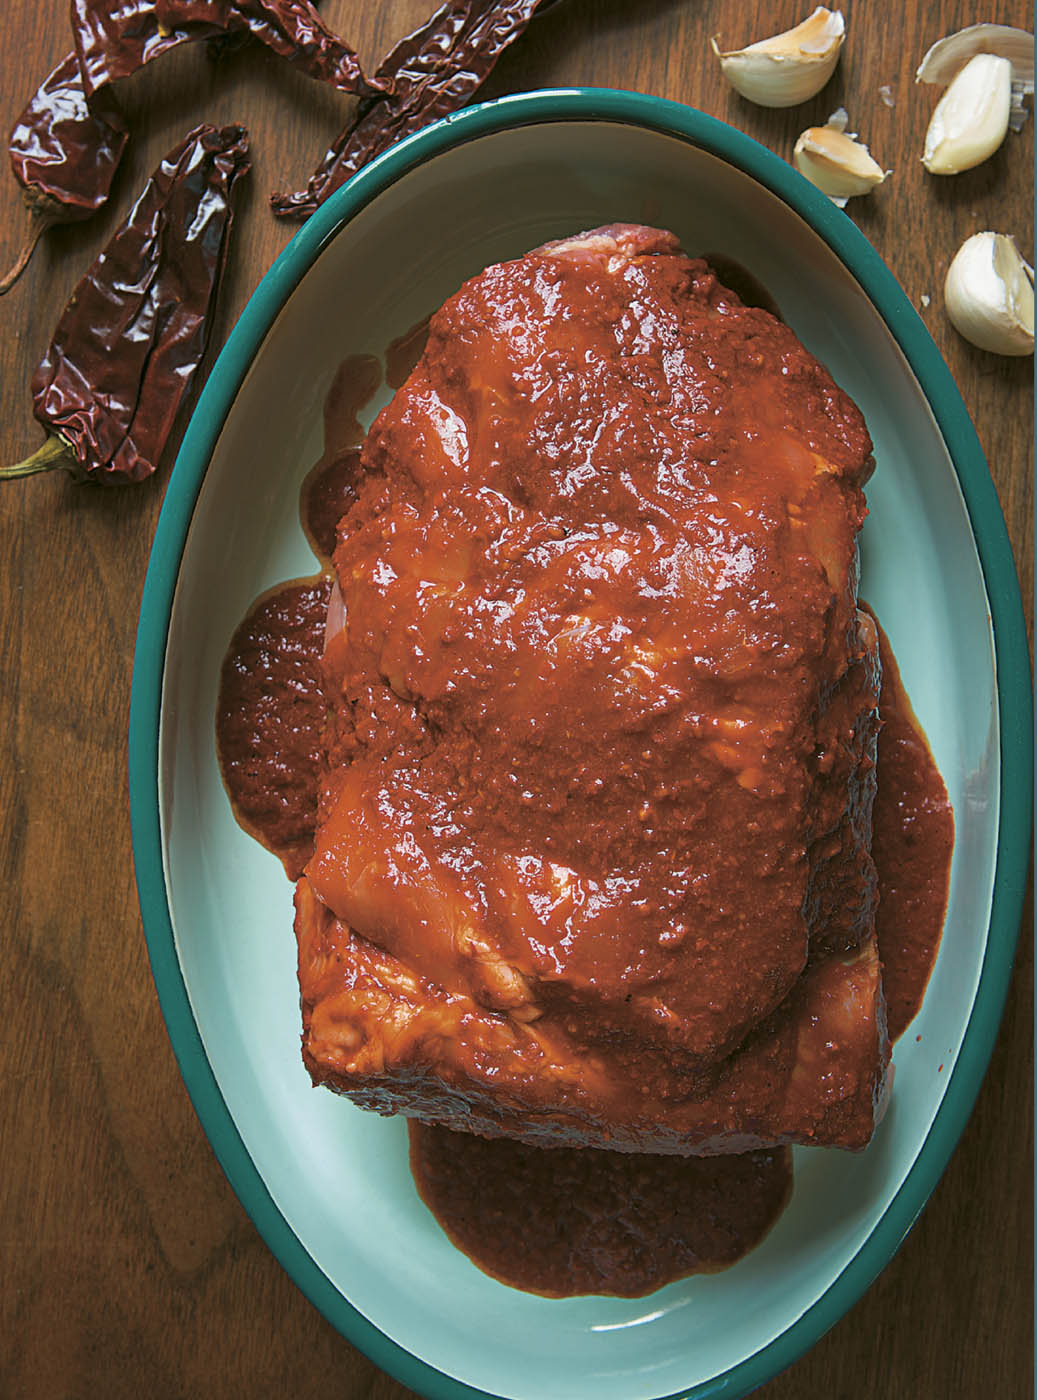
The New Mexican way with pork is a celebration of dried red chiles. Basically, you soften the long, leathery chile peppers by simmering them in a little water, puree them into an intense paste, and smother the meat in this marinade. Then the meat, the picante marinade, and the slow, slow cooking result in the best pulled pork you’ve ever had. Now, I’m not putting down anybody else’s barbecue, and I’m not even saying this is barbecue. This is quite simply the pork of your dreams. serves 4 to 6
6 ounces dried New Mexico red chiles
2 tablespoons lard or vegetable oil
1 large onion, finely diced
Salt and pepper
6 garlic cloves, roughly chopped
1 teaspoon coriander seeds, toasted and ground
1 teaspoon cumin seeds, toasted and ground
1 bay leaf
3 pounds boneless pork shoulder, left whole or cut into large chunks
Rinse and dry the chiles, then toast them in a dry cast-iron pan over medium heat until they puff a bit and become fragrant, 2 to 3 minutes. Cut the chiles lengthwise in half and remove the stems and seeds.
Put the chiles in a small pot of water and bring to a boil. Simmer for about 5 minutes. Let the chiles cool in the liquid. Puree the chiles with a cup of their cooking liquid in a blender until smooth.
Heat the lard or oil in a large skillet over medium heat. Add the onion, season with salt and pepper, and cook for about 5 minutes. No color, no browning. Add the garlic, coriander, cumin, and bay leaf, then add the chile puree and a little salt and simmer for another 5 minutes. Cool the mixture. (You can do this well ahead if you wish.)
Preheat the oven to 350°F. Put the pork in a low roasting pan or a heavy-bottomed ovenproof pot and season generously with salt and pepper. Pour the chile sauce over the pork and mix well to coat. Cover tightly with a lid or foil.
Bake the pork for 1½ to 2 hours, until the meat is quite tender and falling apart. (This dish can be made a day or many hours ahead and reheated.)
Serve the carne adovada in shallow soup bowls with a big spoonful of the steaming-hot hominy.
Hominy

Hominy or pozole, like dried beans, should be soaked overnight. Then it can be simmered for an hour and a half or so, unattended, at any time during the day you are serving it. As it slowly cooks, the hominy perfumes the kitchen with its sweet aroma. Freshly cooked hominy has a corny flavor and a pearly texture that you can’t get from canned. It’s perfect as a starch to accompany a spicy pork stew and it’s delicious in many soups as well.
1 pound dried hominy, soaked overnight in water to cover
4 quarts water
1 teaspoon salt, or to taste
1 small onion, halved and stuck with a clove
6 garlic cloves
2 medium carrots, peeled and chunked
Drain the hominy, rinse, and put in a soup pot. Cover with the water, add the salt, onion, garlic, and carrots, and bring to a boil. Reduce the heat and simmer for 1½ to 2 hours, until the kernels have swelled and softened. Discard the aromatics. Taste for salt, and add a bit more if needed. Serve immediately, or reheat when ready.
Mexican chocolate, available here in thick round tablets, is rather granular, with a certain rustic quality—you can still taste the toasty cacao pods. It’s usually flavored with cinnamon, and often nutmeg or allspice, too.
If you can’t find Mexican chocolate, use bittersweet instead and add a 2-inch length of cinnamon stick, a couple of cloves, and a pinch each of nutmeg and allspice to the warm milk; discard the spices once the mixture is cool.
3 cups whole milk
8 ounces Mexican chocolate
¾ cup sugar
½ teaspoon salt
Warm the milk in a medium saucepan. Grate the chocolate coarsely, then stir it into the warm milk. Add the sugar and salt and stir over low heat for about 5 minutes, until everything is well dissolved. Let cool.
Churn the mixture in your ice cream maker for 15 to 20 minutes, then transfer to a container and freeze for at least 1 hour.
menu fourteen
Wild Mushroom Ragout with Ziti
Sometimes I think I could easily be a vegetarian save for a few small exceptions—like pork, for example. There are all sorts of what I like to think of as situation vegetarians: you have your bacon vegetarians, and your chicken vegetarians, and your fish vegetarians.
I even know a vegetarian who eats hamburgers while traveling because he says it’s just easier. Upon his return from a trip, he goes back to being a vegetarian. When Alain Passard announced he was embracing vegetarianism at his three-star restaurant Arpège in Paris, he got a lot of press. But this big deal turned out to mean no red meat on the menu—just birds and fish. At Arpège, though, I had the most memorable plate of beets, caramelized with onions and served warm.
There’s a whole awful tradition of making vegetarian ingredients masquerade as something else. In the 1970s, health-food nuts were always cooking things like lentil loaf and vegetable protein cutlets, with the intent of making you think you were eating something meaty. Today the final insult is tofurkey—it is demeaning to the tofu, and it’s demeaning to the turkey.
At home, I often cook meals that turn out almost inadvertently to be vegetarian. But I also like cooking a vegetable stew with a little bit of meat—bacon, or petit salé, for example—added for flavor. I also love the traditional Chinese dish of spicy tofu with meat sauce.
We think of summer as the season of the vegetable. But when you get to autumn, there is a whole new basket of vegetables waiting for you: bitter chicories, cauliflower, winter squashes, and wild mushrooms in full force. It’s truly the last glory time before the weather starts turning cold for good.
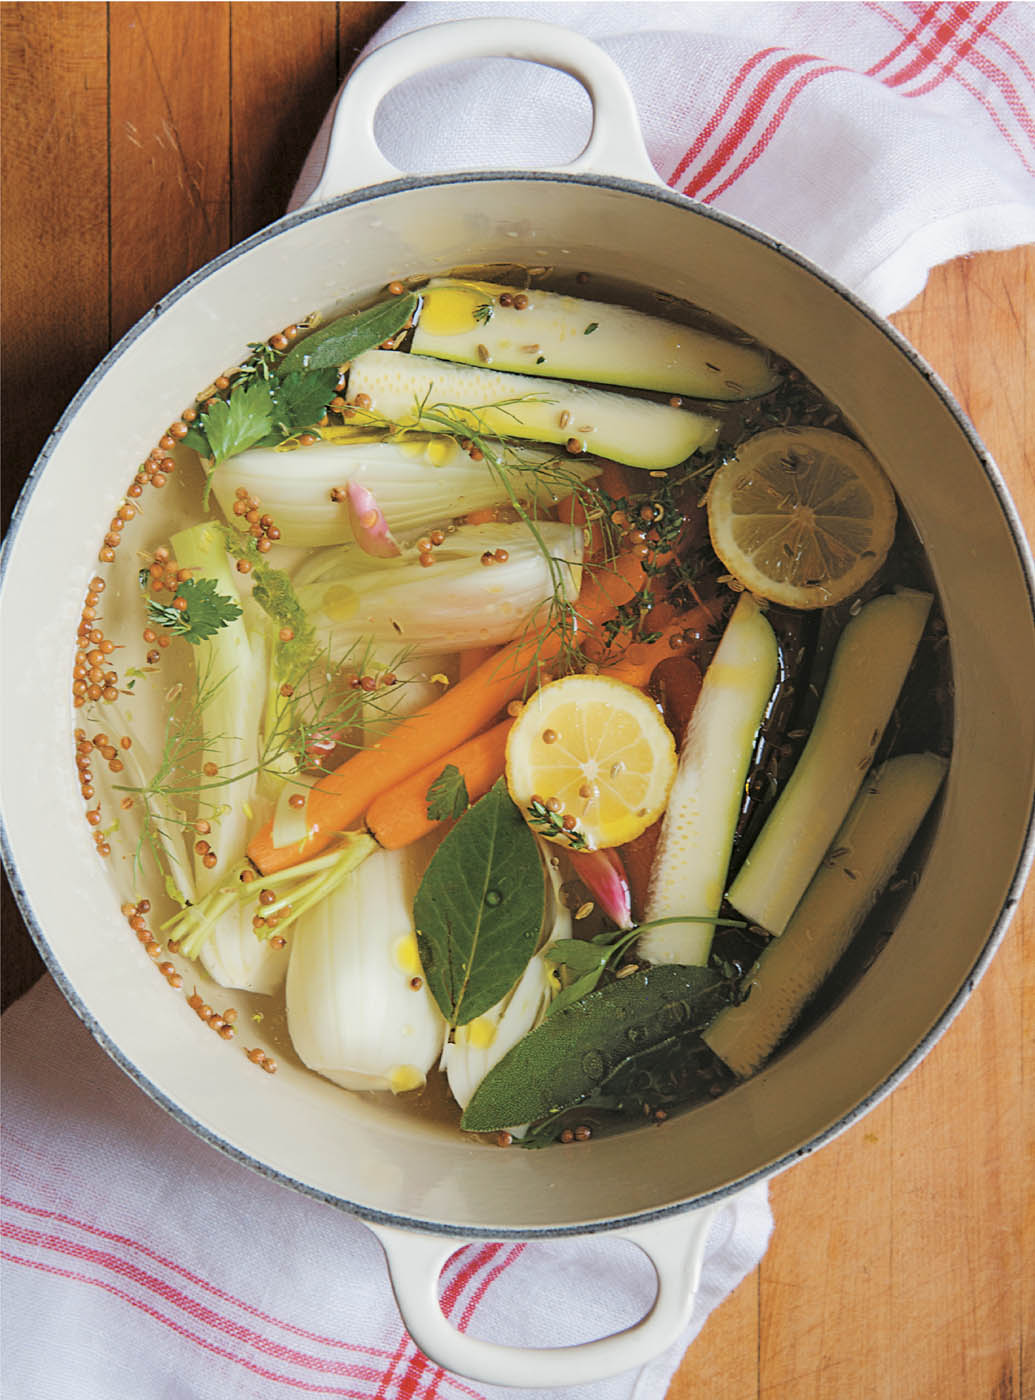
The Greek origins of this manner of cooking vegetables are lost in the dim mists of history, but look in any French cookbook, and you’ll find a recipe for all kinds of vegetables prepared à la grecque: artichokes, zucchini, celery and celery root, fennel, carrots, onions, cardoons, mushrooms. It’s a straightforward technique well suited to Mediterranean vegetables, or almost any vegetable for that matter. You simmer white wine, olive oil, and herbs to make a tasty bath for whichever vegetables you prefer.
The ultimate result is a platter of delicious lightly pickled vegetables, which can be cooked ahead and served at room temperature, giving them an admirable versatility. They can accompany any main course or, paired with a few olives, a piece of feta cheese, and good bread, make a meal.
for the poaching liquid
2 cups dry white wine
2 cups olive oil
2 cups water
2 teaspoons salt, or to taste
1 teaspoon coriander seeds
1 teaspoon fennel seeds
1 teaspoon black peppercorns
1 bay leaf
1 small bunch thyme
6 garlic cloves, thickly sliced
1 small lemon, sliced
2 tablespoons white wine vinegar
for the vegetables
12 boiling onions, red or white
6 medium carrots, peeled and halved lengthwise
2 small fennel bulbs, trimmed and cut into small wedges (or use celery hearts)
2 medium zucchini, cut into thick batons
To make the poaching liquid, combine all the ingredients in a wide nonreactive (enamel or stainless steel) heavy-bottomed pot and bring to a boil. Reduce the heat and simmer for about 5 minutes. Taste and adjust for salt. It should be well seasoned, as this bath will flavor the vegetables.
Some people dump all the vegetables into the pot at once, but they’re a bit hard to keep track of that way, since each has a different cooking time. The way I learned it is to cook the vegetables separately, to make sure none is overcooked. The goal is tender, not mushy, vegetables.
Start with the onions. Simmer them gently until easily pierced with a skewer, about 10 minutes. Remove from the poaching liquid with a slotted spoon and let them cool on a plate. Continue with the other vegetables, counting on about 5 minutes for the carrots and fennel, and about 3 minutes for the zucchini.
Strain and cool the poaching liquid.
Put the vegetables in a deep wide dish and pour the cooled liquid over them. Let them sit in the liquid for at least a few hours, or refrigerate overnight.
When you’re ready to serve, remove the vegetables to a platter and spoon a little of the poaching liquid over the top. Serve at room temperature.
foraging for wild mushrooms
Hunting wild mushrooms is a thrill. Once you’ve learned (from a legitimate mushroom authority) how to distinguish two or three varieties, it’s the best kind of shopping experience. One of the first times I went hunting for porcini was with a really good mushroom hunter. We drove four or five hours to get to the forest where he claimed the mushrooms were. We found ourselves deep in the woods but we saw only pine needles on the forest floor. Then he showed me how to read the needles. Beneath a vague bump, trying to poke its head up, was a fat Boletus edulis! I felt pretty lucky. Usually, you can never ask a mushroom hunter for his favorite spots, because he’ll tell you the wrong place every time.
The varieties of wild mushroom that typically come to market in the autumn are chanterelles; black trumpets, sometimes called black chanterelles; yellowfoot; hedgehog; and, if you’re really lucky, porcini. It’s excellent to have many different kinds of mushroom in your stew, but one variety will do as well. And even if you have no access to fresh wild mushrooms, you can make a satisfying ragout with cultivated varieties such as portobello, cremini, or a combination of button mushrooms and a little dried wild mushroom powder.
Wild mushrooms will range from quite muddy to beautifully dry, but either way, they need a bit of prep to ready them for cooking. Wild mushrooms should be picked over and trimmed with a paring knife, removing soft spots, sticks, and wormholes. It’s better to trim them first, then determine if they need a rinse. Generally speaking, mushrooms and water don’t mix. Only if your mushrooms are full of dirt and debris should you dunk them quickly: Fill a bowl with lukewarm water, plunge the mushrooms into the warm bath for 2 seconds, and immediately remove them to dry on a towel. Cultivated button mushrooms and cremini are sometimes a little gritty; rinse them quickly under running warm water, in a colander. Portobellos and oyster mushrooms usually just need to be trimmed.
Although many vegetarians I know are understandably tired of pasta, this deeply satisfying autumnal dish isn’t so much a pasta as a rich mushroom stew that would be just as wonderful with warm polenta, steamed rice, or other grains.
for the mushroom ragout
¼ cup olive oil
1 large onion, finely diced
Salt and pepper
2 pounds wild or cultivated mushrooms, cleaned and sliced
3 garlic cloves, smashed to a paste with a little salt
1 teaspoon finely chopped thyme
2 teaspoons finely chopped sage
½ teaspoon red pepper flakes
2 tablespoons tomato paste
1 tablespoon all-purpose flour
2 cups Porcini Mushroom Broth, hot, or as needed
1 pound long ziti
2 tablespoons olive oil or butter
2 garlic cloves
Salt and pepper
2 tablespoons chopped parsley
To prepare the ragout, in a large skillet, heat 2 tablespoons of the olive oil over high heat. Add the onion and cook, stirring well, until it begins to brown. Lower the heat to medium, season the onions with salt and pepper, and continue stirring until nicely caramelized, about 5 minutes. Remove the onion to a small bowl. Return the pan to the heat, add the remaining 2 tablespoons olive oil, and turn the heat to high. Add the mushrooms, stirring well to coat with oil. Keep the heat high and sauté the mushrooms until they brown lightly. If juices accumulate in the pan, pour them off and reserve.
Season the mushrooms with salt and pepper, add the garlic, thyme, sage, and pepper flakes, and stir well. Reduce the heat to medium, add the caramelized onion and the tomato paste, and stir well to coat the mushrooms and to dry the mixture slightly. Cook for another 2 minutes, stirring.
Sprinkle the flour over the mixture and stir it in. Ladle in 1 cup of the hot mushroom broth, stirring well as the mixture thickens. Add another cup of hot broth and let the ragout cook for another 5 minutes. If it’s too thin, cook it a bit longer; if too thick, add a bit more broth. Taste for seasoning. (The ragout can be made a few hours ahead and reheated.)
To cook the pasta, bring a large pot of salted water to a boil. Break the ziti into 6-inch lengths (or use cut ziti). Boil the pasta for about 10 minutes, or until on the firm side of al dente.
When the noodles are almost cooked, warm the olive oil or butter in a large wide skillet. Put in the garlic and stir; don’t let it brown. Add salt and pepper and turn off the heat.
Drain the pasta, add to the skillet along with the parsley, and mix well. Transfer the pasta to a warm serving bowl. Put the hot mushroom ragout in another serving bowl, and bring them both to the table.
Porcini Mushroom Broth
Put 3 cups water in a saucepan and add a bay leaf, a few slices of dried porcini mushrooms or 2 teaspoons dry porcini powder (see below), half a small onion, 1 small celery stalk, and a small carrot, peeled and chopped. Bring to a boil, then lower to a simmer and cook for 20 to 30 minutes; strain.
{variation} dry porcini powder
Porcini powder is available at specialty shops, but it’s easy to make your own, to add intensity to the mushroom ragout or many other sauces or dishes. Dried porcini can sometimes be sandy. So, to get rid of any grit, soak a handful of them briefly in warm water, then blot them very well in a towel, put them on a baking sheet, and let them air-dry completely. When the mushrooms are dry, grind them up in a spice grinder and keep the powder in a jar in the freezer.
The notion of a dessert made with chard may sound bizarre, but it’s traditional in the South of France and Italy. Because of the baking powder the pastry will puff as it bakes—the resulting texture is more like a cake than a pie. Serve a small slice of tart with a glass of mint tea to end this meal.
for the dough
2 cups all-purpose flour
1 tablespoon baking powder
½ cup sugar
Pinch of salt
8 tablespoons (1 stick) cold butter, cut into small pieces
1 egg, beaten with 1 tablespoon milk
Grated zest of ½ lemon
for the filling
1 large bunch chard, trimmed, ribs discarded, and cut into ½-inch-wide strips (about 4 cups)
1 cup whole-milk ricotta
1 egg
⅓ cup sugar
Grated zest of ½ lemon
¼ teaspoon powdered ginger
¼ teaspoon ground allspice
½ cup golden raisins, soaked in warm water until plumped
¼ cup pine nuts
To make the dough, in the bowl of an electric mixer, using the flat beater, mix the dry ingredients on low speed. Add the butter and mix for about 2 minutes more, until crumbly. Add the egg mixture and the lemon zest and mix another minute, or until you can pinch the dough together.
Turn the dough out and form 2 balls, one twice as big as the other. Chill for at least an hour.
To make the filling, bring a large pot of salted water to a boil. Blanch the chard for 1 minute; drain well. Let cool, and squeeze out any liquid.
Preheat the oven to 350°F. In a small bowl, whisk together the ricotta, egg, sugar, lemon zest, and spices.
Dust a pastry cloth with flour and roll out the larger dough ball into a circle 2 inches larger than the diameter of your 9- or 10-inch springform pan. Roll the dough onto the rolling pin, then carefully unroll it over the pan and gently press it into place, so that it comes about 2 inches up the sides of the pan. Expect the dough to be pretty soft; if it tears, just press on a scrap to cover any holes.
Drain the raisins, mix them with the greens, and spread over the dough in the pan. Pour the ricotta mixture over the greens and smooth out. Sprinkle the pine nuts over the ricotta.
To make the lattice top, roll out the second piece of dough into a ⅛-inch-thick rectangle. Cut the dough into ¾-inch-wide strips. Fashion a lattice top by alternating crosswise and lengthwise strips. Leave a gap of ¾ inch between strips running in the same direction.
Fold the edges of the bottom crust over the ends of the lattice strips. Bake for 40 to 50 minutes, until the crust is golden.
Cool on a rack before serving.

menu fifteen
Hors d’Oeuvres Variés: Roasted Beet Salad, Julienned Carrot Salad, and Leeks Vinaigrette
Petit Salé with Braised Cabbage
It’s a sad fact of modern life that ham isn’t what it used to be, even in some extremely ham-centric cultures. Which is not to say that good ham can’t be had—it has just become more of a rarity than a given, at least in North America.
There used to be real ham, real pork in the United States. How did we get from there to canned ham, honey-cooked spiral-cut ham, and Spam? How did we further descend to today’s ubiquitous plastic-wrapped, bright pink “cured pork-product, water added”? Most factory-produced cured pork products today taste only of salt and added “natural flavors” and have very little resemblance to their artisanal-made ancestors. More’s the pity! Factory farming has robbed a precious foodstuff of its very identity.
There is good news, however. Some small-scale American farms are now producing real pork again, and there is increasing interest among a new generation of cooks in the old preserving methods. So we are sure to see some real ham again in the near future.
In France most butcher shops sell petit salé, sometimes called demi-sel. This salt-cured pork is rather like a mild cured unsmoked ham, not as salty as our frontier-style salt pork. Petit salé was originally designed to preserve pork before the days of refrigeration. As with other forms of cured meat, its unique flavor is still in demand. In France, every part of the pig, from the snout to the tail, goes into the brine bucket. A cook there can buy any of the parts: belly, hock, trotter, ear, loin, shoulder.
When I’m in Paris, it’s easy to buy a piece of petit salé and bring it home to throw into a pot of lentils. Back in the States, I make my own by mixing up a simple brine in which to submerge a piece of good pork. It’s ready in a few days and keeps a week in the fridge. Simmered gently for an hour with a few aromatic vegetables, petit salé makes a wonderful meal, accompanied by braised cabbage or sauerkraut, or with wilted greens. You can also cut petit salé into lardons to use like bacon in a pot of beans. As a bonus, the resulting delicious broth can be used to make soup.
In a Parisian brasserie, the presentation of simple humble vegetables dressed with vinaigrette is raised to a fine art. The array of a dozen earthenware bowls that greets you as you enter, each with its freshly made vegetable salad, is a purely French thing. I am always shocked by both their ordinariness and their deliciousness.
Thanks to our farmers’ markets, we too can find the tastiest vegetables in season. It’s all about enjoying each vegetable in its own right: roasted beets, sliced carrots, lovely leeks. Any one of these salads can be a wonderful first course on its own, but man! The sight of them together, so bright, so glistening—piled on one platter or on individual plates—is just too good to miss.
Roasted Beet Salad
Roast your beets the morning of the dinner, or even a day or two before.
6 medium beets
Salt and pepper
1 tablespoon red wine vinegar, or more to taste
1 tablespoon sherry vinegar, or more to taste
2 teaspoons grated orange zest
½ teaspoon fennel seeds, crushed
¼ cup olive oil
Preheat the oven to 350°F. Wash the beets and put them, unpeeled, in a roasting pan with about an inch of water. Bake, covered, for an hour, or until they are easily pierced with a fork. Slip off the skins while the beets are still warm. (Roasted beets will keep for 2 or 3 days in the refrigerator.)
Dice, slice, or wedge the beets. Put them in a mixing bowl, season with salt and pepper, add the vinegars, and toss well. Add the rest of the seasonings and the oil.
Set aside for a few moments, then taste and reseason as needed. Beets need vinegar, and often after they’re dressed, they’ll need a bit more.
Transfer the beets to a serving platter and serve at room temperature.
Julienned Carrot Salad
6 large carrots
Salt and pepper
Juice of ½ lemon
1 teaspoon white wine vinegar
Pinch of cayenne
1 garlic clove, smashed to a paste with a little salt
3 tablespoons olive oil
2 teaspoons snipped chives
2 teaspoons chopped tarragon
Wash and peel the carrots. Cut them into 2-inch lengths. You want to make short thin strips about the width of thick spaghetti. This you can accomplish with the julienne blade of a food processor, with a mandoline, or with a nice sharp knife.
Put the julienned carrots in a mixing bowl. Season with salt and pepper, add the lemon juice and vinegar, and toss well. Add the cayenne, garlic, and oil. Mix gently but thoroughly. Let sit for about 10 minutes, then check for seasoning.
Transfer to a serving platter. Just before serving, sprinkle with the chives and tarragon.
Leeks Vinaigrette
12 leeks, about ¾ inch in diameter
Salt and pepper
3 tablespoons red wine vinegar
1 small garlic clove, smashed to a paste with a little salt
1 tablespoon Dijon mustard
¼ cup olive oil
2 teaspoons chopped capers for garnish (optional)
Wash the leeks. Trim the roots just to the base of the leek, peel off the 2 or 3 outer layers of each leek, and then trim the green tops, leaving a little green on the end. Make a lengthwise slit halfway down each leek and soak the leeks in a large bowl of lukewarm water. Agitate them to remove any sand or grit, lift the leeks from the bowl, and rinse again.
Bring a large pot of well-salted water to a boil. Put in the leeks and simmer briskly until tender, about 10 minutes. Most people either overcook (too mushy) or undercook (too crunchy) leeks. Badly cooked leeks are a terrible waste. To test for doneness, fish out a leek and lay it out on a cutting board. Press it at the thick end with your thumb—there should be a little resistance, but the leek should be soft.
Remove all the leeks from the pot, drain on towels, and then put them in one layer on a platter. Season them lightly with salt and pepper.
In a small bowl, whisk the vinegar, garlic, and mustard, then whisk in the olive oil. The sauce should be slightly thickened. Spoon the vinaigrette over the leeks and let them marinate at room temperature for an hour.
Just before serving, sprinkle with a few chopped capers, if you like.
Making petit salé is essentially like making a mild cured ham: it’s a very simple process, but you must begin it 5 days ahead. If you wish, make the cabbage earlier in the day and reheat. serves 4 to 6
for the brine
8 cups water
½ cup salt
1 teaspoon black peppercorns
3 or 4 allspice berries
2 bay leaves
1 large sprig fresh thyme or 1 teaspoon dried thyme
A few whole cloves
1 scant teaspoon curing salt (see Note)
2 pounds fresh pork belly, skin on
2 pounds fresh pork shanks
for the broth
1 onion
1 celery stalk
1 carrot, peeled
Several garlic cloves
A few thyme sprigs
1 bay leaf
2 or 3 whole cloves
A few black peppercorns
Braised Cabbage, steaming hot
2 pounds small potatoes, peeled
Chopped parsley for garnish
2 tablespoons freshly grated horseradish
¼ cup Dijon mustard
To brine the pork, whisk together all the brine ingredients in a stainless steel or glass bowl or other nonreactive container large enough to hold the meats and brine. Slice the pork belly into 4 or 5 thick pieces. Add all the meat to the brine, and put a plate on top to keep the meat submerged. Cover and refrigerate for 5 days, or up to a week.
To cook the pork, drain the meat and discard the brine. Put the meat in a heavy-bottomed pot and cover with water. Add all the broth ingredients and bring to a boil, then reduce the heat and simmer gently for at least an hour, until the belly is tender and the shank meat is almost falling from the bone. If the belly seems done sooner, take it out and continue cooking the shanks until they’re done. Set aside 1 cup of broth in which to braise the cabbage (see below) and reserve the rest for another use, such as in bean or lentil soup.
While the meat is cooking, braise the cabbage. Boil the potatoes in a pot of lightly salted water for 10 to 15 minutes, until tender. Drain and keep warm.
To serve, pile the braised cabbage on a big, deep platter and put the ham shanks on top. Cut the belly into smaller pieces, if you like, and add to the platter. Sprinkle plenty of chopped parsley over the pork. Mix the horseradish and mustard and serve along with the boiled potatoes.
{note on} curing salt
Curing salt, a kind of nitrate also known as sel rose, is available online from sausage-making supply companies. Alternatively, you can buy a little from your butcher. You need only a tiny amount for use in brines or ham-making.
Braised Cabbage
I prefer to use a hard green cabbage sometimes called Dutch, but red cabbage is good here too. If you like softer-leaved cabbages such as Savoy or Napa, the cooking time will be much shorter.
2 large onions
1 large firm green cabbage
2 tablespoons butter
Salt and pepper
2 tablespoons sugar
2 to 3 tablespoons cider vinegar or red wine vinegar
1 teaspoon caraway seeds
A good pinch of cayenne
2 tart apples, peeled, cored, and chunked
1 cup pork broth (from above)
A small bunch of parsley, leaves chopped
Slice the onions into half moons, about ⅛ inch thick. Slice the cabbage into ½-inch-wide ribbons.
In a large heavy-bottomed pot, melt the butter. Add the sliced onions, season with salt and pepper, and cook over medium heat until softened, about 5 minutes. Add the sugar, vinegar, caraway seeds, and cayenne, then add the apples and stir gently for a few minutes.
Add the cabbage a handful at a time, salting it lightly as you go. Add the pork broth, raise the heat, put the lid on the pot, and bring to a simmer. Reduce the heat to low and let the cabbage cook, stirring regularly, for about 30 minutes, until quite tender. Sprinkle with the parsley before serving.
quinces

The quince is an ancient relative of the apple and looks like a giant apple, yellow-green and fuzzy, with gray-green leaves. Quinces are incredibly aromatic; a basket of freshly picked fruit will perfume the whole house. The tree in blossom is a sight to behold: the flower is bright pink. And when the fruits ripen in late September, the trees are heavy with it, bowed almost to the ground, or propped up with sticks.
Quinces must be cooked to be edible; otherwise, they are far too astringent. Common uses are quince jelly—easy to make, since quinces are full of natural pectin—but quinces are good too as an addition to apples in a pie. The fruit may be best known as quince paste: membrillo in Spain, and pâte de coing in France. Quince paste can be sliced for a little dessert, or paired with cheese, usually an aged sheep’s-milk. In Sicily, the paste is called cotognata and made from an old quince varietal. In Mexico, fruit paste made with quince, guava, and other fruits is called ate. Argentina loves membrillo too, almost as much as she loves dulce de leche.
This recipe is a three-stage journey from raw quince to membrillo. In the first stage, you make a fine dessert of sliced quinces poached in a sugar syrup, and as a side benefit, you get a jar of quince-flavored syrup. Then the slices can become quince marmalade, and finally be cooked down to membrillo.
6 medium quinces
6 cups sugar
4 cups water
Raw quinces are a little difficult to peel. What I do is quarter the quinces, peel each quarter and remove the core with a paring knife, and then slice each peeled quarter lengthwise into thirds. Discard the peels, but save the cores. Tie them in a piece of cheesecloth to add pectin to the syrup.
In a heavy-bottomed nonreactive pot (enameled or stainless steel), heat the sugar with the water, stirring to dissolve the sugar. Add the quince slices and cores, and simmer gently, stirring occasionally, for 30 to 40 minutes, or until the quince slices are tender. Discard the cores. Cool the quince slices in the syrup.
Quince slices in syrup make a delicious dessert—so intense, you need only 2 or 3 slices per serving. And such a lovely rose color. Quince syrup with yogurt is a satanically good combination.
Stop here, or continue the journey to quince marmalade or quince paste.
To make marmalade, ladle off some of the syrup, so the quinces are barely covered in liquid. Return the pot to the stove and bring to a boil over medium-high heat, then reduce the heat and simmer briskly for 30 minutes, stirring frequently. Basically, you’re cooking away the water and thickening the jam. By this point, the fruit should be very soft, with little liquid remaining. Remove the pan from the stove.
Mash the quinces with a potato masher, but leave them rather chunky. Check the consistency. If the marmalade seems too thin, put it back on the stove for a few minutes, but remember it will thicken upon cooling. Spoon the marmalade into a jar and store in the refrigerator.
To make membrillo, the last step on the quince’s journey, grind up the marmalade in a food processor or a meat grinder. Depending upon the thickness, you might have to cook it a little more. Take a spoonful, spread it on a plate, and put the plate in the refrigerator for an hour. If it is nicely jelled at this point, the quince mixture is ready to pour into a terrine or other mold that has been oiled with olive oil or lined with plastic wrap. Chill the mold for 24 hours.
To serve, unmold the membrillo and cut into thin slices.
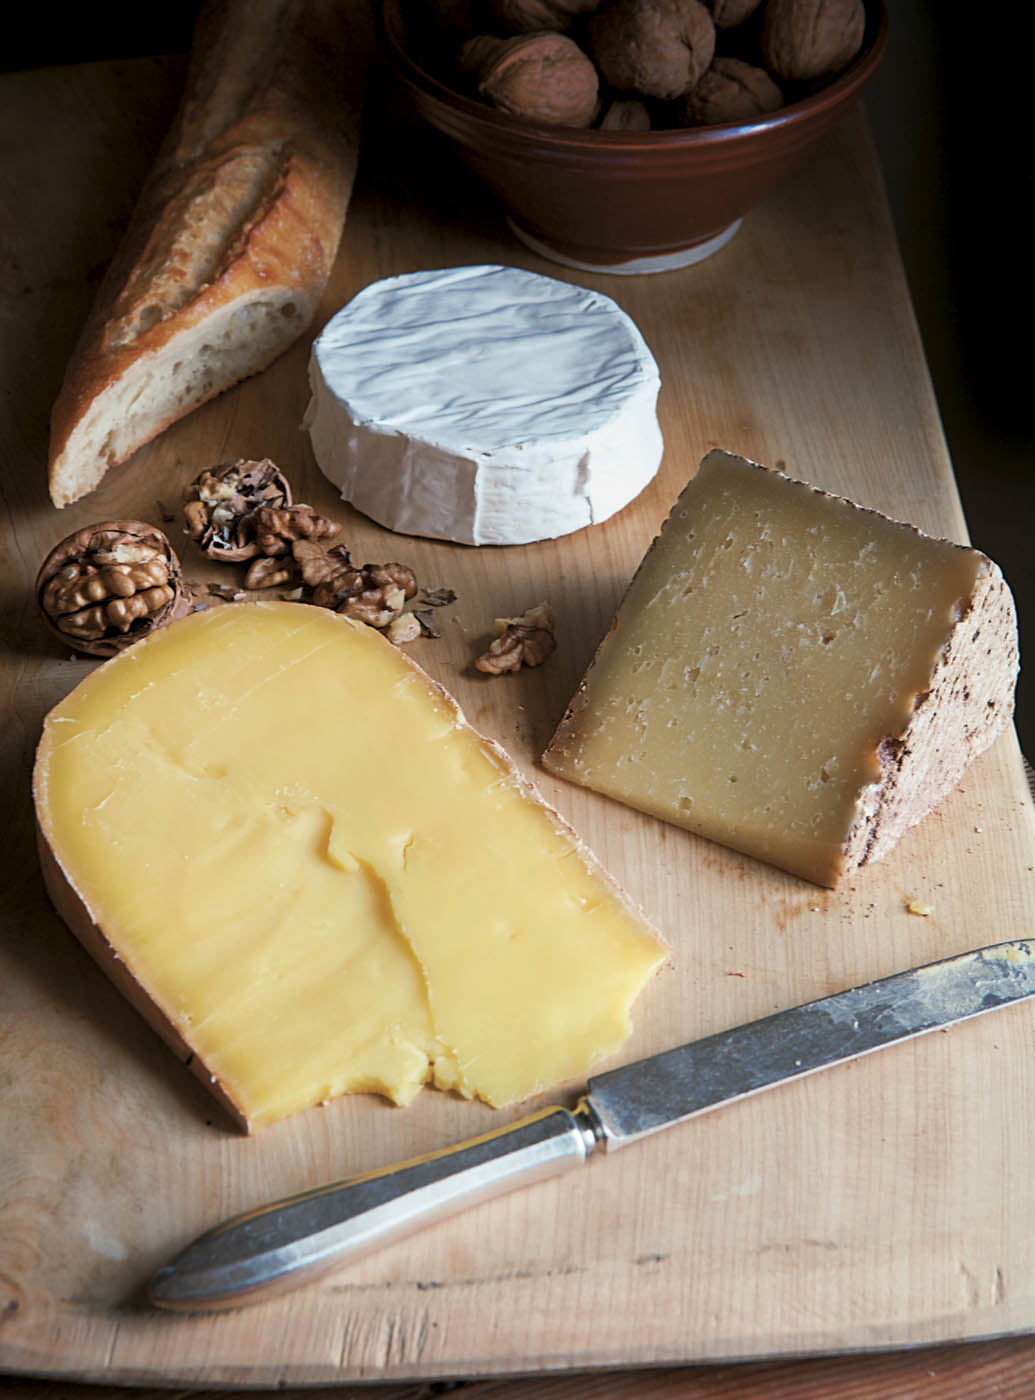
Fall is a good time to look for new-crop walnuts and cheeses at your local farmers’ market. Wherever you are in the States, there are good artisanal cheese makers, and a sampling of their local offerings can make an excellent cheese course.
The rule of thumb for a balanced cheese plate is to have a range of textures, from soft to semi-hard to firm, and a variety of cheeses, from goat’s, sheep’s, and cow’s milk, as well. But it’s sometimes more interesting to taste three kinds of goat’s-milk cheese, or three kinds of cow’s-milk. Three cheeses are plenty.