How to Succeed in the Pediatrics Clerkship
How to Prepare for the Clinical Clerkship Examination
Introduction
This clinical study aid was designed in the tradition of the First Aid series of books. You will find that rather than simply preparing you for success on the clerkship exam, this resource will also help guide you in the clinical diagnosis and treatment of many of the problems seen by pediatricians. The content of the book is based on the objectives for medical students laid out by the Council on Medical Student Education in Pediatrics (COMSEP). Each of the chapters contains the major topics central to the practice of pediatrics and has been specifically designed for the third-year medical student learning level.
The content of the text is organized in the format similar to other texts in the First
Aid series. Topics are listed by bold headings, and the “meat” of the topic provides
essential information. The outside margins contain mnemonics, diagrams, summary or
warning statements, and tips. Tips are categorized into typical scenarios Typical Scenario, exam tips  , and ward tips
  .
.
The pediatric clerkship is unique among all the medical school rotations. Even if you are sure you do not want to be a pediatrician, it can be a very fun and rewarding experience. There are three key components to the rotation: (1) what to do on the wards, (2) what to do on outpatient, and (3) how to study for the exam.
On the Wards . . .
Be on time. Most ward teams begin rounding around 7 am. If you are expected to “pre-round,” you should give yourself at least 15 minutes per patient that you are following to see the patient, look up any tests, and learn about the events that occurred overnight. Like all working professionals, you will face occasional obstacles to punctuality, but make sure this is occasional. When you first start a rotation, try to show up at least an extra 15 minutes early until you get the routine figured out. There may be “table rounds” followed by walking rounds, but the emphasis is patient and family-centered.
Family-centered rounds is a model of communicating and learning between the patient, family, medical professionals, and students on an academic, inpatient ward setting.
Find a way to keep your patient information organized and handy. By this rotation, you may have figured out the best way for you to track your patients including a focused physical, medications, labs, test results, and daily progress. If not, ask around—other medical students or your interns can show you what works for them and may even make a copy for you of the template they use. We suggest index cards, a notebook, or a page-long template for each patient kept on a clipboard.
Dress in a professional manner. Even if the resident wears scrubs and the attending wears stiletto heels, you must dress in a professional, conservative manner. It would be appropriate to ask your resident what would be suitable for you to wear (it may not need to be a full suit and tie or the female equivalent). Wear a short white coat over your clothes unless discouraged.
Men should wear long pants, with cuffs covering the ankle, a long-sleeved, collared shirt, and a tie—no jeans, no sneakers, no short-sleeved shirts, no flip-flops.
Women should wear long pants or a knee-length skirt and blouse or dressy sweater—no jeans, sneakers, heels greater than 1½ inches, or open-toed shoes.
Both men and women may wear scrubs during overnight call. Do not make this your uniform.
Act in a pleasant manner. Inpatient rotations can be difficult, stressful, and tiring. Smooth out your experience by being nice to be around. Introduce yourself to the team you will be working with, including the attendings, the residents, the nurses, and the ancillary staff. Smile a lot and learn everyone’s name. If you do not understand or disagree with a treatment plan or diagnosis, do not “challenge.” Instead, say “I’m sorry, I don’t quite understand, could you please explain . . . .” Be empathetic toward patients.
Be aware of the hierarchy. The way in which this will affect you will vary from hospital to hospital and team to team, but it is always present to some degree. In general, address your questions regarding ward functioning to interns or residents. Address your medical questions to residents, your senior, or the attending. Make an effort to be somewhat informed on your subject prior to asking attendings medical questions.
Address patients and staff in a respectful way. Address your pediatric patients by first name. Address their parents as Sir, Ma’am, or Mr., Mrs., or Miss. Do not address parents as “honey,” “sweetie,” and the like. Although you may feel these names are friendly, parents will think you have forgotten their name, that you are being inappropriately familiar, or both. Address all physicians as “doctor” unless told otherwise. Nurses, technicians, and other staff are indispensable and can teach you a lot. Please treat them respectfully.
Take responsibility for your patients. Know everything there is to know about your patients—their history, test results, details about their medical problem, and prognosis. Keep your intern or resident informed of new developments that he or she might not be aware of, and ask for any updates of which you might not be aware. Assist the team in developing a plan, and speak to radiology, consultants, and family. Never give bad news to patients or family members without the assistance of your supervising resident or attending. Respect patients’ rights.
 All patients have the right to have their personal medical information kept private.
This means do not discuss the patient’s information with family members without that
patient’s consent, and do not discuss any patient in hallways, elevators, or cafeterias.
All patients have the right to have their personal medical information kept private.
This means do not discuss the patient’s information with family members without that
patient’s consent, and do not discuss any patient in hallways, elevators, or cafeterias.
All patients have the right to refuse treatment. This means they can refuse treatment
by a specific individual (e.g., you, the medical student) or of a specific type (e.g.,
no nasogastric tube [NGT]). Patients can even refuse lifesaving treatment. The only
exceptions to this rule are patients who are deemed to not have the capacity to make
decisions or understand situations, in which case a health care proxy should be sought,
and patients who are suicidal or homicidal.
All patients should be informed of the right to seek advanced directives on admission
(particularly DNR/DNI orders). Often, this is done in a booklet by the admissions staff. If your patient is chronically ill or has a life-
threatening illness, address the subject of advanced directives. The most effective
way to handle this is to address this issue with every patient. This will help to
avoid awkward conversations, even with less ill patients, because you can honestly
tell them that you ask these questions of all your patients. These issues are particularly
imminent with critically ill patients; however, the unexpected can happen with any
patient.
Volunteer. Be self-propelled, self-motivated. Volunteer to help with a procedure or a difficult task. Volunteer to give a 20-minute talk on a topic of your choice. Volunteer to take additional patients. Volunteer to stay late. Bring in relevant articles regarding patients and their issues—this shows your enthusiasm, your curiosity, your outside reading, and your interest in evidence-based medicine.
Be a team player. Help other medical students with their tasks; teach them information you have learned. Support your supervising intern or resident whenever possible. Never steal the spotlight, steal a procedure, or make a fellow medical student or resident look bad. Before leaving for the day ask your team if there is anything else you can do to help.
Be prepared. Always have medical tools (stethoscope, reflex hammer, penlight, measuring tape), medical tape, pocket references (often electronic these days), patient information, a small toy for distraction/gaze tracking, and stickers for rewards readily available. That way you will have what you need when you need it, and possibly more importantly, you will have what someone else needs when they are looking for it! The key is to have the necessary items with you without looking like you can barely haul around your heavy white coat.
Be honest. If you don’t understand, don’t know, or didn’t do it, make sure you always say that. Never say or document information that is false (a common example: “bowel sounds normal” when you did not listen).
Present patient information in an organized manner. The presentation of a new patient will be much more thorough than the update given at rounds every morning. Vital information that should be included in a presentation differs by age group. Always begin with a succinct chief complaint, including identifiers (age, sex) and always a symptom, not a diagnosis (e.g., “wheezing,” not “asthma”)—and its duration. The next line should include important diagnoses carried (e.g., this is where you could state “known asthmatic” or other important information in a wheezer).
Here is a template for the “bullet” presentation for inpatients the days subsequent to admission:
This is day of hospitalization number for this [age] year old [gender] with a history of [major/pertinent history such as asthma, prematurity, etc. or otherwise healthy] who presented with [major symptoms, such as cough, fever, and chills], and was found to have [working diagnosis]. [Tests done] showed [results]. Yesterday/overnight the patient [state important changes, new plan, new tests, new medications]. This morning the patient feels [state the patient’s words], and the physical exam is significant for [state major findings]. Plan is [state plan].
Some patients have extensive histories. The whole history should be present in the admission note, but in a ward presentation it is often too much to absorb. In these cases it will be very much appreciated by your team if you can generate a good summary that maintains an accurate picture of the patient. This usually takes some thought, but it is worth it.
How to Present a Chest Radiograph (CXR)
Always take time to look at each of your patients’ radiographs; don’t just rely on the report. It is good clinical practice and your attending will likely ask you if you did. Plus, it will help you look like a star on rounds if you have seen the film before.
First, confirm that the CXR belongs to your patient and is the most recent one.
If possible, compare to a previous film.
Then, present in a systematic manner:
1. Technique
Rotation, anteroposterior (AP) or posteroanterior (PA), penetration, inspiratory effort (number of ribs visible in lungfields).
2. Bony structures
Look for rib, clavicle, scapula, and sternum fractures.
3. Airway
Look at the glottal area (steeple sign, thumbprint, foreign body, etc), as well as for tracheal deviation, pneumothorax, pneumomediastinum.
4. Pleural space
Look for fluid collections, which can represent hemothorax, chylothorax, pleural effusion.
5. Lung parenchyma
Look for infiltrates and consolidations. These can represent pneumonia, pulmonary contusions, hematoma, or aspiration. The location of an infiltrate can provide a clue to the location of a pneumonia:
Obscured right (R) costophrenic angle = right lower lobe
Obscured left (L) costophrenic angle = left lower lobe
Obscured R heart border = right middle lobe
Obscured L heart border = left upper lobe
6. Mediastinum
Look at size of mediastinum—a widened one (>8 cm) suggests aortic rupture.
Look for enlarged cardiac silhouette (>½ thoracic width at base of heart), which
may represent congestive heart failure (CHF), cardiomyopathy, hemopericardium, or
pneumopericardium.
7. Diaphragm
Look for free air under the diaphragm (suggests perforation).
Look for stomach, bowel, or NG tube above diaphragm (suggests diaphragmatic rupture).
8. Tubes and lines
Identify all tubes and lines.
An endotracheal tube should be 2 cm above the carina. A common mistake is right
mainstem bronchus intubation.
A chest tube (including the most proximal hole) should be in the pleural space
(not in the lung parenchyma).
An NGT should be in the stomach and uncoiled.
The tip of a central venous catheter (central line) should be in the superior vena
cava (not in the right atrium).
The tip of a Swan-Ganz catheter should be in the pulmonary artery.
The tip of a transvenous pacemaker should be in the right atrium.
A sample CXR presentation may sound like:
This is the CXR of [child’s name]. The film is an AP view with good inspiratory effort. There is an isolated fracture of the 8th rib on the right. There is no tracheal deviation or mediastinal shift. There is no pneumoor hemothorax. The cardiac silhouette appears to be of normal size. The diaphragm and heart borders on both sides are clear, no infiltrates are noted. There is a central venous catheter present, the tip of which is in the superior vena cava. This shows improvement over the CXR from [number of days ago] as the right lower lobe infiltrate is no longer present.
How to Present an Electrocardiogram (ECG)
See chapter on cardiovascular disease for specific rhythms.
First, confirm that the ECG belongs to your patient and is most recent one.
If possible, compare to a previous tracing.
Then, present in a systematic manner:
1. Rate (see Figure 1-1)
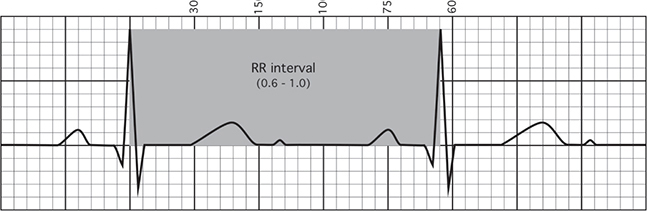
FIGURE 1-1. ECG rate.
“The rate is [number of] beats per minute.”
The ECG paper is scored so that one big box is .20 seconds. These big boxes consist
of five little boxes, each of which are .04 seconds.
A quick way to calculate rate when the rhythm is regular is the mantra: 300, 150,
100, 75, 60, 50 (= 300/# large boxes), which is measured as the number of large boxes
between two QRS complexes. Therefore, a distance of one large box between two adjacent
QRS complexes would be a rate of 300, while a distance of five large boxes between
two adjacent QRS complexes would be a rate of 60.
For irregular rhythms, count the number of complexes that occur in a 6-second interval
(30 large boxes) and multiply by 10 to get a rate in bpm.
2. Rhythm
“The rhythm is [sinus]/[atrial fibrillation]/[atrial flutter].”
If p waves are present in all leads, and upright in leads I & AVF, then the rhythm
is sinus. Lack of p waves usually suggests an atrial rhythm. A ventricular rhythm
(V Fib or V Tach) is an unstable one (could spell imminent death)—and you should be
getting ready for advanced cardiac life support (ACLS).
3. Axis (see Figure 1-2)
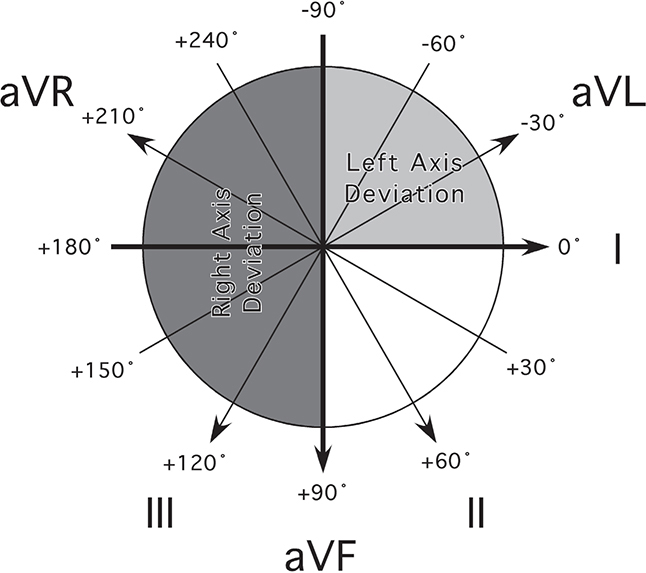
FIGURE 1-2. ECG axes.
“The axis is [normal]/[deviated to the right]/[deviated to the left].”
If I and aVF are both upright or positive, then the axis is normal.
If I is upright and aVF is upside down, then there is left axis deviation (LAD).
If I is upside down and aVF is upright, then there is right axis deviation (RAD).
If I and aVF are both upside down or negative, then there is extreme RAD.
4. Intervals (see Figure 1-3)
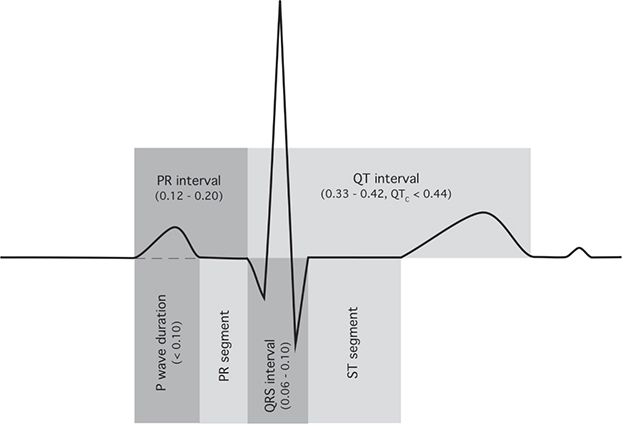
FIGURE 1-3. ECG segments.
“The [PR]/[QRS] intervals are [normal]/[shortened]/[widened].”
Normal PR interval = .12–.20 seconds.
Short PR is associated with Wolff-Parkinson-White syndrome (WPW).
Long PR interval is associated with heart block of which there are three types:
First-degree block: PR interval >.20 seconds (one big box).
Second-degree (Wenckebach) block: PR interval lengthens progressively until a QRS
is dropped.
Second-degree (Mobitz) block: PR interval is constant, but one QRS is dropped at
a fixed interval.
Third-degree block: Complete AV dissociation, prolonged presence is incompatible
with life.
Normal QRS interval ≤.12 seconds.
Prolonged QRS is seen when the beat is initiated in the ventricle rather than the
sinoatrial node, when there is a bundle branch block, and when the heart is artificially
paced with longer QRS intervals. Prolonged QRS is also noted in tricyclic overdose
and WPW.
5. Wave morphology (see Figure 1-4)
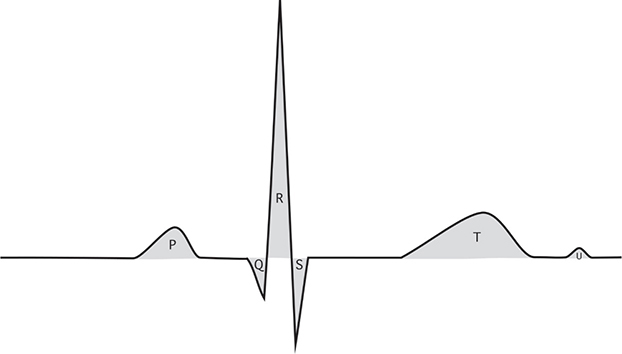
FIGURE 1-4. ECG waves.
a. Ventricular hypertrophy
“There [is/is no] [left/right] [ventricular/atrial] hypertrophy.”
b. Atrial hypertrophy
Clue is presence of tall p waves.
c. Ischemic changes
“There [are/are no] S-T wave [depressions/elevations] or [flattened/inverted] T
waves.” Presence of Q wave indicates an old infarct.
d. Bundle branch block (BBB)
“There [is/is no] [left/right] bundle branch block.”
Clues:
Presence of RSR′ wave in leads V1–V3 with ST depression and T wave inversion goes
with RBBB.
Presence of notched R wave in leads I, aVL, and V4–V6 goes with LBBB.
On Outpatient
The ambulatory part of the pediatrics rotation consists of mainly two parts—focused histories and physicals for acute problems and well-child visits. In the general pediatrics clinic, you will see the common ailments of children, but don’t overlook the possibility of less common ones. Usually, you will see the patient first, to take the history and do the physical exam. It is important to strike a balance between obtaining a thorough exam and not upsetting the child so much that the attending won’t be able to recheck any pertinent parts of it. For acute cases, present the patient distinctly, including an appropriate differential diagnosis and plan. In this section, be sure to include possible etiologies, such as specific bacteria, as well as a specific treatment (e.g., a particular antibiotic, dose, and course of treatment). For presentation of well-child visits, cover all the bases, but focus on the patients’ concerns and your findings. There are specific issues to discuss depending on the age of the child. Past history and development is important, but so is anticipatory guidance–prevention and expectations for what is to come. The goal is to be both efficient and thorough.
Pediatric History and Physical Exam
HISTORY
ID/CC: Age, sex, symptom, duration
HPI: This should be presented in an organized and concise way, leading up to the day of admission or the day of presentation. Avoid using actual dates and days of the week. Avoid superfluous details which will not influence your differential diagnosis.
A good opening line for your HPI: This is a 4-year-old male with no significant past medical history, who was in his usual state of good health until 3 days prior to admission when . . .
In the HPI, include:
Symptoms—location, quality, quantity, aggravating and alleviating factors (make sure to include all pertinent positive and pertinent negative symptoms)
Time course—onset, duration, frequency, change over time
Rx/Intervention—medications, medical help sought, other actions taken Exposures, ill contacts, travel
Current Health:
Nutrition—breast milk/formula/food, quantity, frequency, supplements, problems (poor suck/swallow, reflux)
Sleep—quantity, quality, disturbances (snoring, apnea, bedwetting, restlessness), intervention, wakes up refreshed
Elimination—bowel movement frequency/quality, urination frequency, problems, toilet training
Behavior—toward family, friends, discipline
Development—gross motor, fine motor, language, cognition, social/emotional
PMH:
Pregnancy (be sensitive to adoption issues)—gravida/para status, maternal age, duration, exposures (medications, alcohol, tobacco, drugs, infections, radiation); complications (bleeding, gestational diabetes, hypertension, etc), occurred on contraception?, planned?, emotions regarding pregnancy, problems with past pregnancies
Labor and delivery—length of labor, rupture of membranes, fetal movement, medications, presentation/delivery, mode of delivery, assistance (forceps, vacuum), complications, Apgars, immediate breathe/cry, oxygen requirement/intubation, and duration
Neonatal—birth height/weight, abnormalities/injuries, length of hospital stay, complications (respiratory distress, cyanosis, anemia, jaundice, seizures, anomalies, infections), behavior, maternal concerns
Infancy—temperament, feeding, family reactions to infant
Illnesses/hospitalizations/surgeries/accidents/injuries—dates, medications/interventions, impact on child/family—don’t forget circumcision
Medications—past (antibiotics, especially), present, reactions
Allergies—include reaction
Immunizations—up to date, reactions
Family history—relatives, ages, health problems, deaths (age/cause), miscarriages/stillbirths/deaths of infants or children, health status of parents and siblings, pertinent negative family history
Social history—parents’ education and occupation, living arrangements, pets, water (city or well), lead exposure (old house, paint), smoke exposure, religion, finances, family dynamics, risk-taking behaviors, school/daycare, other caregivers, HEADDSSS exam for adolescents (see Health Supervision and Prevention of Illness and Injury in Children and Adolescents chapter)
ROS:
General—fever, activity, growth
Head—trauma, size, shape
Eyes—erythema, drainage, acuity, tearing, trauma
Ears—infection, drainage, hearing
Nose—drainage, congestion, sneezing, bleeding, frequent colds
Mouth—eruption/condition of teeth, lesions, infection, odor
Throat—sore, tonsils, recurrent strep pharyngitis
Neck—stiff, lumps, tenderness
Respiratory—cough, wheeze, chest pain, pneumonia, retractions, apnea, stridor
Cardiovascular—murmur, exercise intolerance, diaphoresis, syncope
Gastrointestinal—appetite, constipation, diarrhea, poor suck, swallow, abdominal pain, jaundice, vomiting, change in bowel movements, blood, food intolerances
GU—urine output, stream, urgency, frequency, discharge, blood, fussy during menstruation, sexually active
Endocrine—polyuria/polydipsia/polyphagia, puberty, thyroid, growth/stature
Musculoskeletal—pain, swelling, redness, warmth, movement, trauma
Neurologic—headache, dizziness, convulsions, visual changes, loss of consciousness, gait, coordination, handedness
Skin—bruises, rash, itching, hair loss, color (cyanosis)
Lymph—swelling, redness, tender glands
PHYSICAL EXAM
General—smiling, playful, cooperative, irritable, lethargic, tired, hydration status
Vitals—temperature, heart rate, respiratory rate, blood pressure, pulse ox
Growth—weight, height, head circumference (include percentiles), BMI if applicable
Skin—inspect, palpate, birthmarks, rash, jaundice, cyanosis
Head—normocephalic, atraumatic, anterior fontanelle, sutures
Eyes—redness, swelling, discharge, red reflex, strabismus, scleral icterus
Ears—tympanic membranes (DO LAST!)
Nose—patent nares, flaring nostrils
Mouth—teeth, palate, thrush
Throat—oropharynx (red, moist, injection, exudate)
Neck—range of motion, meningeal signs
Lymph—cervical, axillary, inguinal
Cardiovascular—heart rate, murmur, rub, pulses (central/peripheral; bilateral upper and lower extremities including femoral), perfusion/color
Respiratory—rate, retractions, grunting, crackles, wheezes
Abdomen—bowel sounds, distention, tenderness, hepatosplenomegaly, masses, umbilicus, rectal
Back—scoliosis, dimples
Musculoskeletal—joints—erythema, warmth, swelling tenderness, range of motion
Neurologic—gait, symmetric extremity movement, strength/tone/bulk, reflexes (age-appropriate and deep tendon reflexes), mentation, coordination
Genitalia—circumcision, testes, labia, hymen, Tanner staging
Note: The COMSEP website (http://comsep.org) has a video clip demonstrating the pediatric physical exam. It can be found under “curriculum” then “curriculum support resources.”
Your Rotation Grade
Usually, the clerkship grade is broken down into three or four components (every medical school divides grade differently, check with your school’s grading policy):
Inpatient evaluation: This includes evaluation of your ward time by residents and attendings and is based
on your performance on the ward.
Ambulatory evaluation: This includes your performance in clinic, including clinic notes and any procedures
performed in the outpatient setting.
National Board of Medical Examiners (NBME) examination: This portion of the grade is anywhere from 20% to 50%, so performance on this multiple-choice
test is vital to achieving honors in the clerkship.
Objective Structured Clinical Examination (OSCE) or oral exam: Some schools now include an OSCE or oral exam as part of their clerkship evaluation.
This is basically an exam that involves standardized patients and allows assessment
of a student’s bedside manner and physical examination skills.
How to Study
Make a list of core material to learn. This list should reflect common symptoms, illnesses, and areas in which you have particular interest or in which you feel particularly weak. Do not try to learn every possible topic.
SYMPTOMS
Fever
Failure to thrive
Sore throat
Wheezing/cough
Vomiting
Diarrhea
Abdominal pain
Jaundice
Fluid and electrolyte imbalance
Seizures
The knowledge you need on the wards is the day-to-day management know-how (though just about anything is game for pimping!). The knowledge you want by the end-of-rotation examination is the epidemiology, risk factors, pathophysiology, diagnosis, and treatment of major diseases seen in pediatrics.
As you see patients, note their major symptoms and diagnosis for review. Your reading on the symptom-based topics above should be done with a specific patient in mind. For example, if a patient comes in with diarrhea, read about common infectious causes of gastroenteritis and the differences between and complications of them, noninfectious causes, and dehydration in the review book that night.
Select your study material. We recommend the following:
The review book, First Aid for the Pediatrics Clerkship
A major pediatric textbook—Nelson’s Textbook of Pediatrics (also available on MD Consult) and its very good counterpart, Nelson’s Essentials
The Harriet Lane Handbook—the bible of pediatrics: medicine, medications, and lab values as they apply to children
Prepare a talk on a topic. You may be asked to give a small talk once or twice during your rotation. If not, you should volunteer! Feel free to choose a topic that is on your list; however, realize that the people who hear the lecture may consider this dull. The ideal topic is slightly uncommon but not rare, for example, Kawasaki disease. To prepare a talk on a topic, read about it in a major textbook and a review article not more than 2 years old. Then search online or in the library for recent developments or changes in treatment.
Procedures. You may have the opportunity to perform a couple of procedures on your pediatrics rotation. Be sure to volunteer to do them whenever you can, and at least actively observe if participation is not allowed. These may include:
Lumbar puncture
Intravenous line placement
NGT placement
Venipuncture (blood draw)
Foley (urinary) catheter placement
Transillumination of scrotum
IM/SQ immunization injections
Rapid strep or throat culture
Nasopharyngeal swabs or cultures
How to Prepare for the Clinical Clerkship Examination
If you have read about your core illnesses and core symptoms, you will know a great deal about pediatrics. It is difficult but vital to balance reading about your specific patients and covering all of the core topics of pediatrics. To study for the clerkship exam, we recommend:
2–3 weeks before exam: Read this entire review book, taking notes.
10 days before exam: Read the notes you took during the rotation on your core content list, and the corresponding review book sections.
5 days before exam: Read the entire review book, concentrating on lists and mnemonics.
2 days before exam: Exercise, eat well, skim the book, and go to bed early.
1 day before exam: Exercise, eat well, review your notes and the mnemonics, and go to bed on time. Do not have any caffeine after 2 PM
Throughout all your studying do practice questions from a reliable source of questions.
Other helpful studying strategies include:
Study with friends. Group studying can be very helpful. Other people may point out areas that you have not studied enough and may help you focus on the goal. If you tend to get distracted by other people in the room, limit this to less than half of your study time.
Study in a bright room. Find the room in your house or in your library that has the best, brightest light. This will help prevent you from falling asleep. If you don’t have a bright light, get a halogen desk lamp or a light that simulates sunlight (not a tanning lamp).
Eat light, balanced meals. Make sure your meals are balanced, with lean protein, fruits and vegetables, and fiber. A high-sugar, high-carbohydrate meal will give you an initial burst of energy for 1 to 2 hours, but then you’ll drop.
Take practice exams. The point of practice exams is not so much the content that is contained in the questions, but the training of sitting still for 3 hours and trying to pick the best answer for each and every question.
Tips for answering questions. All questions are intended to have one best answer. When answering questions, follow these guidelines:
Read the answers first. For all questions longer than two sentences, reading the answers first can help you sift through the question for the key information.
Look for the words “EXCEPT, MOST, LEAST, NOT, BEST, WORST, TRUE, FALSE, CORRECT, INCORRECT, ALWAYS, and NEVER.” If you find one of these words, circle or underline it for later comparison with the answer.
Finally, remember—children are not just small adults. They present with a whole new set of medical and social issues. More than ever, you are treating families, not just individual patients.
Pocket Cards for the Wards
The following “cards” contain information that is often helpful during the pediatrics rotation. We advise that you make a copy of these cards, cut them out, and carry them in your coat pocket when you are on the wards.