Chapter 9
Pure Beauty
Recipes
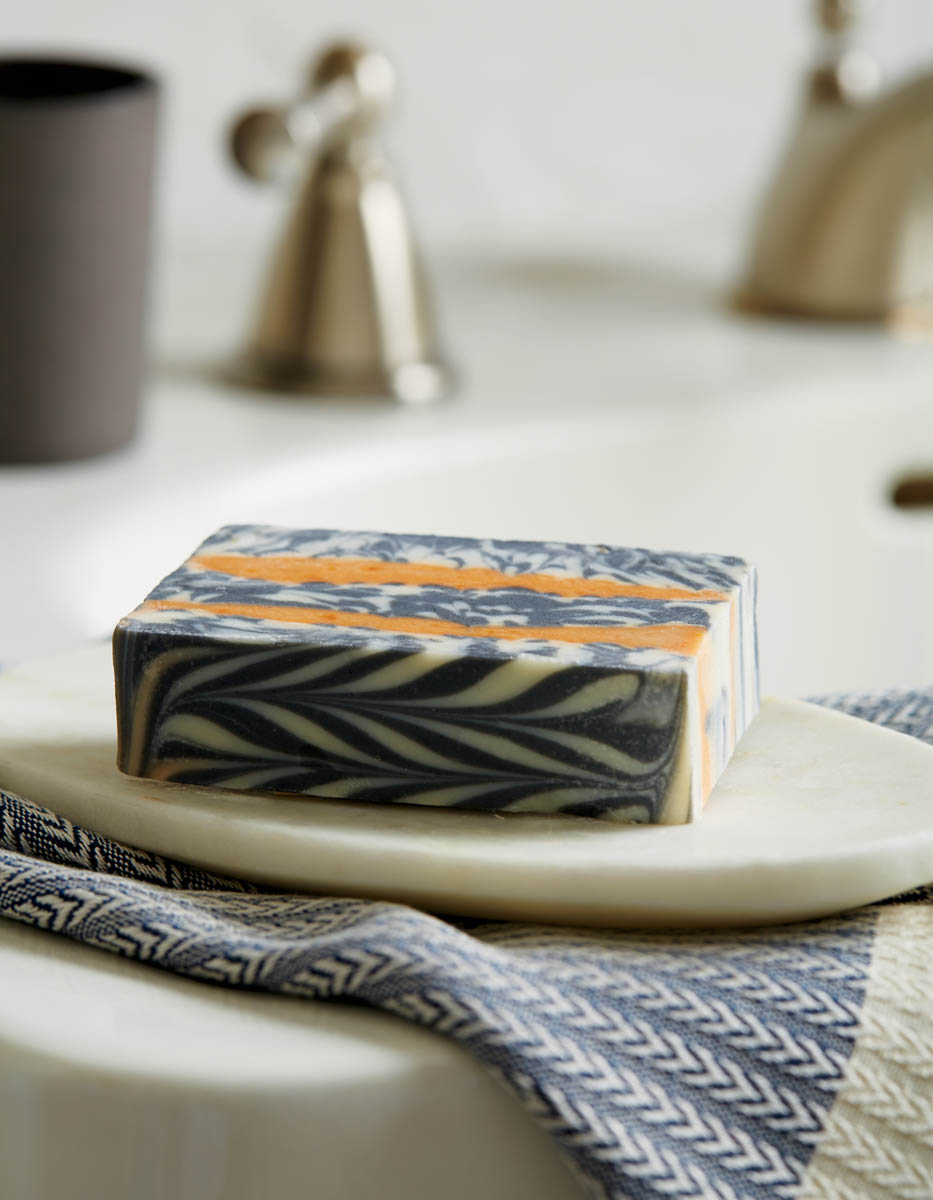
Annatto-Yarrow with Embeds
Approximately 12 bars
This recipe uses a number of herbs and several different techniques, but it is not complicated to make. It calls for an annatto oil infusion, a yarrow lye-water infusion, and embeds that need to be made ahead of time.
Annatto is used in many foods and cosmetics for the beautiful pop of orange it provides. An ancient remedy used as a wound healer, yarrow has been found in burial sites as old as 60,000 bce. Today, many people use it to improve circulation and soothe skin irritation, but it should be avoided during pregnancy.
Stage 1:
Make the Embeds
Mold and Special Tools
- 10-inch silicone loaf mold
- Cheese slicer
Lye-Water Amounts
- 1 ounce lye (5% superfat)
- 2.3 ounces distilled water
- 1⁄2 teaspoon sodium lactate (optional)
Oil Amounts
- 1.8 ounces palm oil (25%)
- 1.8 ounces coconut oil (25%)
- 0.5 ounce mango butter (7%)
- 3 ounces olive oil pomace (43%)
Colorant and Additive Amounts
- 1 tablespoon spirulina powder
- 1 teaspoon yarrow powder
Essential Oil
- 0.3 ounce bergamot essential oil
Note: This beautiful design requires that the embeds cure for 48 hours before using them in the base soap, so plan ahead.
Safe Soaping!
- Wear proper safety gear the whole time.
- Work in a well-ventilated space.
- No distractions (keep kids and pets away).
Make the Soap Mixture
- 1. Add the lye to the water (never the other way around) and stir gently until all of the lye is dissolved. If using sodium lactate, add it to the lye-water and stir to combine. Set aside until clear.
- 2. Add the spirulina and yarrow powder directly to the hot lye-water, and stir until there are no more clumps.
- Melt the palm oil in its original container, mix it thoroughly, and measure into a bowl large enough to hold all of the oils and the lye-water with room for mixing. Melt and measure the coconut oil and add it to the bowl. Add mango butter to the hot oils, and stir until melted. If needed, microwave in 10-second bursts until completely melted. Add the olive oil pomace to the hot oils.
- 3. When the oils and the lye-water are between 110° and 120°F (43–49°C), add the lye-water to the oils, pouring it over a spatula or the shaft of the stick blender to minimize air bubbles. Tap the stick blender a couple of times against the bottom of the bowl to release any air that may be trapped in the blades. Do not turn on the stick blender until it is fully immersed. Stick-blend for 10 seconds, or until very thin trace is achieved.
- 4. Add all of the essential oil and stick-blend for 5 seconds.
- 5. Pour the batter into the mold; it should just be a thin layer of soap. Tap the mold to settle the soap, and let it set for 48 hours before attempting to unmold.
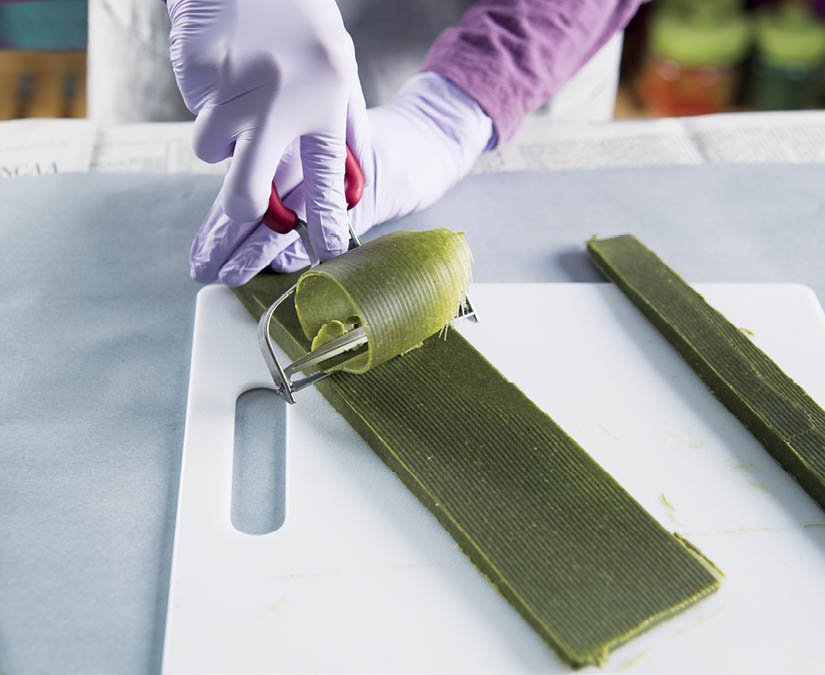
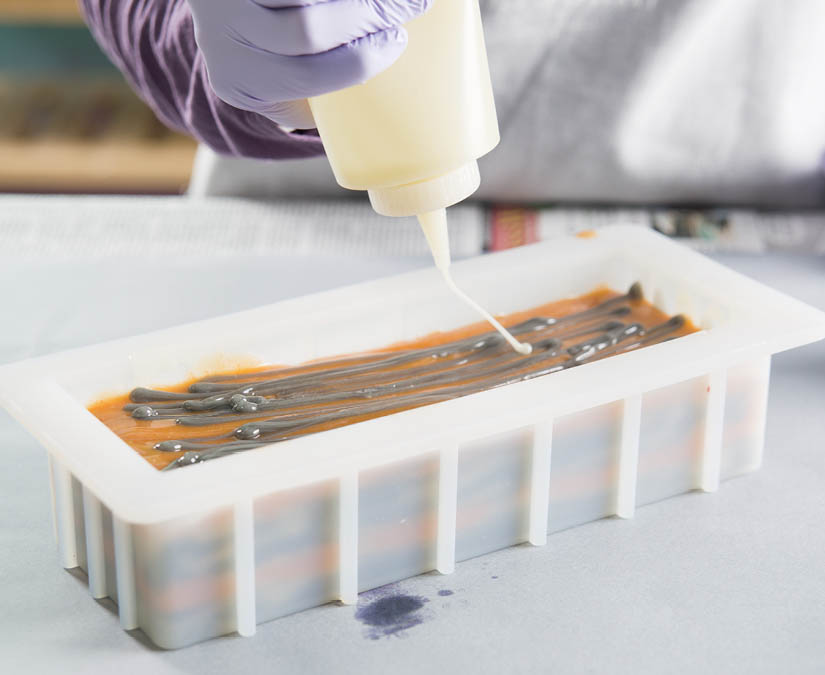
Cut the Embeds
- 6. Once unmolded, cut the soap lengthwise to create two pieces, with one piece being twice as wide as the other (roughly one-third and two-thirds).
- 7. Use a cheese slicer to cut both pieces into slices of various thicknesses. Having different-sized embeds creates a unique look to each bar.
Stage 2:
Make the Base Soap
Mold and Special Tools
- 10-inch silicone loaf mold
Lye-Water Amounts
- 4.7 ounces lye (5% superfat)
- 11.2 ounces distilled water
- 1 tablespoon sodium lactate (optional)
Oil Amounts
- 6.8 ounces palm oil (20%)
- 8.5 ounces coconut oil (25%)
- 10.2 ounces olive oil pure (30%)
- 6.8 ounces rice bran oil (20%)
- 1.7 ounces chia seed oil (5%)
Essential Oil Blend
- 0.8 ounce bergamot essential oil
- 0.8 ounce rosemary essential oil
Colorant and Additive Amounts
- 2 tablespoons poppy seeds
- 1 tablespoon annatto seeds infused in 1 ounce olive oil pure*
- 2 heaping tablespoons calendula petals
- Embed slices (made 48 hours before)
*See how to make infused oils.
Make the Soap Mixture
- 1. Add the lye to the water (never the other way around) and stir gently until all of the lye is dissolved. If using sodium lactate, add it to the lye-water and stir to combine. Set the mixture aside to cool until it becomes clear.
- 2. Melt the palm oil in its original container, mix it thoroughly, and measure into a bowl large enough to hold all of the oils and the lye-water with room for mixing. Melt and measure the coconut oil and add it to the bowl. Add the olive oil pure, rice bran oil, and chia seed oil to the hot oils.
- 3. When the oils and the lye-water are between 110° and 120°F (43–49°C), add the lye-water to the oils, pouring it over a spatula or the shaft of the stick blender to minimize air bubbles. Tap the stick blender a couple of times against the bottom of the bowl to release any air that may be trapped in the blades. Do not turn on the stick blender until it is fully immersed. Stick-blend for 45 seconds, or until thin trace is achieved.
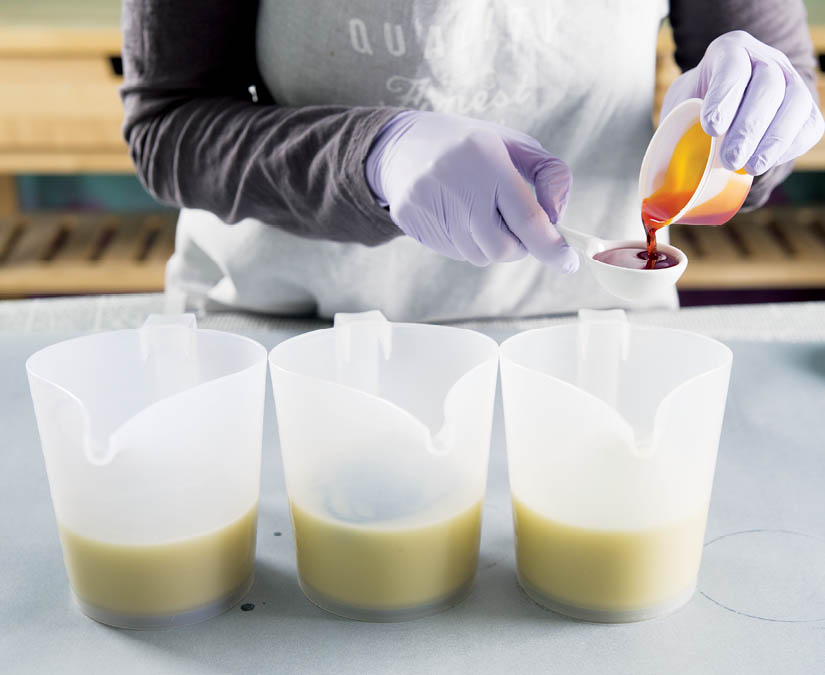
- 4. Add all of the essential oil to the batter and whisk to combine. Split the batch in half, add the following to each container, then whisk to combine:
- Container A: all the poppy seeds
- Container B: 2 tablespoons annatto infusion
Pour the Soap
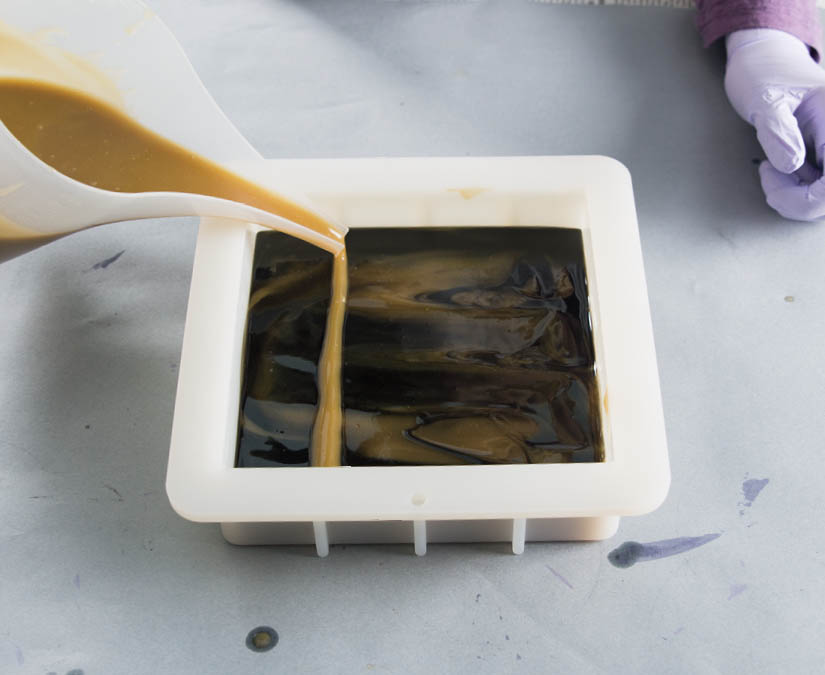
- 5. Beginning with the poppy seed batter, pour across the bottom of the mold in an S pattern, using only about a cup of batter.
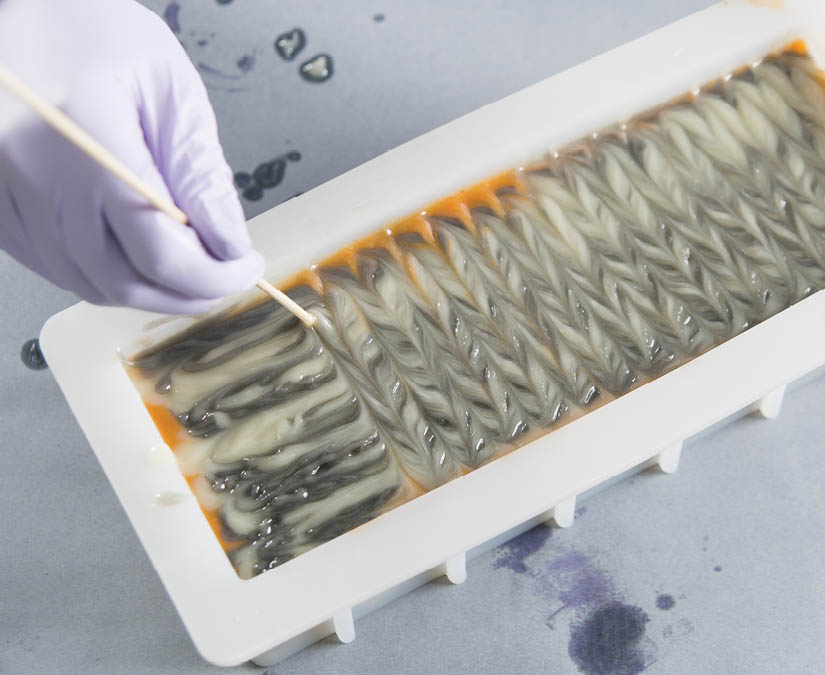
- 6. Repeat this process with the yellow batter, pouring it into the poppy seed batter. Continue alternating pours of poppy seed and annatto batter until all of the batter is used.
- 7. Insert the green embeds, pushing them into the soap like grass blades in a random fashion. Tap the mold firmly on the counter to settle the soap and release any bubbles.
Final Steps
- 8. Finish off the soap with a sprinkling of calendula petals across the entire surface of the soap. If needed, use a spoon to gently push the petals securely into the soap.
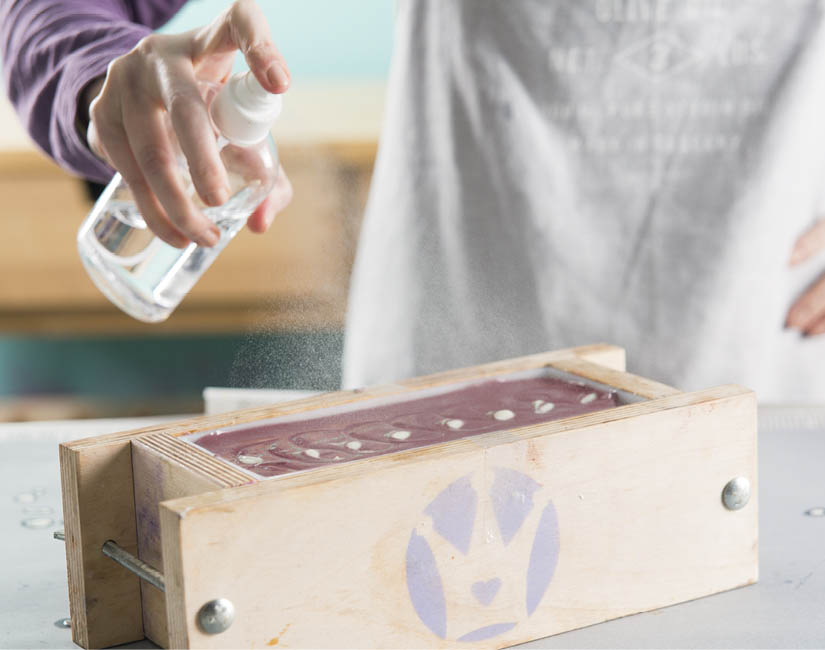
- 9. Spritz with 99% rubbing alcohol to help prevent soda ash. Allow the soap to set for 2 to 3 days before attempting to unmold.
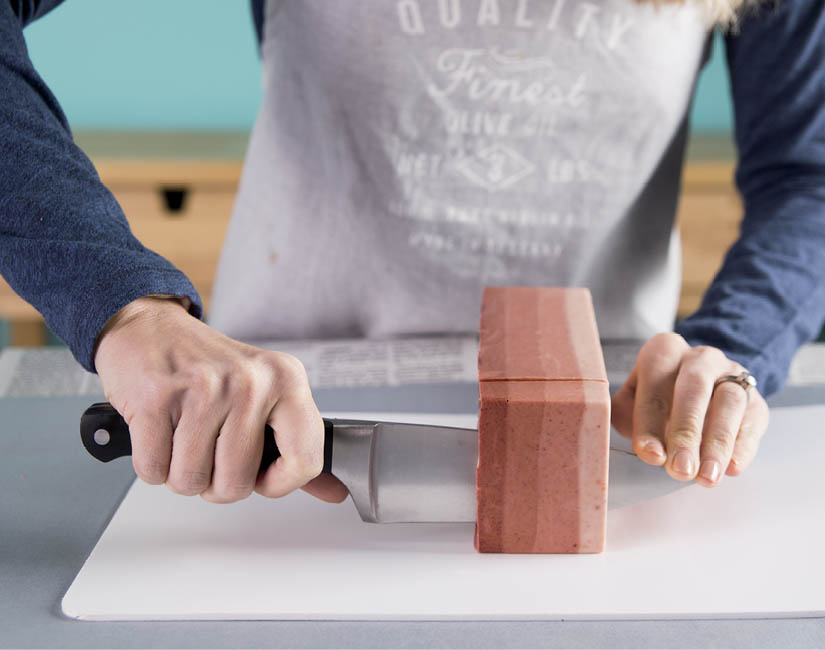
- 10. To cut into bars, turn the block on its side to avoid dragging petals down through the soap as you cut. Allow the bars to cure in a well-ventilated area for 4 to 6 weeks before using, turning them every few days to ensure that they cure evenly.
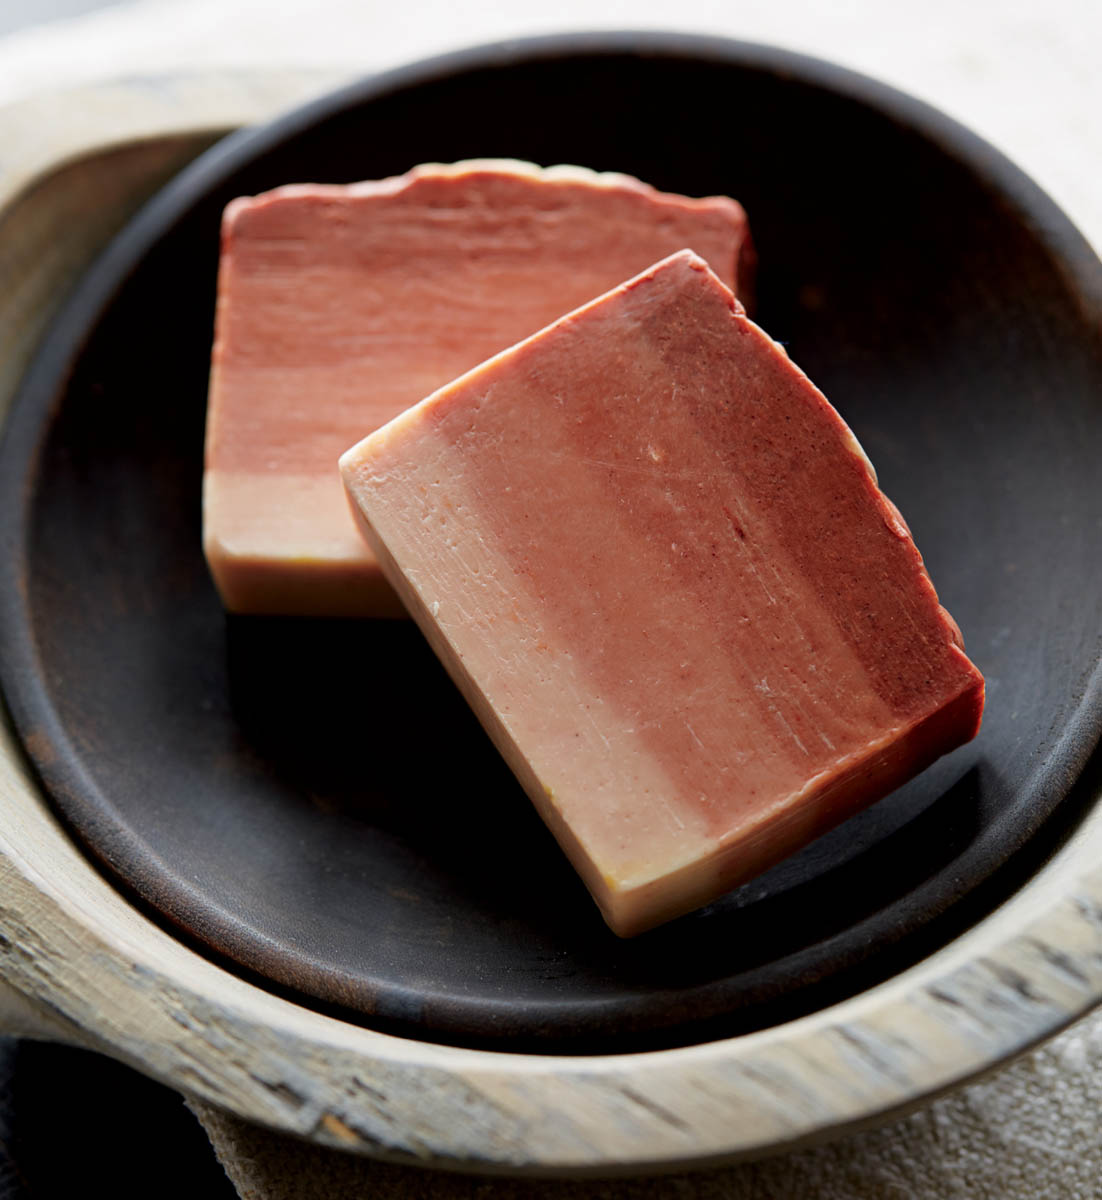
Madder Root Ombre Bars
Approximately 8 bars
Powdered madder root has a rich red color. It belongs in the same family as coffee and is a natural astringent. To achieve the ombre effect, pour each layer low and slow over a spatula to keep the lines nice and straight. To bring out the best color for this soap, a hot gel phase is essential. Soaping at slightly higher temperatures than in typical recipes and using good insulation will ensure a full gel (see What Is Gel Phase?).
Materials
Mold and Special Tools
- 2-pound wooden mold with silicone liner
- Squirt bottle
- Chopstick or similarly sized swirling tool
- Heating pad
Lye-Water Amounts
- 3 ounces lye (5% superfat)
- 7.3 ounces distilled water
- 2 teaspoons sodium lactate (optional)
Oil Amounts
- 5.5 ounces palm oil (25%)
- 5.5 ounces coconut oil (25%)
- 0.7 ounce cocoa butter (3%)
- 5.5 ounces olive oil pure (25%)
- 4.8 ounces rice bran oil (22%)
Additive Amounts
- 2 teaspoons titanium dioxide dispersed into 2 tablespoons olive oil pure
- 3 tablespoons of madder root dispersed into 2 ounces olive oil pure
Essential Oil Blend
- 0.5 ounce black pepper essential oil
- 0.5 ounce lemongrass essential oil
Safe Soaping!
- Wear proper safety gear the whole time.
- Work in a well-ventilated space.
- No distractions (keep kids and pets away).
Make the Soap Mixture
- 1. Add the lye to the water (never the other way around) and stir gently until all of the lye is dissolved. If using sodium lactate, add it to the lye-water and stir to combine. Set the mixture aside to cool until it becomes clear.
- 2. Melt the palm oil in its original container, mix it thoroughly, and measure into a bowl large enough to hold all of the oils and the lye-water with room for mixing. Melt and measure the coconut oil and add it to the bowl. Add the cocoa butter to the hot oils. Stir until melted. If needed, heat the oils further until the cocoa butter is melted. Add the olive oil pure and rice bran oil to the other oils.
- 3. When both the oils and the lye-water are between 120° and 130°F (49–54°C), add the lye-water to the oils, pouring it over a spatula or the shaft of the stick blender to minimize air bubbles. Tap the stick blender a couple of times against the bottom of the bowl to release any air that may be trapped in the blades. Do not turn on the stick blender until it is fully immersed. Stick-blend for 30 seconds, or until very thin trace is achieved.
- 4. Pour about 1⁄4 cup of batter into a squirt bottle. Set aside.
Mix and Pour
- 5. For the first layer, pour about 1 cup of batter into an easy-pour container. Add to the batter:
- 1 teaspoon of titanium dioxide dispersion
- 1⁄4 teaspoon madder root dispersion
- One-fourth of the essential oil blend
Using a whisk, blend the batter until the color and essential oil are completely mixed in. Stick-blend for 5 seconds to help soap set up.
- 6. Gently pour the batter into the mold, and tamp the mold until the layer is flat.
- 7. For the second layer, pour 1 cup of batter into the same container and add:
- 1 teaspoon titanium dioxide blend
- 11⁄2 teaspoons madder root dispersion
- One-third of the remaining essential oil
Whisk the batter until the color and essential oil are completely dispersed. Stick-blend for 5 seconds.
- 8. Gently pour the batter over the first layer, pouring as low as possible and very slowly to allow the batter to spread over the first layer and cover it completely. Gently tap the mold on the table to release any air bubbles.
- 9. For the third layer, pour 1 cup of batter into the container and add:
- 1 teaspoon titanium dioxide blend
- 1 tablespoon madder root dispersion
- Half of the remaining essential oil
Whisk the batter until the color and essential oil are completely mixed in and pour the third layer as described in step 8.
- 10. For the final layer, pour the last of the batter into the container and add:
- 1 teaspoon titanium dioxide blend
- 2 tablespoons madder root dispersion
- Remaining essential oil
Whisk the batter until the color and essential oil are completely mixed in and pour the final layer as described in step 8.
- 11. Gently shake the squirt bottle to loosen the soap, and squirt dots down the center of the soap, roughly 1⁄2 inch apart.
- 12. Insert the wide end of a chopstick about 1⁄4 inch into the soap, starting on the edge of the mold, next to the white dots. Move the chopstick through the dots in a figure eight pattern, dragging the white through the purple soap.
Final Steps
- 13. Spritz the soap with 99% rubbing alcohol, and place the mold on a heating pad on medium for 30 minutes, covered. Turn off the pad, but leave the soap insulated and on top of the warm pad overnight. Allow the soap to set for at least 48 hours before attempting to unmold.
- 14. To cut this soap, turn the loaf on its side so that the cuts run with the layers; this will keep the layers from dragging into each other. Allow the bars to cure in a well-ventilated area for 4 to 6 weeks before using, turning them every few days to ensure that they cure evenly.
Cucumber Layers
Approximately 8 bars
The simple cucumber is packed with skin-loving vitamins: C, B1, B2, B3, and B5 Some soapmakers report that cucumber accelerates trace, so double-check that the mold and all of the necessary spoons and containers are ready for action before beginning to make this soap. This recipe works with the acceleration and is designed to hold a tall peak that will not sag.
Materials
Mold and Special Tools
- 2-pound wooden loaf mold with silicone liner
- Heating pad
- Large piece of cardboard
Lye-Water Amounts
- 2.9 ounces lye (5% superfat)
- 6.1 ounces distilled water
- 2 teaspoons sodium lactate (optional)
Oil Amounts
- 17.6 ounces olive oil pure (80%)
- 3.3 ounces coconut oil (15%)
- 1.1 ounces shea butter (5%)
Colorant and Additive Amounts
- 1 ounce cucumber puree (2-ounce chunk of peeled cucumber, seeds included, pureed in a blender until smooth)
- 1 tablespoon cucumber skin, pureed until mostly smooth
- 1 tablespoon spirulina powder dispersed into 1 tablespoon olive oil pure
- 1 teaspoon titanium dioxide dispersed into 1 tablespoon olive oil pure
- 1 tablespoon annatto seeds infused in 1 ounce olive oil pure
Optional Color Palette
For a more intense color, replace the spirulina powder and the annatto infusion with the following:
- 1 teaspoon green chrome oxide dispersed into 1 tablespoon olive oil pure
- 1 teaspoon yellow oxide dispersed into 1 tablespoon olive oil pure
Essential Oil Blend
- 0.7 ounce lavender 40/42 essential oil*
- 0.3 ounce patchouli essential oil
*Regular lavender essential oil will work, but this variety has been specifically blended to last in cold-process soap.
Safe Soaping!
- Wear proper safety gear the whole time.
- Work in a well-ventilated space.
- No distractions (keep kids and pets away).
Make the Soap Mixture
- 1. Add the lye to the water (never the other way around) and stir gently until all of the lye is dissolved. Add the sodium lactate to the lye-water and stir to combine. Set the mixture aside to cool until it becomes clear.
- 2. In a bowl large enough to hold all the oils and the lye-water solution, measure out the olive oil pure. In a separate container, measure out and melt the coconut oil and shea butter. Once they are completely melted, combine with the other oils in the large bowl.
- 3. When both the oils and the lye-water have cooled to between 110° and 120°F (43–49°C), add the lye-water to the oils, pouring it over a spatula or the shaft of the stick blender to minimize air bubbles. Tap the stick blender a couple of times against the bottom of the bowl to release any air that may be trapped in the blades. Do not turn on the stick blender until the blades are fully immersed. Stick-blend for about 45 seconds, or until thin trace is achieved.
Mix and Pour
- 4. Add one ounce of the light green cucumber puree to the batter, and stick-blend for 5 seconds.
- 5. Divide the batter equally among three containers. Color the containers as follows.
- Container A: 1 tablespoon dark green cucumber-skin puree, 1 tablespoon spirulina dispersion (or green chrome oxide dispersion)
- Container B: 1 teaspoon titanium dioxide dispersion
- Container C: 4 teaspoons annatto-infused oil (or yellow oxide dispersion)
- 6. Pour approximately one-third of the essential oil blend into the dark green soap. Stick-blend this into the batter for 3 seconds. Pour the green soap into the lined mold.
- 7. Pour approximately one-third of the essential oil blend into the white soap. Whisk the essential oils into the soap. Carefully pour the white soap low and slow over the green soap, so that the second layer doesn’t break through. (Pour over the back of a clean spatula if it isn’t quite thick enough.)
- 8. Repeat with the orange soap, again using a spatula if necessary to keep it from breaking into the white layer.
- 9. Using the back of a spoon, build texture on the top of the soap. Pull the soap from the outer edges of the mold, up toward the center into a peak. If the soap is not quite solid enough to hold its shape, wait a minute or two and try again.
Final Steps
- 10. Set the soap on top of a heating pad (not shown here) turned on low in an out-of-the-way spot. Place a cardboard “tent” over the soap so it is not touching your creation, and carefully drape a small towel over it. Leave the heating pad on for 20 minutes, then turn it off, but don’t move the soap.
- 11. After 48 hours, unmold the soap and cut it into bars. To cut, turn the soap on its side to avoid dragging the layers into each other. Allow the bars to cure in a cool, dark, well-ventilated area for 4 to 6 weeks before using, turning them every few days to ensure that they cure evenly.
White Tea Faux Funnel Pour
Makes 9 bars
The beautiful concentric swirls of this soap are created using a technique called “faux funnel pour.” A thin trace and random placement of centers for the pour combine to create the fine lines. White tea is the least processed type of tea, and it retains the highest content of catechins, powerful antioxidants that are often used in anti-aging creams. The tea is frozen to help prevent it from scorching and turning an even darker color in the soap. Keeping a neutral color palette is essential for pulling off this design with aplomb.
Materials
Mold and Special Tools
- 9-bar birchwood mold and liner
- 2 squirt bottles
Lye-Water Amounts
- 4.5 ounces lye (5% superfat)
- 10.8 ounces white tea made with distilled water, frozen into cubes
- 1 tablespoon sodium lactate (optional)
Oil Amounts
- 7.8 ounces coconut oil (23%)
- 2.3 ounces shea butter (7%)
- 16.5 ounces olive oil pure (50%)
- 6.6 ounces canola oil (20%)
Essential Oil Amount
- 1.5 ounces eucalyptus essential oil
Colorant Amounts
- 1 teaspoon titanium dioxide dispersed into 1 tablespoon canola oil
- 1 teaspoon green chrome oxide dispersed into 1 tablespoon canola oil
Safe Soaping!
- Wear proper safety gear the whole time.
- Work in a well-ventilated space.
- No distractions (keep kids and pets away).
Make the Soap Mixture
- 1. Place the white tea ice cubes in a heat-safe container and put the container in a cold-water bath. Slowly sprinkle approximately 1 tablespoon of lye over the tea. Carefully stir until the lye is beginning to dissolve. Add another tablespoon of lye to the mixture, and continue stirring. Repeat this process until all of the lye is dissolved. The mixture will have an odd smell and color to it, which is normal.
It’s important to keep the tea-and-lye mixture as cold as possible, so you may need to change out the cold-water bath as things heat up. This process should take 5 to 7 minutes. Heating the tea slowly by adding the lye slowly is key to keeping the color as neutral as possible. If using sodium lactate, add it to the lye mixture and stir to combine. Set aside until clear.
- 2. Melt and measure the coconut oil into a bowl large enough to hold all the oils and the lye mixture. Add the shea butter to the hot coconut oil, and stir until it is melted. If needed, heat in 10-second bursts in the microwave, stirring between bursts until the butter melts. Add the olive oil pure and canola oil to the hot oils.
- 3. When the oils and the lye mixture are both below 110°F (43°C), add the lye mixture to the oils, pouring it over a spatula or the shaft of the stick blender to minimize air bubbles. Tap the stick blender a couple of times against the bottom of the bowl to release any air that may be trapped in the blades. Do not turn on the stick blender until it is fully immersed. Stick-blend for 30 seconds, or until very light trace is achieved. Add all of the eucalyptus essential oil, and stick-blend for another 5 seconds to combine.
- 4. Divide the batch into two containers:
- Container A: 1 tablespoon titanium dioxide mixture
- Container B: 3⁄4 tablespoon green chrome mixture
Stick blend each container for 5 seconds. Pour into squirt bottles.
Pour the Soap
- 5. Squirt white circles into the mold in a random pattern. Count to 5 as you squeeze, to help keep the circles in similar sizes. We had 6 circles in our mold to start with.
- 6. Squirt green soap directly in the center of each white circle, again counting to 5 for each squirt. You want the soap to squirt into the previous circle, so don’t be afraid to squirt firmly. Repeat the process, alternating with green and white soap. Tamp the mold down often to settle the soap. Do not use dividers in this soap, or it will disrupt the design.
Final Steps
- 7. Allow the soap to set for at least 48 hours before unmolding, then cut into bars. You can use the divider set as a guide to cut even bars.
- 8. Allow the bars to cure in a well-ventilated area for 4 to 6 weeks before using, turning them every few days to ensure that they cure evenly.
Gardener Scrub with Coffee Grounds
Approximately 20 bars
The perfect soap for cleaning up after working outside, this super-scrubby bar gets the dirt off your fingers while leaving behind a fresh, herbaceous scent. For extra exfoliation, use large grounds; for gentler soap, use a finer grind.
Easy-pour containers with long spouts are highly recommended for this project; they allow you to get close to the soap while pouring layers in the small spaces between the dividers. Gel phase will help the colors in this recipe pop.
Materials
Mold and Special Tools
- 5-pound wooden mold with sliding bottom with silicone liner
- Multi-pour sectioning tool
- Heating pad
Lye-Water Amounts
- 6.9 ounces lye (5% superfat)
- 16.5 ounces distilled water
- 11⁄2 tablespoons sodium lactate (optional)
Oil Amounts
- 10 ounces palm oil (20%)
- 12.5 ounces coconut oil (25%)
- 2.5 ounces avocado butter (5%)
- 17.5 ounces olive oil pure (35%)
- 7.5 ounces canola oil (15%)
Essential Oil Blend
- 1.5 ounces lemongrass essential oil
- 1 ounce rosemary essential oil
- 0.5 ounce basil essential oil
Colorant and Additive Amounts
- 5 teaspoons paprika dispersed into 1 tablespoon of canola oil
- 5 teaspoons ground orange peel dispersed into 1 tablespoon of canola oil
- 5 teaspoons brewed coffee grounds
- 10 teaspoons green zeolite clay dispersed into 2 tablespoons distilled water
- 2 teaspoons spirulina dispersed into 2 tablespoons canola oil
Safe Soaping!
- Wear proper safety gear the whole time.
- Work in a well-ventilated space.
- No distractions (keep kids and pets away).
Make the Soap Mixture
- 1. Add the lye to the water (never the other way around) and stir gently until all of the lye is dissolved. If using sodium lactate, add it to the lye-water and stir to combine. Set the mixture aside to cool until it becomes clear.
- 2. Melt the palm oil in its original container, mix it thoroughly, and measure into a bowl large enough to hold all of the oils and the lye-water with room for mixing. Melt and measure the coconut oil and add it to the bowl. Add the avocado butter, and stir it in the hot oils until the butter is melted. Add the olive oil pure and the canola oil.
- 3. When both the oils and the lye-water are between 110° and 120°F (43–49°C), add the lye-water to the oils, pouring it over a spatula or the shaft of the stick blender to minimize air bubbles. Tap the stick blender a couple of times against the bottom of the bowl to release any air that may be trapped in the blades. Do not turn on the stick blender until it is fully immersed. Stick-blend for 30 seconds, or until very light trace is achieved.
- 4. Set up the mold with one long divider down the middle, pushed firmly to the bottom. Use a cross-section divider just across the top of the mold to hold the long one centered while you pour.
Color the Soap
- 5. Divide the batter into four exactly equal sections. If you trust your visual skills, you can measure this way, or you can weigh the batter as you pour it into each container. Each container should have approximately 20 ounces by weight of soap batter.
- 6. Add the following amounts to the containers:
- Container A: All of the paprika dispersion
- Container B: All of the orange peel powder
- Container C: All of the coffee grounds
- Container D: All of the zeolite clay, 1 teaspoon of the spirulina powder dispersion
Stick-blend each container for 15 seconds, making sure to incorporate all of the colorants fully. Whisk about one-fourth of the essential oil into each container.
Pour the Soap
- 7. For the first layer, slowly pour the green zeolite and the paprika soap on opposite sides of the divider, at an even rate. Gently tap the mold on the table to settle once all of the soap is poured.
- 8. Next, pour the second layer. Move the spout of the containers as close to the first layer as possible to avoid breaking through. Pour the coffee soap over the paprika soap, and the orange peel soap over the spirulina soap.
Final Steps
- 9. Pull the divider straight up out of the soap, and then gently remove the end pieces. Spritz with 99% rubbing alcohol to help prevent soda ash. Cover the mold with a towel and place it on a heating pad for 30 minutes to encourage gel phase.
- 10. Allow the soap to harden for 48 hours before attempting to unmold, then cut into bars. To remove the sliding bottom, turn the entire mold on its side and pull the bottom out. Allow the bars to cure in a well-ventilated area for 4 to 6 weeks before using, turning them every few days to ensure that they cure evenly.
Layered Tomato Swirl Bars
Approximately 12 bars
Tomatoes may seem like a surprising ingredient in a soap, but their beautiful, rich color hints at skin-loving nutrients, such as lycopene, which is thought to help with the effects of aging. The tea tree and peppermint essential oils in this recipe leave a refreshing, cooling feeling on the skin. The contrasting colors and bold layers make an eye-catching design.
Materials
Mold and Special Tools
- 10-inch silicone loaf mold
- 2 squirt bottles
- Chopstick or similar swirling tool
Lye-Water Amounts
- 4.6 ounces lye (5% superfat)
- 10.9 ounces distilled water
- 1 tablespoon sodium lactate (optional)
Oil Amounts
- 9.9 ounces coconut oil (30%)
- 3.3 ounces mango butter (10%)
- 8.2 ounces canola oil (25%)
- 9.9 ounces olive oil pomace (30%)
- 1.6 ounces hazelnut oil (5%)
Colorant and Additive Amounts
- 2 teaspoons activated charcoal dispersed into 2 tablespoons canola oil
- 1.5 ounces tomato paste
Essential Oil Blend
- 0.7 ounce peppermint 2nd distilled essential oil
- 0.7 ounce tea tree essential oil
Safe Soaping!
- Wear proper safety gear the whole time.
- Work in a well-ventilated space.
- No distractions (keep kids and pets away).
Make the Soap Mixture
- 1. Slowly add the lye to the distilled water (never the other way around) and stir gently until all of the lye is dissolved. If using sodium lactate, add it to the lye-water and stir to combine. Set the mixture aside to cool until it becomes clear.
- 2. Melt the coconut oil in its original container, and measure into a bowl large enough to hold all of the oils and the lye-water with room for mixing. Add the mango butter to the hot oil, and stir until melted. If needed, heat the coconut/mango butter in 15-second bursts in the microwave to melt completely. Add the canola oil, olive oil pomace, and hazelnut oil to the hot oils.
- 3. When both the lye and the oils have cooled to between 110° and 120°F (43–49°C), slowly pour the lye-water into the oils, pouring it over a spatula or the shaft of the stick blender to minimize air bubbles. Tap the stick blender a couple of times against the bottom of the bowl to release any air that may be trapped in the blades. Do not turn on the stick blender until it is fully immersed. Stick-blend for 25 seconds, or until very light trace is achieved. Add all of the essential oil, and whisk to combine.
- 4. Separate the batter into three separate containers. Add the following colorants to the containers:
- Container A: 1.5 tablespoons activated charcoal dispersion
- Container B: 1.5 ounces tomato paste
- Container C: Uncolored (white)
- 5. Stick-blend each container (moving from lightest to darkest) for 5 seconds to incorporate the color. Pour the black and the white batter (Containers A and C) into squirt bottles.
Pour and Swirl
- 6. Begin the pattern by squirting stripes of black and white lengthwise across the bottom of the mold, alternating colors. Continue until you have approximately a 1⁄2-inch layer of soap. Tamp the mold to release any bubbles.
- 7. Pour the tomato paste soap over the back of a spatula over the striped soap. Pour low and slow to avoid breaking through the layers. Use half of the tomato paste soap for this layer.
- 8. Repeat steps 6 and 7.
- 9. After the second layer of tomato soap has been poured, continue making straight lines of the black and white soap until all soap has been used.
- 10. Insert the swirling tool about 1⁄4 inch into the soap in one corner. Working down the length of the mold, drag the tool from one side of the mold to the other to create narrow U shapes perpendicular to the lines of soap.
Final Steps
- 11. Spray the surface of the soap with 99% rubbing alcohol to help prevent soda ash, and cover the soap while it rests. Allow it to sit undisturbed for 48 to 72 hours before attempting to unmold.
- 12. Once unmolded, cut the soap into bars and leave them in a well-ventilated area to cure for 4 to 6 weeks before using, turning them every few days to ensure that they cure evenly.
Coffee Swirl Layered Cubes
Approximately 9 bars
A cup of coffee is usually known for waking you up in the morning, but caffeine also provides a jolt for your skin. It is a popular ingredient in some anti-cellulite creams. The rich, warm scent of the balsam Peru essential oil and the creamy tan color imparted from the brewed coffee make this soap smell and look almost good enough to eat. I fell in love with the beautiful “reverse stamp” technique on Auntie Clara’s Handcrafted Cosmetics blog and have recreated it for you here. There are many options for creating your own stamp designs.
Materials
Mold and Special Tools
- 6-inch silicone slab mold
- 10-inch length of 19-gauge (or similar) stainless steel wire bent into a 11⁄2-inch-diameter spiral
Lye-Water Amounts
- 3.0 ounces lye (5% superfat)
- 7.2 ounces cooled coffee
- 2 teaspoons sodium lactate (optional)
Oil Amounts
- 7.5 ounces olive oil pomace (34%)
- 5 ounces rice bran oil (23%)
- 0.6 ounce castor oil (3%)
- 1.1 ounces coffee butter (5%)
- 2.2 ounces cocoa butter (10%)
- 5.5 ounces coconut oil (25%)
Colorant
- 1 teaspoon activated charcoal mixed in 1 tablespoon rice bran oil
Essential Oil
- 1 ounce balsam Peru essential oil
Safe Soaping!
- Wear proper safety gear the whole time.
- Work in a well-ventilated space.
- No distractions (keep kids and pets away).
Make the Soap Mixture
- 1. Slowly add the lye to the cooled coffee, stirring constantly until the lye is dissolved. As the lye reacts with the coffee, it will turn a green hue and produce a distinctive smell. This smell is normal, and will dissipate in the finished soap. Once all of the lye flakes are dissolved, stir in the sodium lactate (if using) and set aside to cool.
- 2. In a bowl large enough to hold all the oils and the lye-coffee solution, measure out the olive oil pomace, rice bran oil, and castor oil. In a separate container, measure out and melt the coffee butter, cocoa butter, and coconut oil in 20-second bursts to avoid overheating. Once the butters are completely melted, combine with the liquid oils in the large container.
- 3. When both the oils and the lye-mixture are between 110° and 120°F (43–49°C), add the coffee-lye solution to the oils, pouring it over a spatula or the shaft of the stick blender to minimize air bubbles. Tap the stick blender a couple of times against the bottom of the bowl to release any air that may be trapped in the blades. Do not turn on the stick blender until it is fully immersed. Stick-blend for 50 seconds, or until thin trace is achieved.
- 4. Add all of the essential oil, and stick-blend again for 15 seconds.
Add Colorants
- 5. Split the batch into four easy-pour containers with the following amounts:
- Container A: 11⁄4 cups (300ml)
- Container B: 11⁄4 cups (300ml)
- Container C: 2⁄3 cup (150ml)
- Container D: 2⁄3 cup (150ml)
- 6. To Container C, add 2 teaspoons of the activated charcoal dispersion.
Pour, Swirl, and Stamp
- 7. Blend Container A (uncolored batter) with the stick blender for 5 seconds. Pour all of this batter into the mold, and tap the mold on the table until smooth.
- 8. Pour the black batter (Container C) in a spiral pattern into the small uncolored batch of soap (Container D). Pour from at least 6 inches above the container so the black penetrates all the way through the uncolored soap.
- 9. Slowly pour the black and tan swirl from Container D over the first layer of soap. Pour over the back of a spatula, and as low to the first layer as possible to avoid breaking the first layer. Pour the entire swirled mixture.
- 10. Whisk the soap in container B to loosen the batter. Again pouring low and slow, or over the back of a spatula, pour about half of the batter carefully over the swirled layer.
- 11. Stick blend the remaining batter in container B for about 10 seconds. Carefully pour the thickened soap into the mold, and gently tamp the mold to settle the batter.
- 12. Insert the wire tool just under the surface of the soap, in one corner. When you pull it up, it should draw the soap into a spiral design with it. If the soap is too thin to hold the pattern, let it sit for 5 more minutes and try again. Repeat the pattern across the surface of the soap in three rows of three.
Final Steps
- 13. Spritz the soap with 99% rubbing alcohol, and allow the soap to set for 48 hours before attempting to unmold. If it is not releasing from the mold, let it set another 24 hours, or place it in the freezer for 3 hours and try again.
- 14. Cut the slab into bars. Allow the bars to cure in a well-ventilated area for 4 to 6 weeks before using, turning them every few days to ensure that they cure evenly.
Alkanet Layers with Pencil Lines
Approximately 12 bars
Alkanet root produces a beautiful array of colors from light gray to deep lavender. It is amazing to watch the color change as the brilliant magenta infusion hits the alkaline soap and transforms into purple before your eyes! The multiple pencil lines and angled pours add to the visual interest of the final bars. The color of alkanet root is enhanced by heat, so don’t skip the gel phase on this soap (see What Is Gel Phase?).
Materials
Mold and Special Tools
- 10-inch silicone loaf mold
- 1-inch-thick notebook or similar item to tip the mold
- Powder duster
Lye-water Amounts
- 4.6 ounces lye (5% superfat)
- 10.8 ounces distilled water
- 1 tablespoon sodium lactate (optional)
Oil Amounts
- 9.9 ounces palm oil (30%)
- 8.3 ounces coconut oil (25%)
- 11.6 ounces olive oil pomace (35%)
- 3.3 ounces refined hempseed oil (10%)
Essential Oil Blend
- 1.1 ounces lavender 40/42 essential oil*
- 0.4 ounce fennel essential oil
Colorant and Additive Amounts
- 2 teaspoons titanium dioxide dispersed into 2 tablespoons hemp oil
- 2 tablespoons alkanet root powder infused in 2 ounces olive oil pomace**
- 1 tablespoon alkanet root powder, dry
*Regular lavender essential oil will work, but this variety has been specifically blended to last in cold-process soap.
**See instructions on infusing herbs.
Note: Each layer in this soap is thickened individually to avoid having the entire batch get too thick. While there are only two colors, you will need four containers to achieve this technique.
Safe Soaping!
- Wear proper safety gear the whole time.
- Work in a well-ventilated space.
- No distractions (keep kids and pets away).
Make the Soap Mixture
- 1. Add the lye to the water (never the other way around) and stir gently until all of the lye is dissolved. If using sodium lactate, add it to the lye-water and stir to combine. Set the mixture aside to cool until it becomes clear.
- 2. Melt the palm oil in its original container, mix it thoroughly, and measure into a bowl large enough to hold all of the oils and the lye-water with room for mixing. Melt and measure the coconut oil and add it to the bowl. Add the olive oil pomace and refined hempseed oil.
- 3. When both the oils and lye-water are between 120° and 130°F (49–54°C), add the lye-water to the oils, pouring it over a spatula or the shaft of the stick blender to minimize air bubbles. Tap the stick blender a couple of times against the bottom of the bowl to release any air that may be trapped in the blades. Do not turn on the stick blender until it is fully immersed. Stick-blend for 20 seconds, or until trace is just reached. Add the essential oil blend, and whisk to combine.
- 4. Divide the batter equally between two containers. Add the following and whisk to combine.
- Container A: 2 tablespoons titanium dioxide mixture
- Container B: 2 ounces alkanet root infusion
- 5. Pour off just over 1 cup of batter from each color into two more easy-pour containers: white soap in Container C and purple soap in Container D.
Pour the Soap
- 6. Set the mold up with one long side resting on the notebook or other wedge.
- 7. Stick-blend the white batter in Container C for 5 seconds, or until medium trace is reached. Pour this batter into the lower side of the tipped mold.
- 8. Stick-blend the purple batter in Container D for 5 seconds, or until medium trace is reached. Gently switch the wedge to the other side of the mold, so it is resting under the first layer of soap.
- Pour the purple soap (Container D) into the lower side of the mold, beside the white layer.
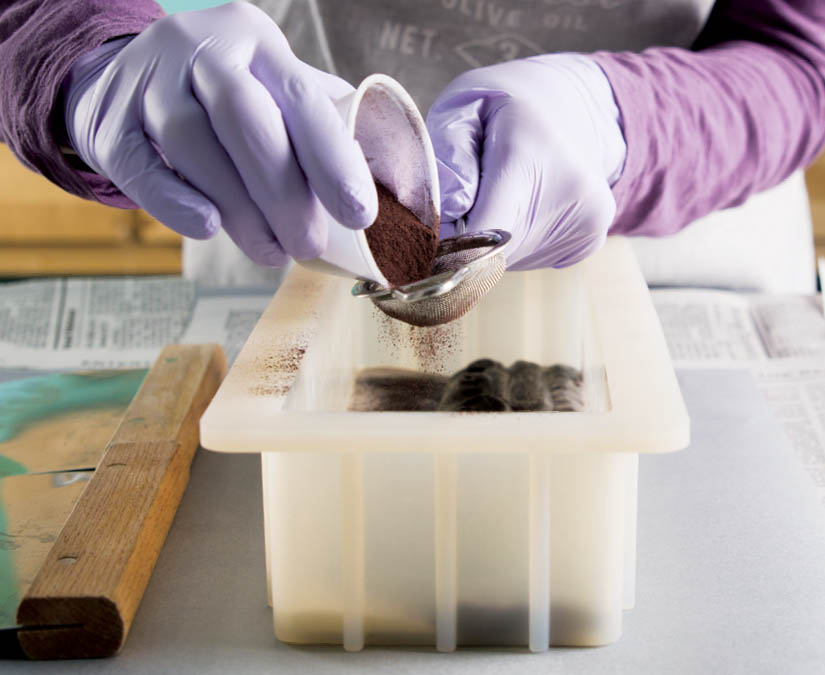
- 9. Place a teaspoon of alkanet powder into the powder duster, and gently tap the duster over top of the soap until there is a light dusting of powder across the entire surface.
- 10. Pour another cup of batter into containers C and D from containers A and B with their respective colors. Stick-blend containers C and D for 5 seconds or until medium trace is reached.
- Switch the wedge under the mold again, and gently pour a layer of thickened white soap into the lower edge, over the first white layer.
- 11. Allow the white layer to set for 10 seconds, and switch the wedge again. Pour 1 cup of thickened purple over the first purple layer.
- 12. Repeat steps 9 through 11 with the remaining two containers, thickening the batter as needed, until all of the soap is gone.
- 13. Using the back of a spoon, gently pull the sides of the soap batter from the outer edge, to the center, building it into a peak. Clean off the spoon between the purple and the white sides so you do not blend colors.
Final Steps
- 14. Cover and insulate the mold. Place it on a heating pad on medium for 1 hour. Turn off the heating pad, leaving the covered mold on it. Allow it to set for 72 hours.
- 15. Once out of the mold, cut the soap on its side to help avoid drag marks from the pencil lines. Allow the bars to cure in a well-ventilated area for 4 to 6 weeks before using, turning them every few days to ensure that they cure evenly.
Egg Yolk Secret-Feather Swirl
Approximately 20 bars
Everyone knows eggs are a beneficial food, but it’s less commonly known that they can be used in skincare. This recipe uses just the nutrient-packed yolk, which contains vitamins A and B3. The design of this soap may look simple, but it is not for the faint of heart! To get the best effect, keep the trace nice and thin to give yourself time to create all the layers.
Materials
Mold and Special Tools
- 5-pound sliding bottom log mold with silicone liner
- Multi-pour sectioning tool
- Powder duster (or similar thin mesh strainer)
- 4 (8-ounce) squirt bottles
- Wire hanger and plastic drinking straws to make swirling tool
Lye-Water Amounts
- 8.4 ounces lye (5% superfat)
- 19.8 ounces distilled water
- 11⁄4 tablespoons sodium lactate (optional)
Oil Amounts
- 14.4 ounces palm oil (24%)
- 14.4 ounces coconut oil (24%)
- 1.8 ounces avocado butter (3%)
- 1.2 ounces palm kernel flakes (2%)
- 1.8 ounces castor oil (3%)
- 3 ounces sweet almond oil (5%)
- 10.2 ounces canola oil (17%)
- 9.2 ounces olive oil pure* (22%)
Essential Oil Blend
- 2 ounces lavender 40/42 essential oil**
- 0.5 ounces litsea cubeba essential oil
Colorant and Additive Amounts
- 1 teaspoon ultramarine pink oxide dispersed into 1 tablespoon sweet almond oil
- 2 teaspoons titanium dioxide dispersed into 2 tablespoons sweet almond oil
- 1 teaspoon black oxide dispersed into 1 tablespoon sweet almond oil
- 1 teaspoon chrome green oxide dispersed into 1 tablespoon sweet almond oil
- 4 egg yolks, room temperature
- 4 ounces olive oil pure
*Plus 4 ounces mixed with the egg yolks and added at trace, for a total of 13.2 ounces
**Regular lavender essential oil will work, but this variety has been specifically blended to last in cold-process soap.
Safe Soaping!
- Wear proper safety gear the whole time.
- Work in a well-ventilated space.
- No distractions (keep kids and pets away).
Make the Swirling Tool
Untwist the hooked end of a wire hanger. Pull the two ends apart to form an angled U shape with the long straight end as the base of the U. Measure the straight end of the hanger alongside the long end of the mold. Use a pair of needle-nose pliers to bend the hanger to fit inside the mold. Thread plastic drinking straws onto the straight bottom of the hanger, cutting them to fit across the entire length. This makes a thicker line that creates a more dramatic feather effect.
Make the Soap Mixture
- 1. Add the lye to the water (never the other way around) and stir gently until all of the lye is dissolved. If using sodium lactate, add it to the lye-water and stir to combine. Set the mixture aside to cool until it becomes clear.
- 2. Melt the palm oil in its original container, mix it thoroughly, and measure into a bowl large enough to hold all of the oils and the lye-water with room for mixing. Melt the coconut oil, and add the avocado butter and palm kernel flakes to the hot oils, and stir until melted. If needed, microwave in 10-second bursts. Add the castor oil, sweet almond oil, canola oil, and 9.2 ounces of the olive oil pure to the rest of the oils.
- 3. In a small cup, combine the remaining 4 ounces of olive oil pure with the egg yolks.
- 4. Temperatures are important in this recipe; you don’t want to “cook” the egg in the oil. When the oils and lye-water are between 85° and 95°F (29–35°C), add the lye-water to the oils, pouring it over a spatula or the shaft of the stick blender to minimize air bubbles. Tap the stick blender a couple of times against the bottom of the bowl to release any air that may be trapped in the blades. Do not turn on the stick blender until it is fully immersed. Stick-blend for 20 seconds, or until very thin trace is achieved.
- 5. Pour the egg yolk and oil mixture into the bowl through a strainer. Combine with a whisk.
- 6. Pour slightly less than 1⁄2 cup (115ml) of batter into three easy-pour containers, leaving the bulk of the batter in the bowl.
- 7. Add the following colors to the containers:
- Main batter: 11⁄2 tablespoons titanium dioxide dispersion
- Container A: 1 teaspoon ultramarine pink dispersion
- Container B: 1⁄2 teaspoon titanium dioxide dispersion, 1 teaspoon ultramarine pink dispersion, 1/16 teaspoon black dispersion
- Container C: 1⁄4 teaspoon green chrome dispersion
- 8. Add all of the essential oil to the main batch of soap, and stick-blend for 5 seconds. Split off 2 cups of this white batter, and set aside.
Pour into Dividers
- 9. Pour a 1⁄2-inch layer of the main soap into the mold. Insert the multi-pour sectioning tool with the three-section option (two dividers) directly into the soap.
- 10. Fill the squirt bottles, one with pink batter, one with green batter, one with purple batter, and one with white batter (from the main batch, not the 2-cup batch).
- Squirt a layer of green batter in the center section of the divider set. The green will not completely cover the white layer; it is okay to have gaps showing through.
- 11. Squirt a layer of white batter over the green layer. Again, full coverage is not required.
- Squirt more layers in the center section in the following pattern:
|
Green
|
Pink
|
|
White
|
White
|
|
Purple
|
Purple
|
|
White
|
White
|
- Refill the white squirt bottle as needed from the large batch of soap. Reserve about 1⁄8 cup of the green, pink, and purple soap batters.
- 12. Fill the outer dividers with the 2-cup batch white soap until each side reaches the depth of the soap in the center divider.
- 13. Carefully remove the two center dividers and then the pieces at each end, pulling straight up and out of the soap.
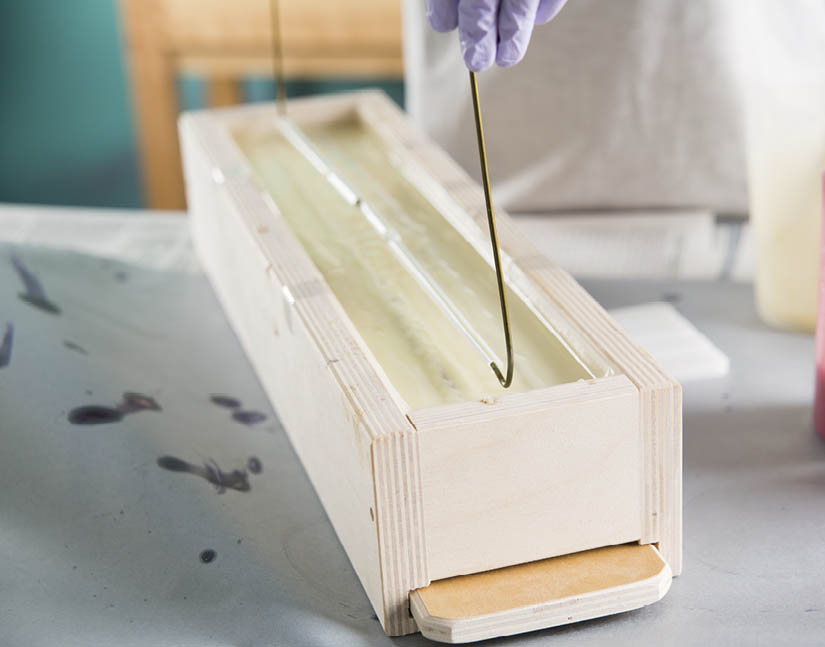
- 14. Insert the hanger tool straight down the middle of the colored soap to the bottom, through all the colored layers. Slide the tool along the bottom, up one side, and out of the soap.
- 15. Whisk the white batter that was set aside in step 8. Gently pour it across the surface of the soap using a back-and-forth pattern. Pour all of the white batter for this step.
- 16. Using the leftover green batter, squirt a squiggle across the surface of the soap.
- 17. In each curve of the green squiggle, squirt a pink dot of soap. Squirt a smaller dot of purple on top of each pink dot.
Final Steps
- 18. Spritz the top of the soap with 99% rubbing alcohol, and allow it to set uncovered for 24 to 48 hours before attempting to unmold. To remove the sliding bottom, turn the entire mold on its side and pull the bottom out.
- 19. Cut into bars and allow them to cure in a well-ventilated area for 4 to 6 weeks before using, turning them every few days to ensure that they cure evenly.