
If you have never made cold-process soap before, this is the perfect basic recipe to start with. It contains the three common soapmaking oils, and will make two pounds of soap or about eight beautiful, hard bars, depending on the type of molds you use. You can repurpose clean, dry plastic containers such as tofu or yogurt tubs — gather enough of them to hold 32 ounces of soap batter. If you use a larger container, you’ll cut the final block into bars.
Before you begin, read the preceding chapters, collect your equipment, and set up a safe workstation. For a list of standard soaping equipment, see Starting Out.
Wearing gloves and goggles and working in a well-ventilated environment, weigh out the water in a heatproof container. Weigh out the lye flakes in a separate chemical-resistant container. Digital scales have a tare button, which tells the scale not to include a weight it is already measuring, such as the empty bowl. The easiest way to measure out ingredients is to use the tare button. To weigh multiple ingredients in the same container, use the tare button after the empty container is placed on the scale and again after each ingredient is added.
Slowly pour the lye into the water (never the reverse — the lye might bubble up like a volcano). Stir the mixture gently until the lye dissolves. If you are using sodium lactate, add it and stir to dissolve. Set the lye-water aside in a safe, out-of-the-way place to cool. It is ready to use when it has gone from cloudy to clear.

Use a container that is somewhat larger than the total volume of lye-water called for.
Most of the recipes in this book call for sodium lactate as an optional additive. Sodium lactate is a liquid salt that is naturally derived from the fermentation of sugars found in corn and beets. If you do not use it, your soap will turn out just fine, but adding it to cold-process recipes greatly reduces the time needed to unmold the soap.
The general usage rate is 1 teaspoon of sodium lactate for every 16 ounces (1 pound) of oils or 0.5 percent. It is stirred into the lye-water solution.
Melt the palm oil in its original container, mix it thoroughly, and measure it into a bowl large enough to hold both the lye-water and the oils, with plenty of room left for mixing. (At room temperature, palm oil separates into fatty acids and other components, so it must be mixed separately every time to ensure equal distribution and a consistent product.)
Melt the coconut oil — either in the original package or by melting a glob of it in a separate bowl — then measure it, and add it to the soapmaking bowl. Add the olive oil and stir.

When soaping with palm oil, it’s important that the oil is thoroughly mixed in the container to incorporate all of the constituents before being added to soap. The quickest and most efficient way to do this is to melt those oils in their original container, then stir well before weighing out the amount needed. If the container is microwave-safe, heat the whole thing in short bursts at low power.
If you don’t have a microwave, you can place the container of oil in a double boiler or hot-water bath (not over direct heat). This can be time consuming, as the water may need to be reheated to melt down the oil. Another option is to thoroughly stir together all of the solid and liquid elements of the palm oil in the container before weighing out the desired amount to melt.
Check the temperature of the oils and lye-water. Unless otherwise noted, both temperatures should be under 140°F (60°C). Many soapers find a temperature range that feels the most comfortable for them and will work for most recipes. My personal preference is around 120°F (49°C), but every soapmaker has a different opinion.
Slowly add the lye-water to the oils, pouring it over the shaft of the stick blender or over a spatula to avoid adding bubbles to the mixture. You will be able to see a clear separation between the oils and the lye-water. Never pour the oil into the lye-water — it could cause a reaction that can bubble or splash over the sides of the container.
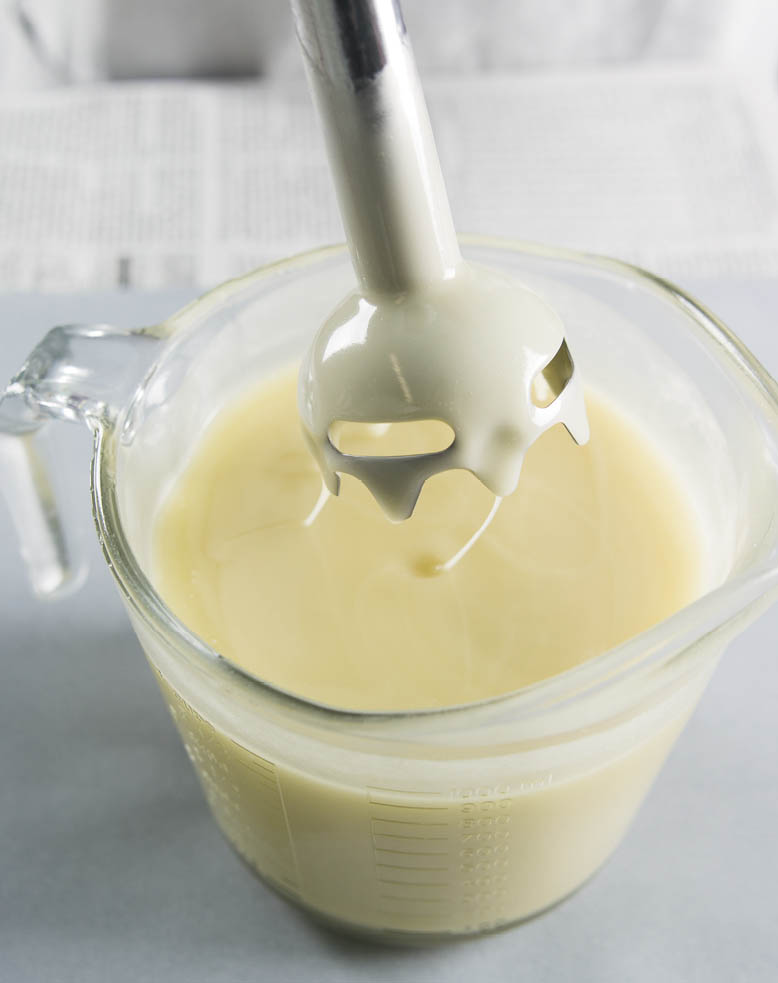
Place the stick blender on the bottom of the bowl. Tilt the bell of the blender sideways while fully immersed, and tap it on the bottom of the bowl to release any air bubbles. Do not turn on the stick blender until it is fully submerged.
Keep the stick blender on the bottom of the bowl and pulse it at high speed, mixing the oils and lye-water until they have reached thin trace, about 30 seconds.
Note: Each recipe in this book lists the specific time that it took to achieve the needed trace during testing. For most recipes, thin trace is achieved within about 30 seconds of stick-blending. Many factors contribute to trace times, including the starting temperatures of the ingredients, the power of your stick blender, and whether you blend straight through or pulse the stick blender. With all of these variables, it is important to learn to recognize the signs of trace. (See A Few FAQs.)
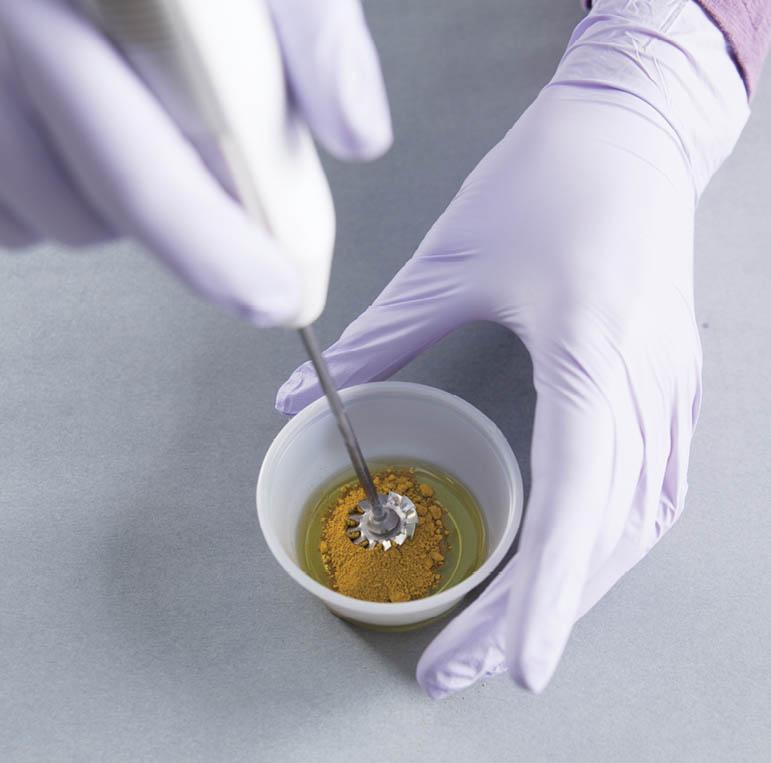
Split the batter into batches, depending on the recipe directions. Add the essential oil and 1 teaspoon of the premixed colorant, and stir to combine. Many recipes call for using a whisk for this step, as using the stick blender at this point might accelerate trace too much.

Colorants typically come as powders that need to be mixed with oil in order to combine properly with the batter. Before adding a colorant, combine it thoroughly with a lightweight oil (amounts for both are given in every recipe), either whisking it by hand or using a mini mixer. The latter does a better job, but be sure to stir the powder into the oil a bit before turning on the mixer to avoid sending up a cloud of colored dust.
Prepare the mold as necessary. For this recipe, a simple container is divided into two sections, one for each color.
Pour the batter into the mold, scraping the edges of the bowl to make sure no soap is wasted.

Gel phase is the stage when a freshly poured soap heats up and begins to saponify as the lye reacts with the other ingredients. Soap typically gels when it reaches a temperature above 140°F (60°C) in the mold. Gelling begins in the center of the soap, where the heat is the most concentrated. The area that is in gel phase becomes dark, gelatinous, and somewhat translucent. As the soap cools, it begins to harden again and the colors become lighter and brighter. To gel or not to gel is personal preference which can vary from soap to soap.
Gel phase is a normal part of soap making. It happens naturally with most recipes that are mixed at 120°F (49°C) or above. It can also be created by higher initial starting temperatures of the lye-water and oils, additives (such as natural sugars) reacting with the lye, certain fragrance oils, and by placing the soap on a heating pad or insulating it to avoid heat loss.
Some soaps are enhanced by gel phase. Many of the natural colors in this book can only be achieved by fully gelling the soap, though there are some instances where gelling is not the best choice for a recipe. For example, most recipes containing milk are not gelled to avoid overheating and discoloring the milk.
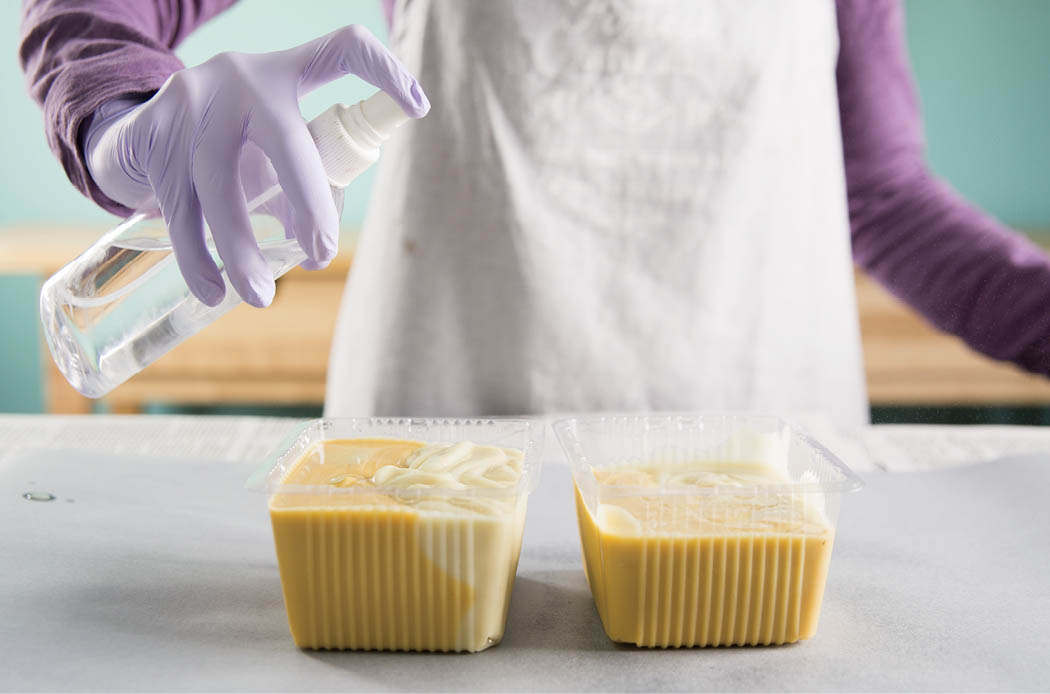
Lightly mist the top of the soap with 99% rubbing alcohol. The alcohol creates a barrier between the surface of the soap and the air, which helps to prevent soda ash.
Soda ash is a harmless by-product of soap that appears as a white, powdery substance across the surface. It is a purely an aesthetic flaw, and will not hurt the soap, so this step is optional.
Place a folded piece of cardboard or similar item over the top of the mold so it isn’t touching the soap, and cover the whole thing with a towel to insulate the soap. This technique is used in many soaps in this book to encourage gel phase. A soap that has gone through gel phase tends to have bolder colors and will harden more quickly. Not all soaps should go through gel phase, though. Soaps that contain additives with sugars, such as milks and purees, are naturally prone to heat up as the sugars react with the lye. These soaps are generally not insulated to avoid overheating the soap.

Leave the soap in the mold for at least 48 hours before attempting to unmold it. Recipes differ in how long they take to set up. Formulas with a lot of soft oils (such as almond oil and olive oil) take longer than ones with a lot of hard oils (such as coconut, palm, or cocoa butter).
To unmold, gently pull the edges of the mold away from the soap to allow a little air in around the sides.
If the soap is not releasing smoothly or begins to tear or crack, do not force it. Allow the soap to set for another 48 hours and try again. (For tips, see Unmolding Stubborn Soap below.)
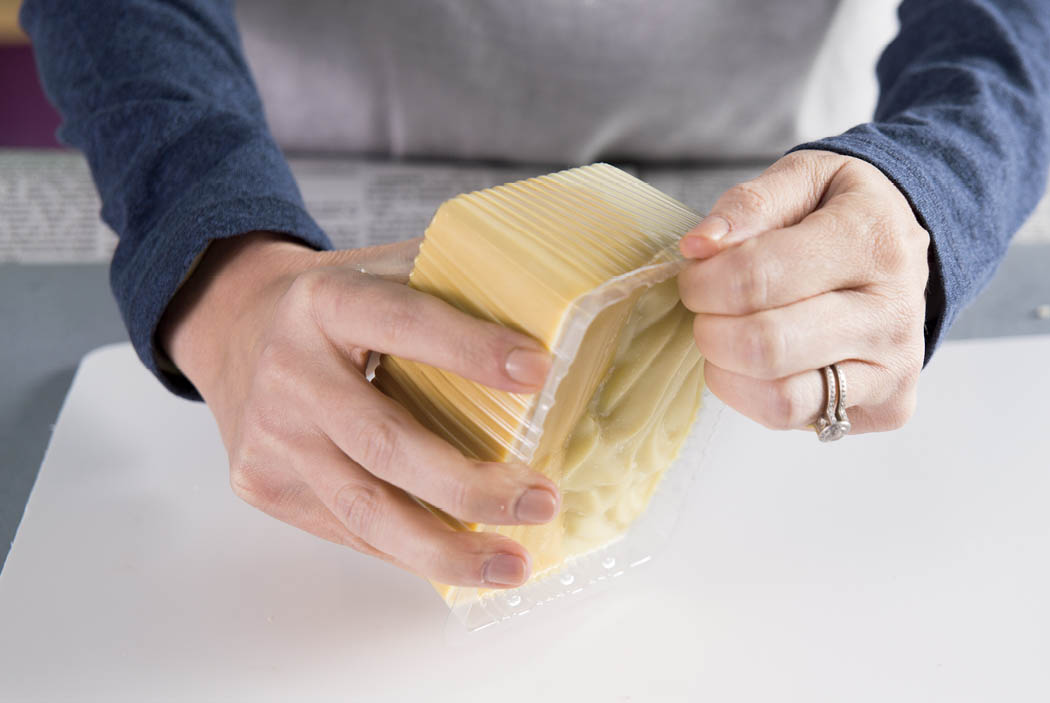
Once the soap is unmolded, it can be cut into bars. The bar size and shape will depend on the container you used. Cut them so they fit comfortably in the palm of your hand. A sharp, nonserrated knife works well. Cut straight through the soap, and slide the soap off the knife, instead of pulling it off. This will prevent tearing the soap. If the soap is sticking badly to the knife or dragging, let it set for another few days on a well-ventilated rack (such as a cookie cooling rack) and try again after it has dried out some.
Let the soap cure in a well-ventilated area for 4 to 6 weeks before using or selling the bars. Turn the bars every few days to ensure they cure evenly. During the cure time, excess moisture will evaporate, the bars will become more mild to use and the lather will improve.
All of the recipes in this book include sodium lactate as an optional ingredient, because it can greatly speed up the time needed for a soap to unmold easily. If you choose to leave it out, your soap may take a bit longer to unmold. There are other reasons why a soap may be difficult to unmold — one of the most common is the type of oils used. Over half of the recipes in this book contain no palm oil, which is a hard oil that helps soap set up faster. If the recipe uses other oils and is difficult to unmold, wait a few days and try again.
If you just cannot wait to get your soap out of the mold, you can pop any soap that is at least 24 hours old into the freezer overnight so the soaps retract a bit from the sides of the mold. For the best unmolding success, hold the mold on one corner with both hands and gently pry the mold away from the side of the soap. Do this for all four corners, or until the soap breaks free and can be slid out. Some soap stays stuck in the mold for weeks. Be patient if this happens — you don’t want to break your mold to release the soap.
Why do I need to use distilled water?
Distilled water makes longer-lasting bars of soap. Tap water often contains additives such as chlorine, minerals, and even heavy metals from the piping system. Minerals and heavy metals can cause DOS (Dreaded Orange Spots) in your soap. While DOS is safe, it can ruin a beautiful batch of soap with its unattractive appearance and off-putting odor.
Lye is so caustic; why is it necessary?
Soap is a combination of oils or fats, and lye. Without the latter, the oils will not go through the chemical reaction required to produce soap. In a properly calculated recipe, the lye reacts completely with the oils, leaving none in the final bar of soap. All of the recipes in this book produce final bars that have no trace of residual lye. Soaps that are advertised as “lye free” are likely not true soaps and are usually labeled as “beauty bars,” “cleansing bars,” or something similar. These products are typically created from surfactants, chemicals that act as degreasers.
What exactly is “trace”?
The word “trace” comes from the idea of literally tracing a design — or your name, even! — into the soap batter after mixing it. To determine the degree of trace, drizzle a line of batter off your stick blender over the pot of soap.
Thin trace appears when the oils and lye-water are completely combined with no visible oil streaks or pockets and the batter is just beginning to thicken, similar to a melted milkshake texture. When batter at thin trace is drizzled on the surface of the mixture, the drizzle does not immediately sink, but remains visible for a few seconds.
Medium trace is when the batter moves from melted milkshake texture to more of a cake batter texture. This is the ideal stage for mixing in additives, such as poppy seeds, that need to remain suspended in the batter, and to create layers of soap that need to support additional layers. You should be able to “trace” a few letters on the surface before the first letter sinks into the batter.
Thick trace is when the batter develops into a thick pudding texture, and holds its shape when spooned or poured out. Thick trace is great for creating textured tops and holding up embeds.
Note: It is better to stop blending and check if you aren’t sure how thick your trace is; you can always thicken it, but you cannot make it thinner!
What might prevent soap from achieving trace?
One factor is that not all stick blenders are equal. The recipes in this book use the amount of time that it took to achieve trace with Cuisinart brand stick blender. If your stick blender has less power, it will take longer than the suggested trace time. Blend for a little longer to see if it starts to pull together.
If your stick blender is not the problem, then run through your ingredient list to ensure that you used the proper amounts of oils, lye, and liquid. The most likely reasons that soap will not trace are too much oil too much water or not enough lye. If the proper amounts of pure ingredients are used, your batter will turn into soap every time. Stick-blend for longer, up to five minutes.
If you still have not achieved trace, there is a chance that you will not. However, go ahead and pour it into the mold and see if it hardens. If the problem is too much water, it will eventually evaporate.
What is the white, powdery stuff on my finished soap?
Soda ash is a very common, harmless substance that forms on cold-process soap when a small amount of unreacted lye in newly poured soap reacts with carbon dioxide. It can easily be prevented by spraying the mold with 99% rubbing alcohol to create a barrier while the soap sets up.
A number of factors can contribute to soda ash: two common ones are the temperature of the soap (cold soap tends to ash more than gelled soap) and trace that is too thin. To prevent ash, keep the temperature of the soap at 120°F (49°C) or more (unless otherwise specified for a recipe) and make sure your soap is at a full trace where you can easily see trailings on the surface of the batter.
Another factor is too much water in the batter, so experienced soapers may choose to remove 10 percent of the recommended liquid from a recipe for an effective fix. Note that using a water discount causes the soap to have less working time. Some soapers also add a very small amount of melted beeswax at high temperatures (above 140°F [60°C]) at thin trace to lessen soda ash.
Sometimes a batch of soap just refuses to trace. Common reasons for this are mixing by hand instead of using a stick blender; using lye that isn’t fresh or using potassium hydroxide instead of sodium hydroxide; or making mistakes when measuring ingredients. It is possible to save a problem batch, but it’s tricky. Set aside a couple of hours, put on your safety gear, and give this a try:
If you can’t salvage your soap, scrap it into a disposable container and let it cool and harden as much as possible before triple bagging it in plastic bags and disposing of it in the trash.