YEAST and FERMENTATION
Variation: Base Beer as a Starter
YEAST QUALITIES AND SELECTION

Selecting a yeast often starts with matching its attributes to your recipe—fruity or clean? sweet or dry?—you also must consider factors such as temperature tolerance, alcohol tolerance, and flocculation to determine whether a yeast strain suits your needs. Homebrewers have an advantage over commercial brewers when it comes to yeast selection: A homebrewer can choose a specific strain for each batch of beer, whereas commercial brewers usually have to limit themselves to just a few strains. For breweries, this has to do with convenience as well as expense. With one house strain, there’s always fresh yeast to harvest around the brewery—and you get to know that strain extremely well. Plus, a pitchable amount of a specialty strain could cost a brewery close to $1,000! (What you pay for yeast doesn’t seem so bad in comparison, does it?)
Most breweries use pure liquid cultures bought from the same companies that sell to homebrewers: Wyeast and White Labs. For homebrewers, Wyeast packages their yeast in a foil pouch with a nutrient pack inside. When popped, it gives the yeast some food and nutrients that cause the package to swell. While it’s no substitute for making a starter, it does let you know that the yeast is alive in there. Even a slight swelling of the package is OK, according to Wyeast. White Labs, on the other hand, packages their yeast in thick plastic vials, with no built-in nutrient pack. Both companies are stellar in quality. If given the choice, pick the fresher of the two.
BOUTIQUE YEAST COMPANIES
One of the most exciting developments of modern homebrewing is the proliferation of tiny yeast labs offering local and exotic strains. See the end-of-book resources (page 190) for a list of boutique yeast labs and some of my favorite strains that they produce. Because of the limited availability of these products, this book focuses on the yeast products that your local homebrew shop most likely will carry.
Note: In this book, when I talk about a specific yeast strain, I give names and product numbers for both companies, like this: California Ale WLP001/American Ale WY1056. White Labs yeast will appear first, accompanied by three numbers. Wyeast’s yeast will follow, along with four numbers. (Some strains are unique to one particular manufacturer and will not have an equivalent.)
ESTERS AND PHENOLS
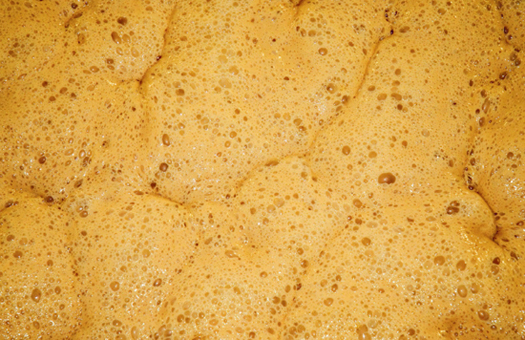
Esters are fruity aromas and tastes created by yeast at the beginning of fermentation. Each strain produces different amounts of various esters that give it its personality. Some strains, such as California Ale, produce very low levels of esters and are considered clean yeasts. However, a yeast that produces no esters at all makes a very bland beer—so some esters are good!
The amount of esters produced by yeast increases with temperature, beginning at the time the yeast is pitched. This is why it’s important to pitch cool and keep the fermentation temperature under control for the first few days. If the beer starts fermenting too warm, it doesn’t help to cool it down later—the damage has been done already. Insufficient levels of oxygen at the beginning of the fermentation also can increase esters to an undesirable level.
These are the most common esters and their signature aromas:
 Isoamyl acetate: banana
Ethyl acetate: solvent or nail polish remover
Ethyl caproate: apple
Unlike esters, phenols usually are considered an off-flavor in beer. Some common descriptors are plastic, smoke, or model-airplane glue. Usually they’re caused by a wild yeast infection, because most traditional brewing yeasts lack the ability to create phenols. (An exception: German wheat beer strains and Belgian strains, which can produce the phenol 4-vinyl guaiacol, give hefeweizens their characteristic clove aroma and taste.) When a yeast has the ability to create phenols, it uses ferulic acid in the wort to create them. Brewers of hefeweizen often perform a mash rest at around 114°F, known as a ferulic acid rest. This creates more ferulic acid, which, in theory, can increase the levels of the phenol and, therefore, add more clove character.
One of the most common faults in homebrewed and commercial beers is diacetyl, caused by the conversion of an ester released as a by-product of fermentation. Diacetyl’s aroma and taste are so similar to butter that some food manufacturers use it for butter flavoring. Diacetyl can get into your beer in two ways: through a wild yeast infection or through a normal yeast strain that wasn’t allowed to clean up after itself.
Any yeast strain can produce diacetyl, but most will reduce the levels to below the taste threshold if given enough time and a warm enough temperature. If a strain is notorious for producing large amounts of diacetyl or needs more time than most yeasts to clean up diacetyl, the strain description from the manufacturer will recommend a diacetyl rest. A diacetyl rest warms the beer higher than the fermentation temperature as fermentation is finishing, then holds it at the warmer temperature for a few days. This helps the yeast reabsorb and break down the diacetyl. For ale yeasts, warm the beer about 5–10° higher than your fermentation temperature. For lagers, raise them all the way up to 65–70°.
If you’re worried about diacetyl in a beer, you can do a forced diacetyl test. Take out a small amount of beer, put it in a small glass jar covered with foil, place it in a hot water bath (about 160°F), and let it sit for an hour. Then chill the sample before you smell and taste it. If there’s no buttery flavor, then you can assume that the beer is fine. If a bottled beer has signs of diacetyl, you can determine easily whether it’s an infection—bad haze and a ring around the neck of the bottle usually accompany the buttery aroma. If the beer is clear and there’s no ring, chances are you need to perform a diacetyl rest the next time you use that particular yeast.
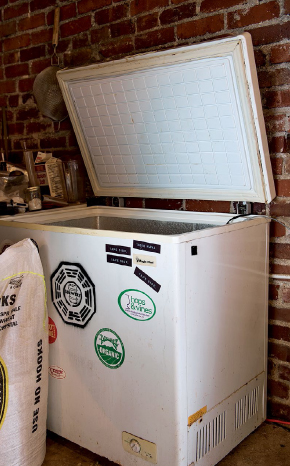
TEMPERATURE TOLERANCE
A fermentation chamber, such as a chest freezer with a temperature regulator, is one of the best investments you can make when you get serious about brewing. Once you have the ability to set and control temperatures, you have the ability to use any yeast. It’s still important, however, to read up on your yeast and follow a fermentation schedule suited to it. (See page 115 for more on temperature schedules for fermentation.) Once you dial in a yeast strain, you can re-create fermentation environments—and consistently make the same beer without depending on the whims of the weather or your home’s thermostat.
If you don’t have a fridge or freezer with a temperature regulator, then you’re at the mercy of ambient temperatures in your house or basement. But there’s nothing wrong with brewing by season. In warmer months, spend time exploring saisons and other beers with Belgian strains of yeast, which generally produce better aromas and tastes with temperatures above 70°F. (Some work better at very high temperatures.) If it’s not too hot where you live, you can push some strains of clean American ale yeasts into warmer-than-normal temperatures, which will give you fruitier ales that are still tasty. Here’s a sampling to get your ideas flowing.
California Ale WLP001/American Ale WY1056: So many breweries use Cal Ale for their house yeast because it’s a workhorse that can ferment down to 58°F if you want a clean, slightly sulfury pseudo lager. It can also ferment to 80°F and still produce a fine, if slightly estery, ale. When I use it, I start the fermentation at 65–67°F and let it warm up to 71°F for the last few days of fermentation. Cal Ale produces very little diacetyl but can take a while to clear up. It responds well to clarifiers such as gelatin if you’re looking for clearer beer (page 123).
Belgian Saison WLP565/WY3724: This strain can be problematic if fermented too cool—meaning below 75°F! That makes it a great strain for the dog days of summer. I’ve brewed fantastic saisons with this yeast by fermenting at 95°F. The biggest mistake you can make with this yeast is not to check the final gravity. It can look completely finished, but the gravity might still be 1.030. Give the fermentor a swirl and be patient—it’ll keep going and going. The final gravity should fall below 1.010 and sometimes as low as 1.003.
Abbey WLP530/Trappist WY3787: Three traditional Trappist breweries use this strain: Westmalle, Westvleteren, and Achel. Each brewery produces distinct beers by fermenting at different temperatures. Rumor has it that Westmalle keeps it at 68°F and Westvleteren lets it rise to 84°F. It’s a fun yeast to play around with and get to know. At low temperatures, it’s relatively clean, so a complex malt bill will shine. At high temperatures, it has increased dark-fruit flavors that work best with a simple malt bill.
Super Yeast WLP090: This is a great house strain if you want a clean flavor with better flocculation than Cal Ale. It’s a quick, strong fermenter that can knock out a beer in four days! That isn’t a huge selling point for homebrewers, but for a commercial brewery, it can mean a huge increase in production. It ferments best around 65–68°F, but since it’s so quick you could take advantage of a cool week in your part of the country. Keep in mind that the vigorous fermentation can mean higher-than-usual heat buildup in the fermentor.
ALCOHOL TOLERANCE
If you’re making a beer with an alcohol content above 10% ABV, then you need to choose an appropriate yeast. Almost any yeast strain can handle up to 10 percent alcohol, but for anything above that you need to choose a yeast that can keep working in a high-alcohol environment. While strain is important, it’s even more important to make sure you’re pitching the proper amount of yeast, adding the appropriate amount of oxygen, and driving the fermentation through temperature control.
The Super Yeast mentioned above would be a great choice for most beers, as would good old Cal Ale. I’ve gotten Cal Ale up to 15% ABV, but it has problems going much higher. White Labs has a strain specifically for high-alcohol beers that supposedly can go up to 25% ABV, but it’s very needy and difficult to work with, and some brewers haven’t liked the overall flavor. Homebrewers often hear that they should add Champagne yeast to a stuck fermentation, but Champagne yeast and wine yeast in general can’t ferment the long-chain sugars in beer and so won’t be of much use to brewers.
Other alcohol-tolerant strains include Dry English Ale WLP007, just about any Trappist or Abbey yeast, Zurich Lager WLP885, and Denny’s Favorite 50 WY1450. Never repitch yeast from a high-alcohol brew (more than 7% ABV), because it likely will be too stressed to perform well again.
FLOCCULATION
Highly flocculent strains drop from solution more than lower flocculent strains, but flocculation actually measures the degree to which the yeast cells stick or clump together. The more they stick together, the heavier they get and the faster they drop out and settle to the bottom of the tank.
Highly flocculating yeasts often leave more residual sugars behind, which can result in a fuller-bodied beer. But they also can leave more diacetyl behind compared with a low-flocculating yeast, which hangs out in solution and reabsorbs diacetyl. Low levels of calcium can slow the flocculation of yeast, so if you check your water (page 56), make sure you always have at least 50 ppm.
ATTENUATION
Attenuation measures the percentage of fermentable sugars that yeast converts during the fermentation process. Most yeasts have attenuation in the 70 to 75 percent range. To figure out your approximate finishing gravity, take the last two numbers of your OG (1.060 = 60) and divide that number by 4 (60 ÷ 4 = 15). Put that number back in its place (1.015), and you have your final gravity if your yeast gets 75 percent efficiency. Just as with alpha acids and other brewing numbers, online calculators are available and highly recommended for more accurate estimations. See page 191 for recommendations.
The attenuation rates for any yeast are available from the yeast manufacturer’s website, but take them as more of a general guideline than hard fact. Mash temperature, grain bill, and other factors can affect attenuation. Yeast can consume only fermentable sugars, so if the wort has a lot of unfermentable sugars, the attenuation will be lower. Generally, very flocculant yeast also has lower attenuation because it settles out of solution more quickly. This can sometimes be fixed by rousing the yeast back into solution by swirling the fermentor, but if you’re worried about attenuation for a particular beer, it’s probably better to use a less-flocculant strain.
COMMON TYPES OF YEAST
Saccharomyces is the genus of yeast used for the majority of brewing, and was probably the earliest domesticated organism. Egyptian ruins from 4,000 years ago depict the yeasting of bread. The original yeasts were undoubtedly wild, present in the air or on the grain and fruit used to make primitive, ancient beers. By continuing to select the best-tasting yeasts and discarding the ones that tasted unpleasant, humans unknowingly selected the first brewing-yeast cultures!
The top-fermenting/bottom-fermenting method of separating ale and lager strains—meaning that ale yeast rises to the top of the beer, and lager yeast sinks to the bottom—is overly simplistic. Plenty of lager yeasts form a large krauesen (the foamy head on the beer during fermentation), and plenty of ale yeasts don’t. Even the rule that ale strains ferment warm (65–70°F) and lagers ferment cold (47–52°F) is flawed, since some ale yeasts can ferment down into lager temperatures and vice versa. However, that’s typically the way yeast manufacturers divide yeasts, so we’ll stick to it for now.
Technically, ale yeast strains are members of the Saccharomyces cerevisiae species, and they do tend to be warm fermenters, shutting down and refusing to ferment at temperatures below 55°F. This is a motley crew of yeasts, ranging from super-clean yeasts to spicy, estery Belgian and fruity British strains.
Lager yeast taxonomy seems to change every decade. It used to be known as Saccharomyces carlsbergensis, then became Saccharomyces uvarum, and now is Saccharomyces pastorianus. Lager yeast can continue fermenting below 40°F, although most lager fermentations happen in the 48–52°F range. Lager yeasts can ferment complex sugars that ale yeasts can’t, but these sugars exist in such tiny amounts in wort that the difference in attenuation isn’t notable.
Countless strains are now available, and it isn’t possible to cover all of them here. As a brewer, you’re going to need to do some experimentation with different strains. Taste them yourself and get to know their individual personalities. By familiarizing yourself with some of the most popular strains used by homebrewers and commercial brewers alike, you’ll get an idea of what yeasts you might want to try for a particular beer. From there, brew up a batch, split it between two yeasts, and compare the different yeast characters.
USING TWO STRAINS OF YEAST
Back in the day, most breweries used a multistrain culture of yeast. Today, brewers use multiple yeasts for three main reasons:
1. Blends for flavor: Yeast labs today sell special blends of different cultures to achieve certain complex flavor profiles. Using a blend or multiple yeasts means that, if you repitch, one strain starts to dominate. Over time, the flavor will change.
2. Tag-teams for attenuation: Sometimes brewers add a second yeast later in fermentation to help finish the process after they’ve achieved the flavor profile they want from the primary yeast. This technique is popular with saison brewers who use the classic Dupont strain, which tastes great but poops out long before fermentation finishes. As a result, brewers will blend a second strain known for high attenuation with it. Several yeast companies offer just such a blend, or you can blend your own.
3. Bottling only: Using a different yeast for bottle conditioning is pretty common. A brewer might want a yeast that compacts on the bottom of the bottle or one that has a lower alcohol resistance to prevent it from eating complex sugars still in the beer and over-carbonating the bottles. For example, many German brewers filter out the yeast in hefeweizens and replace it with a lager yeast since the hefe yeast tends to autolyze (break down) much more quickly than lager yeast. Adding a different yeast at bottling for flavor development isn’t going to do much, however, because the yeast won’t undergo enough growth to produce any substantial esters. The one exception is adding Brettanomyces (page 130) at bottling, because it will produce a lot of funky aromas and tastes and will eat sugars that normal beer yeast can’t.
American Ale
The most popular ale yeast strain among homebrewers and commercial breweries originated from the Sierra Nevada Brewery. (Rumor has it that they propagated it from the old Ballantine brewery.) It’s sold as California Ale WLP001 by White Labs, as American Ale WY1056 by Wyeast, and as Safale US-05 in dry yeast form. Of the breweries in my city, three-quarters use Cal Ale as their primary strain!
Why is it so popular? Cal Ale has a clean flavor that lets the malt and hops shine through. No fruity or bready flavors muddy the waters. It doesn’t flocculate too quickly, which means it does a good job of attenuating most beers and cleaning up any off-flavors created in fermentation. It’s also a workhorse strain that can be repitched for 10 to 12 generations. That so many brewers use Cal Ale is a double-edged sword: It allows breweries to borrow yeast in an emergency, but it also gives many breweries the same house flavor (especially if they use the same base malt as well).
Many other American strains have more character than Cal Ale. California Ale V WLP051/American Ale II WY1272 is much fruitier and leaves a maltier beer. (If you have the choice, go for the WY1272.) Dry English Ale WLP007/British Ale II WY1335 also is characterized as a clean American strain because it has low fruitiness and good attenuation. (Stone Brewing Company supposedly uses it.) A seasonal offering from Wyeast, Pacman WY1764 is a popular yeast sourced from Rogue Brewing. It’s a strong fermenter and good flocculator.
British Ale
Traditional British yeast strains are fruitier than Cal Ale, often with some bready notes. They’re also known for flocculating more quickly than American strains. Since this will produce clearer beer in a shorter amount of time, it’s a natural for beers served on cask. High flocculation also means the attenuation will be lower in most cases, however, and you may have to rouse the yeast or repitch to get the yeast to continue its work.
Dozens of British ale strains exist, and each can be quite distinctive. The most popular is English Ale WLP002/London ESB Ale WY1968, which comes from the Fuller’s brewery. Like Cal Ale, it’s another workhorse strain that ferments strong and fast. It leaves a mildly fruity, almost biscuity aroma and clears amazingly fast. I’ve had crystal-clear beer flowing from a keg one week after pitching the yeast! Other fairly popular British strains include London Ale WLP013/WY1028 (crisp, complex, almost woody) and Burton Ale WLP023/Thames Valley Ale WY1275 (very fruity and complex but buttery if fermented too warm). Irish Ale WLP004/WY1084 is smooth with a hint of butterscotch, a good yeast for high-gravity beers. One of my favorites is London Ale III WY1318. It clears quickly, contributes soft fruity notes, and is very easy to work with. When using any British ale strain, conduct a diacetyl rest at the end of fermentation (page 102).
Belgian Ale
It’s impossible to say much that applies to all Belgian yeasts because each strain is so unique. Some are highly phenolic (bubblegum and banana notes), some are estery (pear and pineapple notes), and others are earthy with hints of dark fruit. To complicate further, most strains produce a different character when fermented at different temperatures! The same strain fermented at 65°F and 75°F produces two very different beers.
The modern method of fermenting a Belgian ale is to pitch the yeast at normal temperatures (65°F) and let it slowly rise over the course of the fermentation until it gets to around 75°F. (See page 115 for more information.) Warming it at the end of fermentation ensures that the yeast will keep eating any leftover sugars and reabsorbing any off-flavors. This is especially important when making strong Belgian ales, because it encourages a dry, crisp finish to the beer even when it rises above 8% ABV.
When I choose yeast for my Belgian ales, I think about the color of the beer. In light-colored brews, there isn’t much malt flavor, so it’s an opportunity to let a brighter, spicier yeast be the main focus of the beer. Some of my favorites are Belgian Ale WLP550/Belgian Ardennes WY3522 (reportedly from the Achouffe brewery) or any Belgian Wit strain. For amber to dark styles, find a strain that melds with the complex malt and dark candy-sugar flavors. Some of my favorites are yeasts that add a dark fruit and/or earthy element to the beer: Abbey Ale WLP530/Trappist High Gravity WY3787 (used by three of the top Trappist breweries), Abbey IV Ale WLP540/Belgian Abbey II WY1762, and Belgian Strong Ale WLP545 are all excellent. For a mild yeast flavor in a Belgian pale ale, try Antwerp Ale WLP515.

Saisons are delicious to drink, but they can be very problematic when it comes to fermentation. Many strains often stall out at 1.020 or higher. This can lead to bottle bombs and a sweet flavor unacceptable in a saison. Certain strains are more troublesome than others: Belgian Saison I WLP565/Belgian Saison WY3724 are sourced from Saison Dupont, which makes fantastic beer, but the yeast is very finicky. To help the fermentation go to completion, give it plenty of oxygen and drive the fermentation by increasing the temperature as it progresses. Pitch around 70°F and allow it to get up to 90°F by the end of fermentation if possible. The final gravity on saison strains can be amazingly low. Readings of 1.000 aren’t uncommon. Packaging too early is a common mistake when brewing saisons. The gravity should be 1.006 or lower to avoid bottle bombs.
Many different saison strains are available, especially from new boutique yeast labs. My saison blend at Zebulon mixes Saison Blend #1 and Saison Blend #2 from the Yeast Bay in San Diego (along with some native yeast from Southyeast Labs in South Carolina). Remember that saison yeasts produce different flavor profiles at different temperatures. A strain might be boring at 65–68°F but amazing at 85–90°F.
Hefeweizens are unique in that the beers are almost defined by the yeast strains used. Descendants of a wild yeast, the strains can produce phenols that create a traditional clove aroma and taste. The vast majority of breweries use one specific yeast strain: It’s available as Weihenstephan Weizen WY3068 from Wyeast and Hefeweizen Ale WLP300 from White Labs. They’re both supposedly the same strain, but the two are slightly different. Do a side-by-side experiment with both strains. If I had to choose one, I’d go with the Weihenstephan Weizen WY3068. Like the other Belgian strains, these strains can produce very different beers at different fermentation temperatures. You can get too much bubblegum aroma and taste if you go too warm. Pitch at 65°F and ramp up to 68°F for the final few days. Some brewers will disagree with that method, but I think that it’s best to bottle condition hefes. They should have a high level of carbonation, and it’s very difficult to get that in a keg without lots of foaming.
Lager
There isn’t much perceivable difference among lager strains. The low fermentation temperatures keep the yeast’s fruity esters firmly in check, but subtle differences still exist. Some lager strains leave the beer a bit more malty, some a bit crisper, and a few are prone to leaving sulfur or buttery diacetyl behind. Lagers are enough work on their own—building up a big starter for proper pitching, lots of oxygenation, and maintaining proper fermentation temperatures. Why choose any strain that could prove problematic? With that in mind, avoid Southern German Lager WLP838/Munich Lager WY2308, which produces a lot of diacetyl, and Czech Pils WY2278, which can produce lots of sulfur.
Instead, pick one yeast strain that’s easy to work with and familiarize yourself with it. Keep repitching it for a few batches. A great workhorse lager yeast and the most used widely lager yeast in Germany is German Lager WLP830/Bohemian Lager WY2124. If you’re looking for more complexity, try the German Bock Lager WLP833 (from Ayinger Brewery). My favorite lager yeast is the Hessian Pils from the Yeast Bay in San Diego. It clears amazingly well without filtration and has a classic lager profile.
USING YEAST

One of the most common bad habits of new brewers is pitching just one vial or smack pack of yeast per 5-gallon batch. If a company handed you a couple of ounces of hops, is that all you’d use in your IPA? Just as with hops and malt, the amount of yeast required for each beer is unique. For the average homebrewed beer, a single vial or smack pack is barely at—and often far below—the bare minimum amount of yeast a professional brewery would use.
In addition to quantity, we’ll also get into yeast health in this section. Yeast cells take in all necessary nutrients and expel all waste products through their cell walls. If they’re not healthy, things go downhill quickly. You have to give your yeast what it needs. Remember, we aren’t brewers, we’re yeast farmers!
CELL COUNTS AND PITCH RATES
Pitching the proper amount of yeast is easy if you follow a few basic guidelines. On the following pages, we’ll demystify cell count, learn a couple of ways to make starters, and cover plenty of other topics that will guarantee a happy home for your yeast—because happy yeast means happy beer!
A typical vial or smack pack contains somewhere in the neighborhood of 100 billion yeast cells. According to the manufacturers, that number is designed to be the proper amount to pitch directly into 5 gallons of wort at about 1.050 OG within a month of the manufacturing date. But the typical rate used by professional brewers is 1 million cells per milliliter per degree Plato (1.004), which equates to 4 billion cells per gallon for every increase of 1.004 of your gravity. Here is an example for 5 gallons of wort at 1.050 (which is 12.5 degrees Plato):
4 billion cells × 5 gallons × 12.5 Plato = 250 billion yeast cells
That means most professional brewers are pitching between double and triple the amount you get in one vial or pack! Does that mean that you really need to buy three packs? Yes, if you want to pitch the same amount of yeast a brewery would. But you have a few other options, as well.
![]() Make a standard 2-liter starter (page 110): This roughly will double a colony of yeast, so you can take one vial or smack pack and turn it into two by making a mini-batch of beer. This amount, while still less than brewery levels, very rarely results in any subprime fermentations for 5 gallons of any ale up to about 1.060 (though I recommend doubling it by making two starters from two vials or smack packs if you’re making a lager).
Make a standard 2-liter starter (page 110): This roughly will double a colony of yeast, so you can take one vial or smack pack and turn it into two by making a mini-batch of beer. This amount, while still less than brewery levels, very rarely results in any subprime fermentations for 5 gallons of any ale up to about 1.060 (though I recommend doubling it by making two starters from two vials or smack packs if you’re making a lager).
![]() Brew a low-gravity beer to double as a starter: Whip up a delicious low-gravity beer, such as an ordinary bitter, when using a single vial or pack of liquid yeast for the first pitch. Make sure the recipe you choose is under 1.040, and leave as much sludgy hop residue in the kettle as possible so that it doesn’t get mixed in with the yeast. One package of yeast never has a problem handling 5 gallons of wort at this strength. Then you can save the yeast from the bottom (or top, as on page 125) and use it to brew stronger beers. In essence, the beer you get to drink also acts as a 5-gallon starter! This is my preferred method when growing yeast for a strong ale (more than 1.070) or a lager.
Brew a low-gravity beer to double as a starter: Whip up a delicious low-gravity beer, such as an ordinary bitter, when using a single vial or pack of liquid yeast for the first pitch. Make sure the recipe you choose is under 1.040, and leave as much sludgy hop residue in the kettle as possible so that it doesn’t get mixed in with the yeast. One package of yeast never has a problem handling 5 gallons of wort at this strength. Then you can save the yeast from the bottom (or top, as on page 125) and use it to brew stronger beers. In essence, the beer you get to drink also acts as a 5-gallon starter! This is my preferred method when growing yeast for a strong ale (more than 1.070) or a lager.
![]() Pick up fresh yeast slurry from a local brewery: This is by far the easiest way to get a healthy colony ready to pitch on the same day. Call ahead and bring a sanitized quart Mason jar. For a 5-gallon batch of 1.060 wort, you’ll need only about 4 ounces (½ to ¾ cup) of yeast slurry if it’s an ale and 8 ounces (1 cup) of slurry if it’s a lager. Double-check to see what beer it’s being pulled from, too. The yeast slurry from a strong IPA may contain too much hop character if you’re brewing a drastically different style of beer.
Pick up fresh yeast slurry from a local brewery: This is by far the easiest way to get a healthy colony ready to pitch on the same day. Call ahead and bring a sanitized quart Mason jar. For a 5-gallon batch of 1.060 wort, you’ll need only about 4 ounces (½ to ¾ cup) of yeast slurry if it’s an ale and 8 ounces (1 cup) of slurry if it’s a lager. Double-check to see what beer it’s being pulled from, too. The yeast slurry from a strong IPA may contain too much hop character if you’re brewing a drastically different style of beer.
Pitch Rates for Various Beer Styles

STARTERS
If money is no object, buy two or three packages of yeast to get the right amount for your beer. For the rest of us, starters are a great way to save money and begin fermentations with more yeast. A yeast starter is essentially a mini-batch of beer made so that your yeast culture can create more cells ahead of fermenting your actual beer. In addition to growing your cell count, a starter invigorates the yeast cells and gets them ready to start fermenting. Making a starter is an essential technique that any serious brewer should know how to do.
The traditional size of a starter is 2 liters (about ½ gallon). You can make a starter about 24 hours before you brew and pitch it at the height of its activity, or you can let the starter finish fermenting, refrigerate it for two to three days, pour off the fermented wort, and pitch just the settled yeast. I prefer the latter method, because I don’t want to dilute my beer with 2 liters of generic unhopped wort. However, in the rare instance that you have a stuck fermentation and want to restart the fermentation with a starter, pitch the starter at the height of activity (after 12–24 hours). Also, if it’s brew day and you forgot to make a starter, even a small starter made a few hours before brewing can be beneficial.
MAKE A STARTER
A 2-liter starter is the most popular size among homebrewers. It will double your yeast population in about 24 hours, so a vial or smack pack with 100 billion cells will become 200 billion cells. This is an acceptable, if not quite perfect, pitch of yeast for a 5-gallon batch of beer under 1.060. If you want to brew a bigger starter, consider brewing a 5-gallon batch of low-gravity beer. That way, you’ll have some beer to drink instead of throwing out gallons of starter wort! Just remember: Regardless of the size or the beer you’re pitching into, shoot for a gravity of 1.040 for the starter.
1 medium to large pot
7 ounces light dry malt extract
2 liters purified water
Fermcap (optional)
sanitized container that holds 2 liters (a glass growler works)
sanitizer
aluminum foil
Note: Fermcap is the brand name of an anti-foam additive. It’s optional but highly recommended. A drop or two in your starter will keep the yeast from foaming over the top. It also can help when boiling the starter, which is notorious for boiling over.
1. Boil 7 ounces of dry malt extract with 2 liters of purified water for 20 minutes. If using Fermcap, add 2 drops before the wort comes to a boil.
2. Pour this mixture into the sanitized container. Chill to the pitching temperature of your yeast. If using a glass growler, chill the wort below 120°F before pouring into the growler to prevent cracking.
3. Aerate by shaking for 45 seconds. Pitch your yeast into the starter and let it ferment for at least 24 hours. If you can shake the starter occasionally (every hour or so), you will get more yeast growth. The shaking releases CO2 from the wort and introduces oxygen while keeping the yeast in solution.
4. After 24 hours, you can pitch the entire starter into your wort, assuming it’s visibly very active. Alternatively, you can wait until the starter’s activity dies down (typically 48 hours) and then refrigerate your starter. If you refrigerate your starter, take it from the fridge on brew day just as you would a vial or smack pack. While the starter is still cold, carefully pour off as much of the beer on top as possible without discarding any yeast. When your wort chills to pitching temperature, shake the yeast into solution and pitch into your wort or add some of the fresh wort to the yeast sediment and swirl it around. Let it reactivate the yeast for 30–60 minutes, and then add it to the wort—this will wake the yeast cells and ready them for action.
Note: If you brew frequently, you may want to make a large batch of wort and package it in large Mason jars so you’ll have a supply of it on hand. If you heat the sealed jars in a pressure cooker, they can be stored at room temperature. However, if they’re just filled with boiling wort, then you need to store them in the fridge.
VIABILITY
You need healthy yeast to have a healthy fermentation. Homebrew stores tend to receive refrigerated shipments, which means the yeast has stayed in ideal storage conditions since being made. Yeast shipped straight to the consumer without refrigeration will fare worse. Even under ideal transportation and storage, White Labs estimates that yeast viability drops to 75 to 85 percent after 30 days. If your yeast is older than that or shipped warm, definitely make a starter to get back to the original amount of cells. Generally, if you buy yeast from the homebrew store, assume that every 30 days the cell count drops by 20 percent. If you have a yeast package that’s three months old, it’s sitting at 40 percent of 100 billion cells.


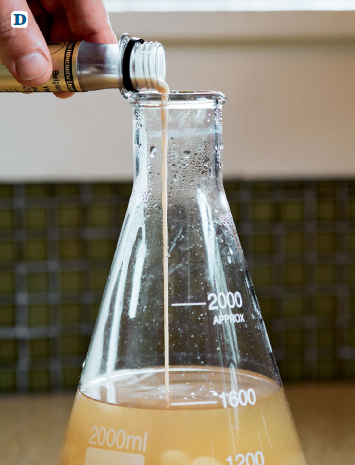
Variation: Advanced Starter
If you’re looking for maximum cell growth in a starter, then you need a stir plate. A constantly agitated and aerated starter increases cell counts by two or three times more than a standard starter.
YOU NEED
equipment and ingredients listed on page 111, except the sanitized container
stir plate
stir bar
2-liter Erlenmeyer flask (which can be boiled on a stovetop and then chilled without cracking)
1. Combine 7 ounces of dry malt extract, your stir bar, and 2 liters of purified water in the Erlenmeyer flask. A
2. Add Fermcap if desired and bring to a boil. B Boil for 20 minutes. C
3. Chill to the pitching temperature of your yeast.
4. Pitch your yeast, place your flask on the stir plate, and turn it on. D The stir bar will start to spin inside the flask, creating a whirlpool. Fermentation should finish within 24 hours.
5. After 24 hours, you can pitch the entire starter into your wort, assuming it’s visibly very active. Alternatively, you can wait until the starter’s activity dies down (typically 48 hours) and then refrigerate your starter. If you refrigerate your starter, take it from the fridge on brew day just as you would a vial or smack pack. While the starter is still cold, carefully pour off as much of the starter wort as possible without discarding any yeast. When your wort chills to pitching temperature, shake the yeast into solution and pitch it into your wort.
Variation: Base Beer as a Starter
To make world-class lagers, it’s essential to have a large quantity of healthy yeast. It’s difficult to get enough yeast by making a starter, so I recommend making a “sacrificial” batch. This batch should be drinkable, but making it is really about creating a 5-gallon starter so you can harvest the yeast. You also can make a starter for a high-gravity ale with the same process.
YOU NEED
basic brewing equipment (page 3)
For a lager starter: 7½ pounds pilsner malt, 1 ounce low-alpha hops (4% alpha acid), and 1 pack or vial yeast
For a high-gravity ale starter: 7 pounds pale-ale malt, ½ pound crystal 60°L, 1 ounce low-alpha hops (4% alpha acid), and 1 pack or vial yeast
1. Brew your beer as usual. Make sure that your gravity is about 1.036–1.040 and that you have just enough hops for balance (generally 15–20 IBUs).
2. Oxygenate well before pitching your yeast. (See page 116.) Ferment the beer at room temperature (65–70°F).
3. When this batch finishes, you will have enough yeast at the bottom of the fermentor to fill up a quart-size Mason jar. This is the proper amount of yeast to pitch for a lager or an ale over 1.080. (It’s also enough yeast to pitch into two or three batches of a normal gravity ale.) In general, you need ½ to ¾ cup of yeast slurry for ales and 1 to 1½ cups for lagers. Store the Mason jars in the fridge for no more than three to four days before you brew your “real” lager or ale.
Note: If you want to go further into lab techniques, such as growing yeast on plates or in test tubes, pick up a copy of Yeast: The Practical Guide to Beer Fermentation by Chris White and Jamil Zainasheff.
USING DRY YEAST
Back in the early days of homebrewing, dry yeast was the only option, and it was terrible. Homebrewers often had nothing better to use than the repackaged bread yeast found under the cap of a can of malt extract! Today, dry yeast has evolved into a respectable option. Many small commercial breweries use it because it’s cost effective and can be stored easily. There’s an advantage to dry yeast for homebrewers, too. Danstar and Fermentis, the two largest dry-yeast companies, both package their yeast in an 11-gram foil pack that contains 200–400 billion cells. As you might remember from page 109, that’s the perfect size for most normal 5-gallon batches.
The main downfall of dry yeast is lack of selection, although prospects are improving slowly. One of the most popular strains of dry yeast is Safale US-05 (close to the same strain as the one used by Sierra Nevada), which is crisp and clean with soft fruit notes. Another is Safale S-04, a British strain that clears faster than the US-05 but gives beer a breadier, fruitier character. Both are available at any homebrew shop. There also are new dried yeasts for brewing lagers, hefeweizens, wit beers, Belgian ales, and saisons, but reviews have been mixed, and the prices can be similar to liquid yeast.
Dry yeast needs to be rehydrated properly before pitching. Boil ½ cup of purified water and pour it into a sanitized cup or jar. Let it cool to 95–105°F, sprinkle the dried yeast on the surface of the water and leave it for 10 minutes. Stir the yeast into a slurry with a sanitized utensil, and then pitch it into your wort. Oxygen isn’t as critical with dry yeast because the manufacturers pre-oxygenate the yeast before drying. Shaking your fermenter for a minute should be fine.
Don’t risk trying to repitch dry yeast. Rehydrate a fresh pack for every beer. There’s always a tiny amount of contamination in dry yeast that you won’t notice in one generation, but, after multiple uses, it may start to show up. It’s not worth the couple of bucks you’ll pay for a fresh pack.
YEAST HEALTH
Pitching the right amount of yeast is only half of the battle. You also need to create an environment that will let it happily turn your wort into beer. The following details separate good brewers from great brewers. Without paying close attention to fermentation temperatures and proper aeration/oxygenation, it will prove almost impossible for you to make consistently great beers.
Fermentation Temperature
Aside from sanitation and pitch rate, the most important point to focus on is fermentation temperature. If you’ve ever had a beer that smelled boozy, tasted overly fruity, or gave you a headache after drinking it, it was probably due to a hot fermentation. Furthermore, you can’t reproduce a beer consistently unless you can control the temperature within a few degrees. Let’s start with the two most common problem areas, since they’re responsible for the majority of yeasty off-flavors.
![]() Temperature at the pitch: While yeast companies recommend pitching yeast on the warm side and then cooling the wort to the proper temperature once fermentation has started, it’s better to do the opposite. Chill your wort (overnight if necessary) to the proper pitching temperature before aerating and pitching the yeast. This one method will take your beers, especially lagers, to a new high.
Temperature at the pitch: While yeast companies recommend pitching yeast on the warm side and then cooling the wort to the proper temperature once fermentation has started, it’s better to do the opposite. Chill your wort (overnight if necessary) to the proper pitching temperature before aerating and pitching the yeast. This one method will take your beers, especially lagers, to a new high.
The science behind this advice is that the yeast produces most of the precursors for potential off-flavors during the growth phase, which happens in the first 48 hours. If you pitch at the proper temperature and keep the beer cool for the first two days of fermentation, you can relax a bit. Many breweries purposely let the beer warm up as the fermentation progresses, a process known as “driving the fermentation.”
For lagers, it’s doubly important to cool the wort to pitching temperature before adding the yeast. When I first started brewing, it took me years to realize that adding the yeast at 68°F and then putting it into a chest freezer set at 50°F wasn’t achieving the clean flavor I wanted. When I waited overnight, letting the wort drop to 47°F, before adding oxygen and the yeast, my lagers took a big jump in quality.
![]() Beer temperature vs. ambient temperature: Many new homebrewers set their beer in a room that’s the temperature they want for their fermentation and assume everything’s fine. But beer inside the fermentor can measure as much as 10°F more than the ambient temperature, which means that, even if you set your beer in a 70°F room, it can heat to 80°F during the peak of fermentation. That’s a huge difference! To get an accurate reading of the beer, you should insert a thermometer in the beer itself. Since that’s not practical for sanitation reasons, do the next best thing: Tape the thermometer to the outside of the fermentor and insulate it. A piece of polystyrene foam or a similar product works well. Inexpensive adhesive strip thermometers also work fine, but you’ll need to replace them occasionally.
Beer temperature vs. ambient temperature: Many new homebrewers set their beer in a room that’s the temperature they want for their fermentation and assume everything’s fine. But beer inside the fermentor can measure as much as 10°F more than the ambient temperature, which means that, even if you set your beer in a 70°F room, it can heat to 80°F during the peak of fermentation. That’s a huge difference! To get an accurate reading of the beer, you should insert a thermometer in the beer itself. Since that’s not practical for sanitation reasons, do the next best thing: Tape the thermometer to the outside of the fermentor and insulate it. A piece of polystyrene foam or a similar product works well. Inexpensive adhesive strip thermometers also work fine, but you’ll need to replace them occasionally.
During the first few days of fermentation, when the yeast is churning up the most heat, it’s essential to monitor and control the temperature. If it gets too hot and you don’t have a fermentation chamber with temperature control, a cold-water bath can help. Once you’re out of the danger zone, the temperature in the bucket or carboy will settle out much closer to your ambient temperature.
Fermentation Schedules
Pitching the yeast cool and starting the fermentation cool for the first couple of days before letting it warm up near the end is known in commercial brewing as “driving the fermentation.” This practice minimizes the production of off-flavors and makes cleaning them up easier for the yeast down the line. After three to four days, most fermentations are half finished at least, and the yeast cells are having a midlife crisis—they’re getting tired and don’t particularly enjoy the rising alcohol content. This is the time to let the temperature start rising a few degrees. It will keep the yeast cells active and help them work on that last little bit of fermentable sugar. Warming up the fermentation toward the end also increases the yeast’s ability to reabsorb diacetyl and other off-flavors.
For most beers, you want a gentle increase in temperature: around 5°F for an ale and 10°F for a lager or a Belgian ale. After four to five days at the warmer temperature, the beer should be completely fermented out. You’ll be able to tell: There will be no activity in the airlock and no krauesen (foam) on top of the beer. Hydrometer readings should show the same final gravity consistently. Every beer should stay in the primary fermentor for at least two weeks to ensure complete fermentation and diacetyl cleanup. Lagers or beers fermented cool (Kölsch, alt, cream ale) should go for three weeks before transferring off the yeast or chilling.
You can try to drive fermentation temperatures based on cool or warm areas of your house, but to control temperatures effectively you’ll need a chest freezer or fridge with a temperature regulator eventually.
American and British Ale Fermentation
1. Pitch the yeast at 65°F and hold the temperature for 3 days.
2. Let the temperature rise slowly to 68°F over the next 4 to 5 days.
3. Let the temperature rise to 72°F over the next 3 to 5 days.
4. At this point, commercial breweries crash the beer to 32°F to flocculate the yeast from solution. You can do the same using a refrigerator or chest freezer with a thermostat. If you’re kegging your beer, this is the time to add a fining agent if you’re using one (page 123). After 3 days of cold conditioning, transfer the beer into a keg or bottling bucket.
Traditional Belgian Ale
1. Pitch the yeast at 68°F and let it rise slowly to 76–86°F over the course of 7 to 10 days.
2. When the fermentation finishes, let the beer sit at room temperature for several weeks.
3. Bottle condition with fresh yeast.
Modern Belgian Ale
1. Pitch the yeast at 66°F and let it rise slowly over the next 7 to 10 days to 68–70°F.
2. Raise the temperature to 72°F and keep it there for 3 to 4 days.
3. When fermentation finishes, drop the temperature to below 40°F and hold for one week.
4. Bottle condition with fresh yeast.
Traditional Lager
Historically, lager fermentation took place in an ice-cooled room. Once the yeast started to slow down and stopped producing heat, the temperature started to drop. Instead of increasing the temperature at the end of fermentation as brewers do today, the opposite happened, making it much harder for the yeast to reabsorb diacetyl and other off-flavors. This meant the beer had to sit for months at 32–36°F in order to clean up. If you want your lager finished faster, go with the Modern Lager schedule below.
1. Pitch the yeast at 46°F and hold the temperature for 7 to 10 days.
2. Slowly drop the temperature of the beer 1–2°F a day until it reaches 38°F.
3. Store the beer at 34–38°F for 3 to 12 months.
Modern Lager
1. Pitch the yeast at 46–48°F and hold the temperature for 4 to 5 days.
2. Slowly let the temperature rise to 55°F over the next 5 days.
3. Raise the temperature to 68–70°F for 5 to 7 days for diacetyl reduction.
4. When fermentation finishes, drop the temperature to 32°F and hold for a week before transferring into a keg or bottling.
Aeration/Oxygenation
Yeast cells can reproduce anaerobically (without oxygen), but the daughter cells will be weak, which often leads to off-flavors and poor fermentations—especially if you plan to reuse the yeast. For healthy yeast, oxygenation is key.
The optimal amount of oxygen fluctuates based on the yeast strain, the gravity of the beer, and many other variables. But the rule of thumb is 10 ppm for ales and up to 15 ppm for lagers, strong beers, and saison strains. Proper oxygen levels are even more important if you’re planning to reuse your yeast. Oxygen-deprived yeast can start acting badly in a couple of generations. You can introduce oxygen in a few ways.

![]() Manual labor: Splashing your wort into the fermentor post-boil using a siphon spray will give you only around 4 ppm. Pouring wort back and forth between buckets greatly increases your chances of an infection and isn’t recommended. Shaking is the best way to oxygenate without additional equipment. Shaking for just 45 seconds will oxygenate your wort as much as possible. There’s no benefit to shaking for 10 to 20 minutes. Since you’re not using pure oxygen, your max is about 8 ppm no matter how long you shake. Once you’re done shaking, pitch the yeast immediately.
Manual labor: Splashing your wort into the fermentor post-boil using a siphon spray will give you only around 4 ppm. Pouring wort back and forth between buckets greatly increases your chances of an infection and isn’t recommended. Shaking is the best way to oxygenate without additional equipment. Shaking for just 45 seconds will oxygenate your wort as much as possible. There’s no benefit to shaking for 10 to 20 minutes. Since you’re not using pure oxygen, your max is about 8 ppm no matter how long you shake. Once you’re done shaking, pitch the yeast immediately.
![]() Oxygen tank and diffuser: The best and most expensive option is a tank of pure oxygen with a diffusion stone and a regulator. The oxygen tank is the pricey part. You can get one through a homebrew supply store or through a welding or CO2 supplier. Look for oxygen regulators on eBay—they’re remarkably cheap. Just make sure you find one that allows you to adjust the flow of the gas. Most online homebrew suppliers sell diffusion stones. I like the kind attached to a stainless wand.
Oxygen tank and diffuser: The best and most expensive option is a tank of pure oxygen with a diffusion stone and a regulator. The oxygen tank is the pricey part. You can get one through a homebrew supply store or through a welding or CO2 supplier. Look for oxygen regulators on eBay—they’re remarkably cheap. Just make sure you find one that allows you to adjust the flow of the gas. Most online homebrew suppliers sell diffusion stones. I like the kind attached to a stainless wand.
Once you buy the equipment and fill the tank, adjust the regulator so that the flow is 1 liter per minute. Most beers require just one minute of flow at that rate, which will give you around 10 ppm. Lagers and stronger beers will require two minutes, which should give you around 15 ppm. Over-oxygenation isn’t really a concern unless you accidentally set it and walk away.
When using pure oxygen, oxygenate before you add the yeast. There’s a chance that the pure oxygen (O2) may freak the yeast out. Don’t wait too long to add the yeast after oxygenating, though, as it starts coming from solution almost immediately. Once you add the yeast, it will absorb all the oxygen from the wort within an hour or two, so you may want to add an additional charge of oxygen after 12 hours for high-gravity beers.
![]() Aquarium pump setup: Some homebrewers use an aquarium pump fitted with a diffuser and a sterile in-line filter. These pumps use air and not pure oxygen, so you’re still limited to 8 ppm. Go for an O2 tank/regulator/diffusion stone if you have the money to spare. If not, you might as well just shake your fermentor vigorously, which will get you in the 8 ppm range for free.
Aquarium pump setup: Some homebrewers use an aquarium pump fitted with a diffuser and a sterile in-line filter. These pumps use air and not pure oxygen, so you’re still limited to 8 ppm. Go for an O2 tank/regulator/diffusion stone if you have the money to spare. If not, you might as well just shake your fermentor vigorously, which will get you in the 8 ppm range for free.
Yeast Nutrients
For the most part, yeast has enough nutrients in a typical all-malt beer, so you don’t need additional nutrients. But yeast nutrients are like multivitamins: they may not do much, but why not use them? I typically use ½ teaspoon of Wyeast nutrients in a 5-gallon batch. On the other hand, I’ve never noticed any yeast health problems when not using nutrients, even for 10-plus generations.
Nutrients supply some nitrogen, some B vitamins, and often some zinc. (There’s some controversy about whether an all-malt wort has enough zinc for normal yeast health, so it can’t hurt to get a nutrient that includes it.) A brand of nutrient sold as Servomyces consists of dried yeast fed a large amount of zinc. This allows German brewers who can’t use nutrients if they follow Reinheitsgebot (page 157) to add zinc. Yeast cells also need at least 50 ppm of calcium and 10 to 20 ppm of magnesium, which is usually present in the water supply. However, if you’re using reverse-osmosis or very soft water, adding ½ teaspoon each of Epsom salts and gypsum per 5 gallons is a good idea. (For more on water adjustment, see page 56.)
BELGIAN BLONDE ALE
While I enjoy all the beer styles of Belgium, some of them are too boozy to have on tap for regular drinking. A Belgian blonde is an exception. It has the same ABV as a pale ale but with the complex yeast character that makes Belgian beers distinctive. This is a good recipe if you want to try different Belgian yeasts and become accustomed to the fermentation regimen used for them. Belgian brewers commonly blend pilsner malt and pale-ale malt to add complexity. This recipe follows their lead and also adds a small amount of honey malt and aromatic malt for some additional complexity that doesn’t overly darken the beer.
YOU NEED
basic brewing equipment (page 3)
9 gallons filtered water (page 12)
5 pounds German pilsner malt (46.2%)
4 pounds British or Belgian pale-ale malt (36.9%)
1 pound wheat malt (9.2%)
½ pound Belgian aromatic malt (4.6%)
⅓ pound honey malt (3%)
7.5 alpha acid units German Perle or Hallertau hops at 60 minutes (26 IBU)
1 Whirlfloc tablet
2 vials or packages the Belgian ale yeast your choice (or a 2-liter starter made from 1 pack, page 110); I used Belgian Ardennes WY3522
5 ounces dextrose/corn sugar (optional, use only for bottling)
TARGETS
Yield: 5 gallons
OG: 1.057–1.059
FG: 1.010
IBU: 26
1. Mix the malt with 4 gallons of water at 163°F or the appropriate temperature to mash at 148°F. Mash for 60 minutes. If you can, raise the temperature to 164°F for a mashout (to ensure complete gelatinization). If you can’t mash out, don’t sweat it.
2. Recirculate the wort until it’s fairly clear. Run off the wort into the kettle.
3. Sparge with 5 more gallons of water at 165°F. Run off the wort into the kettle.
4. Bring the wort to a boil. Boil it for 30 minutes. Add the hops and continue to boil for 60 minutes. Add the Whirlfloc tablet at 30 minutes. Put your wort chiller into the wort at least 15 minutes before the end of the boil.
5. When the boil finishes, cover the pot with a lid or a new trash bag and chill to 65°F. Siphon the wort into your sanitized fermentor and pitch two packs of liquid yeast or a 2-liter starter.
6. Ferment at 65°F for two days, then allow the temperature to rise to 74°F and hold it there for two weeks.
7. Keg or bottle the beer. (If you’re bottling, I recommend 5 ounces of dextrose/corn sugar for this beer.)

NEW AMERICAN PILSNER
I love sweet pilsner malt balanced with a firm hop bitterness and a clean, flowery aroma. I had good luck a few years back brewing a pilsner using 100 percent Centennial hops, so I decided to see if I could push it even further into the American hop realm. Because it includes dank, citrusy American hops, this recipe combines the aggressive hop character of an IPA with the drinkability and finesse of a German pilsner.
YOU NEED
basic brewing equipment (page 3)
8 gallons filtered brewing water (page 12)
9 pounds German pilsner malt (100%)
6.3 alpha acid units Citra hops at 90 minutes (20 IBU)
3.2 alpha acid units Columbus hops at 30 minutes (7 IBU)
15 alpha acid units Columbus hops at 20 minutes (15 IBU)
6 alpha acid units Cascade hops at 10 minutes (7 IBU)
½ ounce Citra hops at end of boil
1 Whirfloc tablet
3 vials or packages German Lager WLP 838/Bavarian Lager WY2206 yeast (or a 1-gallon starter made from 1 pack; page 110)
½ ounce each Citra and Centennial hops (dry hop)
4.6 ounces dextrose/corn sugar (optional, use only for bottling)
TARGETS
Yield: 5 gallons
OG: 1.050–1.053
FG: 1.010
IBU: 49
1. Mix the malt with 3 gallons of water at 165°F or the appropriate temperature to mash at 150°F. Mash for 60 minutes.
2. Recirculate the wort until it’s fairly clear. Run off the wort into the kettle.
3. Sparge with 5 more gallons of water at 165°F. Run off the wort into the kettle.
4. Bring the wort to a boil. Add the first addition of hops and continue to boil for 90 minutes, adding the other hop additions as called for at left. Add the Whirlfloc tablet at 30 minutes. Put your wort chiller into the wort at least 15 minutes before the end of the boil.
5. When the boil finishes, cover the pot with a lid or a new trash bag and chill it to 48°F. If you can’t get the wort down to that temperature, siphon it into your sanitized fermentor and chill it overnight so that it reaches 48°F. Then pitch three packs of liquid yeast or a 1-gallon starter.
6. Ferment at 48°F for 2 days, then raise the temperature to 50°F for 3 more days. Up it to 55°F for another week, add the dry hops, then let the temperature rise to 65–68°F for 3 days for a diacetyl rest and to complete fermentation. Crash to 32°F and hold for 7–10 days.
7. Keg or bottle the beer. (If you’re bottling, I recommend 4.6 ounces of dextrose/corn sugar for this beer.)

YEAST AFTER FERMENTATION
You might think a finished fermentation means the yeast is done, but that’s not the case. Even after you reach final gravity, yeast continues its work. If you bottle, the yeast will wake up and work hard one last time to carbonate your beer.
But let’s start where we just left off: finished fermentation. When that happens, some yeast cells die. These cells settle to the bottom of the fermentor, which is why brewers throw away the very bottom of the yeast sediment cake—it’s mostly dead yeast and other waste (proteins, hop particles, etc.) known as trub. If dead yeast remains in the beer, it eventually will autolyze, or leak its insides into the beer. This process results in a meaty, brothlike flavor that’s unpleasant and a major flaw in any beer.
Healthy yeast doesn’t start to autolyze for a long time, even after it dies. Homebrewers used to believe that beer had to be taken off the yeast after one week or it would develop off-flavors, but we know now that this isn’t true. There shouldn’t be any off-flavors from dead yeast until at least four weeks in the primary fermentation vessel—maybe up to six weeks if it’s kept cold. That’s one reason that most of today’s homebrewers don’t bother with secondary fermentation.
The other reason is that removing the beer from all of the yeast too soon (as soon as fermentation finishes) means that only some of the yeast—whatever was left in suspension—has a chance to reabsorb diacetyl and other off-flavors. If there’s not enough yeast to do the job, those off-flavors stay in the beer. Leave just about any beer with all of its yeast for a total of two weeks before racking or packaging, just to be safe.
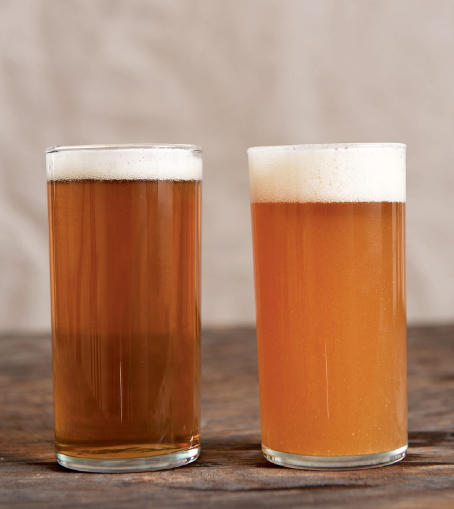
FILTERING AND FINING
Having filtered beer through a variety of filters over the years, I don’t recommend it on a homebrew scale. You’re increasing the chance of oxidizing or contaminating your beer when you can get the same results with finings and a few days of patience.
On the finings side, your best option is gelatin. It’s easy to work with, and it performs very well. The only downside is that it’s not suitable for vegetarian or vegan consumers. A product called Biofine is vegan and works similarly. Isinglass, often mentioned in older brewing literature, isn’t vegetarian. It’s notoriously hard to work with and difficult to find. Since there’s no advantage to using it over gelatin, just stick with gelatin.
No matter what you choose as a fining agent, the process is more or less the same. Here are the two types of fining I recommend:
![]() Pre-fermentation: Kettle finings coagulate many types of proteins in the boil, which means a clearer wort going to the fermentor. Almost all kettle finings derive from a seaweed called “Irish moss.” You can find straight Irish moss, but use either the powdered version or a tablet version. (The most popular brand is Whirlfloc.) No matter what you buy, the cost is very small for each 5-gallon batch. Instructions for that amount usually appear on the package, but all of the various forms are added toward the end (final 15 minutes) of the boil.
Pre-fermentation: Kettle finings coagulate many types of proteins in the boil, which means a clearer wort going to the fermentor. Almost all kettle finings derive from a seaweed called “Irish moss.” You can find straight Irish moss, but use either the powdered version or a tablet version. (The most popular brand is Whirlfloc.) No matter what you buy, the cost is very small for each 5-gallon batch. Instructions for that amount usually appear on the package, but all of the various forms are added toward the end (final 15 minutes) of the boil.
![]() Post-fermentation: Gelatin typically gives you a beer that looks filtered within a week. Once your beer finishes fermenting and cleaning up (typically around two weeks), crash it down to 32°F overnight. This is when the beer develops the chill haze you’re trying to avoid—clarifiers can’t clear something that’s not formed!
Post-fermentation: Gelatin typically gives you a beer that looks filtered within a week. Once your beer finishes fermenting and cleaning up (typically around two weeks), crash it down to 32°F overnight. This is when the beer develops the chill haze you’re trying to avoid—clarifiers can’t clear something that’s not formed!
The next day, take a pack of unflavored gelatin (next to the flavored gelatin in most supermarkets) and slowly sprinkle it onto the surface of a cup of cold, purified water. After letting it rehydrate for 5 to 10 minutes, heat it to a boil in the microwave or on the stovetop and then immediately cut the heat. Add this to your chilled beer and give it a gentle swirl. Your beer should be crystal clear within a few days.
YEAST MANAGEMENT
When it comes to yeast handling and maintenance, most small brewpubs and breweries are counting their yeast cells in bucketfuls or seconds on a pump. Rarely is there a lab on the premises. But the estimation method does work. It may not be a textbook approach to cell counting, but as long as you don’t repeat it for too many generations, the risk of a problematic fermentation remains very low.
The same goes for homebrewing. Everyone says that pitching onto a previous batch’s yeast cake is taboo, but it works fine—as long as you do it only one time. If you forget to add oxygen to a batch, don’t freak out. Just don’t reuse that yeast. The most common problems that develop with yeast take multiple generations to show up, so, if you repitch only one or two times, you can relax a little. Since fresh yeast is inexpensive, start with a fresh culture after no more than four uses/generations.
Washing and Packaging Yeast
Commercial brewers often joke that they’re really yeast farmers, because yeast in a brewery is rarely grown from a new culture but is harvested from the bottom of a fermentor and repitched in another batch instead. Some breweries go years without a new culture. As long as their sanitation is good and they treat the yeast properly, there’s not much of a downside.
It’s tempting for a homebrewer to do the same, continually saving yeast from one batch and using it in another. But the differences among commercial breweries and homebrewers are large in some important respects. Breweries brew every day, yeast goes from one fermentor and into the next in a matter of minutes, and rarely do breweries store yeast for weeks before using it. Commercial brewers are harvesting the yeast from fermentors with valves at the bottom, which allows them to discard the first stuff to come out (mostly hop residue, dead yeast, and break material) and get to the creamy white yeast in the center. Homebrewers, on the other hand, typically have a jar full of all kinds of junk that may contain only 10 percent healthy yeast! Trying to separate the healthy yeast from the detritus is a lot of work, but it isn’t difficult, and it will result in cleaner and better yeast for your next fermentation.
YOU NEED
sanitizer, such as Star San or iodophor
2 (1-quart) Mason jars with lids (or other similar-size glass containers)
2 (1-pint) Mason jars with lids
beer that has finished fermenting (ideally one with minimal trub and hop residue mixed with the yeast and no more than 6% ABV) as well as any kegging or bottling equipment you need to package the beer
1 gallon pre-boiled and cooled water or commercial spring water
1. Mix your sanitizer and sanitize the glass containers and lids.
2. Siphon the beer into the keg or bottling bucket, leaving about an inch of beer at the bottom of the fermentor above the yeast sediment.
3. Swirl the fermentor to get the yeast into solution, then pour or siphon it into the quart jars until they’re about two-thirds full. Top the jars off with the purified water, give them a good shake, and let them sit for about 15 minutes.
4. After 15 minutes, you should be able to see some separation in the jars. Carefully pour the top portion of the jars into the two sanitized pint jars, leaving behind the precipitate at the bottom of the quart jars. The pint jars can be stored in the fridge for up to two weeks; each is the proper pitching size for a 5-gallon batch of normal gravity beer.
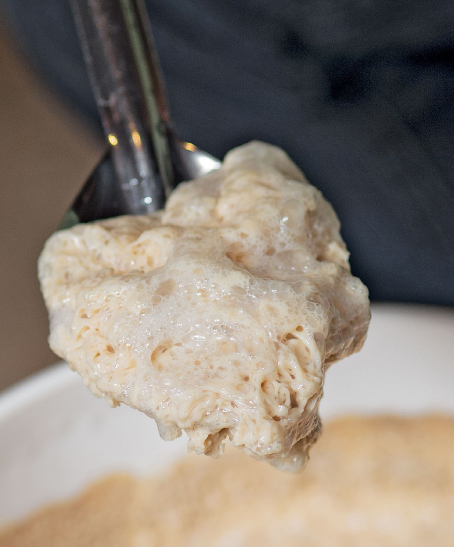
Top Cropping Yeast
Back in the days before conical fermentors, yeast used to be collected from the top of an actively fermenting beer. This yeast is usually very healthy and clean because it’s free of any dead cells or trub (which sink to the bottom), and the yeast is removed before the alcohol content of the beer gets very high. This is still the preferred way to harvest yeast for reuse, but it’s tricky for commercial brewers because they don’t have access to the top of the wort in a closed conical fermentor. Homebrewers have it easier if they’re fermenting in buckets. They can crack the lid carefully and scrape off the yeast. Sanitation is of utmost importance when harvesting yeast this way. Enlist an assistant to hold the jar or freezer bag as you work.
YOU NEED
wort 2–3 days into fermentation (too early, and the krauesen won’t have formed properly; too late, and it might have fallen back into the beer already)
sanitized stainless steel spoon
sanitized large-mouth pint jar or large freezer bags
1. In a draft-free room, carefully crack open the lid of the fermentor. Use the sanitized spoon to scoop off some of the yeast and deposit it quickly into the jar or freezer bag. Repeat until you have skimmed off most of the yeast. Quickly close the fermentor’s lid and seal the jar or bag.
2. Keep the jar or bag in the fridge for up to a week. If you’re using a freezer bag, place it in a second freezer bag to prevent it from contamination.
3. When you’re ready to use the yeast, just add it to the wort. The full amount of yeast you collected is a good amount to pitch into a 5-gallon batch.