Splits user interface interaction into three distinct roles.
Model View Controller (MVC) is one of the most quoted (and most misquoted) patterns around. It started as a framework developed by Trygve Reenskaug for the Smalltalk platform in the late 1970s. Since then it has played an influential role in most UI frameworks and in the thinking about UI design.
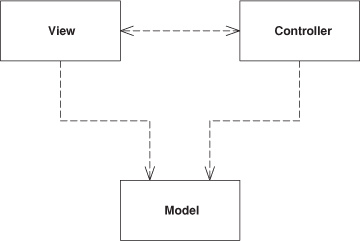
MVC considers three roles. The model is an object that represents some information about the domain. It’s a nonvisual object containing all the data and behavior other than that used for the UI. In its most pure OO form the model is an object within a Domain Model (116). You might also think of a Transaction Script (110) as the model providing that it contains no UI machinery. Such a definition stretches the notion of model, but fits the role breakdown of MVC.
The view represents the display of the model in the UI. Thus, if our model is a customer object our view might be a frame full of UI widgets or an HTML page rendered with information from the model. The view is only about display of information; any changes to the information are handled by the third member of the MVC trinity: the controller. The controller takes user input, manipulates the model, and causes the view to update appropriately. In this way UI is a combination of the view and the controller.
As I think about MVC I see two principal separations: separating the presentation from the model and separating the controller from the view.
Of these the separation of presentation from model is one of the most fundamental heuristics of good software design. This separation is important for several reasons.
• Fundamentally presentation and model are about different concerns. When you’re developing a view you’re thinking about the mechanisms of UI and how to lay out a good user interface. When you’re working with a model you are thinking about business policies, perhaps database interactions. Certainly you will use different very different libraries when working with one or the other. Often people prefer one area to another and they specialize in one side of the line.
• Depending on context, users want to see the same basic model information in different ways. Separating presentation and view allows you to develop multiple presentations—indeed, entirely different interfaces—and yet use the same model code. Most noticeably this could be providing the same model with a rich client, a Web browser, a remote API, and a command-line interface. Even within a single Web interface you might have different customer pages at different points in an application.
• Nonvisual objects are usually easier to test than visual ones. Separating presentation and model allows you to test all the domain logic easily without resorting to things like awkward GUI scripting tools.
A key point in this separation is the direction of the dependencies: the presentation depends on the model but the model doesn’t depend on the presentation. People programming in the model should be entirely unaware of what presentation is being used, which both simplifies their task and makes it easier to add new presentations later on. It also means that presentation changes can be made freely without altering the model.
This principle introduces a common issue. With a rich-client interface of multiple windows it’s likely that there will be several presentations of a model on a screen at once. If a user makes a change to the model from one presentation, the others need to change as well. To do this without creating a dependency you usually need an implementation of the Observer pattern [Gang of Four], such as event propagation or a listener. The presentation acts as the observer of the model: whenever the model changes it sends out an event and the presentations refresh the information.
The second division, the separation of view and controller, is less important. Indeed, the irony is that almost every version of Smalltalk didn’t actually make a view/controller separation. The classic example of why you’d want to separate them is to support editable and noneditable behavior, which you can do with one view and two controllers for the two cases, where the controllers are strategies [Gang of Four] for the view. In practice most systems have only one controller per view, however, so this separation is usually not done. It has come back into vogue with Web interfaces where it becomes useful for separating the controller and view again.
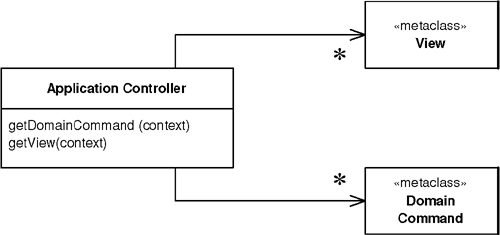
The fact that most GUI frameworks combine view and controller has led to many misquotations of MVC. The model and the view are obvious, but where’s the controller? The common idea is that it sits between the model and the view, as in the Application Controller (379)—it doesn’t help that the word “controller” is used in both contexts. Whatever the merits of a Application Controller (379), it’s a very different beast from an MVC controller.
For the purposes of this set of patterns these principles are really all you need to know. If you want to dig deeper into MVC the best available reference is [POSA].
As I said, the value of MVC lies in its two separations. Of these the separation of presentation and model is one of the most important design principles in software, and the only time you shouldn’t follow it is in very simple systems where the model has no real behavior in it anyway. As soon as you get some nonvisual logic you should apply the separation. Unfortunately, a lot of UI frameworks make it difficult, and those that don’t are often taught without a separation.
The separation of view and controller is less important, so I’d only recommend doing it when it is really helpful. For rich-client systems, that ends up being hardly ever, although it’s common in Web front ends where the controller is separated out. Most of the patterns on Web design here are based on that principle.
An object that handles a request for a specific page or action on a Web site.
Most people’s basic Web experience is with static HTML pages. When you request static HTML you pass to the Web server the name and path for a HTML document stored on it. The key notion is that each page on the Web site is a separate document on the server. With dynamic pages things can get much more interesting since there’s a much more complex relationship between path names and the file that responds. However, the approach of one path leading to one file that handles the request is a simple model to understand.
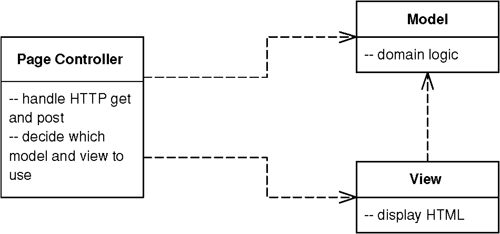
As a result, Page Controller has one input controller for each logical page of the Web site. That controller may be the page itself, as it often is in server page environments, or it may be a separate object that corresponds to that page.
The basic idea behind a Page Controller is to have one module on the Web server act as the controller for each page on the Web site. In practice, it doesn’t work out to exactly one module per page, since you may hit a link sometimes and get a different page depending on dynamic information. More strictly, the controllers tie in to each action, which may be clicking a link or a button.
The Page Controller can be structured either as a script (CGI script, servlet, etc.) or as a server page (ASP, PHP, JSP, etc.). Using a server page usually combines the Page Controller and a Template View (350) in the same file. This works well for the Template View (350) but less well for the Page Controller because it’s more awkward to properly structure the module. If the page is a simple display, this isn’t a problem. However, if there’s logic involved in either pulling data out of the request or deciding which actual view to display, then you can end up with awkward scriptlet code in the server page.
One way of dealing with scriptlet code is to use a helper object. In this case the first thing the server page does is call the helper object to handle all the logic. The helper may return control to the original server page, or it may forward to a different server page to act as the view, in which case the server page is the request handler but most of the controller logic lies in the helper.
Another approach is to make a script the handler and controller. The Web server passes control to the script; the script carries out the controller’s responsibilities and finally forwards to an appropriate view to display any results.
The basic responsibilities of a Page Controller are:
• Decode the URL and extract any form data to figure out all the data for the action.
• Create and invoke any model objects to process the data. All relevant data from the HTML request should be passed to the model so that the model objects don’t need any connection to the HTML request.
• Determine which view should display the result page and forward the model information to it.
The Page Controller needn’t be a single class but can invoke helper objects. This is particularly useful if several handlers have to do similar tasks. A helper class can then be a good spot to put any code that would otherwise be duplicated.
There’s no reason that you can’t have some URLs handled by server pages and some by scripts. Any URLs that have little or no controller logic are best handled with a server page, since that provides a simple mechanism that’s easy to understand and modify. Any URLs with more complicated logic go to a script. I’ve come across teams who want to handle everything the same way: all server page or everything is a script. Any advantages of consistency in such an application are usually offset by the problems of either scriptlet-laden server pages or lots of simple pass-through scripts.
The main decision point is whether to use Page Controller or Front Controller (344). Of the two, Page Controller is the most familiar to work with and leads to a natural structuring mechanism where particular actions are handled by particular server pages or script classes. Your trade-off is thus the greater complexity of Front Controller (344) against the various advantages of Front Controller, most of which make a difference in Web sites that have more navigational complexity.
Page Controller works particularly well in a site where most of the controller logic is pretty simple. In this case most URLs can be handled with a server page and the more complicated cases with helpers. When your controller logic is simple, Front Controller (344) adds a lot of overhead.
It’s not uncommon to have a site where some requests are dealt with by Page Controllers and others are dealt with by Front Controllers (344), particularly when a team is refactoring from one to another. Actually, the two patterns mix without too much trouble.
A simple example of an Page Controller displays some information about something. Here we’ll show it displaying some information about a recording artist. The URL runs along the lines of http://www.thingy.com/recordingApp/artist?name=danielaMercury.
Figure 14.1. Classes involved in a simple display with a Page Controller servlet and a JSP view.
The Web server needs to be configured to recognize /artist as a call to ArtistController. In Tomcat you do this with the following code in the web.xml file:
<servlet>
<servlet-name>artist</servlet-name>
<servlet-class>actionController.ArtistController</servlet-class>
</servlet>
<servlet-mapping>
<servlet-name>artist</servlet-name>
<url-pattern>/artist</url-pattern>
</servlet-mapping>
The artist controller needs to implement a method to handle the request.
class ArtistController...
public void doGet(HttpServletRequest request, HttpServletResponse response)
throws IOException, ServletException {
Artist artist = Artist.findNamed(request.getParameter("name"));
if (artist == null)
forward("/MissingArtistError.jsp", request, response);
else {
request.setAttribute("helper", new ArtistHelper(artist));
forward("/artist.jsp", request, response);
}
}
Although this is a very simple case, it covers the salient points. First the controller needs to create the necessary model objects to do their thing, here just finding the correct model object to display. Second it puts the right information in the HTTP request so that the JSP can display it properly. In this case it creates a helper and puts it into the request. Finally it forwards to the Template View (350) to handle the display. Forwarding is a common behavior, so it sits naturally on a superclass for all Page Controllers.
class ActionServlet...
protected void forward(String target,
HttpServletRequest request,
HttpServletResponse response)
throws IOException, ServletException
{
RequestDispatcher dispatcher = getServletContext().getRequestDispatcher(target);
dispatcher.forward(request, response);
}
The main point of coupling between the Template View (350) and the Page Controller is the parameter names in the request to pass on any objects that the JSP needs.
The controller logic here is really very simple, but as it gets more complex we can continue to use the servlet as a controller. We can have a similar behavior for albums, with the twist that classical albums both have a different model object and are rendered with a different JSP. To do this behavior we can again use a controller class.
class AlbumController...
public void doGet(HttpServletRequest request, HttpServletResponse response)
throws IOException, ServletException
{
Album album = Album.find(request.getParameter("id"));
if (album == null) {
forward("/missingAlbumError.jsp", request, response);
return;
}
request.setAttribute("helper", album);
if (album instanceof ClassicalAlbum)
forward("/classicalAlbum.jsp", request, response);
else
forward("/album.jsp", request, response);
}
Notice that in this case I’m using the model objects as helpers rather than creating a separate helper class. This is worth doing if a helper class is just a dumb forwarder to the model class. If you do it, though, make sure that the model class doesn’t contain any servlet-dependent code. Any servlet-dependent code should be in a separate helper class.
Using a servlet as a controller is one route to take, but the most common route is to make the server page itself the controller. The problem with this approach is that it results in scriptlet code at the beginning of the server page and, as you may have gathered, I think that scriptlet code has the same relationship to well-designed software that professional wrestling has to sport.
Despite this you can make a server page as the request handler while delegating control to the helper to actually carry out the controller function. This preserves the simple property of having your URLs denoted by server pages. I’ll do this for the album display, using the URL of the form http://localhost:8080/isa/album.jsp?id=zero. Most albums are displayed directly with the album JSP, but classical recordings require a different display, a classical album JSP.
This controller behavior appears in a helper class to the JSP. The helper is set up in the album JSP itself.
album.jsp...
<jsp:useBean id="helper" class="actionController.AlbumConHelper"/>
<%helper.init(request, response);%>
The call to init sets the helper up to carry out the controller behavior.
class AlbumConHelper extends HelperController...
public void init(HttpServletRequest request, HttpServletResponse response) {
super.init(request, response);
if (getAlbum() == null) forward("missingAlbumError.jsp", request, response);
if (getAlbum() instanceof ClassicalAlbum) {
request.setAttribute("helper", getAlbum());
forward("/classicalAlbum.jsp", request, response);
}
}
Common helper behavior naturally sits on a helper superclass.
class HelperController...
public void init(HttpServletRequest request, HttpServletResponse response) {
this.request = request;
this.response = response;
}
protected void forward(String target,
HttpServletRequest request,
HttpServletResponse response)
{
try {
RequestDispatcher dispatcher = request.getRequestDispatcher(target);
if (dispatcher == null) response.sendError(response.SC_NO_CONTENT);
else dispatcher.forward(request, response);
} catch (IOException e) {
throw new ApplicationException(e);
} catch (ServletException e) {
throw new ApplicationException(e);
}
}
The key difference between the controller behavior here and that when using a servlet is that the handler JSP is also the default view and, unless the controller forwards to a different JSP, control reverts to the original handler. This is an advantage when you have pages where the JSP directly acts as the view most of the time and so there’s no forwarding to be done. The initialization of the helper acts to kick off any model behavior and set things up for the view later on. It’s a simple model to follow, since people generally associate a Web page with the server page that acts as its view. Often this also fits naturally with Web server configuration.
The call to initialize the handler is a little clumsy. In a JSP environment this awkwardness can be much better handled with a custom tag. Such a tag can automatically create an appropriate object, put it in the request, and initialize it. With that all you need is a simple tag in the JSP page.
<helper:init name = "actionController.AlbumConHelper"/>
The custom tag’s implementation then does the work.
class HelperInitTag extends HelperTag...
private String helperClassName;
public void setName(String helperClassName) {
this.helperClassName = helperClassName;
}
public int doStartTag() throws JspException {
HelperController helper = null;
try {
helper = (HelperController) Class.forName(helperClassName).newInstance();
} catch (Exception e) {
throw new ApplicationException("Unable to instantiate " + helperClassName, e);
}
initHelper(helper);
pageContext.setAttribute(HELPER, helper);
return SKIP_BODY;
}
private void initHelper(HelperController helper) {
HttpServletRequest request = (HttpServletRequest) pageContext.getRequest();
HttpServletResponse response = (HttpServletResponse) pageContext.getResponse();
helper.init(request, response);
}
class HelperTag...
public static final String HELPER = "helper";
If I’m going to use custom tags like this, I might as well make them for property access too.
class HelperGetTag extends HelperTag...
private String propertyName;
public void setProperty(String propertyName) {
this.propertyName = propertyName;
}
public int doStartTag() throws JspException {
try {
pageContext.getOut().print(getProperty(propertyName));
} catch (IOException e) {
throw new JspException("unable to print to writer");
}
return SKIP_BODY;
}
class HelperTag...
protected Object getProperty(String property) throws JspException {
Object helper = getHelper();
try {
final Method getter = helper.getClass().getMethod(gettingMethod(property), null);
return getter.invoke(helper, null);
} catch (Exception e) {
throw new JspException
("Unable to invoke " + gettingMethod(property) + " - " + e.getMessage());
}
}
private Object getHelper() throws JspException {
Object helper = pageContext.getAttribute(HELPER);
if (helper == null) throw new JspException("Helper not found.");
return helper;
}
private String gettingMethod(String property) {
String methodName = "get" + property.substring(0, 1).toUpperCase() +
property.substring(1);
return methodName;
}
(You may think it’s better to use the Java Beans mechanism than to just invoke a getter using reflection. If so, you’re probably right ... and also probably intelligent enough to figure out how to change the method to do that.)
With the getting tag defined, I can use it to pull information out of the helper. The tag is shorter and eliminates any chance of my mizpelling “helper.”
<B><helper:get property = "title"/></B>
The Web system in .NET is designed to work with the Page Controller and Template View (350) patterns, although you can certainly decide to handle Web events with a different approach. In this next example, I’ll use the preferred style of .NET, building the presentation layer on top of a domain using Table Module (125) and using data sets as the main carrier of information between layers.
This time we’ll have a page that displays runs scored and the run rate for one innings of a cricket match. As I know I’ll have many readers who are afflicted with no material experience of this art form, let me summarize by saying that the runs scored are the score of the batsman and the run rate is how many runs he scores divided by the number of balls he faces. The runs scored and balls faced are in the database; the run rate needs to be calculated by the application—a tiny but pedagogically useful piece of domain logic.
The handler in this design is an ASP.NET Web page, captured in a .aspx file. As with other server page constructs, this file allows you to embed programming logic directly into the page as scriptlets. Since you know I’d rather drink bad beer than write scriptlets, you know there’s little chance that I’d do that. My savior in this case is ASP.NET’s code behind mechanism that allows you to associate a regular file and class with the aspx page, signaled in the header of the aspx page.
<%@ Page language="c#" Codebehind="bat.aspx.cs" AutoEventWireup="false" trace="False"
Inherits="batsmen.BattingPage" %>
The page is set up as a subclass of the code behind class, and as such can use all its protected properties and methods. The page object is the handler of the request, and the code behind can define the handling by defining a Page_Load method. If most pages follow a common flow, I can define a Layer Supertype (475) that has a template method [Gang of Four] for this.
class CricketPage...
protected void Page_Load(object sender, System.EventArgs e) {
db = new OleDbConnection(DB.ConnectionString);
if (hasMissingParameters())
errorTransfer (missingParameterMessage);
DataSet ds = getData();
if (hasNoData (ds))
errorTransfer ("No data matches your request");
applyDomainLogic (ds);
DataBind();
prepareUI(ds);
}
The template method breaks down the request handling into a number of common steps. This way we can define a single common flow for handling Web requests, while allowing each Page Controller to supply implementations for the specific steps. If you do this, once you’ve written a few Page Controllers, you’ll know what common flow to use for the template method. If any page needs to do something completely different, it can always override the page load method.
The first task is to do validation on the parameters coming into the page. In a more realistic example this might entail initial sanity checking of various form values, but in this case we’re just decoding a URL of the form http://localhost/batsmen/bat.aspx?team=England&innings=2&match=905. The only validation in this example is that the various parameters required for the database query are present. As usual I’ve been overly simplistic in the error handling until somebody writes a good set of patterns on validation—so here the particular page defines a set of mandatory parameters and the Layer Supertype (475) has the logic for checking them.
class CricketPage...
abstract protected String[] mandatoryParameters();
private Boolean hasMissingParameters() {
foreach (String param in mandatoryParameters())
if (Request.Params[param] == null) return true;
return false;
}
private String missingParameterMessage {
get {
String result = "<P>This page is missing mandatory parameters:</P>";
result += "<UL>";
foreach (String param in mandatoryParameters())
if (Request.Params[param] == null)
result += String.Format("<LI>{0}</LI>", param);
result += "</UL>";
return result;
}
}
protected void errorTransfer (String message) {
Context.Items.Add("errorMessage", message);
Context.Server.Transfer("Error.aspx");
}
class BattingPage...
override protected String[] mandatoryParameters() {
String[] result = {"team", "innings", "match"};
return result;
}
The next stage is to pull the data out of the database and put it in an ADO.NET disconnected data set object. Here this is a single query to the batting table.
class CricketPage...
abstract protected DataSet getData();
protected Boolean hasNoData(DataSet ds) {
foreach (DataTable table in ds.Tables)
if (table.Rows.Count != 0) return false;
return true;
}
class BattingPage...
override protected DataSet getData() {
OleDbCommand command = new OleDbCommand(SQL, db);
command.Parameters.Add(new OleDbParameter("team", team));
command.Parameters.Add(new OleDbParameter("innings", innings));
command.Parameters.Add(new OleDbParameter("match", match));
OleDbDataAdapter da = new OleDbDataAdapter(command);
DataSet result = new DataSet();
da.Fill(result, Batting.TABLE_NAME);
return result;
}
private const String SQL =
@"SELECT * from batting
WHERE team = ? AND innings = ? AND matchID = ?
ORDER BY battingOrder";
Now the domain logic gets its turn to play, organized as a Table Module (125). The controller passes the retrieved data set to the Table Module (125) for processing.
class CricketPage...
protected virtual void applyDomainLogic (DataSet ds) {}
class BattingPage...
override protected void applyDomainLogic (DataSet dataSet) {
batting = new Batting(dataSet);
batting.CalculateRates();
}
At this point the controller part of the page handler is done. By this I mean, in classic Model View Controller (330) terms, that the controller should now hand over to the view to do display. In this design the BattingPage acts as both the controller and the view and the last call to prepareUI is part of the view behavior. I can now say farewell to this example in this pattern. However, I suspect you’ll find this to lack a certain dramatic closure, so you can find the example continued later (page 350).
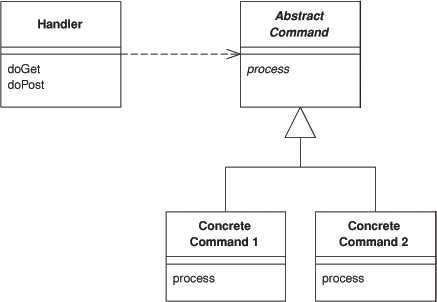
A controller that handles all requests for a Web site.
In a complex Web site there are many similar things you need to do when handling a request. These things include security, internationalization, and providing particular views for certain users. If the input controller behavior is scattered across multiple objects, much of this behavior can end up duplicated. Also, it’s difficult to change behavior at runtime.
The Front Controller consolidates all request handling by channeling requests through a single handler object. This object can carry out common behavior, which can be modified at runtime with decorators. The handler then dispatches to command objects for behavior particular to a request.
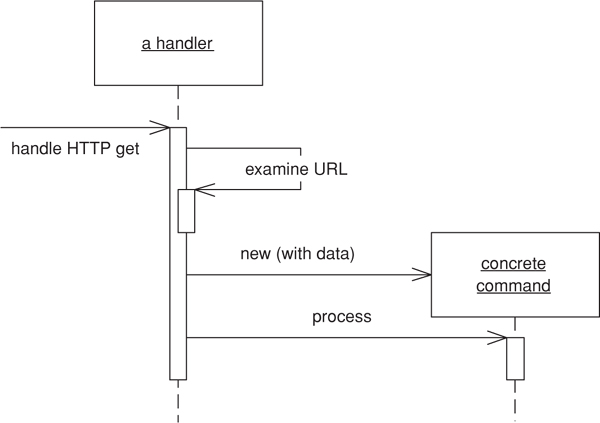
A Front Controller handles all calls for a Web site, and is usually structured in two parts: a Web handler and a command hierarchy. The Web handler is the object that actually receives post or get requests from the Web server. It pulls just enough information from the URL and the request to decide what kind of action to initiate and then delegates to a command to carry out the action (see Figure 14.2).
Figure 14.2. How the Front Controller works.
The Web handler is almost always implemented as a class rather than as a server page, as it doesn’t produce any response. The commands are also classes rather than server pages and in fact don’t need any knowledge of the Web environment, although they’re often passed the HTTP information. The Web handler itself is usually a fairly simple program that does nothing other than decide which command to run.
The Web handler can decide which command to run either statically or dynamically. The static version involves parsing the URL and using conditional logic; the dynamic version usually involves taking a standard piece of the URL and using dynamic instantiation to create a command class.
The static case has the advantage of explicit logic, compile time error checking on the dispatch, and lots of flexibility in the look of your URLs. The dynamic case allows you to add new commands without changing the Web handler.
With dynamic invocation you can put the name of the command class into the URL or you can use a properties file that binds URLs to command class names. The properties file is another file to edit, but it does make it easier to change your class names without a lot of searching through your Web pages.
A particularly useful pattern to use in conjunction with Front Controller is Intercepting Filter, described in [Alur et al.]. This is essentially a decorator that wraps the handler of the front controller allowing you to build a filter chain (or pipeline of filters) to handle issues such as authentication, logging, and locale identification. Using filters allows you to dynamically set up the filters to use at configuration time.
Rob Mee showed me an interesting variation of Front Controller using a two stage Web handler separated into a degenerate Web handler and a dispatcher. The degenerate Web handler pulls the basic data out of the http parameters and hands it to the dispatcher in such a way that the dispatcher is completely independent of the Web server framework. This makes testing easier because test code can drive the dispatcher directly without having to run in a Web server.
Remember that both the handler and the commands are part of the controller. As a result the commands can (and should) choose which view to use for the response. The only responsibility of the handler is in choosing which command to execute. Once that’s done, it plays no further part in that request.
The Front Controller is a more complicated design than its obvious counterpart, Page Controller (333). It therefore needs a few advantages to be worth the effort.
Only one Front Controller has to be configured into the Web server; the Web handler does the rest of the dispatching. This simplifies the configuration of the Web server, which is an advantage if the Web server is awkward to configure. With dynamic commands you can add new commands without changing anything. They also ease porting since you only have to register the handler in a Web-server-specific way.
Because you create new command objects with each request, you don’t have to worry about making the command classes thread-safe. In this way you avoid the headaches of multi-threaded programming; however, you do have to make sure that you don’t share any other objects, such as the model objects.
A commonly stated advantage of a Front Controller is that it allows you to factor out code that’s otherwise duplicated in Page Controller (333). To be fair, however, you can also do much of this with a superclass Page Controller (333).
There’s just one controller, so you can easily enhance its behavior at runtime with decorators [Gang of Four]. You can have decorators for authentication, character encoding, internationalization, and so forth, and add them using a configuration file or even while the server is running. ([Alur et al.] describe this approach in detail under the name Intercepting Filter.)
[Alur et al.] give a detailed description of how to implement Front Controller in Java. They also describe Intercepting Filter, which goes very well with Front Controller.
A number of Java Web frameworks use this pattern. An excellent example appears in [Struts].
Here’s a simple case of using Front Controller for the original and innovative task of displaying information about a recording artist. We’ll use dynamic commands with a URL of the form http://localhost:8080/isa/music?name=barelyWorks&command=Artist. The command parameter tells the Web handler which command to use.
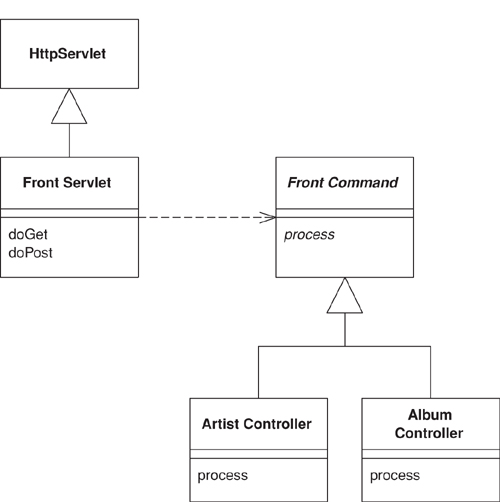
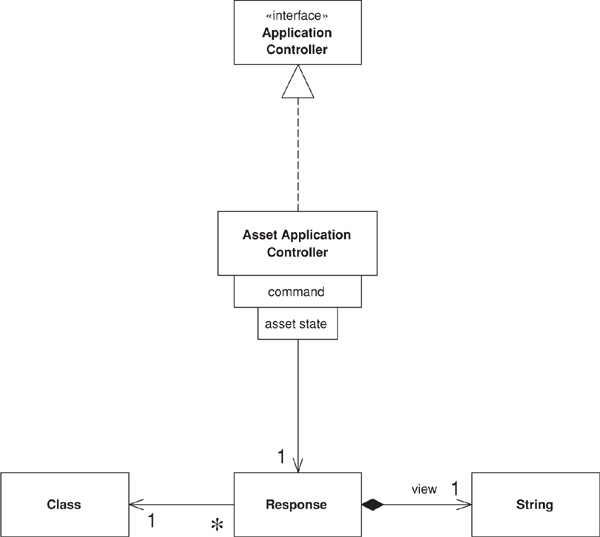
Figure 14.3. The classes that implement Front Controller.
We’ll begin with the handler, which I’ve implemented as a servlet.
class FrontServlet...
public void doGet(HttpServletRequest request, HttpServletResponse response)
throws IOException, ServletException {
FrontCommand command = getCommand(request);
command.init(getServletContext(), request, response);
command.process();
}
private FrontCommand getCommand(HttpServletRequest request) {
try {
return (FrontCommand) getCommandClass(request).newInstance();
} catch (Exception e) {
throw new ApplicationException(e);
}
}
private Class getCommandClass(HttpServletRequest request) {
Class result;
final String commandClassName =
"frontController." + (String) request.getParameter("command") + "Command";
try {
result = Class.forName(commandClassName);
} catch (ClassNotFoundException e) {
result = UnknownCommand.class;
}
return result;
}
The logic is straightforward. The handler tries to instantiate a class named by concatenating the command name and “Command.” Once it has the new command it initializes it with the necessary information from the HTTP server. I’ve passed in what I need for this simple example. You may well need more, such as the HTTP session. If you can’t find a command, I’ve used the Special Case (496) pattern and returned an unknown command. As is often the case, Special Case (496) allows you to avoid a lot of extra error checking.
Commands share a fair bit of data and behavior. They all need to be initialized with information from the Web server.
class FrontCommand...
protected ServletContext context;
protected HttpServletRequest request;
protected HttpServletResponse response;
public void init(ServletContext context,
HttpServletRequest request,
HttpServletResponse response)
{
this.context = context;
this.request = request;
this.response = response;
}
They can also provide common behavior, such as a forward method, and define an abstract process command for the actual commands to override.
class FrontCommand...
abstract public void process()throws ServletException, IOException ;
protected void forward(String target) throws ServletException, IOException
{
RequestDispatcher dispatcher = context.getRequestDispatcher(target);
dispatcher.forward(request, response);
}
The command object is very simple, at least in this case. It just implements the process method, which involves invoking the appropriate behavior on the model objects, putting the information needed for the view into the request, and forwarding to a Template View (350).
class ArtistCommand...
public void process() throws ServletException, IOException {
Artist artist = Artist.findNamed(request.getParameter("name"));
request.setAttribute("helper", new ArtistHelper(artist));
forward("/artist.jsp");
}
The unknown command just brings up a boring error page.
class UnknownCommand...
public void process() throws ServletException, IOException {
forward("/unknown.jsp");
}
Renders information into HTML by embedding markers in an HTML page.
Writing a program that spits out HTML is often more difficult than you might imagine. Although programming languages are better at creating text than they used to be (some of us remember character handling in Fortran and standard Pascal), creating and concatenating string constructs is still painful. If there isn’t much to do, it isn’t too bad, but a whole HTML page is a lot of text manipulation.
With static HTML pages—those that don’t change from request to request—you can use nice WYSIWG editors. Even those of us who like raw text editors find it easier to just type in the text and tags rather than fiddle with string concatenation in a programming language.
Of course the issue is with dynamic Web pages—those that take the results of something like database queries and embed them into the HTML. The page looks different with each result, and as a result regular HTML editors aren’t up to the job.
The best way to work is to compose the dynamic Web page as you do a static page but put in markers that can be resolved into calls to gather dynamic information. Since the static part of the page acts as a template for the particular response, I call this a Template View.
The basic idea of Template View is to embed markers into a static HTML page when it’s written. When the page is used to service a request, the markers are replaced by the results of some computation, such as a database query. This way the page can be laid out in the usual manner, often with WYSIWYG editors, often by people who aren’t programmers. The markers then communicate with real programs to put in the results.
A lot of tools use Template View. As a result this pattern isn’t about how to build one yourself, but about how to use one effectively and what the alternative is.
There are a number of ways markers can be placed in the HTML. One is to use HTML-like tags. This works well with WYSIWYG editors because they realize that anything between the angled brackets (<>) is special and so either ignore it or treat it differently. If the tags follow the rules for well-formed XML you can also use XML tools on the resulting document (providing your HTML is XHMTL, of course).
Another way to do this is to use special text markers in the body text. WYSIWYG editors treat that as regular text, still ignoring it but probably doing annoying things to it like spell checking. The advantage is that the syntax can be easier than the clunky syntax of HTML/XML.
Many environments provide the set of tags you use but more and more platforms now give you the ability to define your own tags and markers so you can design them to fit in with your particular needs.
One of the most popular forms of Template View is a server page such as ASP, JSP, or PHP. These actually go a step further than the basic form of a Template View in that they allow you to embed arbitrary programming logic, referred to as scriptlets, into the page. In my view, however, this feature is actually a big problem and you’re better off limiting yourself to basic Template View behavior when you use server page technology.
The most obvious disadvantage of putting a lot of scriptlets into a page is that it eliminates the possibility of nonprogrammers editing the page. This is particularly important when you’re using graphic designers for the page design. However, the biggest problems of embedding scriptlets into the page come from the fact that a page is poor module for a program. Even with an object-oriented language the page construct loses you most of the structural features that make it possible to do a modular design either in OO or in procedural style.
Even worse, putting a lot of scriptlets into the page makes it too easy to mingle the different layers of an enterprise application. When domain logic starts turning up on server pages it becomes far too difficult to structure it well and far too easy to duplicate it across different server pages. All in all, the worst code I’ve seen in the last few years has been server page code.
The key to avoiding scriptlets is to provide a regular object as a helper to each page. This helper has all the real programming logic. The page only has calls into it, which simplifies the page and makes it a more pure Template View. The resulting simplicity allows nonprogrammers to edit the page and programmers to concentrate on the helper. Depending on the actual tool you’re using, you can often reduce all the templates in a page to HTML/XML tags, which keeps the page more consistent and more amenable to tool support.
This sounds like a simple and commendable principle, but as ever quite a few dirty issues make things more complicated. The simplest markers are those that get some information from the rest of the system and put in the correct place on the page. They are easily translated into calls to the helper that result in text, (or something that’s trivially turned into text), and the engine places the text on the page.
A more knotty issue is conditional page behavior. The simplest case is the situation where something is displayed only if a condition is true. That might be some kind of conditional tag along the lines of <IF condition = "$pricedrop > 0.1"> ...show some stuff </IF>. The trouble with this is that when you start having conditional tags like this, you start going down the path of turning the templates into a programming language in and of themselves. This leads you into all the same problems you face when you embed scriptlets in the page. If you need a full programming language, you might as well use scriptlets, but you know what I think of that idea!
As a result, I see purely conditional tags as a bad smell, something you should try to avoid. You can’t always avoid them, but you should try to come up with something more focused than a general purpose <IF> tag.
If you’re displaying some text conditionally, one option is to move the condition into the helper. The page will then always insert the result of the call into helper. It’s just that if the condition isn’t true the helper will send back an empty string, but this way the helper holds all the logic. This approach works best if there’s no markup for the returned text or it’s enough to return empty markup that gets ignored by the browser.
This doesn’t work if, say, you want to highlight good-selling items in a list by putting their names in bold. In such a situation you always need the names displayed but sometimes you want the special markup. One way to get it is to have the helper generate the markup. This keeps all the logic out of the page, at the cost of moving the choice of highlighting mechanism away from the page designer and giving it to the programming code.
In order to keep the choice of HTML in the hands of the page design, you need some form of conditional tag. However it’s important to look beyond a simple <IF>. A good route to go is a focused tag, so rather than a tag that looks like this:
<IF expression = "isHighSelling()"><B></IF>
<property name = "price"/>
<IF expression = "isHighSelling()"></B></IF>
you have one like
<highlight condition = "isHighSelling" style = "bold">
<property name = "price"/>
</highlight>
In either case it’s important that the condition be done based on a single Boolean property of the helper. Putting any more complex expression into the page is actually putting the logic into the page itself.
Another example would be putting information on a page that depends on the locale on which the system is running. Consider some text that should only be shown in the United States or Canada, which, rather than
<IF expression = "locale = 'US' || 'CA'"> ...special text </IF>
Would be something like
<locale includes = "US, CA"> ...special text </locale>
Iterating over a collection presents similar issues. If you want a table where each line corresponds to a line item on an order, you need a construct that allows easy display of information for each line. Here it’s hard to avoid a general iteration over a collection tag, but it usually works simply enough to fit in quite well.
Of course the kinds of tag you have to work with are often limited by the environment you’re in. Some environments give you a fixed set of templates, in which case you may be more limited than you would like in following these kinds of guidelines. In other environments, however, you may have more choice in the tags to use; many of them even allow you to define your own tag libraries.
The name Template View brings out the fact that the primary function of this pattern is to play the view in Model View Controller (330). For many systems the Template View should only play the view. In simpler systems it may be reasonable for it to play the controller, and possibly even the model, although I would strive to separate model processing as much as possible. Where Template View is taking on responsibilities beyond the view, it’s important to ensure that these responsibilities are handled by the helper, not by the page. Controller and model responsibilities involve program logic, which program logic everywhere, should sit in the helper.
Any template system needs extra processing by the Web server. This can either be done by compiling the page after it’s created, compiling the page or on its first request, or by interpreting the page on each request. Obviously the latter isn’t a good idea if the interpretation takes a while to do.
One thing to watch with Template View is exceptions. If an exception works its way up to the Web container, you may find yourself with a half-handled page that provides some decidedly odd output to the calling browser instead of a redirect. You need to look into how your Web server handles exceptions; if it does something strange, catch all exceptions yourself in the helper class (yet another reason to disdain scriptlets.)
Although server pages are one of the most common forms of Template View these days, you can write scripts in a Template View style. I’ve seen a fair bit of Perl done this way. Most noticeably demonstrated by perl’s CGI.pm, the trick is to avoid concatenating strings by having function calls that output the appropriate tags to the response. This way you can write the script in your programming language and avoid the mess of interspersing print strings with programming logic.
For implementing the view in Model View Controller (330) the main choice is between Template View and Transform View (361). The strength of Template View is that it allows you to compose the content of the page by looking at the page structure. This seems to be easier for most people to do and to learn. In particular it nicely supports the idea of a graphic designer laying out a page with a programmer working on the helper.
Template View has two significant weaknesses. First, the common implementations make it too easy to put complicated logic in the page, thus making it hard to maintain, particularly by nonprogrammers. You need good discipline to keep the page simple and display oriented, putting logic in the helper. The second weakness is that Template View is harder to test than Transform View (361). Most implementations of Template View are designed to work within a Web server and are very difficult or impossible to test otherwise. Transform View (361) implementations are much easier to hook into a testing harness and test without a running Web server.
In thinking about a view you also need to consider Two Step View (365). Depending on your template scheme you may be able to implement this pattern using specialized tags. However, you may find it easier to implement it based on a Transform View (361). If you’re going to need Two Step View (365) you need to take that into account in your choice.
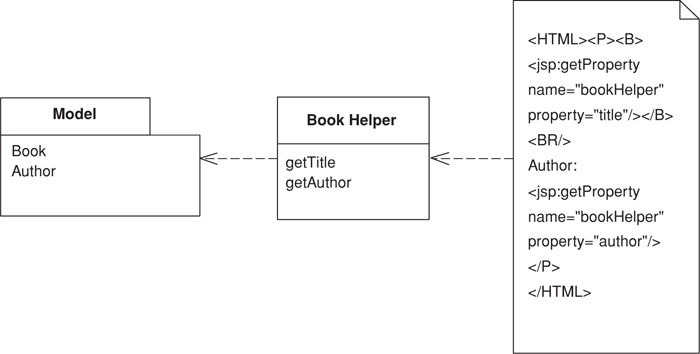
When using a JSP as a view only, it’s always be invoked from a controller rather than directly from the servlet container. Thus, it’s important to pass to the JSP any information it will need to figure out what to display. A good way to do this is to have the controller create a helper object and pass it to the JSP using the HTTP request. We’ll show this with the simple display example from Page Controller (333). The Web-handling method for the servlet looks like this:
class ArtistController...
public void doGet(HttpServletRequest request, HttpServletResponse response)
throws IOException, ServletException {
Artist artist = Artist.findNamed(request.getParameter("name"));
if (artist == null)
forward("/MissingArtistError.jsp", request, response);
else {
request.setAttribute("helper", new ArtistHelper(artist));
forward("/artist.jsp", request, response);
}
}
As far as the Template View is concerned the important behavior is creating the helper and placing it in the request. The server page can now reach the helper with the useBean tag.
<jsp:useBean id="helper" type="actionController.ArtistHelper" scope="request"/>
With the helper in place we can use it to access the information we need to display. The model information the helper needs was passed to it when it was created.
class ArtistHelper...
private Artist artist;
public ArtistHelper(Artist artist) {
this.artist = artist;
}
We can use the helper to get appropriate information from the model. In the simplest case we provide a method to get some simple data, such as the artist’s name.
class ArtistHelper...
public String getName() {
return artist.getName();
}
Then we access this information by a Java expression.
<B> <%=helper.getName()%></B>
or a property
<B><jsp:getProperty name="helper" property="name"/></B>
The choice between properties or expressions depends on who is editing the JSP. Programmers find expressions easy to read and more compact, but HTML editors may not be able to handle them. Nonprogrammers will probably prefer tags, since they fits in the general form of HTML and leave less room for confusing errors.
Using a helper is one way to remove awkward scriptlet code. If you want to show a list of albums for an artist, you need to run a loop, which you can do with a scriptlet in the server page.
<UL>
<%
for (Iterator it = helper.getAlbums().iterator(); it.hasNext();) {
Album album = (Album) it.next();%>
<LI><%=album.getTitle()%></LI>
<% } %>
</UL>
Frankly, this mix of Java and HTML is really horrible to read. An alternative is to move the for loop to the helper.
class ArtistHelper...
public String getAlbumList() {
StringBuffer result = new StringBuffer();
result.append("<UL>");
for (Iterator it = getAlbums().iterator(); it.hasNext();) {
Album album = (Album) it.next();
result.append("<LI>");
result.append(album.getTitle());
result.append("</LI>");
}
result.append("</UL>");
return result.toString();
}
public List getAlbums() {
return artist.getAlbums();
}
I find this easier to follow because the amount of HTML is quite small. It also allows you to use a property to get the list. Many people don’t like putting HTML code in helpers. While I prefer not to, given the choice between this and scriptlets I’d choose HTML in helpers any day or night.
The best route to go is a specialized tag for iteration.
<UL><tag:forEach host = "helper" collection = "albums" id = "each">
<LI><jsp:getProperty name="each" property="title"/></LI>
</tag:forEach></UL>
This is a much nicer alternative as it keeps scriptlets out of the JSP and HTML out of the helper.
This example continues the one I started in Page Controller (333) (page 340). To remind you, it shows the scores made by batsmen in a single innings of a cricket match. For those who think that cricket is a small noisy insect, I’ll pass over the long rhapsodies about the world’s most immortal sport and boil it all down to the fact that the page displays three essential pieces of information:
• An ID number to reference the match
• Which team’s scores are shown and which innings the scores are for
• A table showing each batsman’s name, score, and run rate (the number of balls he faced divided by the runs he scored)
If you don’t understand what these statistics mean, don’t worry about it. Cricket is full of statistics—perhaps its greatest contribution to humanity is providing odd statistics for eccentric papers.
The Page Controller (333) discussion covered how a Web request is handled. To sum up, the object that acts as both the controller and the view is the aspx ASP.NET page. To keep the controller code out of a scriptlet, you define a separate code behind class.
<%@ Page language="c#" Codebehind="bat.aspx.cs" AutoEventWireup="false" trace="False"
Inherits="batsmen.BattingPage" %>
The page can access the methods and properties of the code behind class directly. Furthermore, the code behind can define a Page_Load method to handle the request. In this case I’ve defined the Page_Load as a template method [Gang of Four] on a Layer Supertype (475).
class CricketPage...
protected void Page_Load(object sender, System.EventArgs e) {
db = new OleDbConnection(DB.ConnectionString);
if (hasMissingParameters())
errorTransfer (missingParameterMessage);
DataSet ds = getData();
if (hasNoData (ds))
errorTransfer ("No data matches your request");
applyDomainLogic (ds);
DataBind();
prepareUI(ds);
}
For the purposes of Template View I can ignore all but the last couple of lines of the page load. The call to DataBind allows various page variables to be properly bound to their underlying data sources. That will do for the simpler cases, but for more complicated cases the last line calls a method in the particular page’s code behind to prepare any objects for its use.
The match ID number, team, and innings are single values for the page, all of which came into the page as parameters in the HTTP request. I can provide these values by using properties on the code behind class.
class BattingPage...
protected String team {
get {return Request.Params["team"];}
}
protected String match {
get {return Request.Params["match"];}
}
protected String innings {
get {return Request.Params["innings"];}
}
protected String ordinalInnings{
get {return (innings == "1") ? "1st" : "2nd";}
}
With the properties defined, I can use them in the text of the page.
<P>
Match id:
<asp:label id="matchLabel" Text="<%# match %>" runat="server" font-bold="True">
</asp:label>
</P>
<P>
<asp:label id=teamLabel Text="<%# team %>" runat="server" font-bold="True">
</asp:label>
<asp:Label id=inningsLabel Text="<%# ordinalInnings %>" runat="server">
</asp:Label> innings</P>
<P>
The table is a little more complicated, but actually works easily in practice because of the graphical design facilities in Visual Studio. Visual Studio provides a data grid control that can be bound to a single table from a data set. I can do this binding in the prepareUI method that’s called by the Page_Load method.
class BattingPage...
override protected void prepareUI(DataSet ds) {
DataGrid1.DataSource = ds;
DataGrid1.DataBind();
}
The batting class is a Table Module (125) that provides domain logic for the batting table in the database. Its data property is the data from that table enriched by domain logic from Table Module (125). Here the enrichment is the run rate, which is calculated rather than stored in the database.
With the ASP.NET data grid you can select which table columns you wish to display in the Web page, together with information about the table’s appearance. In this case we can select name, runs, and rate columns.
<asp:DataGrid id="DataGrid1" runat="server" Width="480px" Height="171px"
BorderColor="#336666" BorderStyle="Double" BorderWidth="3px" BackColor="White"
CellPadding="4" GridLines="Horizontal" AutoGenerateColumns="False">
<SelectedItemStyle Font-Bold="True" ForeColor="White" BackColor="#339966"></
SelectedItemStyle>
<ItemStyle ForeColor="#333333" BackColor="White"></ItemStyle>
<HeaderStyle Font-Bold="True" ForeColor="White" BackColor="#336666"></HeaderStyle>
<FooterStyle ForeColor="#333333" BackColor="White"></FooterStyle>
<Columns>
<asp:BoundColumn DataField="name" HeaderText="Batsman">
<HeaderStyle Width="70px"></HeaderStyle>
</asp:BoundColumn>
<asp:BoundColumn DataField="runs" HeaderText="Runs">
<HeaderStyle Width="30px"></HeaderStyle>
</asp:BoundColumn>
<asp:BoundColumn DataField="rateString" HeaderText="Rate">
<HeaderStyle Width="30px"></HeaderStyle>
</asp:BoundColumn>
</Columns>
<PagerStyle HorizontalAlign="Center" ForeColor="White" BackColor="#336666"
Mode="NumericPages"></PagerStyle>
</asp:DataGrid></P>
The HTML for this data grid looks intimidating, but in Visual Studio you don’t manipulate it directly but through property sheets in the development environment, as you do for much of the rest of the page.
This ability to have Web form controls on the Web page that understand the ADO.NET abstractions of data sets and data tables is the strength, and limitation, of this scheme. The strength is that you transfer information through data sets, thanks to the kind of tools that Visual Studio provides. The limitation is that it only works seamlessly when you use patterns such as Table Module (125). If you have very complex domain logic, then a Domain Model (116) becomes helpful; to take advantage of the tools, the Domain Model (116) needs to create its own data set.
A view that processes domain data element by element and transforms it into HTML.
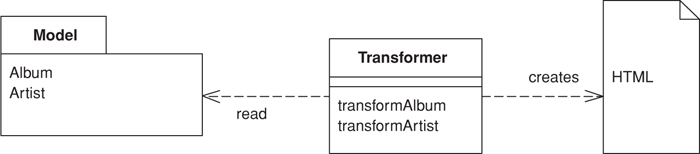
When you issue requests for data to the domain and data source layers, you get back all the data you need to satisfy them, but without the formatting you need to make a proper Web page. The role of the view in Model View Controller (330) is to render this data into a Web page. Using Transform View means thinking of this as a transformation where you have the model’s data as input and its HTML as output.
The basic notion of Transform View is writing a program that looks at domain-oriented data and converts it to HTML. The program walks the structure of the domain data and, as it recognizes each form of domain data, it writes out the particular piece of HTML for it. If you think about this in an imperative way, you might have a method called renderCustomer that takes a customer object and renders it into HTML. If the customer contains a lot of orders, this method loops over the orders calling renderOrder.
The key difference between Transform View and Template View (350) is the way in which the view is organized. A Template View (350) is organized around the output. A Transform View is organized around separate transforms for each kind of input element. The transform is controlled by something like a simple loop that looks at each input element, finds the appropriate transform for that element, and then calls the transform on it. A typical Transform View’s rules can be arranged in any order without affecting the resulting output.
You can write a Transform View in any language; at the moment, however, the dominant choice is XSLT. The interesting thing about this is that XSLT is a functional programming language, similar to Lisp, Haskell, and other languages that never quite made it into the IS mainstream. As such it has a different kind of structure to it. For example, rather than explicitly calling routines, XSLT recognizes elements in the domain data and then invokes the appropriate rendering transformations.
To carry out an XSLT transform we need to begin with some XML data. The simplest way this can happen is if the natural return type of the domain logic is either XML or something automatically transformable to it—for example, a .NET. Failing that, we need to produce the XML ourselves, perhaps by populating a Data Transfer Object (401) that can serialize itself into XML. That way the data can be assembled using a convenient API. In simpler cases a Transaction Script (110) can return XML directly.
The XML that’s fed into the transform don’t have to be a string, unless a string form is needed to cross a communication line. It’s usually quicker and easier to produce a DOM and hand that to the transform.
Once we have the XML we pass it to an XSLT engine, which is becoming increasingly available commercially. The logic for the transform is captured in an XSLT style sheet, which we also pass to the transformer. The transformer then applies the stylesheet to the input XML to yield the output HTML, which we can write directly to the HTTP response.
The choice between a Transform View and a Template View (350) mostly comes down to which environment the team working on the view software prefers. The presence of tools is a key factor here. There are more and more HTML editors that you can use to write Template Views (350). Tools for XSLT are, at least so far, much less sophisticated. Also, XSLT can be an awkward language to master because of its functional programming style coupled with its awkward XML syntax.
One of the strengths of XSLT is its portability to almost any Web platform. You can use the same XSLT to transform XML created from J2EE or .NET, which can help in putting a common HTML view on data from different sources.
XSLT is also often easier if you’re building a view on an XML document. Other environments usually require you to transform such a document into an object or to indulge in walking the XML DOM, which can be complicated. XSLT fits naturally in an XML world.
Transform View avoids two of the biggest problems with Template View (350). It’s easier to keep the transform focused only on rendering HTML, thus avoiding having too much other logic in the view. It’s also easy to run the Transform View and capture the output for testing. This makes it easier to test the view and you don’t need a Web server to run the tests.
Transform View transforms directly from domain-oriented XML into HTML. If you need to change the overall appearance of a Web site, this can force you to change multiple transform programs. Using common transforms, such as with XSLT includes, helps reduce this problem. Indeed it’s much easier to call common transformations using Transform View than it is using Template View (350). If you need to make global changes easily or support multiple appearances for the same data, you might consider Two Step View (365), which uses a two-stage process.
Setting up a simple transform involves preparing Java code for invoking the right style sheet to form the response. It also involves preparing the style sheet to format the response. Most of the response to a page is pretty generic, so it makes sense to use Front Controller (344). I’ll describe only the command here, and you should look at Front Controller (344) to see how the command object fits in with the rest of the request-response handling.
All the command object does is invoke the methods on the model to obtain an XML input document, and then pass that XML document through the XML processor.
class AlbumCommand...
public void process() {
try {
Album album = Album.findNamed(request.getParameter("name"));
Assert.notNull(album);
PrintWriter out = response.getWriter();
XsltProcessor processor = new SingleStepXsltProcessor("album.xsl");
out.print(processor.getTransformation(album.toXmlDocument()));
} catch (Exception e) {
throw new ApplicationException(e);
}
}
The XML document may look something like this:
<album>
<title>Stormcock</title>
<artist>Roy Harper</artist>
<trackList>
<track><title>Hors d'Oeuvres</title><time>8:37</time></track>
<track><title>The Same Old Rock</title><time>12:24</time></track>
<track><title>One Man Rock and Roll Band</title><time>7:23</time></track>
<track><title>Me and My Woman</title><time>13:01</time></track>
</trackList>
</album>
The translation of the XML document is done by an XSLT program. Each template matches a particular part of the XML and produces the appropriate HTML output for the page. In this case I’ve kept the formatting to a excessively simple level to show just the essentials. The following template clauses match the basic elements of the XML file.
<xsl:template match="album">
<HTML><BODY bgcolor="white">
<xsl:apply-templates/>
</BODY></HTML>
</xsl:template>
<xsl:template match="album/title">
<h1><xsl:apply-templates/></h1>
</xsl:template>
<xsl:template match="artist">
<P><B>Artist: </B><xsl:apply-templates/></P>
</xsl:template>
These template matches handle the table, which here has alternating rows highlighted in different colors. This is a good example of something that isn’t possible with cascading style sheets but is reasonable with XML.
<xsl:template match="trackList">
<table><xsl:apply-templates/></table>
</xsl:template>
<xsl:template match="track">
<xsl:variable name="bgcolor">
<xsl:choose>
<xsl:when test="(position() mod 2) = 1">linen</xsl:when>
<xsl:otherwise>white</xsl:otherwise>
</xsl:choose>
</xsl:variable>
<tr bgcolor="{$bgcolor}"><xsl:apply-templates/></tr>
</xsl:template>
<xsl:template match="track/title">
<td><xsl:apply-templates/></td>
</xsl:template>
<xsl:template match="track/time">
<td><xsl:apply-templates/></td>
</xsl:template>
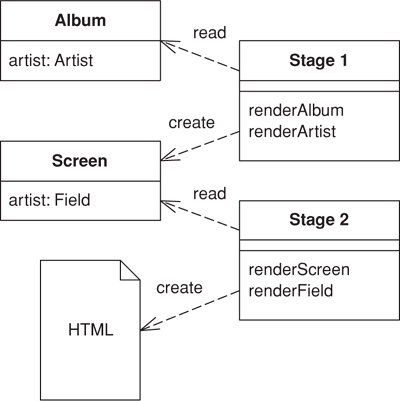
Turns domain data into HTML in two steps: first by forming some kind of logical page, then rendering the logical page into HTML.
If you have a Web application with many pages, you often want a consistent look and organization to the site. If every page looks different, you end up with a site that users find confusing. You may also want to make global changes to the appearance of the site easily, but common approaches using Template View (350) or Transform View (361) make this difficult because presentation decisions are often duplicated across multiple pages or transform modules. A global change can force you to change several files.
Two Step View deals with this problem by splitting the transformation into two stages. The first transforms the model data into a logical presentation without any specific formatting; the second converts that logical presentation with the actual formatting needed. This way you can make a global change by altering the second stage, or you can support multiple output looks and feels with one second stage each.
The key to this pattern is in making the transformation to HTML a two-stage process. The first stage assembles the information in a logical screen structure that is suggestive of the display elements yet contains no HTML. The second stage takes that presentation-oriented structure and renders it into HTML
This intermediate form is a kind of logical screen. Its elements might include things like fields, headers, footers, tables, choices, and the like. As such it’s certainly presentation-oriented and certainly forces the screens to follow a definite style. You can think of the presentation-oriented model as one that defines the various widgets you can have and the data they contain but doesn’t specify the HTML appearance.
This presentation-oriented structure is assembled by specific code written for each screen. The first stage’s responsibility is to access a domain-oriented model, either a database, an actual domain model, or a domain-oriented Data Transfer Object (401); to extract the relevant information for that screen; and then to put that information into the presentation-oriented structure.
The second stage turns this presentation-oriented structure into HTML. It knows about each element in the presentation-oriented structure and how to show it as HTML. Thus, a system with many screens can be rendered as HTML by a single second stage so that all the HTML formatting decisions are made in one place. Of course, the constraint is that the resulting screen must be derivable from the presentation-oriented structure.
There are several ways to build a Two Step View. Perhaps the easiest is with two-step XSLT. Single-step XSLT follows the approach in Transform View (361), in which each page has a single XSLT style sheet that transforms the domain-oriented XML into HTML. In the two-step approach there are two XSLT style sheets. The first-stage style sheet transforms the domain-oriented XML into presentation-oriented XML, the second-stage style sheet renders that XML into HTML.
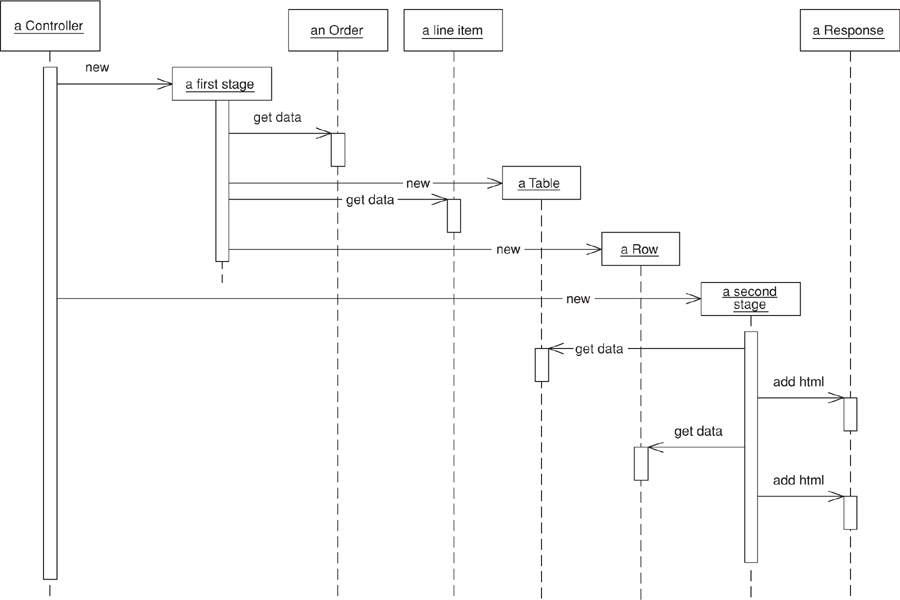
Another way is to use classes. Here you define the presentation-oriented structure as a set of classes: with a table class, a row class, and so forth. The first stage takes domain information and instantiates these classes into a structure that models a logical screen. The second stage renders the classes into HTML, either by getting each presentation-oriented class to generate HTML for itself or by having a separate HTML renderer class to do the job.
Both approaches are based on Transform View (361). You can also use a Template View (350) based approach, in which you pick templates based on the idea of a logical screen—for example:
<field label = "Name" value = "getName" />
The template system then converts these logical tags into HTML. In such a scheme the page definition includes no HTML but only these logical screen tags. As a result it will probably be an XML document, which of course means that you lose the ability to use WYSIWYG HTML editors.
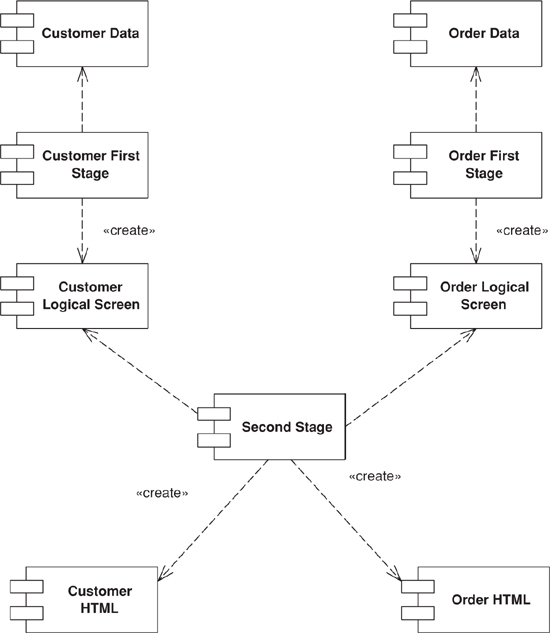
Figure 14.4. Sample classes for two-step rendering.
Figure 14.5. Sequence diagram for two-step rendering.
Two Step View’s key value comes from the separation of first and second stages, allowing you to make global changes more easily. It helps to think of two situations: multiappearance Web applications and single-appearance Web applications. Multiappearance apps are the rarer breed but a growing one. In them the same basic functionality is provided through multiple organizations and each organization has its own distinct look. A current example of this is airline travel sites, where as you look at them you can tell from the page layout and design that they’re all variations on one base site. I suspect many airlines want that same functionality but with a distinctly individual appearance.
Single-appearance apps are more common. Only one organization fronts them, and they want a consistent look throughout the site. This makes them the easiest case to consider first.
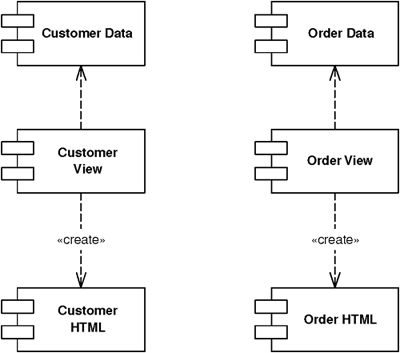
With a single-stage view (either Template View (350) or Transform View (361), you build one view module per Web page (see Figure 14.6). With a Two Step View you have two stages: one first-stage module per page and one second-stage module for the entire application (Figure 14.7). Your pay-off in using Two Step View is that any change to the appearance of the site in the second stage is much easier to make, since one second-stage change affects the site as a whole.
Figure 14.6. Single-stage view with one appearance.
Figure 14.7. Two-stage view with one appearance.
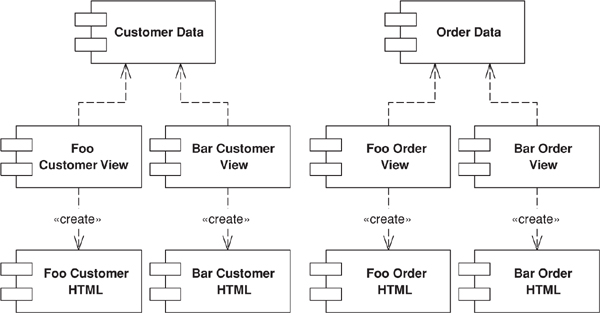
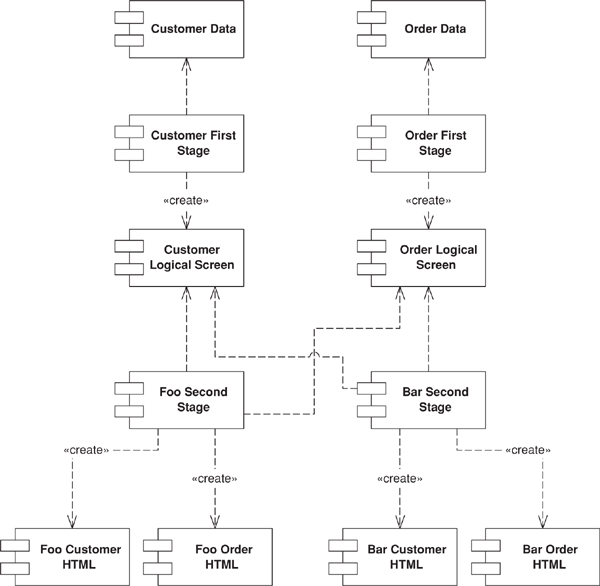
With a multiappearance app this advantage is compounded because you have a single-stage view for each combination of screen and appearance (Figure 14.8). Thus, ten screens and three appearances require thirty single stage view modules. Using Two Step View, however (see Figure 14.9), you can get away with ten first stages and three second stages. The more screens and appearances you have, the bigger the saving.
Figure 14.8. Single-stage view with two appearances.
Figure 14.9. Two-stage view with two appearances.
Nevertheless, your ability to pull this off is entirely dependent on how well you can make the presentation-oriented structure to really serve the needs of the appearance. A design-heavy site, where each page is supposed to look different, won’t work well with Two Step View because it’s hard to find enough commonality between the screens to get a simple enough presentation-oriented structure. Essentially the site design is constrained by the presentation-oriented structure, and for many sites that’s too much of a limitation.
Another drawback of Two Step View is the tools required to use it. There are a lot of tools for designers with no programming skills to lay out HTML pages using Template View (350), but Two Step View forces programmers to write the renderer and controller objects. Thus programmers have to be involved in any design change.
It’s also true that Two Step View, with its multiple layers, presents a harder programming model to learn, although once you’re used to it it’s not that difficult, and may help reduce repetitive boilerplate code.
A variation on the theme of multiple appearances is providing different second stages for different devices, so you can have one second stage for a browser and another for a PDA. The usual limitation here is that both appearances must follow the same logical screen, and for very different devices this may be too much to ask.
This approach to a Two Step View uses a two-stage XSLT transformation. The first stage transforms domain-specific XML into logical screen XML; the second transforms the logical screen XML into HTML.
The initial domain oriented XML looks like this:
<album>
<title>Zero Hour</title>
<artist>Astor Piazzola</artist>
<trackList>
<track><title>Tanguedia III</title><time>4:39</time></track>
<track><title>Milonga del Angel</title><time>6:30</time></track>
<track><title>Concierto Para Quinteto</title><time>9:00</time></track>
<track><title>Milonga Loca</title><time>3:05</time></track>
<track><title>Michelangelo '70</title><time>2:50</time></track>
<track><title>Contrabajisimo</title><time>10:18</time></track>
<track><title>Mumuki</title><time>9:32</time></track>
</trackList>
</album>
The first stage XSLT processor transforms it into this screen-oriented XML:
<screen>
<title>Zero Hour</title>
<field label="Artist">Astor Piazzola</field>
<table>
<row><cell>Tanguedia III</cell><cell>4:39</cell></row>
<row><cell>Milonga del Angel</cell><cell>6:30</cell></row>
<row><cell>Concierto Para Quinteto</cell><cell>9:00</cell></row>
<row><cell>Milonga Loca</cell><cell>3:05</cell></row>
<row><cell>Michelangelo '70</cell><cell>2:50</cell></row>
<row><cell>Contrabajisimo</cell><cell>10:18</cell></row>
<row><cell>Mumuki</cell><cell>9:32</cell></row>
</table>
</screen>
To do this we need the following XSLT program:
<xsl:template match="album">
<screen><xsl:apply-templates/></screen>
</xsl:template>
<xsl:template match="album/title">
<title><xsl:apply-templates/></title>
</xsl:template>
<xsl:template match="artist">
<field label="Artist"><xsl:apply-templates/></field>
</xsl:template>
<xsl:template match="trackList">
<table><xsl:apply-templates/></table>
</xsl:template>
<xsl:template match="track">
<row><xsl:apply-templates/></row>
</xsl:template>
<xsl:template match="track/title">
<cell><xsl:apply-templates/></cell>
</xsl:template>
<xsl:template match="track/time">
<cell><xsl:apply-templates/></cell>
</xsl:template>
The screen-oriented XML is very plain. To turn it into HTML we use a second-stage XSLT program.
<xsl:template match="screen">
<HTML><BODY bgcolor="white">
<xsl:apply-templates/>
</BODY></HTML>
</xsl:template>
<xsl:template match="title">
<h1><xsl:apply-templates/></h1>
</xsl:template><xsl:template match="field">
<P><B><xsl:value-of select = "@label"/>: </B><xsl:apply-templates/></P>
</xsl:template>
<xsl:template match="table">
<table><xsl:apply-templates/></table>
</xsl:template>
<xsl:template match="table/row">
<xsl:variable name="bgcolor">
<xsl:choose>
<xsl:when test="(position() mod 2) = 1">linen</xsl:when>
<xsl:otherwise>white</xsl:otherwise>
</xsl:choose>
</xsl:variable>
<tr bgcolor="{$bgcolor}"><xsl:apply-templates/></tr>
</xsl:template>
<xsl:template match="table/row/cell">
<td><xsl:apply-templates/></td>
</xsl:template>
In assembling the two stages, I used Front Controller (344) to help separate the code that does the work.
class AlbumCommand...
public void process() {
try {
Album album = Album.findNamed(request.getParameter("name"));
album = Album.findNamed("1234");
Assert.notNull(album);
PrintWriter out = response.getWriter();
XsltProcessor processor = new TwoStepXsltProcessor("album2.xsl", "second.xsl");
out.print(processor.getTransformation(album.toXmlDocument()));
} catch (Exception e) {
throw new ApplicationException(e);
}
}
It’s useful to compare this to the single-stage approach in Transform View (361). If you want to change the colors of the alternating rows, Transform View (361) requires editing every XSLT program, but with Two Step View only the single second-stage XSLT program needs to be changed. It might be possible to use callable templates to do something similar, but this needs a fair bit of XSLT gymnastics to pull off. The down side of Two Step View is that the final HTML is very much constrained by the screen-oriented XML.
Although the XSLT route is conceptually the easiest way to think about implementing Two Step View, plenty of other ways exist. For this example I’ll use JSPs and custom tags. Although they’re both more awkward and less powerful than XSLT, they do show how the pattern can manifest itself in different ways. I’m being a bit cheeky with this example, for I haven’t seen this done in the field. But I feel a somewhat speculative example will give you an idea of what might be possible.
The key rule of Two Step View is that choosing what to display and choosing the HTML that displays it are totally separate. For this example my first stage is handled by a JSP page and its helper; my second stage, by a set of custom tags. The interesting part of the first stage is the JSP page.
<%@ taglib uri="2step.tld" prefix = "2step" %>
<%@ page session="false"%>
<jsp:useBean id="helper" class="actionController.AlbumConHelper"/>
<%helper.init(request, response);%>
<2step:screen>
<2step:title><jsp:getProperty name = "helper" property = "title"/></2step:title>
<2step:field label = "Artist"><jsp:getProperty name = "helper" property = "artist"/></2step:field>
<2step:table host = "helper" collection = "trackList" columns = "title, time"/>
</2step:screen>
I’m using Page Controller (333) for the JSP page with a helper object you can flick over to Page Controller (333) to read more about that. The important thing here is to look at the tags that are part of the 2step namespace. They are the ones I’m using to invoke the second stage. Also notice that there is no HTML on the JSP page; the only tags present are either second-stage tags or bean manipulation tags to get values out of the helper.
Each second-stage tag has an implementation to pump out the necessary HTML for that logical screen element. The simplest of these is the title.
class TitleTag...
public int doStartTag() throws JspException {
try {
pageContext.getOut().print("<H1>");
} catch (IOException e) {
throw new JspException("unable to print start");
}
return EVAL_BODY_INCLUDE;
}
public int doEndTag() throws JspException {
try {
pageContext.getOut().print("</H1>");
} catch (IOException e) {
throw new JspException("unable to print end");
}
return EVAL_PAGE;
}
For those that haven’t indulged, a custom tag works by implementing hook methods called at the beginning and the end of the tagged text. This tag simply wraps its body content with an <H1> tag. A more complex tag, such as the field, can take an attribute. The attribute is tied into the tag class using a setting method.
class FieldTag...
private String label;
public void setLabel(String label) {
this.label = label;
}
Once the value is set, you can use it in the output.
class FieldTag...
public int doStartTag() throws JspException {
try {
pageContext.getOut().print("<P>" + label + ": <B>");
} catch (IOException e) {
throw new JspException("unable to print start");
}
return EVAL_BODY_INCLUDE;
}
public int doEndTag() throws JspException {
try {
pageContext.getOut().print("</B></P>");
} catch (IOException e) {
throw new JspException("how are checked exceptions helping me here?");
}
return EVAL_PAGE;
}
The Table is the most sophisticated of the tags. As well as allowing the JSP writer to choose which columns to put in the table, it highlights alternate rows. The tag implementation acts as the second stage, so the highlighting is done there so that a system-wide change can be made globally.
The Table tag takes attributes for the name of the collection property, the object on which the collection property sits, and a comma-separated list of column names.
class TableTag...
private String collectionName;
private String hostName;
private String columns;
public void setCollection(String collectionName) {
this.collectionName = collectionName;
}
public void setHost(String hostName) {
this.hostName = hostName;
}
public void setColumns(String columns) {
this.columns = columns;
}
I made a helper method to get a property out of an object. There’s a good argument for using the various classes that support Java beans, rather than just invoking a “getsomething” method, but this will do for the example.
class TableTag...
private Object getProperty(Object obj, String property) throws JspException {
try {
String methodName = "get" + property.substring(0, 1).toUpperCase() +
property.substring(1);
Object result = obj.getClass().getMethod(methodName, null).invoke(obj, null);
return result;
} catch (Exception e) {
throw new JspException("Unable to get property " + property + " from " + obj);
}
}
This tag doesn’t have a body. When it’s called it pulls the named collection out of the request property and iterates through the collection to generate the rows of the table.
class TableTag...
public int doStartTag() throws JspException {
try {
JspWriter out = pageContext.getOut();
out.print("<table>");
Collection coll = (Collection) getPropertyFromAttribute(hostName, collectionName);
Iterator rows = coll.iterator();
int rowNumber = 0;
while (rows.hasNext()) {
out.print("<tr");
if ((rowNumber++ % 2) == 0) out.print(" bgcolor = " + HIGHLIGHT_COLOR);
out.print(">");
printCells(rows.next());
out.print("</tr>");
}
out.print("</table>");
} catch (IOException e) {
throw new JspException("unable to print out");
}
return SKIP_BODY;
}
private Object getPropertyFromAttribute(String attribute, String property)
throws JspException
{
Object hostObject = pageContext.findAttribute(attribute);
if (hostObject == null)
throw new JspException("Attribute " + attribute + " not found.");
return getProperty(hostObject, property);
}
public static final String HIGHLIGHT_COLOR = "'linen'";
During the iteration it sets every other row to the linen background to highlight them.
To print the cells for each row, I use the column names as property values on the objects in the collection.
class TableTag...
private void printCells(Object obj) throws IOException, JspException {
JspWriter out = pageContext.getOut();
for (int i = 0; i < getColumnList().length; i++) {
out.print("<td>");
out.print(getProperty(obj, getColumnList()[i]));
out.print("</td>");
}
}
private String[] getColumnList() {
StringTokenizer tk = new StringTokenizer(columns, ", ");
String[] result = new String[tk.countTokens()];
for (int i = 0; tk.hasMoreTokens(); i++)
result[i] = tk.nextToken();
return result;
}
Compared to the XSLT implementation, this solution is rather less constraining on the uniformity of the site’s layout. An author of one page wanting to slip some individual HTML into it will find that easier to do. Of course, while this allows tweaking of design-intensive pages, it’s also open to inappropriate use by people who are unfamiliar with how things work. Sometimes constraints help prevent mistakes. That’s a trade-off a team has to decide for themselves.
A centralized point for handling screen navigation and the flow of an application.
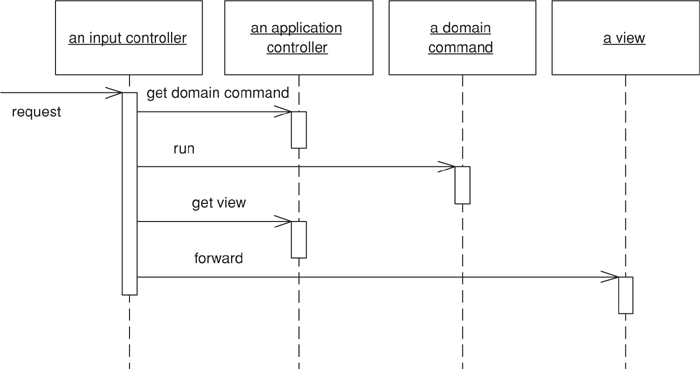
Some applications contain a significant amount of logic about the screens to use at different points, which may involve invoking certain screens at certain times in an application. This is the wizard style of interaction, where the user is led through a series of screens in a certain order. In other cases we may see screens that are only brought in under certain conditions, or choices between different screens that depend on earlier input.
To some degree the various Model View Controller (330) input controllers can make some of these decisions, but as an application gets more complex this can lead to duplicated code as several controllers for different screens need to know what to do in a certain situation.
You can remove this duplication by placing all the flow logic in an Application Controller. Input controllers then ask the Application Controller for the appropriate commands for execution against a model and the correct view to use depending on the application context.
An Application Controller has two main responsibilities: deciding which domain logic to run and deciding the view with which to display the response. To do this it typically holds two structured collections of class references, one for domain commands to execute against in the domain layer and one of views (Figure 14.10).
Figure 14.10. An application controller has two collections of references to classes, one for domain logic and one for view.
For both the domain commands and the view, the application controller needs a way to store something it can invoke. A Command [Gang of Four] is a good choice, since it allows it to easily get hold of and run a block of code. Languages that can manipulate functions can hold references to them. Another option is to hold a string that can be used to invoke a method by reflection.
The domain commands can be command objects that are part of the Application Controller layer, or they can be references to a Transaction Script (110) or domain object methods in the domain layer.
If you’re using server pages as your views, you can use the server page name. If you’re using a class, a command or a string for a reflective call makes sense. You might also use an XSLT transform, to which the Application Controller can hold a string as a reference.
One decision you’ll need to make is how much to separate the Application Controller from the rest of the presentation. At the first level this decision manifests itself in whether the Application Controller has dependencies to the UI machinery. Perhaps it directly accesses the HTTP session data, forwards to a server page, or invokes methods on a rich-client class.
Although I’ve seen direct Application Controllers, my preference is for the Application Controller to have no links to the UI machinery. For a start this makes it possible to test the Application Controller independently of the UI, which is a major benefit. It’s also important to do this if you’re going to use the same Application Controller with multiple presentations. For these reasons many people like to think of the Application Controller as an intermediate layer between the presentation and the domain.
An application can have multiple Application Controllers to handle each of its different parts. This allows you to split up complex logic into several classes. In this case I usually see the work divided up into broad areas of the user interface and build separate Application Controllers for each area. On a simpler application I might need only a single Application Controller.
If you have multiple presentations, such as a Web front end, a rich client, and a PDA, you may be able to use the same Application Controller for each presentation, but don’t be too eager. Often different UIs need a different screen flow to achieve a really usable user interface. However, reusing a single Application Controller may reduce the development effort, and that decreased effort may be worth the cost of a more awkward UI.
A common way of thinking about a UI is as a state machine, where certain events trigger different responses depending on the state of certain key objects in the application. In this case the Application Controller is particularly amenable to using metadata to represent the state machine’s control flow. The metadata can either be set up by programming language calls (the simplest way) or it can be stored in a separate configuration file.
You may find domain logic particular to one request placed in an Application Controller (379). As you might suspect, I come down pretty hard against that notion. However, the boundary between domain and application logic does get very murky. Say I’m handling insurance applications and I need to show a separate screen of questions only if the applicant is a smoker. Is this application logic or domain logic? If I have only a few such cases I can probably put that kind of logic in the Application Controller (379), but if it occurs in lots of places I need to design the Domain Model (116) in such a way to drive this.
If the flow and navigation of your application are simple enough so that anyone can visit any screen in pretty much any order, there’s little value in a Application Controller. The strength of an Application Controller comes from definite rules about the order in which pages should be visited and different views depending on the state of objects.
A good signal to use an Application Controller is if you find yourself having to make similar changes in lots of different places when your application’s flow changes.
Most of the ideas that underlie the writing of this pattern came from [Knight and Dai]. Although their ideas aren’t exactly new, I found their explanations remarkably clear and compelling.
State models are a common way of thinking about user interfaces. They’re particularly appropriate when you need to react differently to events depending on the state of some object. In this example I have a simple state model for a couple of commands on an asset (Figure 14.11). ThoughtWork’s leasing experts would faint at the virulent oversimplification of this model, but it will do as an example of a state-based Application Controller.
Figure 14.11. A simple state diagram for an asset.
As far as the code is concerned our rules are these:
• When we receive a return command and we’re in the On lease state, we display a page to capture information about the return of the asset.
• A return event in the in Inventory state is an error, so we show an illegal action page.
• When we receive a damage command we show different pages depending on whether the asset is in the Inventory or the On lease state.
The input controller is a Front Controller (344). It services the request like this:
class FrontServlet...
public void service(HttpServletRequest request, HttpServletResponse response)
throws IOException, ServletException
{
ApplicationController appController = getApplicationController(request);
String commandString = (String) request.getParameter("command");
DomainCommand comm =
appController.getDomainCommand(commandString, getParameterMap(request));
comm.run(getParameterMap(request));
String viewPage =
"/" + appController.getView(commandString, getParameterMap(request)) + ".jsp";
forward(viewPage, request, response);
}
The flow of the service method is pretty straightforward: We find the right application controller for a given request, ask the application controller for the domain command, execute the domain command, ask the application controller for a view, and, finally, forward to the view.
In this scheme I’m assuming a number of Application Controllers, all of which implement the same interface.
interface ApplicationController...
DomainCommand getDomainCommand (String commandString, Map params);
String getView (String commandString, Map params);
For our commands the appropriate Application Controller is an asset application controller. It uses a response class to hold the domain commands and view references. For the domain command I use a reference to a class; for the view I use a string, which the front controller will turn into a URL for a JSP.
class Response...
private Class domainCommand;
private String viewUrl;
public Response(Class domainCommand, String viewUrl) {
this.domainCommand = domainCommand;
this.viewUrl = viewUrl;
}
public DomainCommand getDomainCommand() {
try {
return (DomainCommand) domainCommand.newInstance();
} catch (Exception e) {throw new ApplicationException (e);
}
}
public String getViewUrl() {
return viewUrl;
}
The application controller holds on to the responses using a map of maps indexed by the command string and an asset status (Figure 14.12).
class AssetApplicationController...
private Response getResponse(String commandString, AssetStatus state) {
return (Response) getResponseMap(commandString).get(state);
}
private Map getResponseMap (String key) {
return (Map) events.get(key);
}
private Map events = new HashMap();
Figure 14.12. How the asset application controller stores its references to domain commands and views
When asked for a domain command, the controller looks at the request to figure out the asset ID, goes to the domain to determine the status of that asset, looks up the appropriate domain command class, instantiates that class, and returns the new object.
class AssetApplicationController...
public DomainCommand getDomainCommand (String commandString, Map params) {
Response reponse = getResponse(commandString, getAssetStatus(params));
return reponse.getDomainCommand();
}
private AssetStatus getAssetStatus(Map params) {
String id = getParam("assetID", params);
Asset asset = Asset.find(id);
return asset.getStatus();
}
private String getParam(String key, Map params) {
return ((String[]) params.get(key))[0];
}
All the domain commands follow a simple interface that allows the front controller to run them.
interface DomainCommand...
abstract public void run(Map params);
Once the domain command has done what it needs to do, the Application Controller comes into play again when it’s asked for the view.
class AssetApplicationController...
public String getView (String commandString, Map params) {
return getResponse(commandString, getAssetStatus(params)).getViewUrl();
}
In this case the Application Controller doesn’t return the full URL to the JSP. It returns a string that the front controller turns into an URL. I do this to avoid duplicating the URL paths in the responses. It also makes it easy to add further indirection later should I need it.
The Application Controller can be loaded for use with code.
class AssetApplicationController...
public void addResponse(String event, Object state, Class domainCommand, String view) {
Response newResponse = new Response (domainCommand, view);
if ( ! events.containsKey(event))
events.put(event, new HashMap());
getResponseMap(event).put(state, newResponse);
}
private static void loadApplicationController(AssetApplicationController appController) {
appController = AssetApplicationController.getDefault();
appController.addResponse("return", AssetStatus.ON_LEASE,
GatherReturnDetailsCommand.class, "return");
appController.addResponse("return", AssetStatus.IN_INVENTORY,
NullAssetCommand.class, "illegalAction");
appController.addResponse("damage", AssetStatus.ON_LEASE,
InventoryDamageCommand.class, "leaseDamage");
appController.addResponse("damage", AssetStatus.IN_INVENTORY,
LeaseDamageCommand.class, "inventoryDamage");
}
Doing this from a file instead isn’t rocket science, but even so I’ll leave it to you.