NIKON D2X ISO 400 1/320 SEC. F/8
Pressing your camera’s shutter release button moves the shutter out of the way of the camera’s sensor, allowing light to enter through the lens and be recorded as an image. That’s the easy part. The challenge is to capture the right amount of light so that the resulting image looks the way you want it to look. It is important to remember that you cannot actually control the intensity light with just the camera, but you can decide how much of it to allow through the lens (aperture) and how much you let the sensor actually record (shutter speed). By understanding your camera’s exposure settings and how each setting affects the image (and each other), you will gain control over the images you capture. This chapter is about the basics: shutter speed, aperture, ISO, and the different exposure modes available. It also introduces the ideas of equivalent exposures and exposure compensation, two key concepts when it comes to creatively capturing the scene.
Three settings on your camera work together to create the exposure for your image: shutter speed, aperture, and ISO. Shutter speed controls the length of time light is allowed to reach the sensor, the aperture is the size of the opening in the lens, and ISO controls how sensitive the sensor acts to light. These three settings are the foundation on which you’ll build all your images. First let’s look at each individually, and then I’ll show you how they work together.
The shutter speed setting controls the length of time the shutter exposes the sensor when you press the shutter release button. Shutter speed is measured in time, from fractions of a second to minutes and even hours. Most cameras enable you to set the shutter speed from 30 seconds to 1/4000 second; some cameras offer settings as fast as 1/8000 second. A fast shutter speed means the shutter is open a short time and less light is allowed to reach the sensor. A slow shutter speed leaves the shutter open longer and allows more light to reach the sensor. In addition to time increments, you can also set your shutter speed to Bulb, which keeps the shutter speed open indefinitely and is useful for shots taken with a cable release or remote.
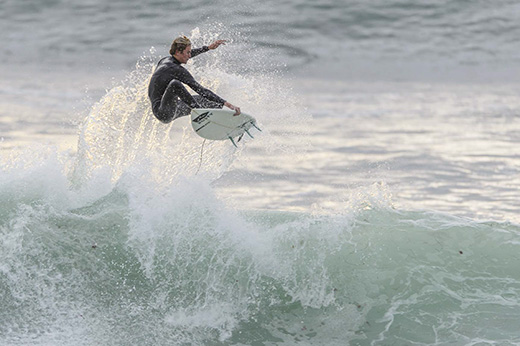
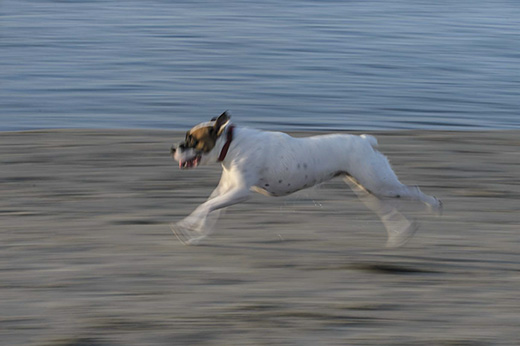
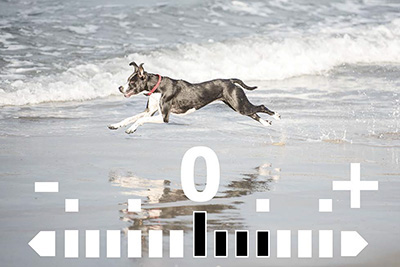
Beyond merely letting the light in, the shutter speed setting you choose also determines how motion is depicted in your images. The faster the shutter speed, the less time your subject can move during the exposure, so fast settings freeze the action. For example, in Figure 3.1 a shutter speed of 1/1000 second froze the surfer in mid-wave. Because the subject was moving so quickly, I needed a fast shutter speed to freeze the action. When the shutter is open for a longer period of time, blurring can occur because the subject (or the camera) has more time to move while the shutter is open. The shutter speed of 1/40 second was nowhere near fast enough to freeze the action in Figure 3.2 ; the dog was running too fast and appears blurred in the image.
NIKON D4 ISO 640 1/1000 SEC. F/2.8
Figure 3.1 Freezing fast-moving action takes a fast shutter speed. Here I needed 1/1000 of a second to freeze the surfer mid-ride.
NIKON D4 ISO 100 1/40 SEC. F/11
Figure 3.2 A fast-moving subject like this running dog and a slower shutter speed (here 1/40 second) equals a blurry subject.
Adding a flash to the equation enables you to freeze action, even at longer shutter speeds, because the duration of the flash is very short. The exact duration of the flash actually depends on how much light is output. For example, at full power the duration of the SB-910 is measured at 1/880 second, but at half power it is 1/1100 second. Using the short burst of light to freeze the action allows you to freeze the action even at longer shutter speeds. This means you can allow some of the ambient light in the scene to be recorded. In Figure 3.3 the action was frozen by the flash, while the shutter speed was 1/6 of second, which allowed for some of the lights in the city background to appear in the photo.
NIKON D4 ISO 400 1/6 SEC. F/6.3
Figure 3.3 The short duration of the flash freezes the motion in the image. For this shot, the shutter speed was really slow to allow for some ambient light to show up, but Tim was frozen mid-kick with the flash.
Note
When you use a flash, normally your shutter speed cannot be faster than 1/250 (or 1/200 for some models). This limit is called the sync speed and is because of the way the shutter opens and closes. Chapter 9 covers sync speed and the High Speed Sync mode in more detail.
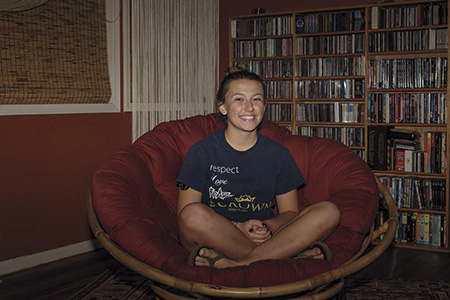
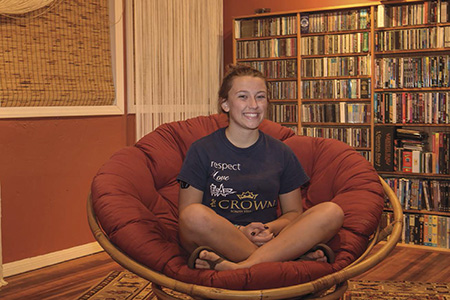
The shutter speed also controls how much ambient light is allowed to be recorded in your images. Leaving the shutter open longer allows more ambient light to affect the image, while faster shutter speeds mean less ambient light. By lengthening or shortening the shutter speed, you can better control the existing light in a scene and thereby decide what and how much will be lit in the scene. Figures 3.4 and 3.5 have the same exposure, but the longer shutter speed in Figure 3.5 allows for more of the ambient light in the room to illuminate the background.
NIKON D700 ISO 200 1/250 SEC. F/5.6
Figure 3.4 Using a fast shutter speed doesn’t allow the ambient light to illuminate the setting; all the light in the scene is produced from the flash.
NIKON D700 ISO 200 1/15 SEC. F/5.6
Figure 3.5 A slower shutter speed allows the ambient light to illuminate the background and can change the whole look and feel of the image.
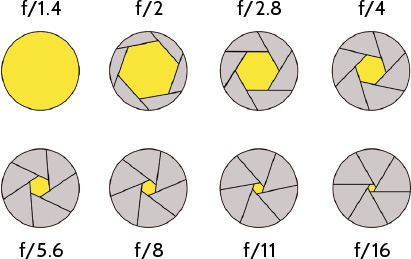
The aperture setting refers to the size , specifically the area, of the opening in the lens through which light can reach the sensor. A bigger opening means more light can reach the sensor over the same amount of time. Aperture is measured in f-stops , such as f/1.4, f/2.8, f/4, and so on. Because the f-stop is a fraction, a smaller number after the f means a larger opening. For example, f/2.8 is a larger opening than f/5.6, and f/16 is a smaller opening than f/8 ( Figure 3.6 ). By controlling the size of the opening in the lens, the aperture also controls the amount of flash that illuminates the subject. Because the duration of the flash is very short, all the illuminating power is discharged during the exposure, so changes in the shutter speed don’t really affect how much of the flash’s light is able to reach the sensor, but changing the aperture does.
Figure 3.6 Each of these apertures lets in twice as much light or half as much light as its neighbor.
Finally, the aperture setting also affects the depth of field in your image, which is the area that is in acceptable focus. The wider the aperture and therefore the larger the opening, the shallower the resulting depth of field. This gives you incredible control over what is in focus and what is out of focus in your image. For example, using an aperture of f/4 in Figure 3.7 created a very shallow depth of field. The subject is in focus, while the background is not. Using a smaller aperture of f/16 in Figure 3.8 created a deep depth of field with everything in focus.
NIKON D4 ISO 400 1/2000 SEC. F/4
Figure 3.7 A wide aperture of f/4 produces a shallow depth of field. The subject pops off the background, while the trees in the background are just green blurs.
NIKON D2X ISO 100 1/10 SEC. F/16
Figure 3.8 Using an aperture of f/16 creates a very deep depth of field. The whole scene is in focus from the rocks in the foreground to the café on the pier.
Remember, the range of f-stops available is dependent on the lens attached to the camera and not on the camera itself. Because the aperture is the physical measurement of the opening in the lens, each lens can have a different maximum aperture. In fact, some zoom lenses can have a different maximum aperture depending on the focal length. This can be a little confusing, so I’ll break it down in the next sections.
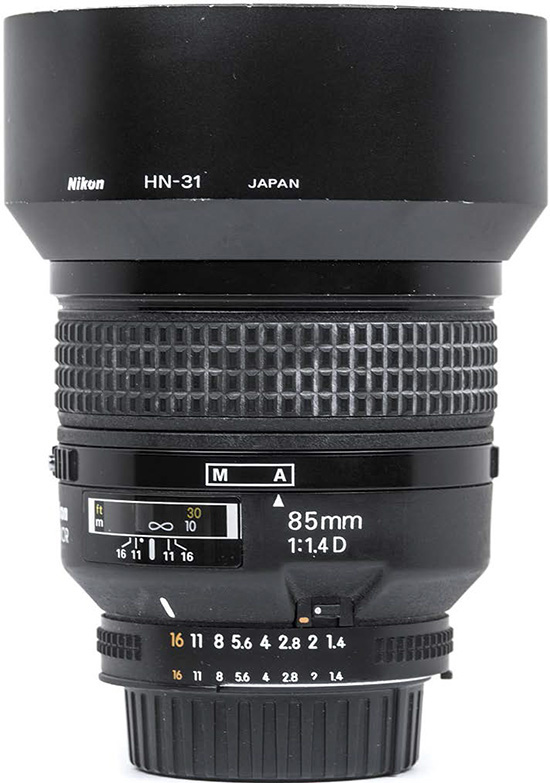
The maximum aperture of a lens is the widest it can open and therefore the widest aperture setting you can use with that lens attached to your camera. Lenses that open to a maximum aperture of f/4 or wider are considered fast lenses and often called fast glasses . Because of the way lenses are constructed, prime lenses (those with a single focal length) can have a larger maximum aperture than zoom lenses (those that have a range of focal lengths). For example, the Nikkor 85mm lens has a maximum aperture of f/1.4 ( Figure 3.9 ), while the Nikkor 24–70mm lens has a maximum aperture of f/2.8, a difference of two full stops of light. (See the sidebar “Understanding Stops .”) The maximum aperture of any lens will be printed on it, usually below the focal length.
Figure 3.9 The Nikkor 85mm has a maximum aperture of f/1.4. You can see the maximum aperture listed under the focal length right on the lens.
The constant aperture zoom lenses have the same aperture throughout the focal length range of the lens. These lenses are usually larger and more expensive than their variable aperture counterparts. When you change the focal length on these lenses (zoom in or out), the aperture doesn’t change. For instance, the Nikkor 24–70mm f/2.8 has a maximum aperture of f/2.8 no matter the focal length you use, while the Nikkor 70–200mm f/4 has a maximum aperture of f/4 no matter the focal length.
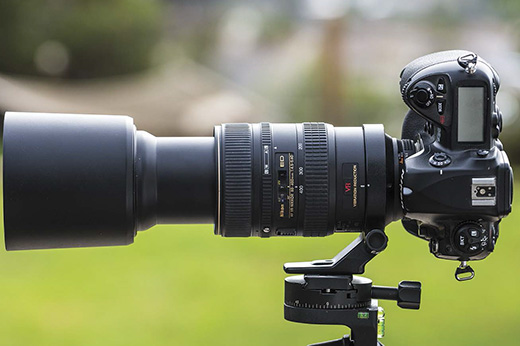
Some zoom lenses have a different maximum aperture depending on which focal length you use. These lenses are usually less expensive and lighter than the constant aperture versions. As you choose a larger focal length for these lenses, their maximum aperture decreases. The Nikkor 18–300mm f/3.5–5.6 lens, for example, has a focal length range of 18mm to 300mm and a maximum aperture range of f/3.5 to f/5.6. When you use the lens at 18mm, the maximum aperture is f/3.5, but as you zoom in to 300mm, the maximum aperture changes to f/5.6. The Nikkor 80–400 f/4.5–5.6 shown in Figure 3.10 , meanwhile, has a maximum aperture of f/4.5 at 80mm and f/5.6 at 400mm. It’s not a huge change, but it’s enough to throw off your exposure settings as you change focal lengths.
Figure 3.10 The Nikkor 80–400mm f/4.5–f/5.6 is a versatile lens that covers a huge range of focal lengths, but you do lose 2/3 of a stop of light between the 80mm and 400mm focal lengths.
ISO is a standard measurement of how sensitive the sensor acts to light. This measurement is based on how traditional film of different speeds would react to light. Higher-speed film needs less light to create the same exposure as a lower-speed film. In digital cameras, the actual sensitivity of the sensor can’t change, so instead, the data that the sensor records is amplified in a controlled manor to simulate film speed. The more that data from the sensor is amplified, the less light is needed. So, the higher the ISO, the more the data is amplified. The downside to this is that at the higher ISOs, digital noise also is introduced into the image as the data is amplified. In early digital cameras this was noticeable, especially at ISO 800 or higher. Over the years cameras have improved, however, and now I routinely shoot at ISO 1600, ISO 3200, and even higher with very little noise. At the very high ISOs, you will not only get some digital noise but also can lose some contrast and color.
Not only do your shutter speed, aperture, and ISO settings work together to create your image, different combinations of the three can produce the same overall exposure but very different looks. For example, a photo taken with a fast shutter speed, wide aperture, and low ISO can have the same exposure as a photo taken at with a slow shutter speed, small aperture, and low ISO but may look very different. Consider an analogy: Suppose you need six cups of fruit salad. You could mix two cups each of strawberries, blueberries, and peaches, or you could mix four cups of peaches with one cup each of berry. In both cases, you have six cups of salad, but the look and taste will be very different. This idea of balancing proportions of ingredients (the settings) underlies the concept of equivalent exposures and can give you a lot of creative control over your photographs.
For example, Figures 3.11 through 3.13 all feature the same scene captured with the same exposure, yet each has a unique look because different settings combinations derived that exposure. I used Aperture Priority mode (more on this shortly) with Matrix Metering for each image, allowing me to set the aperture, while the camera set the shutter speed and determined the proper exposure. For Figure 3.11 , I adjusted the aperture to f/1.8 to achieve that very shallow depth of field that makes the subject pop right off the background; the shutter speed was high (1/1000 sec) to freeze any little motion, and the ISO was 200. By comparison, Figure 3.12 was shot with a very deep aperture (f/16) balanced by a very slow shutter speed (1/13 sec.) and an ISO of 200. The subject is blurred because of small movements during the exposure, but the depth of field is deep. Figure 3.13 combines an increased ISO of 1600, an aperture of f/8, and a faster shutter speed (1/400 sec.) to freeze the subject while creating enough depth of field to keep both the subject and the background in acceptable focus.
NIKON D4 ISO 200 1/1000 SEC. F/1.8
Figure 3.11 With an aperture of f/1.8 and fast shutter speed, the background is out of focus, and the flower really stands out.
NIKON D4 ISO 200 1/13 SEC. F/16
Figure 3.12 An aperture of f/16 created a very deep depth of field, but the shutter speed (1/13 sec.) is too low to freeze the slight movement of the flower.
NIKON D4 ISO 1600 1/400 SEC. F/8
Figure 3.13 Increasing the ISO to 1600 allowed for a relatively deep depth of field and a shutter speed fast enough to freeze the action.
Because the camera set the overall exposure for all three images, the photos all have the same level of details in both their light and dark areas. Their different looks are the result of how the individual settings balance within the exposure. Using equivalent exposures, you can tailor how your scene is captured to how you envision it.
Every Nikon camera features four basic exposure modes on every camera: Program Auto (P), Shutter Speed Priority (S), Aperture Priority (A), and Manual (M). These modes determine how the shutter speed and aperture (as well as ISO in some cases) are set. The exposure mode uses the built-in light meter reading and the metering mode to choose the settings that will give you what the camera believes will result in a proper exposure. Take a closer look at the four modes.
 Program Auto
(P
): In this mode, the camera picks the shutter speed and the aperture based on the built-in light meter readings. The camera tries to balance the shutter speed with the aperture resulting in settings that usually give you a properly exposed image. The issue is that the camera doesn’t actually know what it is you are photographing and can use a shutter speed that is too slow to freeze the action or an aperture that gives you a too deep depth of field. Unlike with a completely auto mode, you can adjust the shutter or aperture in Program Auto mode; the camera will adjust the other settings to ensure your exposure is still correct. For example, if you raise the camera to your eye and see that the camera has picked 1/250 second and f/5.6 for the exposure settings, you can then adjust that by increasing the shutter speed, and the camera will automatically use a wider aperture. So if you change the shutter speed to 1/500 second, a full stop of light, the aperture will change from f/5.6 to f/4.0.
Program Auto
(P
): In this mode, the camera picks the shutter speed and the aperture based on the built-in light meter readings. The camera tries to balance the shutter speed with the aperture resulting in settings that usually give you a properly exposed image. The issue is that the camera doesn’t actually know what it is you are photographing and can use a shutter speed that is too slow to freeze the action or an aperture that gives you a too deep depth of field. Unlike with a completely auto mode, you can adjust the shutter or aperture in Program Auto mode; the camera will adjust the other settings to ensure your exposure is still correct. For example, if you raise the camera to your eye and see that the camera has picked 1/250 second and f/5.6 for the exposure settings, you can then adjust that by increasing the shutter speed, and the camera will automatically use a wider aperture. So if you change the shutter speed to 1/500 second, a full stop of light, the aperture will change from f/5.6 to f/4.0.
Shutter Speed Priority
(S
): In this mode, you set the shutter speed, and the camera sets the aperture based on the built-in light meter reading and the metering mode. This mode is a good choice when you want to make sure that the camera uses a specific shutter speed.
Aperture Priority
(A
): In this mode, you set the aperture, and the camera sets the shutter speed based on the built-in light meter reading and the metering mode. This mode is best when you want to keep control over the depth of field in the image.
Manual
(M
): In this mode, you set the shutter speed and the aperture, giving you complete control over the exposure. The camera still reads the light in the scene and shows you what it believes is the correct exposure, but it doesn’t actually do anything. I use this mode when photographing events that have rapidly changing lights, especially in the background. For example, when I photograph concerts, I don’t want the camera to keep changing the exposure every time the background lights change, which it will do on any of the other settings. The downside is that you need to use this mode with care because you can easily over- or underexpose your images.
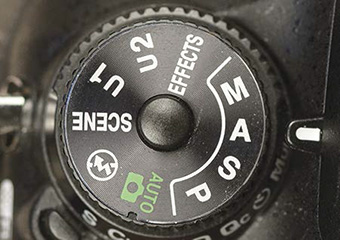
How you set the exposure mode depends on the camera; on the D4, for instance, you push a button and use the command dials, but you simply turn a knob on the D750 ( Figure 3.14 ).
Figure 3.14 To set the exposure mode on the Nikon D750, press the button in the middle of the mode dial and rotate the dial to the desired setting.
Some cameras will also adjust the ISO automatically depending on the exposure mode. To take advantage of this, set the ISO to the Auto ISO setting in the camera’s menu system. The drawback with the Auto ISO is that the camera doesn’t know or care about what it is you are photographing. The camera might pick a higher ISO over a lower shutter speed, producing an image that is full of digital noise. The advantage to using Auto ISO is that you can set the shutter speed and aperture and then let the camera pick the ISO in the changing light. This keeps the same depth of field and motion in the image while still allowing the camera to control the exposure.
What if you and your camera don’t agree on the best exposure for an image? The Exposure Compensation feature enables you to fine-tune your exposure by telling the camera to use settings that purposely under- or overexpose the image by adjusting the recommended exposure. To understand how this works, you first need to know a bit about how your camera determines the proper exposure and communicates that information to you.
According to your camera, a proper exposure is when enough light reaches the sensor so that a scene is rendered with detail in the lightest and the darkest parts of the image without turning the bright parts pure white (from too much light) or the dark parts pure black (from too little). As discussed in Chapter 2 , your camera uses the data from the built-in light meter and averages out the bright and dark parts to determine what it thinks will create the proper exposure. The camera then gives this an exposure value (EV ) of 0 and highlights this value on the EV graph that is visible across the bottom of your viewfinder ( Figure 3.15 ) or on its right side, depending on the camera model. As you can see, the EV graph shows 0 in the middle, with – at one extreme and + at the other, while the small squares indicate one stop. Highlights on the – side of the chart indicate the current setting will underexpose the image. For example, the camera in Figure 3.16 is set to underexpose the image by one stop, so the shot’s EV is –1. The camera in Figure 3.17 is set to overexpose the image by one stop, so that shot’s EV is –1.
Figure 3.15 The proper exposure according to the camera has an EV value of 0, which is highlighted in the EV graph.
Figure 3.16 In this image, the EV value is –1, which means the image is underexposed by one stop as is highlighted on the EV graph.
When you use Program Auto, Shutter Speed Priority, or Aperture Priority mode, the camera will use settings that produce an EV 0 reading. When you shoot in Manual mode, the camera won’t control the exposure, but it will display how your exposure compares to what it thinks is optimal via the EV graph.
On the Nikon camera line, the Exposure Compensation button is marked with +/– ( Figure 3.18 ). When you press the Exposure Compensation button and rotate the command dial to the plus side, the exposure becomes brighter. Conversely, when you dial the exposure compensation to the negative side, the exposure gets darker.
Figure 3.18 To adjust the exposure on the Nikon D750, press the Exposure Compensation button and rotate the rear command dial.
To make the darker areas of Figure 3.19 closer to black, I dialed in a –1 Exposure Compensation to make the image slightly darker.
NIKON D4 ISO 400 1/250 SEC. F/16
Figure 3.19 The large dark areas in the image had the camera using settings that made the image too bright, so I used a –1 Exposure Compensation setting to make the image darker and more true to the actual scene.
Exposure Compensation doesn’t really do anything fancy; it just adjusts the shutter speed or aperture for you. When your camera is in Shutter Priority mode and you use Exposure Compensation, the camera makes the aperture bigger to let in more light (brighter images) or smaller to let in less light (darker image). Keep in mind that the changing the aperture also changes the depth of field. When your camera is in Aperture Priority mode, Exposure Compensation causes the camera to adjust the shutter speed instead. Twisting the dial in the positive direction means the camera will use a slower shutter speed, admitting more light for a brighter image. When you use a negative exposure compensation setting, the camera uses a faster shutter speed, allowing in less light for a darker photo.
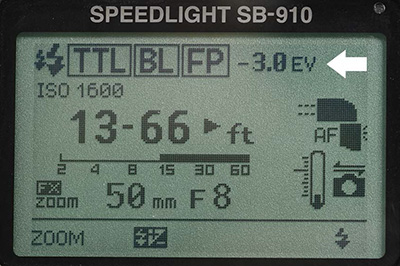
The term flash compensation is a fancy way to describe the power output of the flash. In the Nikon Creative Lighting System, the camera and the flash communicate with each other to create the best possible image. After measuring the information it sees through the lens, the camera tells the flash how much light to output to create a properly exposed image. If you don’t agree with their assessment, you can adjust the flash output with the Flash Compensation setting. Like the Exposure Compensation dial, adjusting the Flash Compensation control to the negative means the flash produces less light, and adjusting it to the positive means the flash produces more light. This capability also comes in play when you use the Advanced Wireless Lighting components of the Creative Lighting System. When you control the mode and power of the remote flashes, you can set them to use the Through The Lens (TTL) information and then adjust the output using Flash Compensation settings from –3 to +3 ( Figure 3.20 ).
You can easily adjust the Flash Compensation right on most Speedlights. Each model is slightly different, so here are the basics for setting Flash Compensation when the flash is mounted on the camera and set to TTL mode:
SB-600
: Press the + button to increase the flash output and press the – button to decrease the flash output. In the top right of the LCD, you will see the Flash Compensation readout change as you adjust the output.
SB-700
: Press the SEL button (it has the Flash Compensation icon above it on the screen) and then rotate the dial to the right to increase flash output and to the left to decrease the flash output.
SB-800
: Press the + button to increase the flash output and press the – button to decrease the flash output.
SB-900
/ SB-910
: Press the Flash Compensation button (the middle function button notated by the Flash Compensation icon above it on the screen) and then rotate the dial to the right to increase the flash output and to the left to decrease the flash output. You can change the Flash Compensation from –3 to +3 in 1/3 steps.
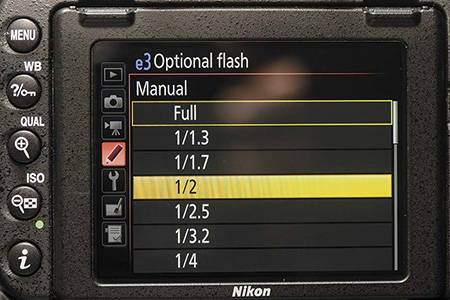
The SB-300, SB-400, and SB-500 don’t include any way to adjust the Flash Compensation on the Speedlight unit itself, but that doesn’t mean it can’t be done. You need to set the power of the flash in the camera. As you can see in Figure 3.21 , to set the power of the SB-500 when it is attached to the Nikon D750, you need to adjust it in the e3 menu. Set the external flash to Manual and then pick the power setting you want. Check your camera manual for the external flash menu.
Nikon cameras combine Exposure Compensation and Flash Compensation differently depending on the model. Knowing which method your camera uses will help you get the results you’re after.
In older Nikon cameras, the Exposure Compensation and Flash Compensation settings were tied together. When you adjusted the Exposure Compensation, the Flash Compensation went along for the ride. For example, if you dialed in –1.5 to underexpose the ambient light in the scene, the power from the flash was reduced by 1.5 stops as well. So if you dialed in –3 for Exposure Compensation and then +3 for Flash Compensation, you were right back at the starting exposure. This is how it still works for most of the Nikon cameras.
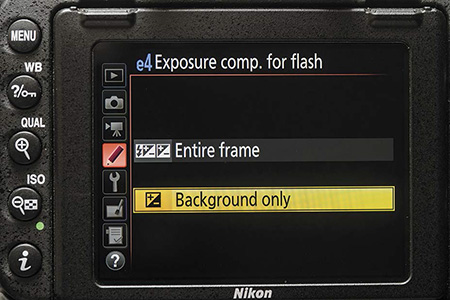
In the newer D4, D4S, D610, D750, D800, and D810 cameras, Nikon has separated the Exposure Compensation and Flash Compensation, enabling you to decide whether you want the two connected ( Figure 3.22 ). You make your choice in the menu system where you specify the Entire Frame option, which ties both compensation settings together, or the Background Only option, which keeps the Exposure Compensation and Flash Compensation independent.
Figure 3.22 The e4 menu on the Nikon D750 shows the choices for linking or separating the Exposure Compensation and Flash Compensation.
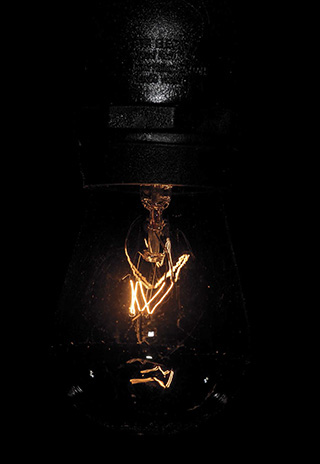
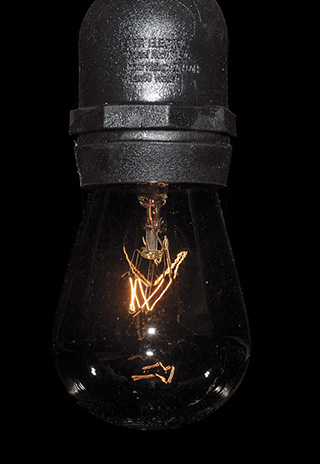
For comparison, Figures 3.23 and 3.24 were both taken with the Exposure Compensation set to –4, and their Flash Compensation was set at +3 in Figure 3.23 and 0 in Figure 3.24 . In Figure 3.23 the compensation settings were linked, while in Figure 3.24 the Flash Compensation was adjusted separately from the Exposure Compensation. You can see a huge difference in the way the image is illuminated. In the first image, the flash was not able to compensate for the –4 Exposure Compensation even while using full power, while in Figure 3.24 , the flash had plenty of power to illuminate the light bulb even at a setting of 0.
NIKON D750 ISO 200 1/250 SEC. F/16
Figure 3.23 With the Exposure Compensation of –4 stops and the Exposure Compensation linked to the whole image, the photo is underexposed. Even the flash firing at the full power of +3 doesn’t counteract the –4 Exposure Compensation.
NIKON D750 ISO 200 1/250 SEC. F/16
Figure 3.24 With the Exposure Compensation and the Flash Compensation set to work independently, the subject of the photo is properly lit even while the background is dark and when using an Exposure Compensation setting of –4.
A proper exposure is important but not as important as an exposure that gets your point across. Not every image needs to have details in the light or dark areas; many times you will want to purposely underexpose or overexpose an image. Once you understand how the exposure is controlled with your camera, lens, and flash combination, you can decide exactly how to render your vision.