Nikon doesn’t make a lot of extra equipment, but its battery packs, TTL cords, and close-up kits can make life a whole lot easier when you’re using the Nikon Speedlights. The Nikon battery packs give you extra power when on the go and can improve recycle time. The TTL cords allow you to easily move the Speedlight off the camera hot shoe without giving up the TTL capability. With the close-up kit you can mount the SB-R200 flashes at the end of your lens, which enables you to control the light in macro work. There is even a way to block the light from a pop-up flash from affecting the exposure when using it as a Commander with the close-up kit. Underlying all these extras—and the Speedlight itself—is one of the most important items you can buy: batteries. This chapter tackles how to use all these components to their (and your) best advantage, starting with the humble battery.
Most of the Nikon Speedlights use AA batteries, which are plentiful and pretty powerful. Just about every convenience store carries AA batteries, making them easy to find even when you’re on location. On the downside, this size battery can run out of juice relatively quickly, and buying new ones constantly can be expensive in the long run. The best solution is to investigate your options, and there are lots of options for AA batteries, as you can see in Figure 6.1 . Alkaline or lithium single-use versus nickel-metal hydride (NiMH) or low-discharge NiMH rechargeables—how do you choose? The sections that follow will help.
Figure 6.1 You can use a wide variety of batteries in your Speedlights. These are just some of the different AAs that I have used over the years.
When choosing and buying batteries for your Speedlights, you need to balance the trade-offs. The following list covers the main points to consider when deciding what to use:
 Cost
: Single-use batteries are cheaper than the rechargeable batteries when you initially buy them, but over time the rechargeables are much more cost effective, even factoring in the added expense of a battery charger. If you are an infrequent user of only one flash, then buying a big pack of AA batteries occasionally might seem like a good way to go. If you are using multiple flashes a couple of times a week, however, the rechargeable batteries will save you a lot of money over time.
Cost
: Single-use batteries are cheaper than the rechargeable batteries when you initially buy them, but over time the rechargeables are much more cost effective, even factoring in the added expense of a battery charger. If you are an infrequent user of only one flash, then buying a big pack of AA batteries occasionally might seem like a good way to go. If you are using multiple flashes a couple of times a week, however, the rechargeable batteries will save you a lot of money over time.
Power
: Does the battery have the juice to power the flash? Which type of battery will fill the capacitor in the flash faster, cutting down the recycle time? Nickel-metal hydride (NiMH) batteries have the fastest recycle time, but they need to be charged before each shoot because they can lose their charge over time.
Capacity
: Knowing how many flashes you can get from a full set of batteries is important when it comes to planning a shoot. NiMH batteries have the highest capacity, but they start to lose their charge soon after recharging. Low-discharge (also called low self-discharge
) NiMH
batteries hold their charge longer but have a lower capacity than NiMH. Regular alkaline single-use batteries have a decent capacity and a long shelf life, so you don’t have to worry about getting them ready for a shoot; just grab a set and go. According to Nikon, NiMH batteries can give you about 190 full-power flashes on a full charge when firing the flash every 30 seconds, while regular alkaline AA batteries give you about 110.
Compatibility
: Remember, not all batteries can be charged in all the different chargers. I try to avoid batteries that need a special charger so that all the rechargeable batteries I use can be charged in the same battery charger. This makes the battery maintenance a lot easier.
Availability
: As I mentioned, you can grab a set of single-use AA batteries just about anywhere, making them attractive when on location. You need to purchase rechargeable batteries ahead of time, as well as usually charge them prior to use, especially NiMH batteries.
Single-use batteries are available in two basic flavors: alkaline or lithium. Each has its pros and cons.
Alkaline
: Walk in to a store, grab a set of AA batteries off the rack, and the chances are good that they are alkaline batteries. These batteries work really well in Speedlights and have a long shelf life. Although I’ve switched to mainly rechargeables, I still carry a pack of these in my bag just in case I run out of power on a shoot. The availability and shelf life make them a great choice when starting out, but when you start using multiple flashes often, the cost does climb fast. The biggest downside to these batteries is the price when shooting a lot.
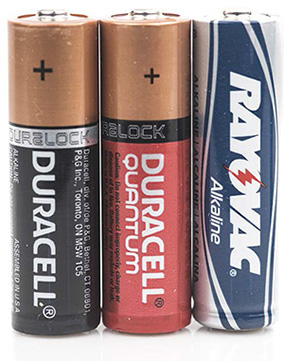
Figure 6.2
shows a selection of alkaline batteries.
Figure 6.2 I have always been partial to the Duracell alkaline batteries, probably because of their ease of availability and price. The Duracell Quantum claims a 10-year shelf life and a built-in battery check. The Rayovac batteries also claim a 10-year shelf life and work great at a great price.
Lithium
: The advantage to lithium AA batteries is their extended shelf life. (Energizer, for example, claims a 15-year shelf life for its Advanced Lithium batteries.) Because lithium batteries can keep a charge for a long time, they’re perfect as backup batteries that can sit in your bag until you need them in a pinch. The downside is that they don’t give up their power easily, making for longer flash recycle times. These batteries can also be much more expensive than their alkaline counterparts. Lithium batteries can also cause slow recycle times when they get hot because they can suppress the output current as the temperature increases. This is meant to protect the equipment and battery, but the side effect is a slowdown in the recycle times.
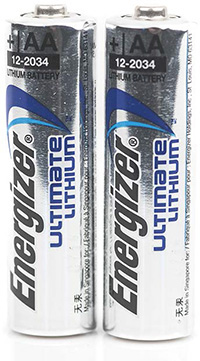
Figure 6.3
shows the only lithium batteries I have used.
Figure 6.3 These Energizer lithium batteries have a 15-year or more shelf life and can operate in extreme temperatures. They are also light, and I carry a set in my camera bag for emergencies.
Rechargeable batteries offer a couple of options. You can choose between nickel-metal hydride batteries (NiMH) and the low-discharge nickel-metal hydride batteries (low-discharge NiMH).
NiMH (Figure 6.4
)
: These are the standard in rechargeable batteries and the type I use. They have the highest capacity and good recycle times. The biggest downside to NiMH batteries is that they lose their charge over time. Because NiMH batteries can lose 10 percent of their power over the first 24 hours after a charge, you’ll need to charge them before use.
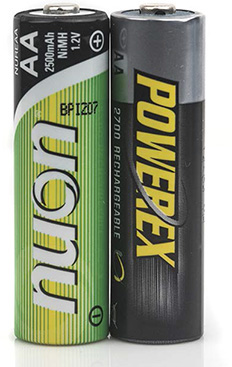
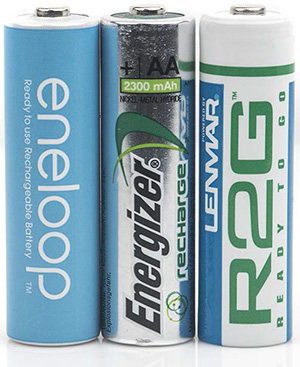
Low-Discharge NiMH (Figure 6.5
)
: Sometimes called low self-discharge NiMH, these batteries are sold as precharged rechargeable batteries because they can hold 80 percent of their charge for close to a year. In other words, low-discharge NiMH batteries can be recharged and stored until you need them. This is a great choice for photographers who don’t want to worry about charging up batteries before each shoot. You can easily tell which of the rechargeable batteries are the low-discharge versions because on the package they will claim to come precharged. These batteries can be used right out of the package, while the regular NiMH need to be charged before use.
Figure 6.5 Some low-discharge NiMH battery brands are Enloop, Energizer Recharge, and the Lenmar R2G.
NiMH batteries all rate their power using the unit mAh , which stands for milliampere-hour and is just a way to say how much actual power a battery can store at one time. For example, Powerex batteries are rated at 2700 mAh, while Nuon rates its rechargeables as 2500 mAh. Lenmar R2G low-discharge batteries hold 2150 mAh. The higher the mAh number, the longer the fully charged battery should be able to power the Speedlights.
Note
Nikon recommends that you do not use carbon-zinc batteries in the Speedlights.
One important rule applies to all four types of batteries: Don’t mix battery types in your Speedlight; mixing can damage the flash. For example, if you are using NiMH batteries in the flash, make sure all of the batteries are NiMH and not a mix of alkaline and NiHM. You also don’t want to mix different brands of batteries either, and always replace all four batteries at the same time.
The charger that you use is just as important as the batteries. A good charger will keep your batteries in good shape and properly charged, but a bad charger can actually shorten the life of your batteries. Use a smart charger that can read the amount of power in a battery and then recharge the battery just until it is full. Many of the inexpensive chargers work on a timer method; they keep charging for a set time no matter the condition of the actual battery. Do yourself a favor and get a good charger; it will make the investment in the rechargeable batteries last longer.
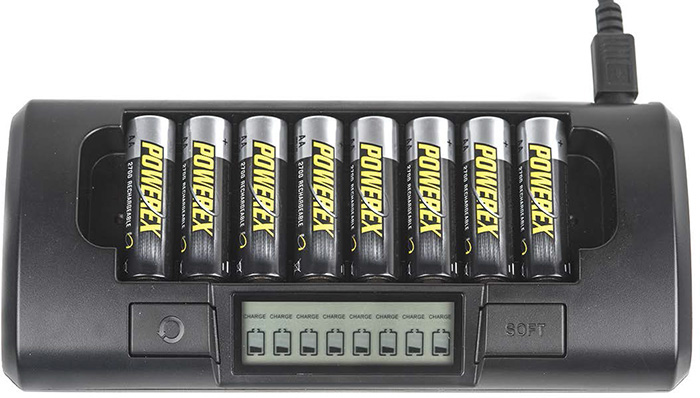
I use (and love) the Maha MH-C801D charger because it works really well, can charge up to eight AA batteries at a time, and has three charging modes that can help keep your batteries in tip-top shape ( Figure 6.6 ). The three modes are as follows:
Default charge
: In this mode, you just stick the batteries in the charger, and they all get filled up with juice in about an hour. This allows you to charge enough batteries for a big job in a couple of hours, plus you can take the charger with you and recharge on location.
Soft charge
: In this mode, the charger takes about twice as long to charge the batteries. This slower charging can extend the life of the batteries. When planning a shoot ahead of time, I use Soft Charge mode to get the batteries ready. When you don’t need the speed of the default mode, this mode is a good choice.
Condition
: In this mode, the charger recharges the battery to full power, discharges it fully, and finally recharges it to full power. The process can take more than 12 hours for a set of 8 batteries, and I do it only when the batteries are not holding a charge for as long as they should. While time-consuming, this discharge–recharge cycle will extend the life of the batteries and make your investment last longer.
Figure 6.6 The Maha MH-C801D charger with eight Powerex batteries in place. Each battery is charged on its own circuit, so it doesn’t matter if they are at different levels of power when placed into the charger. You can also see the individual batteries’ charge levels on the display. The button on the right is for soft charging, and the left button is for conditioning.
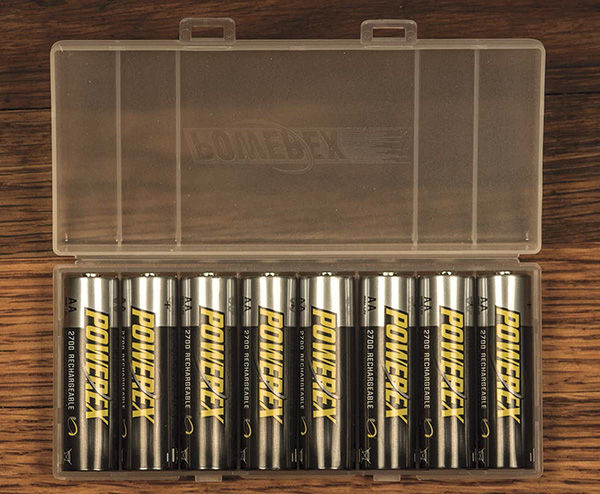
When packing your gear, devise a method of determining whether batteries are charged or used. Do not just throw a handful of batteries into the bottom of your camera bag and hope for the best. You may think you’ll remember which is which, but you won’t without a system. One of the reasons that I like and use Powerex batteries is that they come in a plastic case that is perfect for travel. Battery holders of various sizes are also readily available and reasonably priced to help you get organized.
Over the years, my battery plan has evolved. Currently, I use rechargeable batteries in my flashes, but it was only after I calculated how much money I had been spending on single-use alkaline batteries that I finally made the switch. Specifically, I use Maha Powerex AA 2700mAh NiMH rechargeable batteries. They hold a good charge, run for a decent amount of time, and can be efficiently charged in an hour using the Maha Powerex MH-C801D battery charger. Plus, as I mentioned, they come in a really handy battery caddy. I always store fully charged batteries with the positive pointing up and the negative side pointing down ( Figure 6.7 ). After using the batteries, I reverse the storage position so that I don’t put a used battery back in a flash.
Figure 6.7 A set of eight PowerEx batteries all ready to go in their clear plastic case. As you can see, they are all positive side up, meaning that they are fully charged.
I like to have two complete sets of batteries on hand for all the Speedlights I plan to use for a shoot. Along with those batteries, I always keep one pack of regular alkaline AA batteries in my camera bag for emergencies.
The best part about using rechargeable batteries is that you can grow the system as you need it. A single SB-700 Speedlight takes four AA batteries, so a set of eight rechargeable batteries works just fine—a set and a spare. When you add another Speedlight, you can just buy another set of eight rechargeable batteries.
As a final word on batteries, follow these tips to avoid damaging your Speedlight:
Install correctly
: When putting the batteries in the flash, make sure they go in the right way. Never reverse the polarity of the batteries.
Turn off the Speedlight
: When changing or installing the batteries, make sure that the Speedlight is off. This will help prevent any type of short that could damage the flash.
Don’t mix battery types
: Make sure all the batteries are the same type and brand. Mixing battery types and even brands can result in damage to the flash.
Don’t leave batteries in the flash
: When you are done using the flash, remove the batteries. If you don’t, there is a chance the batteries could leak and damage the flash.
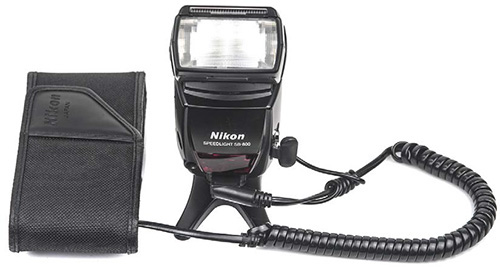
Four AA batteries do the job for Speedlights but aren’t overly powerful. To boost the power to the SB-900 and SB-910 Speedlights, Nikon sells an external battery pack called the SD-9 High Performance Battery Pack. Using this battery pack shortens the flash’s recycle time and can increase the flash capacity. The problem is that the SD-9 costs about $200 and is useful only if you use the SB-900 or SB-910 in an environment where you need the flash to recycle faster and last longer. The battery pack holds four or eight AA batteries and plugs into the front of the SB-900/910. Be aware, however, that you still need the four AA batteries in the flash for the battery pack to work. The SD-9 supplements rather than replaces your batteries. The older, six-battery SD-8a pack did the same for the SB-800 Speedlight. Figure 6.8 shows an SD-8a attached to my SB-800.
Figure 6.8 The older SD-8a battery pack connected to the SB-800 is my combination of choice when shooting events for which I need the most out of my Speedlights.
My main use for a battery pack is shooting events for which I need to be sure that an external flash has power for the whole event or that the flash on my camera can recycle fast enough to keep up with the action. For example, I take a lot of red carpet, step-and-repeat photos during the San Diego Comic Con International ( Figure 6.9 ). At times this can mean standing around for long periods of time doing nothing, followed by a flurry of activity trying to get a great shot of the talent. This is when you need the flash to recycle fast and for the batteries to last.
NIKON D4 ISO 500 1/60 SEC. F/5.6 SB-800
Figure 6.9 When I photographed the cast of How I Met Your Mother during the press event at the 2013 San Diego Comic Con International, I used my SD-8a battery pack and SB-800 to make sure I didn’t run out of power at a crucial moment. The entire shoot lasted only a minute or two.
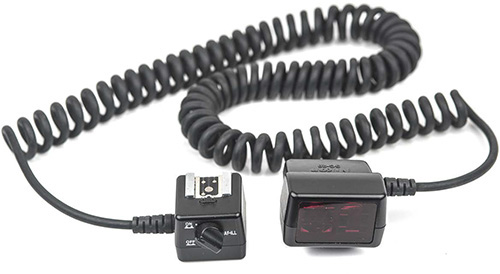
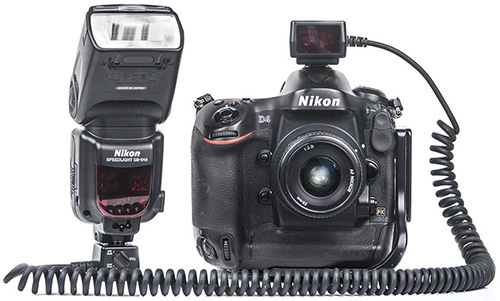
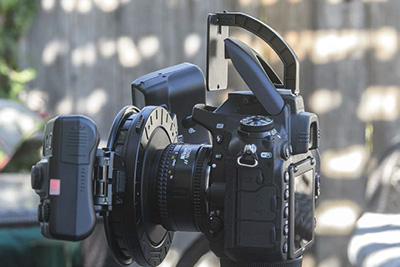
The quickest and easiest way to get your flash off the camera is to use one of the TTL remote cords. Nikon currently offers two TTL remote cords: the SC-29 TTL Coiled Remote Cord ( Figure 6.10 ) and the SC-28 TTL Coiled Remote Cord. The SC-29 cord has AF-Assist Illuminator capability, and the SC-28 doesn’t. You’ll find plenty of third-party TTL cords that are made for Nikon cameras and Speedlights, but I have not used any of these, nor do I plan to. I would rather pay the higher price for the cord from Nikon because I know it was built specifically for my Speedlights and camera and won’t harm either one. I also prefer the SC-29 because the auto-focus assistance is useful when shooting in low-light situations.
One end of the cord slides in the cameras hot shoe, while the other has a hot shoe that the flash slides into, as shown in Figure 6.11 . When you attach a Speedlight to your camera via one of these two cords, the camera believes that the Speedlight is mounted on the camera. Because the camera acts like the flash is still in the hot shoe, you get all the benefits, such as i-TTL, high-speed sync, and Flash Value Lock. When you use a TTL cord to attach to a flash in Commander mode, you can better aim the Speedlight at the remote flashes.
Figure 6.11 The Nikon SC-29 TTL Remote Cord connecting an SB-910 to a Nikon D4. You can see the AF-assist illuminator lamp on the part that slides into the camera’s hot shoe.
A primary use for the TTL cords is when attaching the flash to the camera via a flash bracket. To make a flash bracket work, you need a way for the flash and the camera to talk. The easiest way is with a TTL cord. I still use an old flash bracket at events, and Figure 6.12 illustrates how the camera, bracket, and flash all work together. The TTL cord enables the flash to fire when I press the shutter release button.
Figure 6.12 The Nikon D750 with a flash bracket attached using an SC-29 TTL cord and an SB-910 flash. As you can see, the flash stays above the camera in both landscape and portrait orientations.
There is a good reason that many event and wedding photographers use flash brackets to position their flashes above the camera, no matter the camera orientation: The resulting photos just look better. Keeping the light in a higher position also reduces the chance of red-eye caused by the light reflecting off the back of the eye, and the light looks more natural. This is particularly true when shooting in portrait orientation. Compare Figures 6.13 and 6.14 , and you can see the difference the flash position makes. In both these images the flash was pointed forward, but in Figure 6.14 I used a flash bracket to keep the flash up over the camera.
NIKON D750 ISO 800 1/30 SEC. F/8 SB-910
Figure 6.13 A portrait-orientated photo with the flash mounted in the camera hot shoe creates a hard shadow, and anything reflective bounces the light right back at the camera.
NIKON D750 ISO 800 1/30 SEC. F/8 SB-910
Figure 6.14 Using a flash bracket and TTL cord allows you to place the flash above the camera, creating a more natural-looking image. Notice that the hard shadow visible behind the subject in Figure 6.13 is now gone.
You don’t have to have a flash bracket to use a TTL cord; you can just hold the flash with your free hand. This takes a little practice to get right, but it can be done.
Nikon offers two close-up kits that place the flash right on the end of the lens. These kits are designed for macro-type work mainly but can be used for just about anything. The only difference between the two kits is that the Nikon Close-Up Speedlight Commander Kit R1C1 comes with an SU-800 Commander and two SB-R200 remotes ( Figure 6.15 ), while the Nikon Close-up Speedlight Remote Kit R1 comes with just the two SB-R200 remote Speedlights. Both kits come with the Attachment Ring SX-1, which attaches the SB-R200 to the front of the lens. The attachment ring can hold up to eight of the SB-R200 Speedlights and has adaptors to attach it using the filter thread on the front of a lens. The kit comes with adaptors for five filter sizes—52mm, 62mm, 67mm, 72mm, and 77mm—allowing the kit to be used on just about any lens.
Along with the attachment ring and lens adaptors, the close-up kits have stands for the SB-R200 Speedlights, four different-colored gels for each of the flashes, gel holders, extreme close-up adaptors, a diffuser, a flexible arm to position subjects, and the SG-31IR Panel.
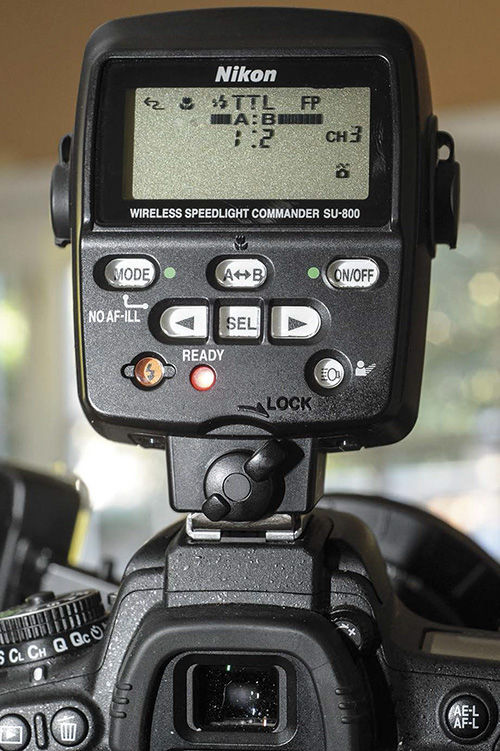
These kits use the Advanced Wireless Lighting capability of the Creative Lighting System with a Commander unit (either the SU-800 or a Speedlight with Commander functionality) mounted on the cameras hot shoe telling the remote flashes (the SB-R200) when to fire, what mode to fire in, and how much power to use ( Figure 6.16 ).
Figure 6.16 The SU-800 shows a 1:2 ratio of power to group A and group B. The SU-800 is using channel 3.
To use the system, you just follow these simple steps:
1. Determine which lens you want to use and screw the correctly sized adaptor onto the front of the lens using the filter threads.
2. Make sure the SB-R200 units and the SU-800 all contain batteries. Each takes a single 3V CR123A battery.
3. Turn the SB-R200 units on, set the same channel (1, 2, 3, or 4) on both SB-R200 units, and then set the group (A, B, or C) for each flash with the knobs on the top of the unit. The channel has to be the same for all the flashes, but the group can be different.
4. Attach the SB-R200 units to the attachment ring and then mount the attachment ring to the adaptor on the front of the lens. You will still be able to adjust the angle of the flash and the placement on the ring.
5. Mount the SU-800 on the camera by sliding into the hot shoe.
6. Turn on the SU-800 and set the channel to match the channel used on the SB-R200 units.
7. Set the flash mode and power for each of the groups.
8. Compose the image, press the shutter release button, and the flashes will fire.
You can do the same thing using any flash that has Commander functions and even the pop-up flash on your camera if it can act as a Commander to trigger the SB-R200 flashes.
The SU-800 has a special mode for close-up work. Changing the SU-800 from a regular Commander to Close-up mode takes only the flip of a switch. Open the battery compartment of the SU-800 and toggle the little switch over on the side from Normal to Close-up (the flower icon). When you set the SU-800 to Close-up mode, only groups A and B will fire; any SB-R200 units set to group C will not fire.
In Close-up mode you can pick either TTL or Manual mode for the flashes and can control the power of each group as a ratio between them. In this mode, both groups have the same flash mode, so you cannot mix TTL and Manual like you can in the Normal mode. If you do not see both the A and B groups represented on the back of the SU-800, press the A–B button until you do. When in TTL mode, press the arrow buttons to adjust the ratio of power between the A and B groups. Press the right arrow to give more power to the B group and the left arrow to give more power to the A group. Press the Mode button to switch between the TTL and Manual modes. In the Manual mode, use the SEL button to switch between the A and B group and then adjust the power using the arrow buttons. You can adjust the power from 1/1 to 1/64 for each group.
You do not have to use the Close-up mode when using the SB-R200 units. I actually prefer the Normal mode because it gives me three groups to work with and more control over the power output in TTL mode.
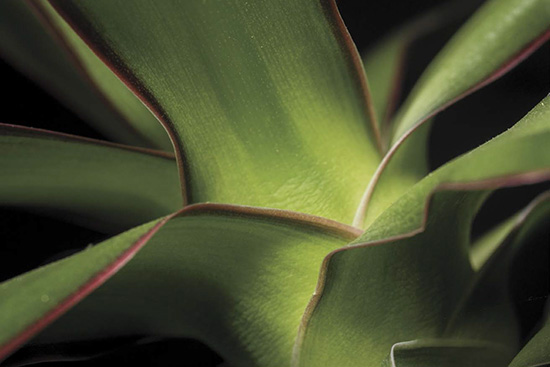
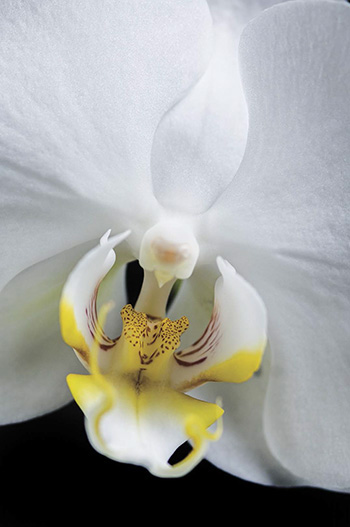
The close-up kits allow you to get in close with controlled light, as you can see in Figures 6.17 and 6.18 .
NIKON D750 ISO 800 1/200 SEC. F/20 SU-800 SB-R200
Figure 6.17 The placement of the SB-R200 flashes right at the end of the lens enables me to control the spill of the light. Here I photographed the stem and leaves of a simple houseplant. The placement of the light draws your eye into the image.
NIKON D2X ISO 400 1/60 SEC. F/5.6 SU-800 SB-R200
Figure 6.18 I love photographing flowers, especially orchids using a macro lens and the close-up kit. For this shot, I placed the lights on the top and bottom of the lens with slightly more power going to the top light.
You can use the pop-up flash on your Nikon DSLR to fire the SB-R200 units as long as the camera has the capability to act as a Commander. So that the light from the built-in flash doesn’t affect the final image, however, you need to use an extra component ( Figure 6.19 ). The SG-3IR panel slides into the camera’s hot shoe and is positioned to block the light from reaching the subject but still allows the built-in flash to trigger the SB-R200 units.
Figure 6.19 As demonstrated on this Nikon D750 DSLR, the SC-31R panel sits in front of the pop-up flash, blocking the light from the subject but allowing the triggering of the SB-R200 units.
Nikon does not make a lot of Speedlight accessories because the flash units themselves do most of the work. If I were going to buy one item to take my flash photography to the next level, it would be a TTL cord to get my flash off the camera.
When it comes to powering your flash, there is no right way to do it. Everyone has different needs and priorities. I prefer to use rechargeable batteries because of the long-term savings, and I don’t like the thought of filling up the landfill with tons of single-use batteries every year.
If you enjoy macro photography and want to take it to the next level, then the close-up kit is a great way to go, and I love using the SU-800 as a Commander when working with all off-camera flashes.