NIKON D4 ISO 100 1/320 SEC. F/2.8 50MM LENS
Adding light right where you need it, a Speedlight is great tool by itself, but it can be even more versatile with the help of modifiers. Whether you prefer to start simple with your Speedlight’s built-in options that change the size and shape of the light or to plunge into the add-on market, you’ll find a modifier to suit your lighting needs. There are modifiers that take the small light from the flash and make it a lot more versatile. There are modifiers that make the small light much bigger, giving you a softer and more pleasing portrait light. There are modifiers that control the spread of the light, allowing you to add light to just a small part of the scene with great accuracy. There are modifiers that change the color of the light either to match the ambient light or for special effects. In fact, there are modifiers that do many more things than I can list here. Some of the modifiers are placed between the Speedlight and subject while others are attached directly to the flash, but all will add to your creativity.
With such a tantalizing array of modifier choices on the market, it’s easy to overlook the basics: You can do a lot to change the quality of the light produced by a Speedlight right out of the box, without even putting the diffusion dome over the flash head. The sections that follow offer some simple settings that you can use to adjust the quality of light from your Speedlights. Keep in mind that not every Speedlight has every setting.
A Speedlight’s zoom function controls the angle of coverage of the light produced by the flash. If you want a narrow beam of light, adjust the zoom of the flash to it maximum; for the SB-910, that is 200mm. If you want a wider beam, adjust the zoom to the widest settings; for the SB-910, that is 24mm without the diffusion dome. When a Speedlight is mounted on your camera, its zoom automatically matches the focal length of the lens attached to the camera and changes as you change the focal length.
Note
The SB-300 and the SB-500 do not have any zoom controls.
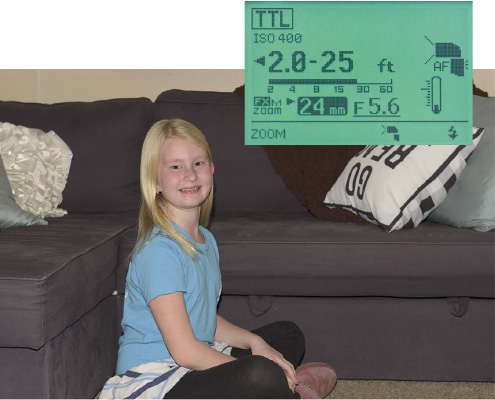
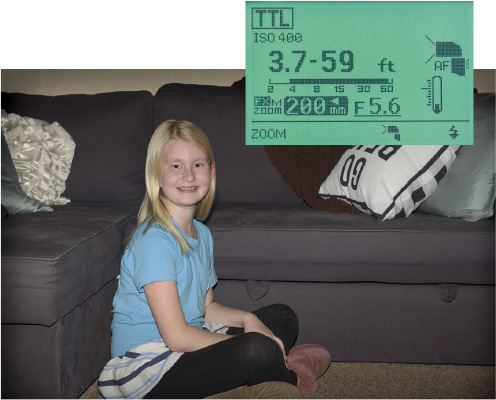
Compare the difference in the spread of light from a flash zoomed to 24mm in Figure 7.1 with light spread from a flash zoomed to 200mm in Figure 7.2 .
NIKON D4 ISO 100 1/250 SEC. F/5.6 SB-910
Figure 7.1 The SB-910 with the flash head set to 24mm makes a wide spread of light.
NIKON D4 ISO 100 1/250 SEC. F/5.6 SB-910
Figure 7.2 The SB-910 zoomed to 200mm creates a tighter, punchier light.
The wide-angle diffuser panel pulls out of the flash head and flips down over its front to create a wider spread of light. When the wide-angle diffuser panel is in place, it changes the zoom from the widest setting of 24mm to an even wider 14mm. To use the built-in wide-angle diffuser, you just pull it gently out of the slot on the top of the flash head until it can fold down over the flash head. Do not force the panel in or out because you could damage it.
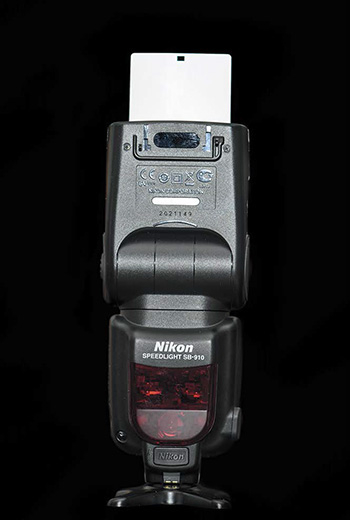
When the diffuser is over the front of the flash head, the zoom setting automatically changes to 14mm. The SB-600, SB-700, SB-800, SB-900, and SB-910 all have wide-angle diffusers built in. You can see the SB-700 with the wide-angle diffuser panel in place in Figure 7.3 .
Figure 7.3 The wide-angle diffuser panel on the SB-700 pulls out from the head of the flash and folds down, automatically setting the zoom to 14mm.
One of the quickest ways to change the quality of the light from your Speedlight is to change the angle of the flash head. Adjusting the direction of the flash head allows you to bounce the light off a wall or ceiling. When you bounce the light off a nearby surface, the light source becomes much larger and the light much softer. You can also aim the light over the subject to illuminate the subject with the edge of the light and create a more natural-looking falloff. All the Speedlights allow you to adjust the tilt of the flash head, and all except the SB-300 allow you to adjust the rotation.
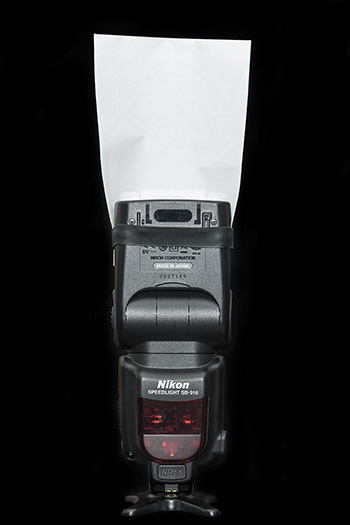
The bounce card is the small, white piece of plastic that pulls out from the top the flash head along with the wide-angle diffuser. To access the bounce card, first pull out the wide-angle diffuser; then, while holding the bounce card, push the wide-angle diffuser back into the slot. The bounce card is meant to bounce some of the light into the subject’s eyes when you aim the flash up at 90 degrees. The idea is that the light from the flash will bounce off the ceiling and some of the light will hit the bounce card and help to give a little pop of light to the subject’s eyes. In reality, the bounce card doesn’t actually do too much because of its small size. The SB-700, SB-800, SB-900, and SB-910 ( Figure 7.4 ) all have built-in bounce cards.
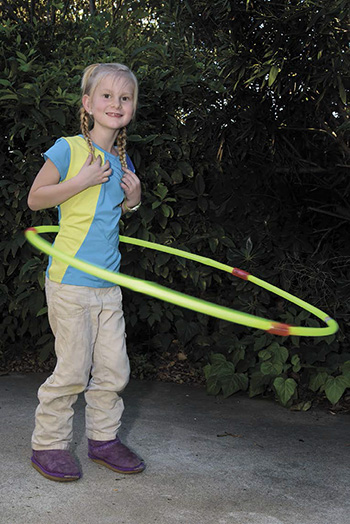
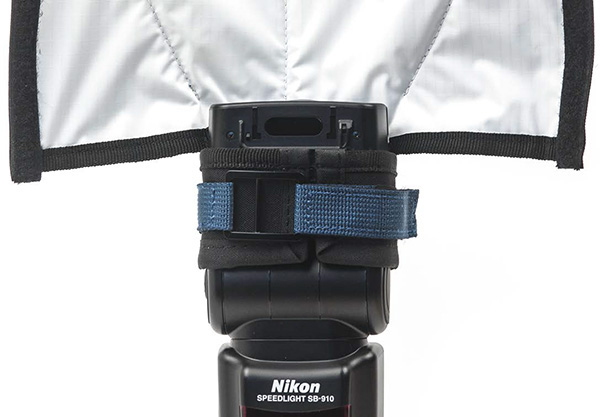
You can easily create your own bigger, and better, bounce card with a rubber band and a white notecard, as shown in Figure 7.5 . One real advantage of the homemade bounce card is that you can use the diffusion dome with it, which you can’t with the built-in version. The bounce card allows more light to reach the subject, as shown in Figure 7.6 .
Figure 7.5 Using a 4x6-inch card as a homemade bounce card on a Speedlight, such as this SB-910, creates a much larger bounce surface than the built-in bounce card.
NIKON D750 ISO 200 1/125 SEC. F/5.6
Figure 7.6 A larger bounce card allows a lot more light to reach the subject, in this case adding some fill light to the young hula-hooper.
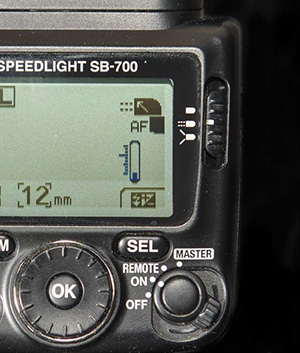
The SB-700, SB-800, SB-900, and SB-910 each offer three different flash illumination patterns that control how the light spreads in the frame. For example, Figure 7.7 shows the illumination pattern switch on the SB-700. Simply slide the switch to choose one of these three available patterns:
 Standard
: This is the default mode of the flash. The light is brighter in the middle of the frame with less light at the edges.
Standard
: This is the default mode of the flash. The light is brighter in the middle of the frame with less light at the edges.
Even
: In this mode there is less light falloff at the edges of the scene. The flash output is more even from edge to edge.
Center-Weighted
: This mode produces more light falloff at the edges compared to the standard setting.
The illumination pattern you choose changes the effective range of the flash. If you use an SB-910 set at 24mm, ISO 100, and f/5.6, for instance, the effective range of the flash is 2 to 15 feet at the Standard setting, 2 to 12 feet at the Even setting, and 2 to 18 feet at the Center-Weighted setting.
Changing the mode creates a subtle change in the way the light illuminates the subject and is most noticeable when your subjects are close to the edge of the frame.
A diffuser is anything that is placed between the flash and the subject that turns a small light source into a bigger light source to create a softer light. Diffusers can range from a small plastic dome that fits over the flash head to large panels that sit between the flash and the subject.
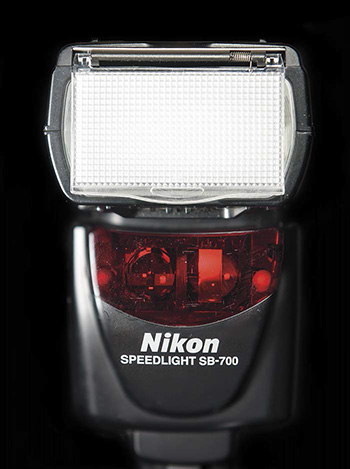
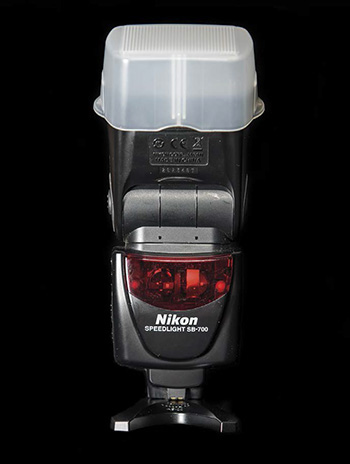
A diffusion dome is a hard plastic cover that slips over the head of a flash. Made of a semi-opaque material, domes have a textured surface on the portion that fits over the front of the flash to help break up the light from the flash. When the flash fires, the light produced can’t blast straight out of the flash. Instead, the photons bounce around inside the dome and then leave in all directions, creating a softer, diffused light. The SB-600, SB-700, SB-800, SB-900, and SB-910 Speedlights all come with diffusion domes. You just slip the diffusion dome over the head of the flash, as shown in Figure 7.8 .
Figure 7.8 When this SB-700 fires, the light will bounce off the textured plastic of the diffusion dome and then bounce around inside the dome to spread and soften the flash.
If you misplace the diffusion dome that came with the flash or just want a different one, you can find many third-party diffusion domes available for all Speedlights. For example, Sto-Fen makes its Omni-Bounce for all Speedlights. Each is a designed for the specific shape of the flash, so make sure you get one designed for your model. You can also get replacement diffusion domes directly from Nikon—as I found out because my dog mistook one for a chew toy.
I use the diffusion dome on the head of the flash even when using the flash inside a softbox or with an umbrella because it helps to soften the light even more than if you just use a plain flash.
Umbrellas used in photography look a lot like those that keep the rain off you outside. Available in a variety of sizes, they open and close in the same way. The real difference is their material, and that depends on how they will be used. In photography, you can buy umbrellas to shoot light through or to bounce light out of. Some umbrellas even have removable covers that enable you to use them both ways.
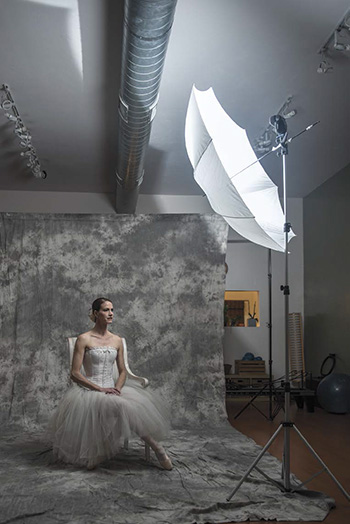
When you fire a Speedlight through an umbrella, the light gets broken up by the diffusion material and becomes a larger softer light source. These umbrellas are usually made of a white, semi-opaque, silk-like material that allows most of the light through. When you shoot through the umbrella, you point the shaft away from the subject so the flash fires into the inside of the umbrella. In Figure 7.9 , I fired an SB-800 through a large umbrella to illuminate Jennifer. You can see the spill of light hitting the ceiling around the edges of the umbrella, and that light adds to the illumination in the room.
NIKON D750 ISO 320 1/80 SEC. F/2.8
Figure 7.9 Firing the Nikon SB-800 through the translucent umbrella creates a soft light that illuminates the whole the room.
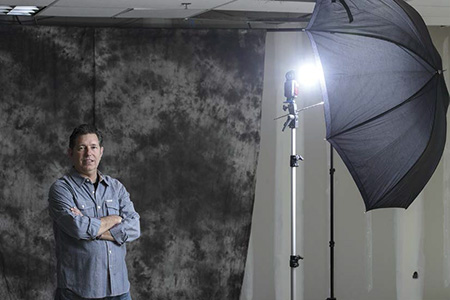
When you use an umbrella as a bounced light source, the inside of the umbrella needs to have a reflective surface of white (the most common), silver, or gold. In this method, you aim the umbrella shaft at the subject and then aim the light away from the subject in the umbrella. The light bounces back out to illuminate the subject (see Figure 7.10 ).
Figure 7.10 The Nikon SB-910 firing into the umbrella creates a big, soft bounce light. One Speedlight fired into an umbrella can create a much larger light source than the Speedlight alone.
Convertible umbrellas can be used as either shoot-through or bounced-light umbrellas. These white umbrellas come with a removable black cover. Leave the cover on to use it as a bounce light or remove the cover to shoot through the umbrella. This makes it a pretty economical device, but there is a better reason to use a convertible umbrella. You can leave part of the cover on the umbrella to block only some of the light and gain more control over the light.
The size of the umbrella makes a difference in the quality of the light and what you can light, as well. The smaller the umbrella, the smaller the area of soft light, and the smaller the area you can shoot. For example, a 30-inch umbrella works great for a headshot or a small product, while a 45-inch umbrella can be used for a full-length shot of one or two people. When you use bigger umbrellas, you will need more light, usually in the form of more Speedlights. For example, when using an extra-large (72-inch or larger) umbrella, you will need to use at least two and preferably more Speedlights to produce enough light to fill it.
Although umbrellas are easy to use and relatively inexpensive, they don’t give you tight control over the light. The light can spill out around the edges of the umbrella, going pretty much everywhere. When you need to light a large group or area, you can use this spill to your advantage, but sometimes you need more control.
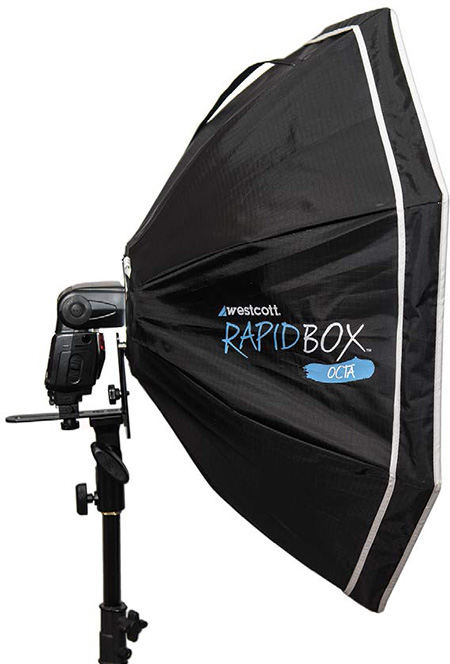
Softboxes offer a greater amount of light control, especially compared to umbrellas. A softbox is basically a black box with a translucent front panel and the Speedlight in the back. The inside of the soft box can be white or reflective silver. The light bounces around the inside of the softbox before it exits through the front. Figure 7.11 shows the Westcott Rapid Box Octa, a softbox made specifically for small flashes.
Figure 7.11 The Westcott Rapid Box Octa is a softbox made specifically for small flashes. Here an SB-700 is mounted into a 26-inch Rapid Box Octa.
Softboxes are traditionally used with studio lights, but with the huge increase in the use of small flash, there are now a great many softboxes designed specifically for Speedlights.
Available in many different shapes and sizes, softboxes are usually square, rectangular, or octagonal. The octagonal softboxes are usually called octas for short. The size, shape, and construction of the softbox all have an effect on the light the box produces. Here are some things to look for:
Front lip
: Some softboxes have a lip in the front because the front diffusion panel is set back from the front of the softbox; others mount the diffusion panel flush to the front. Softboxes with a front lip produce slightly more controllable light because the light doesn’t spill out the edges.
Additional diffusion
: By definition all softboxes have a front diffusion panel, but some have an internal diffusion panel as well. This second panel helps to further soften the light. Inside the box, the light diffuses as it hits the first panel, and then it travels a short way in the box and passes through the second panel.
Internal color
: The inside of a softbox is usually either white or silver. Both colors bounce the light around the inside of the softbox. Silver gives a punchier light, while a white interior creates a softer and a little more forgiving light.
Shape
: Some people prefer the shape of the catchlights produced by the octas, while others prefer the square. It really is a personal choice, but the shape of your softbox controls the shape of the light. I use square, octagon, and rectangular softboxes, all depending on how I want the light to look.
Accessories
: Many softboxes have optional accessories that enable you to further modify the light. For example, the Westcott Rapid Box allows you to add a small metal reflector inside. Called a Deflector Plate, the reflector creates a light more like a beauty dish. You can also place grids over the front of the softbox to control the spread of the light.
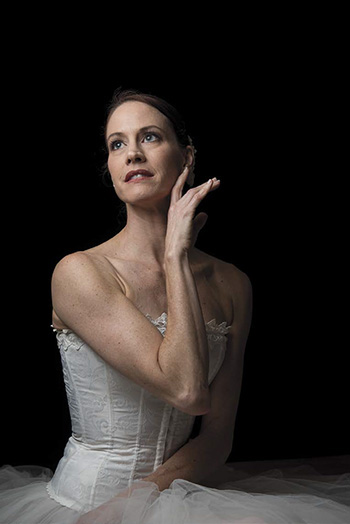
The light from a softbox is generally very soft, especially when used close to the subject, as illustrated in Figure 7.12 . This makes it one of the most popular light modifiers for photographing people.
NIKON D750 ISO 400 1/250 SEC. F/5.6
Figure 7.12 The Nikon SB-910 used inside a softbox creates a pleasing soft light on the subject. There are no hard shadows on the face, but instead the light seems to wrap, creating a smooth transition between the light and the dark.
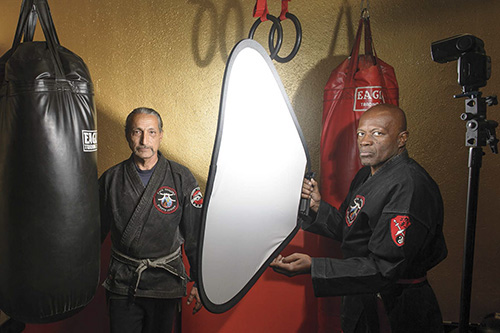
A diffusion panel is just a semi-opaque piece of material that you can put between the light source and the subject. The diffusion panel then acts as a bigger and softer light source than the original. My favorite diffuser is the Lastolite TriGrip 1-Stop Diffuser simply because the design makes it easy to hold in place.
When held close to the model’s face, as demonstrated in Figure 7.13 , the diffusion panel creates a soft, pleasing light by diffusing the light from the SB-910 ( Figure 7.14 ).
Figure 7.13 The Lastolite TriGrip 1-Stop Diffuser held close to the subject’s face softens the light from the flash.
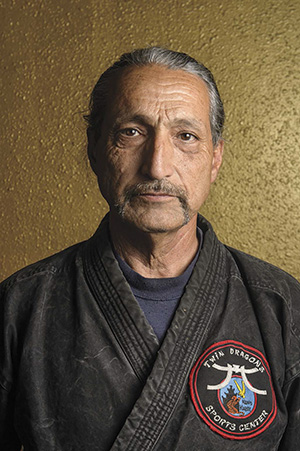
NIKON D4 ISO 100 1/200 SEC. F/6.3
Figure 7.14 For this portrait, placing the diffuser between the light and the subject created a softer light with no hard lines between the light and the shadow on his face.
One advantage of using a diffusion panel rather than a softbox or an umbrella is that you can place a diffusion panel further away from the light source. Because the light travels further, allowing it to spread out before passing through the modifier, the resulting light is even softer. You can also use the diffusion panel in conjunction with other light modifiers ( Figure 7.15 ). Adding a diffusion panel in front of the softbox makes the soft light even softer, as shown in Figure 7.16 .
Figure 7.15 Placing the diffusion panel between a softbox and the subject creates an even softer light than just the softbox alone.
NIKON D4 ISO 100 1/250 SEC. F/5.6
Figure 7.16 The setup in Figure 7.15 resulted in this portrait. You can see that there are no hard shadows at all and the light seems to wrap around the face.
The tools in this section control the spread of light, enabling you to add some light right where you need it and none where you don’t. Snoots and grids do this by going over the head of the flash and restricting the light. The main difference between a snoot and a grid is the amount of control you have over the spill of light. A grid’s light is a more accurate and controlled compared to that of a snoot. Gobos , also known as flags , usually just attach to one side of the flash and stop light from spilling over on that side. The next three sections take a closer look at each option.
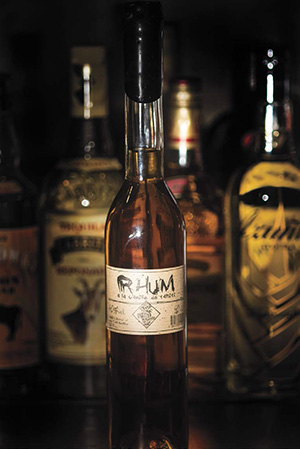
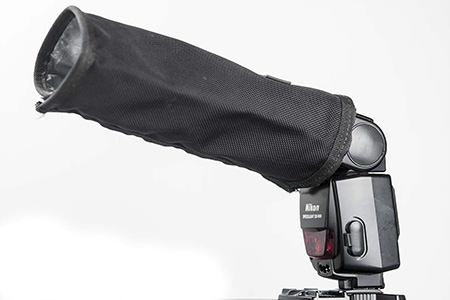
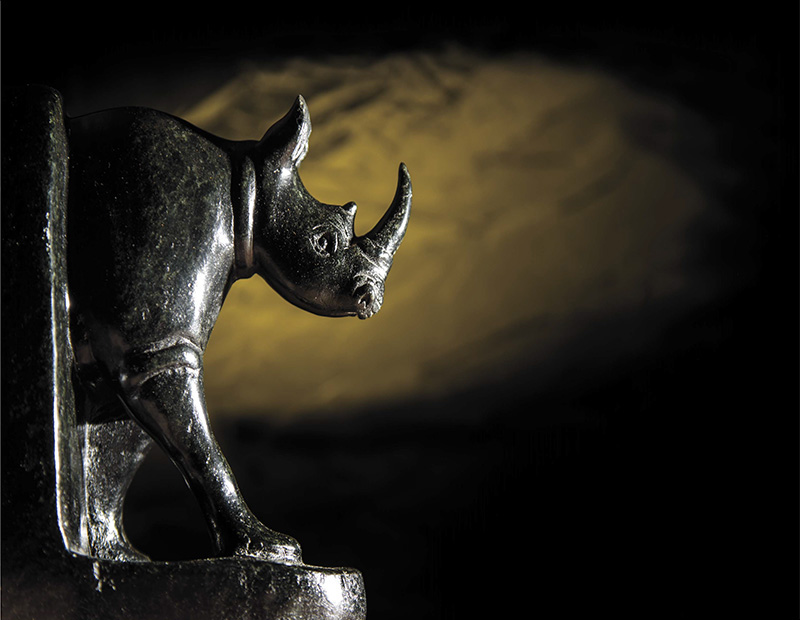
A snoot is a tube that goes over the flash head and tightly controls the spread of the light. Using a snoot allows you to illuminate just the parts of the scene you want to ( Figure 7.17 ). The first snoot I ever used was a pasta box with the ends cut off and a little black gaffer tape to keep it in place. The two key factors in using a snoot are the length of the snoot and the color inside it. The longer the snoot, the tighter the spread of the light is. If the inside is a reflective color, the snoot will bounce the light around, causing it to spread upon exiting. To prevent this, you can use a little black gaffer tape to make the inner surface less reflective.
NIKON D750 ISO 200 1/250 SEC. F/4
Figure 7.17 The light from the flash is tight and controlled when you use a snoot. The label of the Rhum is well lit, for example; then the light just falls off.
The snoots that I use now are made by Honl Photo ( Figure 7.18 ) for the simple reasons that they work well and are close to indestructible (my pasta box was not). To create a less reflective surface, you can use Honl Photo snoots with the black side on the inside—no gaffer tape required. Similarly, you can also use ExpoImaging’s Rogue FlashBenders as snoots: Simply roll the FlashBender into a tube and secure it with its Velcro edges.
Figure 7.18 A Velcro strap around the head of the flash holds the Honl Photo snoot in place on the SB-800 or any Speedlight.
A grid controls the spread of the light from a flash by using a group of small tubes all packed next to each other. Using a grid gives you control over where the light will hit plus gives the light a little softer, more natural edge compared to a snoot. The longer the grid and the smaller the individual tubes, the tighter the beam of light. A tight grid can give you really fine control over what the light does and doesn’t hit.
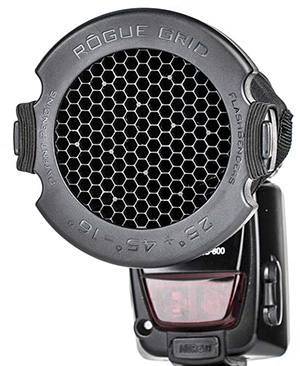
My favorite grid is the Rogue Grid from Expo-Imaging ( Figure 7.19 ), which is basically three grids in one and comes with specially cut gels that can be inserted into the grid. The Rogue Grid allows you to create a 45-degree, 25-degree, or 15-degree grid with the same kit.
Figure 7.19 The Rogue Grid attaches to the front of the Speedlight. Notice the honeycomb grid pattern that controls the spread of light.
A gobo, as its name implies, goes between your light and the subject, allowing you to control what the light actually illuminates. When you want to block some of the light leaving the flash, the easiest way is to place something opaque in the way of the light. Whether you use your hand, a notecard covered in gaffer tape, or a commercially available option, you’re using a gobo. Rectangular gobos are sometimes called flags , and you can use them on the sides, top, or bottom of your flash to control the spill of the light ( Figure 7.20 ). For example, if you have a light placed off to the side and you want to make sure that it doesn’t illuminate the background, you can flag the back of the flash so the light can’t travel in that direction.
Figure 7.20 This Honl Photo flag is held in place with a Velcro strap around the SB-800’s flash head.
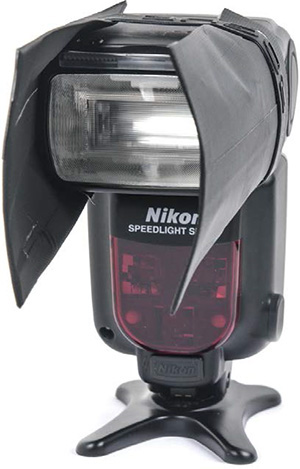
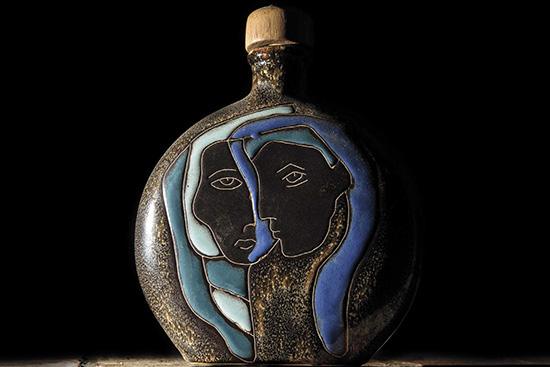
Using a flag on each side of the flash, a modification called barn doors tightly controls the spill of light on both sides of the flash. You can make your own barn doors with some notecards, black gaffer tape, and a rubber band, as demonstrated in Figure 7.21 . As you can see in Figure 7.22 , this homemade rig focuses the flash in close to produce more dramatic light on the subject.
Figure 7.21 Called barn doors, flags on either side of a flash enable you to control the spill of light. Here the flags are just notecards covered in strips of black gaffer tape and held in place with a rubber band.
NIKON D750 ISO 200 1/250 SEC. F/9
Figure 7.22 For this shot, I placed the flash to the left and aimed the light at the side of the hand-painted bottle. Because the light was restrained by the flags, it illuminated only part of the bottle.
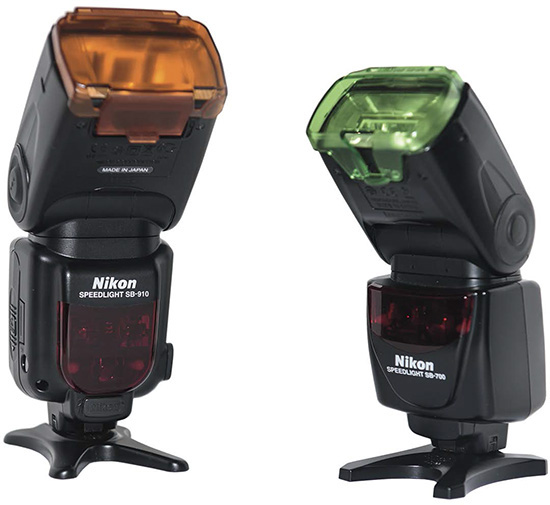
Gels are colored pieces of acetate or hard plastic that cover the front of the front of the flash to change the color of the light produced. The SB-600, SB-800, and SB-900 Speedlights all came with gels and a gel holder, while the SB-700 and the SB-910 Speedlights come with hard-plastic gels. You can use gels for two very different effects. The first is to make the color of the light produced by the flash match the ambient light in scene, and the second is to create a color wash as a creative tool.
The color of the light produced by a Nikon Speedlight is close to the light produced outside by the sun around midday. This is great if you are adding a little fill light outdoors under the same color light but doesn’t do you any good when you’re trying to match a tungsten light or the colors of a fluorescent bulb. Gels can help you balance the flash’s light with the ambient light.
You may hear a lot of terms like CTO , CTB , quarter cut , half cut , and full cut surrounding color-correcting gels. This insider talk can make a beginner feel awkward asking about the best ways to use the various gels. The answer actually is simpler than it sounds and pretty easy to implement. All you have to do is put the right color gel in front of the flash to match the ambient light’s color. Here’s a guide to getting it right:
Color temperature orange
(CTO
): These gels turn the light more orange to match tungsten/incandescent lights. The gels are often referred to as CTO
or color to orange
, which is easy to remember because they make the light more orange.
Color temperature blue
(CTB
): These gels turn the light from your flash to a cooler blue that matches the light in shade to deep shade. These gels are often called CTB
or color to blue
because they change the light to blue.
Green
: These gels turn the light from your flash to a green that aims to match the green in fluorescent lights.
When discussing the strength of gels, photographers use the term cut . A full cut of a gel means that color gel is used at full strength. A quarter cut or half cut of a gel means that the gel’s color is lighter, specifically one-quarter or half strength, respectively. For example, a full-cut CTO is the same as two half cuts of CTO stacked on top of each other. By stacking the gels, you can adjust the strength of the gels’ effect on the light from the flash.
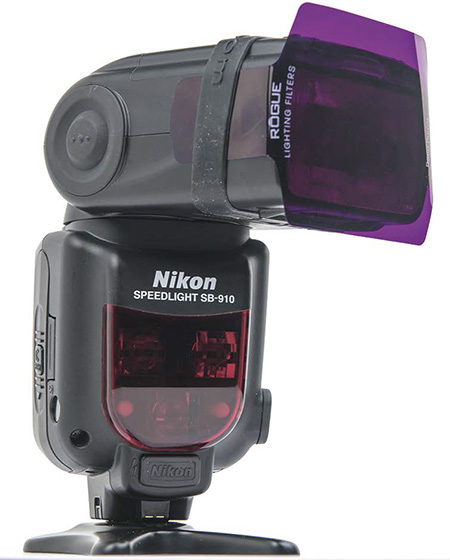
As I mentioned earlier, the SB-700 and SB-910 Speedlights come with hard-plastic gels ( Figure 7.23 ) in both green and CTO. Nikon calls these a fluorescent filter and an incandescent filter, respectively, because they are intended for matching the color of fluorescent lights and incandescent lights. These gels do something very cool when attached to a Speedlight mounted on a camera. When you adjust the camera’s the White Balance setting to Auto or Flash and attach one of the Nikon gels, the camera will automatically adjust the white balance to match the light produced from the flash.
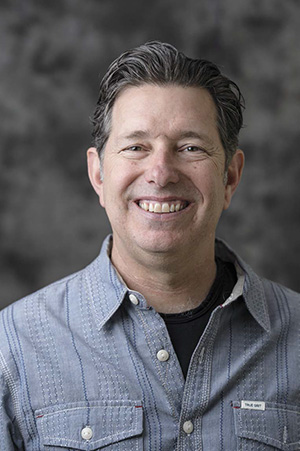
Alternately, you can create some dramatic lighting by purposefully using a color gel that does not match the ambient light color and then setting the white balance to match the light from the flash. For example, if you adjust the camera’s White Balance setting to Tungsten, the colors of the image will shift toward blue as the camera adds a little blue to counteract the reds in the tungsten lights. If you photographed outside in the late evening when the light is blue to start with, the whole image will look very blue. If you also add a full CTO gel on your Speedlight, that very warm light will counteract the blue shift created by the Tungsten White Balance setting so that anything that the flash illuminates looks normal. You can see how this works in Figure 7.24 ; I lit Tim with one off-camera flash gelled with a full-cut CTO and fired through a small softbox creating a natural-looking skin tone while the white balance was set to Tungsten to create a very blue sky.
NIKON D700 ISO 200 1/250 SEC. F/5.6
Figure 7.24 The light from the flash with a CTO gel illuminates Tim, making him look normal, and the color shift by adjusting the White Balance setting to Tungsten creates the very blue sky.
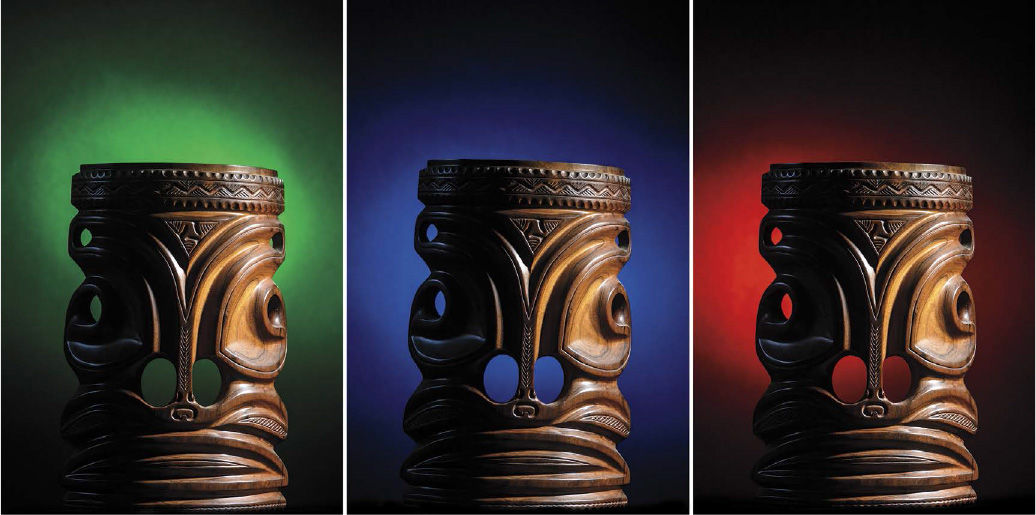
Gels come in many colors besides CTO, CBO, and green, and you also can use them to create color washes or different colored areas in an image. Gels can change a whole scene because color can affect the mood of an image. Want the image to look a little cold? Add a touch of blue. Want to warm up a scene? Add a little red. Want to change the background in a dull image? Add a splash of color. As shown in Figure 7.25 , the subject is the same in each shot, but the backgrounds are radically different because of various color filters on the Speedlight aimed at a plain black background.
NIKON D750 ISO 200 1/250 SEC. F/5.6
Figure 7.25 Using different colored gels allowed me to change the background color of the image quickly.
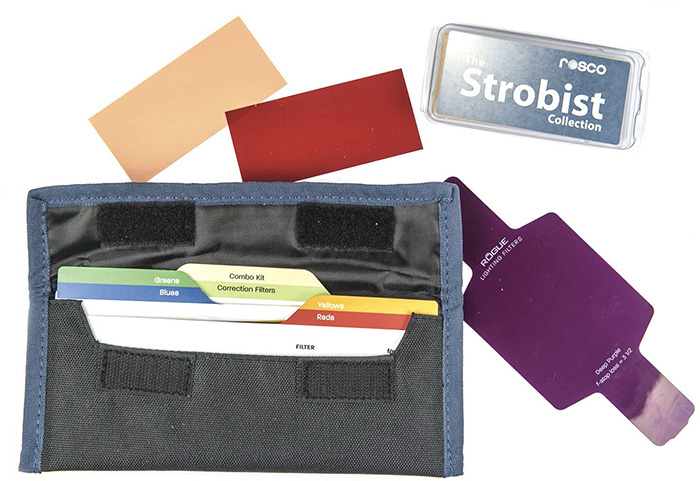
Many manufacturers offer gels already prepped to go on the front of your flash, as you’ll learn in the “Product Options ” section coming up. ExpoImaging’s Rogue Universal Gels are some of my favorites, and no gel discussion would be complete without mentioning Rosco gels. I was introduced to the Rosco line of gels by David Hobby, when he convinced Rosco to release the Strobist Collection of 55 filters in 20 colors. These gels are cut to fit over the front of the flash and are held in place by a simple rubber band. The only issue that I have with the Rosco gels is that they are cut a little small for the SB-900 and SB-910 flash heads. The Rogue Universal Gels from ExpoImaging are much larger and have longer tabs that wrap around the flash head, making them much easier to use ( Figure 7.26 ). Rogue Universal Gels also come in a useful gel holder with dividers that keep the gels organized.
ExpoImaging also offers a set of gels made specifically for the Rogue Grid. These are round and fit exactly into the grid holder, making them especially easy to use.
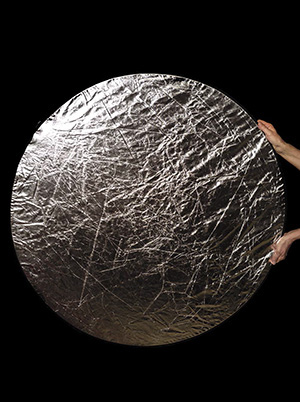
Reflectors bounce the light from the source into the scene. The source can be the sun, any ambient light in the scene, or (most importantly here) the light from your Speedlights. You can use any surface to bounce light—a nearby wall, the ceiling, a commercial reflector—and thereby create a larger light from the small Speedlight. Commercial reflectors are usually constructed as a spring steel ring with the reflective surface attached. Many times they come with covers that give you a choice of surface colors. The color of the reflector’s surface affects the color of the light. Most reflectors come in the following colors:
Gold
: The gold surface creates a warm light that matches early-morning and late-afternoon sunlight. A gold reflector can be a little much if you are not careful, turning a healthy glow into an orange radiation glow. I don’t use the gold side of the reflector often with the Speedlights, but it can be useful for matching the golden hour light.
Silver
: The silver side of the reflector is probably the most useful because it bounces a huge amount of light and gives the light some more punch. You just have to be aware that the bounced light from the silver surface could overpower the main light.
White
: White reflectors don’t bounce as much light as gold and silver surfaces, but they don’t change the color of the light either. The light from the white surface can add a nice even light to the scene and reduce the hard shadows. For a homemade white reflector, try a nearby white wall or a piece of white poster board; both work well.
Combination colors
: Some reflectors come with sides that are a combination of white and silver or white and gold. These work great because they are toned-down versions of the gold surfaces and silver surfaces.
Reflectors come in a variety of sizes; the bigger ones obviously reflect more light than the smaller ones. I like the 40- to 42-inch reflectors for most photos, as long as I can get the reflector in close enough to the subject (see Figure 7.27 ).
A great many manufacturers build light modifiers specifically for small flashes. The sections that follow highlight some that I own, have used, and still use on a regular basis. This is by no means a complete list of all the modifiers available, but it will give you a good place to start. For more information on each product, see Appendix A .
Lastolite makes some of my favorite products for dealing with light; they’re made well and really do last. If I had to pick only one accessory to take with me on a shoot, it would be the 30-inch TriFlip 7:1 Kit, which consists of a TriGrip 2-Stop Diffuser and a set of panels with seven different surfaces that enable you to diffuse, bounce, or block light. Its triangular shape and built-in handle make the diffuser easy to place just about anywhere and or hold with one hand. The best part is that the whole package folds up, making it easier to carry on location.
Considered a master of small-flash lighting (of all lighting actually), Joe McNally teamed with Lastolite to design some light-shaping tools specifically for his work with small flashes. The resulting Joe McNally Signature line is now available for us all to use and consists of eight excellent products specifically designed for Speedlights. For me, however, two products stand out from the rest.
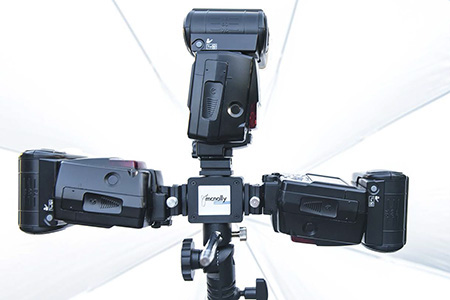
Joe McNally TriFlash
: Designed to hold three Speedights at the same time, this device is a small metal square with a cold shoe on the top and one on each side that then mounts on a light stand using the bottom fitting (
Figure 7.28
). The genius to the design is that the three cold shoes can rotate. When the Speedlights are mounted, you can position them so that the Advanced Wireless receiver sensors all face the same way, making triggering the flashes a lot easier. The metal cold shoes even have a small piece of tape on the inside to stop the contacts on the flash from contacting the metal.
Figure 7.28 This Joe McNally TriFlash has three SB-800 Speedlights mounted. You can see how each of the Speedlights can be rotated, allowing them to be triggered off-camera.
Joe McNally 4 in 1 Umbrella
: This might look like a standard convertible umbrella that can convert from a shoot through to a white bounce, but it is much more. This umbrella has a removable square panel in the middle that turns the big, soft, uncontrollable umbrella light into a smaller, soft, softbox-type of light all in the same device. And, as an added bonus, the inside can be skinned with either white or silver, giving you options when you use it as a bounce light source.
All of the Joe McNally Signature light-shaping tools are tough and can handle life on the road, as you’d expect from a photographer who spends so much time on location.
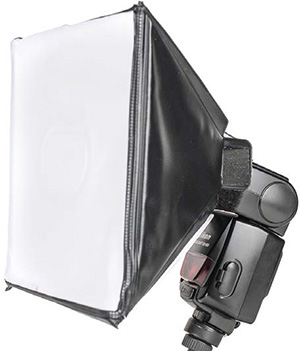
The first small softbox I ever used on my Speedlights was the LumiQuest SoftBox II ( Figure 7.29 ), and it still has a place in my travel camera bag. This small softbox needs no extra hardware; it just attaches directly around the flash head. It creates a soft light that can easily be used on location and folds up flat for easy transportation. LumiQuest also makes a slightly larger softbox called the LumiQuest SoftBox LTp, which folds flat to the size of a laptop (which is the reason for the LTp name) so you can carry it in the laptop pocket of a camera bag.
LumiQuest makes a great line of small-flash modifiers, including a full range of bounce devices, which create a much softer light by bouncing the light at the subject instead of having you aim the flash directly at them. The company also offers a full gel set, a snoot product, and softboxes of various sizes. All the LumiQuest items attach to the flash head using a Velcro strap called the UltraStrap.
When David Honl moved to Istanbul to photograph the Iraq war, he found out rather quickly that trying to haul a studio setup was not going to work. Instead, he started to create snoots made of cardboard to help create the lighting he needed. He later used ballistic nylon to create snoots and flags for his small flash units, securing them with Velcro straps. Now, he heads Honl Photo, which sells small-flash accessories for everyone to use. The Honl snoot was the first small flash accessory I ever purchased, and I still use it. In addition to the snoot that started it all, the Honl Photo line includes a softbox, bounce cards, flags, gel kits, and grids. One of the great things about the products is their ability to take a beating and still perform flawlessly. The construction is top-notch, and the products will last a long time.
I love ExpoImaging’s Rogue line of light modifiers and always have one of the FlashBenders tucked into my camera bag. The Rogue line encompasses three types of accessories.
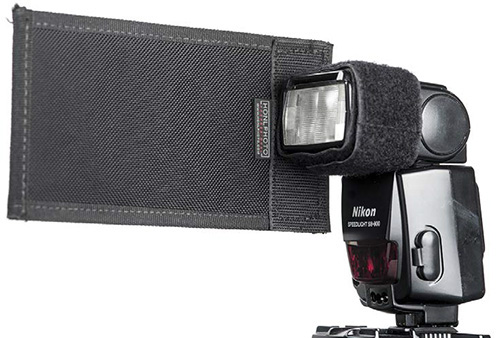
FlashBenders
: The FlashBenders are flexible, shapeable light modifiers made for small-flash units (
Figure 7.30
). Available in a range of sizes, they attach to the flash with an attached strap and have bendable rods built in to help shape and position the reflective material. You can use FlashBenders as everything from a straight bounce card to a snoot. You can also get a diffusion panel to attach to your FlashBender, turning the whole thing into a small softbox.
Figure 7.30 A Velcro strap wraps around the flash head to keep the Rogue FlashBender light modifier in place on your Speedlight (here an SB-800).
Rogue Grid
: The Rogue Grid is a three-in-one honeycomb grid system that provides three grid patterns: 45 degrees, 25 degrees, and 16 degrees. The honeycomb grids produce a spot of light with some fall-off that you can use to fine-tune where the light strikes the subject. This grid also has a set of gels that are cut to fit inside the grid holder.
Rogue Universal Gels
: I’m a sucker for well-designed products and packaging, which is part of why I like the Rogue Universal Gels so much. They are packaged in a handy pouch that lets you get to the color you need quickly, and attaching a gel is just as easy: Position the gel to the front of your flash, bend the tabs to the sides of the flash, and slip on a rubber band to hold it in place (
Figure 7.31
). Simple, quick, easy, and organized is the perfect combination when you’re working with small pieces.
Figure 7.31 A rubber band just holds the side tabs of a Rogue Flash Gel in place so that the gel covers the whole head of this SB-910 Speedlight.
ExpoImaging recently updated its line of FlashBender products to create lighter versions of each with an improved fastening system. The new versions are just as flexible and sturdy as the originals, but the lighter weight means that they put less stress on your flash. Plus, the new fastener uses a buckle that enables you to cinch the modifier tighter than ever (see Figure 7.32 ).
Figure 7.32 The new buckle fastener on the Rogue FlashBender allows the modifier to be cinched tight around the flash head, making it more secure than ever.
Westcott offers so many different lighting tools that I don’t have room to list them all. Basically, the company makes everything you could need to bounce light, diffuse light, and even produce light.
One line that I use quite a bit is Westcott’s Rapid Box line of softboxes, which are made to hold a single Speedlight and come with everything you need. I use the 26-inch Rapid Box Octa a lot and recently added the Rapid Box Strip to my lighting kit. If your work requires multiple Speedlights, you might consider the 32-inch Rapid Box Duo, which holds two Speedlights at the same time.
The number of light modifiers available for Speedlights increases every day. Thanks to the popularity of using a small flash, you can find just about any type of light modifier you can imagine. Whether you use a diffusion panel, umbrella, or soft box, however, you should keep one final, invaluable tool close at hand: gaffer tape. A few pieces can block errant rays of light, and it is a simple, quick, and inexpensive solution to last-minute dilemmas. I keep a small roll of gaffer tape with me at every shoot. A well-placed piece or two can keep the light on the subject and off the background. Think of it as a flexible gobo or flag that you can attach to the flash or you can tape over a section of the diffuser shaping the light.