NIKON D4 ISO 100 1/250 SEC. F/11
Using multiple off-camera flashes allows for some really creative lighting scenarios. The ability to trigger an unlimited number of Speedlights in up to three groups using the Advanced Wireless Lighting (AWL) functions of the Creative Lighting System (CLS) enables you to build up complex lighting scenarios. This chapter not only covers the possibilities when using AWL’s A, B, and C groups but also shows you alternative ways to trigger off-camera lights, including radio triggers and SU-4 mode on the Nikon Speedlights.
The ability to control and adjust three groups, each with an unlimited number of flashes and each with its own flash mode and power setting, makes the AWL capability of the CLS incredibly powerful.
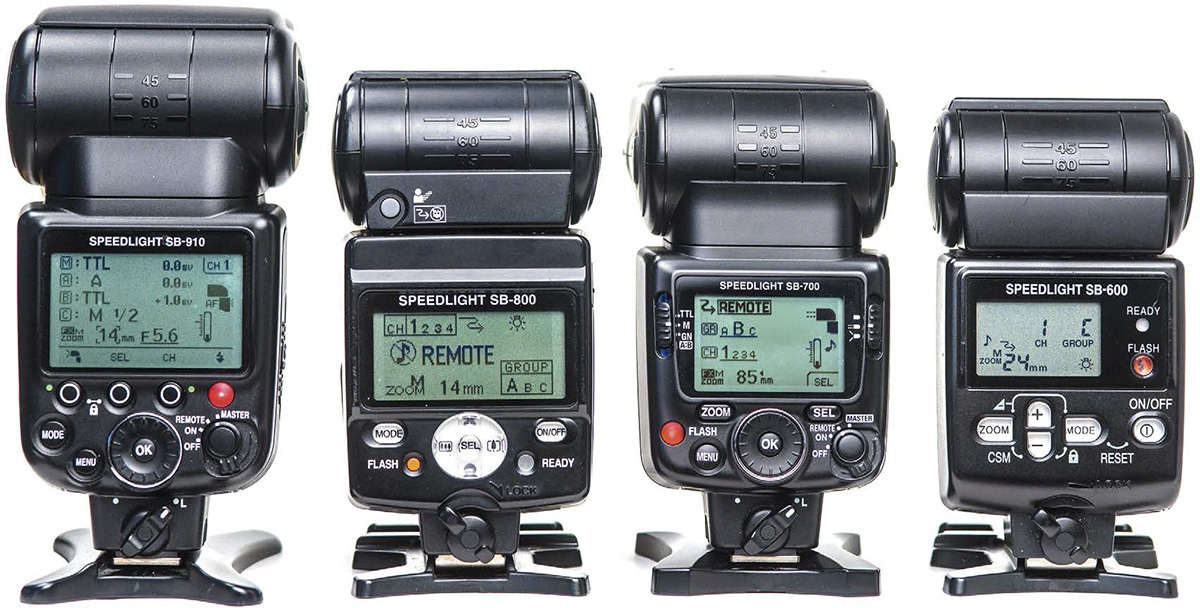
When you set up a Speedlight as a remote, you need to set the channel and the group. All the flashes and the Commander need to be on the same channel to work, but the remotes can use the A, B, or C group. For all the examples in this chapter, I used a Commander that supports all three groups and allows for different flash modes to be set separately for each group. The SB-800, SB-900, and SB-910 (shown in Figure 11.1 ) all can handle this configuration.
Figure 11.1 The SB-910 in this lineup is set as the Commander with the SB-800 as group A, the SB-700 as group B, and the SB-600 as group C. All the Speedlights are set to channel 1. As you can see, the layout showing the group and channel is different on each Speedlight.
When working with multiple groups, you need to plan the shoot beforehand so that you can sort and set the Speedlights into the proper groups. Here are some tips for keeping your Speedlights organized when using them in multiple groups:
 Sort by lighting area
: Instead of thinking about the Speedlights as individual lights, it helps to think in terms of the zones
that you want to illuminate. When I am setting up a shoot, I usually think in terms of a main light, fill light, and background light. I assign group A to be the main light source, group B to be the fill light, and group C to be the background light.
Sort by lighting area
: Instead of thinking about the Speedlights as individual lights, it helps to think in terms of the zones
that you want to illuminate. When I am setting up a shoot, I usually think in terms of a main light, fill light, and background light. I assign group A to be the main light source, group B to be the fill light, and group C to be the background light.
Build the scene group by group
: One advantage to using multiple groups is the ability to build up the light in the scene by turning the groups on one at a time. This is especially useful when using the flashes in TTL mode because the light from one group can affect the power of another group. Being able to turn a group on or off from the camera position allows for quick adjustments.
Label your lights
: Setting up a lot of lights can create some issues when it comes to remembering which lights are in which groups. I have used two different methods to keep track of which Speedlights are in which groups. The first was color-coding; I used red tape to designate the main light (group A), yellow tape for the fill light (group B), and white for the background (group C). Illustrated in
Figure 11.2
, this method worked great if I was working alone because only I needed to know what the colors meant. My second method is to use a piece of white gaffer tape and just write A, B, or C on it as I set up the lights. This method works great when you are working with an assistant who also needs to know which lights are in which group at a glance.
Figure 11.2 Some colored electrical tape makes it easy to see which Speedlights are in which groups.
Test the groups
: You can use the Test Fire button on the Commander flash or SU-800 to trigger the remote flashes. When the remotes fire, they do so in sequence; first the Commander unit fires (if it is a Speedlight), then group A, followed by group B, and finally group C. A test fire allows you to do two things: It shows you visually which lights are in which group, and it makes sure that the Speedlights are awake and ready to fire.
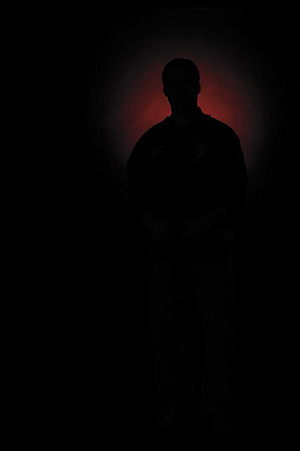
Using groups allowed me to build up the lighting for this photograph of Tim performing a snap kick. Using three groups enabled me to control the three different lighting zones. The background (group C) was a Speedlight with a grid and red gel creating the red area behind Tim. Figure 11.3 shows the scene with just group C turned on. Group C was set to Manual flash mode with the power at 1/16 to create a deep red. If this group had been set to TTL, it would have tried to put out as much light as possible to make the whole scene a middle gray. I wanted to make sure the red light on the background remained constant no matter what the other flashes did.
NIKON D750 ISO 200 1/320 SEC. F/5
Figure 11.3 The group C Speedlight had a Rogue Grid (Expo Imaging) with a red gel and was placed behind Tim, facing the black paper background.
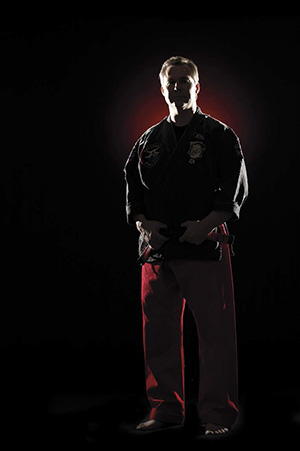
The next step in building the light was to add the two sidelights that would help to define the outline of the subject. I set the two SB-800 Speedlights, one on either side of Tim, to group B and outfitted them with flags to keep the light from spilling onto the background or foreground. Group B was set to TTL with –1 Flash Compensation. As you can see in Figure 11.4 , adding the sidelights didn’t diminish the red background, but now Tim is outlined with the hard, white light.
NIKON D750 ISO 200 1/320 SEC. F/5
Figure 11.4 The two SB-800s are set to group B and add the sidelight to the image. Because group C is set to Manual, the addition of the sidelights doesn’t change the amount of red in the background.
The final light is an SB-910 with a Wescott Rapid Box 26" Octa on a boom placed off to the camera’s left and angled both to light up the foot that is kicking and to add some fill light to Tim’s face ( Figure 11.5 ).
NIKON D750 ISO 200 1/320 SEC. F/5
Figure 11.5 With all three groups set up, it was just a matter of timing to catch the kick at the highest point.
The CLS uses line-of-sight triggering for remote flashes, but what do you do when that line is blocked? Rather than compromise your lighting or set design, you could use a wireless radio trigger, such as those made by PocketWizard (www.pocketwizard.com ) and RadioPopper (www.radiopopper.com ), to fire your off-camera flashes. You simply attach a transmitter unit to the camera and receiver units to each of the remote flashes. When you press the shutter release button on the camera, the transmitter sends a signal to the receiver units, and the flashes fire.
The debate of which is better, radio triggers or CLS, seems to strike a nerve with many people. For me, it depends on what the subject is and, much more importantly, where the remote flashes need to be placed. There are some real advantages and disadvantages to wireless radio triggers.
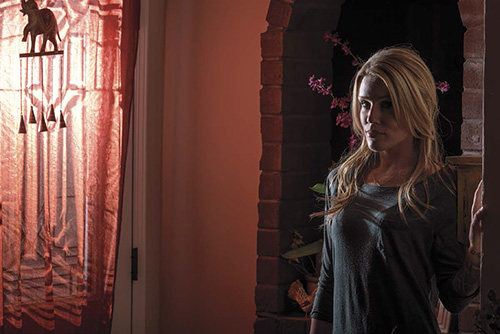
The biggest advantage to using radio triggers is that they use a wireless radio signal instead of a line-of-sight trigger, which means they can trigger remote flashes that are hidden from the camera. In addition, radio triggers can have a much longer range than the built-in, CLS line-of-sight triggers and can be more consistent. For example, PocketWizard triggers have a range of up to 1,600 feet (and that’s with the entry-level units), while the CLS system’s range is a lot less, especially outdoors. The CLS is also dependent on the direction that the Commander unit faces and the ability for the remote to see the light the Commander produces. The flash in Figure 11.6 , for example, was placed outside and triggered using a set of PocketWizard triggers. You can see the resulting image in Figure 11.7 . The same thing might have been possible using AWL, but it would have involved using multiple TTL cables and getting the Commander flash positioned in such a way that the remote could see it. Using the set of PocketWizard triggers was just easier.
NIKON D750 ISO 400 1/250 SEC. F/5.6
Figure 11.6 Placing the Speedlight outside the window created a light that looked like natural sunlight. Triggering the Speedlight with a PocketWizard system allowed me to move around and not worry about maintaining a line of sight between a Commander and remote.
NIKON D750 ISO 400 1/250 SEC. F/5.6
Figure 11.7 Using the light coming in from outside through the window created a soft light on Nicole, and I could move around freely without worrying about losing the line of sight between the Commander and the remote.
Radio triggering systems do have a few disad-vantages. Most obviously, you need to buy a transmitter and at least one receiver (you need a separate receiver for each remote flash), so the cost of using radio triggers can climb quickly. For example, if you go with the lowest-priced PocketWizard system, the PlusX, you will have to pay $200 for the two units to get started and then another $100 per unit as you add more remote flashes. This can add up fast.
Another disadvantage to using a radio trigger is that many of the systems do not allow you to control the power of the remote flash from the camera; every power adjustment needs to happen on the actual flash, or you need to adjust the settings on the camera to get the exposure you want based on the flash’s power. Having to adjust each flash can take a lot of time and disrupt the entire photo shoot. Imagine if you had a Speedlight mounted on the top of a tall light stand and each time you wanted to make a small adjustment to the power you needed to either lower the light or climb a ladder. That could disrupt the entire flow of the shoot, and you might not end up looking very professional.
There is also the issue that not all the Speedlights are compatible with the PocketWizard sync cord. For example, the SB-500, SB-600, and SB-700 have no way to attach a sync cord, so you need a special cord for each flash (the HSFM3) to use them with the PocketWizard system. The PocketWizard MiniTT1 and FlexTT5 combination is meant to work with the Nikon CLS, but you still need to purchase a receiver for each flash and transmitter for the camera.
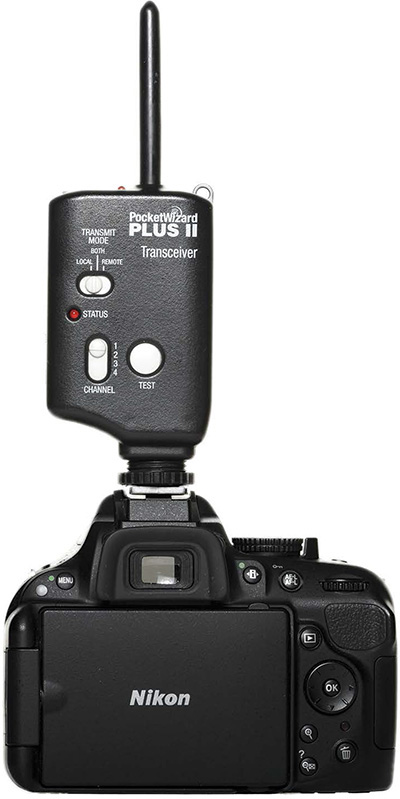
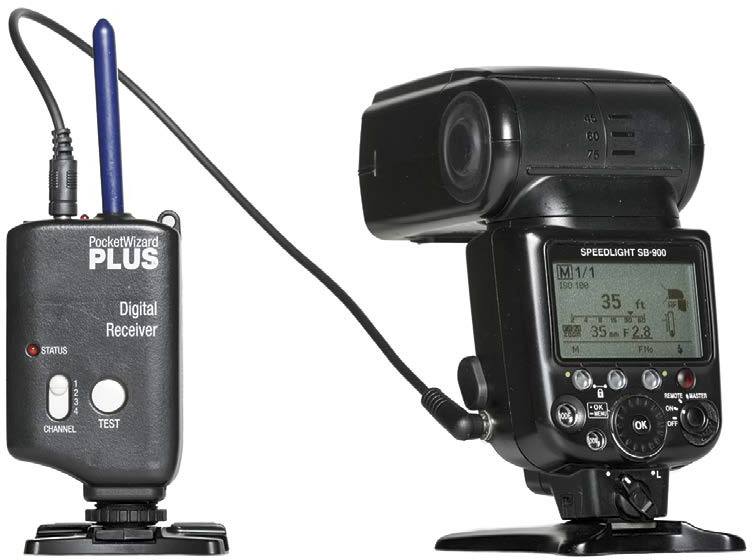
To use radio triggers, you need to put the transmitter on the camera using the camera’s hot shoe ( Figure 11.8 ) and then attach the receiver to the Speedlight using a PC sync cable for the Speedlights that have a PC port ( Figure 11.9 ). Only three Speedlights have PC ports: the SB-800, the SB-900, and the SB-910. If you want to use a PocketWizard trigger with a Speedlight that doesn’t have a PC port, you can use the HSFM3 trigger cable. This 3-foot cord has a hot shoe on one end and a mono miniphone connector on the other. This allows you to put any flash into the hot shoe and plug the miniphone connector into the PocketWizard receiver.
Figure 11.8 When you press the shutter release button, the PocketWizard transmitter in the camera’s hot shoe sends a signal to the receiver and triggers the flash.
Figure 11.9 The PocketWizard receiver unit attaches to the flash using a PC sync cord, allowing the flash to fire when it receives a signal from the transmitter.
The transmitter and the receiver both need to be set to the same channel. When you press the shutter release button, the transmitter sends a signal to the receiver firing the flash. When you use a radio trigger to fire the remote flashes, you no longer have the ability to use the High-Speed Sync and the shutter speed needs to be 1/250 or slower.
For this type of off-camera flash, you need to set the flash mode on the Speedlight to Manual and set the power to the desired output level. This type of triggering does not have any way to adjust the output of the remote flashes, and because the transmitter is mounted in the camera’s hot shoe, you can’t mount a flash on the camera to add any illumination to the scene. If you want to adjust the output of any of the remotes, you have to physically adjust the power on the individual flashes.
Some radio triggers work using TTL so that the output of the flash is controlled by the radio transmitter on the camera. For example, PocketWizard’s Flex TT5 and Mini TT1 system leverages the Nikon CLS idea but uses radio signals instead of line-of-sight triggering. This system allows for TTL metering and flash output control but over a greater range and without the line-of-sight limitations. For the system to work, you need a Flex TT5 for each of the Speedlights you want to control and either a Flex TT5 or the dedicated Mini TT1 as a transmitter. The downside to this system is the price: The Mini TT1 transmitter retails for approximately $200, and the Flex TT5 retails for $220. That means you need to spend at least $440, plus $220 per additional off-camera flash.
A third remote triggering alternative is using SU-4 mode, which is built into some Speedlights and turns them into optical remotes that are triggered by any flash. When you use SU-4 mode, the flash fires when it sees another flash fire. This is a basic optical slave mode and can be especially useful when combining line-of-sight triggering with radio triggers. SU-4 mode predates the Creative Lighting System, but it is still available in the SB-700, SB-800, SB-900, and SB-910.
The steps for setting your Speedlight to work in SU-4 mode depend on which model you are using.
1. Turn on the flash.
2. Press the MENU button.
3. Use the Selector dial on the back of the flash to navigate to the REMOTE setting.
4. Press the OK button.
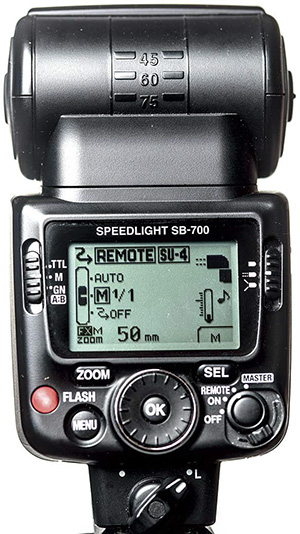
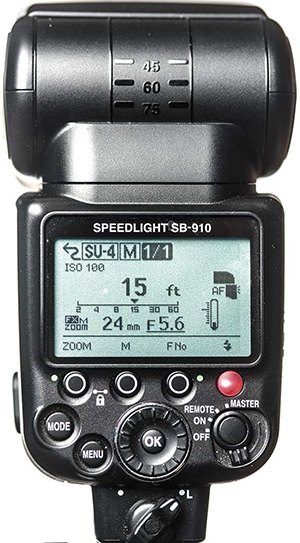
5. Use the Selector dial to highlight and select SU-4 ( Figure 11.10 ).
6. Press the OK button.
7. Press the MENU button to exit the menu system.
8. Press the button in the middle of the On/Off/Remote/Master switch and rotate the switch to Remote.
You will know that the flash is set the SU-4 mode because it will show SU-4 and REMOTE on the back of the flash ( Figure 11.11 ).
To set the SB-800 to SU-4 mode, follow these steps:
1. Turn on the flash.
2. Press and hold the SEL button for two seconds, and the menu system will open.
3. Press the Right arrow.
4. Press SEL button to select the mode menu.
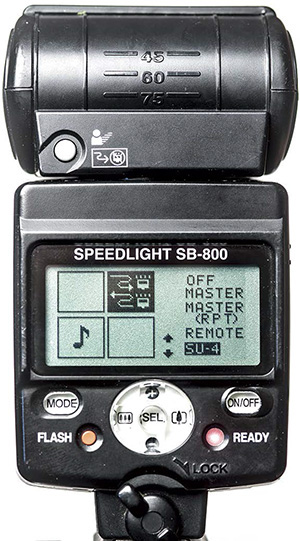
5. Press the – button until SU-4 is highlighted.
6. Press the SEL button to select the mode ( Figure 11.12 ).
7. Tap the power button to exit the menu.
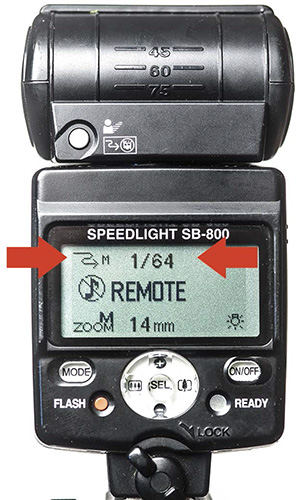
The back of the flash will say REMOTE ( Figure 11.13 ).
1. Turn on the flash.
2. Press the MENU button.
3. Use the Selector dial on the back of the flash to navigate to the WIRELESS setting.
4. Press the OK button.
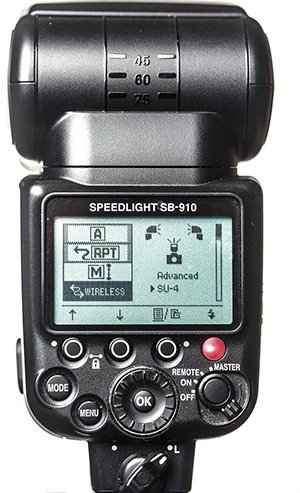
5. Use the Selector dial to select SU-4 ( Figure 11.14 ).
6. Press the OK button.
7. Press the MENU button to exit the menu system.
8. Press the button in the middle of the On/Off/Remote/Master switch and rotate the switch to Remote.
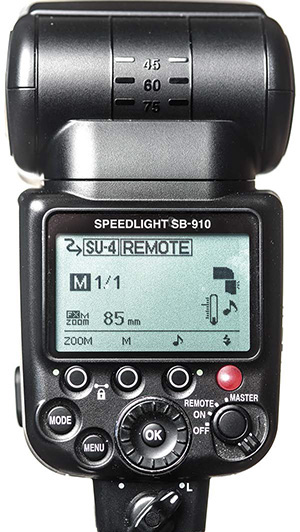
You will know that the flash is set the SU-4 mode because it will show SU-4 and REMOTE on the back of the flash ( Figure 11.15 ).
You can also set the SB-900 and SB-910 to act as a Commander in SU-4 mode if you want to trigger off-camera remotes that are set to SU-4 mode. To do this, just follow the previous directions, but instead of rotating the On/Off/Remote/Master switch to Remote, turn it all the way to Master. You will see that the LCD will show SU-4 mode and the mode the flash is set to; for instance, the SB-910 in Figure 11.16 is set to Manual.
Figure 11.16 When set to SU-4 Commander mode, the SB-910 LCD displays SU-4 and the mode across the top.
When a Speedlight is in SU-4 mode and set as a remote, you can use your choice of three flash modes.
Auto
: In this mode, the Commander flash controls the flash output. The remote starts to fire when the Commander does and stops when the Commander does. This mode can give you inconsistent results, especially when working with different flashes. I prefer to work in Manual mode, which gives much more control over the flash output.
Manual
: In this mode, you set the power of the flash, and as long as the flash has enough time to recycle, the output stays constant. The flash fires when it sees another flash fire.
Off
: This temporarily turns off the flash without having to power it all the way off. It’s useful when setting up the shot so that you can see what effect the individual Speedlight is having on the overall lighting. (Off mode is not available on the SB-800.)
On the SB-700, you set the mode by sliding the Mode switch on the back-left side of the flash. The TTL setting puts the flash in Auto mode, the Manual setting puts the flash in Manual mode, and the GN setting turns the flash output off. Figure 11.17 shows the back of the SB-700 and highlights the switch in relationship to the modes in relationship.
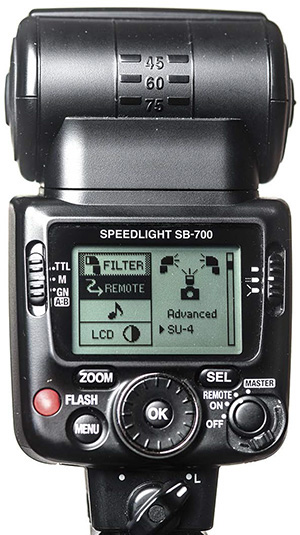
On the SB-800, you just press the MODE button to change between Manual and Auto mode. You can tell which mode the SB-800 is in by the small A or M next to the Wireless icon on the LCD, as shown in Figure 11.18 .
Figure 11.18 When the SB-800 is set to SU-4 mode, its LCD displays SU-4 and a small M along with the output setting.
On the SB-900 and SB-910, you change the mode by pressing the MODE button, which cycles through the three choices. You can also change the zoom of the flash head and the light pattern on the flash. When the SB-900 and SB-910 are in SU-4 mode and set to Master, then you can use them to trigger off-camera flashes set to SU-4 mode. There are three modes the Speedlight can use as a Commander: Manual, Auto-Aperture, and GN.
When you use SU-4 mode to trigger remote flashes, you do not have control of the remotes from the Commander unit. If you want to change their flash mode or power settings, you need to physically change them on the actual flash. You also need to make sure that none of the flashes fires a pre-flash because the pre-flash can trigger the remote flashes. This is extremely important and one of the main reasons for misfires when using SU-4 mode. The remote flash fires when it sees any flash of light; a pre-flash will set it off, and the flash will fire too early.
The easy fix for this is to make sure that the flash on the camera, the one that is triggering the SU-4 remote, is set to Manual mode, which does not fire any pre-flash at all. But the SU-4 remote doesn’t have to be triggered from the flash on the camera; it can be triggered by any flash that it sees, so it is also extremely important that none of the other flashes that are in range of and can be seen by the sensor fires a pre-flash of any type.
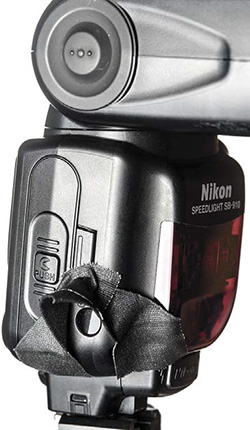
A second issue can prevent the remote flash from firing, especially when using it outdoors in sunlight. When the sensor on the remote flash is in direct sun, it might not see the flash from the Commander unit. The fix for this is easy; you just need to make a sunshade for the sensor window so that the sensor on the side of the flash is no longer in direct sunlight. A small piece of gaffer tape works great, as you can see in Figure 11.19 .
Figure 11.19 A small piece of tape shades the sensor so you use the flash in SU-4 mode outdoors in bright light.
The actual setup of the flashes is the same as if you are using SU-4 mode or AWL. You need to make sure that the sensors on the remote flashes can see the Commander flash. For me, the real power of SU-4 mode is when you combine it with radio triggers.
SU-4 mode allows you to mix flashes fired by radio triggers with those triggered by line of sight. Not only does this allow you to trigger Speedlights at a much greater distance and out of sight of the camera, but it also allows you to mix studio strobes and Speedlights.
When mixing radio-triggered flashes and line-of-sight flashes, use a radio transmitter on the camera to trigger the main lights and ensure the SU-4 Speedlights can see those main flashes fire so they are triggered by their flash of light. For this to work, the flashes need to be in SU-4 mode and the sensor on the side of the flash needs to face the light that is triggered by the radio trigger.
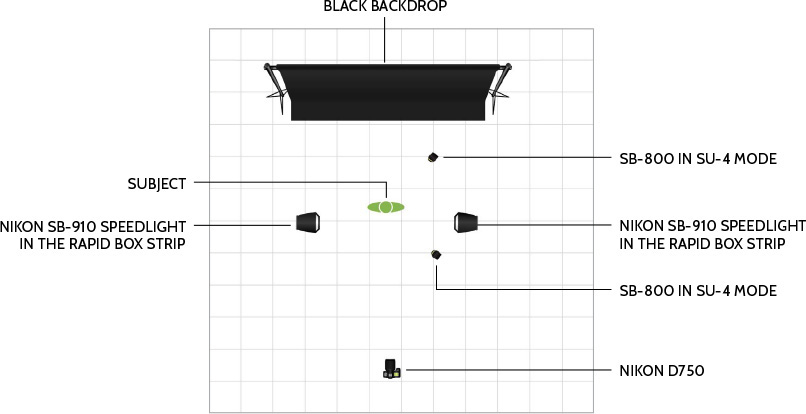
The easiest way to demonstrate how this all works together is to walk through an example using the PocketWizard system and some Speedlights set to SU-4 mode. Although I could just as easily have used studio strobes as the main lights, I set up two SB-910 Speedlights, each equipped with a PocketWizard PlusX receiver. A PocketWizard Plus Digital Transmitter on my Nikon D750 acts as the trigger, and all the PocketWizard units are set to channel 1 ( Figure 11.20 ). Both the SB-910 Speedlights are mounted in the Westcott Rapid Box Strips, and because I am not using AWL line-of-sight triggering, I do not have to worry whether the sensors are facing the camera.
Figure 11.20 The PocketWizard units are all set to channel 1 with the PlusX attached to the SB-910s and the Plus on the hot shoe of the camera. All the PocketWizard units must be set to the same channel for them to work, and because the Plus has only four channels, the choices are limited to those four when using this model.
Both the SB-910s are set to Manual flash mode with a 1/4 power setting and are set up to either side of the subject. These are the main lights that will illuminate the subject from either side.
There are going to be two SB-800s adding some hard light right on the feet from the front right and the rear right, and both are set in SU-4 mode so they will be triggered when the SB-910s fire. The SB-800s both have snoots on them to tightly control the spill of light, and both the SB-800s are set to Manual at 1/8 power. The lighting diagram for this is shown in Figure 11.21 and the final images in Figure 11.22 and 11.23 .
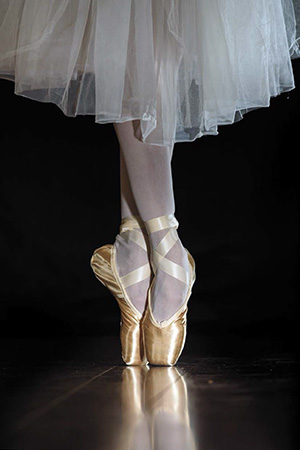
NIKON D750 ISO 400 1/250 SEC. F/5.6
Figure 11.22 The final shot was taken with a 300mm f/4 lens, which creates a tight crop. The low angle of the SB-800 Speedlights helps to create the great reflection off the floor and keep the focus right on the ballet slipper.
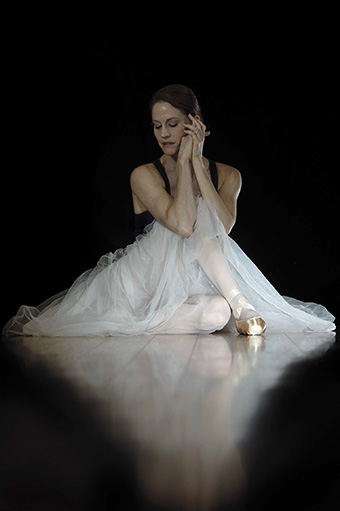
NIKON D750 ISO 400 1/250 SEC. F/5.6
Figure 11.23 Keeping the same camera and flash settings, I had Jennifer sit, and I lowered the two strip lights on either side for this image. Notice that the focus and bright lights are still right on the ballet slipper.
By combining the radio triggers with the SU-4 line-of sight mode, I was able to use four Speedlights to create the necessary lighting without having to have a radio trigger for each flash. On the downside, I was limited to a maximum shutter speed of 1/250 second, which might have given me problems if I was shooting during the daylight hours as I needed to reduce the ambient light as much as possible.
Off-camera Nikon Speedlights might not replace big studio strobes for every job, but they sure are versatile and at a much lower cost. You can trigger the Speedlights using wireless radio triggers, like you would studio strobes, or by turning on the optical slave SU-4 mode you can use the Speedlights along with the studio strobes. An often-overlooked function of the SB-700, SB-800, SB-900, and SB-910, SU-4 mode makes the Speedlights even more useful. Between Advanced Wireless Lighting and SU-4 mode, I have not come up with a lighting plan that I couldn’t execute using Speedlights.