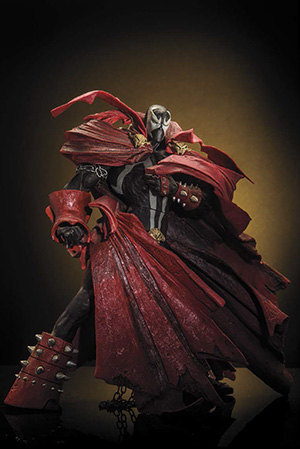
NIKON D4 ISO 100 1/250 SEC. F/4.5
Nikon Speedlights work really well when photographing products. They provide plenty of power, have a small footprint, are easily triggered off-camera, and have plenty of light modifiers to shape their light. All these factors make them ideally suited for photographing products of all sizes. I find it easier to set up a small product shoot with a couple of Speedlights than to set up studio strobes—and I get the same results. This chapter covers the basics of setting up and shooting products using small flashes.
When you shop in a brick-and-mortar store, you can look at the product you want to buy, considering its size, color, and texture in person. When you’re shopping on the Internet, you don’t have the luxury of being able to pick up the product. Instead, you base your decision to buy on a photograph. The product photographer’s role has never been more important: Your images need to be accurate representations of the product and, at the same time, make it look as appealing as possible to potential purchasers.
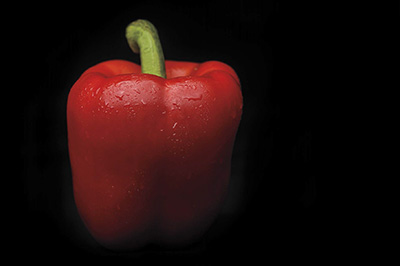
Photographing products can be more difficult than photographing people because lighting issues, color issues, and blemishes can be more difficult to fix in post-production. The lighting needs to be spot-on when the photo is taken. The person looking at the product photograph needs to know what the product will look like in person—not simply its shape and color but also whether it is opaque, translucent, textured, or smooth. The direction of the light and its hardness or softness all play roles in getting the best shot possible ( Figure 14.1 ).
NIKON D4 ISO 100 1/250 SEC. F/4.5
Figure 14.1 This simple bell pepper was photographed with a single off-camera SB-910 in a softbox. The light and shadows give the pepper its shape and show the texture.
Obviously, the right flash settings are important to your success. When shooting products, I generally use Manual flash mode to control the flash output, rather than TTL. Most of the time backgrounds for product shots are either all black or white, which can cause the TTL metering readings to either overexpose the image (when the background is black) or underexpose the image (when the background is white).
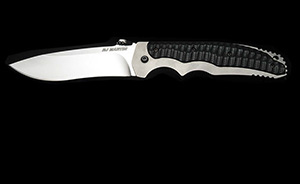
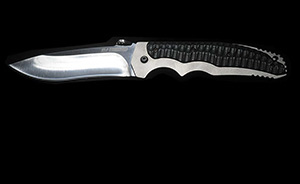
The basic lighting terms and placement are the same for products as they are for portraits: the main light, fill light, accent light, and background light. When photographing shiny products, you’ll find the use of bounced light or light modifiers like a softbox to be extremely important. When you photograph something metallic or just plain shiny, the light that illuminates the object bounces off the subject. That reflected light is what the camera records. Compare Figures 14.2 and 14.3 to see the difference between using a softbox to light a knife blade and aiming the flash directly at the reflective blade surface.
NIKON D4 ISO 100 1/250 SEC. F/14
Figure 14.2 Photographing a reflective object like a pocket knife with a softbox creates an even lighting and reflection.
NIKON D4 ISO 100 1/250 SEC. F/14
Figure 14.3 A bare flash creates a harder light that just doesn’t look good.
You can control how hard or soft the light will appear on the product by changing the distance between the light and the product. This is especially important when working on small objects because the smallest changes in the position of the light can have big effects.
The distance between the light and the subject can also have a huge effect on how much light hits the background. Remember the Inverse Square Law discussed in Chapter 1 : The amount of light falls off drastically over distance. The shorter the distance between the light and the subject, the faster the light falls off. When put into practice, this theory means you can control the look of your shot’s background. As you can see in Figures 14.4 and 14.5 , the distance of the light to the main subject can make a big difference in how the background is rendered. With the light close to the main subject, the light doesn’t reach the background, so it is rendered black. When the distance between the light and the subject is increased, however, more light reaches the background and what was black is now lighter.
NIKON D750 ISO 800 1/160 SEC. F/32
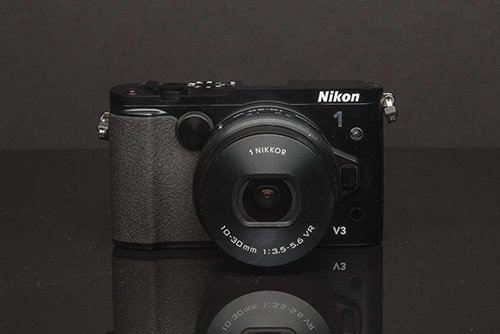
Figure 14.4 The single Speedlight in a softbox is close to the camera for this photo of the Nikon 1 V3 on a piece of black plastic. The background, a piece of black board, is rendered black as the light doesn’t reach it after illuminating the camera.
NIKON D750 ISO 800 1/160 SEC. F/32
Figure 14.5 Using the same setting as Figure 14.4 , I moved the light farther away. More light reached the background, which rendered the black as dark gray.
In addition, you can change how your background renders by moving it further away from the subject. If the light, camera, and subject are all in the same spot but the background is moved further away, less light will be able to reach it. This does three things:
 Allows for the background to be lit separately
Creates a blurred background because of the shallow depth of field
Creates a solid black background
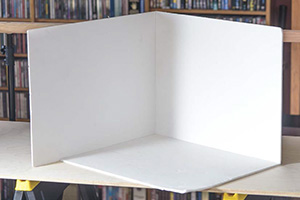
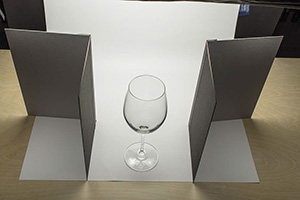
You can use just about any flat surface for product photography, and I have photographed a great many images set up on a small side table or even on my dining room table. A simple approach when lighting products is to use a soft light. This can be done in a few different ways, but the easiest is to use an open-sided box made from white foam-core board that bounces the light all around to create a soft light. You can see my box in Figure 14.6 . This method works great but doesn’t offer much control over the light. Although I still use the open box on occasion, I have come up with a more advanced setup for taking product photos.
Figure 14.6 This open box is great for bouncing the light around the object and creating soft lighting.
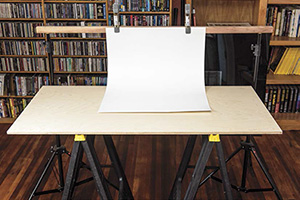
The setup I use most now consists of two plastic sawhorses that support a replaceable surface on which I can photograph the product. The replaceable surface means I can change the material used from foam core to plain plywood to reflective plastic or even to a translucent material, which enables me to light items from below much easier than when using a regular table. For the background, I use two light stands, but instead of the traditional metal background holder, I use a piece of wood that has two 3/4-inch holes drilled through it so it fits over the light-stand posts. Because the wood is square, it allows me to easily clamp different backdrop papers or cloth in place using standard clamps or Justin clamps if I need a light-up top. I can also just use pushpins to attach different backdrop papers to the wood. Figure 14.7 shows my setup with a white piece of paper as the backdrop.
Figure 14.7 My product photography workspace features a replaceable plywood surface on the two sawhorses and a white piece of paper hanging from the adjustable background setup.
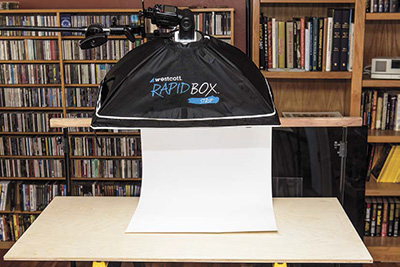
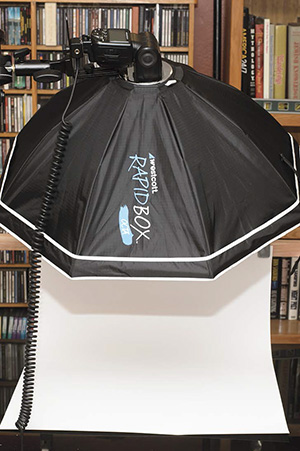
When photographing products, you will want to be able to place a light above the product work area so you can illuminate the product from above and angle the light to control how it falls on the background. You also need a way to position it there without the light stand being in the way, and for this I use either a boom or a century stand to hold the light out over the whole setup. Because I use small flashes and lightweight light-shaping tools, the century stand works great, allowing me to position the light exactly where I need it. I do make sure to put a sandbag over the legs of the stand to keep it from tipping or falling while I shoot. One of the advantages of using the Nikon CLS and Advanced Wireless Lighting is that once the flash is in place, you can change the flash mode and power without having to actually touch the unit. In Figure 14.8 you can see the SB-910 mounted in the Rapid Box Strip softbox placed over the surface of the work table. You need to make sure that the flash is set to Remote mode and that the sensor on the flash can see the pre-flash from the Commander.
Figure 14.8 The size and placement of your softbox depends on the size of the object being photographed. Here an SB-910 in a Rapid Box Strip is placed over the work area.
Whichever setup you prefer, make sure you can move around it freely so you can position lights and change the angle of both the lights and the product. I use the same light stands and light modifiers for products as I do for portraits, including the Rogue FlashBender line of modifiers, snoots, and grids, as well as the Westcott Rapid Box Octa and Strip lights.
Some of the most essential gear at a product shoot, however, is also the most low tech. Without a clothespin to prop up a sagging product or some glass cleaner to wipe away your fingerprints, your perfect lighting setup could go to waste. Here are a few accessories to have on hand that will make your product photography photos easier to light:
Clamps
: A variety of clamps enable you to attach background paper, hold flags in place, and generally allow you to place the lights and modifiers in perfect position. You can get these clamps at any decent home improvement store.
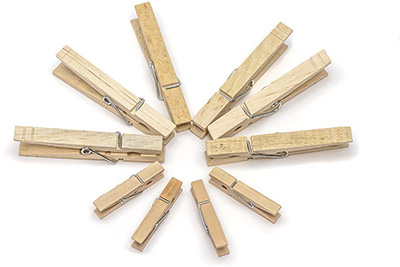
Clothespins
: Use these little clips to help prop up items and keep things from moving around during a shoot. Get a selection of clothespins in different sizes, as shown in
Figure 14.9
.
NIKON D4 ISO 800 1/30 SEC. F/5.6
Figure 14.9 Clothespins come in a variety of sizes, and I like to have a few larger and a few smaller on hand to help place small items.
Wood blocks
: While at the hardware store picking up some clamps and clothespins, grab a few pieces of wood at the same time. You can use these to prop up the item being photographed or to position small reflectors or flags.
Glass cleaner
: A small bottle of glass cleaner and a soft rag are vital and can be used to get rid of pesky fingerprints that can show up as you position the item. (For more detail on cleaning the items you’re going to shoot, see the section “Prepping Your Items
.”)
Cloth gloves
: These go along with the glass cleaner and rag. You need a way to move and reposition the item you are photographing without leaving marks, and a pair of cotton gloves works great.
HandiTAK
: This material is sticky and malleable, which allows you to mold it to support the item to be photographed. You can pick it up at many home improvement stores, including The Home Depot.
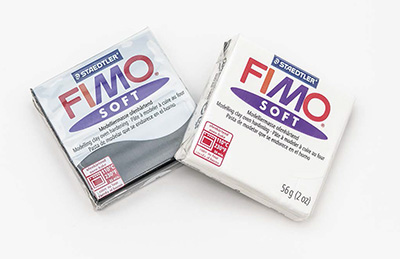
FIMO
: You can buy this modeling clay from most art supply stores and use it in the same way as the HandiTAK (
Figure 14.10
).
NIKON D4 ISO 800 1/30 SEC. F/5.6
Figure 14.10 Some small pieces of modeling clay can go a long way in positioning objects and helping with placement of small light-shaping tools.
Gaffer tape
: I love gaffer tape and consider it the photographer’s secret weapon. Gaffer tape is strong like duct tape, but it doesn’t leave behind any sticky residue. This makes it perfect for attaching things to surfaces where you want to leave no trace.
Artist tape
: You can use this tape to temporarily hold together papers and then remove it without damage. You can find it in an art supply stores.
Electrical tape
: Black electrical tape works really well for holding small items together. It doesn’t reflect a lot of light, which makes it ideal for use behind items.
Compressed air
: Use a can of compressed air to blow off any last bits of dust from the surface of the subject.
Small mirrors
: Nothing allows you to bounce the light around quite like a small mirror. You can find them at any hobby store in a variety of sizes and shapes.
Washers
: A selection of washers enables you to fine-tune the placement of the object. Need to raise it just a little? Use a washer or two. I have a large selection in a variety of sizes for just about any size object.
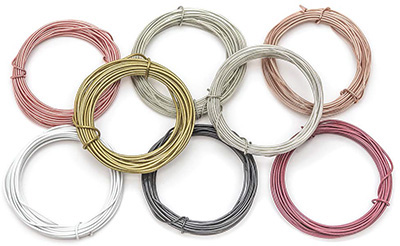
Wire
: Some pieces of wire can make positioning items much easier. You can find packs of 24-gauge wire in different colors at craft stores (
Figure 14.11
).
NIKON D4 ISO 800 1/30 SEC. F/5.6
Figure 14.11 Flexible and strong, lengths of wire help with hanging items or supporting them “invisibly.” The different colors are useful in hiding the wire from the camera and the viewer.
Paper and poster board
: With paper and poster board you can create small flags and reflectors. I have a variety of different colored papers and boards to use as backdrops and light-shaping tools, and the best part is that they last for a long time and don’t cost much.
Cloth pieces
: Going to the fabric store and picking up a few pieces of fabric can help when you want to shoot an item on a softer-looking surface. A piece of black felt can be a life-saver when you want a solid black background.
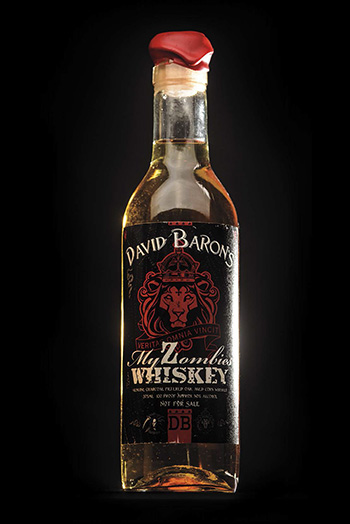
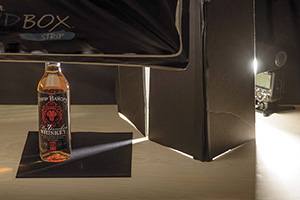
Controlling where the light hits and where it doesn’t is a little easier with product photography than when photographing people. For products, especially those that are smaller, you can create small flags and reflectors using poster board and tape. Just take two pieces of board and tape one edge together. Then you can place them where you need to either block the light or bounce the light. In Figure 14.12 , notice the hard line of light on the edge of the bottle. As you can see in Figure 14.13 , I created this by firing an SB-910 but blocking most of the light using a couple of pieces of black poster board.
NIKON D750 ISO 200 1/320 SEC. F/8
Figure 14.12 A good friend made some whiskey a few years ago. I still have a bottle, and while I might never drink it, it does make a great photo subject.
Figure 14.13 A couple of pieces of black poster board and black gaffer tape create a way to block out unwanted light. The large softbox adds the fill light, while the SB-910 adds the hard edge of light on the right side.
No matter how spotlessly clean you think the object you are about photograph is, your image will prove otherwise. Every fingerprint, every smudge, and every dust speck will become visible when the light hits it just right. You need to clean the items before shooting, and once they are in place, use cotton gloves to avoid leaving any other smudges.
Cleaning the items you want to photograph is pretty easy and shouldn’t take long. A little elbow grease and some cleaning supplies should get most items looking pretty good. The first step is to follow any cleaning directions on the item in question. Many products include cleaning and care directions in their user manuals. For everything else, some common sense and basic cleaning supplies can make your products look their best:
Glass
: Bottles, glasses, and anything else made of glass or porcelain needs to be spotless because the lights will pick up any fingerprints, dust, or dirt. You can use any of the commercial glass-cleaning products or just a combination of half water and half vinegar, but the real keys are the cloth used to wipe the glass clean and what you use to polish the glass after it’s clean. A soft, lint-free cloth works well, but so does newspaper, which doesn’t leave lint. The newspaper might leave ink on your hands, however, so either wear gloves or make sure you wash up after cleaning.
Toys
: You can usually clean plush toys in the washing machine; check the care label and follow the directions. For soft plastic and rubber toys, use liquid dish soap and warm water and then use a half-and-half solution of rubbing alcohol and water to disinfect them (
Figure 14.14
).
For hard plastic toys, such as Lego or Duplo blocks, put them in a delicates bag on the top rack of an otherwise empty dishwasher. Do not submerge any toys that have or take batteries; just wash the outside with some warm soapy water and air dry.
NIKON D750 ISO 200 1/200 SEC. F/8
Figure 14.14 Dust and smudges can be easily removed from plastic toys with a clean cloth and some compressed air.
Books
: Your best bet is to wipe the book with a lint-free cloth and take care not to damage any areas that are already frayed or damaged.
Jewelry needs to sparkle and shine to be attractive ( Figure 14.15 ). Fortunately, it’s not hard to get your jewelry looking great with just a few common household products:
Gold
: Mix two cups of warm water and a few drops of mild dishwashing liquid and then soak the jewelry for 15 minutes. Use a soft-bristle toothbrush to scrub off any stubborn dirt spots and then rinse the pieces in warm water and dry with a soft cloth.
Silver
: Rinse silver jewelry in warm water and dry with a clean cloth. If the silver is really tarnished, use a commercial silver-cleaning product, such as Goddard’s, and follow the directions. You do not want to brush or scrub silver because that can scratch it. For most jewelry, a silver-polishing cloth is perfect to give it a quick shine.
Pearls
: You need to be careful when cleaning strands of pearls because soaking them can damage the string that holds them together and cause the whole strand to stretch. Create a solution of two cups of warm water and a few drops of mild dishwashing liquid; then dampen a clean cloth and wipe each pearl individually. Let the whole strand air dry on a clean (lotion-free) tissue. Pearls themselves are fragile as well, so if you have a pearl in a ring or pendant, be sure to avoid ammonia and harsh detergents.
Diamonds
: Mix 1 cup of warm water with 1/4 cup of ammonia and soak the diamonds for 20 minutes or so. Use a clean, soft-bristle toothbrush to clean all the small areas around the diamond and between the diamonds and the settings. Rinse the piece with warm water and leave it to dry on a tissue.
Turquoise:
This is the easiest of the lot; just use some clean, warm water and a soft brush and then rinse again and air dry.
NIKON D4 ISO 400 1/60 SEC. F/9.0
Figure 14.15 Clean jewelry looks a lot better than dirty jewelry but is also a lot more reflective.
If the jewelry is extremely dirty, consider taking it to a jewelry store to be professionally cleaned. Many jewelry stores offer free cleaning and inspection of your pieces, which might be a good idea because it can also help you determine their true value. Ask for a ballpark price to see whether it is worth getting a full appraisal, which could cost around $100 per item.
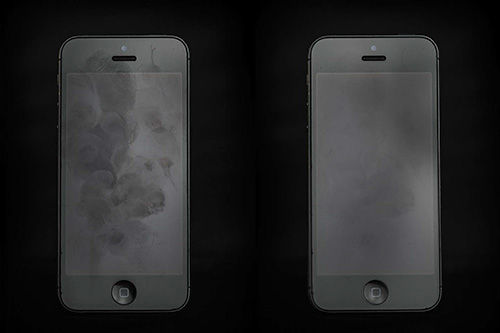
Photographing electronic devices can be difficult because they attract dust and fingerprints that seem to show up without anyone even touching the device. You need to make sure that the device and, most importantly, the screen are clean—really clean—to give the device that new, out-of-the-box look.
Here are some general rules for cleaning your electronic gear:
Make sure the item is unplugged from any power outlets.
Use only cleaners made specifically to clean electronic devices.
Spray any cleaner onto the cloth and then wipe off the device.
Use a lint-free, soft cloth to wipe the screen and body of the device.
Do not use paper towels to clean the device. They are actually abrasive and can scratch the device.
Do not spray any cleaners directly onto the device. Spray can easily seep into ports, vents, or openings and damage the device.
I have always been partial to the iKlear line for cleaning my Apple products and other electronic devices ( Figure 14.16 ). For a reasonable price, you can get an iKlear cleaning kit that includes the lint-free cloth and the cleaning solution specifically designed for different electronic devices.
NIKON D4 ISO 100 1/250 SEC. F/7.1
Figure 14.16 I am always amazed at how quickly my iPhone screen gets dirty. A quick rub with a lint-free cloth takes care of most of the smudges, and a little iKlear gets rid of the tougher dirt.
Using a can of compressed air can help get rid of dirt and dust ( Figure 14.17 ). Just be careful not to spray it inside the device and hold the can upright so air—not propellant—sprays out.
NIKON D4 ISO 200 1/250 SEC. F/16
Figure 14.17 Some items need a combination of cleaning techniques. For a photo of a camera, for example, you need to clean the plastic, rubber, metal, and glass. In this case, I used compressed air and a lint-free cloth to clean off the rubber and plastic and some lens cleaner to clean the glass.
As I mentioned previously, a pair of cotton gloves is a great investment when you’re photographing electronics. They allow you to pick up and position small items and electronics without leaving smudges and fingerprints. You can buy a pair of cotton gloves for less than $6 at your local pharmacy. Or, I like Dot Line’s eight-pack of white-cotton disposable gloves, which you can get from Amazon for less than $10. These are the same type of gloves I used back in the film days when handling negatives and slides.
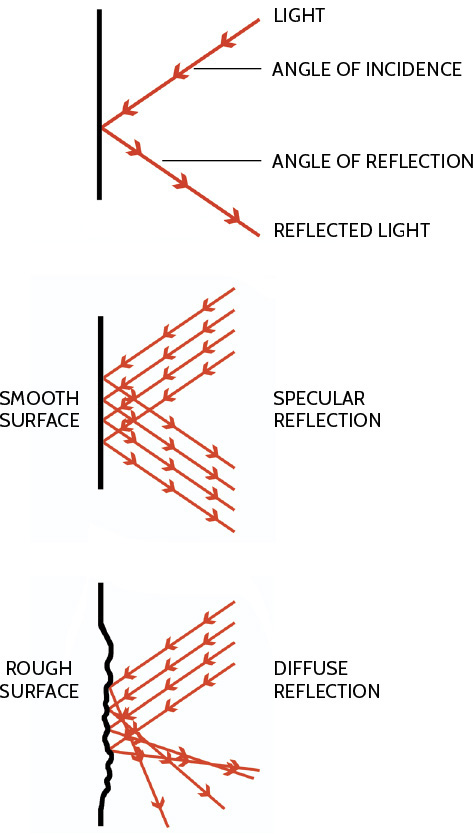
Light reflects off different surfaces in different ways. When you’re trying to light a product, remember that the light that reflects off of the object is what the camera actually records. The good thing is that light bounces in a predictable way so you can control the where it goes and how it looks. Once you know your angles and reflections, you can better understand the way light bounces ( Figure 14.18 ):
Angle of incidence
: This is the angle at which the light hits
the surface.
Angle of reflection
: This is the angle at which the light leaves
the surface.
Specular reflection
: When the angle of incidence and angle of reflection are the same, the resulting reflection is a specular reflection. This happens when you reflect the light off of a smooth shiny surface, such as a mirror, glass, smooth metal, flat water, or even smooth plastic.
Diffuse reflection
: When the light hits an object and that light reflects off in multiple directions because the surface isn’t smooth, that is a diffuse reflection. In these cases, the angle of incidence and the angle of reflection are not the same.
Figure 14.18 Light bounces off surfaces that it strikes. The texture of the surface affects how that light behaves.
Different surfaces create different reflections. Keep in mind that reflections are not inherently bad. They can help to define the shape of an object, for example, and because our brains know what reflects and what doesn’t, they can help viewers understand what they are looking at. The shape of the reflection in the object is dictated by the shape of light source. For example, a large softbox that covers the whole item will have no edges in the reflection. But if you use a small, square, white card to add some fill light, it can end up in the image as a bright, reflected square in the image. Consider how various surfaces reflect (or don’t):
Metal
: Metal reflects light in a specular manner, so you will want to use a big, soft light and carefully watch the placement of the lights and camera. If a small, hard light hits a metal surface, it will create a hard, small light as a reflection. Using a large bounced light or a diffuser between the light and object can really soften the reflection. A small, hard reflection isn’t inherently bad but can distract from the product.
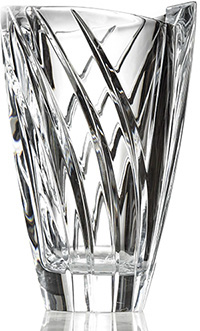
Glass
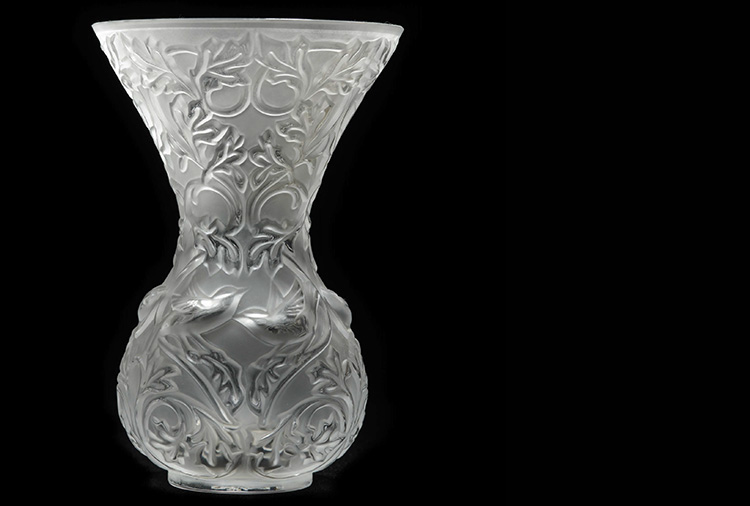
: Glass can be tricky to photograph because light passes through it and bounces off it at the same time, making it both reflective and transparent. Glass also comes in a variety of colors that can affect the color of the light that is reflected off it and the color of the light as it passes through the glass. In addition, glass reflects anything else in the environment, creating odd shadows and reflections that show up in the image (
Figure 14.19
). One thing you can do to minimize the reflections is to use pieces of white board to block out the unwanted shadows.
NIKON D750 ISO 100 1/250 SEC. F/11
Figure 14.19 A glass vase is a tough item to light because it is both reflective and translucent. One Speedlight is aimed at the background making it pure white, while the other is in a softbox overhead. Notice that items in the room where the photo was taken are causing odd reflections in the sides of the vase.
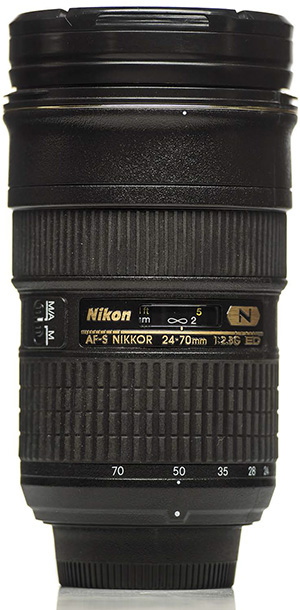
Plastic
: How reflective plastic is depends on its finish and the texture. Plastic can be highly reflective, if it is shiny, all the way to only slightly reflective, if it has matte finish (
Figure 14.20
). The reflection will also depend on how textured the surface is. A smooth surface is more reflective than a heavily textured surface.
NIKON D750 ISO 100 1/250 SEC. F/11
Figure 14.20 This is not a Nikkor lens, but instead it is a plastic coffee mug. You can see how the light is only slightly reflecting off the textured surface.
Cloth
: Cloth is not reflective at all unless it contains metal thread or some other reflective element. There are some materials that have a sheen that can reflect light, like satin, and others that suck up light, like black felt.
Paper
: Paper can be reflective or nonreflective, depending on the texture and the color (more on colors shortly). Some papers, like the high-gloss photo papers, reflect a lot of light, while matte papers tend to reflect only a little light. The more texture a paper has, the less light it will reflect.
The best way to deal with the different surfaces is to adjust the angle of the lights. If you see the light bouncing off the object, try moving the camera, the object, or the light just a little. Remember that when working in close quarters, a little movement goes a long way.
The surface color of items can cause them to be more reflective or less reflective. White, silver, gold, and any of the metallic surfaces tend to be more reflective than black, red, blue, and green, for example.
Colors other than black and white tend to reflect some of the light, but more importantly, they will change the color of the reflected light. This is neither positive or negative, but just a fact that you have deal with and decide whether the color cast adds or subtracts from the final image.
The color of the surface that you place your products on is important, as well. White will reflect light, so a white surface essentially adds a second light source (a large bounced light) below and around the product. Using black paper creates a more matte finish from which the light does not bounce back up. At times, I will take it a step further and use a paper with a rich black suede texture (which you can find at any craft store). Because this paper has a rough, textured surface, the light does not bounce back, and when combined with the black color, you get almost no reflection at all. The same little figure photographed on the black suede paper and the red suede paper is shown in Figure 14.21 . You can see how the light doesn’t reflect back up from these textured surfaces.
NIKON D750 ISO 100 1/250 SEC. F/6.3
Figure 14.21 I photographed the same little statue on black and red suede paper. This paper has a rough texture that light just doesn’t reflect off of, making it great for product photography.
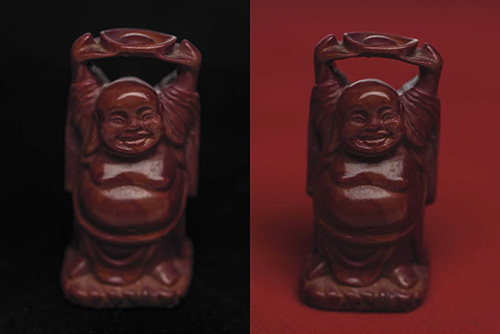
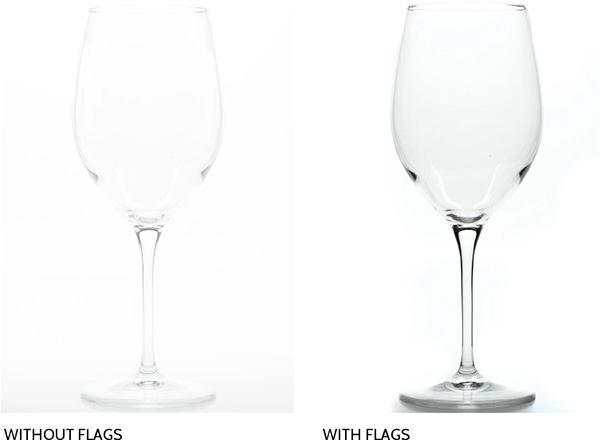
Any item that goes between the light and the object being photographed is called a gobo , and if that item blocks all the light, it is usually called a flag . As I have mentioned before, I use pieces of black poster board or black foam board as flags when shooting products because black absorbs the light. These flags can block any ambient light from entering the scene and help control the spill of the light being used to illuminate the object. This is especially important when photographing glass or metal, both of which reflect everything including the surroundings. I use white poster board or white foam board to act as small bounce cards because white will reflect the light. Because I like to be frugal, I have started making flags and bounce cards out of material that is white on one side and black on the other so that the same item can be used in two different ways ( Figure 14.22 ).
Figure 14.22 I made a bounce card and flag combination using board that is black on one side and white on the other and a strip of black gaffer tape.
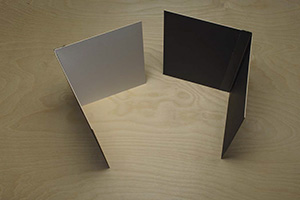
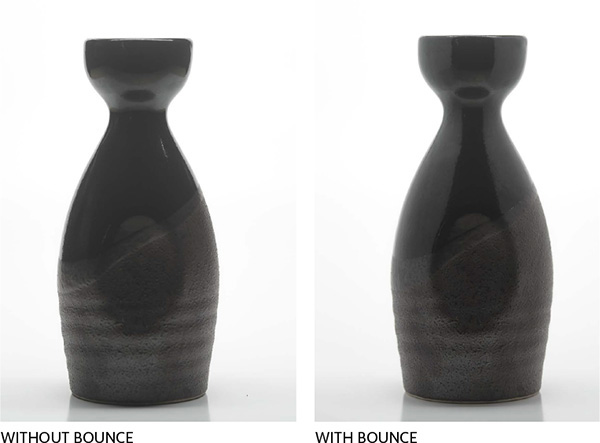
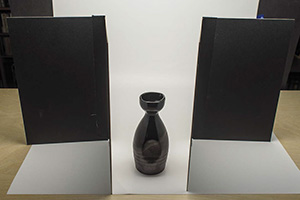
These small pieces of card can make a big difference when lighting your products. Figures 14.23 through 14.26 all show the same items, first photographed without a bounce card or flag and then with the modifier in place.
NIKON D750 ISO 200 1/250 SEC. F/6.3
Figure 14.23 The white bounce cards add some shape to the saké bottle.
Figure 14.24 This behind-the-scenes shot shows the bounce cards in place for Figure 14.23 .
NIKON D750 ISO 200 1/250 SEC. F/6.3
Figure 14.25 A glass can be tricky to photograph because the light goes right through it. Using a flag on either side allows the glass to reflect the black boards in the side of the glass and give it a clear shape.
Figure 14.26 This behind-the-scenes shot shows the flags in place for Figure 14.25 .
Lots of times product photography means working with smaller items. The smaller the item, however, the more precise you have to be with the light and camera placement. The smallest change in the light can produce really big changes in the image.
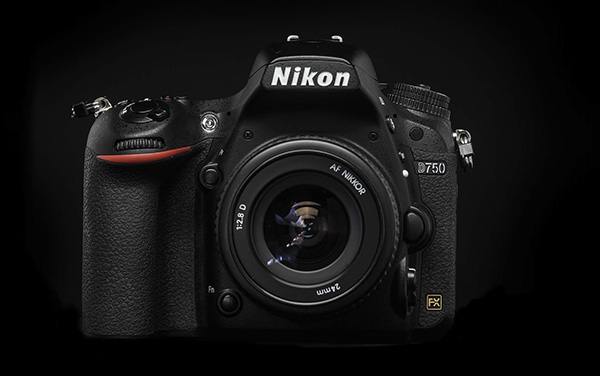
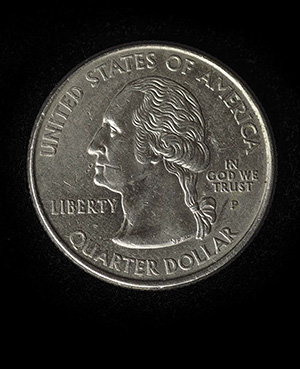
All lenses have a minimum focusing distance that dictates how close you can use them to the subject you are photographing. For example, the 70–200mm f/2.8 has a minimum focusing distance of 4.6 feet, which means you have to be at least 4.6 feet away from the subject for the lens to focus. When you need to get in really close, using a lens that has a small minimum focusing distance is important. Lenses that are used for macro work are perfect for this. For example, the 105mm f/2.8 Micro-Nikkor lens has a minimum focusing distance of 1 foot. That allows you to fill the frame with even the smallest subject. For example, the photo of the coin in Figure 14.27 is the full frame right out of the camera, with no cropping at all. The image was lit with a single SB-800 in a softbox over the coin and triggered by an SU-800 on the camera.
NIKON D750 ISO 100 1/160 SEC. F/11
Figure 14.27 A 105mm Micro-Nikkor lens allowed me to fill the frame with the coin, capturing all the minute details.
A macro lens makes it possible to capture all the details while photographing items like jewelry. For the photo of the diamond in Figure 14.28 , I used a macro lens and a single softbox with an SB-910 placed directly overhead set to group A and triggered using the SU-800 on the camera. I used the Manual setting for group A and set the power to 1/8 power. The placement of the light allowed me to move the camera until I got the reflection just right on the surface of the gem.
NIKON D750 ISO 320 1/250 SEC. F/18
Figure 14.28 A 105mm macro lens enabled me to get in close to this diamond.
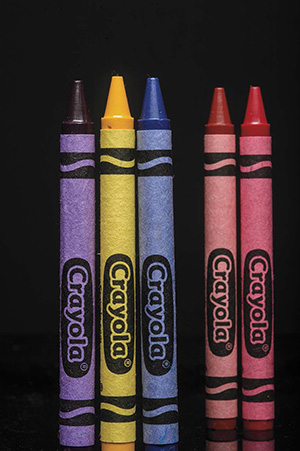
When you photograph using a macro lens close to your subject, you have to pay close attention to the depth of field. The depth of field is affected by the distance between the front of the lens and the object being photographed. What this means in practical terms is that you need to use a smaller aperture, which creates a deeper depth of field but allows less light to reach the sensor. This means either that you have to increase the power of the flash, add another flash, increase the ISO, or slow the shutter speed.
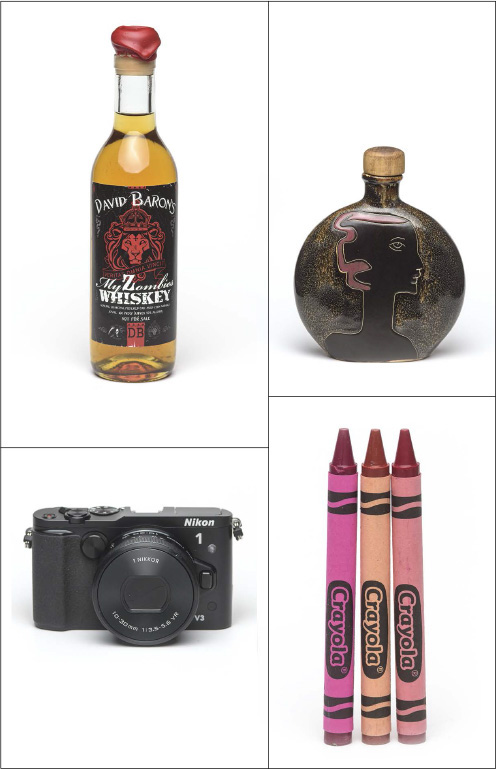
To illustrate this, I placed some simple crayons on a black piece of plastic with a single softbox over and slightly in front of the crayons. Three of the crayons are just 1 inch ahead of the other two. In Figure 14.29 I used an aperture of f/5.0, and as you can see, the two crayons just an inch behind the others are blurred and out of focus. I was able to use 1/32 power on the single flash in the softbox.
NIKON D4 ISO 320 1/250 SEC. F/5.0
Figure 14.29 I created this shallow depth of field by using an aperture of f/5.0 and positioning the subject extremely close to the front of the lens.
To get all the crayons in focus, I used an aperture of f/32 to create a deep depth of field. Because of this small aperture, I needed to drastically increase the amount of light. In this case, I used full power of 1/1 to get enough light to create the proper exposure shown in Figure 14.30 .
NIKON D4 ISO 320 1/250 SEC. F/32
Figure 14.30 Photographing these five crayons with a deep depth of field so that they are all in focus needs a lot of light. I used an aperture of f/32 and full 1/1 power on the flash.
The Nikon Close-Up Kit allows you to place the SB-R200 units right at the end of the lens. You can use this in conjunction with other Speedlights to add a little extra light right where you want it and still keep the basic overall lighting the same. The kit works by attaching the Speedlights to a ring that mounts on the front of the lens and lets them move along with the lens as you adjust the composition.
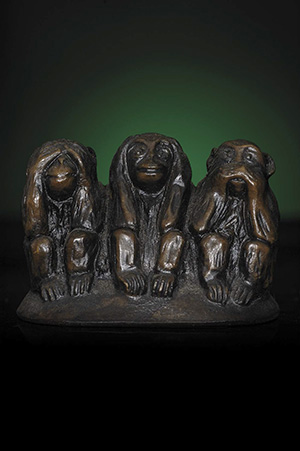
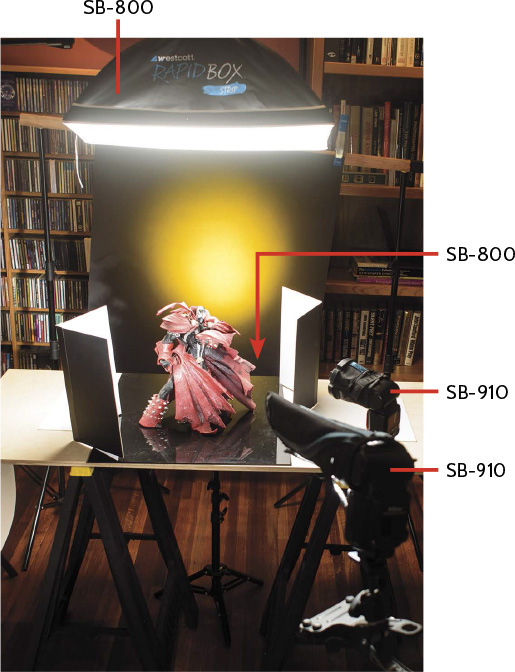
The SB-R200 units can also be used as small accent lights off of the mounting ring. This combination of small size and ability to be used right near the end of the flash make them perfect for photographing products. For Figure 14.31 , I used the SB-R200 units mounted on the front of the lens to add some fill light to the small statue. This shot was taken using the AWL features of the CLS. The main light was a single SB-900 in a softbox placed over the work surface and set to group A. I created the green background by placing an SB-700 with a Rogue Grid and green gel behind and below the work surface and setting it to group B. Finally, I mounted two SB-R200 units on the front of my 105mm lens and set them to group C. An SU-800 triggered all the lights with group A set to Manual 1/32 power, group B set to Manual 1/16 power, and group C set to Manual 1/64 power.
NIKON D4 ISO 200 1/250 SEC. F/13
Figure 14.31 This is one of the small statues that I have in my office. To light the image, I used a single softbox overhead and a couple of SB-R200 units right on the end of the lens. The background was lit separately with an SB-700.
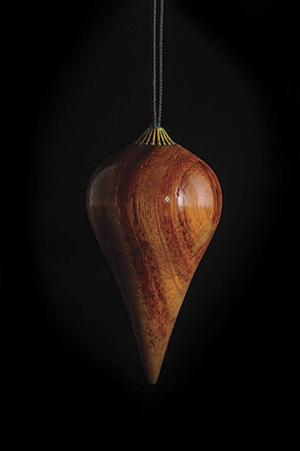
Using just one of the SB-R200 units attached to the front of the lens allowed me to light only one side of the pendulum in Figure 14.32 (on the previous page ). To make the light softer, I used a small white card to bounce the light. Because the SB-R200 can be used only as a remote, I used an SB-910 as a Commander to trigger it.
NIKON D750 ISO 200 1/250 SEC. F/18
Figure 14.32 I photographed this small wood pendulum using a single SB-R200 off to camera right.
Lighting for product photography can be a lot of fun—no models to worry about and the only time you need to rush is when food or drink is about to spoil. I have spent quite a few pages talking about the issues that you can have when photographing products; now it is time to discuss some strategies in making the products look their best. We’ll start with just one light and then move on to some more complicated setups involving two or more lights.
You don’t need more than one light to take some great product photos, but you do need to get that Speedlight off the camera. The best solution to using one light for product photography is to get that light into a softbox and positioned above the product. I am a fan of the Westcott Rapid Box line of diffusers for portrait photography, and they work just as well for product photography. The general idea is to use a big, soft light, and just about everything will look good. Just because you have only one Speedlight doesn’t mean you have only one light source. You can add some bounce cards or reflectors and make that light do double or triple duty. Use a couple of pieces of black poster board to flag the light, and you can create some pretty stunning photos.
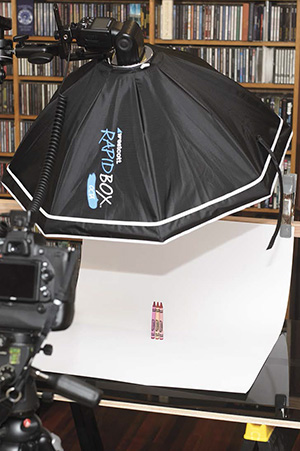
All the items in Figure 14.33 were shot under the same light. It was one softbox positioned above and in front of the product using a century stand. You don’t even have to use the wireless capability of the CLS; I fired the flash using a TTL cord.
NIKON D750 ISO 200 1/200 SEC. F/6.3
Figure 14.33 A single softbox and a piece of white paper are all you need to create a great product photo. Each of these items was shot in the same setup with slight adjustments to the angle of the light.
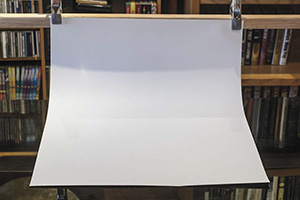
For Figure 14.33 ’s series of shots, I clamped a plain piece of white paper to the wood beam in the back to act as a seamless background ( Figure 14.34 ); then I placed a single SB-910 in a softbox and positioned it above and in front of the product ( Figure 14.35 ). I locked the camera down in a tripod and ran the TTL cord from the camera to the flash ( Figure 14.36 ).
Figure 14.34 A plain piece of white paper attached with clamps to the wood bar behind the work space serves as a backdrop.
Figure 14.35 A TTL allowed me to fire the flash (an SB-910 in a Westcott Rapid Box) without using the AWL functions of the CLS.
Figure 14.36 The product sits on the white paper, and the camera is connected to the flash using the TTL cord.
Alternately, you could use this setup with AWL, a Commander, and a remote, but if you have only one Speedlight, then this is the way to go. Set the Speedlight to Manual flash mode, the power to 1/8, and the camera to Manual mode, and then use these settings as a starting point: 1/200 second, f/6.3, and ISO 200. All that’s left is to adjust the placement of the object and light and then fine-tune the position of the camera to create the best composition. For example, in Figure 14.37 I positioned a single pepper on the background, with the help of some tape and wire to hold it in place.
NIKON D750 ISO 200 1/320 SEC. F/8
Figure 14.37 A difficult part of this simple image of a pepper is getting the pepper to stand up. As you can see from the insert, a little wire and white tape were useful.
You can easily change to look of the items and the whole tone and feel of the image just by changing the color of the paper background. For Figure 14.38 , I changed the background from white to black and adjusted the height and angle of the camera.
NIKON D750 ISO 200 1/320 SEC. F/8
Figure 14.38 The drill and gloves photographed against a black background using the same settings as when shooting against the white background.
At this point, I am just using a single SB-910 in a softbox, but that doesn’t mean I can’t add more light sources without adding any more actual lights. A couple of pieces of white poster board can act as small fill lights. Using the same settings as used in Figure 14.38 , I placed a piece of white board over on the right side of the drill to add some light to the back of the drill. You can see the results in Figure 14.39 and the board in Figure 14.40 .
NIKON D750 ISO 200 1/320 SEC. F/8
Figure 14.39 Adding a little fill light can help with some subtle additions to the lighting. I wanted the shadows to be opened up a little on the back end of the drill to give it more shape.
Figure 14.40 You can see the white board that is being used to add some light to the back of the drill—nothing fancy, just some white poster board.
With two Speedlights at your disposal, you can light your product and background independently, which opens up a lot of creative options. One of the main reasons that I use the table with the background stand option is the ability to place a light between the product and the background. I can then use this light to light the background or backlight the product. In Figure 14.41 , the bottle is still lit by the single SB-910 in the softbox, but I added a second SB-910 in a small light stand placed between the bottle and the background with a Rogue Grid and red gel. The flashes are fired using an SU-800 with the single SB-910 in the softbox set to channel 1 and group A and the Speedlight in the rear set to channel 1 and group B. Both flashes were set to Manual power with group A at 1/16 power and group B at 1/32 power. You can see the placement of the group B flash in Figure 14.42 .
NIKON D750 ISO 200 1/320 SEC. F/8
Figure 14.41 The bottle is lit with the single softbox, while the background is lit with a second flash using a grid and red gel to keep the light tight.
The second light allows you to separate the product from the background in much the same way as you can when photographing people. The big difference with products is that you usually have a lot less space to work with. Small adjustments when lighting a small product can have big changes in the way the light interacts with the subject. When you set up a light to illuminate the background, try moving it forward and back in small increments until it looks the way you want.
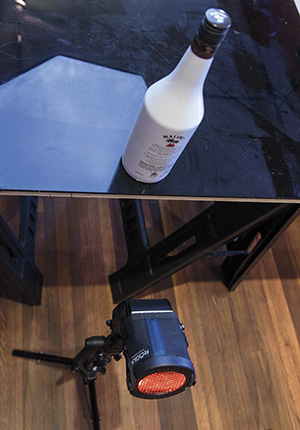
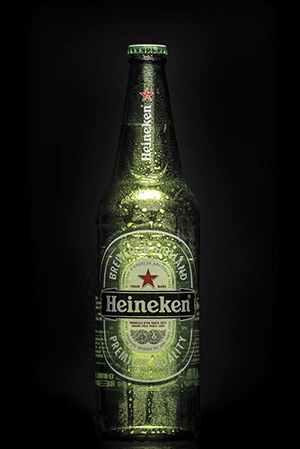
A second Speedlight is also useful when photographing a bottle with liquid in it, such as a bottle of beer. You can blast the light through the bottle right at the camera, creating a glow as the light bounces around while traveling through the liquid ( Figure 14.43 ). The two flashes were fired using an SU-800 with the single SB-910 in the softbox set to channel 1, group A and the SB-700 Speedlight in the rear set to channel 1, group B. Both flashes were set to Manual power with group A at 1/16 power and group B at 1/64 power.
NIKON D750 ISO 200 1/320 SEC. F/8
Figure 14.43 The bottle was lit by a two speed lights, one in the softbox in front and one aimed through the bottle back at the camera.
With multiple flashes you can add more controllable accent lights to your image. For example, you can start with the same basic setup with a softbox up front as the main light and a single gelled Speedlight for the background and then add another light or two for some accent light.
The basic setup is to have the main light as group A, the accent lights as group B, and the background light as group C. I have all three set to Manual power and am using an on-camera SU-800 as the Commander unit. For example, Figures 14.44 and 14.45 use four Speedlights and two reflectors.
NIKON D750 ISO 200 1/250 SEC. F/16
Figure 14.44 The figure is lit by four Speedlights: The main light is overhead placed slightly behind the subject, the background is gelled yellow, and two accent lights add some light to the details in the front. One of the accent lights has a snoot to keep the light tight on the front, and a second light with a grid is aimed at the face.
Figure 14.45 The main light is an SB-800 in the Rapid Box Strip with another SB-800 as the background light and two SB-910s as the accent lights.
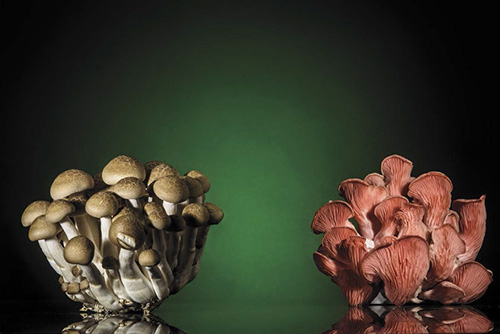
Using multiple lights allows you to light multiple items at the same time. This can be a little more tricky because the illumination used on one item can spill over and affect the illumination on another item. Using flags can help, but I have found that grids and snoots can better keep the light under control. For Figure 14.46 , the two exotic mushrooms were placed next to each other but were lit by separate lights. I positioned a single overhead light in a softbox above the setup (group A) and placed a single Speedlight with a green gel in the back (group C). Positioned on each side, the two additional Speedlights (group B), one for each of the mushrooms, had small Rogue FlashBenders as snoots keeping their light tight on their respective mushrooms. As you can see from the shadows, the light from the left doesn’t reach the mushroom on the right, and the light on the right doesn’t reach the mushroom on the left.
NIKON D750 ISO 200 1/250 SEC. F/22
Figure 14.46 These two exotic mushrooms are lit using four Speedlights: one for the overhead light, one for the background, and one for the details on each of the mushrooms. I used small snoot to keep the sidelights tight and on target.
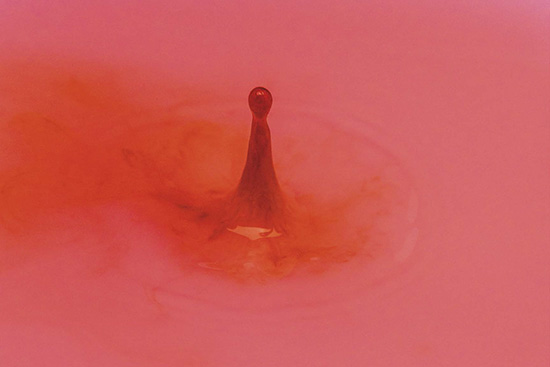
Working with water and other liquids in product photography can create stunning images, and although it can make a huge mess, it’s a lot of fun. The basic idea is to freeze the splash of water as it happens. This could be water being poured into a glass, an ice cube splashing into a drink, or as simple as a drop of water frozen at the moment it lands in a pool of water mixed with milk ( Figure 14.47 ).
NIKON D750 ISO 800 1/2000 SEC. F/7.1
Figure 14.47 The drop of water is frozen in the second that it lands. Using an eyedropper and some red food coloring made for a more interesting shot.
There are two ways to freeze the action. The first is to use the short burst of light produced by the flash, and the second is to use a faster—really fast—shutter speed. It is much easier to use a fast shutter speed to freeze the action, and with Nikon’s CLS you can sync the flash at fast shutter speeds, up to 1/8000 of a second. Not all the cameras in the Nikon system have the High-Speed Sync feature, and many of the cameras go to only 1/4000 of second as the fastest shutter speed. If you cannot sync at a shutter speed higher than 1/200 second, you need to use the flash on a low-power setting. The flash power is based on the length of time of the flash burst: The longer the burst, the more light. If you want to freeze something, you need to use a shorter burst of light.
Pouring a liquid from one container into another is a great subject to photograph. For Figure 14.48 , I used a fast shutter speed to freeze the action of the liquid landing in the glass. This was shot with two Speedlights: The first light is the main light in a softbox over the action, and the second is to turn the background a solid white.
NIKON D4 ISO 1600 1/1250 SEC. F/9
Figure 14.48 Water pouring into a wine glass is a simple idea and a lot of fun to photograph even with the mess it makes.
Instead of using a shutter speed of 1/1260 as for Figure 14.48 , I froze the action in Figure 14.49 by using a lower flash power, which has a short duration. To do this, I needed to use a higher ISO and wide aperture. For this shot, I used a flash power of 1/32, an ISO of 1/6400, a shutter speed of 1/200, and an aperture of f/4.0 to get the exposure I wanted and for the water to look frozen. I prefer to use the higher shutter speed that the Nikon system allows with the High-Speed Sync, but not all the cameras support that function.
NIKON D750 ISO 6400 1/200 SEC. F/4.0
Figure 14.49 The pour is frozen by the short burst of light instead of the high shutter speed.
If you look through magazines, you will see a lot of examples of splash photography in the advertisements for drinks. Nothing looks quite as refreshing as a couple of ice cubes landing in a fresh drink. This might look like it is really difficult to do, but actually it can be accomplished with a single Speedlight and some patience. For Figure 14.50 , I filled a glass with some water, colored slightly with yellow food dye, and then proceeded to drop an ice cube into the drink from above and pressed the shutter release button as the ice cube hit the water. Again, using a fast shutter speed and the ability of Nikon’s CLS to sync at high shutter speeds allowed me to freeze the splash. The lighting consisted of a single SB-800 in a softbox overhead and an SB-800 behind and below the glass with a blue gel to light up the background. The light was placed close to the background and angled upward to give the gradient effect to the light.
NIKON D4 ISO 800 1/2000 SEC. F/5
Figure 14.50 As the ice cubes splashed down into the glass of liquid, the 1/2000 shutter speed froze the splash.
The lighting for photographing objects isn’t that much different than for photographing people. It is actually beneficial for portrait photography to learn how to light inanimate objects because you can take you time and adjust the lights without the subject getting tired or impatient. You also don’t have to worry about messing up, and you can keep working on it until it is just right.
Experimenting with product photos can expand your understanding of light and how it interacts with a subject. If you are stuck in a rut, experiment with some product photography. Plenty of great subjects are probably waiting in your own home.