The creative possibilities blossom when you move your flash off the camera. Not only can you change the direction of the light relative to the camera, you can also change the composition of your image without affecting the lighting. To demonstrate, this chapter revisits the subjects from Chapter 15 , but this time I used a single off-camera flash in Remote mode for the portraits. Although the techniques that follow use only a single flash as lighting, depending on which camera and Speedlight you are using, you might actually need two flash units, one as the light source and the other as the controller on the camera. For the images in this chapter, I used either the SU-800 or another Speedlight in Commander mode to trigger the remote flash. Because I used only one Speedlight off the camera, I kept it set as a remote in group A, using channel 1.
For the portrait of Jennifer at her Pilates studio, I wanted a really soft light on her. To get the biggest possible light on Jennifer, I used a large umbrella, which turns a small Speedlight into a big, softer light. The downside to using an umbrella instead of a softbox is that the light is not as controllable. The light blasts out of the flash into the umbrella, bounces all around, and comes blasting back out in all directions.
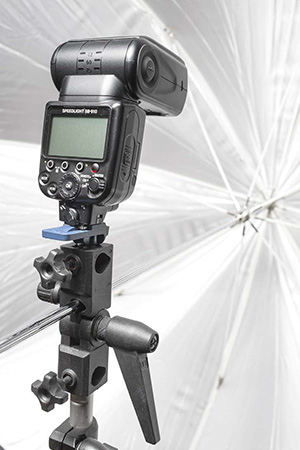
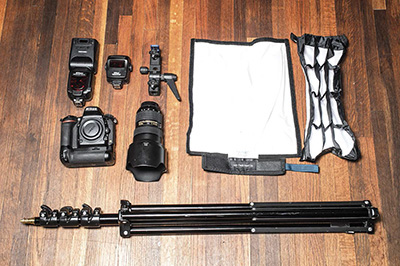
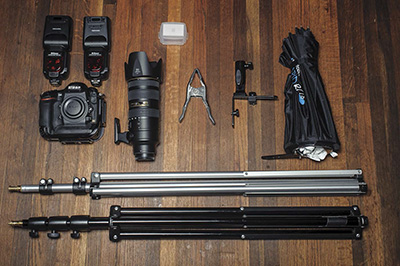
The equipment for this shoot was basic: a single camera and lens and one off-camera SB-910 Speedlight with the SU-800 Commander to trigger it ( Figure 16.1 ). To create the soft light, I decided to use a large umbrella, which needed a light stand and bracket to hold it. The umbrella I chose had a black removable cover, enabling it to serve as a shoot-through light modifier or a bounced light modifier. I chose to use it as a bounced light modifier, aiming the flash into the umbrella so the light was then bounced back at the subject. This gave me slightly more control over the spill of the light. Here’s the entire gear list:
 Nikon D750 DSLR
: You can use any camera for this type of shot.
Nikon D750 DSLR
: You can use any camera for this type of shot.
24–70mm f/2
.8 Nikkor lens
: The focal length range of this lens allowed me to capture the scene as I wanted. I could have used a longer lens but would have had to back up farther away from the subject, and there wasn’t a lot of space to work.
Nikon SB-910 Speedlight
: The SB-910 gave me enough to power to really light up the whole scene, but any of the Speedlights that support Remote mode would have worked.
Nikon SU-800 Commander unit
: I needed a way to trigger the SB-910 from the camera, and the SU-800 is built for that task. Any Speedlight that can act as a Commander could be used or even the built-in flash, if your camera supports that function.
Umbrella
: An umbrella is a great way to create a soft light from a small flash. The umbrella that I used here was a convertible version, meaning it could be used with its cover in place to bounce the light out of the umbrella or as a shoot-through umbrella with the cover off. I used the Westcott 60-inch optical white satin umbrella without its black, removable cover for this shoot.
Light stand
: A light stand was needed to hold the umbrella and flash in place.
Flash bracket/umbrella holder
: This is the device that goes between the light stand and flash that the umbrella is attached to. It allows for the light to be angled up or down as needed.
Frio universal locking cold shoe
: This little wonder goes on the flash bracket and holds the flash in place. It works great, and I know that the flash isn’t going to fall out or come loose.
Background stand kit
: Creating a studio on location requires a way to hang the backdrop, and these kits (like the Westcott Background Support System) are made for that exact purpose. The kit consists of two heavy-duty light stands and four metal rods. The rods combine to make a heavy-duty crossbeam that the backdrops hangs on.
Cloth background
: For this set of photos, I used a gray mottled cloth backdrop. You can get just about any color or pattern imaginable.
Figure 16.1 The gear for this shoot was simple: a camera, lens, and flash. The big addition here over the gear used for Chapter 15 ’s “Dancer ” portrait was the SU-800, which allows the SB-910 to be used remotely.
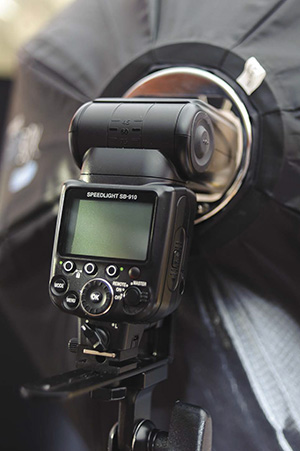
The concept behind this image was to create a large, soft light to illuminate Jennifer. For this, I placed the Speedlight and umbrella on a light stand off to the camera’s right. The SB-910 was placed in the Frio cold shoe and aimed into the umbrella ( Figure 16.2 ) so that the light bounced out of the umbrella and onto the subject. For shots like this, be sure that the remote sensor on the Speedlight can see the signal from the SU-800 on the camera.
Figure 16.2 Here the SB-910 is mounted in the Frio cold shoe and placed on the light stand. I attached the umbrella by sliding the shaft into the hole and then tightening the locking screw.
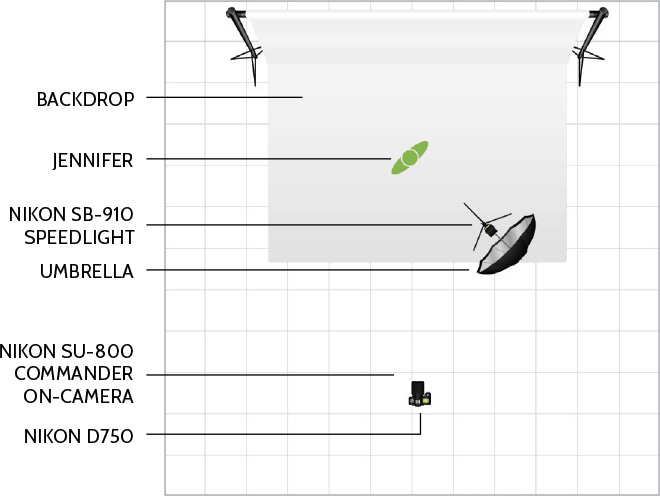
I next positioned the light in front of Jennifer and aimed it by pointing the shaft of the umbrella that comes out of the umbrella holder where I wanted the light to go. When using this technique, don’t worry about absolute accuracy, because the light will spread out and go everywhere. You can see the basic setup in Figures 16.3 and 16.4 . The light is up high and off to the side with Jennifer looking up to the light.
NIKON D750 ISO 320 1/80 SEC. F/2.8
Figure 16.3 The SB-910 is inside the umbrella and aimed back so that the light bounces out of the umbrella. The single Speedlight produces a pleasing soft light.
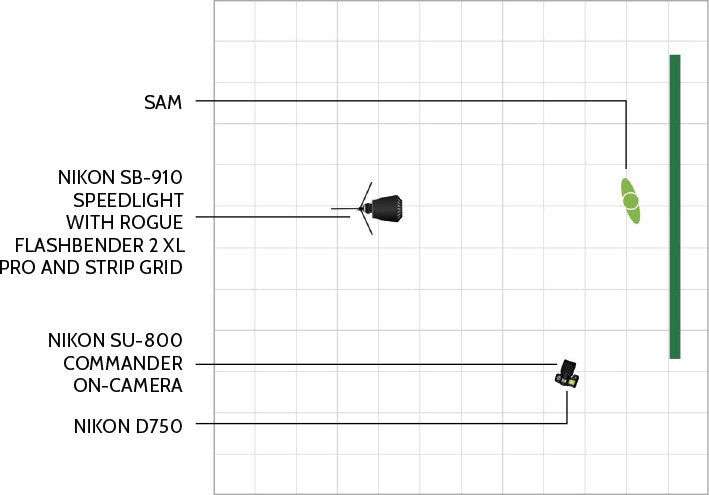
Figure 16.4 The lighting diagram for this image shows the placement of the light, subject, and backdrop.
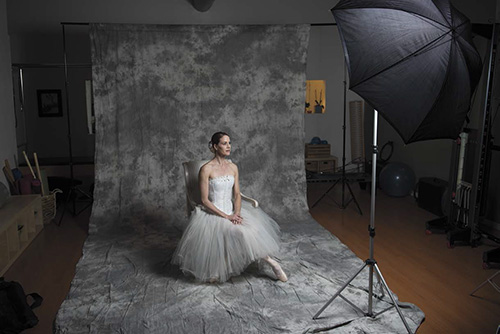
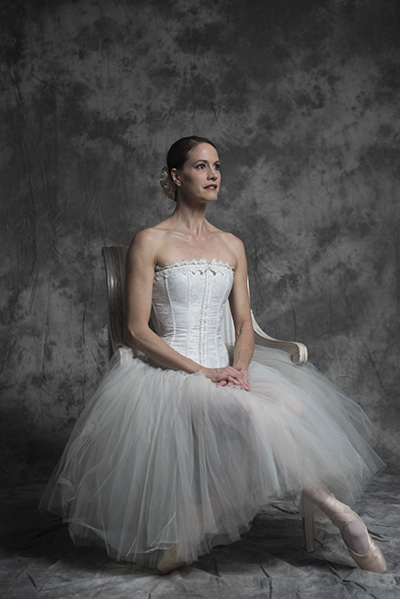
For the final image, I set the SB-910 to Remote mode using channel 1 and group A and triggered it from the camera using the SU-800 Commander. The flash mode was set to TTL, and the power was increased by +1. I set the camera to Manual mode with a 1/80-second shutter speed, an f/2.8 aperture, and an ISO of 320. I did not have to worry about freezing the action, so a slower shutter speed was perfectly fine. The shallow depth of field created by the aperture of f/2.8 still wasn’t enough to blur out the backdrop because the distance between the backdrop and the subject was small ( Figure 16.5 ).
NIKON D750 ISO 320 1/80 SEC. F/2.8
Figure 16.5 The soft light is perfect for a photograph of a ballerina, and because the flash wasn’t on the camera, I could move around and change the composition without affecting the position of the light.
Getting the flash off the camera allowed me more flexibility in the cramped dugout. I still lit Sam from the front, but I was able to change my shooting position, which changed the whole composition of the image.
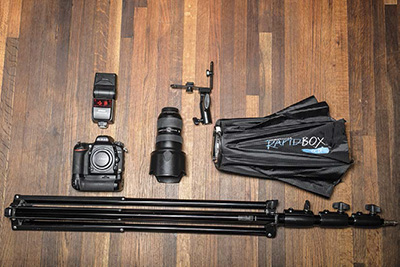
The equipment for this shoot was nearly identical to what I used for the “Dancer ” portrait, with the exception of the light modifier. For this shoot, I used the new Rogue FlashBender 2 XL Pro Lighting System instead of the large umbrella. As you’ll see, that small change in gear changed the whole look of the image. Here is the complete list for this shoot ( Figure 16.6 ):
Nikon D750 DSLR
: You can use any camera for this type of shot.
24–70mm f/2
.8 Nikkor lens
: I wanted to use a wider angle here to get more of the surrounding area in the photo. The 24–70mm focal length range was ideal.
Nikon SB-910 Speedlight
: I chose the SB-910, but for this type of shot you could use any Speedlight that supports Remote mode. Because of the size of the light modifier, however, I would stick with the SB-600, SB-700, SB-800, or SB-900/910 and avoid the smaller SB-500, because it will have issues connecting to the FlashBender 2 XL Pro.
Nikon SU-800 Commander unit
: I needed a way to trigger the SB-910 from the camera, and the SU-800 is built for that task. Alternately, you could use any Speedlight or built-in flash that can act as a Commander.
Rogue FlashBender 2 XL Pro Lighting System
: This is the largest FlashBender that Rogue makes, and when used with the strip grid, it produces a larger light that is still well controlled. Unlike an umbrella, the light does not spill out all over the place but is kept contained by the grid.
Light Stand
: A light stand held the flash and light modifier in place.
Flash bracket/umbrella holder
: This is the device that goes between the light stand and flash. It allows for the light to be angled up or down as needed, and for this shot I used it without the umbrella.
Frio universal locking cold shoe
: This little wonder goes on the flash bracket and holds the flash in place. It works great, and I know that the flash isn’t going to fall out or come loose.
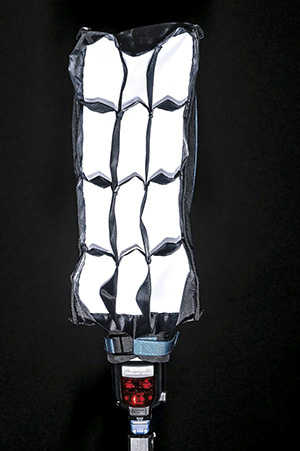
This was the first time I had used the Rogue FlashBender 2 XL Pro Lighting System on a shoot. This large light modifier needs to go over a Speedlight that is pointed straight up ( Figure 16.7 ); then you can add the included strip grid over the front of the modifier ( Figure 16.8 ) to control the spill of the light.
Figure 16.7 The Rogue FlashBender 2 XL Pro Lighting System attaches to the SB-910 Speedlight and vertically creates a large reflective surface.
Figure 16.8 Attaching the strip grid to the FlashBender 2 XL Pro gives you more control over the light spill.
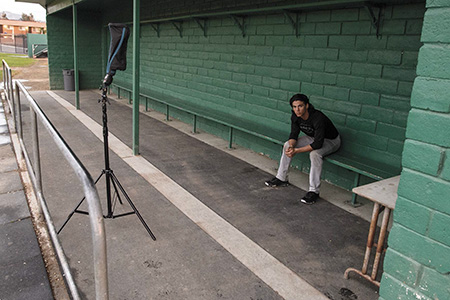
For this version of the Dugout portrait, I mounted the SB-910 on the light stand using the flash bracket and the Frio cold shoe. Next, I attached the FlashBender 2 XL Pro and the strip grid to the flash. Figures 16.9 and 16.10 illustrate the position of the light and Sam.
Figure 16.9 I positioned the single Speedlight with the Rogue FlashBender 2 XL Pro Lighting System positioned in front of the dugout.
I positioned the whole setup in front of Sam to start. After a few test shots and adjusting the position of the light, I found the setup I wanted. The next step was to dial in the exposure.
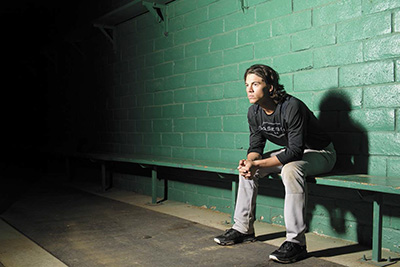
With the camera set to Manual mode with 1/200-second shutter speed, an aperture of f/6.3, and an ISO of 400, I set the flash mode for the remote SB-910 to TTL using the SU-800 on the camera. The TTL mode allowed the flash to adjust the flash power automatically depending on the camera settings and the light meter reading. This resulted in an image that was well exposed but too bright for what I wanted, as you can see in Figure 16.11 .
NIKON D4 ISO 800 1/60 SEC. F/5.6
Figure 16.11 Photographing Sam in the dugout with the flash set on TTL created a properly exposed image, but it was too bright for my liking.
The last step was to reduce the output of the flash to get the exposure that I wanted, not what the flash thought was correct.
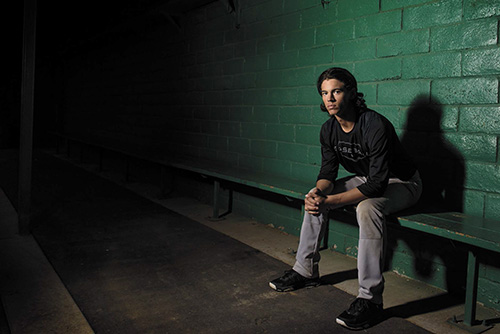
I captured Figure 16.12 , the final image, with the SB-910 set to Remote mode, channel 1, and group A. I triggered the Speedlight from the camera using the SU-800 with the flash mode set to TTL and the power set to –1. This gave me the proper exposure with the camera set to ISO 400, f/6.3, and 1/200 second.
NIKON D750 ISO 400 1/200 SEC. F/6.3
Figure 16.12 With the flash power controlled from the SU-800, I was able to adjust the power of the flash from the camera to fine-tune the exposure without having to move. For this final image, I had Sam look over to the camera.
For Chapter 15 ’s photograph of kids playing, I used a gold reflector to bounce some light from the on-camera flash into the scene. This time, by taking the Speedlight off the camera, I was able to light the scene and then move around unencumbered so I could focus on the kids instead of on where the light was. My goal for this photo was to have a single light set up that would illuminate the entire scene, allowing me to concentrate on the kids and wait for the right moment to take the photo.
The minimal amount of gear I used for this shot was on purpose; I didn’t want to spend too much time setting up lots of stands, lights, and modifiers. I have found that when working with kids, the faster you set everything up, the more photos you can actually take. Using the built-in flash on the Nikon D750 meant that I needed only one Speedlight and one set of batteries. Here is the gear that I used for these photos:
Nikon D750 DSLR
: I used the Nikon D750 because it has the ability to use the built-in flash as a Commander for the off-camera Speedlights.
24–70mm f/2
.8 Nikkor lens
: The distances in the room dictated that I needed a wider-angle lens.
Nikon SB-600 Speedlight
: I chose the SB-600 because it can be used as a remote and can be triggered by the built-in flash on the D750.
Wescott Rapid Box
: This softbox is sturdy, is easy to set up, and comes with all the hardware needed to mount the flash into the modifier.
Light stand
: I needed a way to position the softbox, and a good light stand was the way to go.
Figure 16.13 illustrates how little gear was actually used for this photo.
Figure 16.13 I needed only one flash for this shot because I could use the built-in flash on the D750 to trigger the SB-600 Speedlight.
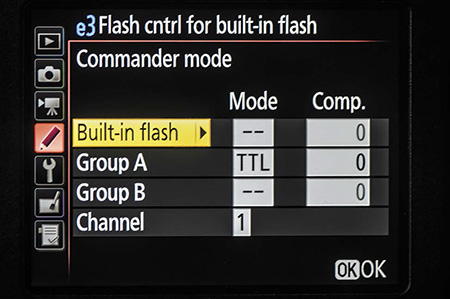
For a shot like this, your first step is to set up the built-in flash as the Commander used to trigger the off-camera flash. Use the menu system on the camera, a D750 in my case, to set the flash to Commander mode, and from there you can set the mode and power of the remote flash. I set the Remote SB-600 Speedlight to channel 1 and group A so that it was the only flash firing. Figure 16.14 shows that the settings that trigger the remote flash in TTL mode will not fire the built-in flash.
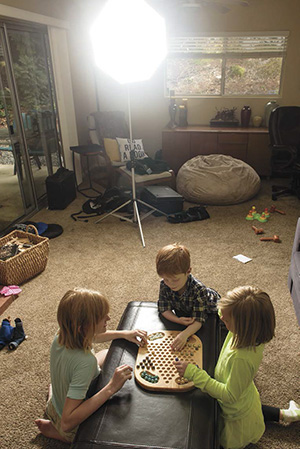
After I placed the SB-600 in the Westcott Rapid Box, I positioned the flash at the far end of the room as high up as possible and aimed slightly downward to make the light look more natural. Although it wasn’t as soft as it would have been if the light was closer, it did produce a more even lighting on the different faces. You can see the position of the light in Figure 16.15 and the lighting diagram for the setup in Figure 16.16 .
NIKON D4 ISO 200 1/250 SEC. F/8
Figure 16.15 The SB-600 was set up off-camera in the softbox and placed quite far away from the kids playing. You can see that the softbox was placed high up and angled slightly down to mimic the natural direction of sunlight.
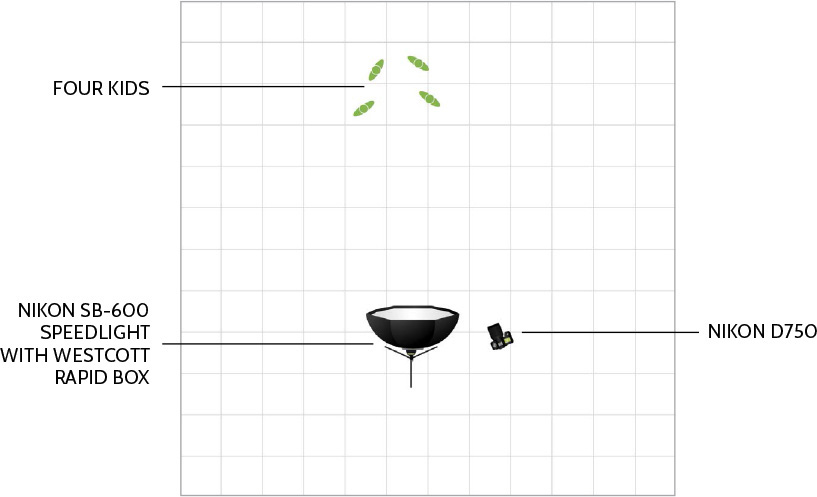
Figure 16.16 The position of the single light across from the subjects shows how little gear was actually used for this image.
The session started with three kids playing, but along the way to the final shot, they were joined by another playmate. To be clear, this was not a posed group shot, instead just a moment captured in time. Once the light is set up and working for this kind of shot, you can just sit and wait until the moment is right. For Figure 16.17 , I waited until Noah turned to the camera and then took the photo. The one technical aspect to pay attention to when using the built-in flash to trigger an external, remote Speedlight is that the remote flash needs to see the built-in flash. Make sure you’re positioned where the camera isn’t too far forward of the remote Speedlight.
NIKON D750 ISO 400 1/125 SEC. F/10
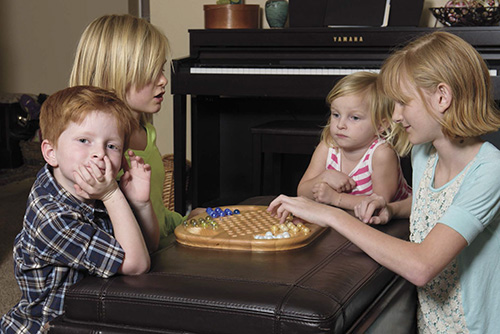
Figure 16.17 With the light setup and in position, all you now have to do is wait until you get the expression you want.
In the previous chapter, I photographed Cody with a single flash on the camera using a white poster board to bounce the light. With the flash removed from the camera, I was able to use a softbox as a small flash modifier, which gave me more control over the light.
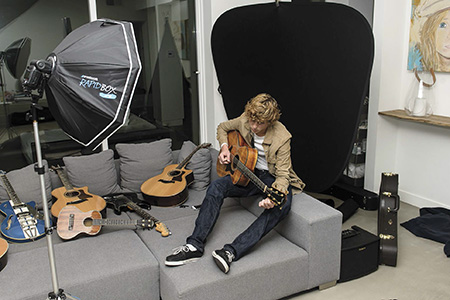
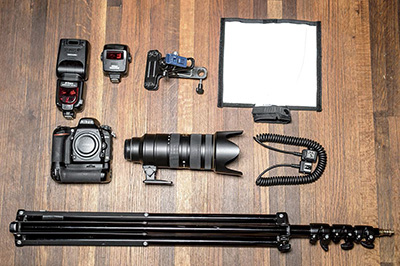
The main piece of equipment for this shoot is the Westcott Rapid Box Octa light modifier. This softbox is easy to use and produces a really great light. As a bonus, it isn’t expensive. Figure 16.18 shows the gear for this shoot, and here’s the list:
Nikon D4 DSLR
: You can use any of the Nikon DSLRs for this type of shoot. Because the D4 does not have a built-in flash, I needed a second flash to trigger the remote Speedlight.
70–200mm f/2
.8 Nikkor lens
: The longer focal lengths compress the background allowing me to zoom in tight and keep the background black using the portable backdrop. I prefer to shoot at the longer focal lengths, but often there isn’t enough space because you need at least 4.6 feet between the subject and the front of the lens.
Two Nikon SB-910 Speedlights
: I used one flash in Remote mode to light up the scene, while the other was the Commander to trigger it. If you have a camera that allows the pop-up flash to trigger the remote, you do not need the second Speedlight.
Nikon SB-910 Diffusion Dome SW-13H
: Adding the diffusion dome to the flash that goes into the softbox helped to diffuse the light even more.
Westcott Rapid Box Octa
: This softbox is designed for use with small a flash and does a great job. It comes with a flash holder that enables you to tilt it, so you don’t need any additional hardware.
Light stands
: The softbox needed to be positioned on a light stand, and a second light stand held the background. When choosing a light stand, make sure to get one that is sturdy enough to hold both your flash and any modifiers you might use.
Clamp
: I used a basic clamp to attach the background to a light stand so that it didn’t fall over. (I usually just lean it up against a wall.)
Black portable backdrop
: This portable backdrop is white on one side and black on the other. It works wonders as a backdrop or as a big flag to block out other light sources.
Figure 16.18 This shoot needed two Speedlights, one as the remote flash and one as the Commander unit, because the D4 doesn’t have a built-in flash to trigger the off-camera flash.
The Westcott Rapid Box comes with the hardware that allows the flash to be mounted so that the flash goes in the back of the softbox. With the diffusion dome on the flash, the fit can be tight, but careful positioning of the flash will make it fit. You can see the flash attached to the softbox in Figure 16.19 .
Figure 16.19 Here the SB-910 is mounted in the Westcott Rapid Box Octa. You can see the fit is pretty tight with the diffusion dome in place, but it will fit.
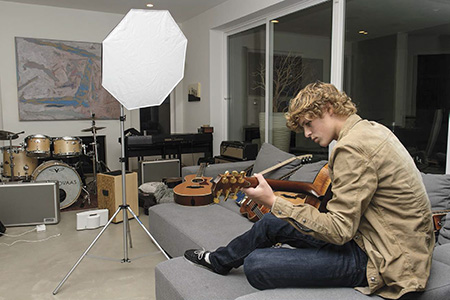
The setup for this shot was similar to the image in Chapter 15 . Instead of having Cody on the floor in front of the couch, however, I asked him to sit on the couch and aimed the softbox at him from across the room. The tighter composition resulting from the 70–200mm focal lengths allowed me to use the backdrop behind Cody to create a clean, black background. I clamped the backdrop to a second light stand to keep it from falling over. The distance between Cody and the background was great enough that the light didn’t lighten the black background.
Figure 16.20 shows the position of both the softbox and the background. To get a better idea of the position of the softbox in relation to Cody, see Figure 16.21 .
You can see that the wall is actually a series of glass doors that would reflect the light from the flash if the light was not controlled. If, for example, I used an umbrella, the light would also bounce off the window creating unwanted light on the subject. Using the softbox gave me more control over the spill of light.
The lighting diagram ( Figure 16.22 ) for the photos shows that the softbox is actually aimed a little to the left of Cody, allowing for some shadows on the right side of the frame, as you will see in the final images.
Figure 16.22 In the lighting diagram for this image, notice the position of the softbox. Remember, you need to position yourself where the flash on the camera can be seen by the flash in the softbox.
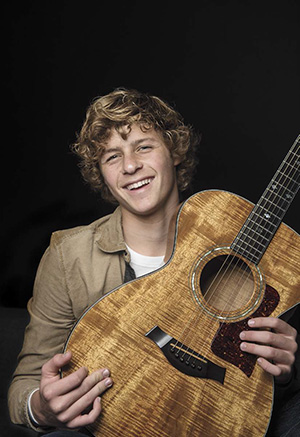
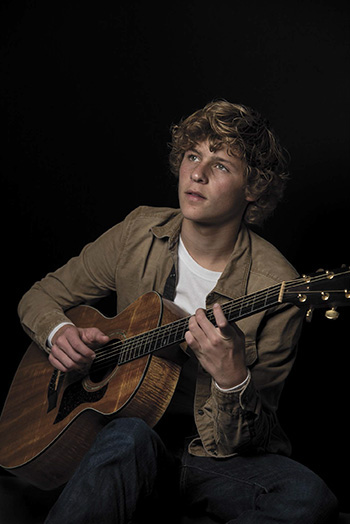
The first SB-910 was set to Remote mode and mounted in the Westcott Rapid Box, and the second SB-910 was set to Commander mode and mounted on the camera. I set both of the Speedlights to channel 1 and the remote to group A. For the camera’s settings, I chose Manual mode, 1/250 second, f/5.6, and ISO 100. These settings rendered the background a pure black and gave me enough of a depth of field to make sure that Cody and his guitar were both in focus. The SB-910 that acted as the Commander set the Flash mode for group A to Manual and the power at 1/8. This resulted in Figure 16.23 , which still looked a little bright to me, so I adjusted the power of the flash down to 1/16, which resulted in Figure 16.24 . The power of the Nikon CLS system is that you can change the power of the flash from the camera without having to actually touch the flash.
NIKON D4 ISO 100 1/250 SEC. F/5.6
Figure 16.23 A tight portrait of Cody with his Taylor guitar used light from a single SB-910 in a softbox.
NIKON D4 ISO 100 1/250 SEC. F/5.6
Figure 16.24 Using the same settings as the previous image but with a slightly lower flash power created a slightly moodier image.
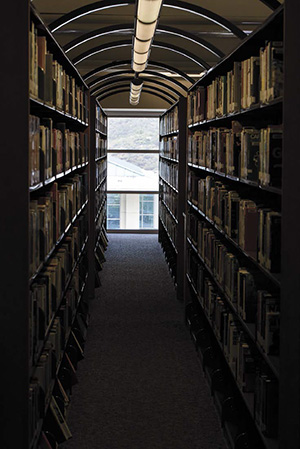
Photographing a librarian between rows of books, also known as the library stacks, is a lot more fun when you can position a remote flash. The idea for this photo was to hide the light between the books so that the light is coming out from where the librarian is looking. The most difficult part of this photo was to position the Commander unit in a way that the remote flash could see it.
The equipment for this shot was similar to the list for Chapter 15 ’s librarian portrait with the addition of the SU-800 and the Justin clamp:
Nikon D750 DSLR
: Any of the Nikon DSLR cameras can work.
70–200 f/2
.8 Nikkor lens
: I needed to work quite far back from the subject and wanted the long focal lengths to compress the scene.
Nikon SB-910 Speedlight
: Any Speedlight that can be set to Remote mode can be used here. I chose the SB-910 because it was the flash I had on hand.
Nikon SU-800 Commander unit
: To trigger the off-camera flash, I needed the SU-800 Commander unit (or a second Speedlight). In this scenario you cannot use the built-in flash to trigger the remote flash because it can’t see the camera.
Rogue FlashBender
: I wanted to control the spill of the light as it came through the bookshelf, and the large FlashBender allowed me to do that by adjusting the bounce off the light.
Justin clamp
: The SB-910 needed to be clamped to the backside of the bookshelf and a Justin clamp was the best tool for the job. It is possible to use a second light stand or a different clamp, but this works great.
Light stand
: I needed a way to keep the SU-800 in position so that the SB-910 could see the trigger signal.
TTL cord
: I used the TTL cord so that I could move the SU-800 off the camera and in position to trigger the SB-910.
The gear shown in Figure 16.25 is all I needed to get this final photograph of the librarian in the library stacks.
Figure 16.25 The TTL cord is the piece of gear that allows me to move the SU-800 off the camera and still trigger the SB-910 in Remote mode.
The setup for this image was similar to the setup in Chapter 15 . I designed the composition to use the library stacks as a frame for the librarian. You can see the basic idea in Figure 16.26 , which is lit by the light coming through the window. Because the Speedlight is positioned in the next row over, the SU-800 needed to be positioned on the light stand and connected to the camera using the TTL cord ( Figure 16.27 ).
NIKON D750 ISO 800 1/250 SEC. F/9.0
Figure 16.26 The library stacks are lit by overhead lights and the window at the end, but I wanted the main light to be hidden behind the books.
Figure 16.27 The SU-800 was mounted in the TTL cord, which is then mounted on the light stand. This allowed me to position the SU-800 where the SB-910 could see it at the end of the row.
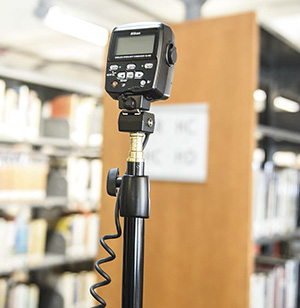
I mounted the SB-910 in the Justin clamp and clamped it to a book on the backside of the shelf that the librarian would be looking at. The flash was oriented so that the light was aimed up. I attached the FlashBender to make the light bounce through the shelf. You can see the flash positioned on the back of the shelf in Figure 16.28 and, in Figure 16.29 , what it looks like on the side where the subject will be standing.
Figure 16.28 You can see the flash positioned in the clamp with the FlashBender attached. It is important that the sensor on the flash can see the SU-800 Commander. I used the clamp on a book on the lower shelf to position the flash so that the FlashBender was just below the shelf to prevent the light from lighting the ceiling.
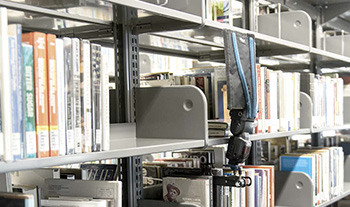
Figure 16.29 Here is the view that the subject has of the light. You can see that the FlashBender is placed so that the light bounces through the bookshelf.
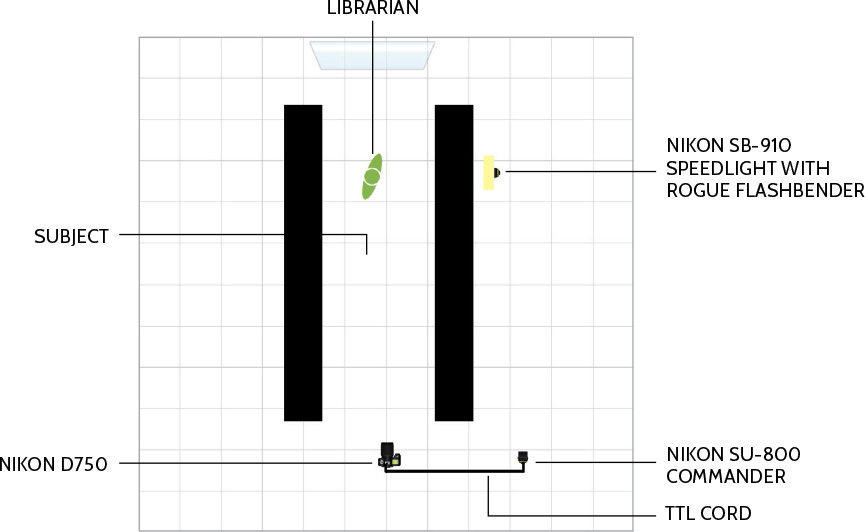
The lighting diagram in Figure 16.30 shows the placement of the flash and the SU-800 that triggered it in relation to the camera and the subject. The TTL cord from the camera to the SU-800 allowed me to position the SU-800 to create a line of sight between it and the SB-910. This is a situation where a radio trigger could have been used instead, but then I would have had to adjust the flash power on the flash instead of on the Commander, which would have been disruptive to the shoot.
Figure 16.30 The lighting diagram shows the relationship between the SB-910 and the SU-800 made possible by using the TTL cord.
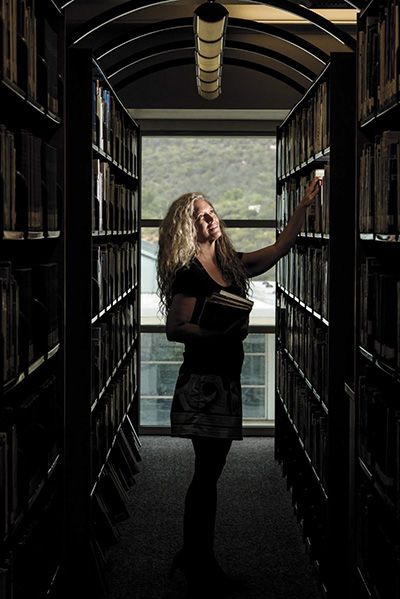
For the final image, I set the camera to Manual mode and underexposed the scene slightly with a 1/250-second shutter speed, f/16 aperture, and ISO 800. On the SU-800, I first set the flash mode to Manual and used a 1/8 power setting. That proved to create too much light, so I reduced the power to 1/16, which produced the result in Figure 16.31 . You can see how the light illuminates the face and arm of the librarian, while the bottom half of the photo falls to deep shadow. There is also a small spill of light on the bookshelf behind the librarian, which I am fine with, and it helps to keep the viewer’s eye in the photo.
NIKON D750 ISO 800 1/250 SEC. F/16
Figure 16.31 A librarian working in the library stacks lit by a single off-camera flash positioned on the shelf makes for an interesting photo.
All the photos in this chapter were really fun to work on. Limiting the number of lights made me think of different ways to light the subjects and not just rely on more flashes to get the job done.
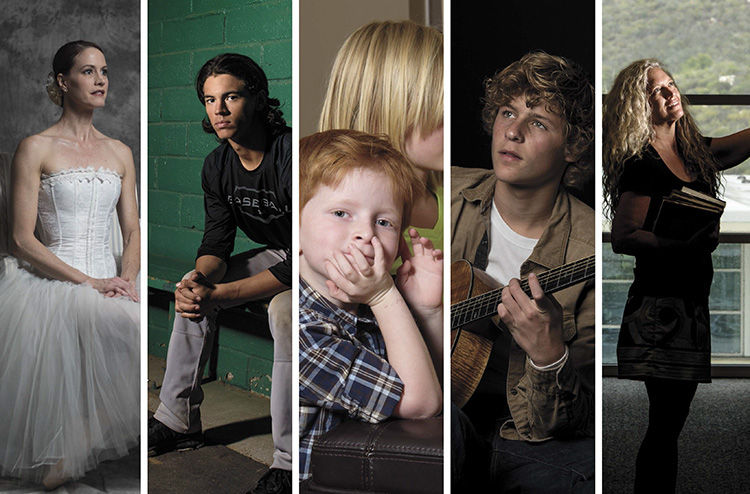
The subjects in this chapter are not models, but instead they are exactly what they were photographed doing. These are normal people: a dancer, a high-school baseball player, some kids playing a game, a local musician, and a college librarian. When photographing regular people doing what they do, I think back to what my friend and great photographer Glyn Dewis said about giving his subjects a role to play. When he photographs our friend Dave Clayton, he gets Dave to play a role, to become a character. That’s what I asked of my subjects here, to play as a dancer, baseball player, musician, and librarian. (You don’t have to coach kids to pretend to be kids; they’re pretty good at it on their own.) In other words, if the person in front of the camera is shy or stiff, have them play as a character, even if that character is their real-life job.
NIKON D750 ISO 400 1/60 SEC. F/2.8
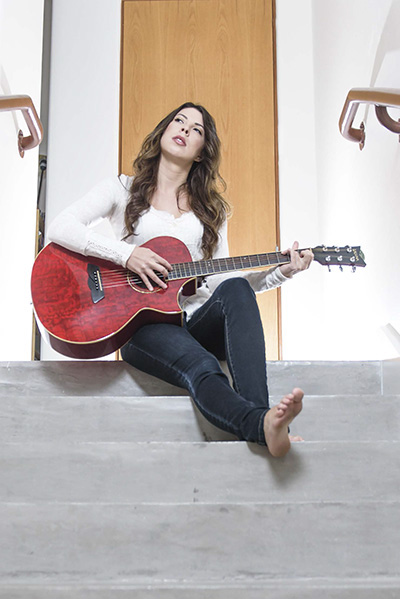
For this photo of musician Jessica Lerner, I used the bright light streaming in through the window to light her and set the speedlight behind her to brighten up the background. The SB-800 was set to Remote mode and triggered by the built-in flash on the D750 camera. You don’t always need to have the off camera flash supply the main light in the image.