You can create great product photos using the Nikon Speedlights. This chapter shows what it possible, whether using a single flash or many. I’ll walk you through the gear you need, show how to set up the shot, and even discuss suggested camera and flash settings.
For all the example images, I used the Creative Lighting System’s Advanced Wireless Lighting to trigger the remote flashes. You can use the built-in flash to trigger the remote units, or you can even use a TTL cord to trigger them from the camera. For all the photos, I used at least one light modifier, such as a softbox to diffuse the main light, or a Rogue Grid to control the spill of light on the background. Although you may never need to photograph splashing fruit, shinning knives, or glistening beer, the techniques required for the example shots will help you with many common photographic challenges.
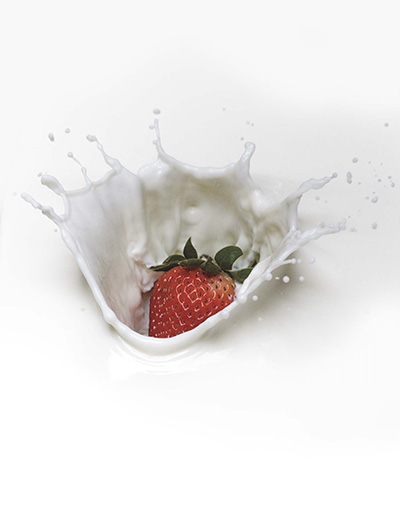
Sometimes the easiest photos to take look the most impressive and complicated. For instance, suppose you want to capture a strawberry splashing into milk at the moment the berry breaks the surface of the liquid. This action sounds difficult to capture, but it really isn’t. The hardest part is having the patience to drop the strawberry into the milk over and over again.
This shoot does not need a lot of gear because it uses just one light. The real issue with this shoot is that it can get messy—a side effect of those splashing milk drops. The gear needed for this photo is as follows:
 Strawberries
: You need some good-looking strawberries to drop in the milk. For the example shot, I spent a few minutes in the supermarket picking out the best pint of strawberries. Not all the strawberries need to be perfect, just two of three that have that proper strawberry shape. The color is also important; you are looking for a deep red because the image will be very bright. If your strawberry is on the lighter side to start with, it will look washed out in the final photo.
Strawberries
: You need some good-looking strawberries to drop in the milk. For the example shot, I spent a few minutes in the supermarket picking out the best pint of strawberries. Not all the strawberries need to be perfect, just two of three that have that proper strawberry shape. The color is also important; you are looking for a deep red because the image will be very bright. If your strawberry is on the lighter side to start with, it will look washed out in the final photo.
Milk
: The cheapest gallon of milk at the local supermarket works great. You can also add a little cold water, if you need to stretch the amount out.
Plastic tub
: You need a tub to hold the milk, one that’s deep enough to hold enough milk to create a good splash as the strawberry hits it. A white plastic tub works the best, but you can also use a clear one, as long as it is big enough so that you don’t see the edges (you don’t want to see anything that doesn’t look like milk). Once again, the supermarket offers inexpensive options.
Speedlight
: The image will be lit by a single Speedlight in a softbox. I used an SB-910, but you can use any Speedlight that can act as a remote.
Softbox
: The Speedlight needs to be diffused so that you don’t get hard shadows when the milk splashes up. I used the 26-inch Westcott Rapid Box Octa, which was the perfect size to light up the splash.
Boom or Century Stand
: The light needs to be placed above the tub of milk and aimed down so that it can light the splash from above. To do this, you need a way to hold the light in place. A boom or a century stand can handle the job with ease. I prefer to use the century stand because it takes up less space, and I don’t have a lot of room to begin with.
Commander unit
: You will need a way to trigger the light from the camera. I used the SU-800, but you can use another Speedlight or the built-in flash to trigger the flash.
Camera and lens
: For the example photo, I used the Nikon D4 and a 105mm macro lens. You will want to use a lens that allows you to shoot a little wide so that you don’t miss the splash. You can always crop the image later.
Tripod
: For this shot to work, the camera needs to be set in a tripod that can hold it at a downward angle above the plastic tub.
Towels
: You can’t have too many towels handy on a messy shoot. I placed one towel under the plastic tub to catch any of the milk drops that made it over the edge but quickly realized I needed another towel to dry the milk from the strawberries I used as models. Each time I dropped a strawberry into the milk, I needed to fish it out and gently dry it for the next take.
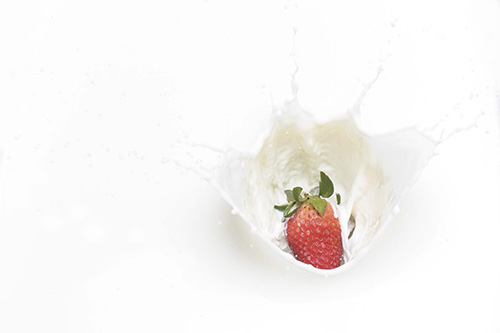
The setup for this photo is simple: Place the tub full of milk on the work surface and the Speedlight in the softbox above it so the light aims straight down on the milk. Then, you drop the strawberry and press the shutter release button as the strawberry hits the milk ( Figure 19.1 ).
NIKON D4 ISO 1600 1/2000 SEC. F/7.1
Figure 19.1 The goal with this shot is to have the strawberry in focus and to capture the instant it breaks the surface of the milk.
The first step is to get the exposure right using a shutter speed that will freeze the action. With the camera set to Manual exposure mode, I tried setting the shutter speed to 1/2000 and the aperture to f/7.1. This gave me a shutter speed that froze the splash and enough of depth of field to keep the strawberry and splash in focus. I set the Speedlight to act as a remote in Manual flash mode at 1/8 power.
The final step is to adjust the ISO. You want the white milk to look white, so I suggest starting at an ISO of 800 and taking a photo. If the milk is not white enough, you can move the ISO to 1600. If the milk is still not white enough, you can either increase the ISO or increase the output of the flash. For Figure 19.2 , for example, a setting of 1/2000 second, f/7.1, and ISO 1600 with a Manual 1/8 power on the flash was still a little dull. I increased the power to 1/4, and that worked perfectly. Because the milk is white, it tends to reflect the light so it acts as a second light source.
NIKON D4 ISO 1600 1/2000 SEC. F/7.1
Figure 19.2 Here is how the milk looked before I got the exposure dialed in. (I didn’t need to drop a strawberry until I had the proper exposure, but a photo of just milk here would have been dull in more ways than one.) To help whiten the milk, I ended up increasing the output of the flash from 1/8 to 1/4 while keeping the camera settings the same.
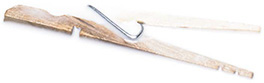
The next step is to set the cameras focus on where you believe the strawberry is going to land. If you keep the camera on the Continuous Auto-Focus setting, the camera will try to focus as you press the shutter release button. This can cause a delay when you try to take the photo. You want to use Manual focus and pre-focus on the spot where the splash will happen. I just floated a clothespin and used auto-focus to get focus set; then I turned the camera to Manual focus and made sure I didn’t move the camera, lens, or milk ( Figure 19.3 ).
NIKON D4 ISO 1600 1/2000 SEC. F/7.1
Figure 19.3 I used a clothespin to act as the strawberry while I adjusted the focus. Because it was right on the surface, I could easily focus on it.
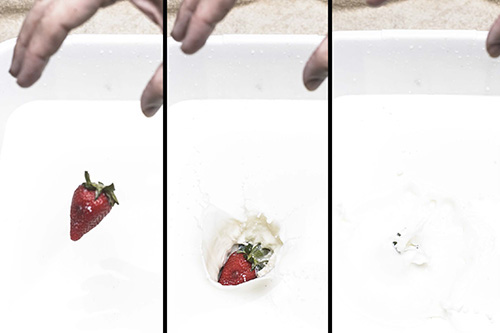
The next steps are to actually drop the strawberry and take the photo. I held the strawberry over the milk with my right hand and put my left on the shutter release button. Then it was just a matter of dropping the strawberry, quickly moving my hand out of the way, and pressing the shutter release button as the strawberry hit the milk—over and over and over again.
You can see in Figure 19.4 that you not only have to press the shutter release button at the right moment but also need to move your hand out of the way to avoid a shadow of the hand in the milk. Press the shutter release button too early, and the strawberry is frozen in mid-air and out of focus; press the shutter release button too late, and the strawberry is covered in milk. You also need to pay attention to the look of the strawberry; for example, the middle image is ruined by a bruise on the berry.
NIKON D4 ISO 1600 1/2000 SEC. F/7.1
Figure 19.4 The sequence of the strawberry drop proves timing is everything and practice is vital.
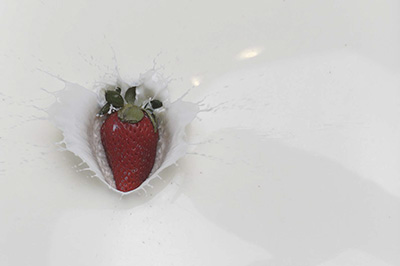
I probably dropped the two best-looking strawberries into the same tub of milk more than 50 times before I got a shot I really liked. Between each drop, I waited until the milk was flat, and I dried off the strawberry. The final image ( Figure 19.5 ) was the one where I could see the strawberry clearly and the splash looked the best.
NIKON D4 ISO 1600 1/2000 SEC. F/7.1
Figure 19.5 Here’s the final strawberry splash image, which was my favorite of the shots I took.
The setup for this shot is simple, and the results are fantastic. It’s easy to try with a minimum of gear—just have a towel handy.
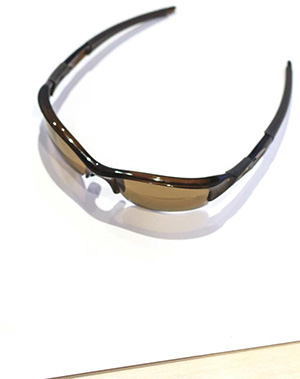
Depending on the product, your photography you may want to enhance or reduce reflections. Glasses are a great subject to photograph, for example, especially against a solid white background. The frames and lenses are both reflective but usually in different ways because of their materials. You also need to make sure that there is something that the lenses of the glasses can reflect to give them shape. A wristwatch is slightly trickier to photograph because you need to watch the angle of the watch face in relationship to the light so that you reduce the reflection on the glass. I put these two products together in the same section because the lighting is really similar, and both can be shot with just one Speedlight.
You can take this type of shot using a single Speedlight in a softbox and a couple of bounce cards. The only real differences are the subject and the angle of the light.
Sunglasses and watch
: Both subjects have reflective glass surfaces that need to be cleaned to remove dust, dirt, and especially any fingerprints.
Wire
: I used a small piece of wire to keep the watch strap in a loop. Buckle the strap and then place the wire inside and bend it to the right shape to position the watch exactly where you need it.
Speedlight
: The image is lit by a single Speedlight in a softbox. I used an SB-800, but you can use any Speedlight that can act as a remote.
Softbox
: The Speedlight needs to be diffused so that there are no bright spots to reflect off the glass. I used the 26-inch Westcott Rapid Box Octa because it is the perfect size for this. It is small enough to be easily managed but large enough to produce a pleasing soft light.
Boom or century stand
: The light needs to be placed above the product and aimed down. A boom or a century stand can hold the softbox in position and can easily be adjusted as you tweak the position of the light.
Commander unit
: You will need a way to trigger the light from the camera. I used the SU-800, but you can use another Speedlight or the built-in flash to trigger the flash. You can also use a TTL cord because the distance between the camera and the flash is short enough.
Camera and lens
: For this photo, I used the Nikon D750 and a 105mm macro lens, allowing me to fill the frame with the product. For the watch, I moved the camera in much closer than for the sunglasses.
White paper
: I used a single large sheet of white paper as the backdrop.
The key to these photos is the surface that the product is placed on. Using a large piece of white paper, you can create a seamless white backdrop for the glasses to sit on. You can see the glasses sitting on my version of the background in Figure 19.6 .
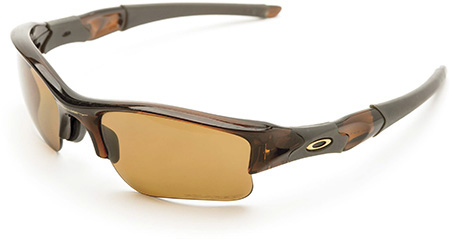
For the sunglasses shot, the main light was an SB-910 in a softbox placed facing down over the work table and slightly toward the back. The SB-910 was set to Remote mode, channel 1, and group A. I triggered it from the camera using the SU-800, but you can trigger yours with any Speedlight or built-in flash that can be used in Commander mode. You can also use a TTL cord because the distance from the camera to flash is short enough.
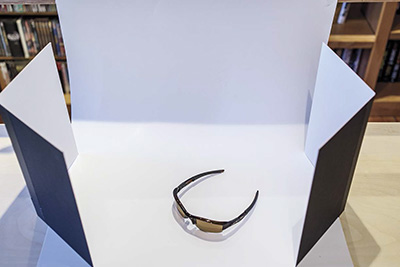
Two more light sources finish the photo: a couple of bounce cards to open up the shadows on the side. Place these on either side of the glasses ( Figure 19.7 ). For the final image ( Figure 19.8 ), I set the Speedlight at 1/4 power and triggered it from the SU-800.
Figure 19.7 Here the bounce cards are placed to add the highlights to the side of the glasses. You can adjust the cards to taste.
NIKON D750 ISO 400 1/200 SEC. F/20
Figure 19.8 The final image of the sunglasses needed only a single light and a couple of bounce cards.
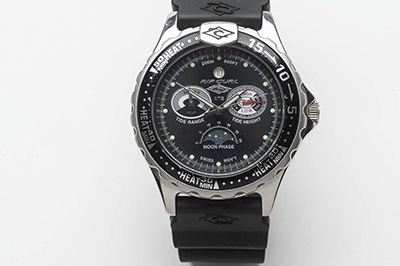
For the wristwatch photo, I replaced the sunglasses with the watch and moved the camera in closer. I used a few small pieces of wire to hold the watchstrap in a circle and then positioned the watch facing the camera.
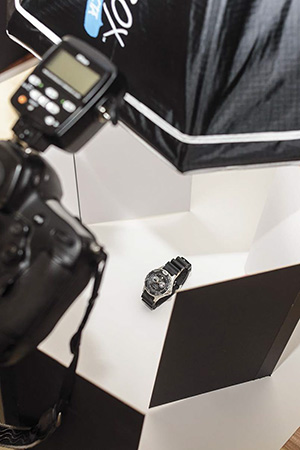
Once the watch was in position, I moved the camera closer to fill the frame with the watch face and angled the overhead light until it looked right ( Figure 19.9 ). I then added the bounce cards into place ( Figure 19.10 ) to create the final image ( Figure 19.11 ). Once again, I triggered the Speedlight from the camera using the SU-800 in Manual mode at 1/4 power, the same as for the sunglasses.
NIKON D750 ISO 400 1/200 SEC. F/20
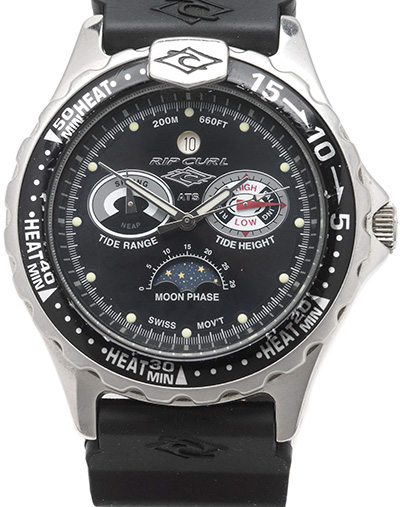
Figure 19.9 Without the bounce cards in place, you can see that the bottom and the bottom edges of the watch are still a little dark. The bounce cards fix that.
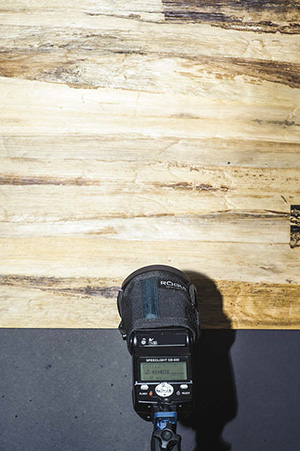
Figure 19.10 This behind-the-scenes shot shows the setup for the wristwatch image with the watch and the bounce cards in place.
NIKON D750 ISO 400 1/200 SEC. F/20
Figure 19.11 The final watch image shows the face of the watch in great detail.
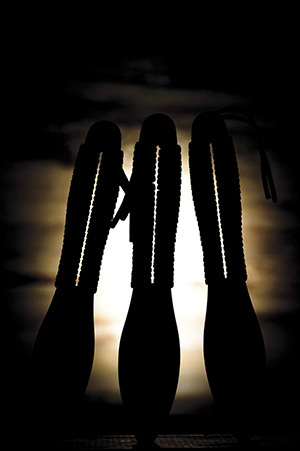
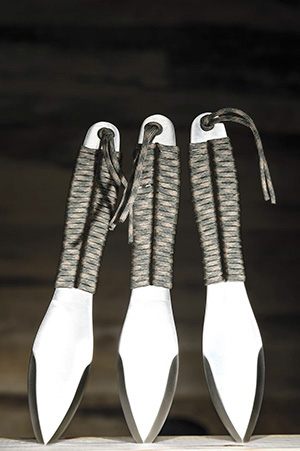
Photographing knives can teach you all about reflective metal objects and the best way to light them. For this photo, I upped the stakes a little and posed three knives together, each at a slightly different angle. Lighting the background separately adds some separation from the knives. This image needs five Speedlights. One lights the background, one lights the overall scene, and each knife has a separate light on it to cause the reflection in the blades. The hardest part of this photo is getting the right angles on the Speedlights in front that create the bright reflections on the blades. Each has to be adjusted until it’s just right.
This photo needs more gear because each of the knives needs its own Speedlight to create the reflection off the blade. If you want to try this but don’t have a lot of lights, try it with just one knife and don’t light the background. Then instead of five Speedlights, you can do it with two.
Here is the gear needed for the photo:
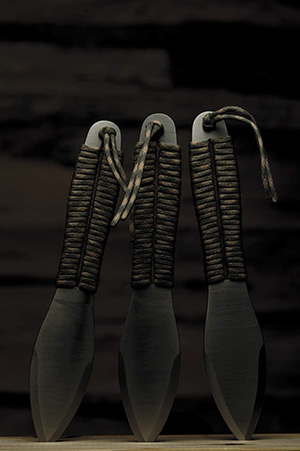
Knife set
: I used a set of three throwing knifes because they are all the same and contain a lot of metal to reflect back at the camera. The handles are also metal but wrapped in paracord, adding some texture to the image.
Speedlights
: I used five Speedlight in the example image, but if you have one knife, you can get away with two lights. For the three-knife setup, you need one Speedlight on the background, one over the top in a softbox, and one on each knife.
Softbox
: The Speedlight over the top of the knives needs to be diffused so that you don’t get hard shadows. I used the 26-inch Westcott Rapid Box Octa because it is the perfect size to light up all three knives. If you want the knives spaced further apart, you will need a bigger softbox or a strip softbox so that all three are covered.
Boom or century stand
: The overhead light needs to be placed above the knives and aimed down. To do this, you need a boom or a century stand to position the softbox.
Commander unit
: You will need a way to trigger the light from the camera. I used the SU-800, but you can use another Speedlight.
Camera and lens
: For this photo I used the Nikon D4 and a 70–200mm lens. You can use any lens that gives you the look you want. I wanted to shoot from further away to provide room to place the accent lights that illuminate the different blades, and the 200mm focal length allowed for this easily.
Tripod
: The camera needs to be set in a tripod that can hold it while you set up and test the lights.
Justin clamps
: These allow you to really fine-tune the exact placement of the Speedlights, which is what you need here. You can use the Justin clamps on light stands as I did or just pull up some chairs and clamp the lights to their backs.
Light stands
: You need a light stand in the back to hold the background light and three light stands up front to hold each of the lights that create the reflections. If you use the Justin clamps, then you can use anything as a light stand; just clamp the lights to a chair back, for example.
Snoots
: The light used to create the reflections in the blades needs to be tightly controlled so that it doesn’t spill over and light everything in the scene. You can use any snoots to do this; I used three of the Rogue FlashBenders rolled up as snoots.
Custom backdrop
: The backdrop is a piece of paper that is made to look like wood. You can buy some great papers to use in product photos at any good art supply store.
Wood
: I used a plain piece of scrap wood to hold the knives in place—simple and effective.
Rogue Grid
: A Rogue Grid is used on the background light to control the spill of light.
Build the lighting for this photo from the back forward with the background light first, then the overhead light, and finally the three accent lights. For the example, I positioned the knives in the piece of wood point first and placed the wood on the work table. I then placed an SB-800 Speedlight on a low light stand and aimed it at the background. With a Rogue Grid over the flash head, the SB-800 was set to Remote mode, channel 1, and group C. For the background, I used a piece of art paper that was made to look like wood. You can see the setup in Figure 19.12 . The goal is to create a bright spot in the middle of the background with the wood pattern at the edges. You can see the example image with only the background light firing in Figure 19.13 .
The next step is to add the overhead main light. I used an SB-800 Speedlight in a Westcott Rapid Box Strip light placed overhead and to the rear of the knives. The Speedlight was set to Remote mode, channel 1, and group A. I wanted the overhead light to add some light to the whole scene and add some illumination to the top of the knives. The overhead light firing alone creates Figure 19.14 .
NIKON D4 ISO 400 1/100 SEC. F/9.0
Figure 19.14 In this test firing, the knives are lit by just the overhead softbox held in place with a century stand. The light is over and slightly to the rear of the knives.
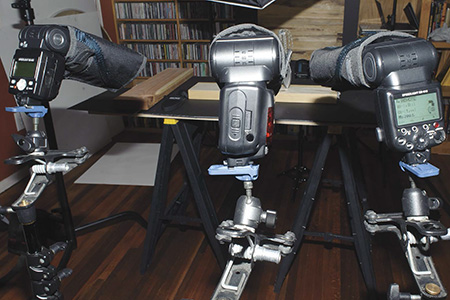
The most difficult part of this setup is aiming the three Speedlights used to illuminate the knife blades. For the example, each of these is set to Remote mode, channel 1, and group B. Because all these lights are in the same group, they will all have the same power and need to be roughly the same distance from the blades. Each of these Speedlights also needs a snoot over the end to control the spill of light. (I used a Rogue FlashBender.) To simplify positioning these lights, turn off two of the flashes and aim the first one, and when you have that flash aimed properly, repeat the same process for the other two lights. You can see the three speed lights in Figure 19.15 all aimed at the work area. Each of the Speedlights is in a Justin clamp and mounted on a light stand. Figure 19.16 shows how the individual lights look when fired separately.
NIKON D4 ISO 400 1/100 SEC. F/9.0
Figure 19.15 The three accent lights need to be aimed individually. The three Speedlights used for the example shot are mounted in Justin clamps on light stands, and each has a Rogue FlashBender as a snoot.
NIKON D4 ISO 400 1/100 SEC. F/9.0
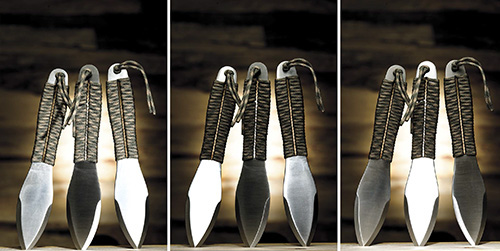
Figure 19.16 In these images, you can see how the individual lights each illuminate and reflect off of a different blade.
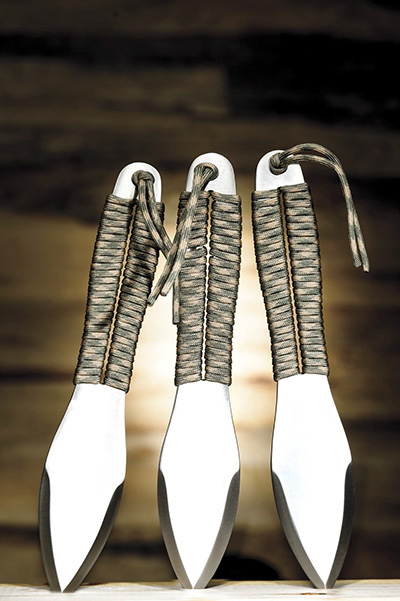
The final step is to turn on all the lights and make sure everything still looks great. In Figure 19.17 you can see all three front lights are turned on, as well as the overhead light. All that is needed is to turn on the background light. The final settings for the images were Manual power at 1/8 for group A, Manual power at 1/64 for group B, and Manual power at 1/8 for group C (see Figure 19.18 ).
NIKON D4 ISO 400 1/100 SEC. F/9.0
Figure 19.18 Here’s the final image of the knife set with all of the Speedlights firing.
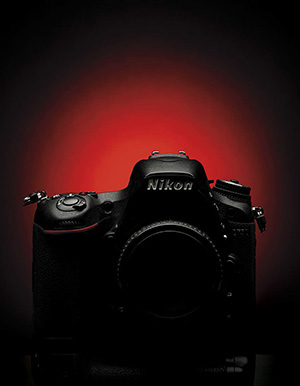
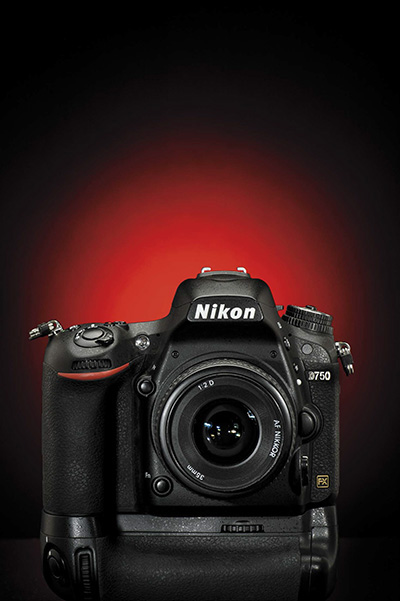
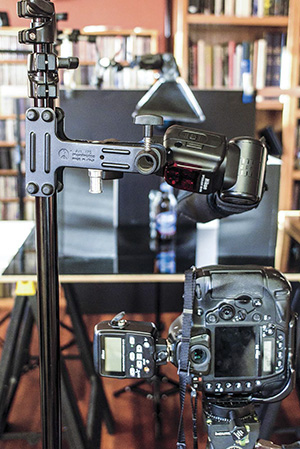
I take a lot of photos of cameras, flashes, and other gear, which are a lot more challenging to photograph than you might think. Because the gear is usually a combination of plastic, rubber, metal, and glass, you must deal with several different reflective surfaces. You also want certain features, such as the model name, to be properly lit and basically look as good as possible. To succeed, you need to add little splashes of light in just the right places. Doing so requires a combination of multiple Speedlights, flags, and bounce cards. Plus, to light the background, you need another Speedlight, grid, and gel.
This image takes more lights than you would think: Four Speedlights are needed to light up everything just right. Here is a complete gear list:
Camera body
: The model for the example photo is the Nikon D750 with the MB-D16 Battery Pack. This camera makes a difficult product to photograph, especially because the name plate is at a different angle than the Nikon logo and both need to be lit properly.
Speedlights
: The image is lit by a four Speedlights. The main light is in a softbox over the camera, then two different Speedlights highlight different parts of the camera, and a fourth Speedlight lights the background.
Softbox
: The main Speedlight needs to be diffused so that you don’t get hard shadows. I use the Westcott Rapid Box strip because it is the perfect size to light up the camera body.
Snoots
: The two accent flashes need snoots so that the light from them doesn’t just spill everywhere. Two small Rogue FlashBenders rolled into snoots, one on each Speedlight, work perfectly to control the light.
Rogue Grid
and gels
: One of the easiest and coolest-looking backgrounds can be created by using a Rogue Grid and a colored gel.
Flags
: A couple of pieces of black poster board help to control the spill of light.
Bounce cards
: A couple of pieces of white poster board help to open up some of the shadow areas and add a little light, especially to the sides of the camera.
Boom or century stand
: The light needs to be placed above the camera and aimed down so that it illuminates the top of the camera. To do this, you need a way to hold that light in place. Either a boom or a century stand can do this with ease.
Justin clamps
: Clamps hold and position the two Speedlights that illuminate the details on the camera. Because they allow the flash to be precisely positioned, I use Justin clamps either attached to the work surface or mounted on light stands.
Light stand
: You will need a couple of light stands for the two Speedlights that add the detail light, as well as one for the back light. Depending on your setup, if you use the Justin clamps, the two detail lights can be mounted on just about anything from a chair to the actual work table.
Commander unit
: You will need a way to trigger the lights from the camera. I used the SU-800, but you can use another Speedlight. I used all three groups for this photo, so I recommend an SB-900, SB-910, SB-800, or SU-800.
Camera and lens
: For the example photo I used the Nikon D4 and a 70–200mm lens, but you can use any camera and any lens you want. The key to consider is how much of the surrounding area you want in your image.
Tripod
: For this shot to work, the camera needs to be set in a tripod that can hold it in the same spot while you adjust the lights.
Black board
: The background is a piece of black board.
The first step is to set up the work area and clean the model camera and lens. Wipe off the camera and use compressed air to blow the dust off the rubber grips. Polish the logo and the camera name with a lint-free cloth and clean the lens. Once you set the model camera on the work surface, try hard not to touch it at all to avoid fingerprints. If you do have to move the model camera, use a cloth or cotton gloves to help reduce any fingerprints or smudges.
The next step is to set up the camera that you’re using to take the photo. Place it on a tripod and aim it at the model camera. Because I took the example photo specifically for this book, I wanted to take a portrait-orientated photo, so I set the camera in the tripod vertically and aimed straight at the model camera.
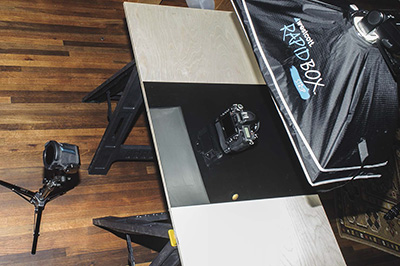
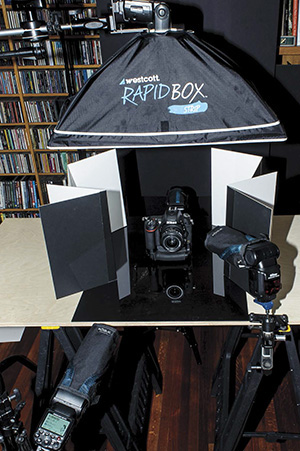
With both cameras in position, set up your lights. I set the background light, an SB-800, to Remote mode, channel 1, and group C. I placed it on a short light stand positioned between the work surface and the background, which was a plain piece of black cardboard. The SB-800 was fitted with a Rogue Grid and a red gel, as well ( Figure 19.19 ). I picked red because the Nikon colors on the camera are black and red, but you can use any color you wanted.
Figure 19.19 The D750 and the background light are in position, and the SB-800 is fitted with the Rogue Grid and red gel.
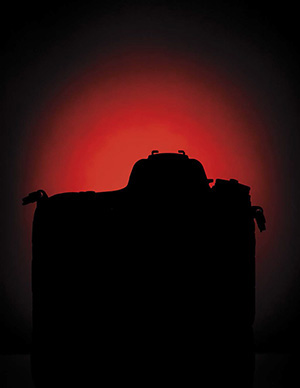
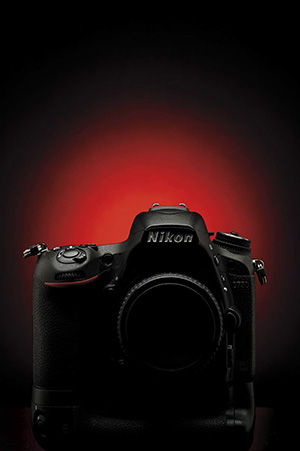
Now it is just a matter of taking some test shots to ensure the background light is in just the right place. For the example, I first set the camera to Manual mode with a shutter speed of 1/200 second, an f/16 aperture, and an ISO of 400. On the SU-800 with the channel set to 1 and groups A and B turned off, I set group C to 1/4 power and took some test shots as I adjusted the position of the background light. I still didn’t like the color, so I adjusted the power to 1/2 and got the image shown in Figure 19.20 .
NIKON D4 ISO 400 1/200 SEC. F/16
Figure 19.20 Take some test shots to begin. Here I photographed the Nikon D750 with just the background light turned on.
Once the background light is set, position the main light, which is the one overhead in the softbox. I used the SB-910 in a Westcott Rapid Box Strip held above and slightly behind the camera using a century stand. I set the Speedlight to channel 1 and group A, and I set the Commander’s mode to Manual power at 1/8. The main light and the backlight together produce the image in Figure 19.21 .
NIKON D4 ISO 400 1/200 SEC. F/16
Figure 19.21 As a test, I photographed the Nikon D750 with the background and overhead lights both on.
Next, place the bounce cards to help the main light illuminate the sides of the camera, adding just a little fill light and giving the camera some shape. Also, add a set of flags to keep the front lights from spilling into the back where you don’t want them. You can see the setup in Figure 19.22 and the effect the cards have in Figure 19.23 .
NIKON D4 ISO 400 1/200 SEC. F/16
Figure 19.23 Here’s the Nikon D750 photographed with just the background light on and the bounce cards in place. You can see how they help define the edges of the camera.
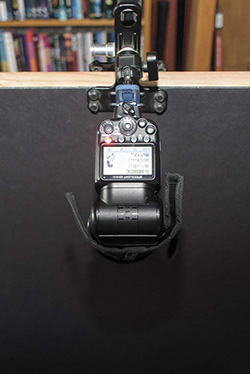
The final step is to add the two accent lights that illuminate the front of the camera. Place the first accent to light up the left side of the camera and the second to illuminate the right side. The light needs to hit the D750 and bounce off at the proper angle to give it the shine.
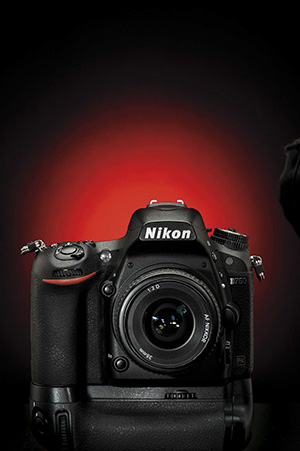
I set the two front lights both to channel 1 and group B and then placed them really close to the camera. Manual power at 1/128 is just enough light to illuminate both the front left and right of the camera body. The angle is the key, however. As you can see in Figure 19.24 , the light on the D750 name was off at first and the text was not reflecting the light and looked dull. All I needed to do was move the light slightly to the right, and the angles at which the light hit the reflective name plate changed. The name bounced the light right at the camera, making the D750 stand out in Figure 19.25 .
NIKON D4 ISO 400 1/200 SEC. F/16
Figure 19.24 All the lights are now firing, but as you can see, the D750 name is still not reflecting the light in the way it should.
NIKON D4 ISO 400 1/200 SEC. F/16
Figure 19.25 Changing the accent light produced this final image with the lights bouncing off all the surfaces exactly the way I wanted.
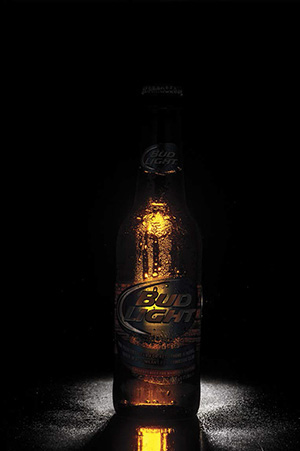
Photographing a bottle full of liquid and making it look appealing takes some work. It’s not difficult, but it can take a quite a few lights and some careful placement of flags to get the light just right.
The basics for this photo are to light the bottle and the liquid inside with a light shining through the bottle right at the camera. A light on each side adds some shape to the bottle, and a light overhead lights up the bottle cap and the top part of the glass. Another light then illuminates the label, and a final light adds a red splash to the background.
This photograph takes the most gear out of all the examples, but much of the lighting is actually very subtle. Here is the gear you will need:
Bottle
: Just pick your favorite bottle to photograph.
Speedlights
: The image is lit by four Speedlights. It needs a light shining though the bottle, one overhead, a separate light for the label, and then a final light on the background.
Softbox
: The overhead Speedlight is in a small softbox because the light needs to be diffused so that you don’t get hard shadows.
Rogue Grid and gels
: Some of the easiest and coolest-looking backgrounds are created by using a Rogue Grid and a colored gel.
Snoot
: A snoot on the light used to illuminate the label keeps the light from spilling all over the rest of the scene.
Bounce cards
: A couple of pieces of white poster board create the lighting on the side of the bottle.
Boom or century stand
: One light needs to be placed above the bottle and aimed down so that it illuminates the bottle cap. Either a boom or a century stand can hold a light in this position with ease.
Justin clamps
: These are needed to hold and position the Speedlights that are going to illuminate the details on the label and the Speedlight that will light the background.
Light stand
: You will need a light stand for the Speedlight that adds the detail to the label.
Commander unit
: You will need a way to trigger the lights from the camera. I used the SU-800, but you can use another Speedlight. I used all three groups for this photo, so I recommend an SB-900, SB-910, SB-800, or SU-800.
Camera and lens
: For this photo, I used the Nikon D4 and a 105mm lens, but you can use any camera and any lens you want. Your choice depends on how much of the surrounding area you want in your image.
Tripod
: For this to work, you need a tripod that can hold the camera in the same spot while you adjust the lights.
Black board
: The background is a piece of black board.
Glycerin
: You can get this at the pharmacy. When mixed with some water and put in a spray bottle, glycerin adds that moisture to the glass that makes the image pop and the bottle look like it’s fresh-from-the-cooler cold.
Position the bottle in the middle of the work area and set up the camera facing it. Once the bottle and camera are in place, try to not move them at all. The first lighting step is to set up the light in the background that will blast its photons through the bottle right at the camera and make the liquid in the bottle glow. For the example, I set this Speedlight to Remote mode, channel 1, and group C. Even though I am setting up the background light first, I still use group C because I consider it a background light. The idea is to get the bottle glowing but not so much that it looks radioactive. Figure 19.26 shows the bottle with only the background light firing.
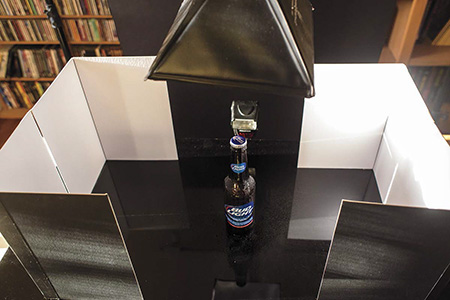
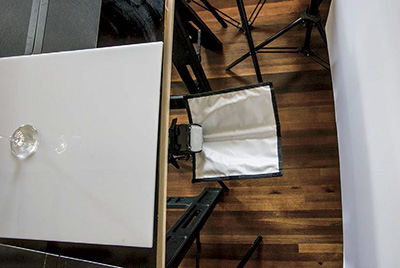
The next step is to add the overhead light that illuminates the bottle cap and the neck of the bottle. I used a small LumiQuest softbox on an SB-800 set to Remote mode and group A. This light is positioned over the bottle and pointed straight down to create the effect in Figure 19.27 . This light will also light up the sides of the bottle using some bounce cards that are set up around the bottle shown in Figure 19.28 .
Figure 19.28 The four bounce cards positioned around the bottle reflect light back to create the great edge lighting.
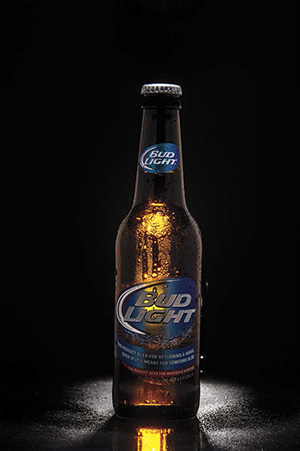
The next step is to add the light for the label. For the example, I used an SB-910 on a light stand positioned right by the camera lens. I used a Justin clamp on the side of the light stand so that the light could be right over the lens, aimed directly at the label. A Rogue FlashBender used as a snoot kept the light tight and right on the label. You can see the setup in Figure 19.29 . For the example, I set this light to Remote mode and group A. It will fire at the same power and mode as the overhead light, but I can control its power and spread by just changing the distance between it and the bottle.
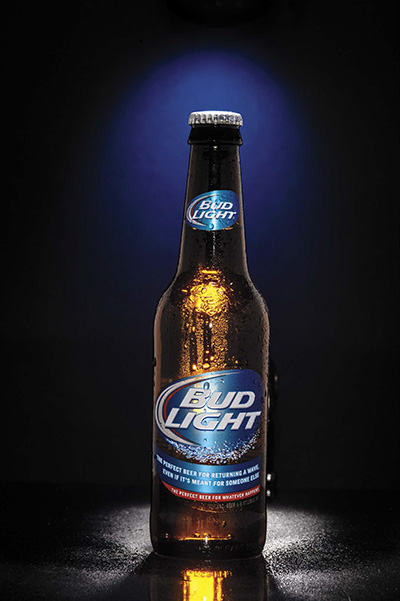
The final step is to attach a light to the top of the background holder and aim it down. Equipped with a Rogue Grid and a blue gel, this light was set to Remote mode and group B for the example. Figure 19.30 shows the light’s position, and you can see the final image in Figure 19.31 . The power settings for the three groups were 1/4 power for group A, 1/8 for group B, and 1/64 for group C.
NIKON D4 ISO 400 1/200 SEC. F/16
Figure 19.31 Here is the final image with all four Speedlights firing.
This final example photo captures a pour from a bottle into a glass. The glass that the liquid is being poured into is captured with one light, which bounces off the background. Because the glass is transparent, the camera is actually capturing the light bouncing off the background and shining through the glass. A second light above the glass lights up the liquid, and a third light evens out the light on the upper part of the background. If you have just a single light, you can try this shot with only the light that bounces off the background because it will give you a good idea of the lighting used.
The gear for this shoot is pretty simple; the hard part is the timing and the setup. Here is the gear you need to capture this shot:
Bottle
: Just pick your favorite bottle to pour from. Make sure the top of the bottle is clean.
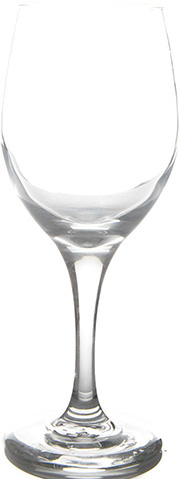
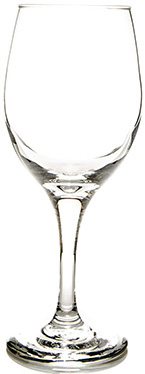
Glass
: You will need a wine glass (or any glass) to pour the liquid into. The glass needs to start off clean.
Food coloring
: The liquid I am pouring is just red food coloring and water. It’s less expensive than wine and easier to clean up, plus it gives me more control over the color.
Speedlights
: The image is lit by three Speedlights. The main light is actually a Speedlight in the back that bounces off the background and illuminates the glass. A second Speedlight above the background lights up the area behind the glass to get that all-white look. One more Speedlight in a softbox overhead lights up the liquid.
Softbox
: The overhead Speedlight is in a Westcott Rapid Box Strip for a softer light.
Flags
: A couple of pieces of black poster board help to control the spill of light and create the thin black lines on the edge of the glass.
Century stand
: The overhead light is on a century stand to hold the light over the glass.
Justin clamps
: These are needed to hold and position the Speedlights that are going to illuminate the background.
Light stand
: You will need a light stand for the background light.
Commander unit
: You will need a way to trigger the lights from the camera. I used the SU-800, but you can use another Speedlight. I used all three groups for this photo, so I recommend an SB-900, SB-910, SB-800, or SU-800.
Camera and lens
: For this photo I used the Nikon D4 and the 24–70mm lens, but you can use any camera and lens you want. Just make your choice based on how much of the surrounding area you want in your image.
Tripod
: The camera needs to be set in a tripod that can hold it in the same spot while you adjust the lights.
White board
: The background is a piece of white board, and a second piece is used as a base to set the glass on.
Towels
: Pouring liquid can create a mess, so having a towel or three is a good idea.
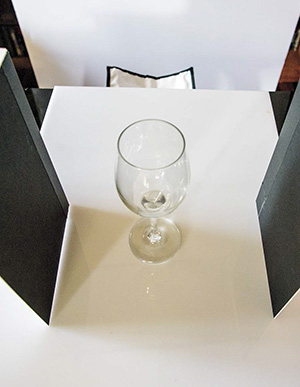
To begin, place the background light in a light stand behind and below the work surface with a Rogue FlashBender (or other reflector) to bounce the light up onto the background ( Figure 19.32 ). Because glass is lit with a reflected light from the background, you can light the background and the glass with one light. This raised an issue for me when taking the example shot because I usually assign the main light to group A and the background light to group C. When the background light is the main light, I have to make a choice. This time, I chose group C and channel 1 because the light is physically in the position to light the background. With the wine glass in place, you can see how the background light illuminates the glass in Figure 19.33 .
Figure 19.32 The SB-910 acts as a background light with a Rogue FlashBender to bounce more of the light onto the background.
NIKON D4 ISO 1600 1/1000 SEC. F/16
Figure 19.33 Here the wine glass is lit with just the background light.
To add some definition to the glass, use a couple of black pieces of board as close to the glass as possible without being in the frame. This creates a thin black line on the edges of the glass giving it shape and form. You can see the placement of the black flags in Figure 19.34 .
The final pieces to add are a light to illuminate the top of the background and a light over the top of the glass to help illuminate the bottle and the liquid pouring. For the first light, I used a Speedlight in a Justin clamp attached to the top of the background and aimed down with a FlashBender bouncing the light on the top of the background while at the same time controlling the spill of light. The last light I placed in Westcott Rapid Box Strip over the top of the setup. You can see the setup in Figure 19.35 . The light over the top of the setup was set to Remote mode, channel 1, and group A, while the light used to light up the top of the backdrop was set to Remote mode, channel 1, and group B.
NIKON D4 ISO 1600 1/1000 SEC. F/9
Figure 19.35 The final setup is ready to capture the pour into the glass.
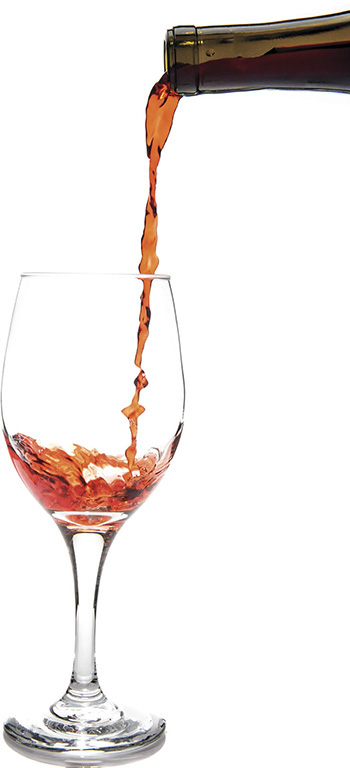
The final steps are to set the exposure and to pour the liquid into the glass while taking the photograph (the tricky part). You need to use a fast enough shutter speed to freeze the pour as it lands in the glass. For the example, a shutter speed of 1/1000 made it easy. That speed also means using a higher ISO (I used 1600) and a medium depth of field (for me, f/9). The next step is to dial in the power for the three groups of lights, and with a little experimentation I found that worked out to group A at 1/16, group B at 1/4, and group C at 1/4. The final image is Figure 19.36 .
As for the strawberry drop, the tricky part to this image is to press the shutter release button at the right time. A couple of different approaches can help you get the best results with the fewest repeats. The best way is to enlist a friend. While he or she pours the liquid (or drops the strawberry), you press the shutter release button. If you are working alone (as I was in these shots), you can use one of the remotes that Nikon makes to trigger the camera from a distance. Depending on the camera, there are a variety of different remotes that work either wirelessly or wired. Check the camera manual for your specific camera. Finally, you can try the method I used for both of these shots, which is to physically press the shutter release button with my left hand while pouring (or dropping) with my right. It takes patience and timing but is not as hard as it sounds.
Product photography can be a lot of fun. The models don’t need to be paid and can hold their poses forever. If you need inspiration, just open any magazine and check out the advertisements. When you look at the images, start to work out the lighting. Where is the main lighting coming from, and how was the scene put together? Trying to build the scene at home is a great way to practice your product lighting.