Level Four

Soup Dumplings
There’s something magical about xiao long bao, the steamed Shanghainese dumplings filled with hot broth and meat. Dim sum master Joe Ng and restaurateur Ed Schoenfeld, who serve NYC’s juiciest version, share the secret to getting the soup inside: Gelatin-rich stock solidifies when chilled, so you can fold the dough around it. Read on to learn their technique.
Pork-and-Crab Soup Dumplings
Time
3 hr active 7 hr 30 min total
Makes
about 4 dozen dumplings

JELLIED STOCK
One 3-lb. chicken, quartered
1 lb. boneless pork shoulder, sliced 1 inch thick
Eight ¼-inch slices of fresh ginger
2 scallions, halved
1 large carrot, thinly sliced
2 qts. low-sodium chicken broth
3 envelopes unflavored gelatin
PORK-AND-CRAB FILLING
4 dried shiitake mushrooms
Boiling water
¾ lb. ground pork shoulder
¼ cup Asian crab paste (optional; see Note)
½ cup finely chopped chives
2 Tbsp. potato starch
2 Tbsp. toasted sesame oil
1½ Tbsp. dark soy sauce
1½ Tbsp. mushroom soy sauce, such as Healthy Boy (see Note)
1 Tbsp. sugar
1 tsp. finely chopped peeled fresh ginger
¾ tsp. kosher salt
½ tsp. white pepper
DOUGH
4½ cups all-purpose flour, plus more for dusting
1½ cups bread flour
Boiling water
Large pinch of saffron threads, crumbled
1 Tbsp. fine sea salt
1. Make the jellied stock
In a large, deep pot, combine the chicken, pork, ginger, scallions, carrot, broth and 1 quart of water and bring to a boil. Reduce the heat and simmer until the chicken is cooked through, about 30 minutes. Remove the chicken; when cool enough, pull the meat from the bones. Return the bones to the pot and simmer until the broth is very flavorful and reduced to 6 cups, 1½ hours longer; strain and skim the fat from the surface. Reserve the chicken meat and pork for another use.
2. In a small bowl, combine the gelatin with ⅓ cup of cold water and let stand for 5 minutes. Whisk the softened gelatin into 3 cups of the hot stock until melted. (Reserve the remaining stock for another use.) Pour the gelatinized stock into a 2-quart glass or ceramic baking dish and refrigerate until firm, at least 3 hours or overnight (A) .
3. Make the pork-and-crab filling
In a small bowl, cover the dried mushrooms with boiling water and soak until softened, about 20 minutes. Drain, squeezing out any excess liquid; discard the stems. Finely chop the caps and transfer to the bowl of a stand mixer fitted with the paddle. Add the pork, crab paste, chives, potato starch, sesame oil, dark and mushroom soy sauces, sugar, ginger, salt and white pepper. Beat at medium speed until thoroughly combined, about 5 minutes.
4. In a food processor, pulse the 3 cups of jellied stock until chopped (B) . Beat into the pork mixture at medium speed until light and fluffy, 5 minutes.
5. Meanwhile, make the dough
In a medium bowl, stir ½ cup of the all-purpose flour, ½ cup of the bread flour and ½ cup of boiling water until combined. Turn the hot-water dough out onto a work surface and knead until fairly smooth, about 5 minutes.
6. In a glass measuring cup, combine 2 cups of room-temperature water with the saffron and let stand for 5 minutes. In the bowl of a stand mixer fitted with the dough hook, blend the remaining 4 cups of all-purpose flour and 1 cup of bread flour with the salt. Add the saffron water and beat at medium speed until a smooth dough forms, about 5 minutes. Add the hot-water dough and beat at medium speed until incorporated, about 5 minutes. Turn the dough out onto a work surface and knead it into a smooth ball. Wrap the dough in plastic and let stand at room temperature for 30 minutes or refrigerate overnight.
7. Form the dumplings
Cut the dough into 4 pieces. Working with 1 piece at a time and keeping the rest covered, roll the piece of dough into a 1-inch-thick rope (C)
. Pinch or cut the rope into ¾-inch pieces and roll them into balls (D)
. Then, using a small dowel, glass bottle or Chinese-style rolling pin, roll each piece of dough into a thin 3½-inch round, dusting with flour as necessary (E)
. Lightly dust the rounds with flour, transfer them to a floured baking sheet and cover with a damp towel to keep them from drying out. Repeat with the remaining dough. You should have about 4 dozen rounds.
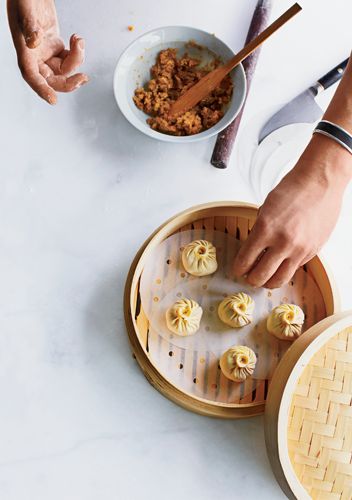
8. Line 2 baking sheets with wax paper and dust lightly with flour. Working with 1 dough round at a time and keeping the rest covered, spoon a well-rounded tablespoon of the filling onto the center of the round (F) . Using your fingers, pinch and pleat the dough around the filling, leaving a tiny steam vent at the top (G) . Transfer to the baking sheet and garnish with a goji berry (optional). Repeat with the remaining dough and filling.
9. Steam the dumplings
Fill a pot with 2 inches of water and bring to a boil. Arrange the dumplings in a bamboo steamer basket in batches, leaving at least 1 inch between them (H)
. Cover and steam over the boiling water until the dough is shiny and the filling is soupy, 5 minutes. Serve with the dipping sauce (see below) while you steam the remaining dumplings.
NOTE Crab paste (a concentrated condiment) and mushroom soy sauce are available at Asian markets and online from amazon.com .
MAKE AHEAD Freeze uncooked dumplings on a baking sheet; seal in a plastic bag and freeze for up to 2 weeks. Steam until cooked, 10 minutes. The jellied stock can be refrigerated in an airtight container for up to 3 days.
Dipping sauce
While Ng’s soup dumplings are delicious on their own, they’re also good with a very simple sauce of ¼ cup Chinese black vinegar mixed with 1 Tbsp. julienned fresh ginger. Drizzle the sauce on top of each dumpling before eating.

Mix Master
Ng runs his jellied stock through a meat grinder to give it the same texture as the pork. A food processor works just as well.
Let Off Steam
To avoid burning your mouth on the piping-hot broth, place the dumpling on a spoon and carefully bite a hole at the edge to let steam out.
Tofu
Who says tofu has to be bland? For the creamiest, most indulgent version you’ve ever tasted, make your own. The key, says Douglas Keane of Two Birds/One Stone in St. Helena, California, is to start with homemade soy milk (most store-bought versions won’t work). “It should have a richness to it similar to whole milk. It shouldn’t be thin and blue like skim.” Follow Keane’s steps for crêpe-like “tofu skins,” delicate silken tofu and the freshest firm tofu that’s anything but boring.

Tofu Skins (Yuba)
Time
1 hr 30 min plus overnight soaking
Makes
about a dozen
1⅓ cups dried soybeans (8 oz.)
6 cups water, preferably filtered
1. Make the soy milk
In a large bowl, cover the soybeans with 3 inches of cold water. Cover and let stand overnight at room temperature.
2. Drain the soybeans and transfer them to a blender. Add 3 cups of the filtered water and puree at high speed until as smooth as possible.
3. Line a large sieve with a clean cotton napkin or 3 layers of cheesecloth and set the sieve over a heatproof bowl. In a large pot, bring the remaining 3 cups of filtered water to a boil. Add the soybean puree and bring just to a boil (be careful not to let it boil over). Boil over moderately high heat for exactly 8 minutes, stirring constantly with a heatproof rubber spatula to prevent sticking and scorching.
4. Carefully pour the mixture into the prepared sieve. Let stand until just cool enough to handle, about 20 minutes. Gather the ends of the napkin or cheesecloth and squeeze to extract as much of the soy milk as possible; the remaining solids should be nearly dry. Discard the solids and skim off any foam from the soy milk. You should have about 4 cups of soy milk.
5. Make the tofu skins
In a large, clean saucepan, bring the soy milk to just below a simmer. A skin will slowly form on the surface of the soy milk. When the skin is fully formed, use a paring knife to carefully detach it from the side of the saucepan. Carefully slide a chopstick or skewer under the skin and lift it from the milk. Let drain for a few seconds before transferring to a plate. Repeat, stacking the tofu skins, until the soy milk is depleted.
SERVE WITH Dashi, scallions and cilantro.
MAKE AHEAD Stacked tofu skins can be wrapped in plastic and refrigerated overnight.
Silken Tofu
Time
1 hr plus overnight soaking
Makes
about 1 lb
1⅓ cups dried soybeans (8 oz.)
6¼ cups water, preferably filtered
1 tsp. nigari flakes (see Note)
1. Make the soy milk
In a large bowl, cover the soybeans with 3 inches of cold water. Cover and let stand overnight at room temperature.
2. Drain the soybeans and transfer them to a blender. Add 3 cups of the filtered water and puree at high speed until as smooth as possible.
3. Line a large sieve with a clean cotton napkin or 3 layers of cheesecloth and set the sieve over a heatproof bowl. In a large pot, bring 3 cups of the filtered water to a boil. Add the soybean puree and bring just to a boil (be careful not to let it boil over). Boil over moderately high heat for exactly 8 minutes, stirring constantly with a heatproof rubber spatula to prevent sticking and scorching.
4. Carefully pour the mixture into the prepared sieve. Let stand until just cool enough to handle, about 20 minutes. Gather the ends of the napkin or cheesecloth and squeeze to extract as much of the soy milk as possible; the remaining solids should be nearly dry. Discard the solids and skim off any foam from the soy milk. You should have about 4 cups of soy milk.
5. Make the silken tofu
In a small measuring cup, dissolve the nigari in the remaining ¼ cup of filtered water. Spoon 2 tablespoons plus 2 teaspoons of the nigari solution into a large heatproof glass bowl. In a clean large saucepan, heat the soy milk to 185°. Gently pour the hot soy milk into the bowl with the nigari solution and quickly stir once or twice just to combine thoroughly; it’s easy to scramble the rapidly coagulating tofu. Cover and let stand undisturbed until the silken tofu is fully set, about 5 minutes. Discard the remaining nigari solution.
SERVE WITH Yuzu zest or fresh ginger.
NOTE Nigari (sea salts like magnesium chloride) can be purchased at Japanese markets or online from myworldhut.com.
Firm Tofu
Time
1 hr 15 min plus overnight soaking
Makes
about ½ lb
1⅓ cups dried soybeans (8 oz.)
6¼ cups water, preferably filtered
1 tsp. nigari flakes (see Note)
1. Make the soy milk
In a large bowl, cover the soybeans with 3 inches of cold water. Cover and let stand overnight at room temperature.
2. Drain the soybeans and transfer them to a blender. Add 3 cups of the filtered water and puree at high speed until as smooth as possible.
3. Line a large sieve with a clean cotton napkin or 3 layers of cheesecloth and set the sieve over a heatproof bowl. In a large pot, bring 3 cups of the filtered water to a boil. Add the soybean puree and bring just to a boil (be careful not to let it boil over). Boil over moderately high heat for exactly 8 minutes, stirring constantly with a heatproof rubber spatula to prevent sticking and scorching.
4. Carefully pour the mixture into the prepared sieve. Let stand until just cool enough to handle, about 20 minutes. Gather the ends of the napkin or cheesecloth and squeeze to extract as much of the soy milk as possible; the remaining solids should be nearly dry. Discard the solids and skim off any foam from the soy milk. You should have about 4 cups of soy milk.
5. Make the tofu
In a small measuring cup, dissolve the nigari in the remaining ¼ cup of filtered water. Spoon 2 tablespoons plus 2 teaspoons of the nigari solution into a large heatproof glass bowl. In a clean large saucepan, heat the soy milk to 185°. Gently pour the hot soy milk into the bowl with the nigari solution and quickly stir once or twice just to combine thoroughly; it’s easy to scramble the rapidly coagulating tofu. Cover and let stand undisturbed until the silken tofu is fully set, about 5 minutes. Discard the remaining nigari solution.
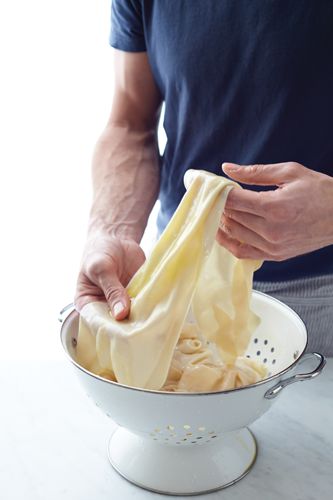
6. Set a cheesecloth-lined sieve, colander or other mold with drainage over a bowl and spoon the silken tofu into it. Neatly fold the overhanging cheesecloth over the tofu and top with a small plate or other light weight to gently press out excess water. Let drain for at least 15 minutes or up to 2 hours, depending on the desired firmness. Unwrap and serve.
SERVE WITH Black radish slices and soy sauce, or a miso glaze.
NOTE Nigari can be purchased at Japanese markets or online from myworldhut.com.
MAKE AHEAD Firm tofu can be refrigerated for up to 3 days, covered with water.
Thin Skin
Known as yuba in Japan, the layer that forms on the surface of hot fresh soy milk (just as it does on warm cow’s milk) has a mild flavor and pleasingly chewy texture. It can be served as is with condiments or fried and stuffed with fillings.
Shape Up
Firm tofu is silken tofu that’s pressed into a block. One great suggestion for an improvised mold: a plastic berry basket lined with cheesecloth.
Lasagna
The ultimate lasagna—say pasta purists—is a creamy tomato-less version. At Pastaria in St. Louis, chef Gerard Craft serves a lush layering of just three elements: delicate egg pasta, béchamel and melted Grana Padano and Fontina cheeses. Instead of baking additional ingredients inside the lasagna, Craft dresses up each slice with seasonal toppings.
Creamy White Lasagna with Toppings
Time
1 hr 30 min active 3 hr 30 min total
Makes
10 servings
PASTA
3½ cups all-purpose flour, plus more for dusting
1½ tsp. kosher salt
3 large eggs, lightly beaten
BÉCHAMEL
2 sticks unsalted butter
1 medium onion, finely chopped
2 rosemary sprigs
2 thyme sprigs
3 garlic cloves, crushed
Kosher salt
1 cup all-purpose flour
2 qts. whole milk
ASSEMBLY
Extra-virgin olive oil
½ lb. imported Fontina cheese, shredded (2½ cups)
5 oz. Grana Padano cheese, freshly grated (1¼ cups)
1. Make the pasta
In a food processor, pulse the 3½ cups of flour with the salt. Add the eggs and ½ cup of water and pulse until the dough starts to come together (A)
. Turn the dough out onto a work surface and knead by hand until smooth and elastic, about 10 minutes (B)
. If the dough is too sticky to work with, lightly dust it with flour. Wrap the dough in plastic and let rest at room temperature for 1 hour.
2. Meanwhile, make the béchamel
In a large saucepan, melt the butter. Add the onion, rosemary, thyme, garlic and a pinch of salt and cook over moderate heat, stirring occasionally, until the onion is softened but not browned, about 8 minutes. Add the flour and cook, stirring constantly, until the roux is light golden, 3 to 5 minutes. Gradually whisk in the milk and bring to a boil, then simmer over moderately low heat, stirring frequently, until no floury taste remains, about 20 minutes. Press the béchamel through a fine sieve into a bowl; discard the solids. Season with salt and let cool.
3. Assemble the lasagna
Cut the dough into 8 equal pieces; work with 1 piece at a time, keeping the rest covered with a towel. Flatten the dough slightly. Run it through a pasta machine a total of 6 times: Start at the widest setting, then run through successively narrower settings (C, D)
. Dust the sheet with flour and lay it on a parchment paper–lined baking sheet. Repeat with the remaining dough, separating the sheets with parchment (E)
.
4. In a large pot of salted boiling water, cook the pasta sheets until just al dente, 1 to 2 minutes (F) . Drain in a colander and cool under running water, then drain again. Return the pasta to the baking sheet and toss with olive oil to prevent the sheets from sticking together.
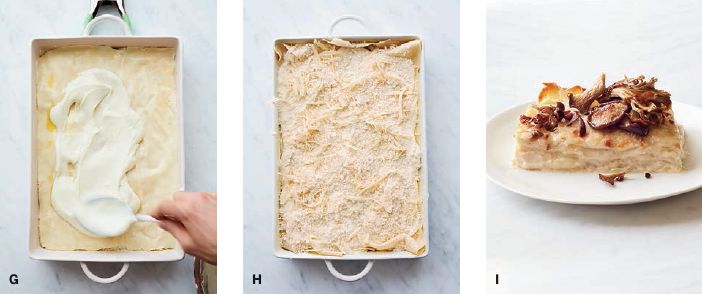
5. Preheat the oven to 350˚. Brush a deep 9-by-13-inch baking dish with oil; spread with ½ cup of the béchamel. Arrange a layer of pasta over the béchamel, trimming to fit. Spread one-fifth of the remaining béchamel over the pasta (G) . Sprinkle with ½ cup of the Fontina and ¼ cup of the Grana Padano. Repeat the layering 4 more times, ending with the cheeses (H) .
6. Tightly cover the baking dish with foil and bake the lasagna for 45 minutes, until bubbling. Remove from the oven and uncover. Preheat the broiler. Broil the lasagna 6 inches from the heat until lightly browned on top, 2 to 4 minutes. Let rest for 15 minutes, then cut into squares and serve with one of the toppings (I) .
MAKE AHEAD The assembled, unbaked lasagna can be refrigerated for 1 day.
WINE Spiced, dark-fruited Chianti Classico.
Toppings
Roasted Wild Mushroom Preheat the oven to 450˚. In a large bowl, toss 2 lbs. mixed chopped mushrooms (such as maitake, stemmed shiitake, oyster and cremini) with ½ cup extra-virgin olive oil and season with salt. Spread on 2 large rimmed baking sheets and roast for about 30 minutes, stirring once, until golden. Season with fresh lemon juice. The roasted mushrooms can be refrigerated overnight. Reheat gently.
Salsa Verde In a large bowl, whisk ¾ cup extra-virgin olive oil with 1½ Tbsp. fresh lemon juice, 1 minced garlic clove and 3 Tbsp. each of finely chopped parsley, tarragon, dill, mint and chives. Season with kosher salt. The salsa verde can be refrigerated overnight.
Roasted Carrot Puree Preheat the oven to 350˚. In a large ovenproof skillet, heat 2 Tbsp. vegetable oil. Add 3 cups chopped carrots (1½ lbs.) and 2 thyme sprigs; cook over moderate heat, stirring, until the carrots are browned, 10 minutes. Transfer to the oven and roast for 10 minutes, until the carrots are tender. Pulse the carrots in a food processor until chopped. With the machine on, drizzle in 1 cup extra-virgin olive oil and ¾ cup water; puree until smooth, about 30 seconds. Season with salt. The carrot puree can be refrigerated overnight. Reheat gently.


Layer It On
At Pastaria, Craft serves lasagna slices with toppings like a tangy salsa verde, carrot puree or his favorite, roasted wild mushrooms. It’s like bruschetta that you can customize to your taste.
Raviolo
At Chicago’s Monteverde, chef Sarah Grueneberg makes an impressive uovo in raviolo —a giant pasta round stuffed with fresh ricotta, feta and a runny egg yolk, inspired by one of her favorite Italian dishes, uova in purgatorio. She serves the behemoth in a fresh-tasting tomato sauce with basil and a pinch of chile flakes. Here’s how to #putanegginit at home.

Uovo in Raviolo with Hand-Grated-Tomato Sauce
Time
1 hr 15 min active 2 hr total
Makes
8 servings
PASTA DOUGH
2 large eggs
4 large egg yolks
2 cups 00 flour (10 oz.)
FILLING
8 oz. soft sheep-milk feta cheese, such as Bulgarian or Spanish
8 oz. whole-milk ricotta
½ cup (1 oz.) freshly grated Pecorino Romano cheese
½ tsp. grated orange zest
1 Tbsp. chopped parsley
2 tsp. chopped oregano
Kosher salt
TOMATO SAUCE
4 lbs. ripe tomatoes, halved
6 Tbsp. extra-virgin olive oil
1 garlic clove, minced
1 pinch of crushed red pepper
Kosher salt
RAVIOLI
Semolina, for dusting
8 large egg yolks
3 large egg whites, beaten
1 cup torn basil leaves, plus small leaves for garnish
Shaved Pecorino Romano cheese, for garnish
1. Make the pasta dough
In a small bowl, whisk the eggs with the egg yolks and ¼ cup of water. Mound the flour on a work surface, make a well in the center and add the eggs. Using a fork, gradually draw in the flour until a dough forms (A)
. Gather and knead the dough until smooth (B)
. Form into a ball, cover in plastic wrap and refrigerate for 1 hour.
2. Meanwhile, make the filling
In a food processor, pulse the feta until smooth. Scrape into a medium bowl and add the next 5 ingredients. Mix until well blended and season with salt. Refrigerate until ready to use.
3. Make the tomato sauce
Grate the tomato halves on the large holes of a box grater set in a bowl until only the skins remain; discard the skins (C)
. In a large saucepan, heat the olive oil. Add the garlic and cook over moderate heat, stirring, until fragrant, about 2 minutes. Add the grated tomatoes and crushed red pepper and season with salt. Cook over moderate heat, stirring occasionally, until the sauce has thickened and reduced to 3 cups, about 20 minutes.
4. Make the ravioli
Divide the pasta dough into 4 pieces. Work with 1 piece at a time, keeping the rest covered. Press the dough to flatten it slightly. Run the dough twice through a pasta machine at the widest setting. Run the dough through 4 successively narrower settings, twice per setting, until the dough is about 1/16 inch thick (D)
. Dust a work surface with semolina and lay the pasta sheet on top; dust the pasta generously with semolina and cover with a damp kitchen towel. Repeat with the remaining 3 pieces of pasta dough, keeping the rolled-out sheets covered.
5. Lay 1 of the pasta sheets on a work surface and brush off the semolina. Spoon four ¼-cup mounds of the cheese filling onto the pasta sheet about 4 inches apart (E) . Spread the mounds of filling into 3-inch rounds and make a small well in the center of the filling. Slip 1 egg yolk into each well (F) . Brush around the filling with the beaten egg whites. Drape another sheet of pasta on top and press around the fillings to push any air pockets out of the ravioli (G) . Using a 4-inch fluted cookie cutter, stamp out the ravioli (H) . Press the edges to make sure they are sealed. Transfer the ravioli to a semolina-dusted baking sheet. Repeat to form another 4 ravioli; reserve any remaining filling for another use.
6. Bring a large pot of water to a boil and season generously with salt. Reheat the tomato sauce in the saucepan. Using a slotted spoon, add 4 of the ravioli to the boiling water and cook until the pasta is al dente, about 3 minutes. Using a slotted spoon, transfer the ravioli to the tomato sauce (I) . Add half of the torn basil and cook, stirring gently, until nicely coated, about 1 minute. Transfer the ravioli to plates and spoon some of the sauce on top. Repeat with the remaining 4 ravioli and torn basil. Garnish with Pecorino Romano and basil leaves and serve.
MAKE AHEAD The filling and tomato sauce can be stored separately in the refrigerator for 3 days. The formed ravioli can be covered and refrigerated for 3 hours.
WINE A bright and smoky red from Sicily.

Round Off
If you don’t have a cookie cutter, stamp out the ravioli with a 4-inch jar lid or an empty aluminum can.
Paella
Seamus Mullen of New York City’s Tertulia has opinions when it comes to Valencia’s most famous dish. “True paella,” he says, “starts with a thin layer of rice slowly infused with an intense stock. The rice shouldn’t be much deeper than the first knuckle on your thumb; that’s why you need a proper paella pan that’s wide and shallow.” For this recipe, Mullen suggests using a 17-inch paella pan set on a grill over a live fire to heat the pan evenly and impart an authentic smoky flavor.
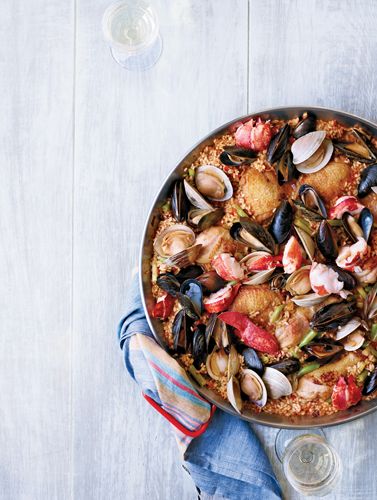
Chicken-and-Seafood Paella with Allioli
Time
2 hr 15 min active 4 hr 15 min total
Makes
8 servings
LOBSTER-INFUSED CHICKEN STOCK
Two 1¼-lb. lobsters
2 dried ñora chiles (see Note), stemmed and seeded
½ cup boiling water
2 Tbsp. vegetable oil
¼ cup tomato paste
½ cup brandy
2 medium onions, quartered
2 medium carrots, quartered
2 fennel bulbs, quartered and cored
4 garlic cloves, quartered
2 qts. plus 3 cups chicken stock
2 bunches of basil
¼ tsp. loosely packed saffron threads
SOFRITO
1 dried ñora chile, stemmed and seeded
½ cup boiling water
2 Tbsp. extra-virgin olive oil
1 small onion, minced
2 garlic cloves, minced
½ red bell pepper, minced
2 plum tomatoes, grated on a box grater
1 Tbsp. white wine vinegar
Salt and pepper
CHICKEN-AND-SEAFOOD PAELLA
2 Tbsp. extra-virgin olive oil
8 chicken drumsticks (about 3 lbs.)
8 chicken thighs (about 3 lbs.)
Salt and pepper
2¼ cups Bomba or Calasparra rice (see Note)
½ lb. romano beans or green beans, cut into ½-inch pieces
2 lbs. littleneck clams, scrubbed
1 lb. mussels, scrubbed
Lemon wedges, for serving
ALLIOLI (GARLIC MAYONNAISE)
3 garlic cloves
1 large egg
2 tsp. white wine vinegar
¼ cup fresh lemon juice
Pinch of salt
¼ cup canola or grapeseed oil
½ cup extra-virgin olive oil
1. Prepare the stock
In a large pot, boil the lobsters until just red but still undercooked, 4 minutes; let cool. Remove the meat from the tails, claws and knuckles; discard the intestinal veins and cut the tails into thick slices. Put the meat in a bowl and refrigerate. Chop the bodies and legs.
2. In a heatproof bowl, cover the chiles with the boiling water and let stand for 15 minutes. Meanwhile, in a pot, heat the oil. Add the chopped shells and cook over high heat for 1 minute. Reduce the heat to moderate and cook, stirring, until browned. Stir in the tomato paste and cook for 1 minute. Add the brandy and simmer for 2 minutes, scraping up any browned bits. Add the onions, carrots, fennel and garlic; cook over low heat for 5 minutes.
3. Lift the chiles from the bowl and mince; add with the soaking liquid to the pot. Add the chicken stock and basil; bring to a boil. Cover partially and simmer for 2 hours. Strain the lobster-infused stock. You should have about 10 cups. Add the saffron and let stand for 20 minutes.
4. Meanwhile, make the sofrito
In a small heatproof bowl, cover the ñora chile with the boiling water and let stand until softened, about 15 minutes. Lift the pepper from the water and finely chop it. Return the chopped pepper to the soaking liquid.
5. In a medium skillet, heat the olive oil. Add the onion and cook over moderate heat until translucent, about 4 minutes. Add the garlic, bell pepper, grated tomatoes, vinegar and the chopped ñora chile and its soaking liquid. Simmer over low heat, stirring occasionally, until the liquid has evaporated and the vegetables are very soft and browned, about 20 minutes. Season with salt and pepper. You should have about 1 cup.
6. Grill the paella
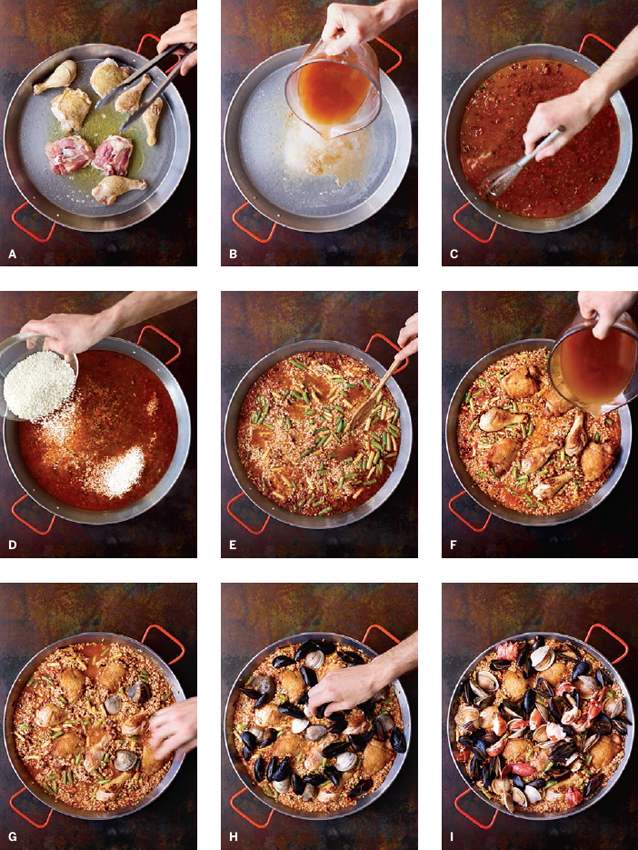
Light a hardwood charcoal or wood fire in a covered grill. When the fire is very hot, set a 17-inch paella pan on the grill. Add the olive oil and heat until shimmering. Season the chicken with salt and pepper and cook until browned, about 4 minutes per side (A)
. Transfer the chicken to a plate. Add 3 cups of the hot lobster-infused stock to the pan, scraping up the browned bits on the bottom (B)
. Whisk in the 1 cup of sofrito and bring to a rolling boil (C)
. Add the rice and romano beans, shaking the pan to distribute them evenly (D)
. Season with salt and return to a vigorous boil. Cook for 4 minutes, stirring as little as possible; add more lit coals and/or wood to the fire to maintain the temperature (E)
. Bury the chicken pieces skin side up in the rice and cook until the stock is nearly evaporated, about 6 minutes.
7. Reduce the heat to a simmer; if necessary, use cast-iron trivets to lift the pan higher off the grill to reduce the heat. Add 3 more cups of the lobster-infused stock, 1 cup at a time, shaking the pan from time to time and waiting until the stock is nearly absorbed between additions, 10 minutes (F) . The rice should be lightly browned and crisp on the bottom, but not burned. Continue to cook the paella, adding as much of the remaining hot stock as necessary, ½ cup at a time, until the rice is almost tender and still very moist, 5 minutes. Nestle the clams and mussels into the rice, cover the grill and cook until they start to open, 6 minutes (G, H) . Arrange the reserved lobster meat all over the paella. Cover and cook until the clams and mussels are wide open and the lobster is heated through, 3 minutes longer (I) .
8. Meanwhile, make the allioli
In a blender, puree the garlic, egg, vinegar, lemon juice and salt at high speed. With the blender at low speed, add the canola oil in a thin stream and blend until the sauce is creamy, then drizzle in the olive oil until blended.
9. Transfer the paella to the table, cover with a kitchen towel and let stand for 5 minutes. Serve with the allioli and lemon wedges.
NOTE Dried ñora chile peppers and Bomba and Calasparra rice are available at specialty stores or online from tienda.com. If you can’t find ñoras, substitute an equal amount of ancho chiles.
WINE Albariño, the crisp Spanish white, has a vibrant minerality that’s reminiscent of the sea, making it an easy match for this paella’s delicately briny shellfish.
Sofrito Secret
The key to sofrito, a mixture of sautéed vegetables that flavors paella? The slower you cook it, the deeper the flavor will be.
Top It Off
Mullen recommends dolloping the paella with some allioli (garlic mayonnaise). The name comes from the Catalan phrase all i oli, which means “garlic and oil.”
Porchetta
This Italian showstopper is traditionally a whole pig that’s been deboned, stuffed, rolled, tied and roasted. With some smart tweaks, Michael Pirolo of Macchialina in Miami Beach transforms it into a spectacular main course using just the pork belly. The roast fits in a conventional oven yet is big (and impressive) enough to feed a crowd. By omitting the leaner cuts, which are prone to drying out, Pirolo’s recipe guarantees amazingly moist meat—all encased in “crack your teeth crispy” skin.
Pork Belly Porchetta
Time
45 min active; 4 hr total plus 2 days brining and seasoning
Makes
10 servings
BRINE
10 rosemary sprigs
10 bay leaves
3 heads of garlic, smashed
⅓ cup juniper berries
3 Tbsp. black peppercorns
2 Tbsp. fennel seeds
1 Tbsp. crushed red pepper
1¼ cups kosher salt
¼ cup sugar
2 Tbsp. honey
One 9-lb. meaty pork belly with skin (see Note)
RUB
1½ Tbsp. fennel seeds
1 tsp. juniper berries
¾ tsp. black peppercorns
¾ tsp. freshly grated nutmeg
¾ tsp. crushed red pepper
3 Tbsp. very finely chopped rosemary
4 large garlic cloves, minced
Roasted potatoes, for serving
1. Brine the belly
In a large pot, combine the rosemary, bay leaves, garlic, juniper berries, peppercorns, fennel seeds, crushed red pepper and 1 gallon of water. Bring to a simmer over high heat, cover and cook for 10 minutes. Add the salt, sugar and honey and stir until dissolved.
2. Pour the brine into a large roasting pan and let cool completely. Add the pork belly to the brine, skin side up. Cover with plastic wrap and refrigerate overnight.
3. Make the rub
In a small skillet, toast the fennel seeds, juniper berries and peppercorns over moderate heat until they are fragrant, about 1 minute. Let cool, then grind to a powder in a spice grinder. Transfer the spice blend to a small bowl and stir in the nutmeg, crushed red pepper, rosemary and garlic.
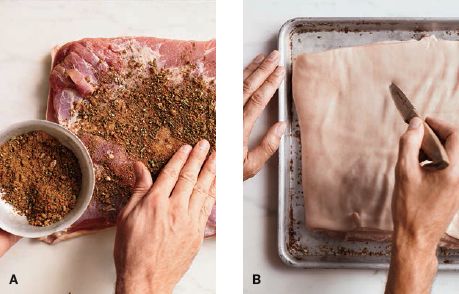
4. Drain the pork belly and pat dry, then pick off any spices. Turn the belly skin side down and rub the meaty side with the spice blend (A) . Transfer the pork belly to the roasting pan, skin side up, and pierce the skin all over with the tip of a knife (B) . Refrigerate the pork uncovered overnight.
5. Preheat the oven to 400° and position a rack in the lower third. Set the pork belly skin side down on a work surface. Roll up the belly lengthwise to form a tight cylinder and tie tightly at 2-inch intervals with kitchen twine (C) .
6. Return the pork to the pan and roast for 1 hour. Lower the heat to 300° and roast for 2 hours and 15 minutes longer, until the skin is deep brown and crisp and an instant-read thermometer inserted in the center registers 185°. Transfer the porchetta to a cutting board and let rest for 20 minutes. Remove the twine and slice the porchetta ½ inch thick, using a serrated knife to cut through the skin (D) . Serve with roasted potatoes (E) .
NOTE Because pork belly can be a very fatty cut, be sure to ask your butcher for one that is very meaty, at least 50 percent lean.
MAKE AHEAD The porchetta can be prepared through Step 5 and refrigerated overnight.
WINE Spicy, dark-fruited Tuscan red.

Love Your Leftovers
Salumi
Serve cold and thinly sliced on a cured-meat board.
Sandwich
Layer with melted provolone and sautéed broccoli rabe on toasted ciabatta.
Eggs
Fold into an omelet with goat cheese and scallions.
Mazemen Ramen
Ramen obsessive Ivan Orkin takes a labor-intensive approach to the dish; the broth recipe alone fills five pages in his cookbook, Ivan Ramen. The most manageable—and still inspiring—recipe for the home cook is the drier-style mazemen. Because the broth is a less critical component, basic chicken stock mixed with instant dashi achieves excellent results. The main project, then, is preparing Orkin’s signature toasted rye noodles, luscious pork belly and chile-eggplant sofrito.

Chile-Eggplant Mazemen Ramen with Pork Belly
Time
2 hr 45 min active 5 hr total
Makes
8 servings
PORK BELLY
One 2-lb. piece of skinless meaty pork belly
1 Tbsp. canola oil
Kosher salt and black pepper
3 cups chicken stock or low-sodium broth
CHILE-EGGPLANT SOFRITO
1 cup canola oil
1 large onion, minced (2 cups)
½ small eggplant, minced (1½ cups)
2 medium tomatoes, minced (1¼ cups)
2½ tsp. chipotle chile powder
Kosher salt
SHOYU TARE
⅓ cup canola oil
1 large onion, minced
3 Tbsp. minced peeled fresh ginger
2 tsp. minced garlic
⅔ cup reduced-sodium soy sauce
½ cup dry sake
½ cup mirin
2 cups chicken stock or low-sodium broth
1 Tbsp. instant dashi, such as Ajinomoto Hon Dashi
TOASTED RYE NOODLES
20 g. (1 Tbsp. plus ¾ tsp.) baking soda
70 g. (¼ cup plus 2½ Tbsp.) rye flour
620 g. (4 cups) bread flour
300 g. (2 cups) cake flour
13 g. (1½ Tbsp.) kosher salt
430 ml (2 cups plus 2 Tbsp.) cool water
Cornstarch, for dusting
Thinly sliced scallions and chipotle chile powder, for garnish
1. Prepare the pork belly
Preheat the oven to 425°. Rub the pork belly on both sides with the oil, season with salt and pepper and set it on a rack in a medium roasting pan. Add the stock to the pan, cover and roast the pork for about 2½ hours, until very tender. Let the pork rest for 30 minutes. Strain the rendered fat through a cheesecloth-lined sieve into a bowl; the stock will have evaporated. Cut the pork into ½-inch-thick slices and keep warm (A)
.
2. Meanwhile, make the sofrito
In a large saucepan, heat the oil. Add the onion and eggplant and cook over low heat, stirring occasionally, until the vegetables are very soft, about 1 hour. Add the tomatoes and cook, stirring occasionally, until the tomatoes have almost melted, about 1 hour. Stir in the chipotle powder and cook for 15 minutes longer; season with salt. Transfer the sofrito to a bowl and let cool to room temperature. Drain the sofrito in a sieve; discard the oil or reserve it for another use.
3. Make the shoyu tare
In a medium saucepan, heat the oil. Add the onion and cook, stirring occasionally, until softened, about 5 minutes. Add the ginger and garlic and cook, stirring occasionally, until lightly caramelized, about 10 minutes. Add the soy sauce, sake and mirin and bring to a boil; simmer for 2 minutes. Add the stock and dashi powder and simmer for 3 minutes. Keep warm.
4. Make the toasted rye noodles
Preheat the oven to 275°. In a small ovenproof skillet lined with aluminum foil, spread the baking soda in an even layer and bake for 1 hour (B)
. Let cool.
5. Meanwhile, in a small nonstick skillet, toast the rye flour over moderately low heat, stirring, until fragrant, about 4 minutes (C) . Using a rubber spatula, scrape the toasted rye flour into the bowl of a stand mixer fitted with the dough hook. Add the bread flour and cake flour. In a medium bowl, stir the baked baking soda and salt with the cool water until dissolved (D) . With the mixer at low speed, slowly blend the baking soda solution into the flour in 3 additions. Mix, scraping down the bowl frequently, until the dough starts to come together. At medium speed, knead the dough until it forms a shaggy ball, about 10 minutes. Cover the bowl with plastic wrap and let stand at room temperature for 30 minutes.
6. Pat the dough into a disk and cut into 8 equal pieces (E, F) . Work with 1 piece at a time and keep the rest of the dough covered with a damp kitchen towel: Flatten the dough about ¼ inch thick. Roll the dough through a pasta machine at the widest setting. Fold the dough in thirds, like a letter, and roll it again at the widest setting. Repeat this folding and rolling until the dough feels smooth and elastic, about 3 more times. Roll the dough through successively narrower settings, two times per setting without folding, until the sheet of dough is 1/16 inch thick (G) . Cut the sheet of dough into roughly 12-inch lengths and transfer them to a baking sheet or work surface lightly dusted with cornstarch. Lightly dust the pasta sheets with cornstarch and cover with a dry kitchen towel. Repeat with the remaining dough, slightly overlapping the pasta sheets on the baking sheet.
7. Run each sheet of pasta through the spaghetti cutter (H) . Gently toss the noodles with cornstarch and spread them on a baking sheet or work surface in a single layer in 8 even portions (roughly 5 ounces each) (I) .
8. Assemble the ramen
Pour ⅓ cup of the warm shoyu tare and 1 teaspoon of the reserved rendered pork fat into a bowl. Boil 1 portion of noodles in unsalted water just until al dente, about 1 minute. (If you are assembling multiple bowls of ramen, you can cook up to 4 portions of noodles together at the same time.) Drain the noodles well and add to the bowl. Top with ¼ cup of the sofrito and a slice of pork belly. Garnish with scallions and chipotle powder and serve.
MAKE AHEAD The pork belly and its rendered fat, the chile-eggplant sofrito and the shoyu tare can be refrigerated separately for up to 3 days. The 5-ounce portions of noodles can be refrigerated overnight in individual resealable plastic bags or frozen for up to 2 weeks. Cook the noodles from frozen.

Ramen 101
Noodles
In Japan, cooks use kansui
(an alkaline solution) to give ramen noodles their springy texture; here, Orkin substitutes baking soda that’s been baked to increase its potency. This dough may seem too dry at first, but adding extra water will result in noodles that are too soft.
Shoyu tare
Tare
—a mixture of ingredients like shoyu (soy sauce), sake and mirin—is the main seasoning in ramen.
Sofrito
Borrowing from Latin American, Italian and Spanish cooking, Orkin tops his ramen with sofrito: vegetables sautéed in oil until almost melting.
Croissants
In Washington, DC, the best power breakfasts involve crackly croissants from Frenchie’s bakery. Here, owner Erica Skolnik simplifies the notoriously fussy shaping process by “turning” (rolling out and folding) her butter and dough just two times, not the traditional four.
Frenchie's Croissants
Time
1 hr 15 min active; 10 hr total plus 2 overnight restings
Makes
18 croissants
SPONGE
1¼ cups all-purpose flour
⅔ cup water, at room temperature
One ¼-oz. package active dry yeast
DOUGH
Extra-virgin olive oil, for greasing
1¾ cups plus 1 Tbsp. whole milk
3 cups all-purpose flour
3 cups bread flour
⅓ cup plus 1 Tbsp. sugar
1½ Tbsp. kosher salt
Two ¼-oz. packages active dry yeast
5 sticks (1¼ lbs.) cold unsalted European-style butter (82 percent butterfat), such as Plugrá
2 large eggs
1. Make the sponge
In a medium bowl, combine the flour, water and yeast and mix well with a wooden spoon. Cover with plastic wrap and refrigerate overnight.
2. Make the dough
Let the sponge stand at room temperature for 30 minutes. Lightly grease a large bowl with olive oil.
3. In a small saucepan, heat the milk until lukewarm. In the bowl of a stand mixer fitted with the dough hook, combine both flours with the sugar, salt and yeast. Scrape in the sponge. At low speed, drizzle in the lukewarm milk and mix just until the dough comes together. Let stand for 10 minutes.
4. Knead the dough at low speed until it forms a ball, about 3 minutes. Transfer to the prepared bowl, cover with plastic wrap and let stand at room temperature for 30 minutes. Punch down and refrigerate for 3 hours.
5. Meanwhile, on a sheet of parchment paper, arrange the sticks of butter side by side so they touch. Cover with another sheet of parchment. Using a rolling pin, pound the butter flat and roll out to a 10-by-12-inch rectangle (A) . Refrigerate until ready to use.
6. Remove the butter from the refrigerator and let stand at room temperature for about 10 minutes, until soft and pliable—the butter should yield gently when you press it with your finger and hold the indent, like a ripe avocado. On a lightly floured surface, using a lightly floured rolling pin, roll out the dough to a 12-by-28-inch rectangle. If the dough springs back, cover it with a kitchen towel and let rest for 5 minutes before rolling. Arrange the butter in the center of the dough so the short sides are parallel. Fold over the 2 short sides of the dough so they meet in the center; pinch together to seal (B) . Pinch the long sides of the dough together to completely seal in the butter. Turn the dough so that a long side is facing you and roll out to a 12-by-28-inch rectangle. Starting from the bottom, fold the dough into thirds like a letter (C) . Brush off any excess flour and wrap the dough in plastic. Chill until firm but pliable, about 1 hour.
7. Arrange the dough on a lightly floured surface with a short side facing you. Using a lightly floured rolling pin, roll out the dough to a 12-by-28-inch rectangle. Fold into thirds like a letter, wrap in plastic and freeze overnight. Before baking, let thaw in the refrigerator until semi-firm and pliable, about 3 hours.
8. Shape the croissants
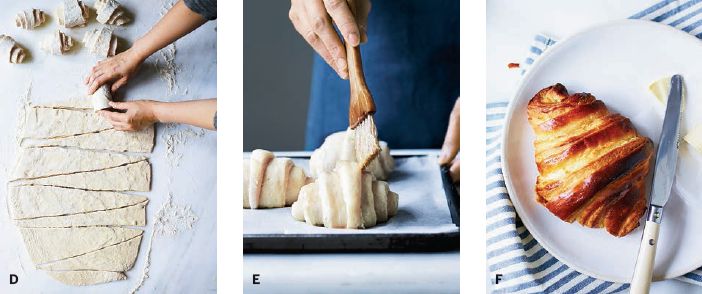
Line 3 baking sheets with parchment paper. On a lightly floured surface, using a lightly floured rolling pin, roll out the layered dough to a 13-by-36-inch rectangle. Using a pizza cutter or sharp knife, cut the dough crosswise to form nine 13-by-4-inch strips. Halve each strip lengthwise on the diagonal to make 18 long triangles. Starting at the shortest side, roll each triangle into a crescent shape (D)
. Arrange the croissants on the prepared sheets, tip side down and spaced 3 inches apart. Cover loosely with plastic wrap and let rise at room temperature until doubled in size, 1 to 2 hours.
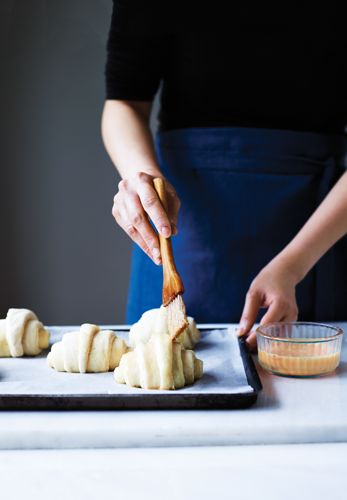
9. Preheat the oven to 400°. In a small bowl, beat the eggs with 1 tablespoon of water. Brush the croissants with the egg wash (E) . Bake until deep golden brown and crisp, 20 to 23 minutes. Transfer the croissants to a rack to cool, then enjoy with butter and jam (F) .
MAKE AHEAD The baked croissants can be frozen for 1 month. Reheat in a 350° oven until warm and crisp.

Bigger is Better
Skolnik makes her croissants larger than the classic kind. “There are more layers to unravel,” she says. “People feel like they’re getting something special.”
Babka
Melissa Weller, master baker of Sadelle’s in New York City, is obsessed with breakfast pastries— both eating and making them. Her thickly glazed babkas are next-level delicious, with whorls of chocolate and chocolate-cookie crumbs or raisin-walnut filling inside tender, buttery dough. Learn how she makes these two varieties of the classic and her genius twisting technique.
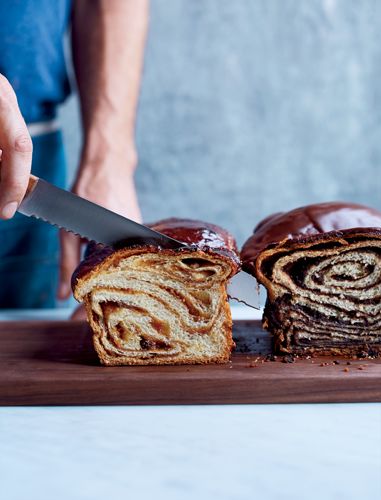
Raisin-Walnut Babka
Time
1 hr 30 min active; 6 hr total plus overnight resting
Makes
two 9-inch babkas
DOUGH
4 cups all-purpose flour, preferably King Arthur
⅓ cup plus 2 Tbsp. granulated sugar
2 tsp. fine sea salt
1 cup whole milk, warmed
1 package active dry yeast
1 large egg plus 1 large egg yolk
1 stick plus 2 Tbsp. unsalted butter, cut into tablespoons, at room temperature
Baking spray
FILLING
3 cups golden raisins, soaked in warm water for 10 minutes and drained
¾ cup granulated sugar
6 Tbsp. unsalted butter, softened
1 Tbsp. ground cinnamon
1½ tsp. fine sea salt
½ cup dark raisins, soaked in warm water for 10 minutes and drained
¾ cup walnuts, toasted and coarsely chopped
GLAZE
1 stick unsalted butter
6 Tbsp. whole milk
1½ cups confectioners’ sugar
2 Tbsp. ground cinnamon
¼ tsp. fine sea salt
1. Make the dough
In a medium bowl, whisk the flour with the granulated sugar and salt. In a stand mixer fitted with the dough hook, combine the milk with the yeast and let stand until foamy, about 5 minutes. Add the egg and egg yolk and sprinkle the dry ingredients on top. Mix at low speed for 2 minutes. Scrape down the side of the bowl and mix at medium speed until all of the dry ingredients are incorporated and the dough is smooth, 5 minutes. Add all of the butter at once and mix at low speed until it is fully incorporated and a tacky dough forms, 3 minutes; scrape down the side of the bowl as needed during mixing. Cover the bowl with plastic wrap and let the dough stand at room temperature for 1 hour.
2. Line a large baking sheet with parchment paper and coat the paper generously with nonstick baking spray. Scrape the dough out onto the parchment paper and cut the dough in half. Pat each piece into a neat square. Cover with plastic wrap and refrigerate overnight.
3. Make the filling
Combine all of the ingredients except the dark raisins and walnuts in a food processor and puree until smooth.
4. Roll the dough
Coat two 9-by-4-inch loaf pans with nonstick baking spray and line with parchment paper, allowing 2 inches of overhang on each of the long sides. Roll out each square of dough to a 16-inch square. Using an offset spatula, spread all but ½ cup of the raisin puree in an even layer over the dough squares to within ½ inch of the edges. Sprinkle the dough evenly with the dark raisins and toasted walnuts. Starting at the edge nearest you, tightly roll up each dough square jelly roll–style into a tight log.
5. Twist the dough
Using a sharp knife, cut the logs in half crosswise. Using an offset spatula, spread ¼ cup of the reserved filling on the top and sides of 2 of the halves. Set the other halves on top in the opposite direction to form a cross. Twist the coated and uncoated logs together to form spirals and transfer to the prepared pans. Cover the loaves with a towel and let stand in a warm place until doubled in bulk, about 2 hours.
6. Bake
Preheat the oven to 375°. Bake the loaves in the center of the oven for about 45 minutes, until puffed and well browned. Let cool slightly, then use the parchment paper to lift the babkas out of the pans and onto a rack set over a large rimmed baking sheet. Discard the paper.
7. Make the glaze
In a small saucepan, melt the butter in the milk. Whisk in the remaining ingredients. Spread the glaze on the warm babkas and let stand until set, about 30 minutes.
Chocolate Babka
Time
1 hr 15 min active; 6 hr total plus overnight resting
Makes
two 9-inch babkas
DOUGH
4 cups all-purpose flour, preferably King Arthur
⅓ cup plus 2 Tbsp. sugar
2 tsp. fine sea salt
1 cup whole milk, warmed
1 package active dry yeast
1 large egg plus 1 large egg yolk
1 stick plus 2 Tbsp. unsalted butter, cut into tablespoons, at room temperature
Baking spray
FILLING
9 oz. milk chocolate, finely chopped
3 oz. bittersweet chocolate, finely chopped
1½ sticks unsalted butter, cubed
1½ cups finely ground chocolate wafer cookies
3 Tbsp. honey
GLAZE
12 oz. bittersweet chocolate, finely chopped
4 oz. milk chocolate, finely chopped
1½ sticks unsalted butter, cubed
2 Tbsp. light corn syrup
1. Make the dough
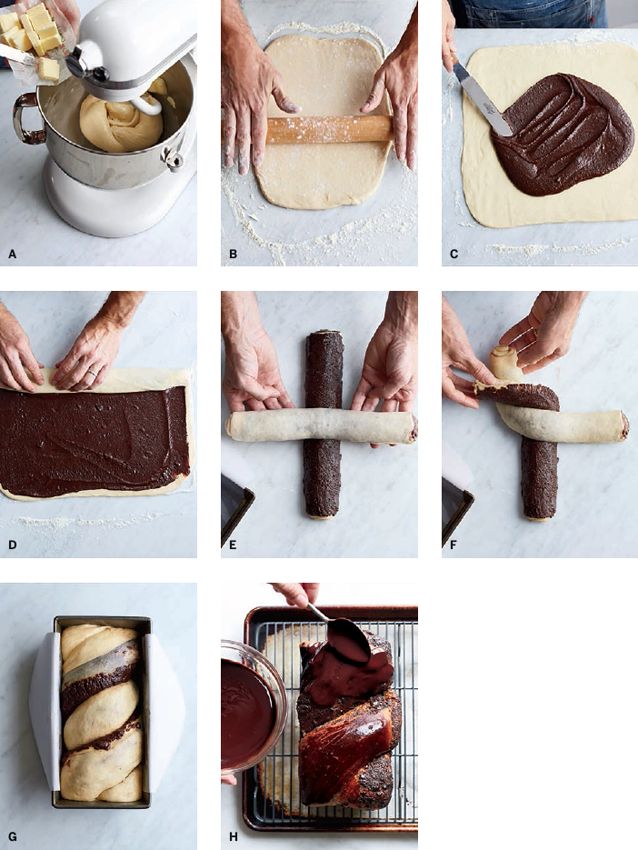
In a medium bowl, whisk the flour with the sugar and salt. In a stand mixer fitted with the dough hook, combine the milk with the yeast and let stand until foamy, about 5 minutes. Add the egg and egg yolk and sprinkle the dry ingredients on top. Mix at low speed for 2 minutes. Scrape down the side of the bowl and mix at medium speed until all of the dry ingredients are incorporated and the dough is smooth, about 5 minutes. Add all of the butter at once and mix at low speed until it is fully incorporated and a tacky dough forms, about 3 minutes; scrape down the side of the bowl as needed during mixing (A)
. Cover the bowl with plastic wrap and let the dough stand at room temperature for 1 hour.
2. Line a large baking sheet with parchment paper and coat the paper generously with nonstick baking spray. Scrape the dough out onto the parchment paper and cut the dough in half. Pat each piece into a neat square. Cover with plastic wrap and refrigerate overnight.
3. Make the filling
In a large heatproof bowl set over a saucepan of simmering water, melt both chocolates with the butter, stirring occasionally, until smooth. Let cool to room temperature, then stir in the cookie crumbs and honey.
4. Roll the dough
Coat two 9-by-4-inch loaf pans with nonstick baking spray and line with parchment paper, allowing 2 inches of overhang on each of the long sides. Roll out each square of dough to a 16-inch square (B)
. Using an offset spatula, spread all but ½ cup of the filling in an even layer over the dough squares to within ½ inch of the edges (C)
. Starting at the edge nearest you, tightly roll up each dough square jelly roll–style into a tight log (D)
.
5. Twist the dough
Using a sharp knife, cut the logs in half crosswise. Using an offset spatula, spread ¼ cup of the reserved filling on the top and sides of 2 of the halves. Set the other halves on top in the opposite direction to form a cross (E)
. Twist the coated and uncoated logs together to form spirals (F)
. Transfer the loaves to the prepared pans, cover them with a towel and let stand in a warm place until doubled in bulk, about 2 hours (G)
.
6. Bake
Preheat the oven to 375°. Bake the loaves in the center of the oven for about 45 minutes, until puffed and well browned. Let cool slightly, then use the parchment paper to lift the babkas out of the pans and onto a rack set over a baking sheet. Discard the paper.
7. Make the glaze
In a heatproof bowl set over a saucepan of simmering water, melt both chocolates with the butter; stir until smooth. Stir in the corn syrup. Spread the glaze on top of the warm babkas and let stand until set, about 30 minutes (H)
.
Raising the Babka Bar
Weller spreads the filling on the inside and outside of the dough before twisting, which guarantees an ample swirl. Then, instead of the usual crumb topping, she opts for a thick glaze—chocolate, as in the recipe here, or cinnamon, for the raisin-walnut version.
Cinnamon Rolls
Pastry chef Megan Garrelts has a cult following for her all-American sweets. At Bluestem in Kansas City, Missouri, her cinnamon rolls require at least two days to make, and they’re served one at a time in individual mini skillets. In this streamlined method, the rolls are swirled with pecans, sugar, cinnamon and sour cream, then baked in big batches.
Glazed Cinnamon Rolls with Pecan Swirls
Time
1 hour active 10 hr 30 min total
Makes
2 dozen rolls
DOUGH
2¼ tsp. instant dry yeast
2 Tbsp. warm water
¼ cup plus 1 tsp. granulated sugar
6 large eggs
4½ cups sifted all-purpose flour (1¼ lbs.), plus more for rolling
1½ tsp. salt
3 sticks unsalted butter, cut into ½-inch cubes and chilled
FILLING
4 oz. pecans (1 cup)
1½ cups packed light brown sugar
1 Tbsp. cinnamon
1 cup sour cream
2 large eggs beaten with ¼ cup of water
SUGAR GLAZE
1½ cups confectioners’ sugar
4 Tbsp. unsalted butter, softened
¼ cup heavy cream
1 tsp. pure vanilla extract
1. Make the dough
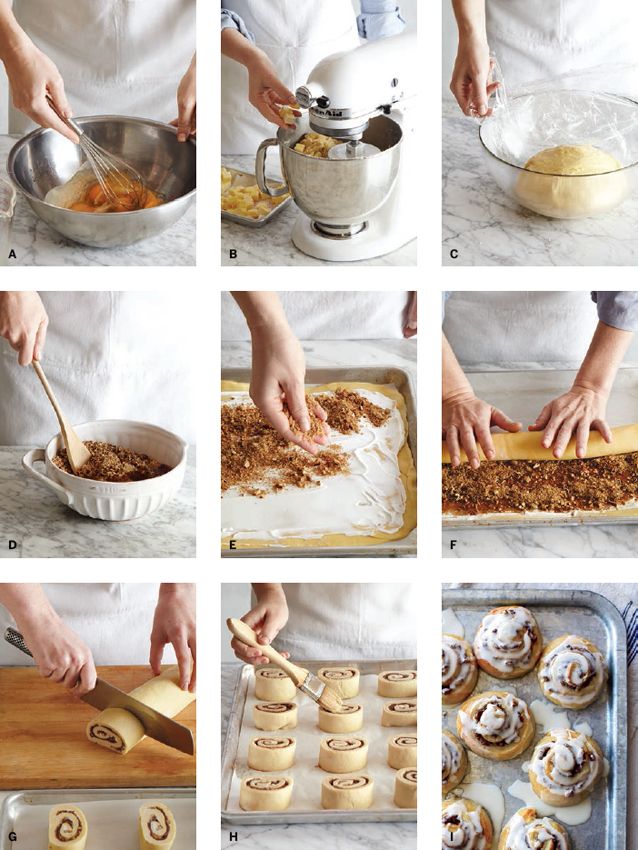
In a medium bowl, combine the yeast with the warm water and 1 teaspoon of the granulated sugar and let stand until foamy, about 5 minutes. Whisk in the 6 eggs (A)
. In a stand mixer fitted with the dough hook, mix the 4½ cups of sifted flour with the salt and the remaining ¼ cup of granulated sugar. Add the egg mixture and beat at medium speed until the dough is just moistened and very stiff. Add the butter a few cubes at a time, waiting until it is partially kneaded into the dough before adding more (B)
. Continue kneading until the butter is fully incorporated and the dough is silky, 8 to 10 minutes. Transfer the dough to an oiled bowl, cover with plastic wrap and refrigerate until chilled and slightly risen, at least 2 hours or overnight (C)
.
2. Make the filling
Preheat the oven to 350°. Spread the pecans in a pie plate and toast for about 8 minutes, until fragrant and browned. Let cool, then finely chop the pecans. Transfer to a medium bowl and stir in the brown sugar and cinnamon (D)
.
3. Line 2 baking sheets with parchment paper. On a floured surface, cut the dough into 2 pieces. Working with 1 piece at a time (while keeping the other refrigerated), roll the dough out to a 12-by-16-inch rectangle. Transfer the dough to a baking sheet and refrigerate until chilled. Repeat with the remaining dough.
4. Spread half of the sour cream over 1 sheet of dough, leaving a ½-inch border all around. Sprinkle with half of the pecan filling (E) . Brush the long sides with some of the egg wash. Roll up the dough from a long side into a tight cylinder and pinch the ends to seal (F) . Freeze the dough log until it is chilled, about 2 hours. Repeat with the remaining dough, sour cream and filling. Cover and refrigerate the remaining egg wash.
5. Transfer the logs to a work surface and cut each one into 12 even slices. Set the slices on the baking sheet, cut side up (G) . Cover with plastic wrap and freeze until firm, at least 3 hours and preferably overnight.
6. Unwrap the rolls and let stand at room temperature for 1 hour.
7. Preheat the oven to 350°. Brush the tops and sides of the rolls with the egg wash (H) . Bake in the center of the oven for 35 to 40 minutes, until golden and risen.
8. Meanwhile, make the sugar glaze
In a medium bowl, using a hand mixer, beat the confectioners’ sugar with the butter, cream and vanilla until thick and smooth. Spread the glaze on the hot cinnamon rolls and let cool for 20 minutes before serving (I)
.
Make-Ahead Tip
The unbaked cinnamon rolls and sugar glaze can be frozen separately for up to 1 month.
Ice Cream Cake
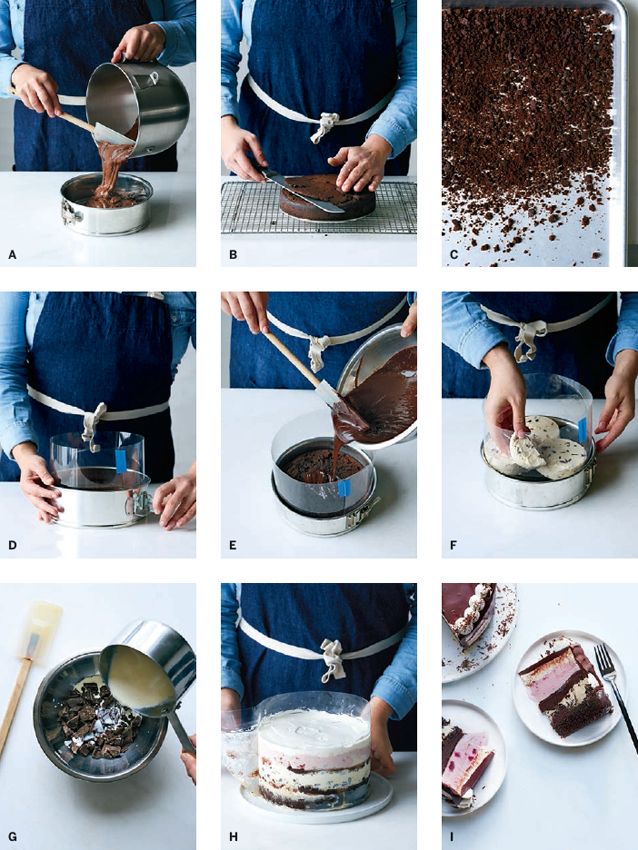
Laura Sawicki loves celebrating birthdays. At Launderette in Austin, she makes an epic layered ice cream birthday cake that’s a nostalgic nod to the Carvel and Baskin-Robbins creations she adored as a kid. The recipe she shares here—with a devil’s food base, cold hot fudge, chocolate crunchies and a seriously thick chocolate ganache glaze—will make chocoholics swoon.
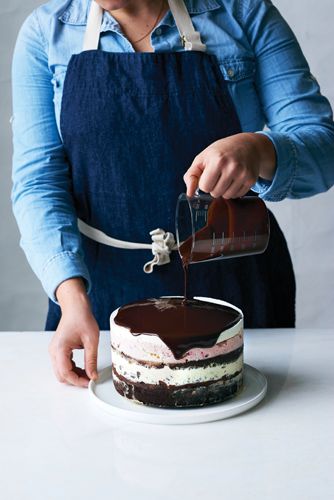
Ice Cream Birthday Cake
Time
1 hr 30 min active; 5 hr total plus overnight freezing
Makes
16 servings
DEVIL’S FOOD CAKE
1 cup all-purpose flour
½ tsp. baking powder
½ tsp. baking soda
½ tsp. kosher salt
½ cup plus 1 Tbsp. unsweetened cocoa powder
½ cup hot water
4 Tbsp. unsalted butter, at room temperature
1¾ cups dark brown sugar
1 large egg plus 1 large egg yolk
½ cup buttermilk
½ tsp. pure vanilla extract
HOT FUDGE
1 cup heavy cream
6 Tbsp. dark brown sugar
4½ Tbsp. unsweetened cocoa powder
¼ cup plus 2 Tbsp. light corn syrup
9 oz. bittersweet chocolate, coarsely chopped
1½ Tbsp. unsalted butter
½ tsp. kosher salt
CAKE ASSEMBLY
2 pints chocolate chip ice cream, softened slightly
2 pints strawberry ice cream, softened slightly
2½ cups heavy cream, chilled
3 Tbsp. granulated sugar
8 oz. bittersweet chocolate, coarsely chopped
Maraschino cherries and rainbow sprinkles, for decorating (optional)
1. Make the devil’s food cake
Preheat the oven to 350°. Spray an 8-inch springform pan with nonstick cooking spray. In a medium bowl, whisk the flour with the baking powder, baking soda and salt. In a small bowl, whisk the cocoa powder with the hot water until a smooth paste forms. In the bowl of a stand mixer fitted with the paddle, beat the butter with the brown sugar at moderate speed for 3 minutes. Beat in the egg, egg yolk, buttermilk and vanilla. At low speed, beat in the dry ingredients and cocoa paste in 2 alternating batches.
2. Scrape the batter into the prepared pan (A) . Bake for 30 to 35 minutes, until a toothpick inserted in the center comes out with a few moist crumbs attached. Let the cake cool for 15 minutes, then remove the ring and let the cake cool completely on a rack. Leave the oven on.
3. Using a serrated knife, cut a ¼-inch-thick layer off the top of the cake (B) . In a food processor, pulse the cake top until fine crumbs form. Spread the crumbs on a small rimmed baking sheet and bake for 10 to 12 minutes, turning the pan halfway through, until the crumbs are crisp (C) . Let the crunchies cool completely.
4. Make the hot fudge
In a small saucepan, combine the cream with the brown sugar, cocoa powder and corn syrup and bring to a boil over moderate heat, whisking constantly. Reduce the heat to low and simmer for 1 minute. Remove from the heat and add the chocolate, butter and salt; whisk until smooth. Scrape the hot fudge into a bowl and let cool to room temperature.
5. Assemble the cake
Using scissors, trim a sheet of clear acetate to 6-by-24 inches. Wrap the acetate around the cake and secure it with tape. Secure the springform pan ring around the acetate-wrapped cake (D)
.
6. Using an offset spatula, spread half of the hot fudge evenly over the cake (E) . Top with half of the cake crunchies Freeze until the fudge is firm, about 20 minutes.
7. Using the spatula, spread the chocolate chip ice cream over the fudge layer (F) . Top with the remaining cake crunchies and press down to help them adhere. Freeze the cake for 20 minutes, until firm.
8. Remove the cake from the freezer and spread the remaining fudge over the crunchies. Freeze for 20 minutes. Spread the strawberry ice cream over the fudge and freeze for another 20 minutes.
9. In the bowl of a stand mixer fitted with the whisk, beat 1½ cups of the heavy cream with the granulated sugar until it holds soft peaks. Spread 2 cups of the whipped cream over the strawberry ice cream layer; refrigerate the rest of the whipped cream for decorating. Freeze the cake overnight.
10. Place the chocolate in a heatproof medium bowl. In a small saucepan, bring the remaining 1 cup of heavy cream to a boil. Pour the hot cream over the chocolate and let stand until melted, about 5 minutes (G) . Stir until smooth, then tap the bowl on the counter to pop any air bubbles. Let the ganache cool down to 80°, about 30 minutes.
11. Carefully remove the springform ring and peel the acetate off the cake (H) . Transfer the cake to a rack set over a rimmed baking sheet. Working quickly, pour the ganache onto the center of the cake in one fluid motion, allowing the excess to drip over the side. Freeze the cake until the ganache is firm, about 30 minutes.
12. Meanwhile, whisk the reserved whipped cream until stiff peaks form. Transfer to a pastry bag fitted with a star tip. Pipe whipped cream around the edge of the cake and garnish with maraschino cherries and rainbow sprinkles, if desired. Freeze the cake for 30 minutes before serving (I) .
MAKE AHEAD The cake can be assembled through Step 11; once the ganache is firm, wrap the cake in plastic and freeze for up to 1 week. Decorate the cake the day you plan to serve it. For neat slices, use a sharp knife warmed in hot water and wipe it off between cuts.
Smooth Finish
You’ll need an acetate collar to make this tall cake. You can buy them presized or cut one yourself with scissors. They’re readily available at baking supply stores and from amazon.com .
Cultured Butter
It doesn’t take much more than a brief lapse in attention to make butter, as anyone who’s mistakenly whipped heavy cream for too long well knows. The European-style cultured variety, however, doesn’t happen by accident. Adeline Druart of the excellent Vermont Creamery shows how to make the pleasingly tangy and nutty butter at home using a stand mixer as a churner.

European-Style Cultured Butter
Time
1 hr plus 1 to 2 days culturing
Makes
¾ lb
1 qt. good-quality heavy cream (at least 40 percent butterfat)
⅓ cup buttermilk or crème fraîche
Ice water
1. In a large bowl, whisk the heavy cream with the buttermilk or crème fraîche. Cover with plastic wrap and let stand at room temperature until thickened, at least 12 hours and up to 48 hours.
2. Scrape the cultured cream into the bowl of a stand mixer, cover with plastic wrap and refrigerate until well chilled, about 45 minutes.
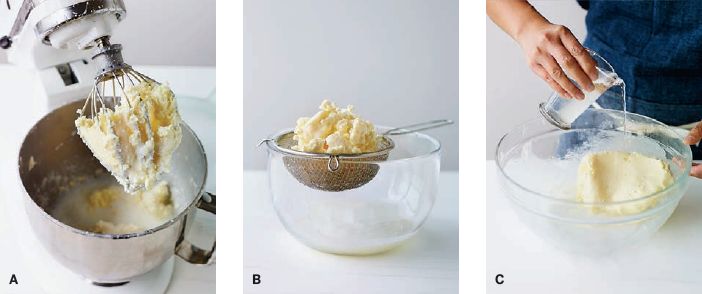
3. Cover the rim of the bowl well with plastic to catch any splatter; alternatively, use the pouring-shield attachment. Beat the cultured cream with the whisk at high speed until the butter solids start to form a ball, about 4 minutes (A) . Drain the butter solids in a fine sieve set over a bowl and reserve the buttermilk for another use (B) .
4. Transfer the butter to a large bowl and, using gloved hands or a large fork, knead to expel any excess buttermilk. Pour ¼ cup of ice water over the butter, knead and drain (C) . Repeat, adding ice water, kneading and draining 3 more times. Continue kneading until the butter no longer expels any water.
5. Form the butter into a cylinder or block, wrap it in cheesecloth and gently squeeze to remove any remaining moisture. Discard the cheesecloth and wrap the butter tightly in plastic, followed by parchment paper, and refrigerate for up to 1 week.

Waste Not, Want Not
The leftover cultured buttermilk in Step 3 can be refrigerated for up to 6 days and used for making biscuits and pastries, or for culturing heavy cream for another batch of butter.
Marmalade
In its complex balance of bitter and sweet, marmalade is the thinking man’s answer to jelly and jam. Rachel Saunders of California’s Blue Chair Fruit Company shows how to make three of her artisanal preserves using the same lemon jelly base. The recipes take three days to make, but the active time is minimal—just two hours. Follow our instructions for an easy-to-follow play-by-play.

Marmalade
Valencia Orange Marmalade
Time
2 hr active 3 days total
Makes
ten ½-pt jars
LEMON JELLY BASE
2 lbs. lemons, cut into 8 wedges each
MARMALADE
2 lbs. Valencia oranges—cut lengthwise into 8 wedges each, seeded and very thinly sliced crosswise
8 cups sugar (3½ lbs.)
¼ cup fresh lemon juice
1. On Day 1, start the lemon jelly base
a large nonreactive saucepan, cover the lemon wedges with 2 inches of water (about 8 cups) and let stand at room temperature overnight.
2. Meanwhile, start the marmalade
In another large nonreactive saucepan, cover the oranges with 2 inches of water (about 8 cups). Let stand overnight.
3. On Day 2, finish the lemon jelly base
Bring the lemons to a boil. Simmer over moderate heat, stirring occasionally, until the lemons are very tender and the liquid is reduced by half, about 2 hours and 15 minutes. Pour the lemons into a fine sieve set over a large heatproof bowl; let cool completely. Cover the sieve and bowl with plastic wrap and let drain overnight at room temperature; discard the lemon wedges.
4. Meanwhile, continue making the marmalade
Bring the oranges to a boil and simmer over moderate heat, stirring occasionally, until the oranges are very tender, about 40 minutes. Let stand covered at room temperature overnight.
5. On Day 3, finish the marmalade Add the lemon jelly base to the oranges in the saucepan. Stir in the sugar and lemon juice and bring to a boil. Simmer over moderate heat, without stirring, until the marmalade darkens slightly, about 30 minutes; skim off any foam as necessary.
6. Test for doneness
Spoon 1 tablespoon of the marmalade onto a chilled plate and refrigerate until it is room temperature, about 3 minutes; the marmalade is ready when it thickens like jelly and a spoon leaves a trail when dragged through it. If it’s not ready yet, continue simmering and testing every 10 minutes until it passes the test, up to 1½ hours.
7. Jar the marmalade
Spoon the marmalade into ten ½-pint canning jars, leaving ¼ inch of space at the top. Screw on the lids. Using canning tongs, lower the jars into a large pot of boiling water; boil for 15 minutes. Remove the jars with the tongs; let stand until the lids seal. Store the marmalade in a cool, dark place for up to 6 months.
Lemon Marmalade
Time
2 hr active 3 days total
Makes
ten ½-pt jars
LEMON JELLY BASE
2 lbs. lemons, cut into 8 wedges each
MARMALADE
2 lbs. lemons—cut lengthwise into 8 wedges each, seeded and very thinly sliced crosswise
8½ cups sugar (3¾ lbs.)
¼ cup fresh lemon juice
1. On Day 1, start the lemon jelly base
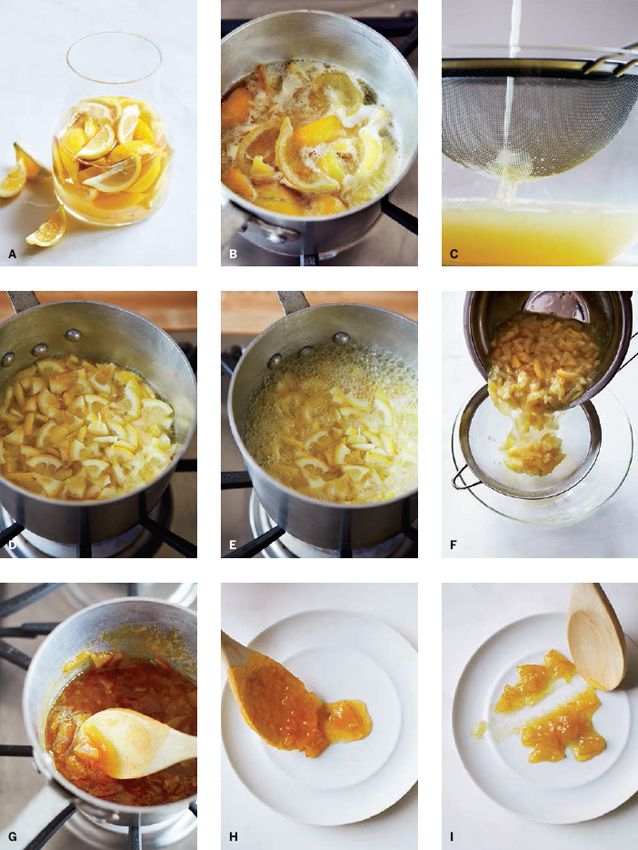
In a large nonreactive saucepan, cover the lemon wedges with 2 inches of water (about 8 cups) and let stand at room temperature overnight (A)
.
2. On Day 2, finish the lemon jelly base
Bring the lemon wedges to a boil. Simmer over moderate heat, stirring occasionally, until the lemons are very tender and the liquid is reduced by half, about 2 hours and 15 minutes (B)
. Pour the lemon wedges into a fine sieve set over a large heatproof bowl; let cool completely (C)
. Cover the sieve and bowl with plastic wrap and let drain overnight at room temperature; discard the lemon wedges.
3. Meanwhile, start the marmalade
In a large nonreactive saucepan, cover the lemon slices with 2 inches of water (about 8 cups) (D)
. Bring to a boil, then simmer over moderately high heat for 5 minutes, stirring occasionally (E)
. Drain the lemon slices in a fine strainer; discard the cooking liquid (F)
. Return the lemon slices to the saucepan and cover with 1 inch of water (about 4 cups). Bring to a boil and simmer over moderate heat, stirring occasionally, until the lemons are very tender, about 40 minutes; let stand covered at room temperature overnight.
4. On Day 3, finish the marmalade
Add the lemon jelly base to the lemon slices in the saucepan. Stir in the sugar and lemon juice and bring to a boil. Simmer over moderate heat, without stirring, until the marmalade darkens slightly, about 30 minutes; skim off any foam as necessary (G)
.
5. Test for doneness
Spoon 1 tablespoon of the marmalade onto a chilled plate and refrigerate until it is room temperature, about 3 minutes (H)
. The marmalade is ready when it thickens like jelly and a spoon leaves a trail when dragged through it (I)
. If it’s not ready yet, continue simmering and testing every 10 minutes until it passes the test, up to 1½ hours.
6. Jar the marmalade
Spoon the marmalade into ten ½-pint canning jars, leaving ¼ inch of space at the top. Screw on the lids. Using canning tongs, lower the jars into a large pot of boiling water; boil for 15 minutes. Remove the jars with the tongs; let stand until the lids seal. Store the marmalade in a cool, dark place for up to 6 months.
MEYER LEMON VARIATION Prepare the lemon jelly base as described in Steps 1 and 2 above. On Day 2, cut 2 lbs. Meyer lemons lengthwise into 8 wedges each, then seed them and very thinly slice them crosswise. Add the lemon slices to a large nonreactive saucepan, cover with 1 inch of water (about 4 cups) and let stand covered at room temperature overnight.
On Day 3, bring the Meyer lemons to a boil. Simmer over moderate heat, stirring occasionally, until the lemons are very tender, about 40 minutes. Add the lemon jelly base to the saucepan. Stir in 7½ cups sugar and ¼ cup fresh lemon juice and bring to a boil. Simmer over moderate heat, without stirring, until the marmalade darkens slightly, about 30 minutes; skim off any foam as necessary. Proceed with Steps 5 and 6 above.
Sweet Talk
“People are shocked by how much sugar goes into marmalade,” says Saunders. “But the sugar acts as a thickener.” If you skimp, the preserves may not set.
Bitters
“People say bitters are the salt and pepper of the bar, but really, they’re like the spice rack,” says Brad Thomas Parsons, the mixologist author of Bitters . Infused with herbs and roots, these intensely flavored concoctions add depth and balance to mixed drinks. Here, Parsons shares three recipes inspired by what he calls “the holy trinity”—Angostura (woodsy and spiced), Peychaud’s (anise-scented) and orange—along with the best cocktail recipes to show them off.

Cranberry-Anise Bitters
Time
20 min plus about 3 weeks steeping
Makes
14 oz
2 cups high-proof vodka (such as Stolichnaya Blue 100 Proof)
1½ cups fresh or thawed frozen cranberries, each one pierced with a toothpick
1 cup dried cranberries
2 Tbsp. chopped candied ginger
2 star anise pods
One 3-inch cinnamon stick
One 1-inch piece of fresh ginger, peeled and sliced ¼ inch thick
1 tsp. gentian root
½ tsp. white peppercorns
2 Tbsp. simple syrup (see Note)
1. In a 1-quart glass jar, combine all of the ingredients except the syrup. Cover and shake well. Let stand in a cool, dark place for 2 weeks, shaking the jar daily.
2. Strain the infused alcohol into a clean 1-quart glass jar through a cheesecloth-lined funnel. Squeeze any infused alcohol from the cheesecloth into the jar; reserve the solids. Strain the infused alcohol again through new cheesecloth into another clean jar to remove any remaining sediment. Cover the jar and set aside for 1 week.
3. Meanwhile, transfer the solids to a small saucepan. Add 1 cup of water and bring to a boil. Cover and simmer over low heat for 10 minutes; let cool completely. Pour the liquid and solids into a clean 1-quart glass jar. Cover and let stand at room temperature for 1 week, shaking the jar once daily.
4. Strain the water mixture through a cheesecloth-lined funnel set over a clean 1-quart glass jar; discard the solids. If necessary, strain again to remove any remaining sediment. Add the infused alcohol and the syrup. Cover and let stand at room temperature for 3 days. Pour the bitters through a cheesecloth-lined funnel or strainer and transfer to glass dasher bottles. Cover and keep in a cool, dark place.
NOTE To make simple syrup, in a small saucepan, dissolve 1 cup of granulated sugar in 1 cup of water over moderate heat. Let cool before using, and reserve the rest for another use.
MAKE AHEAD The bitters can be stored at room temperature indefinitely. For best flavor, use within 1 year.
Cranberry-Spice Cocktail
Mince two 1-inch pieces of candied ginger, transfer to a cocktail shaker and muddle with 1 orange wedge and 10 cranberries. Add 2 oz. Aperol, 1 oz. Lillet blanc, 4 dashes of Cranberry-Anise or Peychaud’s bitters and ice. Shake well. Double-strain the drink into an ice-filled Collins glass and top with 4 oz. hard cider. Garnish with 3 cranberries skewered on a pick with a slice of candied ginger. Makes 1 drink.
Woodland Bitters
Time
20 min plus about 3 weeks steeping
Makes
14 oz
2 cups overproof bourbon (such as Wild Turkey 101)
1 cup pecans, toasted
1 cup walnuts, toasted
4 cloves
Two 3-inch cinnamon sticks
1 whole nutmeg, cracked
1 vanilla bean, split
2 Tbsp. devil’s club root
1 Tbsp. cinchona bark
1 Tbsp. chopped black walnut leaf
1 Tbsp. wild cherry bark
½ tsp. cassia chips
½ tsp. gentian root
½ tsp. sarsaparilla root
3 Tbsp. pure maple syrup
1. In a 1-quart glass jar, combine all of the ingredients except the syrup. Cover and shake well. Let stand in a cool, dark place for 2 weeks, shaking the jar daily.
2. Strain the infused alcohol into a clean 1-quart glass jar through a cheesecloth-lined funnel. Squeeze any infused alcohol from the cheesecloth into the jar; reserve the solids. Strain the infused alcohol again through new cheesecloth into another clean jar to remove any remaining sediment. Cover the jar and set aside for 1 week.
3. Meanwhile, transfer the solids to a small saucepan. Add 1 cup of water and bring to a boil. Cover and simmer over low heat for 10 minutes; let cool completely. Pour the liquid and solids into a clean 1-quart glass jar. Cover and let stand at room temperature for 1 week, shaking the jar once daily.
4. Strain the water mixture through a cheesecloth-lined funnel set over a clean 1-quart glass jar; discard the solids. If necessary, strain again to remove any remaining sediment. Add the infused alcohol and the syrup. Cover and let stand at room temperature for 3 days. Pour the bitters through a cheesecloth-lined funnel or strainer and transfer to glass dasher bottles. Cover and keep in a cool, dark place.
MAKE AHEAD The bitters can be stored at room temperature indefinitely. For best flavor, use within 1 year.
Harvest Cocktail
In a medium saucepan, combine ½ cup water, ½ cup sugar and 2 cinnamon sticks. Boil over moderately high heat, stirring occasionally, until the sugar is dissolved, about 5 minutes. Let the syrup cool. Discard the cinnamon sticks. In an ice-filled cocktail shaker, combine ½ tablespoon of the cinnamon syrup with 2 oz. apple brandy, ½ oz. Snap liqueur and 4 dashes of Woodland or Angostura bitters. Shake well. Strain the drink into an ice-filled rocks glass and garnish with an apple slice. Makes 1 drink.
Figgy-Orange Bitters
Time
20 min plus about 3 weeks steeping
Makes
14 oz
2 cups overproof bourbon (such as Wild Turkey 101)
1 cup dried figs (about 6 oz.), halved
8 green cardamom pods, crushed
4 cloves
2 fresh figs, halved
Strips of zest from 3 oranges
1 Tbsp. cinchona bark
½ tsp. gentian root
¼ cup dried orange peel
One 3-inch cinnamon stick
1 vanilla bean, split
2 Tbsp. rich syrup (see Note)
1. In a 1-quart glass jar, combine all of the ingredients except the syrup. Cover and shake well. Let stand in a cool, dark place for 2 weeks, shaking the jar daily.
2. Strain the infused alcohol into a clean 1-quart glass jar through a cheesecloth-lined funnel. Squeeze any infused alcohol from the cheesecloth into the jar; reserve the solids. Strain the infused alcohol again through new cheesecloth into another clean jar to remove any remaining sediment. Cover the jar and set aside for 1 week.
3. Meanwhile, transfer the solids to a small saucepan. Add 1 cup of water and bring to a boil. Cover and simmer over low heat for 10 minutes; let cool completely. Pour the liquid and solids into a clean 1-quart glass jar. Cover and let stand at room temperature for 1 week, shaking the jar once daily.
4. Strain the water mixture through a cheesecloth-lined funnel set over a clean 1-quart glass jar; discard the solids. If necessary, strain again to remove any remaining sediment. Add the infused alcohol and the syrup. Cover and let stand at room temperature for 3 days. Pour the bitters through a cheesecloth-lined funnel or strainer and transfer to glass dasher bottles. Cover and keep in a cool, dark place.
NOTE To make rich syrup, in a small saucepan, dissolve 2 cups of demerara or turbinado sugar in 1 cup of water over moderate heat. Let cool before using, and reserve the rest for another use.
MAKE AHEAD The bitters can be stored at room temperature indefinitely. For best flavor, use within 1 year.
Figgy-Orange Cocktail
In an ice-filled cocktail shaker, combine 2 oz. bourbon, ½ oz. Punt e Mes, 1 Tbsp. fresh orange juice, ½ Tbsp. simple syrup (see Note ) and 4 dashes of Figgy-Orange or Regan’s Orange Bitters No. 6. Shake well. Strain the drink into a chilled coupe and garnish with freshly grated nutmeg. Makes 1 drink.
Bitters Glossary
Sarsaparilla
A vine with the flavor of root beer.
Cassia chips
Cinnamon-flavored bark from Asia.
Devil’s club root
Has a deeply woodsy scent.
Black walnut leaf
A tannic, mildly bitter ingredient.
Gentian root
From a mountain plant; very bitter.
Wild cherry bark
Has a slight cherry-fruit aroma.
Cinchona bark
The natural source of anti-malarial quinine.
All of these ingredients are sold at dandelionbotanical.com.
Taste Test
To understand how bitters can enhance a drink, Parsons suggests mixing a Manhattan with and without them: “One will be beautifully complex, and the other will be overly sweet and cloying.”
Bitters Backstory
Sometimes still marketed as digestive aids, bitters were once sold as medicine; they later became a key ingredient in classic drinks like the Manhattan. Today’s craft-cocktail enthusiasts are resurrecting 100-year-old “lost” bitters recipes and creating out-there new flavors like Jamaican jerk and Mexican mole.