The Lumbar Spine
Overview of the Spine
The articulated spine is made up of twenty-four distinct bones, or vertebrae, each linked to at least one other, or to the skull or pelvis at either end, with some adapted to link to the ribs in the middle. While they have a lot in common, different segments of the spine are quite specialized to perform their different jobs. The spine derives its virtues—its flexible support and resilience—from the summed qualities of all of its constituent vertebrae. But there are also great differences between them according to their form and function.
The five lumbar vertebrae, at the level of the waist and lower back, are large and thick, with transverse processes that permit the attachment of large, weight-bearing and weight-shifting muscles that support and manage the torso. Because these joints sustain considerable and abrupt forces, arthritis often begins early here.
The twelve thoracic vertebrae have flattened transverse processes at the sides, which connect to the ribs. The ribs and thoracic spine support the sternum, the clavicles, and most of the muscles involved in breathing, such as the diaphragm. Together, the muscles and ribs protect organs such as the heart, lungs, and liver.
The cervical spine’s seven vertebrae are the smallest yet most specialized: the top two, atlas and axis in descending order, permit passage of the spinal cord and cradle the skull in a secure but highly flexible way. This arrangement, coupled with the five less specialized cervical vertebrae beneath the axis, permits quite an extraordinary range of motion to the head, enabling us great versatility in directing our organs of sense and communications, especially our eyes, ears, tongue, and face.
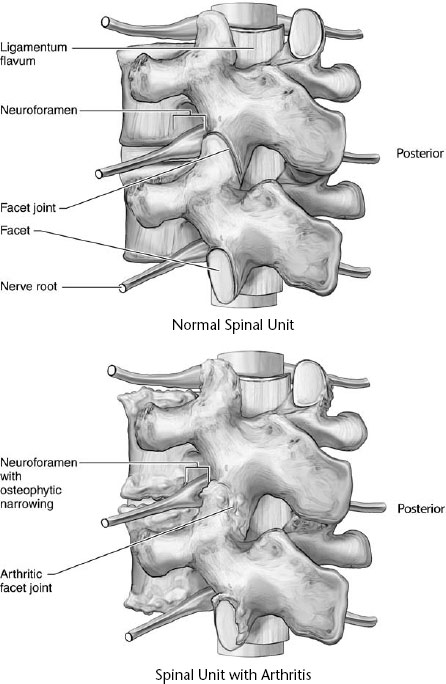
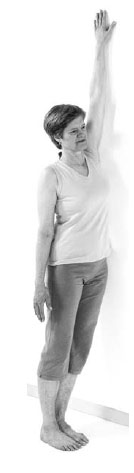
Figure 7. Healthy and arthritic lumbar spinal segments.
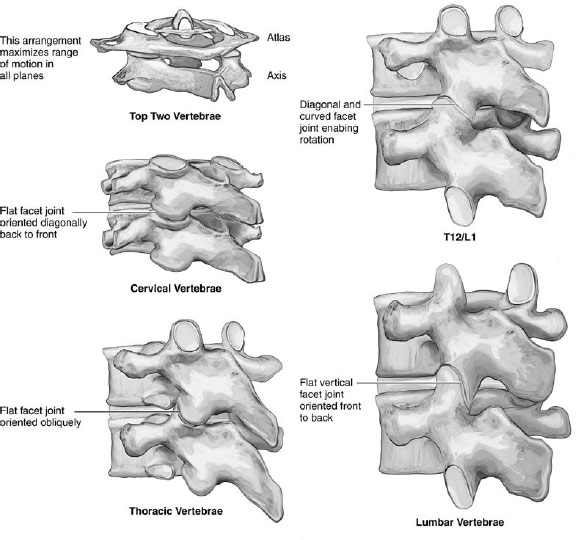
Figure 8. Comparative anatomy of spinal segments: facet orientation in five different segments of the spine.
The neck is a busy place. Nerves, the main passages to the respiratory and digestive systems, and great veins and arteries must fit in with, and coexist with, the many muscles that run from the head to the ribs, collarbone, shoulder blades, and the spine, the scaffolding that is necessary to mobilize the head. Arthritis affects all the vertebrae in some ways, but in the cervical spine, where space is at such a premium, and movement so essential, the swelling that comes with arthritis can have major effects on breathing, swallowing, and circulation to the brain.
There are spatial considerations all the way through the vertebral column, but once beyond the critical region of the neck, they generally involve the neuroforamina, the chinks in the spinal cord’s boney armor through which nerve roots pass on their way to the limbs and other parts of the body. The combination of stress bearing and movement can result in the production of osteophytes, which narrow these openings, at times causing pain, numbness, and strange sensations called paresthesias, as well as weakness in the shoulders, arms, hands, hips, legs, feet, and sphincters. The facet joints bear a good deal of the stress, particularly when overweight or poor posture promotes arching, or lordosis, of the lower back. These joints are behind the vertebral bodies, bordering on the canals through which the nerve roots pass. Arching the back narrows the openings, and osteophytes narrow them further.
Other anatomical features that are not directly part of a spinal joint can also affect the nerve roots. The intervertebral discs often degenerate in the arthritic spine, which lowers the roof of the spaces the nerve roots pass through, the neuroforamina. Swelling of a ligament inside the spinal canal, the ligamentum flavum, can further constrain the passage of nerves just by taking up some of the unchangeable space within the bones.
With arthritis of just about every kind, extreme motion at any of the lumbar joints can compress a nerve root and cause pain. In addition, restricted range of motion even at one level of the spine puts more stress on the joints nearby, such as the hips, sacroiliac joints, and the shoulders. You might exhibit this extra stress by adopting unusual motions, such as when you are getting into a car or out of a boat or passing the sugar at a long table.
Yoga for the Back
Yoga may gradually improve the range of motion of the vertebral joints in all three planes of movement, increasing the ease and degree to which you can bend forward and back and side to side, and twist to the right and left. In doing this it is best to allot a share of the work of bending, weight bearing, and balance to each joint. If each of the twenty-five vertebral joints extends its range 3.6 degrees, that adds up to an additional 90 degrees of motion!
Yoga poses can also be directed specifically to the joints that connect the spine to the head, ribs, and pelvis. Greater range of motion in these joints has the same benefits, by “decompressing”the joints nearby. One prominent theory of osteoarthritis declares it the wear-and-tear disease. If that is true, then sharing the pressures and strains of movement evenly among more vertebrae has obvious advantages.
The same principle applies to the limbs. With more flexibility in the long muscles that cross the major joints of the arms and legs, especially the hamstrings, the wear and tear on the spine is greatly reduced. To appreciate this effect, think of the back strain people with tight hamstrings have when they try to bend forward. Expanding range of movement through increasing flexibility means greater safety for the spine.
First we will concentrate on the lumbar spine, then the cervical spine. We also include special chapters on the spondyloarthropathies that affect the thoracic spine, on the sacroiliac joints, and on scoliosis, which can appear anywhere in the spine.
Lumbar Spine
One key factor in preventing strain in the lumbar spine is to maintain its natural degree of curvature. Too much (excessive lordosis) or too little (“flat”lower back) is a precondition for arthritis and poor movement patterns. In both Mr. Iyengar’s and Anusara Yoga, normal lordosis is maintained by balancing two actions: moving the top of the thighs back, which arches the lumbar spine, and pulling the tailbone down, which flattens the lumbar spine. We recommend that you determine the characteristic curvature of your spine in the spectrum from one extreme to the other. Do you tend to have a significant concave shape at the back of your waist, or do you tend to tuck your tailbone down and flatten your lower back? The best curvature is a happy medium between the two.
Anusara Yoga sums this up in three principles: Inner Spiral, Pelvic Loop, and Kidney Loop (see Appendix III). The Inner Spiral brings the thighs back and widens the pelvis, creating more lumbar arch. If you tend toward a “flat”lumbar spine, this is what you need. Conversely, if you tend toward an excessively arched lumbar spine, the Pelvic Loop (which lengthens the tailbone) and the Kidney Loop (which lifts the thoracic spine away from the lumbar spine) will help to create length and space there.
Other general tips related to yoga for the lumbar spine are as follows:
• In forward bends, be sure to bend from your hips, not your waist, and bring the top of your sacrum forward. Of course, tightness in the hamstring muscles makes this challenging.
• In twists, stabilize the pelvis in good alignment before twisting.
• In back bends, stabilize the tailbone and lift the middle and upper back away from the pelvis, to prevent all the movement from occurring only in the lumbar spine. This will coordinate the parts of the spine and distribute the stress of the movement.
• In any given yoga practice, do all types of movements: bend forward, bend backward, bend to each side, and twist.
• Be attentive to the neighboring areas of the body, especially the thighs, abdomen, and middle back, since immobility, weakness, or misalignment there can cause lumbar strain. The well-known advice to strengthen the abdominal muscles for lower back support is an example of this.
The poses here are arranged in three groups: beginning, intermediate, and challenging. How do you know whether you should start with the beginning poses, the intermediate poses, or the challenging poses? If you don’t know what level you are at, start with the beginning poses. The intermediate poses are for people who meet the following three criteria:
• Their pain is below 5 on a scale of 1 to 10—that is, pain that does not intrude on your concentration.
• They have the ability to stretch the leg in Supta Padangusthasana (see page 83) to a straight ninety degrees or more.
• They do not have a history of back surgery.
The challenging poses are only for people who meet the following two criteria:
• Their pain is below 3 on a scale of 1 to 10.
• They have done the intermediate poses for at least two months.
If you cannot do all the poses in any section, bear in mind that it is best to do at least a forward bend and back bend, side flexion, and twists at each practice session. This thorough approach will also improve what we call “pelvic coordination,”a combination of iliopsoas control, ability to widen the thighs, and an ergonomic distribution of forces in flexion and extension. While most people will be able to engage in all of the poses at the appropriate level of difficulty, the table immediately following the poses will help students and therapists choose the proper asana in special circumstances.
We recommend that people do beginning poses as warm-up for intermediate ones. We have made a list of poses from both of these sections as warm-up for the challenging poses. Our suggestions for this warm-up can be found at the beginning of the challenging section.
Beginning Lumbar Poses
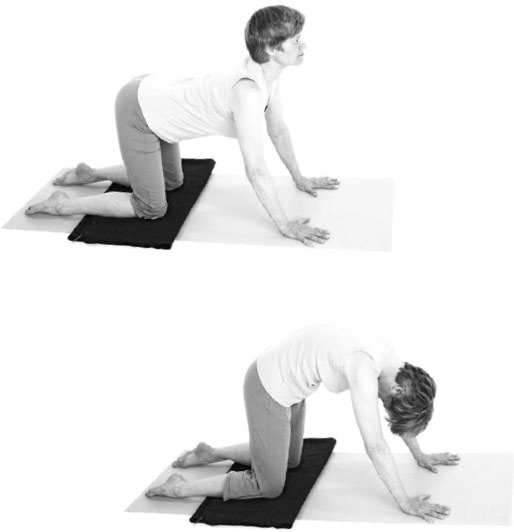
This pose is a gentle way to begin stretching the sides.
Purpose: To mobilize the spine and raise awareness of the segments.
Contraindications: Spinal stenosis, scoliosis, spondylolisthesis.
Prop: A blanket placed under your knees if desired.
Avoiding pitfalls: Move at a moderate speed.
1. Come down on your hands and knees, placing them shoulder-and hip-width apart, respectively.
2. Breathe deeply to open up from inside.
3. With care but lightly, begin to curve and arch your back.
4. Inhale as you move your head and tailbone up. Let the middle of your back soften and descend toward the floor.
5. Exhale. Use your abdominal muscles to push your back up toward the ceiling. Let your head and tailbone curl downward.
6. Continue moving in this way for as long as it feels good.
7. Move your ribs and/or pelvis in slow circular patterns to loosen and mobilize everything, but go easy on the neck. You are warming up all the torso muscles and coordinating them—think fluidity!
Purpose: To stretch the sides, enabling the whole spine to elongate, one-half at a time, facilitating lateral flexion.
Contraindications: Recent vertebral or rib fracture, scoliosis.
Props: A yoga mat and a blanket placed under your knees if desired.
Avoiding pitfalls: Extend and lift up both sides of the body even though the stretch will be on one side at a time.
1. On your hands and knees, using a blanket to pad your knees, sit back on your haunches.
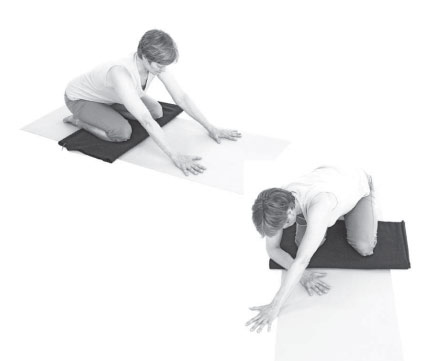
2. Creep to the right with your hands, curving your torso sideways. Maintain your legs in their original position.
3. Bend your right arm and place the forearm on the floor to provide a resting place for your head.
4. Stretch your left arm along the floor near your head. Curve it to your right. Hold the hips and thighs steady.
5. Lift up the left side of your ribs and your left armpit to be level with the right side.
6. Find the longest stretch you can make; stay there as you breathe deeply. Extend out through your left arm and back through your left hip with a calm, steady effort.
7. To come out of the pose, raise your head and walk your hands back to center.
8. Repeat on the left side.
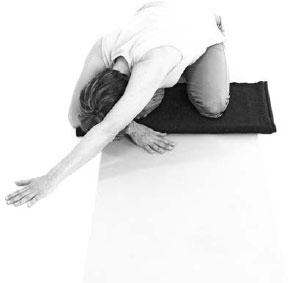
This gently curving stretch flexes the lumbar spine and extends the thoracic spine. It is often used between other poses.
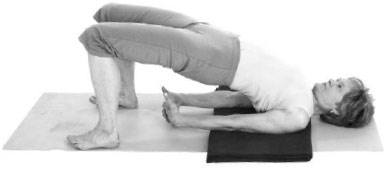
Strengthening the core abdominal muscles with this pose helps to support the lumbar spine.
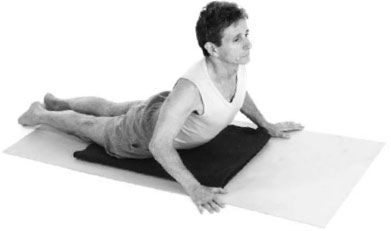
In this pose you create length as you arch the spine gently.
Purpose: To strengthen the back’s extensors, and improve posture.
Contraindications: Colostomy, spinal stenosis, spondylolisthesis.
Props: A yoga mat and a blanket under your abdomen.
Avoiding pitfalls: Come up into the pose slowly and carefully to avoid a sudden extreme load onto your neck or lower back.
1. Lie on your stomach on a mat, with a folded blanket placed under your abdomen to prevent lower back strain.
2. Stretch your arms out to the sides, palms down. Place your forehead on the floor.
3. Prepare the body with strength, drawing energetically into the core of your pelvis. Firm your legs and lengthen your tailbone. Firm your buttocks without squeezing them together.
4. Lift the shoulders away from the floor without raising your head or your hands. Lengthen the sides of your body from your hips to your armpits.
5. Inhale and lift your arms, head, and legs a little off the floor, extending out from your center as you lift.
6. Stay up for several breaths, extending your upper body and legs in a continuous arc. Use the breath to remain light.
7. Slowly return down.

Here you lengthen the lumbar spine with support from the wall.
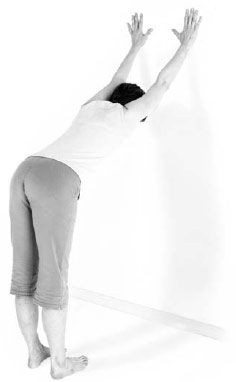
This pose stretches and strengthens the feet and thighs while safely increasing lumbar range of motion.
Purpose: Mild lateral spinal flexion.
Contraindications: Vertebral fracture, rotator cuff or impingement syndromes.
Prop: A wall.
Avoiding pitfalls: Keep your body carefully aligned perpendicular to the wall. Avoid turning.
1. Stand with your left side a few inches from a wall. Lift your left arm high.
2. Test whether you are more comfortable with the palm side or the little finger side of your hand on the wall.
3. Firm all arm muscles and retain the upper arm well within the shoulder joint.
4. Inhale, lift up through your torso, and lean sideways toward the wall until your hip and possibly your shoulder area touch the wall.
5. Gradually intensify this side stretch during several breaths. You can step a little farther from the wall for a deeper stretch. Lengthen your sides.
6. Return to center.
7. Repeat on the other side.
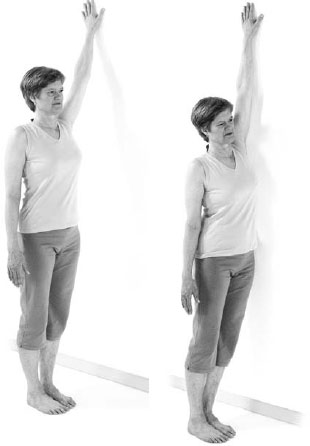
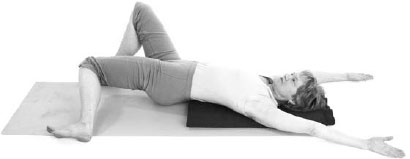
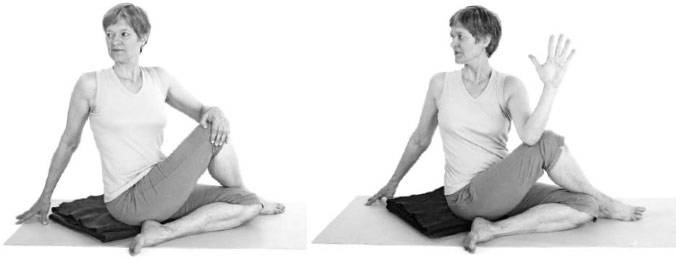
This pose widens the pelvis, giving more freedom to the lumbar spine.
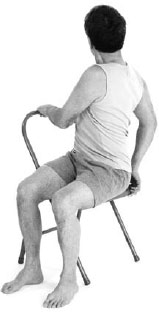
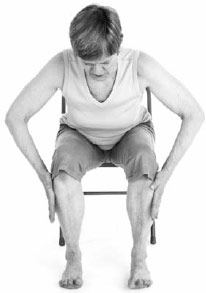
The chair keeps the pelvis steady so that the lumbar spine receives the benefits of the twist.
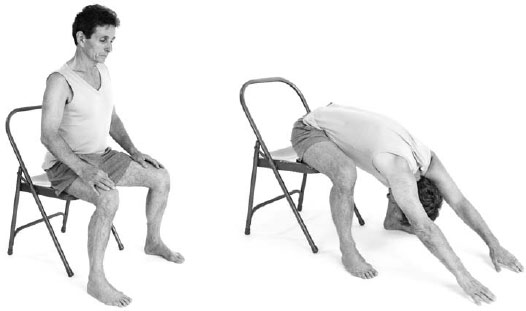
Purpose: To stretch the lumbar spine’s many joints in flexion.
Contraindications: Cerebrovascular disease, severe osteoporosis, vasovagal episodes.
Prop: A chair.
Avoiding pitfalls: Bend forward from the hips, not the waist. Reach your chest forward as you go down.
1. Sit on the front edge of a chair, with your feet parallel and a bit wider apart than your hips.
2. Manually pull your sitting bones and buttocks back and apart as in Pressure Cooker (see page 73).
3. Inhale, and lengthen up through your spine.
4. Exhale. Reach your chest forward and unroll your whole spine out between your legs.
5. Pull in your abdomen; breathe deeply; be sure to fill the backs of your lungs down to the bottom of your rib cage.
6. Allow your head to hang down. Touch the floor with your hands, gently retracting your upper arms into the shoulder joints while stretching your hands forward.
7. Breathe deeply and soften inside.
8. When you are ready to come out of the pose, reach your chest forward as you raise your torso.
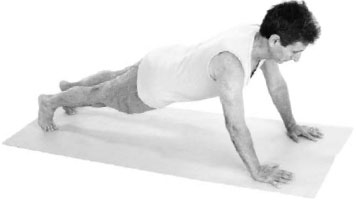
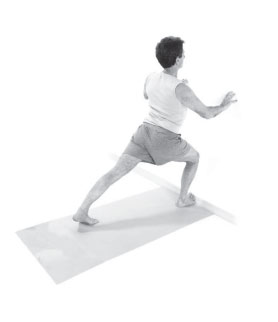
This back bend strengthens the back of the legs and the hips as well as the muscles along the spine, while extending the hips and torso.
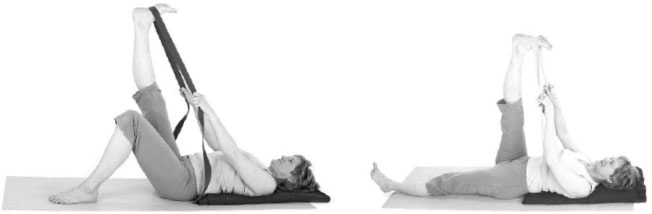
Here the hip capsule and hamstrings are strongly stretched, while the back is well-protected from strain.
Intermediate Lumbar Poses
Like the Standing Lunge with Wall, this pose stretches the iliopsoas muscle, which is often involved with lumbar stiffness. The chair helps with balance.
Side bending strengthens the lumbar muscles, while stretching the hip capsule.
With the arm and leg extended away from each other, one side of the lumbar spine gets a good stretch. One hip is opened, the other revolved, and coordination of the hips and lumbar spine is improved.
Purpose: To revolve the entire spine and enhance range of motion.
Contraindications: Herniated nucleus pulposus, scoliosis, Hill-Sachs deformity, repeated shoulder subluxation.
Props: A yoga mat and a blanket under the knees.
Avoiding pitfalls: Keep the hips square to the front and use your breath.
1. Come onto your hands and knees, with a blanket placed under your knees.
2. Step your right foot forward between your hands.
3. Raise your upper body. Place your hands on your hips.
4. Inhale, firm your leg muscles to stabilize the legs, and lift up your torso.
5. Exhale, bend forward, twist, and place your left elbow outside the right knee.
6. Pull your right hip crease back with your right hand.
7. For the next few breaths, lengthen the spine with inhalation, twist more to the right as you exhale. Move into the pose more deeply with each exhalation.
8. Open your chest. Hold your head in line with the spine as much as possible. A combination of strength and softness is needed here.
9. Return to center and repeat on the other side.
10. To intensify, tuck the back foot’s toes under and raise the back knee. Straighten the back leg and draw every part of your body in toward the midline. Remain aligned from your head to your back heel. If balance is a problem, begin this pose with your back leg alongside a wall. Rise to the challenge!
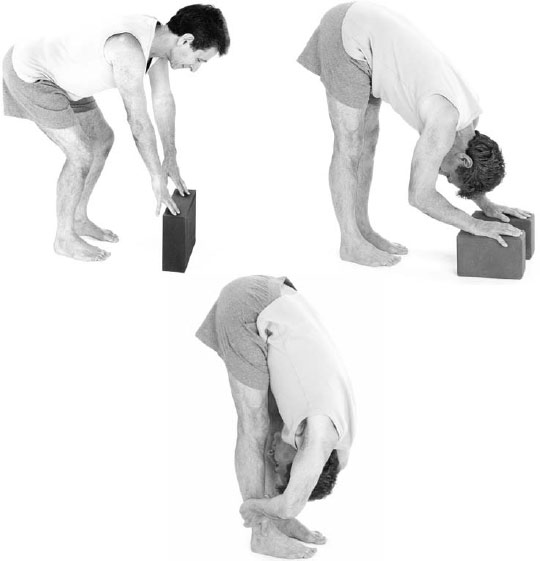
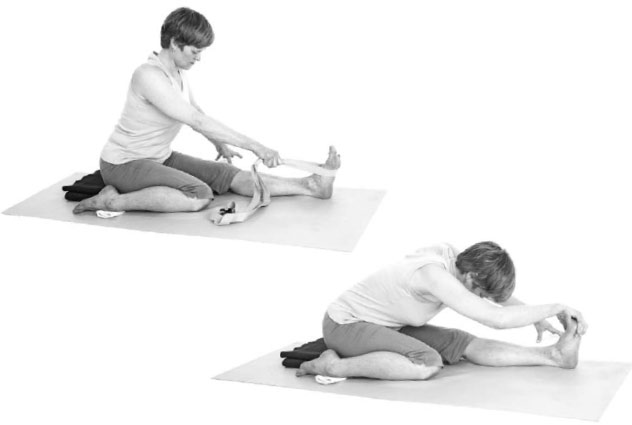
Purpose: To stretch the thoracic and the lumbar spine and the hamstrings.
Contraindications: Imbalance, retrolisthesis, hamstring tear, herniated nucleus pulposus, vasovagal episodes.
Props: A yoga mat, one or two blocks if your legs are stiff.
Avoiding pitfalls: Keep your legs working, whether they are bent or straight. Avoid letting the knees fall in toward the midline. Let your head release.
1. Stand with your feet hip-width apart.
2. Stretch your toes and lift them up, which activates the whole lower leg.
3. Retain the elevated toes and widen your sitting bones and thighs. You can lean forward a little to do this.
4. With the thighs still wide, pull your tailbone down and your spine up vertically.
5. Inhale and stretch up from the inside with full effort. You can relax your toes, but keep the leg muscles firm.
6. Exhale, bend forward, and touch the floor or the two blocks. Bend your knees if necessary.
7. Extend your whole spine from your tailbone to the top of your head.
8. Retain your arms deep in their sockets, even as you reach down.
9. For more intensity, hold your ankles and pull yourself farther down.
10. Balance your use of strength with an attitude of surrender and release. Breathe evenly.
11. To come up, first place your hands on your waist, then extend your head and chest forward and lift up strongly as you inhale.
12. Exhale and release your hands down.
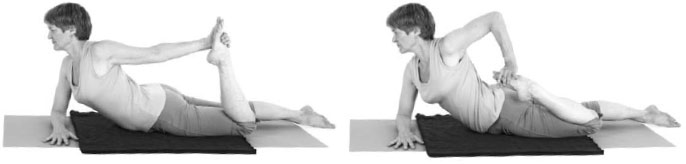
Purpose: To stretch the anterior thigh, shoulder, and hip joints.
Contraindications: Knee effusion, tear of anterior cruciate or posterior horn of medial or lateral meniscus, rotator cuff syndrome.
Props: A yoga mat, a blanket for padding if desired.
Avoiding pitfalls: Keep the spine long and the bending leg close in to the midline. If you have lumbar or thoracolumbar scoliosis, then do this pose only on the convex side.
1. Lie on your stomach.
2. Prepare by lengthening: pull your ribs forward away from the pelvis and stretch your legs back.
3. Come up onto your right forearm.
4. Bend your left knee and grasp your left arch with your left hand, with the palm facing to the left.
5. Spread your toes, especially the fourth and fifth ones. This will help to protect your knee.
6. Press the left knee down toward the floor to soften the groin.
7. Then press the tailbone down and pull your foot down and toward the outside of your hip.
8. Symmetrically extend your torso up and forward. This involves more stretching on the left side. Pull the left shoulder up and back as much as you can.
9. With your awareness and effort spread evenly through your body, maintain the pose for several breaths, then release and repeat on the other side.
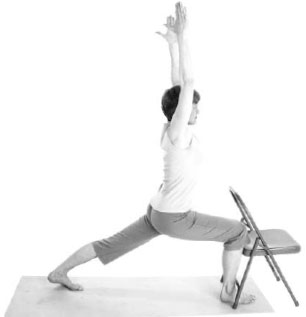
Purpose: To strengthen the spine, increase its arch, strengthen the legs, and improve posture.
Contraindications: Spinal stenosis, spondylolisthesis, recent abdominal surgery.
Props: A blanket and a chair.
Avoiding pitfalls: Lift up strongly before arching your back.
1. Kneel with your back to a chair, with your legs hip-width apart and your feet under the chair seat.
2. Align your calves and feet straight back and parallel.
3. Lean forward slightly and widen your thighs apart, as in Pressure Cooker (see page 73).
4. Come upright again and pull your tailbone down.
5. Lift up through the mid-torso, but hold the sides of the waist back. This is Anusara Yoga’s Kidney Loop (see Appendix III). It helps to prevent compression of the lumbar vertebrae during back bends.
6. Retract your shoulder blades toward the spine and begin to reach your arms behind you.
7. Inhale and vigorously lift your heart.
8. Reach for the chair seat or legs with your hands. Slowly and sequentially arch your midback, upper back, and chest.

9. Move your ears back, then slowly arch your neck and head back.
10. These things will support and guide you; your lower legs press into the floor, your tailbone presses forward, your heart lifts up, and your breathing centers you.
11. To exit the pose, lift your head and shoulders upright, then sit down on your heels.
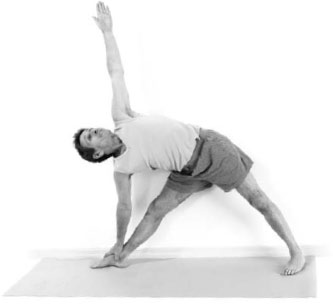
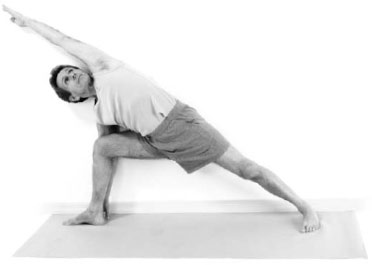
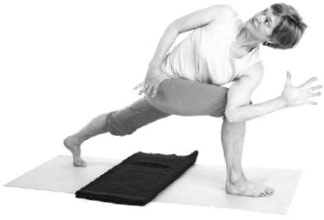
Purpose: To laterally stretch the torso and one leg, improving lateral flexion.
Contraindications: Herniated nucleus pulposus, facet syndrome.
Props: A yoga mat, a blanket placed under the knee and heel, and a chair.
Avoiding pitfalls: Stretch upward before bending to the side. If you have lumbar or thoracolumbar scoliosis, lean only to the convex side.
1. Spread a blanket on the mat and place a chair at one end.
2. Kneel with the chair off to the right. Point your feet straight back behind you.

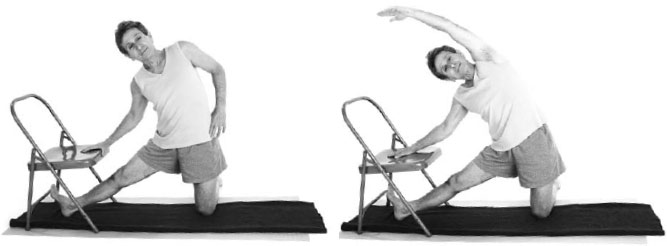
3. Extend your right leg diagonally to the side, with the heel down and toes up. Place your right foot under the chair seat. Your right hand rests on the chair seat, your left hand on your hip.
4. Keep your left hip and knee aligned vertically.
5. With a deep breath in, firm your leg muscles and lengthen through your spine. Pull your shoulders back.
6. Exhale and curve your spine to the right.
7. For more intensity, stretch your left arm overhead with the palm facing to the right and down.
8. Maintain a stretch through your legs, spine, and arms for a few breaths. Extend from the core of your body out to the periphery.
9. Inhale as you come up, then repeat on the other side.
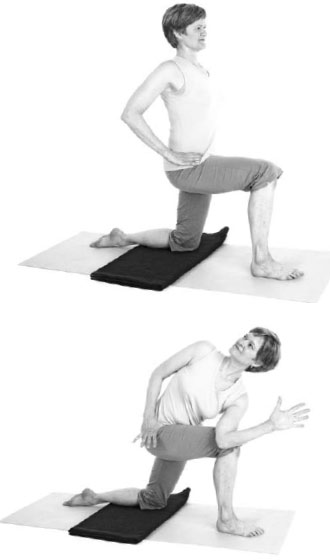
Purpose: To stretch the anterior hip and improve extension.
Contraindications: Prepatellar bursitis, spinal stenosis, recent abdominal surgery, hernias, facet syndrome (segmental rigidity).
Props: A bolster, blanket(s), and a chair.
Avoiding pitfalls: Face your hips squarely to the chair, with your forward leg open to the side and the back leg going straight behind you. Add a folded blanket on top of the bolster if your hips are stiff.
1. Place a bolster about twelve to sixteen inches from the front of the chair.
2. Position yourself onto the bolster, with your right leg in front and left leg behind.
3. Bend your right knee out to the side.
4. Stretch your left leg straight back, with the kneecap and toes facing down.
5. Support yourself with your forearms in the chair seat.
6. Check that your pelvis is facing straight forward. Pull your left hip forward if necessary to achieve it.
7. Firm your leg muscles.
8. Isometrically abduct your upper thighs away from the midline.
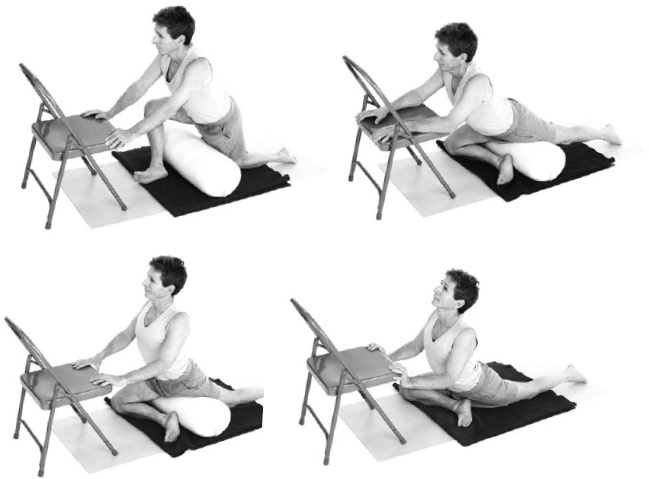
9. Curl your tailbone down and lift your abdomen up.
10. Without turning your pelvis, settle it down as much as possible; slide the back leg farther back if you can.
11. Stretch out through the back leg and up through your entire spine. Continue to face the chair directly.
12. For more intensity, take the bolster out and arch up through your upper back and neck. You can press on the chair for more lift.
13. Take several breaths. Lift your chest while rooting the hips down. Remain poised in the midline for this asymmetrical pose.
14. Release and repeat on the other side.
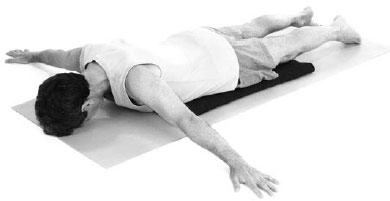
This is a good stretch of the lumbar muscles in a forward bend.
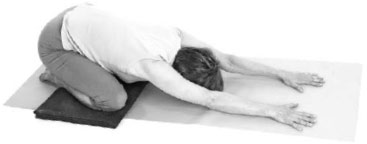
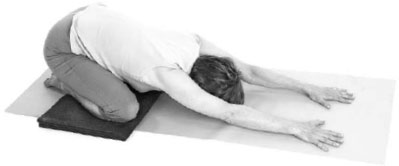
This pose is a gentle ending to the sequence.
Challenging Lumbar Poses
We recommend that you do a warm-up sequence of twelve poses from the beginning and intermediate sections, in the following order: Cat-Cow, Side Child, Bhujangasana, Ardha Bhekasana, Adho Mukha Svanasana, Pressure Cooker, Chair Twist, Parighasana, Ustrasana, Utthita Parsvakonasana, Utthita Trikonasana, and Uttanasana.
Purpose: To stretch the abdominal muscles and hip flexors and extend the spine.
Contraindications: Recent abdominal surgery, spinal stenosis.
Props: A folding chair, a wall, and a blanket. Cushions if desired.
Avoiding pitfalls: Adjust your position in the chair relative to your height. Taller people will sit farther into the chair in the beginning. Take care to lengthen your back as you arch into the full pose.
1. Place your chair about two feet from a wall. Place a folded blanket on the seat.
2. Sit backward in the chair, on the edge of a blanket, with your legs threaded through the backrest.
3. Bring your toes up the wall while your heels are on the floor and your knees are bent.
4. Manually widen your sitting bones and upper thighs.
5. Firm and lift your abdominal muscles.
6. Hold the sides of the chair back with your hands.
7. Inhaling, lift your back ribs up and bow forward, rounding your spine slightly. This is the Kidney Loop again (see Appendix III).

8. Exhale and start to lean back, still rounding your back to create length, until your upper back reaches the front edge of the chair. Come farther into the chair with your hips if you need to, in order to have the spine just below the shoulder blades come to the edge of the chair.
9. Once your back is on the chair and before moving your shoulders and neck into a deeper arch, firm your shoulder blades onto your back and lift your heart up.
10. Move the sides of your neck back and up, lengthening the neck before arching it.
11. Exhale, and arch back with your shoulders and head over the front of the chair. Rest your head on a pile of cushions, or let it hang if this is comfortable. Your hands can stay on the backrest, and even push lightly to increase the opening of your chest.
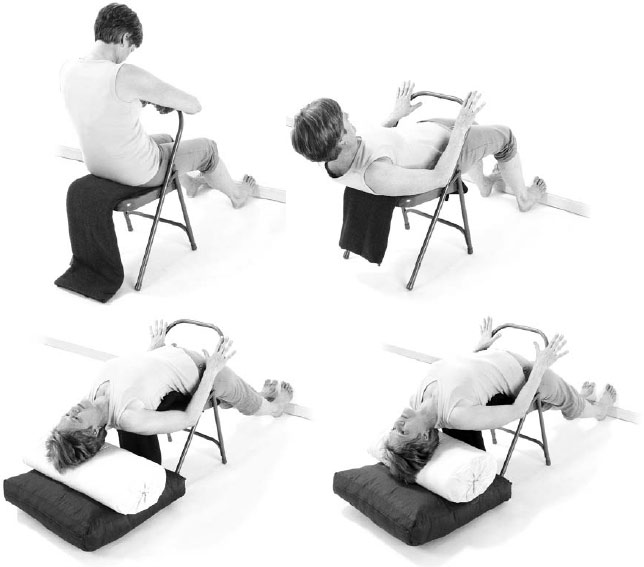
12. Push into the wall with your feet, straightening your legs. The chair may slide away from the wall a little. Use that action of your legs to support a large expansion in your chest as it arches back.
13. Extend through the whole length of your body. Let inside and outside merge as you breathe fully.
14. To come up, bend your knees and slide back to plant your hips firmly on the chair. Keep your chest open; use your arms to lift your chest.
15. Sit upright for a few breaths to rest before coming out of the chair.
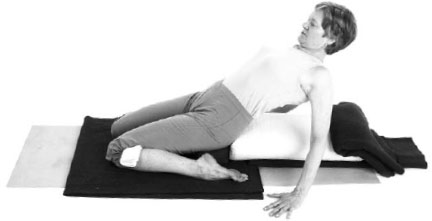
Purpose: To stretch the thighs, knees, and hip flexors.
Contraindication: Knee pathology.
Props: A block, a bolster, several blankets, and two washcloths.
Avoiding pitfalls: Take care to use enough props to avoid straining the knees or lower back. Take note of instructions and pictures for prop use. If difficulties ensue, consult a teacher.
1. Set up the block and the bolster lengthwise on a mat, with a blanket placed beneath them for padding. Have another blanket or two ready.
2. Sit on the block with your feet folded to the outsides of your hips, and knees straight forward. If your knees are uncomfortable, add one folded blanket under your hips and washcloths at the back of the knees. If you need less support, remove the block or use a folded blanket under your hips.
3. Adjust the leg muscles with your hands: buttocks wider, thighs turned in, and calf muscles away from the knees.
4. Set one other folded blanket or more behind you to support your back and head as you lie down. If you feel stiffness or pain in your knees or lower back, stack these blankets over the bolster for more height.
5. Inhale, lift your spine and ribs, and lower your tailbone.
6. Start leaning back, support yourself on your arms, and lengthen the lower back as you go.
7. As you descend and arrive on the blankets, pull your lower ribs away from your waistline to maximize the length of your back, stretch your tailbone toward your knees, and keep your abdominal muscles pulling in and up.
8. An intense thigh stretch is good, but knee or lower back pain is not good. Adjust with more height under you if necessary.
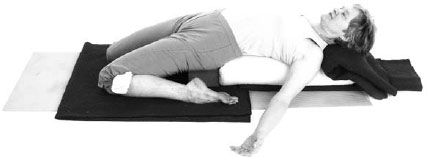
9. Stay in the pose for a minute or two, focusing on creating inner length and inner calm, and then come up and roll to one side to release your legs.
Purpose: To stretch the legs, hips, and side of the torso.
Contraindications: Absolute: pregnancy. Relative: fractured vertebra or rib, colostomy. With scoliosis, do this pose only when the leg on the convex side is straight. Refrain from doing this pose on the other side.
Props: A mat and possibly a belt.
Avoiding pitfalls: Go into the pose in several careful stages.
1. Sit with your legs extended forward in front of you.
2. Pull your left knee out to the side and back, folding the foot in close to you. Separate the thighs as widely as possible.
3. Turn toward your left and extend your spine up.
4. Firm your legs, stretching out through your right heel.
5. Inhale, stretch your spine up, exhale, and incline toward your right leg.
6. Pause here and root your right thigh down to keep the knee straight.
7. On another exhalation, curve your body over to the right, your right arm coming alongside your right leg.
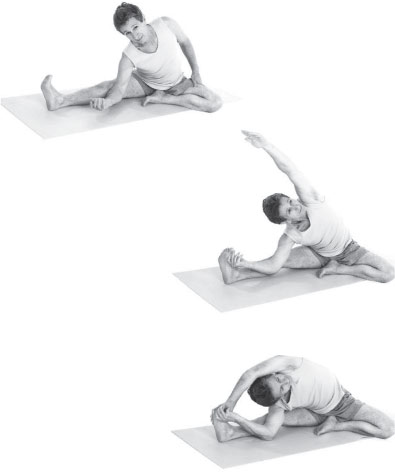
8. Reach for the right foot with your hand. Turn your palm up. Use a belt if necessary.
9. Turn your left ribs up and back as the right side comes forward to twist the spine.
10. Sweep your left hand out, up overhead, and to the right to grasp the right toes if possible. If not, reach up and over with the left arm to stretch your left side.
11. Let your breath and your intention for healing lead you into this deep side stretch.
12. When you are ready to come up, root down through the pelvis and legs and inhale strongly as you rise. Repeat on the second side.
This twist is dedicated to Bharadvaja, a hero from the Mahabharata.
Purpose: To improve a critical range of motion in the spine and stretch the outer parts of the hips as well, one at a time.
Contraindications: Absolute: pregnancy. Relative: herniated nucleus pulposus, total hip replacement, colostomy.
Props: A yoga mat and a folded blanket.
Avoiding pitfalls: Use enough support under your hips to orient your pelvis vertically (without tipping back) and place both knees on the floor.
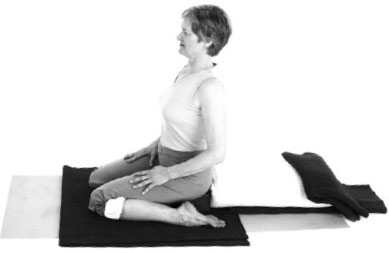
1. Sit next to the blanket with your legs folded under you.
2. Move your hips to the right, settling your right hip onto the corner of a folded blanket.
3. Your feet are to the left, with the right instep in the arch of the left foot.
4. Manually pull your buttocks back and apart.
5. Inhale and stretch up through your spine. Retract your abdomen.
6. Exhale as you turn to your right. Reach your right hand behind you on the floor; place your left hand on your right knee.
7. Deepen the twist with a wrapping action that begins behind the back of your left ribs and moves to the right.
8. Continue in the pose with rhythmic breathing: inhale, lift up the spine, and turn more as you exhale.
9. Level your shoulders; preserve a quiet face as you turn. Soften your diaphragm while maintaining strength in the arms and legs. Move farther with each exhalation.
10. Inhale as you return to center. Repeat on the other side.
This seated twist is dedicated to Matsyendra, a fisherman thought to be the originator of Hatha Yoga. The literal translation of matsyendra is “Lord of the Fishes.”
Purpose: To increase lateral rotation range and stretch the outer hips.
Contraindications: Absolute: pregnancy. Relative: total hip replacement, colostomy, herniated disc, vertebral fracture.
Props: A yoga mat and a blanket.
Avoiding pitfalls: Lengthen the spine upward to free it and the rib cage for rotation. Root down through the pelvic bones. Use your abdominal muscles to help you twist.
1. Sit on the edge of a folded blanket.
2. Fold your left leg so that the knee faces straight forward, and the foot rests outside your right hip.
3. Manually widen your buttocks and upper thighs.
4. Cross your right leg over your left, placing the right foot flat on the floor outside the left knee, with the right shin vertical.
5. Lift your spine as you inhale. Root down through both pelvic bones.
6. Exhale and turn to the right. Hold your right knee with your left hand; place your right hand behind you on the floor.
7. If you can twist more deeply, position the left elbow outside the right knee, pointing your left hand up.
8. Press your right leg and left arm firmly against each other, creating the power for a deep twist. Retain a long, vertical spine.
9. Continue the twist by wrapping the back of your left ribs to the right.
10. When the spine has revolved as far as possible, keep turning your inner body. Lift your spine farther with each inhalation; revolve somewhat farther as you exhale.
11. Release and repeat on the other side.
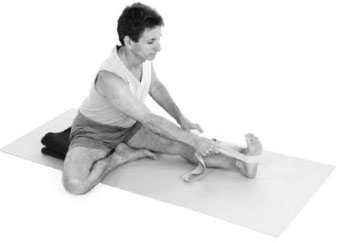
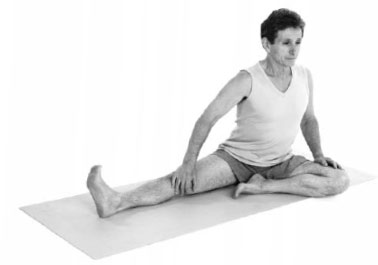
Purpose: To stretch the lower back, hips, thighs, and pelvis.
Contraindications: Knee restrictions, colostomy, total hip replacement.
Props: A yoga mat, a blanket or two, a belt, and a washcloth.
Avoiding pitfalls: Use enough lift under your hips to prevent knee pain in the bent leg.
1. Sit on the edge of a blanket folded to the width of your hips.
2. Fold your right foot back beside your right hip, toes going straight back with your ankle near your thigh. Extend your toes, especially the fourth and fifth ones, on both feet.
3. If your right ankle is stiff, put a folded washcloth under the ankle.
4. Manually pull your sitting bones and buttocks back and apart.
5. If you are leaning to the left, place another blanket under your left hip. This will lower your right hip relative to it.
6. Loop the belt around your left foot and hold both ends with your right hand. Placing your left hand on the floor at your side will help you to align your torso straight forward.

7. Inhaling, lift up through your spine, pulling the middle of your back in and up and your arms back in the shoulder joints.
8. Exhaling, bend forward from your hips, with your abdomen lifting up and your torso moving out over the left leg.
9. Hold your foot if you can reach it, and release your head down.
10. Maintain the pose for several breaths, keeping your legs active but softening and releasing in the upper body.
Forward bends remind one to bring awareness inside and become quiet.
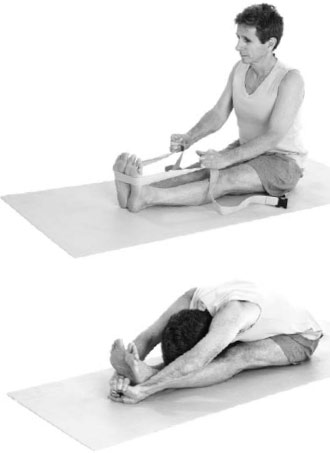
Purpose: To stretch the back and the legs, to conclude a practice with a quiet mind.
Contraindications: Hamstring sprain, ischial bursitis.
Props: Two folded blankets and one belt.
Avoiding pitfalls: Make sure to straighten your legs fully, pressing your thighs down.
1. Sit on the edge of one folded blanket, with your legs extended forward and a belt looped around your feet.
2. Manually pull your sitting bones and thighs back and apart. This will help you tilt your pelvis forward.
3. Hug the leg muscles to the bones and stretch out through your feet, with your toes and kneecaps pointing straight up.
4. Place the other folded blanket on your legs if needed, to rest your head on later.
5. Firm your abdominal muscles and lift your spine up from the core of the pelvis.
6. Pull on the belt to connect your arms into the shoulders and to prepare to bend forward.
7. Prepare yourself for an extreme stretch as you inhale deeply.
8. Exhale, bend forward, and pull on the belt or reach to catch your feet.
9. Extend forward evenly on the sides, front, and back of your torso.
10. Rest your head on the blanket or your legs and stay in the pose for a minute or so, breathing smoothly.
11. Soften your neck, shoulders, and upper back, but activate your quadriceps, pressing the backs of your knees down.
12. Attend to an inner stillness as you breathe smoothly.
13. When you are ready, come up softly to sit tall again and release.
Lumbar Spine Asana: Types of Action and Intensity