The Cervical Spine
It is always rush hour in the neck. The strongest (and most important) reflexes function side by side with the ultimate of human volition: every bite, every breath, almost every movement and sensation, and each spoken word involves passage of impulses through the neck. In addition to housing the most autonomic and the most voluntary aspects of human life, the neck must be supple and versatile enough to turn in every direction as quickly and effortlessly as possible. The vertebrae are smaller and finer, yet a major artery, the vertebral artery, weaves into and out of them on its way to the brain.
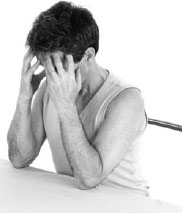
Osteoarthritis erodes the integrity, distorts the fine angles, truncates the delicate fits, and mars the supple symmetry of the cervical spine. Turning your head creates a noise and brings an uncomfortable strain, and your shoulders tend to swivel along with your eyes to compensate. Sometimes your neck aches without any apparent cause, and lying down, instead of giving rest, may produce a sharp twinge.
At times, osteoarthritis narrows the cervical neuroforamina, the openings between the vertebrae through which nerve roots pass from the spine to the arms, hands, and viscera. Then there may be pain, numbness, paresthesias, and weakness in one or both upper limbs—in dramatic cases, weakness to the point of near paralysis. Since the neck is such a compact and dynamic region, even swallowing can be impaired.
As if this were not enough, the shoulders and arms are held up by connections with the head and neck, placing the full weight of anything lifted by the arms on the cervical vertebrae. And though all this weight bearing might tend to make the muscles taut and solid, such tightness can compromise the nerves of the brachial plexus.
In addition to pinching nerves, the main effect of arthritis in the neck is limited range of motion. This is particularly obvious with rotation, a motion that is so vital to everyday activities. In what follows we not only address cervical range of motion directly but also offer some poses that integrate thoracic and cervical motion, coordinate their movements to maximize twist, and divide up the strain of shearing forces.
Yoga can do little to reduce swelling in the neuroforamina. But yoga can reduce compression of nerve roots and even alleviate swallowing disorders. Yoga can accomplish this in four ways: (1) by improving the suppleness of the muscles, (2) by increasing the versatility of the joints, (3) by refining the coordination of the various muscle groups in the neck and adjoining regions of the shoulder and thoracic spine, and (4) by facilitating relaxation. In this way yoga can help in handling the seemingly contradictory tasks of increasing strength and flexibility, adding the soothing element of calm to maximize the balance between them.
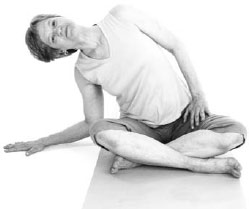
There are two common misalignments of the neck (see Figure 9 on next page), which we call the “tucker”(the head pulled back, neck too straight) and the “thruster”(head pushed forward, neck curved improperly). Both cause excessive strain in the muscles and joints of the neck. Both become habitual, and therefore might seem “normal.”As you consider your own neck alignment, please be open to trying something new, even if it feels odd at first.
Four Anusara Yoga actions provide a valuable template for realigning the neck and balancing strength with flexibility.
• Inner Body Bright—The inside of the chest swells and lifts in the front, sides, and back. Taking a deep breath is one good way to feel this action, which readies you for what is to come.
• Move the top of the throat back, raising the tone of the anterior muscles of the neck. This is especially important for thrusters.
• Shoulder Loop—The shoulder blades pull toward each other. This tone in the upper back prevents the upper spine from collapsing, and retracts your upper arms. Slide the shoulder blades slightly down the back, without losing the lift that you created as you took the deep breath (for Inner Body Bright). The Shoulder Loop also includes a lift of the chin, tilting the tops of the ears slightly back. This part of Shoulder Loop is important for tuckers because it reestablishes the natural lordotic curve of the cervical spine.
• Float the neck and head up, relaxing your ears. Imagine a string drawing the top of your head straight up, or an overhead set of earphones pulling you up taller. For thrusters, floating the back of the head up is important. This corresponds to the Skull Loop (see Appendix III). Once you have balanced your head right on top of the spine (see “Normal”in figure below), then the whole head can float up evenly. This creates a feeling of spacious lightness.
Before and after you perform the neck postures we are about to describe, check your neck alignment with a mirror or a friend. Your goal is for your ears to be over your shoulders when viewed from the side, and your nose to be centered over your sternum when viewed from the front.
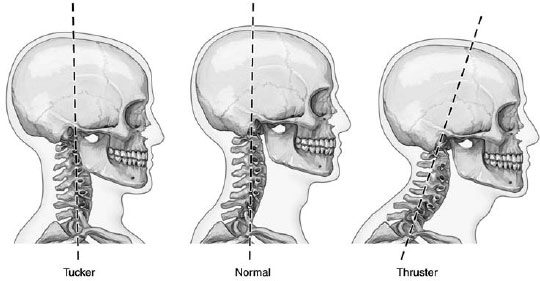
Figure 9. Variants of cervical posture.
Poses

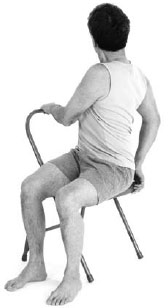
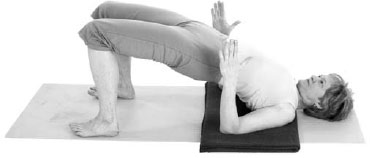
Purpose: To strengthen the upper back and neck extensors and reinforce the natural arch of the neck with an isometric action.
Contraindications: Cervical vertebral instability, including spondylolisthesis, Chiari malformations.
Prop: A chair.
Avoiding pitfalls: Keep all sides of your neck long. Work diligently; do not overwork.
1. Sit in a chair and adjust your thighs back and apart, as in Pressure Cooker (see page 73). This will help you to sit tall. Interlace your fingers behind your head.
2. Keeping your upper back firm, tilt your head backward into your hands. Look up at a comfortable angle.
3. Balance these two goals:
• Move back through the sides of your upper neck and ears.
• Keep the front throat open and long.
4. Stretch up through the crown of your head. Root down through your pelvis and legs.
5. Do not forget to breathe while you hold the pose!
6. Return to center and release your hands down.
Purpose: To strengthen the neck flexors, which will help to free the extensors and prevent unnecessary compression.
Contraindication: Cervical vertebral instability.
Props: A chair and a table.
Avoiding pitfalls: Do not collapse the upper back. Keep your shoulders back.
1. Sit tall, shoulders back. Rest your elbows on the table.
2. Inhale and lengthen your neck and head up.
3. Exhale and bend your head forward just a little; press your forehead into your hands.
4. Continue for a few breaths, then bring your head up.
Twisting the entire spine helps to coordinate the different segments of the spine: the thoracic vertebrae take on some of the rotation when you turn your head.
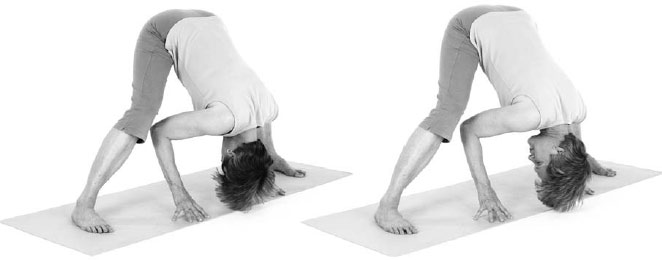
Purpose: To give traction to the cervical spine.
Contraindications: Cerebrovascular disease, wet macular degeneration, history of vasovagal episodes.
Prop: A chair.
Avoiding pitfalls: Extend forward maximally through the whole upper body to give the best angle for the neck.
1. Sit on the front edge of your chair with your legs wide apart.
2. Manually pull your buttocks back and apart, which will free you to tilt your pelvis forward.
3. Inhale; lift up your spine and chest.
4. Exhale and bend forward. Fold your torso between your legs.
5. Rest your hands on the floor. Hang your head straight down.
6. Lightly retract your upper arms into the shoulders, then stretch your arms forward. Maintain that action as you continue to release your neck down.
7. To exit the pose, extend your head and chest forward, support yourself with elbows on thighs, inhale, and swing up.

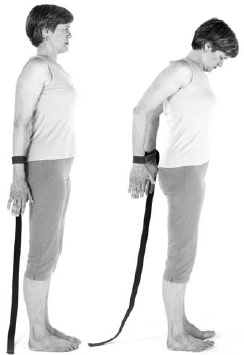
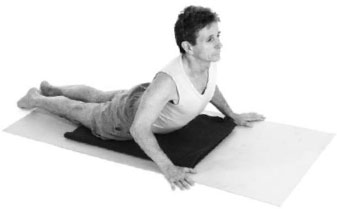
Purpose: To stretch the neck extensors while keeping the shoulders back.
Contraindications: Herniated cervical disc, rotator cuff syndrome.
Prop: A belt.
Avoiding pitfalls: Keep your upper back erect but not rigid. Avoid overly tightening your front neck muscles. Avoid overarching your lower back.
1. Stand with the belt looped around your wrists with your arms behind you.
2. Inhale and lift your inner body up, making the sides of your body very long.
3. Firm your shoulder blades onto your back to support this tall posture. Pull your upper arms back.
4. Press your arms out against the belt.
5. Inhale again; lengthen up through your neck.
6. Exhaling, move your head forward and down toward your chest until you feel a good pull on the back of your neck.
7. Stay for several breaths, then inhale and raise your head.
8. Release your arms from the belt.
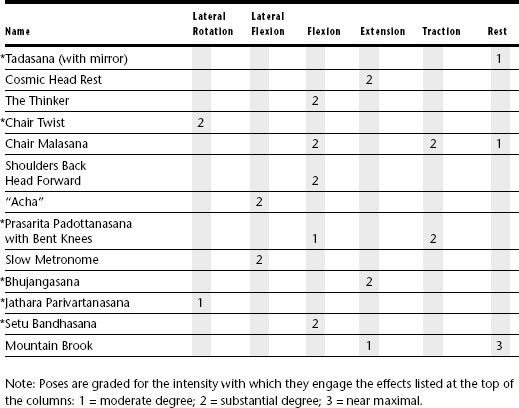
This pose imitates the Indian tilting head movement that means “okay.”
Purpose: To improve sideward tilt of the neck without thoracic movement.
Contraindications: Chiari malformations, cervical vertebral instability, inner ear dysfunction.
Prop: A belt.
Avoiding pitfalls: Your head will tend to bend forward. A little of that is okay, but try to align your head with your shoulder as you tilt. Retain a vertical upper back.
1. Stand tall. Hang a belt over your right shoulder. Hold the ends with your right hand.
2. Inhale. Lift your inner body up. (Remember the action described before: Inner Body Bright.)
3. Firm your shoulder blades onto your back to support this tall posture.
4. Inhale again and softly lengthen up through your neck. Lift the front and back equally.
5. Exhaling, tilt your head to the left side.
6. Pull on the belt with your right hand to isolate the stretch in your neck.
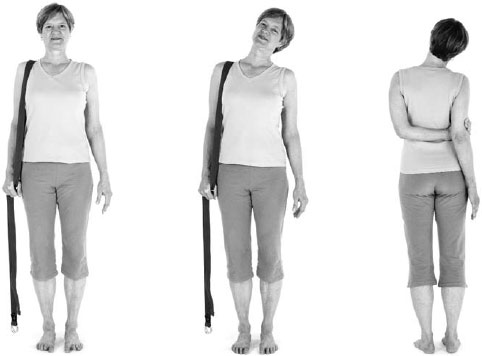
7. Hold this for a few seconds, then return to center and repeat on the other side.
8. For greater intensity, reach behind and catch the arm on the side to which your head is tilting, to keep the shoulders horizontal.
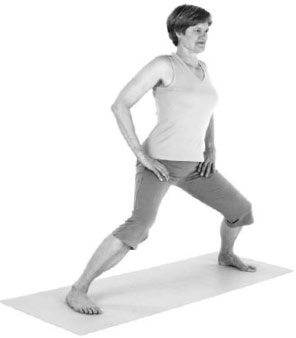
Purpose: To improve traction and rotation of cervical spine, also to stretch the hips.
Contraindication: Poor balance.
Props: A yoga mat and possibly two blocks.
Avoiding pitfalls: Widen your thighs as you bend your legs. The leg muscles stay active.
1. Place your legs wide apart and parallel. Bring your hands to your hips.
2. Bend your knees and lift up through your spine as you inhale.
3. Exhale and bend forward, tilting from the hips as much as possible.
4. Touch the floor or blocks lightly with your hands.
5. Pull your arms up into the shoulder sockets, but let your head hang loosely down.
6. Move your head and neck cautiously in all directions—nodding your head yes, turning side to side, and shaking your head no.
7. Let your head hang again in center for a few breaths, releasing down.
8. Step your feet closer together. Root down through your legs, stretch your chest and head forward, place your hands on your hips, and come up with a strong inhalation.
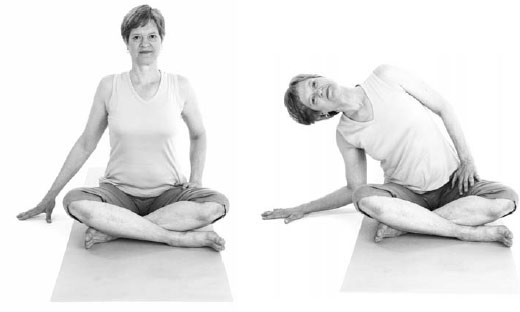
Purpose: To coordinate neck and lateral thoracic spine movements.
Contraindications: Ankylosing spondylitis with fusion, thoracic vertebral fracture, severe degenerative scoliosis.
Props: A yoga mat, possibly a blanket.
Avoiding pitfalls: Retain your shoulder blades firmly together on your back in the Shoulder Loop; avoid leaning forward.
1. Sit cross-legged on the floor. If your knees are higher than your hips, sit up on a folded blanket or pad.
2. Inhale; lift up through your whole spine and torso (Inner Body Bright).
3. Pull your shoulder blades toward the spine and slightly down, lifting the front of your chest up.
4. Exhale and lean to the right as you rest your right hand on the floor beside you and your left hand on your hip or thigh. Make an even curved shape from your left hip to the top of your head. Soften inside.
5. Inhale. Return to vertical.
6. Exhale and bend to the left side as you place your left palm on the floor beside you.
7. Repeat as above several more times to each side. Movements should be as fluid and naturally expressive as possible. Accept whatever range is comfortable for you.
This back bend increases extension and encourages better posture. It also strengthens the neck and upper back.

This spinal twist will help to coordinate the different segments of the spine.
This back bend stretches the neck, encourages better posture, and strengthens the upper back.
Purpose: To support in a resting position the natural curves of the spine.
Contraindications: None.
Props: A yoga mat, a bolster, and two blankets.
Avoiding pitfalls: Take the time to set up the props so you are comfortable.
1. Fold one blanket into a long rectangle and place it on your mat where your upper chest will be when you lie down on your back.
2. Leaving a space for your shoulders to rest, place another blanket down toward the top of your mat. Make a long roll with the side of it to provide support for your neck. What is left after making this roll will pad your head on the floor. The size of the roll should be determined by level of comfort under the curve of your neck. Place the bolster across the mat where your knees will be.
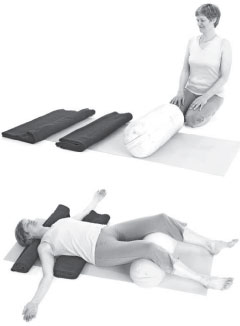
3. Lie down on your back, with the bolster under your knees and the folded blanket under the back of your chest. The bottom of your shoulder blades should be supported by the distant edge of the blanket nearer the bolster.
4. Adjust the other blanket to fit snugly under your neck. It should support the natural arch there.
5. Extend your arms out at a comfortable angle from your sides, palms up.
6. Relax and breathe deeply.
7. If any part of your body is uncomfortable, roll to the side, sit up, and adjust the props.
8. Stay in the position for five to fifteen minutes. Enjoy the support of the props and the heaviness of your body.
9. When you are ready to get up, roll to the side and slowly sit up.
Restorative poses like this give the contours of the body full support and allow you to stay in the position longer, relaxing all joints and muscles deeply.
Cervical Asana: Types of Action and Intensity