Introduction
“When I write of hunger, I am really writing about love and the hunger for it, and warmth and the love of it and the hunger for it . . . and then the warmth and richness and fine reality of hunger satisfied . . . and it is all one.”
—M.F.K. Fisher
As I write this, I am watching my eight small chicks skittering about their brooder. They tilt their heads one way and another, pecking along the ground through their pine shaving bedding, scratching aggressively at the bottom of the box, as if they’ll unearth a worm underfoot if they just dig deep enough. This instinct follows through to the wild adult chicken, whose diet of a wide variety of bugs and seeds requires consumption of sand and grit in the form of tiny pebbles eaten off the ground, which then reside in its stomach and help it break down all the nutty and tasty shelled bits it forages for. At six days old, my chicks weigh less than a small muffin, but in a few months’ time, they’ll be nearly full-grown. Their breasts will become plump and their leg quarters will fill out with dark-flushed tendons. They’ll be rid of their downy fluff and grow long, conspicuous feathers. And in about six months they’ll begin laying their eggs. Yes, I have adopted these hens to give me a constant supply of eggs rather than a brief supply of meat, but in this short time, they have already impressed me with their vigor, adaptability, and gumption.
Chickens are one of a few varieties of flightless birds. Unable to flap their wings to gain flight for more than a few seconds at a time, their limited mobility and diminutive size unintentionally categorized them as the perfect domesticated bird, staying put in even the most rudimentary coops. Inexpensive to raise, they will forage on whatever bugs, nuts, seeds, fruit, and/or vegetables come across their habitat. With the current backyard chicken phenomenon, there are complex concoctions of pre-mixed nuts and seeds you can feed your bird to ensure complete nutritional consumption, but in most parts of the world where raising large and demanding livestock is not an option, chickens are the primary source of meat. These adaptable creatures do not require acres of pasture, nor do they require mounds of specialized grasses. They can live in a variety of climates and locations and can forage for much of their diet if given access to the proper landscape (i.e., one with bugs, seeds, and/or vegetables around). This ability to adapt, survive, and even thrive in such a wide variety of landscapes is what has brought the chicken to the forefront of every culture’s cuisine.
From the coq au vin of France, to the chicken fricassee of Cuba, to the pad thai of Thailand, every corner of the earth has adapted several cherished preparations of this flightless bird, each one more different and intriguing than the next. On its own, roasted without seasoning, chicken has a very mild, savory, and lightly buttery flavor that intensifies when you go from the light meat to the dark. But once you incorporate spices, sauces, fruits, vegetables, or herbs, choose from roasting, braising, grilling, simmering, or frying, and then get down to the specific part of the chicken, whether the juicy drumsticks, the crispy wings, or perhaps the whole bird spatchcocked and flattened, you end up with a staggering and never-ending array of equally sumptuous dishes.
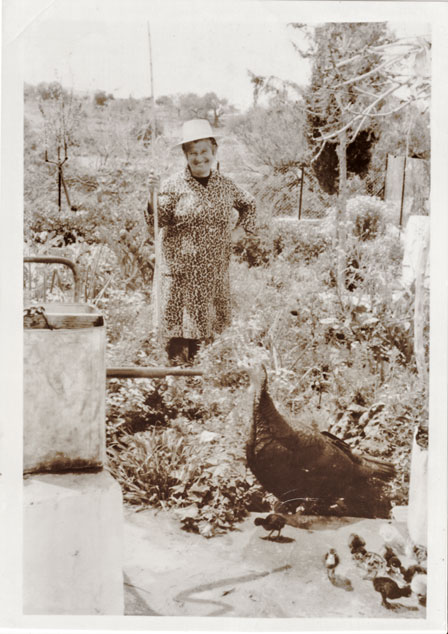
In Thailand, ground chicken and sweet Thai basil leaves are stir-fried together in a hot wok with a variety of regional sauces. In Tennessee, Hot Chicken is a popular present-day preparation that entails deep-frying various chicken parts and serving them atop slices of plain fluffy white bread adorned with homemade pickles. In Peru, the most common dish is pollo a la Brasa, in which a whole chicken is salted, skewered, and cooked over hot coals. And in Greece, the bird is most often roasted with lemons, onions, garlic, oregano, olive oil, and potatoes, a method my father learned from his parents many years ago on the small island of Aegina, where my yiayia and papou tended to their own flock of poultry. Papou was a shoemaker and pistachio farmer, and Yiayia, having eight children on a farm on a rural Greek island, worked full time making sure everyone was fed, clothed, and had a clean place to sleep. Their home consisted of three rooms, the kitchen/master bedroom, the dining room, and the children’s bedroom. Money, as you can imagine, was not something that was in excess. But, having a coop of chickens provided a reliable source of low-fat and high-protein sustenance for the growing family. And even in the dry, arid, and rocky island climate, the birds were happy to eat any scraps, bugs, and seeds tossed their way (my father recalls that they were particularly fond of melon rinds).
The enjoyment of chickens, however, hasn’t been limited to the diets of the poor. They have been relished by queens, captains, sultans, and leaders of nations alike throughout the entirety of their existence. A palate for chicken, it seems, does not distinguish between the rich and the poor, but only between those with and without functioning taste buds. The chicken, in its adaptable and easygoing fashion, has provided both wealthy and impoverished peoples with a reliable food source for hundreds if not thousands of years. And it is because of this duality that there is such a staggering array of ways to prepare this delightfully simple creature.
Being asked to develop 150 recipes with the same key ingredient at first seemed like a markedly strenuous task. But the more I spoke to friends and family about their favorite preparations, the less difficult it became. And then, I started speaking to complete strangers about it. Inquiring into the minds of acquaintances about their beloved chicken dishes not only provided me with a bottomless reservoir of inspiration, but it also created a bond over a simple love of food. Every single person had at least one cherished dish to talk about, with the vast majority of them coming from their families and cultures, providing a glimpse into the life and story behind each person: who they are, where they came from, who the primary cook in their family was, and why they love that particular preparation of this humble bird so much. Sometimes it was because of the surroundings in which they ate it, whether in their mother’s home or during a faraway holiday celebration. Other times it was because it reminded them of the person who made it, some of whom were no longer a part of this world. And just as often, it was simply because it tasted really, really good.
So, when reading this book, I ask you to consider the chicken. Consider it as not only a meal, but as a bridge between cultures, beliefs, and people. And consider it as it truly is, a remarkably adaptable living creature that has a right to a comfortable existence, no matter its final resting place or the brevity of its life. And so, it is in this way that I hope this book gives you the urge not to simply eat to get by, sprinkling a boneless skinless chicken breast with salt, pan-frying it, and calling it dinner, but to eat to explore, inquire, bond, and most importantly, to savor the sensual miracle that is the art of eating.
Why Pastured Poultry?
There are many benefits to eating exclusively pastured chickens, but first I want to talk a little bit about what pastured poultry means, particularly in comparison to “free range” and standard high-density confinement chickens. The USDA regulations for free range poultry require that the bird has access to the outdoors; they do not, however, define the amount of time the bird has that access, the necessary size or population density of the outdoor area, or the plant materials available for grazing in the space. So theoretically, a poultry farm could have a 10,000-square-foot indoor barn and a 50-square-foot fenced-in outdoor gravel area with an open entryway between the two areas allowing chickens to pass in and out for 15 minutes a day and qualify as free range.
Most commercially available chickens come from high-density confinement poultry farms, which is where a large number of chickens are crowded and raised together. Some are raised in cages, but even with the label “cage-free,” the poultry can still be confined to an indoor structure where they are all crowded together on the floor. Chickens are inherent grazers and have evolved to wander around an open environment and peck at the ground for food. Crowding them all together to the point where they can’t walk around can cause an increase in cannibalism, where they peck at each other to the point of injury and death. To help prevent this from happening, some of these high-density confinement farms clip the ends of the chickens’ beaks so that they cannot peck each other but can still eat and drink. This is more common in egg-laying poultry facilities than in meat-processing ones, since broiler chickens are usually slaughtered before adult aggression sets in. Some broiler chickens develop breasts so heavy that they cannot stand for very long because their legs have not evolved to the point where they can support the new weight of their body, so they are unable to move very much, if at all.
As you can imagine, high-density facilities tend to have more issues with bacterial infections because of the large numbers of chickens defecating in a confined and crowded space. To counteract this, many chickens are supplied with a dose of antibiotics. Now, the pro and con antibiotic rabbit hole could be a whole book within itself, so I’m not going to tread there. But, from a solely humanitarian standpoint, forcing an animal that is instinctually meant for grazing in open areas to be confined to a crowded filthy environment without ever seeing the light of day seems especially cruel and torturous. And while yes, when poultry is raised for meat consumption it does mean the bird will eventually be slaughtered, that does not mean that the bird, or any animal for that matter, should have to endure suffering throughout its life leading up to that point.
Pastured poultry follows along this sentiment: Pastured chickens are raised on grass pasture and allowed to forage for a significant part of their feed, creating a well-rounded diet that results in a more nutritious and more flavorful bird. Having the space to forage also creates a cleaner living environment and reduces infections, which reduces the amount of dangerous bacteria living inside the poultry meat, and also neutralizes the need for pumping the bird full of antibiotics, which means you don’t get a side of penicillin every time you roast a chicken. Additionally, the chicken varieties used for pasture are more diverse than those used in the high-density confinement farms, which can introduce you to a range of flavors and textures within the poultry family. To find a pastured poultry source near you, I recommend visiting the American Pastured Poultry Producers Association at APPPA.org and clicking on “Find a Farmer” for their directory of farmers listed by state.
Chicken Varieties
There are hundreds of different chicken varieties in existence today, but there’s only a smattering that you’re likely to come across in even the more high-end grocery stores. Unless stated otherwise, chickens sold in chain grocery stores are usually a variety of broiler chicken, which is the result of a vigorous breeding program that included Cornish game, Plymouth Rock, Jersey Black Giant, New Hampshire, Brahmas, and Langshans varieties.
The modern broiler chicken, or roasting chicken, is white with a red comb and yellowish skin and feet. They are slaughtered as soon as they reach their size maturity, which usually happens around 5 to 7 weeks, depending on the particular chicken. Broiler chickens have been bred to have large breasts for a meatier bird, and they reach their size maturity much more quickly than other varieties.
There are Bantam varieties of chickens as well, and those are much smaller than your standard chicken, almost like a miniature variety. These are mostly used for egg production and as pets, so it’s unlikely you’ll come across one butchered unless you’re buying direct from a local farm.
You will come across Cornish game hens in the grocery store from time to time; usually they are frozen since they don’t move off the shelves as quickly as broiler chickens, but with a bit of defrosting they’re completely fine for food preparation. Commercial Cornish game hens are a cross between the White Cornish and the Plymouth chicken varieties. They are smaller than the broiler varieties, which is both due to their genetic profile and the fact that they are slaughtered a bit earlier than broiler chickens, closer to the 4-week mark than 5 to 7 weeks. Cornish game hens make for beautiful individual servings for more formal meals, since they weigh in at about 1 pound each after slaughter. The breast meat on Cornish game hens is smaller than those on broiler chickens, but still plump in comparison to the relatively small size of the bird. And while “hen” is part of the name, the Cornish game hens you’ll come across in the store are a mix of both male and female birds.
Two Sides to Every Bird:
White Meat vs. Dark Meat
Most people have a preference for dark or white meat, but what’s the real difference and where does it come from? The difference comes from an oxygen-carrying protein called myoglobin. Myoglobin appears in more concentrated amounts in muscles that are in constant use, like the legs and thighs of the chicken, which support its weight. Chickens are relatively flightless, though, so muscles like those in the breast do not get used for extended periods of time, only for short bursts of activity, so the myoglobin doesn’t concentrate as much in those areas. Ducks and most other birds, however, do fly often and regularly so they have dark meat all over their bodies.
As far as the nutritional breakdown goes, dark meat has a higher concentration of saturated fats than white meat, which results in a richer, more intense flavor, but also means more calories per gram of dark meat than white meat. For example, a 130-gram skinless chicken breast has 2.9 grams of saturated fat, whereas a 100-gram skinless chicken thigh has about 7 grams of saturated fat.
I’ve found both types of meat to be tasty prepared in all manner of ways, but I do have some personal preferences for different uses. Everyone has their own dark and light meat preferences, however, so take my advice with a grain of salt, knowing how you feel about each of them. I’ve found the darker areas of the bird to be excellent for creating high concentrations of flavor, like making stocks, soups, gravies, and using just a dash of chicken meat in appetizers. The lighter areas of the bird are great for dishes where the chicken is a subtle complement to other highly flavored ingredients in the dish. Preparations like red Thai curry or chicken tossed in a rich creamy lemon sauce with pasta are great for the milder-flavored white meat because they allow the flavors of the prepared sauce to really shine through.
And, of course, there are always the health benefits to consider. If you need to cut down on saturated fats, then dark meats should be avoided and white meats like chicken breasts should be favored. Keep in mind, however, that different sizes and cuts of meat (with or without bones) will affect the cooking time of the cut. As long as you follow the guidelines in the cooking tips section (Cooking Tips and Precautions), you’ll be fine, but just a heads up that if you’re swapping out different cuts of meat in the recipes here you’ll need to keep a closer eye on the dish as the cooking time will change since white meat will cook more quickly than dark meat, and also dry out more quickly since it has less fat than dark meat.
Breaking Down the Bird
If you start purchasing your poultry directly from a pastured poultry farm, chances are they will sell you the entire butchered chicken. It will have all the feathers removed and the giblets separated out, but if you want to just cook the thighs or drumsticks, you’ll need to know how to separate those out yourself, and that’s where this guide will lend a hand.
The one thing that will make all of the following instructions much, much easier is using a sharp knife. Trying to cut and carve a chicken with a blunt knife is not only extremely difficult, but it is dangerous, since you have to apply more pressure while cutting and, due to the slippery flesh and skin, you’re more likely to slip off the desired cutting area and cut yourself. So, before you get started, make sure you have a nice and sharp chef’s knife at hand.


Cutting a Whole Chicken into Individual Parts
To cut up a whole chicken, first remove the wishbone: Lift up the flap of skin over the neck area so you can see the exposed muscle. Cut a V-shape about ½ inch below the neck, going about 1 inch deep. Reach in with your thumb and forefingers and feel around for the bone. Once you locate it, position your thumb behind the center of the wishbone and push it forward until you can get a grip on it with both the thumb and forefinger, then pull it out.
Remove the wings by cutting through the joint on the wing where it attaches to the body. Set the wings aside.
Remove the legs by holding one leg above the chicken so that the weight of the chicken is hanging from it. Cut along the skin attaching the leg to the breast; as you cut the skin will pull apart and display the muscle and sinew. Pull the leg back towards the back of the chicken to pop the leg joint out of the socket; you will hear a small crack once it happens. Now cut underneath the leg muscle that extends into the back (this area is known as the “oyster”). Lay the leg tucked up against the bird and then fold it over so the top of the leg is now facing the bottom of the bird. Cut through the exposed sinews and the leg should come off easily. Repeat with the other leg.
To remove the breasts, lay the chicken breast facing up. Make a clean cut down the center of the chicken, cutting around both sides of the protruding sternum. Lay the chicken on its side and feel for the joint towards the top of the breast near where the wing attaches. Once you locate it, cut under it with your knife to sever its connection to the spine. Use one hand to hold down the chicken’s body, grab the entire breast with the other hand, and pull it down off the chicken. Set it aside and repeat with the other breast.
Lay the bird flat on its back. You should see two small fillets of meat still attached to the breast area on either side of the sternum. Grab them at the thickest part and pull them off in a downward motion.
You have now broken down a chicken. While you may be tempted to just toss the carcass after you are finished, don’t. The flavor in the bones and joints make for excellent chicken stock. If you don’t have time to make stock right away, place the carcass in a freezer-safe resealable container and keep it in the freezer. Use it to make stock within 6 months.

Spatchcocking
Spatchcocking a chicken flattens the bird by removing the backbone, breaking the breastplate, and unfolding it to lay it flat. This helps the chicken cook more quickly and evenly, and exposes more skin, which crisps up the entire bird quite nicely. This is a great cooking technique if you’d like to prepare a whole chicken at once but don’t have a lot of time on your hands, since it significantly reduces the cooking time, and also allows you to grill the entire chicken over a gas or charcoal grill, since it allows the entire surface of the flattened bird to be exposed to the heat at once. (Butterflying is another term that’s often used interchangeably with spatchcocking, and through all my research on the subject I wasn’t able to find a definitive difference between the two methods, which both involve removing the backbone to allow the chicken to lay flat.)
To spatchcock a chicken, lay it on its breast so that the back is facing up. Using a very sharp pair of kitchen shears, cut along one side of the backbone, cutting as close to it as you can without actually cutting the backbone itself. Cut along the other side of the backbone until it is separate from the bird. The backbone can be saved and used for chicken stock or discarded.
Flip the bird over so that the breast is facing up and the back muscles are splayed out on either side of the breast. Press down firmly on the breast of the bird with the heel of your hand to break and flatten the breast bone. To ensure even cooking with the new shape of the chicken, lift up the wing and make a small ¾-inch-wide and 1-inch-deep incision into the joint. Repeat with the other wing and both leg joints. The incisions should not be visible from the top of the bird since they’re underneath each of the appendages. The incisions allow more heat into those areas of the bird that tend to take longer to cook, thus ensuring that the breast meat doesn’t get overcooked while you’re waiting for the thigh meat to finish.
If you’re grilling the chicken rather than roasting it, push two long skewers through the chicken to form an X-shape, inserting each into a leg quarter and exiting through the opposite upper corner of the breast. Repeat the same technique on the left breast and right thigh of the chicken. This helps maintain the shape of the chicken and makes it easier to flip the chicken over while you’re grilling it without the bird flopping around as much.
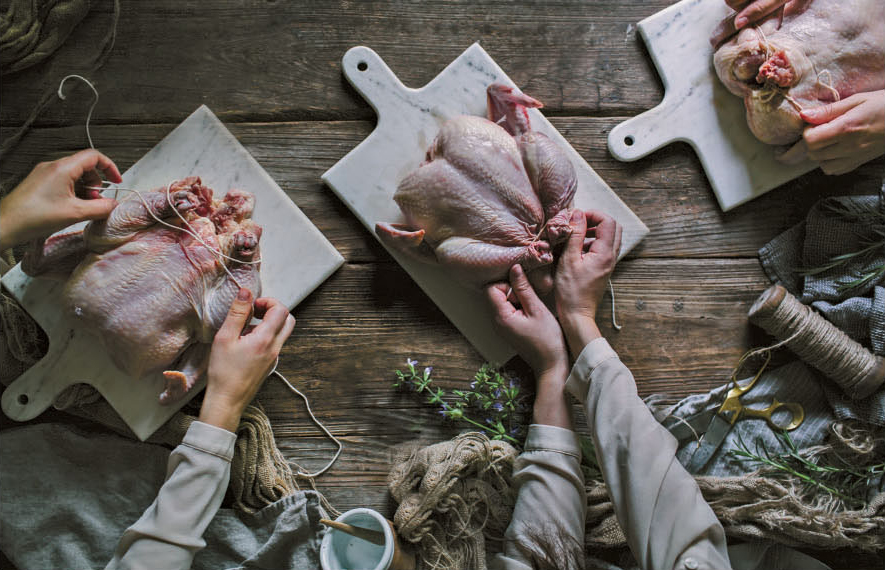
Trussing
Trussing the bird helps keep the chicken from drying out while cooking. Crossing the legs over the entry point of the cavity crates a seal that keeps in moisture, which rises to the top of the cavity, condenses, and then runs back down the sides of the ribcage, essentially creating a self-basting steam room of flavor inside the bird. Without crossing and tying the legs over the entry point of the cavity, the steam is able to escape and the chicken dries out much more quickly.
Before trussing and roasting the chicken, you might want to remove the wishbone (see Cutting a Whole Chicken) as it makes for easier carving of the breast meat later on.
To truss the bird, lay it breast side up and slide the cooking twine just underneath the back of the chicken so that it lies directly underneath the leg joints. Cross the twine over the top of the chicken so that it falls directly over the legs. Place the twine that is now looping around back to the back of the chicken underneath the drumsticks on either side and pull to tighten and close. Bring the twine over the wings and around them to the back of the bird and secure with a tight knot.
Tenting
Tenting tinfoil over the chicken’s roasting pan helps keep moisture inside the bird and is the best method to ensure that the bird doesn’t brown too quickly. The tenting step is especially important in glazes with a high sugar content, as the sugar can crystallize and burn easily without proper tenting. To tent a chicken, take a large sheet of tinfoil about 4 times the size of the pan and fold in half to create a thick double layer of tinfoil. Then fold that slightly in half so that it creates what looks like a camping tent. Place the tent over the bird and secure it onto the edges of the pan by pressing to seal it. Fold the open side at each end shut to seal in the chicken. Poke a small 1-inch hole in the tent to allow excess steam to escape. Make sure the tent does not touch the actual skin of the bird, otherwise it will cook onto it and tear the skin off when you remove the foil.
Carving
Unless you plan on eating an entire roasted chicken by yourself with your hands, carving is an essential step in the preparation process. It allows you to portion it out into serving sizes and separate the white meat from the dark, allowing those with flavor preferences between the two to choose their favorite cut of meat.
To carve a roasted chicken, first remove the drumsticks: Cut along the skin that goes over the front of the joint attaching the leg to the breast. Cut underneath the leg muscle that extends into the back and pull the leg off as you cut through the joint. The leg should come off very easily. Repeat with the other drumstick.
Lay the bird on its side and cut a layer of breast meat off the part of the breast facing up towards you, cutting in towards the backbone of the bird. Flip the bird over so it is resting on its other side and repeat. You are now left with a thick cut of breast meat down the center that is attached to the sternum. Use your knife to cut underneath the breast meat, running it above the sternum, separating the two from each other. Cut the wings at the joint and pull to remove them.
Place the carcass on the serving platter and arrange the cuts of chicken on and around it as if they were still in place. Drizzle the pan drippings over the carved bird and serve.
Cooking Tips and Precautions:
Rules to Eat By
Food Safety
Almost all raw chicken harbors bacteria—including salmonella—and if the chicken is not properly prepared and thoroughly cooked, it can make you seriously ill. Luckily, it is very easy to properly prepare chicken and test doneness with a simple cooking thermometer by following a few simple and common sense steps.
Preparing
Make sure to wash your hands after handling raw chicken and before handling other raw ingredients. And be sure to designate one cutting board and knife for raw chicken and one for other ingredients. For example, if you’re grilling a chicken breast to use in a salad, you need to make sure you’ve washed your hands after touching the raw chicken before you start touching vegetables for the salad. And you need to cut the vegetables on a different surface and with a different knife than the raw chicken (unless you’ve washed the utensils and cutting board thoroughly with antibacterial soap in between uses). It is best to use plastic cutting boards when you’re working with raw chicken, especially if you don’t have a dishwasher, since wood is more porous and can crack and create hard-to-clean crevasses where bacteria can flourish.
Is It Done?
A chicken is safe to eat when the internal temperature of the meat reaches 165°F. If the chicken has not yet reached that temperature, it requires additional cooking. Whenever the phrase “until done” or “cooked through” is used to describe cooked chicken in this book, it means cooking it until the internal temperature of the meat reaches 165°F. When you’re roasting a whole bird, check the temperature at the thigh joint and also inside the cavity of the bird if there’s stuffing, to ensure that the bird is sufficiently cooked in all parts.
Working with Poultry
Chicken is unique in its size, flavor, and fat content, and because of this it’s important to know the preparation, cooking, and storage techniques that will make the most of every component of the bird. Whether you’re considering a marinade or working with frozen chicken, I have some tips below that will help guide you to the most savory chicken possible.
Marinating
Most marinades contain seasonings, a fat, and an acidic element like citrus juice or vinegar. The acidic ingredient helps break down the chicken tissue, slowly tenderizing it, while the flavor of the fats and the seasonings seep into the meat. When the tissue breaks down it also holds more moisture, making for a juicier cut of meat.
You can safely marinate chicken in the refrigerator for up to 2 days in an airtight container. You can cook chicken with the marinade as long as the marinade simmers for at least 10 minutes or if it is boiled first to kill the harmful bacteria. Never put raw marinade on a finished chicken dish without boiling the marinade for at least 10 minutes. Usually, though, the marinade is incorporated into the sauce that the chicken is actually cooked in, whether braised or roasted, which ensures that the bacteria is destroyed during the cooking process.
Brining
Brining has a similar effect on poultry as marinating. A brine is a salt water solution of 3 tablespoons salt per 1 quart water. Herbs and spices can also be added to the brine to impart flavor. The chicken is submerged in the brining solution in a refrigerated airtight container for up to 2 days, and during that time the salt helps dissolve some of the protein in the muscle, tenderizing the meat. The salt and protein that remain in the chicken after it is removed from the brine also help the meat retain moisture, making for an overall juicier and more flavorful bird. Because of the high salt content of brine, it cannot be used for anything else and should be discarded after the brining process.
Basting
Basting helps keep the skin of the bird seasoned and moist. As you baste the juices onto the chicken, they drip down into the pan and whatever juice remains on the skin slowly evaporates until the next basting session, leaving a concentration of spices and flavors behind on the skin. This helps keep the skin rich and flavorful, but be careful if you’re basting with a glaze that contains a high sugar content, as this will make the bird brown much more quickly. In that case, you would definitely want to tent the bird (see Tenting) to ensure the skin doesn’t get too crispy and dark.
When basting a chicken, thoroughly wash the baster in between basting sessions to remove any bacteria from the raw chicken that may have contaminated the baster.
Frozen Chicken
If you’re purchasing chicken from a pastured poultry farm, chances are you can work out a better deal with the farmer if you buy a bulk amount of chickens at once. This means that you’re going to have to freeze them (unless you plan on feasting on a dozen chickens at once). To give yourself a variety of cuts and make it easier to defrost only what you need, I recommend breaking down some of the birds (see Cutting a Whole Chicken) and then separating them out into 1 pound servings of like-cuts in freezer-safe resealable plastic bags. So for example, if I bought a dozen chickens, I would leave three whole so I had a few whole chickens for roasting and spatchcocking, and the rest I would break down and have 1 pound bags of chicken thighs, 1 pound bags of chicken drumsticks, 1 pound bags of chicken breasts, and so on.
To avoid freezer burn, you want to minimize the chicken’s exposure to air. The easiest way to do this is to double wrap each cut of chicken in plastic wrap before placing it in the freezer-safe resealable plastic bag. Once you have 1 pound of cuts in the bag and are ready to seal it, press as much air as possible out of the bag and seal tightly to ensure no air gets back in. Keeping your freezer’s temperature constant and below 0 degrees Fahrenheit will also reduce the effect of freezer burn, as will reducing the amount of time the chicken is in the freezer in the first place, so make sure to label the resealable bags properly with the contents and the date it was frozen. That way you can make sure you’re using the oldest items first.
When you freeze a chicken and then thaw it out, it changes the texture of the meat and make it a bit drier and less firm-feeling. This is because the liquid inside of the protein in the chicken expands when it is frozen, and can puncture through the cell walls. When thawed, those punctured cells leak out moisture and can make the bird look a bit deflated in addition to drying it out. So generally speaking, fresh meat makes for a juicier bird than frozen meat, but the cooking technique of course has a large effect on the juiciness and flavor of the final dish, too, so don’t swear off frozen chicken completely. You can still have a delicious piece of chicken regardless of if it was frozen or not.
If you’re using frozen chicken, make sure to thaw it completely before cooking, because the cooking instructions given in this cookbook apply to fresh chicken. Using partially frozen chicken will result in an undercooked dish that isn’t safe to eat.
Fresh Chicken
Fresh chicken meat should not be cooked or frozen after the use-by date on the package. Chicken meat that has spoiled has a slightly fruity, unpleasant smell to it, and the liquid around and on the bird and meat will be thicker, slimier, and can develop a yellowish tinge to it. If you’re going to prepare the chicken near the date of expiration and it smells unpleasantly fruity, it’s better to be safe and toss the chicken in favor of buying a newer, fresher cut of meat.
Storing Chicken
Cooked chicken can be safely stored in the refrigerator in an airtight container for 3 to 4 days, but if you prepared a whole bird that was stuffed, make sure to remove and store the stuffing separately, otherwise the internal temperature of the chicken might remain too high and allow bacteria to grow.
Hock Locks
And just a short word about hock locks, which you usually find on turkeys but are also on chickens from time to time. They’re the hard plastic locks that bind the drumsticks of the bird together, essentially pre-trussing the bird for you. The hock lock is safe to use in the oven (it won’t melt), however I find them to be a bit of an eyesore, so even if I am planning on roasting the whole bird, I remove them and truss the bird myself with cooking twine.
So there you have it, all the little tips and tricks to safely and deliciously preparing a chicken. Now comes the fun part, where you get to put all this newfound knowledge to use. Onwards, to the kitchen!
