 Chapter 3

The skeletal system of the human body is a complex network composed of several kinds of bones, joints, and connective tissues, each of which is a functional unit designed to serve a particular purpose. Most of the bones and joints appear in pairs, with one on the right and one on the left side of the body. The process of bone formation is called ossification, and all of the bones have a unique structure, formed to suit their special function.
The different parts of the skeleton are connected either by attachments or by joints. The attachments include membranes, muscle tendons, ligaments, and discs. The muscle tendons and ligaments are attached to the bones by collagenous fibers growing through the bone membrane and into the compact bone tissue.
Joints are points in the skeletal system where two or more bones meet (articulate) and are usually attached to each other by connective tissue, which determines the range of movement that is allowed. The immovable joint is an articulation of two bones that have been almost fused together and, as exemplified by the bones at the juncture of the cranium, cannot be moved by muscular force. The slightly moveable joint allows a restricted range of motion due to the structure of the bones and connective tissue around it, as exemplified by the joints in the spine existing between its vertebral bodies and between the sacrum and the ilia. The freely moveable joint, known as a synovial joint, allows a relatively large range of motion. Its bones are always enclosed in a joint capsule, containing a synovial membrane, which produces a lubricating fluid and provides nutrients to its cells. Tough collagen fibers, known as ligaments, surround these synovial membranes, binding the respective bones together and limiting the range of their movement. Synovial joints vary in the movement that they allow. For example, the elbows and knees only allow movement in a single plane, while the hips and shoulders allow movement in many directions.
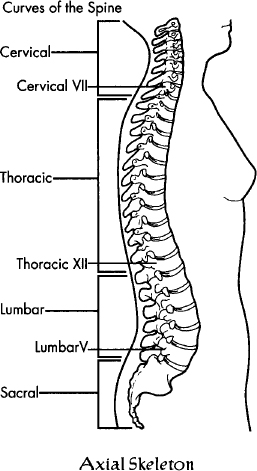
The skeletal system can be divided into axial and appendicular skeletons. The axial skeleton forms the vertical axis of the spine, from the tailbone (coccyx) at the bottom to the cranium at the top. The appendicular skeleton includes the shoulder girdle and attached arms and hands, and the pelvic girdle and attached legs and feet. Our discussion of the structure of the skeleton will be restricted to the spine (vertebral column) and to the pelvic and shoulder girdles that intersect it.
The spine has four distinct segments, consisting of the cervical, the thoracic, the lumbar, and the sacral.
Each spinal segment contains a given number of vertebrae: the cervical spine has seven vertebrae; the thoracic spine has twelve, each of which is attached to one or more pair of ribs; the lumbar spine has five; and the sacrum has five, including the coccyx at its base, which consists of several small, fused vertebrae. The twelve ribs (costae) of the thoracic spine are known as the rib cage. In the front, counting from the top, the first seven pair of these ribs are attached to the breastbone (sternum). Ribs eight through ten are fused to rib seven before it attaches to the sternum, and ribs eleven and twelve are called floating ribs because they have no anterior attachment at all.
The thoracic and sacral spines, including the coccyx, support and protect the major organs of the body. These sections of the spine are formed during fetal development, although the sacrum itself only becomes fully fused sometime after puberty. The cervical and lumbar spines help position the body weight over the legs, and these sections of the spine are also not fully developed until after puberty.
The spine can be considered as a mechanism for the support and transfer of weight. In a standing position, all the weights of the body must be transferred through the spine to the pelvic girdle, down through the legs, and to the ground. The primary weights of the body are the head, the rib cage and its contents, and the pelvic basin and its contents. The upper three spinal segments balance their loads in line with the body’s central axis, and the entire spine is balanced on the wedge-shaped sacrum at its base.
In the front (anterior) portion of the spine, the vertebrae are separated by a kind of hydraulic system called intervertebral discs. These discs are part of a self-contained fluid system that absorbs shock, permits some compression, and allows movement. They are made up of an outer layer of fibroelastic cartilage that encapsulates a more pulpy, highly elastic center of colloidal gel. These intervertebral discs act as shock absorbers, allowing slight movement of one vertebra on another as the gel adjusts anteriorly, posteriorly, or laterally within its semi-elastic container. There are no discs in the sacrum or coccyx.
In the posterior portion of the vertebral column, between each pair of vertebrae, a complex of bony structures protects the spinal cord and serves as the site for muscular attachments and, in the thoracic spine, for forming joints with the ribs.
The major ligaments of the spinal column are the long anterior longitudinal ligaments that run down the front of the spinal column, the ligamentum flavum, which runs between the posterior parts of the neural arches, and the posterior longitudinal ligament, which runs down the back of the vertebral bodies.
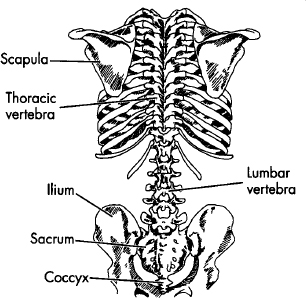
The shoulder girdle consists of two paired bone segments: the right and left scapulae (shoulder blades), and the right and left clavicles (collarbones). The scapulae ride on the upper back (dorsal) portion of the rib cage; the clavicle lies above the front (ventral) portion of the rib cage. The scapula articulates with the outer part of the clavicles and with the upper arm (humerus) at a ball-and-socket joint, allowing movement in all planes. The inner part of the clavicle articulates with the sternum (breastbone) and the first pair of ribs, and is the only direct connection between the shoulder girdle and the axial skeleton. The shoulder girdle itself is composed of the shoulder blades and the muscles that position, support, and move them, and it is this shoulder girdle that guides and controls the movements of the arms.
The shoulder joint has the greatest range of motion of any joint in the body. However, because of its great mobility, it is relatively unstable and, therefore, susceptible to injury. The shoulder has several large pockets of synovial fluid (bursae) that help to reduce friction from the wide range of movement of the arms. Accordingly, excessive stress, from repetitive movement or pressure, can cause inflammation of the bursae (bursitis), resulting in restricted movement. Also, imbalances or injuries to the shoulder girdle itself can decrease the functional efficiency of the upper body, which, in turn, can influence the balance and integrity of the structure as a whole.
The sacrum is the foundation platform upon which the spinal column is balanced. It is firmly attached to the two hipbones at the sacroiliac joint. These hipbones (coxa) are formed from the fusion of three separate bones: the ilium, ischium, and pubis, which, together with the sacrum and coccyx, constitute the pelvis.
The pelvis is centrally balanced between two ball-and-socket joints, formed by the rounded heads of the two thighbones (femurs). The heads of the femurs fit into sockets (acetabulum) at the end of each of the hipbones (ilium). The femurs themselves are attached to the hipbones by their own large ligaments (iliofemoral, ischiofemoral, and pubofemoral) and, in each case, by a smaller ligament (ligamentum teres) that attaches the femur head directly to the socket (acetabulum). These structures are dense and strong, making the hip a very stable joint and capable of transferring weight from the pelvis, through the thighbones, to the knees, the lower legs, the ankles, and the feet.
The knees are very complicated joints. In fact, they are really like two separate joints: one between the upper and lower leg; the other between the kneecap (patella) and upper leg. The knee joint is stabilized by seven major ligaments, a pair of fibro-cartilage pads (menisci) that cushion the articulating surfaces of the upper and lower legs, fat pads for further cushioning, and the muscle tendons of the thigh extensor muscles (quadriceps femoris). The complexity of this joint, combined with its vital role in daily activity, makes it highly susceptible to injury, including torn meniscus, strain to one of its many ligaments, and injury to the kneecap.
As we have seen, the spine consists of four distinct sections. Beginning at the pelvis and moving up the spine, the angle of each of these spinal sections determines the curvature of the spinal section immediately above it. First, there is the pelvis, which rotates back and forth on the joints described above, determining the angle of the sacrum in relation to itself and creating the plane from which the lumbar spine ascends. The lumbar spine ascends upward at an angle perpendicular to this plane, so that its own curve is necessarily determined by the angle of the sacrum to the pelvis. As the pelvis is tilted, that angle increases, causing the lumbar spine to begin at a sharper angle to horizontal and forcing it to arc through a sharper curve in order to return to the midline. Accordingly, if the pubic bone is elevated, a smaller angle is thereby created, depressing the sacrum and permitting a more erect lumbar spine. As the pelvic angle necessarily determines the degree of lumbar curvature, so also the lumbar curvature influences the thoracic curve. There is limited anterior-posterior flexion-extension mobility in the thoracic spine. Thus the thoracic spine balances as a more or less rigid moving segment at the thoracolumbar joints (see page 136); in this case maintenance of equilibrium is a structural given. Finally, the cervical spine balances the head and keeps it at the center of gravity. Thus it can be truly said that pelvic rotation is the basis for erect posture, and that when the pelvis is aligned, as it is designed to be, a stable base of support is present for diverse and powerful movements. Such alignment is one of the goals of Yoga therapy.
Besides its role of support, leverage, and protection of various organs, the skeletal system has two other essential functions: bone marrow produces our red blood cells, and it stores essential minerals (primarily calcium) and energy reserves (lipids), essential for the functioning of our bodies.
The most common problematic chronic conditions of the skeletal system are osteoporosis, osteoarthritis, and rheumatoid arthritis.
Osteoporosis is a condition characterized by a reduction of bone mass, resulting in lighter and more fragile bones, which, therefore, are more easily broken and more difficult to heal. Besides the customary hormonal treatment from health professionals, further treatment can include dietary modification to increase calcium intake and exercise programs that stress the bones and thereby stimulate bone growth.
Osteoarthritis is a degenerative condition of the articular cartilages in synovial joints. It results in subsequent degeneration of the underlying bone structure and inflammation of the joints. It is a condition that usually affects people over sixty years of age and is thought to be linked to a genetic predisposition. A very carefully considered program of Yoga therapy may be helpful to reduce pain, increase confidence, and increase range of motion.
Rheumatoid arthritis is an inflammatory condition of the synovial membranes. It results in subsequent breakdown of the articular cartilage and damage to the underlying bone structures. The cause of this condition is uncertain, although speculation ranges from bacterial or viral infection to allergy to genetic predisposition. In addition to drug therapies to reduce inflammation, regular exercise is thought to slow the process of this disease.
There are also abnormal curvatures of the spine that can be degenerative and can lead to more serious conditions. These include kyphosis, lordosis, and scoliosis. Kyphosis is an abnormal exaggeration of the thoracic spine that creates a rounded upper back. Though this condition is often congenital, it can develop as the result of poor postural habits and/or long-term activity where the body is hunched forward. Lordosis is the abnormal exaggeration of the lumbar curve that creates a hollow or swayed low back. This condition is also often congenital, but it too can be developed by poor postural habits, by wearing high heels, and even from the weight distribution that occurs during pregnancy. Scoliosis is the abnormal lateral curvature and rotation of the spine, often revealed by one hip and/or shoulder higher than the other. Severe scoliosis is congenital, but mild forms of it can be developed through chronic one-sided activities and poor postural habits.
Poor posture restricts circulation, respiration, digestion, and elimination. It can also negatively impact our confidence and self-image. However, a well-conceived program of Yoga practice can significantly improve even the most serious of such postural problems, and, in fact, all but the most progressed will usually get great benefit from a carefully designed program of Yoga therapy.
Beyond these conditions, there are other injuries to the skeletal system that are, unfortunately, quite common. Perhaps the most common are injuries to the intervertebral discs. Discs naturally degenerate with age, reducing their cushioning effect. However, if there is serious strain from an accident or a sport or work-related injury, the nucleus may break through the capsule that encloses it, resulting in a herniated or ruptured disc. These are painful and lead to severely limiting conditions that may require surgery. Therefore, people who have serious disc conditions should seek out professional care. On the other hand, many disc conditions can be effectively treated by a combination of rest and a carefully conceived program of physical or Yoga therapy.
Other problematic conditions of the skeletal system result from accidents, activity-related injuries, or chronic structural stress. Chronic structural stress may be the result of dysfunctional movement patterns. Some of these conditions include bursitis, sprains to the ligaments or tendons, and tendinitis. Bursitis is the inflammation of the bursa around the joint capsules. Tendinitis is the inflammation of the connective tissue that surrounds the tendons. All of these conditions require time and rest to heal. Two main strategies for working with these conditions are recommended: First, identifying and eliminating, as much as possible, sources of stress to the damaged area, including developing new and more functional movement patterns; second, carefully increasing the circulation to the area, bringing nutrients and eliminating the toxic buildup that interferes with healing.
After considering the muscular system in the sections ahead, we will present examples of the way in which Yoga therapy can be adapted to work with a variety of the common aches and pains.
All of the movements of the body, including the internal movements of the physiological processes, are dependent upon the action of muscles. There are three primary types of muscle tissue: cardiac (heart) muscle; smooth (visceral) muscle, which is located in the walls of all organs other than the heart; and striated (skeletal) muscle. All muscle tissue shares certain characteristics: excitability, contractibility, extensibility, and elasticity. Excitability means that the muscle is able to receive and respond to stimuli. Contractibility means that the muscle changes shape as a result of stimuli, usually becoming shorter and thicker (flexion). Extensibility means that the muscle can be stretched beyond its normal length (extension). Elasticity means that the muscle easily returns to its normal length after it has been stretched. The cardiac and smooth muscles push fluids and solids through the internal channels of our bodies. The skeletal muscles, along with tendons, connective, and neural tissues, move the bones of the skeleton. Our discussion will focus on the skeletal muscles.
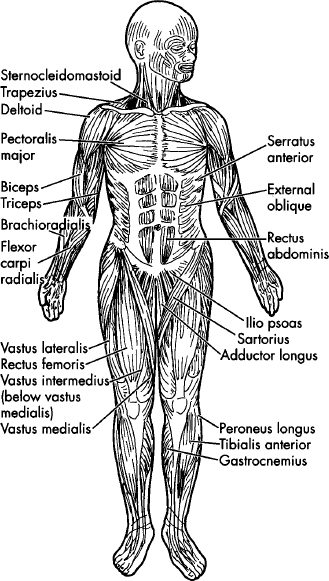
Three layers of connective tissue form a part of each muscle: the outer part, which surrounds the muscle and separates it from surrounding tissue and organs; the central part, which divides the muscle into individual bundles; and the inner part, which surrounds and connects the individual muscle fibers within each bundle. These three parts of the connective tissue blend together at the end of each muscle, forming the tendons, which attach the muscles to the bone. This connective tissue also contains the nerves and blood vessels that control and nourish the muscles.
Muscle fibers contract and actively shorten through a complex process of biochemical and neural activation. When the muscle receives a stimulus from the motor nerves, its center portion contracts, pulling on the connective tissue, which in turn pulls on the bones to which it is attached. After a muscle contracts, it returns to its normal length, either through the contraction of opposing muscles or through its own natural elasticity.
There are three types of muscular contraction: concentric, eccentric, and isometric. Concentric contraction occurs when a muscle shortens and, by so doing, moves a bone segment. Eccentric contraction occurs when a muscle lengthens against resistance. For example, when we squat, the leg extensor muscles lengthen at the same time that they contract, insuring that the force of their own movement remains less than that of the force opposing them. Isometric, or static, muscle work occurs when a muscle neither shortens nor lengthens so that, as a result of neither overcoming nor being overcome by resistance, its contraction is sustained.
A muscle has a resting tension called muscle tone. A muscle with too little muscle tone is usually weak and flaccid, while one with too much is hard and lacks elasticity. On the other hand, a healthy muscle, when at rest, is firm and yet soft. If a muscle is not stimulated through activity, it will lose muscle tone, mass, and power. Irreversible muscle atrophy can occur as a result of paralysis due to spinal injuries and various autoimmune and neurological conditions. However, because regular stimulation is needed to keep the muscles powerful and to maintain their activity (endurance), reversible muscle atrophy can also result from irregular use.
Muscle contraction requires fuel, which is supplied in the form of high-energy molecular compounds, through a complex biochemical process known as glycosis (yielding ATP, CP, and glycogen). In this process, the necessary energy reserves are produced when oxygen, glucose, and fatty acids from the bloodstream are combined and absorbed by the muscle fibers. Thus, normal muscle function is dependent upon sufficient energy reserves, which in turn are dependent upon adequate circulatory supply and normal oxygen concentrations in the blood.
There are two complex metabolic processes by which a muscle builds up and consumes its energy reserves. In moderate muscular activity, the increased energy demands on the muscles are met through a biochemical process known as aerobic respiration. In this process, the respiratory and cardiovascular functions increase to provide the required materials by which energy is generated. However, at peak levels of muscular exertion, the energy demand on the muscles exceeds what can be met by the respiratory and cardiovascular systems. In this case, the energy is provided by a different, and less efficient, biochemical process called anaerobic glycosis.
Aerobic exercise both increases muscle endurance and strengthens the respiratory and cardiovascular systems. It includes activities that provide a sustained increase in both respiratory and cardiovascular function, such as hiking and swimming. Anaerobic exercise, on the other hand, results in enlargement of the muscles. It is usually short and intensive, such as weight lifting, hiking quickly up a steep hill, or swimming at top speed in a race.
Excessive anaerobic activity depletes the muscles’ energy reserves and causes the buildup of lactic acid, a by-product of anaerobic glycosis. The result is muscle fatigue and possibly cramping. After fatigue, a muscle must remove the buildup of lactic acid generated by anaerobic activity and rebuild its energy reserves. In this process, the body is aided by the circulatory system and the action of the liver, which helps to absorb the lactic acid and convert it back to glucose.
After any muscular activity or exercise, the body must also recover oxygen utilized during the activity. Thus the increased rate and depth of the breath continues for some time after the muscles are at rest. In addition, muscular activity or exercise generates heat, which increases the overall body temperature. This heat is released through perspiration, which also continues for some time after the muscles are at rest.
There are approximately seven hundred skeletal muscles, all of which begin (the origin) and/or end (the insertion) in the skeleton. These muscles are paired in an agonist-antagonist relationship to each other and, based on this relationship, form groups that, through the alternation of contraction and extension, determine movement in any part of the body. The agonist muscles are responsible for movement by contraction; the antagonist muscles relax and usually lengthen as the agonist muscles contract. In most movements, other muscles (synergists) also act to either stabilize the point of origin or to assist at the point of insertion. For example, when the arm moves on the shoulder girdle, it must be held firm by the contraction of certain muscles that are attached to it and whose coordinated action is essential for efficient movement of the body.
Following this general presentation, we will now briefly discuss the organization of the muscular system in terms of its axial and appendicular musculature.
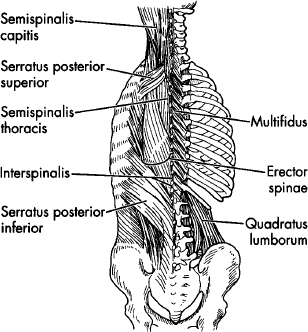
The axial musculature includes all of the muscles of the head and neck, the muscles of the back (posterior), front (anterior), and sides (lateral) of the trunk, and the muscles of the pelvic floor. In muscles of the head and neck, we are including those responsible for facial expression, verbal communication, eating and drinking, and eye movements. Muscles of the trunk are responsible for flexion, extension, and rotation of the head, neck, and trunk. The anterior and lateral muscles of the trunk also form the muscular walls of the thoracic and abdominal cavities and include the respiratory muscles (see the medical drawing on p. 139 with names of major groups). They variously compress the abdomen, expand the thoracic cavity, and elevate or depress the ribs. The muscles of the pelvic floor compress, close, and/or lift the various openings and organs of the pelvic cavity.
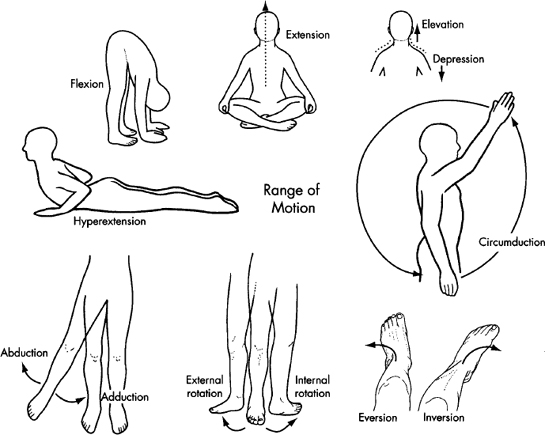
The appendicular musculature includes the muscles of the shoulders and arms and the muscles of the pelvic girdle and legs. Muscles of the shoulders include those muscles that elevate, depress, protract, adduct, abduct, and rotate the shoulder girdle. They also include muscles that flex the neck and rotate the head. Muscles of the shoulder likewise flex, extend, adduct, rotate, pronate, and supinate the upper arm, forearm, wrist, palm, and fingers. Muscles of the legs include those muscles that variously extend, flex, rotate, adduct, and abduct the thighs and lower legs (see the medical drawing on p. 139 with names of major groups). They also include muscles which flex the hip and the lumbar spine. Muscles of the ankles, feet, and toes (dorsi and plantar) variously flex, evert, and invert the feet and toes.
Serious conditions of the muscular system are rare. They include conditions, such as muscular dystrophies (which are congenital) and myasthenia gravis (thought to be an immunological malfunction), that result in weakness and deterioration of the muscle tissue. People with these conditions should be under direct professional care, and with that as a foundation, many will benefit from a carefully conceived program of Yoga therapy.
Accident-, sport-, or work-related injuries, such as muscle cramps and strains, are more common. These conditions respond well to rest, cold and heat therapies, liniments and oil applications, acupuncture, and massage. A more serious example of an activity-related injury is a hernia, in which a portion of an organ protrudes through an opening in a muscle. Hernias are usually the result of intense pressure in the abdominal or pelvic cavity, such as may occur from straining to lift an excessive weight. Sport or workplace injuries can often be avoided by proper training, adequate warm-up, and good equipment. In addition, proper diet will help the body generate the energy the muscles need to perform well and, therefore, avoid injury.
Beyond these conditions are the common, chronic aches and pains that we often assume to be an inevitable part of a normal life. Included in this category is the tendency of muscles, with aging, to develop increased amounts of connective tissue (fibrosis), which limits elasticity and which restricts movement and circulation. In fact, many of these common complaints can be avoided all together, or significantly improved. Sedentary people will benefit from adopting a well-planned exercise program. Active people with chronic, low-grade aches and pains would do well to reexamine their fitness program, as many well-intentioned people begin an exercise program and end up with injuries. And, in both cases, many common aches and pains can be alleviated by a regular commitment to a simple Yoga practice.
In the sections ahead, we will present examples of the way in which Yoga therapy can be adapted to improve a variety of these common aches and pains.
Many people suffer from chronic tension in the neck and shoulders. This may be experienced as mild to severe pain in the neck and/or shoulders, as mild to severe tension in the jaw (TMJ) and/or head, as mild to severe limitation in the mobility of the head, or as mild to severe restriction in the movement of the arms.
Before we begin to work with these conditions, it is important to find out whether there is serious damage to the cervical discs or the rotator cuff in the shoulder joints. If there is numbness or tingling sensations in the arms or hands, sharp, electric, and immobilizing pains in the neck, or sharp pains in the shoulders, it is best to seek professional diagnosis. In such conditions, Yoga therapy may assist the healing process, but the wrong practice may actually make matters worse. In working with tension, restricted movement, and chronic pain, we also want to understand the musculoskeletal condition and the neuromuscular patterns that condition our movements.
Musculoskeletal conditions of the neck and shoulders that contribute to these problems include having one shoulder higher than the other, one shoulder rotated forward, one scapula pulled in more than the other toward the spine, the head leaning to one side, the head jutting forward relative to the spine, and a flattened cervical curve. All of these structural conditions relate to corresponding muscular imbalances, chronic muscular contractions, and/or muscular weakness. Because the condition of the muscles and joints are causally related to neuromuscular mechanisms and movement patterns, there may also be joint instability and hypermobility or joint rigidity and lack of mobility.
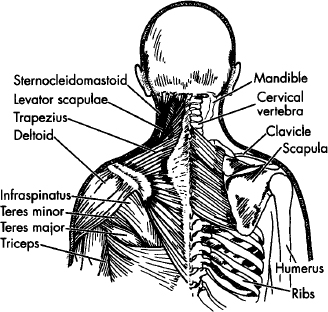
The origin of these conditions may be compensatory, habitual, or the result of stress, physical activity, or improper training. A common compensatory mechanism, for example, is excessive tension on one side of the neck and shoulders due to a congenital curvature of the spine. A very common habitual pattern is lifting the head upward as we bend forward, creating tension and compression in the back of the neck. A common stress pattern is lifting the shoulders toward the ears in reaction to tense situations. An example of a common physical activity that creates tension is talking on the phone while cradling the telephone between the shoulder and ear, and, at the same time, working with the hands. These conditions are also complicated in cases of breast-feeding moms and baby-carrying moms and dads. An example of problems due to improper training can, unfortunately, be found in many Yoga students who have been taught to pull the spine with the head when moving into backward bends and moving out of forward bends.
In conditions of chronic pain combined with restricted movement, there is always some form of muscular contraction linked to specific neuromuscular movement patterns. As the Yoga process involves learning what tools can be used to unravel such limiting mechanisms and then applying those tools, our job is to explore the mechanisms of contraction, identify them, and learn how to release them. It is also important to recognize that most conditions affecting the neck and shoulders reflect a poor functional integration of the head, neck, and shoulders and attached arms, rib cage, and upper back and, therefore, that the methodology for working these conditions involves working to adjust this functional relationship.
The neck connects the head to the shoulders and upper back. Muscles attach from the head, through the neck and shoulders, to the rib cage and upper back. In working the neck, one of the main principles is to work the neck by adjusting the relationship between the head and shoulders. Our normal pattern is for the head and shoulders to turn in the same direction: If we look to the right, the shoulders naturally follow to the right; If we turn our shoulders to the right, the head will follow to the right. To adjust this relationship, we can either stabilize the shoulders as we turn the head, or turn the shoulders in one way and the head in the other. As these practices are based on the principle of opposition, in both cases the effect will be to stretch the neck and shoulder muscles on the opposite side of the direction to which the head is turning. In the second case, however, the stretching effect is stronger.
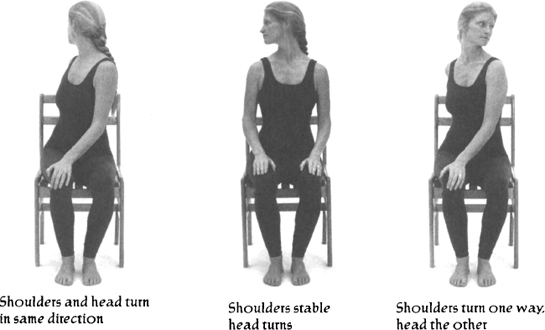
When the head is turned in one direction, muscles on one side of the neck are stretched while muscles on the other side are contracted. When the head is turned in the other direction, both sides of the neck are worked through alternated contraction and stretching. The effect is an increase in circulation to the muscles, both strengthening and relaxing them.
Besides turning the shoulder girdle, we can also bring the shoulders forward, spreading the scapula in the back and compressing the chest in the front. Or, we can pull the shoulders back, compressing between scapula and spine and stretching the chest in the front. This results in increased circulation, strength, and relaxation for the muscles that bind the shoulder girdle through the rib cage and to the spine.
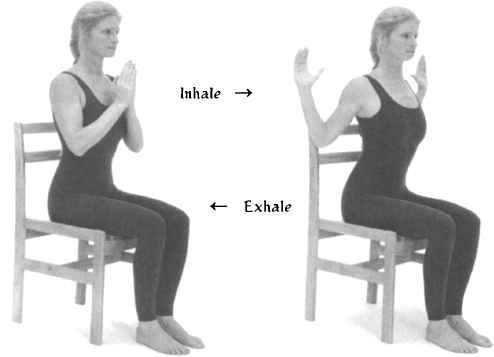
If we coordinate this process with arm movements, we can integrate a similar action with other muscles that bind the shoulders to both neck and upper back. By raising and lowering the arms alternately, we can also contract and stretch these muscles, increasing circulation and strengthening A and relaxing them.
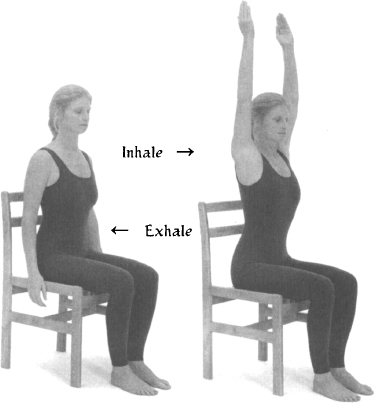
The cumulative effect of these actions is to free binding muscle contraction, restore balance between various structural parts, and establish new and more appropriate movement patterns.
In the methodology of practice, we use a combination of movement and static positions. Movement has the effect of working the paired muscles (agonist and antagonist) alternately, warming them up, increasing circulation, and bringing a more balanced development. Staying in a fixed position, on the other hand, prolongs the stretching and contraction of particular muscles, deepening the work in specific areas.
In the more advanced Yoga postures, we are able to create leverage by wrapping the arms around the legs in various ways. With any leveraged posture, we can deepen the above-mentioned effects, though there are increased risks to the joints. These risks can be mediated, however, by the proper technique, as will be discussed in the context of the practices that follow.
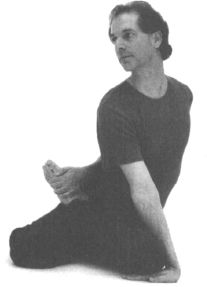
If the more serious conditions mentioned at the beginning of this section are ruled out, then much relief can be had from simple Yoga techniques. Through these techniques, we explore the imbalances in our body and find ways to improve our condition. We work with a variety of techniques, focusing around the neck, shoulder girdle, and upper back, strengthening weak muscles, releasing chronic contractions, stabilizing joints, increasing mobility and flexibility, establishing new movement patterns, and bringing integrity to the structure.
If there is pain, we find the parameters of movement where no pain exists. To this end, we first identify the general area where pain exists. Then, slowly, carefully, without any stress, we stretch and contract, beginning to increase the range of motion and also increasing circulation and avoiding irritation through the use of simple “micro” movements. When there is strong pain, we don’t push into a position, making the condition worse, and we avoid positions that are locked, favoring those that allow unrestricted and easy movement. I worked with a woman once who had broken her neck. We started very simply, raising her hands partway out to the side and lowering them again, while gently turning her head. As a result of starting slowly, recognizing her limitations, and slowly increasing the parameters of her movement without going into the pain, in only a few weeks there was significant improvement.
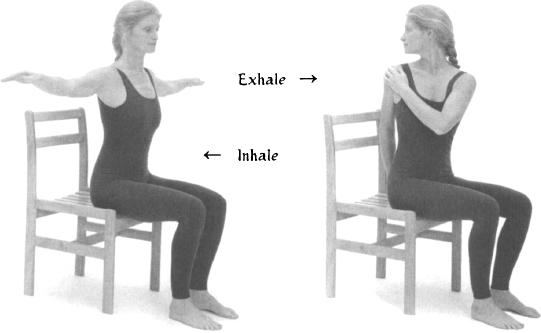
Therefore, the first principle is simple movement. From sitting in a chair, on inhale, raise your arms out to the side and about halfway up. Then, on exhale, simultaneously turn your shoulders to the right, look to the right, lower your right arm, and bring your left hand to your right shoulder. Finally, on inhale, raise both arms out to the side and turn your head and shoulders to the middle. Repeat on the other side.
The next principle is stabilizing one part of the body and moving another part from the fixed base. From the same seated position, on inhale, put your hands on the right side of your collarbone. On exhale, turn your head slightly to the left. On the next inhale, lean your head slightly back and pull your chin up while depressing your collarbone slightly down. Stay in the stretch as you exhale, and then return to the neutral position. Can you feel the strong stretching of the muscles on the right front side of your neck? Now try this on the other side.
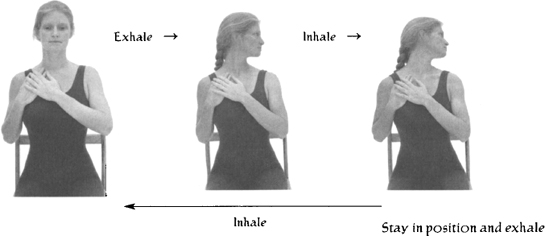
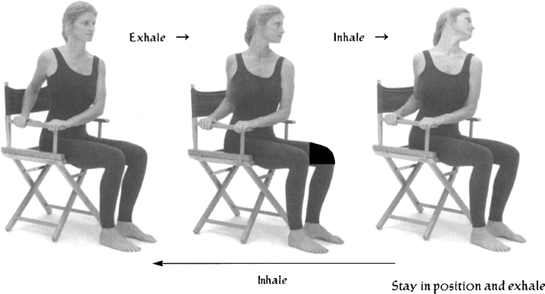
The next principle is opposition. The exercise is stronger and involves more compression on one side. Sitting on a chair with arms, place both hands on the right arm of the chair. On exhale, twist your shoulders farther to the right as you turn your head to the left. On inhale, lean your head slightly back to the left and pull your chin up. Stay in the stretch as you exhale, and then return to the neutral position on inhale. Relax and feel the right side of your neck. Then repeat these movements on the other side.
In addition to stretching and increasing circulation to the neck and shoulder area, we often need to strengthen the supporting structures of the shoulders and upper back. Another student of mine had long-term chronic pain in the neck and shoulders, with corresponding weakness in the shoulders and upper back. To deal with this situation, one of our long-term goals was to strengthen her upper back and shoulders in order to provide a more stable base for her neck. After a period of preparation we were able to introduce some external weight. From sitting in a chair, I had her raise and lower each arm separately, while holding small, half-filled plastic water bottles in each hand. After a few weeks, there was already a marked reduction of tension and an increase in strength. She no longer complained of tension or pain in her neck and was happily able to intensify her practice. In using this kind of technique, however, it is important not to pull the spine with the shoulders. Rather, we must lift the chest first, feeling the arms rising as an extension of this lift. Otherwise the techniques we use to strengthen our body may in fact increase tension and pain.

These simple exercises, in which we isolated and worked the neck and shoulders, have an educational value. In a full Yoga therapy practice, however, we use movements that integrate the whole body. This is based on the recognition that what is happening in the area of the neck and shoulders is, ultimately, linked not only to the upper back and rib cage, but to the low back, sacrum, hips, and legs. Lasting improvement necessarily involves the functional integration of the entire body.
The underlying methodological orientation of the following sequences is to support this functional integration, while focusing the work in the head, neck, shoulders and arms, and in the upper back and upper part of the rib cage. They present a progression from therapeutic to developmental work specific to the neck and shoulders.
This practice was developed for F.M., a twenty-six-year-old architect. At our first session, F.M. said that she had chronic mild tension in her neck and shoulders, and recurring sharper pains between the shoulder blade and spine on her right side. She said it felt like a knife in her back.
When I asked about her work, she told me that she spent many hours each day seated or standing over a drafting table, making precise technical drawings. She told me she was right-handed. She said that her neck was constantly “going out” and that she regularly went to a chiropractor for adjustments. She said she got temporary relief, though not in the area between the scapula and spine. A friend had told her about our work, and she wanted to see if it would help.
F.M. had good coordination and supple joints. And yet her body lacked structural stability. She told me that even if she drove her car too much, her neck would bother her for days. When I asked what she was doing for exercise, she said she was not involved in any regular program. I asked her if she would be willing to do a regular Yoga practice on her own, and she said, “That’s what I am here for.”
My plan was to develop a practice that would strengthen and stabilize her neck. As we worked together, I found that there was a lot of tightness and congestion between the scapula and spine. I added to her practice movements that would stretch the area between the scapula and the spine, to help free her neck.
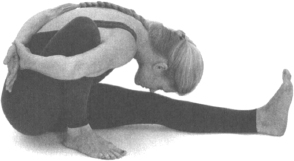
Over the next several months we met once a week and developed the following course. I asked her to go for a walk in the morning before work and to do the practice after work and before dinner. In the first few weeks, she told me that when she did Marīcyāsana she would feel popping sounds in her upper back, between the shoulder and the spine on the right side. After that, she said her shoulder felt more open and her head felt as if it was floating away from her spine.
About six months after F.M. stopped her weekly sessions, she came in for a “checkup.” She told me that she had been able to maintain her practice and that she felt much more stable and rarely went to the chiropractor anymore. She also told me that she joined the Sierra Club and went often on organized hikes in the mountains. She told me that she is now able to carry a pack without problems. I asked her how she manages with the four-wheel roads they have to take to get to the trailheads. She told me that now that she has her practice, she is much more confident that she can handle any tension that may arise.
1.
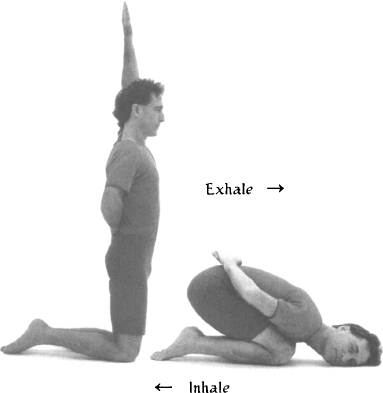
POSTURE: Vajrāsana, asymmetrical adaptation.
EMPHASIS: To gently stretch neck.
TECHNIQUE: Stand on knees with left arm over head, right arm folded behind back, and head turned to center.
On exhale: Bend forward, sweeping left arm behind back, turning head to right and resting on left side of face.
On inhale: Return to starting position.
Repeat on other side.
NUMBER: 4 times on each side, alternately.
DETAILS: On exhale: Keep buttocks higher than hips, and rest side of face on floor. Keep most of body weight on legs.
2.
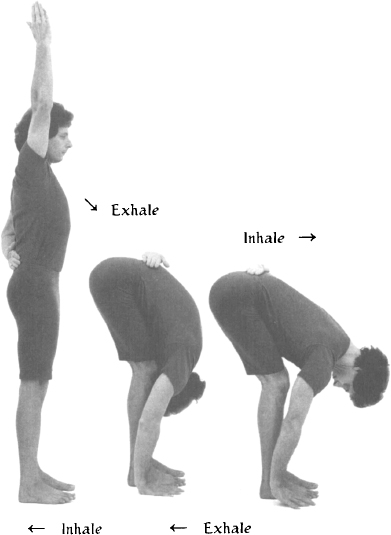
POSTURE: Uttānāsana, asymmetrical adaptation.
EMPHASIS: To stretch back and shoulders, one side at a time.
TECHNIQUE: Stand with right arm over head, left arm folded behind back.
On exhale: Bend forward, bringing chin down, belly and chest toward thighs, and right hand to side of right foot.
On inhale: Keeping right hand by foot, lift chest and flatten upper back. Allow chin to lift slightly only toward end of inhale.
On exhale: Return to forward bend position.
On inhale: Return to starting position.
NUMBER: Repeat 4 times on each side, one side at a time.
DETAILS: On inhale: Lift chin slightly toward end of inhale. On exhale: lower chin.
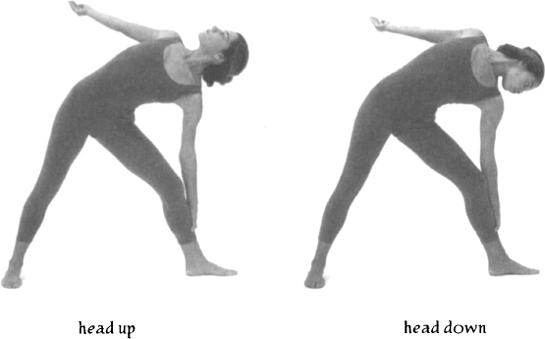
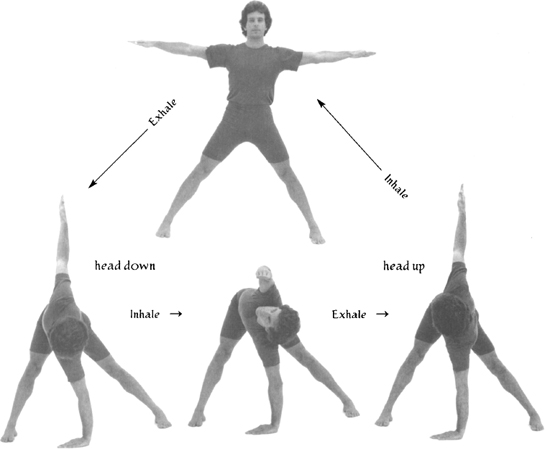
POSTURE: Parivrtti Trikonāsana.
EMPHASIS: To stretch and strengthen neck by alternately rotating head up and down in coordination with movement of shoulder girdle and arm.
TECHNIQUE: Stand with feet spread wider than shoulders and with arms out to sides and parallel to floor.
On exhale: Bend forward and twist, bringing right hand to floor, pointing left arm upward, and twisting shoulders left. Turn head down toward right hand.
On inhale: Maintaining rotation, and with left shoulder vertically above right, bring left arm up over shoulder and forward, turning head to center and looking at left hand.
On exhale: Return to previous position with left arm pointing upward. Turn head up, looking toward left hand.
On inhale: Return to starting position.
Repeat on other side.
NUMBER: 6 times each side, alternately.
DETAILS: Keep down arm vertically below its respective shoulder, and keep weight of torso off arm. Knees can bend while moving into twist.
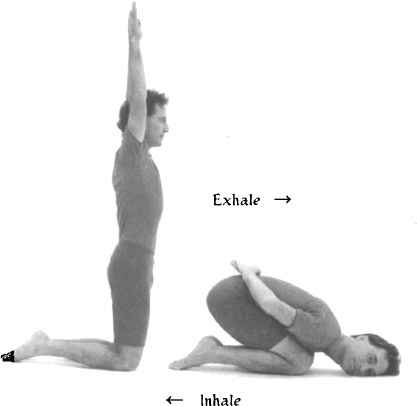
POSTURE: Vajrāsana adaptation.
EMPHASIS: To gently stretch neck and to make transition from standing twist to prone back bend.
TECHNIQUE: Stand on knees with head to center and arms over head.
On exhale: Bend forward, sweeping arms behind back, turning head to right, and resting left side of face on floor.
On inhale: Return to starting position.
Repeat on other side.
NUMBER: 4 times each side, alternately.
DETAILS: On exhale: Keep buttocks higher than hips while resting face on floor. Keep most of body weight on legs.
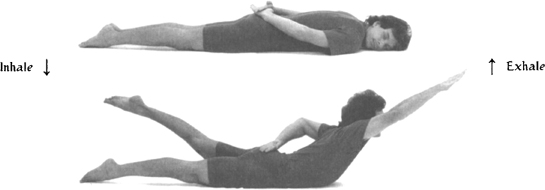
5.
POSTURE: Ardha Śalabhāsana.
EMPHASIS: To integrate movements of upper back, shoulders, and neck.
TECHNIQUE: Lie on stomach, turning head to right, crossing hands over sacrum, and turning palms up.
On inhale: Lift chest, right arm, and left leg, and turn head to center.
On exhale: Lower chest and leg while sweeping arm behind back and turning head to left. Repeat on other side.
NUMBER: 6 times each side, alternately.
DETAILS: On inhale: Lift chest slightly before leg, and emphasize chest height. Keep pelvis level. On exhale: Turn head opposite arm being lowered.
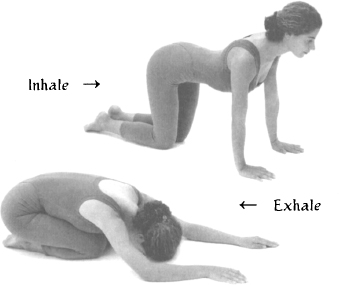
POSTURE: Cakravākāsana.
EMPHASIS: To make transition from back bend to twist.
TECHNIQUE: Get down on hands and knees, with shoulders vertically above wrists, and with hips above knees.
On inhale: Lift chest up and away from belly.
On exhale: Gently contract belly, round low back, and bring chest toward thighs.
NUMBER: 8 times.
DETAILS: On inhale: Lead with chest, keeping chin slightly down. Avoid compressing low back; rather, feel chest expanding. On exhale: Round low back without collapsing chest over belly. Avoid increasing curvature of upper back. Let chest lower toward thighs sooner than hips toward heels.
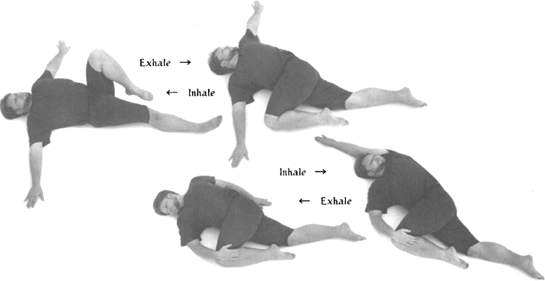
7.
POSTURE: Jathara Parivrtti.
EMPHASIS: To stretch front of shoulder and massage area between shoulder blades and spine.
TECHNIQUE: Lie flat on back, with arms out to sides and left knee pulled up toward chest.
On exhale: Twist, bringing left knee toward floor on right side of body while turning head left.
On inhale: Return to starting position.
Repeat 4 times.
On fifth repetition, stay in twist, holding knee with hand.
On inhale: Sweep left arm, palm up, wide along floor toward ear, while turning head to center.
On exhale: Lower arm back to side while turning head right.
Repeat 6 times.
Repeat on other side.
DETAILS: On exhale: While twisting right, keep angles between left arm and torso and between left knee and torso less than ninety degrees.
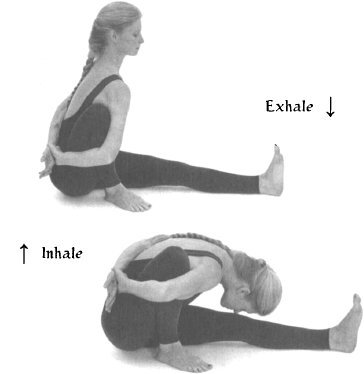
POSTURE: Marīcyāsana.
EMPHASIS: To stretch muscles between shoulder blades and spine, and from shoulders to neck.
TECHNIQUE: Sit with left leg extended forward, right knee bent with heel close to sit bone and knee toward chest. Wrap right arm, from inside of right thigh, around outside of right thigh and behind back. Wrap left arm behind back and grasp left wrist with right hand.
On inhale: Lift chest and flatten upper back, bringing left shoulder forward and keeping it as level with right shoulder as possible.
On exhale: Bend forward, bringing chest down toward left leg.
Repeat 6 times.
Wait, in a symmetric position, feeling quality of space in right shoulder.
Repeat on other side.
DETAILS: Allow right sit bone to come off floor when bending forward. Allow left knee to bend on exhale.
9.
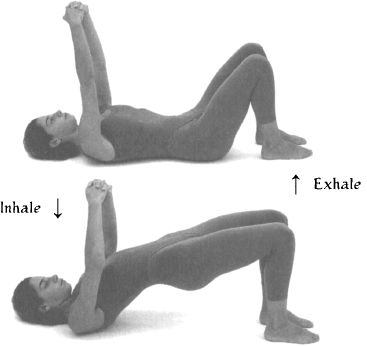
POSTURE: Dvipāda Pītham adaptation.
EMPHASIS: To stretch neck and upper back, spreading shoulder blades and massaging between them.
TECHNIQUE: Lie on back with arms relaxed and pointing upward, fingers interlocked and palms down, knees bent, and feet on floor, slightly apart and comfortably close to buttocks.
On inhale: Press down on feet and, keeping arms relaxed, raise pelvis and lower chin until neck is gently flattened on floor.
On exhale: Return to starting position, extending arms upward, pulling shoulder blades away from spine, and feeling massage of upper back on the way down.
NUMBER: 8 times.
10.
POSTURE: Śavāsana with support.
EMPHASIS: To rest.
TECHNIQUE: Lie flat on back with head on small pillow, arms at side, palms up, and legs slightly apart. Close eyes. Relax body fully, keeping mind relaxed and alert to sensations in body.
DURATION: Minimum 3 to 5 minutes.

This practice was developed for G.R., a forty-three-year-old building contractor. His wife was a student at our school. He was suffering from chronic neck tension and pain, and also had recurring headaches. On the phone, he told me that his headaches had been getting worse, and that he realized that he had to do something to help himself.
In our conversations together, I learned that he had begun to back away from the heavier work of framing houses but was still involved with the finish carpentry. As we discussed his condition, he realized that the fumes from the finishes and the intense sounds and vibrations of the tools were significant contributing factors to his headaches.
As we began to work together, I could see that he had strong but very tight muscles. He could barely turn his head without displacing his shoulder girdle. G.R. was busy, and he felt that a fifteen- to twenty-minute program was all he could do. He said he would like to practice in the evening before bed.
We started with simple movements of the arms, shoulders, and head coordinated with breathing. Over the few weeks that we worked together, we evolved the following course. He told me that it not only increased the mobility of his head but that it improved his sleep.
I heard from his wife that he was very happy with the work we had done together. She told me that he had learned to reduce the tension in his neck and control his headaches through the practice.
About a year later, G.R. came back to see me. He told me that he had hurt his low back playing golf and was hoping I could help him. I told him I was surprised that he had the time to play golf, remembering how busy he had been. He told me that he had hired a foreman and was able to be off the job site more often. He had decided that he had had enough stress and strain on the job, and he said that he now spent more time working up bids and negotiating deals than cutting boards and hammering nails. He told me he much preferred using his body for sport and making a living with his mind. I asked about his neck pain and headaches, and he told me that they hadn’t been a problem since the time we had worked together the previous year.
1.
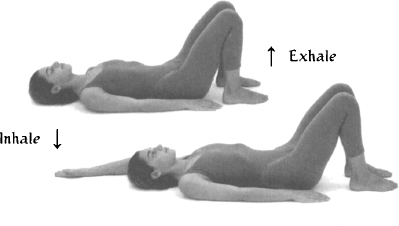
POSTURE: Śavāsana adaptation.
EMPHASIS: To gently mobilize chest, upper back, and shoulders.
TECHNIQUE: Lie on back with knees bent, feet on floor, and arms down at sides.
On inhale: Raise left arm straight up over head and toward floor behind you.
On exhale: Return to starting position.
Repeat on other side.
NUMBER: 4 times on each side, alternately.
DETAILS: Move arm progressively farther toward floor behind you with each successive inhale.
2a.
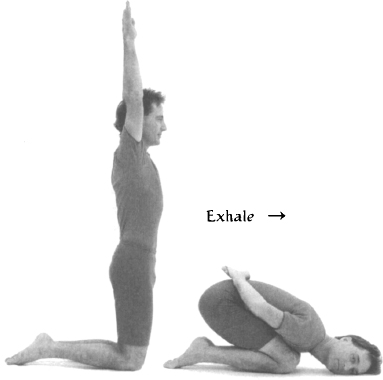
POSTURE: Vajrāsana.
EMPHASIS: To mobilize upper back and shoulders.
TECHNIQUE: Stand on knees with arms over head.
On exhale: Bend forward, sweeping arms behind back, and bring hands to sacrum, keeping palms up.
On inhale: Return to starting position.
NUMBER: 4 times on each side, alternately.
DETAILS: On exhale: Bring chest to thighs before bringing buttocks to heels. Rotate arms so palms are up and hands are resting on sacrum. On inhale: Expand chest and lift it up off of knees as arms sweep wide.
2b.
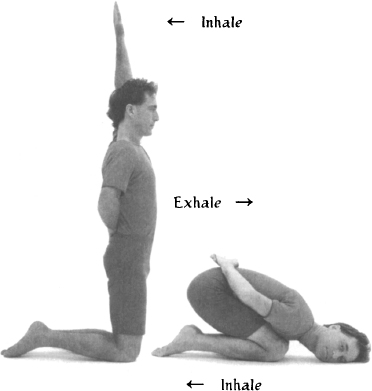
POSTURE: Vajrāsana, asymmetrical adaptation.
EMPHASIS: To gently stretch neck and to integrate neck and shoulders with arm movement.
TECHNIQUE: Stand on knees with left arm over head, right arm folded behind back, and head to center.
On exhale: Bend forward, sweeping left arm behind back, turning head to right, and resting on left side of face.
On inhale: Return to starting position.
Repeat on other side.
NUMBER: 4 times on each side, alternately.
DETAILS: On exhale: Keep buttocks higher than hips while resting side of face on floor. Keep most of body weight on legs.
POSTURE: Dvipāda Pītham adaptation.
EMPHASIS: To stretch neck and shoulders, and to integrate neck and shoulders with arm movement.
TECHNIQUE: Lie on back with arms down at sides, knees bent, and feet on floor, slightly apart and comfortably close to buttocks.
On inhale: Keeping chin down, press down on feet, raising pelvis and raising left arm up over head to floor behind, until neck is gently flattened on floor.
On exhale: Return to starting position, lowering left arm and turning head right.
On inhale: Move into upward position again, raising right arm and turning head center.
On exhale: Return to starting position, lowering right arm and turning head left.
NUMBER: 4 times each side, alternately.

4.
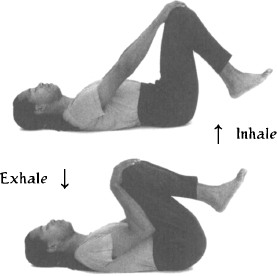
POSTURE: Apānāsana.
EMPHASIS: To gently stretch low back.
TECHNIQUE: Lie on back with both knees bent toward chest and feet off floor. Place each hand on its respective knee.
On exhale: Pull thighs gently but progressively toward chest.
On inhale: Return to starting position.
NUMBER: 12 times.
DETAILS: On exhale: Pull gently with arms, keeping shoulders relaxed and on floor. Press low back down into floor and drop chin slightly toward throat.
5.
POSTURE: Śavāsana with support.
EMPHASIS: To rest.
TECHNIQUE: Lie flat on back with head on small pillow, arms at sides, palms up, and legs slightly apart. Close eyes. Relax body fully, keeping mind relaxed and alert to sensations in body.
DURATION: Minimum 3 to 5 minutes.

Many people suffer from tension and pain in the back. These conditions are variable and relate to the condition of the spinal curves and their supporting musculature. They may involve mild to severe pain in the upper back (thoracic spine) and/or lower back (lumbar spine), and there may be mild to severe rigidity and restricted movement in either or both of these spinal segments.
As with neck and shoulder conditions, it is important to assess the cause of the pain. In particular, we want to find out whether there is serious damage to any of the intervertebral discs. If this is the case, there will be numbness or tingling sensations in the legs and feet, or sharp, electric, and immobilizing pains in the back. When these symptoms are present, it is best to seek professional diagnosis, because, while Yoga therapy may assist the healing process, the wrong practice may actually make matters worse.
In working with tension, restricted movement, and/or chronic pain, we need to consider the interrelated effects of three potentially contributing factors: our musculoskeletal condition; the neuromuscular patterns that condition our movements; and the bio-mechanical relationship that exists between the main spinal curves themselves.
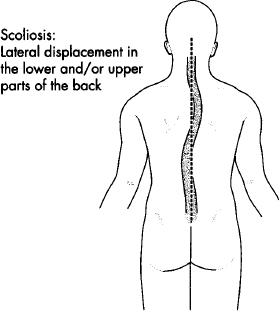
General musculoskeletal conditions of the spine that may contribute to these problems include mild to severe examples of the following conditions: excessive curvature of the upper back (kyphosis), causing it to be accentuated and resulting in inward collapse of the chest, or decreased curvature of the upper back, causing it to flatten and resulting in “military spine”; excessive curvature of the lower back (lordosis), causing it to be accentuated and resulting in compression in the back part of the intervertebral discs, or decreased curvature of the lower back, causing it to flatten and resulting in compression in the front part of the intervertebral discs; and lateral displacement in the lower and/Or upper parts of the back (scoliosis). All of these structural conditions relate to corresponding muscular imbalances, chronic muscular contractions, and/or muscular weakness. In addition, there may be intervertebral rigidity and corresponding movement restriction, or instability and corresponding hypermobility—all of which are causally related to habitual movement patterns.
The origin of these conditions may be congenital (from birth) or acquired. Individual tendencies in the spinal curves are usually established early in the growing process and may be exaggerated by repetitive activity. Excessive rounding of the thoracic curvature (kyphosis), for example, can be increased by any activity that requires long hours of bending forward, such as the work habits of an office worker, a taxi driver, or a dental hygienist. The congenital tendency to excessive curvature of the upper back can also be increased by carrying objects such as babies or groceries over long periods of time. And the congenital tendency to have a flattened upper back can likewise be increased by weight-bearing activity that requires the back muscles to contract. Curvature of the lumbar spine (lordosis) can be increased by natural developments such as pregnancy or carrying babies in the arms, and even dads may develop an increased lumbar curve by years of carrying their children. The tendency to excessive curvature of the lower back is also increased by wearing high heels or by sitting at a desk, leaning the torso forward toward a computer screen.
It is important to realize that conditions in the upper back and lower back are interconnected. If one spinal curve increases, the other usually increases to compensate. When, for example, a woman is in advanced stages of pregnancy, there is a tendency for the lumbar curve to increase and for the hips to push forward. This creates the dual condition of lumbar lordosis and sway back. In this condition, there would naturally be a tendency to fall forward. As a natural compensatory mechanism, the thoracic curve may increase, displacing some weight backward to help the body restore equilibrium.
In addition to this kind of weight distribution, the supporting musculature will contract to support those body segments that are out of vertical alignment. As an example, from a standing position, and while holding a plastic water bottle in your hands, try raising your arms forward and up halfway, until they are parallel to the ground. You will notice a slight backward displacement of your shoulders, and, after a short while, you will also notice muscle tension in your shoulders and upper back. This is because both compensatory weight distribution and muscular contraction are necessary to maintain this position.
Let’s take some time now to consider our upper backs. When the curvature of the upper back increases, the chest tends to collapse over the belly. Over time, muscles in the front of the spine tighten, and it becomes increasingly difficult to lift and expand the chest. Flattening an exaggerated curvature in the upper back involves not only strengthening the musculature that runs behind the spine, but also stretching those muscles that run in front of the spine.
Based on this musculoskeletal point of view, in āsana practice, the basic instruction given for inhalation is to simultaneously expand the chest horizontally, lift the ribs vertically, lengthen in the front of the torso, and flatten the upper back. This has the effect of strengthening the muscles in the back while stretching those in the front of the spine. Then, as the lungs deflate and there is less pressure in the thoracic cavity as a result of exhalation, we can also effectively isolate the middle and upper areas of the back and displace them forward.
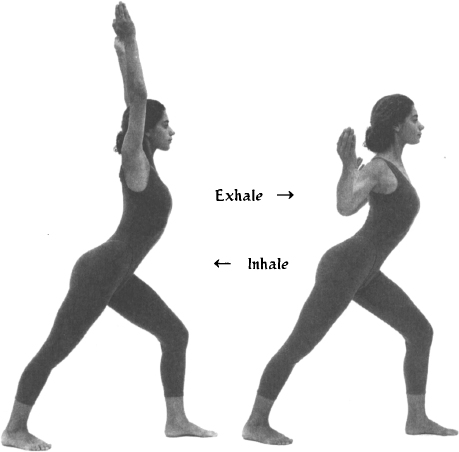
If we coordinate this process with movements of the shoulder girdle and the arms, we can deepen this effect. For example, if the shoulder blades are pulled back toward each other as the arms are opened wide, the rib cage expands and the upper back is pushed forward. As this action is repeated, muscles in the front and back of the spine are alternately stretched and contracted, increasing circulation, and strengthening and relaxing them. If the arms are also raised up over head, singly or together, we can deepen the stretching of the musculature in the front of the spine, relaxing it and allowing the chest to lift more freely. In fact, in the more advanced Yoga postures, we use the arms as levers to help expand the chest and flatten the upper back more intensely or to stretch the muscles in the front of the torso more deeply. Of course, using leverage increases risk to the joints and must be done with careful preparation.
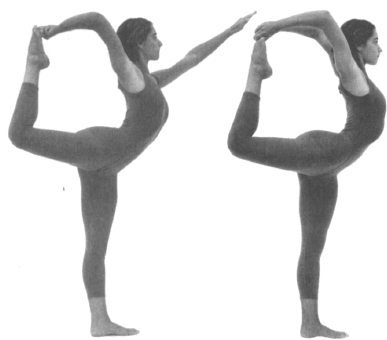
Both the lower back and the neck and shoulders can function as release valves for stress in the upper back. We must remember that in working to flatten the curve of the upper back, there is a great tendency to simply increase the curve of the lower back. And if we are successful in blocking the curve of the lower back, we must be careful not to bring too much stress to the neck and shoulders.
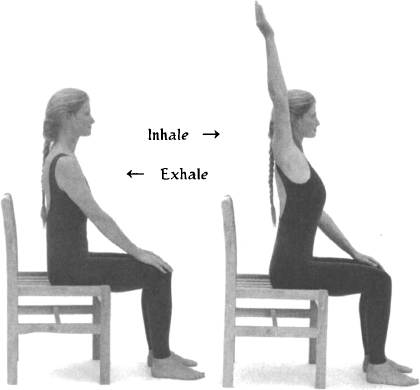
The first principle in working with an increased curvature of the upper back is simple movement co-ordinated with breathing. Sitting in a chair, move forward so that your back does not touch the back of the chair. Place the palms of your hands on the corresponding knees. On inhalation, raise one arm forward and straight up over your head. Take the arm back as far as is comfortable—behind the ear if possible—feeling the stretching on that side of the front of your torso and all the way down to the belly. On exhale, return the palm to the knee. Repeat on the same side a few times, waiting to feel the residual sensations in the front of your body. Then repeat the same procedure on the other side.
Next, place your palms together in front of your heart. On inhalation, while pulling the shoulder blades back toward each other, expand the chest horizontally and open the palms outward until they move behind your shoulders. At the same time lift the chest slightly up and away from the belly, feeling the stretching in the front of the torso. On exhale, return to the starting position with the palms together in front of your heart. Repeat several times.
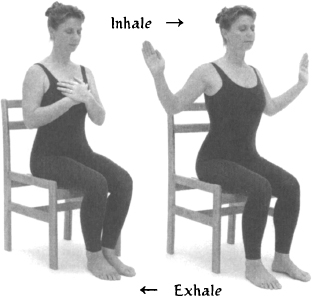
The next principle is that of using the arms as levers, and it is accomplished by using exhalation to push the mid-thoracic forward. Sitting forward on a chair, place both palms on your knees. On inhale, lift the chest upward, stretching the front of the torso, while pulling gently backward on your knees with your hands. On exhale pull a bit more strongly backward with your arms while pulling your shoulder blades toward each other and pushing your upper back forward. Repeat a few times and then relax. The arms can be used more strongly as levers when they are raised over the head or when the hands are behind the back.
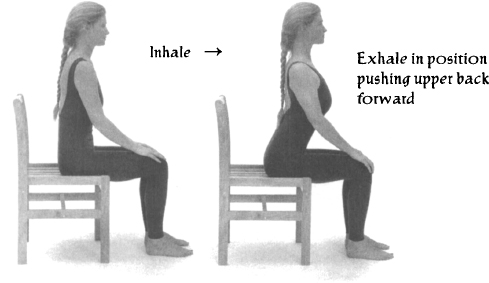
In the practice that follows, you will experience examples of this action.
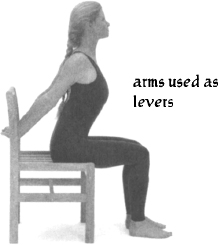
These are simple exercises designed to show you the fundamental principles for working with increased thoracic curve. They are exercises that isolate the upper back and are primarily useful for their educational value. In practice, the upper back does not function in isolation but is dependent on the position of the lower back. Also, the muscles that run in the front and back of the spine connect all the way down to the pelvis. The sequence that follows is oriented toward working with conditions of increased curvature of the upper back and corresponding tension and mild pain.
This practice was developed for P.M., a thirty-four-year-old single mom. P.M. worked as a seamstress. She came because she felt that her posture was getting progressively worse. She recognized that carrying her baby and sewing were contributing factors to the problem of her posture, and she wanted to find a way to work with it.
P.M. had an exaggerated thoracic curve and a corresponding restriction in her inhalation. Over several months, we evolved the following practice. My strategy was to deepen her capacity to inhale, expand her chest and flatten her upper back, and to stretch her psoas, abdomen, and diaphragm.
Initially, P.M. resisted the practice. One day she came to me and told me she had had a dream where she angrily told me to leave her back alone! But after several weeks, she began to move through her resistance and actually enjoy the practice.
As we got to know each other, I asked her whether she had any plans for her future. Although she was a competent seamstress, it didn’t satisfy her. I learned that she had completed all the course work necessary to take her teacher certification but had failed the exam several years back. She was so shocked that she had failed that she had just dropped it and returned to sewing. She told me that she could have taken the exam again but lacked confidence in herself and feared failing again. I reminded her about how she had persevered and overcome the resistance to working with her upper back, and I strongly encouraged her to prepare herself to take the exam again.
P.M. continued her practice and started coming to group classes once a week. In the following year, she passed her teacher’s exam and found a job doing what she loves—teaching first grade. She tells me that she is happy with her job, feels more open in her body, and has more confidence in herself.
1.
POSTURE: Vajrāsana.
EMPHASIS: To warm up body, using movement to open chest and flatten upper back.
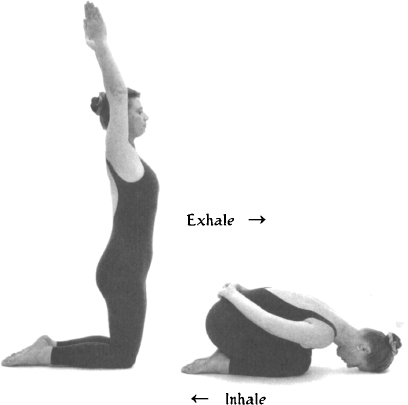
TECHNIQUE: Stand on knees with arms over head.
On exhale: Bend forward, sweeping arms behind back, and bring hands to sacrum, palms up.
On inhale: Return to starting position.
NUMBER: 8 times.
DETAILS: On exhale: Bring chest to thighs before bringing buttocks to heels. Rotate arms so palms are up and hands are resting on sacrum. On inhale: As arms sweep wide, open chest, pull shoulder blades back, and flatten upper back.
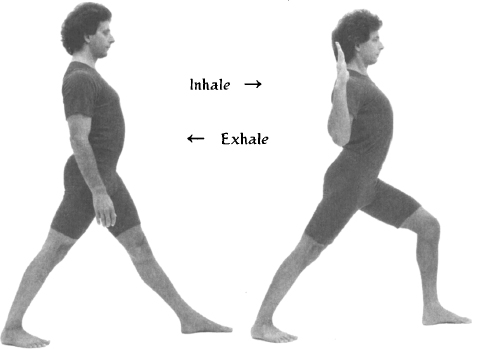
POSTURE: Vīrabhadrāsana.
EMPHASIS: To strengthen muscles of back, expand chest, and flatten upper back. To introduce short hold after inhalation.
TECHNIQUE: Stand with left foot forward, feet as wide as hips, and arms at sides.
On inhale: Simultaneously bend left knee, displace chest slightly forward and hips slightly backward, bring arms out to side, with elbows slightly bent and shoulders back. After inhale hold breath 4 seconds.
On exhale: Return to starting position.
NUMBER: 6 times each side.
DETAILS: On inhale: Keep hands and elbows in line with shoulders. Feel opening of chest and flattening of upper back, not compression of lower back. Keep gaze forward and head level. Keep weight on back heel.
3.
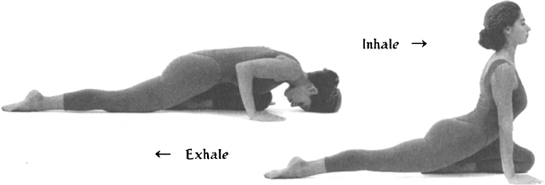
POSTURE: Godhāpītham.
EMPHASIS: To contract musculature of upper back and flatten thoracic curve. To stretch front of torso, particularly psoas muscle.
TECHNIQUE: Kneel on left knee, with right leg extended straight behind, hands on floor on either side of left knee.
On inhale: Lift rib cage forward and up while pulling down and back with hands, pushing chest forward and flattening upper back.
On exhale: Bend elbows and lower chest to thigh.
Repeat 4 times.
Then stay up in stretch 4 breaths, each side.
DETAILS: On inhale: Pull down and back with hands, rather than pushing up. Drop shoulders and pull shoulder blades back. On exhale: While staying in posture, push mid-thoracic forward. Avoid compressing low back.
POSTURE: Bhujangāsana adaptation.
EMPHASIS: To gently stretch and expand rib cage. To flatten upper back with arm variation.
TECHNIQUE: Lie on belly with arms behind back, palms up and resting on sacrum, and head turned to one side.
On inhale: Lift chest, sweeping arms wide and forward, and turning head to center.
On exhale: Bend elbows and pull them back toward ribs, lifting torso higher and flattening upper back.
On inhale: Extend arms forward again.
On exhale: Return to starting position, turning head to opposite side.
NUMBER: 6 times.
DETAILS: When bending arms, keep palms and elbows at same level.

5.
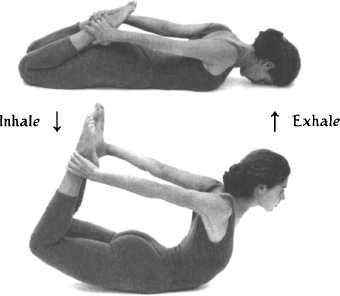
POSTURE: Dhanurāsana.
EMPHASIS: To expand chest, stretch front of torso, and flatten upper back.
TECHNIQUE: Lie on stomach, resting on forehead, with knees bent and hands grasping ankles.
On inhale: Simultaneously, press feet behind you, pull shoulders back, lift chest, and lift knees off ground.
On exhale: Return to starting position.
Repeat 4 times.
Then stay in position 4 breaths.
DETAILS: While staying in position, lift chest slightly higher on inhale.
POSTURE: Cakravākāsana.
EMPHASIS: To stretch and relax low back after deep back bend.
TECHNIQUE: Get down on hands and knees, with shoulders vertically above wrists, and hips above knees.
On inhale: Lift chest up and away from belly.
On exhale: Gently contract belly, rounding low back and bringing chest toward thighs.
NUMBER: 8 times.
DETAILS: On inhale: Lead with chest, keeping chin slightly down. Avoid compressing low back; rather, feel chest expanding. On exhale: Round low back without collapsing chest over belly. Avoid increasing curvature of upper back. Let chest lower toward thighs sooner than hips toward heels.

7.
POSTURE: Ūrdhva Prasārita Pādāsana.
EMPHASIS: To extend spine and flatten it onto floor. To stretch upper back.
TECHNIQUE: Lie on back with arms down at sides, legs bent, and knees in toward chest.
On inhale: Raise arms upward all the way to floor behind head and legs upward toward ceiling.
On exhale: Return to starting position.
Repeat 4 times.
Then stay in position 4 breaths, with fingers interlocked and palms out.
DETAILS: On inhale: Flex feet as legs are raised upward. Keep knees slightly bent and keep angle between legs and torso less than ninety degrees. Push low back and sacrum downward. Bring chin down.
While staying in position: On exhale, Flex knees and elbows slightly. On inhale: Extend arms and legs straighter.

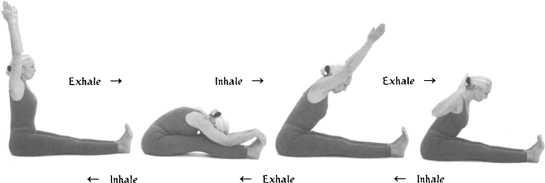
POSTURE: Paścimatānāsana adaptation.
EMPHASIS: To strengthen muscles of upper back. To further flatten back with arm variation.
TECHNIQUE: Sit with legs forward, back straight, and arms raised over head.
On exhale: Bend forward, bending knees slightly, bringing chest to thighs, and palms to balls of feet.
On inhale: Leading with chest, lift arms and torso to forty-five-degree angle from legs.
On exhale: Bend elbows back toward ribs and displace upper back forward.
On inhale: Extend arms forward again.
On exhale: Bring chest and arms back to forward bend position.
On inhale: Return to starting position.
NUMBER: 6 times.
DETAILS: Same arm variation as used in numbers 2 and 4.
9.
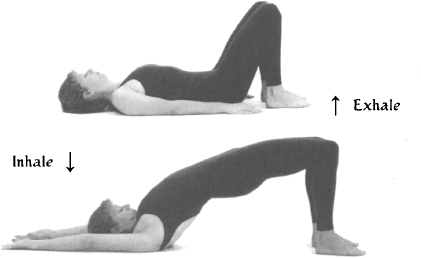
POSTURE: Dvipāda Pītham.
EMPHASIS: To relax upper back.
TECHNIQUE: Lie on back with arms down at sides, knees bent, and feet on floor, slightly apart and comfortably close to buttocks.
On inhale: Pressing down on feet and keeping chin down, raise pelvis up until neck is gently flattened on floor and arms are overhead on floor behind.
On exhale: Return to starting position.
NUMBER: 6 times.
DETAILS: On inhale: Lift spine, vertebra by vertebra, from bottom up. On exhale: Unwind spine, coming down vertebra by vertebra.
10.
POSTURE: Śavāsana with support.
EMPHASIS: To rest.
TECHNIQUE: Lie flat on back, arms at sides, palms up, and legs slightly apart. Close eyes.
Relax body fully, keeping mind relaxed and alert to sensations in body.
DURATION: Minimum 3 to 5 minutes.

Now let’s explore the lower back. Low back pain is perhaps the most common kind of structural pain and effects a large percentage of the population worldwide. In fact, many of the variations of this condition can be managed through simple Yoga therapeutic techniques.
It is important to understand that the curvature of the lower back (lordosis) is directly related to the angle of the pelvis. The lumbar spine rises up off its sacral base. If the pelvis is rotated forward, there will be an increased lumbar curve, sometimes referred to as a hollow back. When this occurs, there may be mild to severe compression on the back side of the lumbar’s intervertebral discs. In this condition, the muscle groups running behind the lumbar spine are often chronically contracted, holding the pelvis in its forward rotation. Flattening the lumbar curve involves stretching these muscles as well as strengthening the abdominal muscles in the front of the torso. As the abdominal muscles contract from their insertion into the pubic bone, they rotate the pelvis backward, flattening the lumbar curve.
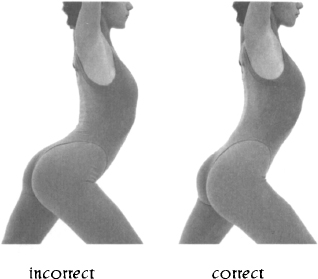
Another important muscle group that relates to low back problems is the iliopsoas. These muscles run from the hips, through the pelvis, and are attached on the front of the lumbar spine. If the psoas is contracted, there may be mild to severe compression on the front side of the lumbar’s intervertebral discs. If the muscles behind the spine are also contracted, then the intervertebral discs will be compressed in both the front and the back.
The condition of a contracted psoas may also be present in cases where curvature of the low back is too flattened. This condition is not as common as an increased curvature, and is most often either a congenital condition or one acquired in childhood development. This can be a serious condition, and must be managed carefully.
From the musculoskeletal point of view, the basic instruction given for exhalation in āsana practice is to contract the abdominal muscles, compressing the belly, pulling the pubic bone slightly upward, and flattening the curvature of the low back. This has the effect of stretching the muscles of the low back while strengthening the muscles of the abdomen.
Forward bending is understood as a development of this concept of exhalation and serves to deepen the stretching of the muscles of the low back. Backward bending, on the other hand, contracts the muscles of the back while stretching the muscles in the front of the spine. This alternation of contraction and stretching of the back muscles is important in healing low back pain, as it actually both strengthens and loosens those muscles, as well as stabilizes the pelvic/lumbar relationship. Backward bending can also be adapted to stretch the psoas muscles, which helps relieve intervertebral compression.
Both the upper back and the pelvis can function as release valves for the lower back. It is important to remember that, when we work to flatten the lumbar curve in forward bending, there is a tendency to increase the thoracic curve. If we keep the chest lifted and the upper back flat, we must then watch for the tendency to move from the hips, increasing stress to the lumbar/sacral junction. If the hips are loose, we have to block the forward rotation of the pelvis to assure the low back will be stretched.
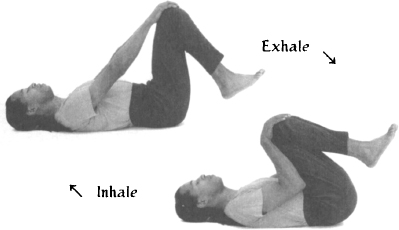
The first principle for working with increased cur vature of the low back is simple stretching movements coordinated with breathing. As an example, lie on your back with the knees bent, the hands placed on each knee, and the arms straight. As you exhale, tighten the belly below the navel, and bend the elbows, pulling the thighs toward the chest. Keep the neck and shoulders relaxed and the head on the floor. Push the low back down into the floor throughout the movement, avoiding the tendency to pull the low back up. On inhale, straighten your arms, bringing the thighs arms distance from the chest. Repeat several times. This type of simple stretching of the low back should feel good for all conditions except those involving more serious disc injuries.
The second principle is to alternate movements that gently stretch the muscles of the low back with those that gently contract them. These exercises will be part of the sequence that follows below.
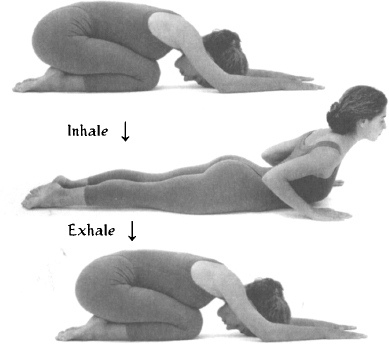
The next principle is to introduce movements that effectively stretch the psoas muscles. This usually means using asymmetrical postures, in which each side can be stretched independently. When stretching the psoas, we must be careful not to increase the compression in the low back.
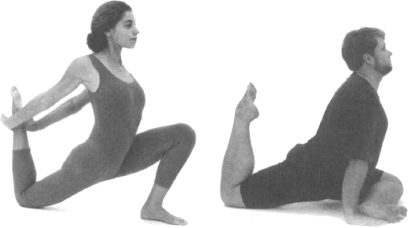
Again, the overall methodology is to begin with simple movements in which there is no pain, gradually increasing the parameters of movement and working to stretch and contract the back muscles alternately. This will increase circulation, release chronic contraction, and stabilize the area. In addition, the use of repetition will help develop new and more functional movement patterns that will carry over into daily activity.
The sequence that follows is specifically oriented to working with conditions of chronic, mild lower back pain.
This practice was developed for L.S., a thirty-eight-year-old successful sales representative for several major clothing lines in Hawaii. She came to see if Yoga could help her chronic low back pain.
L.S.’s work schedule was very busy. She spent a lot of time on the phone and in and out of her car, carrying boxes of samples to various stores. She also flew to the other islands regularly, with the same repetitive routine from car to store and back again.
When I asked her what else she did, she told me that she worked out regularly at the gym. I asked her if she ever slowed down. She told me she was actually afraid to stop. She told me that her husband had many creative projects that were “just about to make it” but that she had been more or less supporting them both for the past ten years. She confided that, although she loved him, she was very frustrated about the situation.
We met once a week for several months, during which time we evolved the following sequence. I observed that her hip joints were very mobile and that her low back muscles were tight and weak. My plan was to slowly stretch and strengthen her low back and stabilize the pelvic-lumbar relationship.
I had an occasion to meet L.S.’s husband, J.S., on several occasions. He was proud of his wife’s success and, at the same time, ashamed that his own efforts were not bearing fruit. He told me that he felt he had to match his wife’s success. His real love, he said, was playing classical guitar.
After some time, husband and wife came to meet me together. Our time was spent reflecting on different solutions to their situation. J.S. is now working with L.S. in her business and giving guitar lessons to children on the weekends. L.S. tells me that she feels her back is much stronger since she began her Yoga practice, and she rarely experiences discomfort. She told me that she never expected that finding a solution to her back problem might also lead to a solution in her marriage.
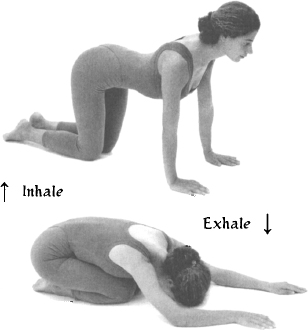
1.
POSTURE: Cakravākāsana.
EMPHASIS: To warm up body and to gently stretch lower back.
TECHNIQUE: Get down on hands and knees, with shoulders vertically above wrists and with hips above knees.
On inhale: Lift chest up and away from belly.
On exhale: Gently contract belly, rounding low back and bringing chest toward thighs.
NUMBER: 8 times.
DETAILS: On inhale: Lead with chest, keeping chin slightly down. Avoid compressing low back; rather, feel chest expanding. On exhale: Round low back without collapsing chest over belly. Avoid increasing curvature of upper back. Let chest lower toward thighs sooner than hips toward heels.
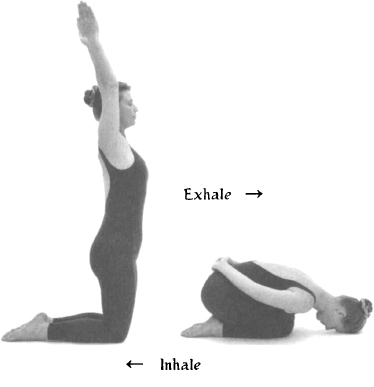
POSTURE: Vajrāsana.
EMPHASIS: To further warm up body and to gently stretch back.
TECHNIQUE: Stand on knees with arms over head.
On exhale: Bend forward, sweeping arms behind back and bringing hands to sacrum, palms up.
On inhale: Return to starting position.
NUMBER: 8 times.
DETAILS: On exhale: Bring chest to thighs before bringing buttocks to heels. On inhale: Expand chest and lift it up off knees as arms sweep wide.
3.
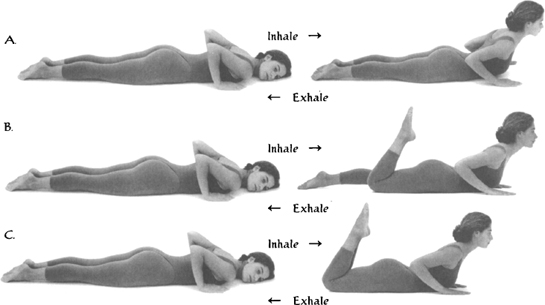
POSTURE: Bhujangāsana adaptation.
EMPHASIS: To strengthen low back muscles and stabilize pelvic-lumbar relationship.
TECHNIQUE: Lie on belly, with palms on floor by chest and with head turned to one side.
A: On inhale: Lift chest, pulling slightly down and back with hands, turning head to center.
On exhale: Return to starting position, turning head to opposite side.
Repeat 4 times.
B: On inhale: As chest is lifted, bend one knee, bringing heel toward buttock.
On exhale: Return to starting position.
Repeat 2 times each side, alternately.
C: As in B, but bending both knees simultaneously.
Repeat 4 times.
DETAILS: DO not push chest higher with arms.
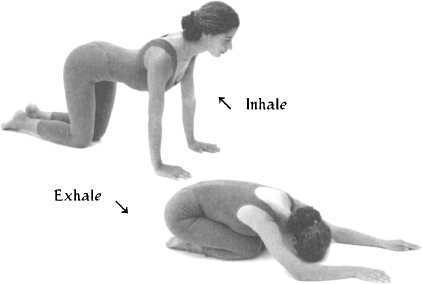
POSTURE: Cakravākāsana.
EMPHASIS: To stretch and relax low back after back bend, and to make transition from prone to standing.
TECHNIQUE: Get down on hands and knees, with shoulders vertically above wrists and with hips above knees.
On inhale: Lift chest up and away from belly.
On exhale: Gently contract belly, rounding low back and bringing chest toward thighs.
NUMBER: 8 times.
DETAILS: Move slowly, feeling gentle stretch in low back.
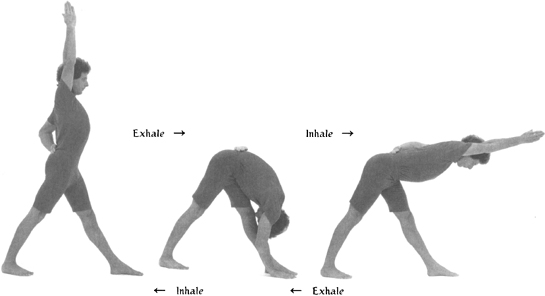
5.
POSTURE: Ardha Pārśvottānāsana.
EMPHASIS: To stretch and strengthen low back, one side at a time.
TECHNIQUE: Stand with left foot forward, right foot turned slightly outward, right arm over head, and left arm folded behind back.
On exhale: Bend forward, flexing left knee, bringing chest toward left thigh and bringing right hand to left foot.
On inhale: Lift chest and arm until torso is parallel to ground.
On exhale: Return to forward bend position.
On inhale: Return to starting position.
NUMBER: 4 times each side.
DETAILS: Stay stable on back heel and keep shoulders level throughout movement.
POSTURE: Godhāpītham.
EMPHASIS: To stretch front of torso, particularly psoas muscle.
TECHNIQUE: Kneel on left knee, with right leg extended straight behind, and hands on floor on either side of left knee.
On inhale: Lift rib cage forward and up, pulling down and back with hands, pushing chest forward, and flattening upper back.
On exhale: Bend elbows and lower chest to thigh.
Repeat 4 times.
Then stay up in stretch 4 breaths, each side.
DETAILS: On inhale: Pull down and back with hands, rather than pushing up. Drop shoulders and pull shoulder blades back. On exhale: While staying in posture, push mid-thoracic forward on exhale. Avoid compressing low back.

7.
POSTURE: Ardha Śalabhāsana.
EMPHASIS: To strengthen lower back.
TECHNIQUE: Lie on stomach, with head to left and palms on floor by chest.
On inhale: Lift chest and left leg, turning head to center.
On exhale: Lower chest and leg, turning head to right.
Repeat on other side.
NUMBER: 6 times each side, alternately.
DETAILS: On inhale: Lift chest slightly before leg and emphasize chest height. Keep pelvis level.
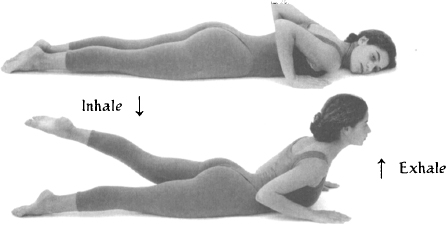
POSTURE: Supta Eka Pādāngusthāsana.
EMPHASIS: To gently stretch low back and to stretch legs, one side at a time.
TECHNIQUE: Lie on back, with legs bent, left foot on floor, right foot lifted, hands holding right thigh behind right knee, and arms bent.
On inhale: Extend right leg upward, straightening arms.
On exhale: Return to starting position.
Repeat on other side.
NUMBER: 6 times each side.
DETAILS: On inhale: Flex foot as leg is raised upward. Knee can remain slightly bent. Push low back and sacrum downward. Keep chin down.
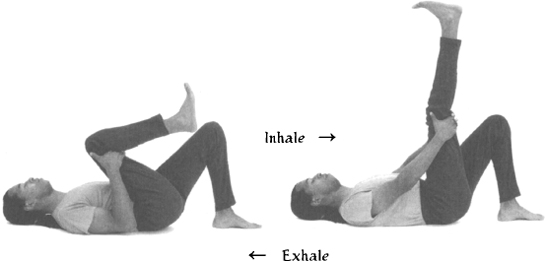
9.
POSTURE: Jānu Śirsāsana.
EMPHASIS: To stretch lower back, one side at a time.
TECHNIQUE: Sit with right leg folded in, heel to groin, left leg extended forward, right arm over head and left arm folded behind back.
On exhale: Bend forward, bringing belly and chest toward left leg and bringing right hand to left foot.
On inhale: Return to starting position.
Repeat 4 times.
Then stay down in forward bend position for 4 breaths, both arms holding left foot.
Repeat on other side.
DETAILS: While staying in forward bend position: On inhale: Lift chest slightly, flattening upper back. On exhale: Sink from hips, bringing belly to thigh.
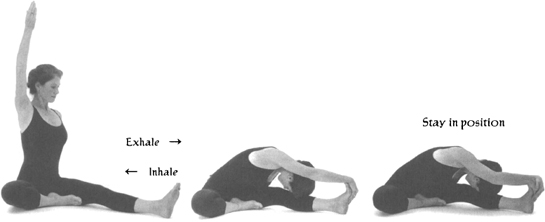
POSTURE: Dvipāda Pītham.
EMPHASIS: To relax upper and lower back and to stretch between belly and thighs.
TECHNIQUE: Lie on back with arms down at sides, knees bent, and feet on floor, slightly apart and comfortably close to buttocks.
On inhale: Press down on feet, raising pelvis up toward ceiling, keeping chin down, until neck is gently flattened on floor, while raising arms overhead to floor behind.
On exhale: Return to starting position.
NUMBER: 6 times.
DETAILS: On inhale: Lift spine, vertebra by vertebra, from bottom up. On exhale: Unwind spine, coming down vertebra by vertebra.

11.
POSTURE: Śavāsana.
EMPHASIS: To rest.
TECHNIQUE: Lie flat on back, with arms at sides, palms up, and legs slightly apart. Close eyes. Relax body fully, keeping mind relaxed and alert to sensations in body.
DURATION: Minimum 3 to 5 minutes.

Scoliosis is the lateral displacement and asymmetry in the spine. Scoliosis can be congenital or acquired. Though most of us have some degree of mild congenital scoliosis, this condition is increased by repetitive, one-sided activity. Common examples are the case of the mother who always carries her baby on one hip, or the professional tennis player, or even the professional truck driver who always wears his wallet in the same back pocket. Many children develop scoliosis from always carrying their books in one arm during the years of their primary development. Men who wear their wallets in their back pockets and who sit a lot at the office or in the car may even develop a kind of scoliosis. This is especially true if the wallet is thick with credit cards and cash! This simple habit creates a kind of stress in the spine and, over time, can even lead to serious back pain.
Congenital scoliosis is often more severe and can appear at any point along the spine. At the level of the pelvis, this condition can involve an S-like curve at the sacrum. The lumbar spine can also be severely curved. And, if there is a severe curve in the thoracic spine, the rib cage can be severely displaced. Often congenital scoliosis is a degenerative condition that, unless proper attention is given, can lead to serious problems with the back and even to organ disfunction.
There are different kinds and degrees of both congenital and acquired scoliosis. In all cases, there will be more muscular tightness on one side of the body than the other. If we look carefully at our bodies, we will see that for most of us there is some degree of imbalance between the muscles on the right and left sides of our spine. Usually one side is stronger than the other and one side has more tightness or restricted movement. Whatever the problem is, it will almost always involve the whole spine, from the sacrum through the cervical spine, as well as the pelvic and shoulder girdles. Except for the most extreme cases, these conditions respond very well to a well-conceived program of Yoga therapy. In working with them, we want to release contracted muscles and strengthen weak muscles. We want to work to bring more balance in the development of the spinal musculature. In other words: where there is hyper-mobility, we want to bring stability; where there is rigidity, we want to increase mobility.
The primary way of working with scoliosis is to do asymmetrical postures, so that we make each side of the body work separately and independently. If we do a symmetric posture, the looser side will absorb most of the work when stretching, and the stronger side will bear most of the work when lifting. The symmetric postures will often reinforce the imbalances, through compensation. The asymmetric postures enable us to isolate and make sure each side works. They will also bring our conscious awareness more directly to the nature of our imbalances, because of the difference in our experience when we work both sides. The more we understand this, the more we are able to adapt tools and restore or correct the imbalance.
As a general rule, we work with asymmetric postures symmetrically. That is, working both sides equally. This is important to avoid creating secondary imbalances through our work to restore balance! It may be useful to do the same number of movements on each side but make subtle shifts in the way we are moving on each side. In this way we can emphasize different things on each side while preserving balance in other areas of the body.
The following sequence offers a developmental approach to the condition of scoliosis and should be practiced when there are no conditions of acute pain.
This practice was developed for C.M., a sixteen-year-old student, who was brought to see me by her mother (a naturopathic physician) for help with her severe scoliosis. They first came together to group classes, to experience our work and see whether C.M. would like the practice. After some months, C.M. said she wanted to work out a program that she could do on her own.
When she was twelve, a doctor had told C.M. that her degree of scoliosis was often degenerative and that she might need surgery one day. She told me that since then she had been strongly motivated to work on her back. She had been taking regular dance classes for the past four years and was a very good dancer.
From her participation at our school, I knew that C.M. was in excellent physical condition. She was both strong and supple. She told me that she rarely experienced pain in her back. After the group class experience, C.M. told me that she realized that Yoga was about her, not about performance. She recognized that she could bring all of her energy and attention to work specifically on her body, and she was eager to learn more.
We took four sessions together to develop the following sequence. We worked out a general practice that emphasized asymmetric postures in order to stretch and strengthen both sides of her body independently. I asked her to pay careful attention to the differences she experienced from one side to the other in each posture that she practiced. I asked her to let her mind link to her body through her breath in order to feel more deeply what was happening as she practiced. I wanted her to develop as much awareness as she could about the imbalances in her body and how, through her own efforts, she could work with them.
C.M. tells me that she is very happy with her practice. She told me that since she has been practicing, she has become more aware of how she uses her body—both in dance as well as in normal daily activities. I see C.M. occasionally in group classes with her mother, who has become a regular student at our school.
1.
POSTURE: Vajrāsana.
EMPHASIS: To warm up body, gently stretching back, one side at a time.
TECHNIQUE: Stand on knees with left arm over head and right arm folded behind back.
On exhale: Bend forward, pushing left arm forward and bringing chest to thighs and hand and forehead to floor.
On inhale: Return to starting position.
NUMBER: 4 times each side, one side at a time.
DETAILS: On exhale: Bring chest to thighs before bringing buttocks to heels. On inhale: Lift chest and arm, flattening upper back upon return.
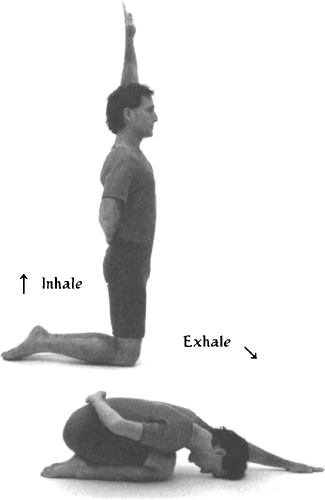
POSTURE: Ardha Pārśvottānāsana.
EMPHASIS: To stretch and strengthen low back, one side at a time.
TECHNIQUE: Stand with left foot forward, right foot turned slightly outward, right arm over head, and left arm folded behind back.
On exhale: Bend forward, flexing left knee and bringing chest toward left thigh and right hand to left foot.
On inhale: Lift chest and arm until torso is parallel to ground.
On exhale: Return to forward bend position.
On inhale: Return to starting position.
NUMBER: 4 times each side.
DETAILS: Stay stable on back heel and keep shoulders level throughout movement.
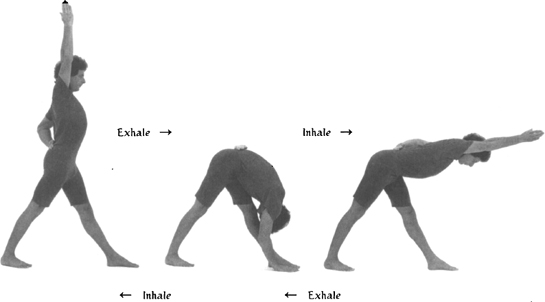
POSTURE: Utthita Trikonāsana.
EMPHASIS: To laterally stretch torso and rib cage.
TECHNIQUE:
A: Stand with feet spread wider than shoulders, left foot turned out at a ninety-degree angle to the right foot, left arm over head, and right arm straight down at waist and slightly rotated externally.
On exhale: Keeping shoulders in same plane as hips, bend laterally, lowering left shoulder and bringing left hand below left knee while turning head down toward left hand.
On inhale: Return to starting position.
Repeat.
B: With left hand down along left leg:
On inhale: Bring right arm up and forward while turning head forward toward right hand.
On exhale: Return right hand to starting position while turning head down toward left hand.
Repeat.
NUMBER: Repeat A and B four times on each side, one side at a time.
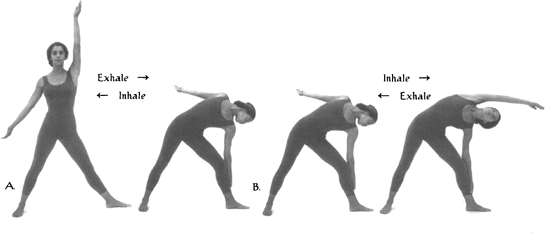
4.
POSTURE: Cakravākāsana adaptation.
EMPHASIS: To stretch low back, one side at a time.
TECHNIQUE: Get down on hands and knees, with shoulders vertically above wrists, and with hips above knees. Put right knee 2 to 4 inches behind left knee.
On inhale: Lift chest up and away from belly.
On exhale: Gently contract belly, round low back, and bring chest toward thighs.
NUMBER: 4 times each side, one side at a time.
DETAILS: Move slowly, feeling a gentle one-sided stretch in low back and sacrum.
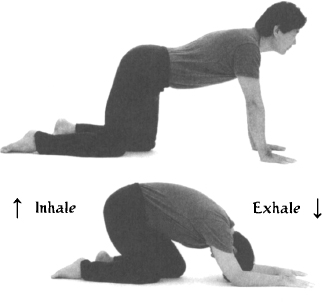
POSTURE: Dvipāda Pītham adaptation.
EMPHASIS: To stretch neck and upper back asymmetrically.
TECHNIQUE: Lie on back with arms down at sides, knees bent, and feet on floor, slightly apart and comfortably close to buttocks.
On inhale: Keeping chin down, press down on feet, raising pelvis and raising left arm up over head to floor behind, until neck is gently flattened on floor.
On exhale: Return to starting position, leaving left arm over head.
On inhale: Move into upward position again.
On exhale: Return to starting position with arms at side.
NUMBER: 4 times each side, alternately.
DETAILS: On inhale: Lift spine vertebra by vertebra, from the bottom up. On exhale: Unwind spine, coming down vertebra by vertebra.

6.
POSTURE: Sarvāngāsana and Ekapāda Sarvāngāsana/Ākuñcanāsana variation.
EMPHASIS: To stretch and strengthen musculature of torso, emphasizing one side at a time.
TECHNIQUE: Lie on back.
On exhale: Raise legs and torso to shoulder stand position, placing palms on middle back for support. Keep low back slightly rounded with feet above eyes.
Stay 8 breaths.
On exhale: Lower left knee toward left shoulder.
Stay and inhale.
On exhale: Lower right leg straight toward floor behind head.
On inhale: Raise only right leg.
Repeat slowly 4 times.
Repeat on other side.
DETAILS: Move straight leg down and up slowly, keeping bent knee stable and toward chest, with heel near sit bone.
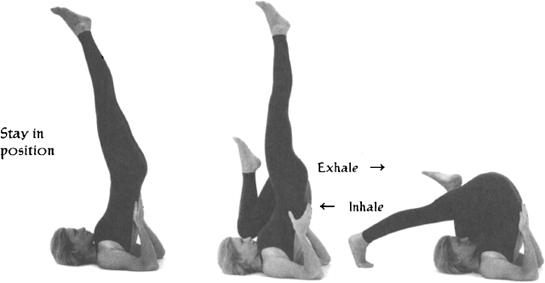
POSTURE: Ardha Śalabhāsana.
EMPHASIS: To strengthen musculature of back, emphasizing one side at a time.
TECHNIQUE: Lie on stomach, with head turned to right, arms folded behind back, and palms up.
On inhale: Lift chest, right arm, and left leg, turning head to center.
On exhale: Lower chest and leg, turning head to left.
Repeat on other side.
NUMBER: 6 times each side, alternately.
DETAILS: On inhale: Lift chest slightly before leg, and emphasize chest height. Keep pelvis level.

8.
POSTURE: Ūrdhva Prasārita Pādāsana, one side at a time.
EMPHASIS: To gently stretch low back and to stretch legs, emphasizing one side at a time.
TECHNIQUE: Lie on back with both knees lifted toward chest, feet off floor.
On inhale: Extend left leg upward, raising right arm up and over head to floor behind you.
On exhale: Return to starting position.
Repeat on other side.
NUMBER: 6 times each side, alternately.
DETAILS: On inhale: Flex foot as leg is raised upward. Knee can remain slightly bent. Low back and sacrum push downward. Chin is down.
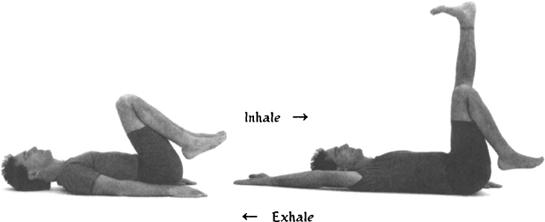
POSTURE: Jathara Parivrtti.
EMPHASIS: To stretch across hips and back, one side at a time.
TECHNIQUE: Lie flat on back, with arms out to sides, and with left knee pulled up toward chest.
On exhale: Twist, bringing left knee toward floor on right side of body while turning head to left.
On inhale: Return to starting position.
Repeat 4 times.
Then stay in twist, holding left knee with right hand.
On inhale: With palm up, sweep left arm wide along floor toward ear, turning head to center.
On exhale: Lower arm back to side, turning head to left.
Repeat 6 times.
Repeat on other side.
DETAILS: On exhale: When twisting right, keep angles between left arm and torso and between left knee and torso less than ninety degrees.

10.
POSTURE: Jānu Śirsāsana Parivrtti.
EMPHASIS: To deeply stretch lateral portion of torso, one side at a time.
TECHNIQUE: Sit with right leg folded in, heel to groin, left leg extended forward at an angle, left arm overhead, and right arm bent.
On exhale: Bending left knee slightly, bend laterally, bringing left hand toward left foot, keeping shoulders twisted so right shoulder is vertically above left, and turning head down toward left knee. Place right palm above right shoulder.
On inhale: Extend right arm forward, stretching right side of torso, and looking toward right hand.
On exhale: Bend right arm again, turning head down toward knee.
Repeat 4 times.
Then stay in the full stretch 4 breaths.
Repeat on other side.
DETAILS: Bend left knee enough to comfortably lower left shoulder toward knee. Keep shoulders in vertical alignment. Rotate left hand externally to grasp inside arch of left foot.

POSTURE: Paścimatānāsana.
EMPHASIS: To relax back with gentle symmetric stretch.
TECHNIQUE: Sit with legs forward, back straight, and arms raised over head.
On exhale: Bending knees slightly, bend forward, bringing chest to thighs, and palms to balls of feet.
On inhale: Return to starting position.
Repeat 4 times.
Then stay in posture 4 breaths.
DETAILS: On exhale: Bend knees to facilitate stretching low back and bringing belly and chest to thighs. Move chin down toward throat. On inhale: Lift chest up and away from thighs, flattening upper back.
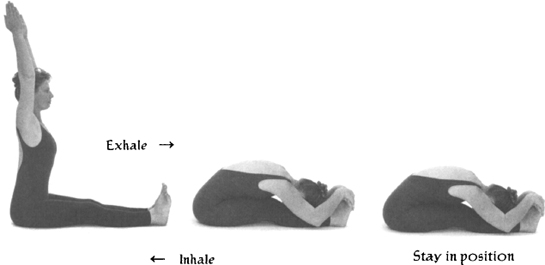
12.
POSTURE: Śavāsana.
EMPHASIS: To rest.
TECHNIQUE: Lie flat on back, with arms at sides, palms up, and legs slightly apart. Close eyes. Relax body fully, keeping mind relaxed and alert to sensations in body.
DURATION: Minimum 3 to 5 minutes.

Much of the low back pain that people suffer is lumbar pain, although many low back conditions also relate to the pelvis. These conditions may include mild to severe tension and pain in the sacroiliac area, the hip sockets, and the sciatic nerves. It may also include tension and pain in the groin area of the inner thighs, pain at the very top part of the front of the thighs, pain in the knees, and may involve mild to severe restriction in the movement of the legs.
Before working with these problems, it is important to assess the cause of the pain. In particular, it is important to make sure there is no serious damage to the ligaments of the sacrum, hips, and knees. We can work with sprains and strains, but if there are torn ligaments or cartilage, it is best to seek professional help. Again, in such conditions, Yoga therapy may help in the healing process, but the wrong practice may actually make matters worse.
In working with tension, restricted movement, and chronic pain, we want to understand both our musculoskeletal condition and the neuromuscular patterns that condition our movements.
The pelvis is a complex junction of the lumbosacral spine, the pelvic girdle and the attached legs. This juncture includes the various bony structures, ligamentous structures that attach the bones to each other, and muscle groups that control movements in the area. Musculoskeletal conditions that contribute to these problems include having one hip higher than the other, one hip rotated forward of the other, and/or one leg more turned in or out than the other. All of these structural conditions relate to corresponding muscular imbalances, chronic muscular contractions, and/or muscular weakness. In addition there may be joint instability and hypermobility or joint rigidity and lack of mobility. In short, conditions of the muscles and joints are causally related to neuromuscular mechanisms and movement patterns.
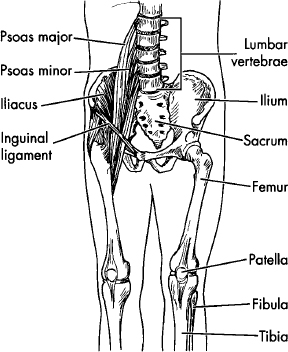
The origin of these problems may be congenital or acquired. Birth conditions can include differences in the length of the legs, lax (loose) ligaments, or shortened tendons. Acquired conditions can be the result of habitual activities due to injury or even improper training. An example of a habitual activity that creates stress in the sacrum, hips, and knees is driving a car with a standard shift. Men who wear their wallets in their back pockets often create, through this seemingly harmless habit, long-term imbalances, tension, and pain. Golfers are often troubled by sacrum pain, as are women after giving birth or, later, from always carrying the baby on one hip. Strain to the sacrum is also a common result of lifting heavy objects. Women trained in ballet at a young age also often have problems with their hips and knees. And many Yoga students have injured their sacroiliac ligaments from the stress of extreme forward bending or straining to get their legs behind their heads.
It is important to recognize that most of the conditions affecting the sacrum, hips, and knees reflect a poor functional integration between the lumbosacral spine, the pelvis, and the attached legs. The methodology for working these conditions, therefore, involves working to adjust the functional relationship between these areas.
The sacrum is a triangular-shaped wedge at the base of the spine that fits between the two sides of the pelvis. In both standing and seated positions, the weight of the spine is transferred through the sacrum to the pelvis, the sacrum acting as a bridge in weight transfer. If there is structural asymmetry in the sacrum, there will be a shear stress at the sacroiliac joints, which can result in strain and pain. From lifting increasingly heavy weight loads, for example, there is increased risk of injury, and injury to the ligaments takes time to heal.
In working with the sacrum, we want first of all to develop a balanced pelvic-lumbar rhythm. This involves both the condition of the musculature and the use of proper movement patterns. Our aim is to work to release chronically contracted muscles of both the low back and the important muscles that bind the legs, through the pelvis, to the spine (the iliopsoas group). We also want to work toward balance, strength, and flexibility on both sides of the pelvis, within each muscle group.
Many hip and knee problems are a direct result of injury or accident. Professional athletes, dancers, skiers, and Yoga practitioners, to name a few, all have increased risk to the knees. But many hip and knee problems are also the result of cumulative stress due to more subtle patterns of body use.
In working the hips and knees, the main point to consider is the tracking of the legs from the hip to the foot. Tracking refers to the way the distinct segments of the leg relate to each other, and is the result of musculoskeletal conditions and neuromuscular pat-terns. We can understand this phenomenon by looking at our shoes. For example, if we look at the heels of our shoes, especially shoes that we have had for a long time, we can see the way they sometimes wear evenly and sometimes are more worn on the inside or the outside edge. There are many variations of this tracking that can actually be read by looking at our shoes. The body is a weight transference mechanism within the gravitational field, body weight being transferred through the bones and joints to the earth. If there is a misalignment or imbalance, the weight is not transferred in a balanced way through the center of gravity in the joint, and the result is shear stress in the joints.
If we look further into this issue, we can notice different tracking from the ankles to the knees, and from the knees to the hips. There are people whose knees turn in, while their ankles turn out; others who have one knee that turns in more than the other; and still others who have knees that turn out. There are all kinds of tracking differences.
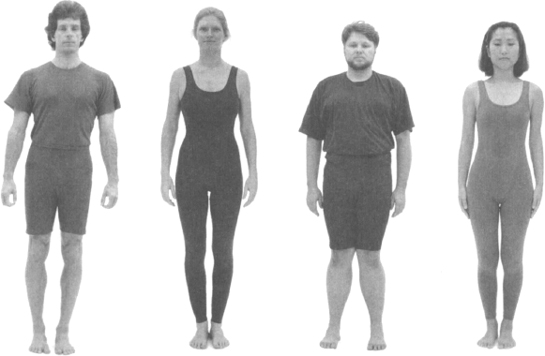
The origin of our tracking patterns may be in the musculature of the pelvis, the length of the bones of the legs, or even in the condition of the ankles and feet. These patterns are often linked to the way in which the femur head (greater trochanter) rotates in the hip socket (acetabulum). We can begin to understand these patterns through observation, and the bottoms of our shoes are a good place to begin. We can then try to notice how our knees turn as we walk. Of course Yoga postures, particularly standing postures, can also reveal a lot about our tracking, but, again, this requires accurate observation. For example, it is advisable to watch our knees and see how they are responding before we try to impose a rigid form on our legs.
In working with any kind of a joint problem, there are three main objectives.
The first is to identify and to stop, wherever possible, activities that are causing irritation. In acute conditions, this may mean immobilizing the joint for some time. In less acute conditions, it may mean avoiding excessive weight-bearing and all forceful torquing of the joints. Or it may mean changing from a standard to an automatic car, wearing a wallet in the front pocket instead of the back, or taking a break from the golf course.
The second objective is to slowly and carefully find activities that improve the condition. This means increasing circulation to the joint, strengthening the muscles that support it, and releasing muscle spasms or chronic contractions. In Yoga therapy, this involves isolating specific muscle groups and working them gently without stress to the joints. As this presents a particular challenge for the sacrum, hip, and knee, which are all weight-bearing joints, it is most appropriate to work into these joints from supine (on the back) or prone (on the stomach) positions.
The third objective is to modify the movement patterns of the joints. For sacrum, hip, and knee problems, this means establishing a proper pelvic-lumbar rhythm and reorganizing the tracking of the legs. In Yoga therapy, this involves the repetition of carefully designed movements to re-pattern our use of the legs and hips.
In the methodology of practice, we want to introduce simple movements that increase circulation, stretch what needs to be stretched, and strengthen what needs to be strengthened. An important methodological point in working with most joint problems is to work the joint without restricting it, because, as a general rule, restricting the joint increases risk. The approach is to make the problematic area more stable and, at the same time, more flexible. This is achieved by gently contracting and stretching the muscles that support the problematic area. We then want to integrate that area with the rest of the body. This is achieved through the use of larger and more complete movements of the whole body.
The three practices that follow are designed to stabilize the sacrum, hips, and knees, and to strengthen their supporting musculature. They may be useful in certain chronic and painful conditions. They are intended to be exploratory rather than prescriptive, illustrating different tools that work the sacrum, hips, and knees. The key to this area of the body is the junction of the legs to the spine through the pelvis. Through the various postures offered in these sequences, that junction is explored from the front, back, outside, and inside of the legs and pelvis. There are many other postures that can be adapted to the sacrum, hips, and knees. And, in fact, many of these movements may not be suitable for some individuals. From these practices, we hope that you may derive ideas for working in these areas.
This practice was developed for R.B., a thirty-seven-year-old Yoga teacher from a city in the southwestern United States. He was visiting Hawaii on vacation, had heard about our work for years, and had come to see if I could help him with his chronic sacrum problem.
In our first session together, I asked R.B. to show me how he usually practices. I could see that R.B. was well trained in the form of the classical postures and practiced with a lot of precision and attention to details. At the same time, I could see that in his choice of postures and efforts to practice them “correctly,” he was aggravating his condition. He told me that he had sensed that this was true and was frustrated with both his own practice and his teaching. He had been to see several other Yoga teachers for help, as well as other health practitioners, but was unable to find a solution.
I told him that there were two aspects to working with his condition. One was to identify what he was doing in his daily activity that was irritating his sacrum, and to modify or eliminate those activities. The other was to find out what he could do to support his healing, and add those activities to his daily routine.
On the first point, R.B. realized that most of what he had been doing in his Yoga practice was a source of stress. At the same time, he felt that as a teacher he had to practice. I told him there were things he could do to actually help his condition and that, once things were stabilized, he would be able to return to his regular practice. I also told him that because of this experience he would be a much better teacher.
In our discussions together, I learned that although he didn’t practice while he was teaching, he regularly demonstrated the more difficult postures. I asked him to please avoid demonstrating and instead to use a student who understood the posture and was already warmed up from the practice. I also asked him to carry his wallet in his front rather than back pocket.
On the addition side, we developed the following practice over the three sessions we had together before he had to go home. The main orientation was to strengthen the muscles that surround the sacroiliac joint and increase the circulation to the sacroiliac ligament. I also suggested that he look into some nutritional supplements that would support the healing of his ligaments.
Before he left, R.B. told me that no one up till then had given him a coherent explanation about what was happening in his sacrum. He felt encouraged to have a clear direction to work with his condition. He called me several months later to say that he was feeling much better and that he was maintaining the practice I worked out for him. Since then he has continued to train with me in Hawaii and in Los Angeles. He no longer strains his sacrum in his practice, recognizing that the form of the postures should be adapated to serve the needs of his body. He tells me that his students really love the new, user-friendly style he now teaches.
1.
POSTURE: Cakravākāsana.
EMPHASIS: To gently mobilize low back and sacrum.
TECHNIQUE: Get down on hands and knees, with shoulders vertically above wrists and with hips above knees.
On inhale: Lift chest up and away from belly.
On exhale: Gently contract belly and round low back, bringing hips backward toward heels and bringing chest toward thighs.
NUMBER: 8 times.
DETAILS: On inhale: Lead with chest, keeping chin slightly down. Avoid compressing low back; rather, feel chest expanding. On exhale: round low back without collapsing chest over belly. Avoid increasing curvature of upper back. Go progressively lower each time, but avoid going all the way down. Let chest lower toward thighs sooner than hips toward heels.
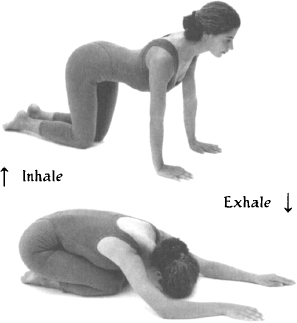
POSTURE: Bhujangāsana, progressively widening legs.
EMPHASIS: To strengthen large muscles of back and buttocks, strengthening musculature supporting sacroiliac joint.
TECHNIQUE: Lie on stomach, with head turned to right, palms up by chest, and legs together.
On inhale: Lift chest, turning head to center.
On exhale: Lower chest, turning head to left.
Repeat 6 times, turning head to center on inhale, and to alternate sides on successive exhales.
DETAILS: Widen legs every second repetition.
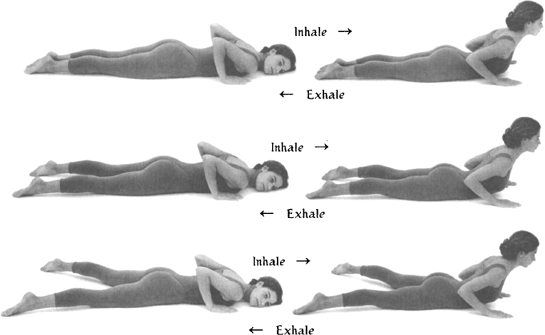
3.
POSTURE: Cakravākāsana.
EMPHASIS: To gently mobilize low back and sacrum after previous back bend.
TECHNIQUE: Get down on hands and knees, with shoulders vertically above wrists and with hips above knees.
On inhale: Lift chest up and away from belly.
On exhale: Gently contract belly and round low back, bringing hips backward toward heels and bringing chest toward thighs.
NUMBER: 8 times.
DETAILS: On inhale: Lead with chest, keeping chin slightly down. Avoid compressing low back; rather, feel chest expanding. On exhale: round low back without collapsing chest over belly. Avoid increasing curvature of upper back. Go progressively lower each time, but avoid going all the way down. Let chest lower toward thighs sooner than hips toward heels.
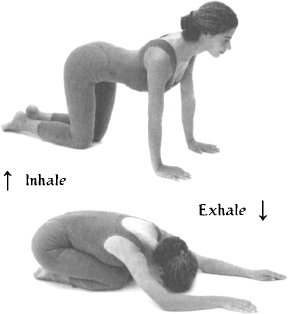
POSTURE: Vimanāsana (variation of Śalabhāsana).
EMPHASIS: To strengthen large muscles of back and buttocks, strengthening musculature supporting sacroiliac joint.
TECHNIQUE: Lie on stomach, with head turned to right, palms up by chest, and legs together.
On inhale: Lift chest, turning head to center, and lift legs, opening them as wide as possible.
On exhale: Keeping chest and legs up, and keeping legs straight, bring knees together.
On inhale: Open legs wide.
On exhale: Return to starting position.
NUMBER: 6 times.
DETAILS: On exhale: Rotate hips inwardly to bring knees together.

5.
POSTURE: Cakravākāsana.
EMPHASIS: To gently mobilize low back and sacrum after previous back bend.
TECHNIQUE: Get down on hands and knees, with shoulders vertically above wrists and with hips above knees.
On inhale: Lift chest up and away from belly.
On exhale: Gently contract belly and round low back, bringing hips backward toward heels and bringing chest toward thighs.
NUMBER: 8 times.
DETAILS: On inhale: Lead with chest, keeping chin slightly down. Avoid compressing low back; rather, feel chest expanding. On exhale: round low back without collapsing chest over belly. Avoid increasing curvature of upper back. Go progressively lower each time, but avoid going all the way down. Let chest lower toward thighs sooner than hips toward heels.
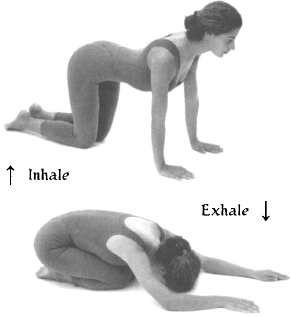
POSTURE: Supta Baddha Konāsana.
EMPHASIS: To increase circulation to sacrum and perineal floor.
TECHNIQUE: Lie on back with knees bent and feet near buttocks. On inhale, open legs wide, bringing soles of feet together. Take up to sixty seconds to close knees together. Open legs again naturally.
NUMBER: 6 times.
DETAILS: While closing legs, keep low back flat on floor. Allow any trembling of legs that may occur.
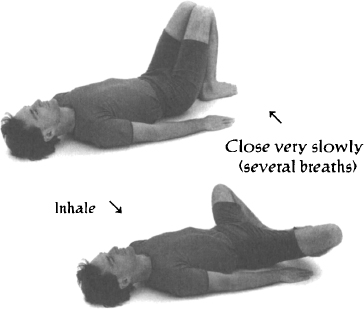
7.
POSTURE: Supported Śavāsana.
EMPHASIS: To rest.
TECHNIQUE: Lie flat on back, with arms at sides, palms up, and legs elevated and slightly apart. Close eyes. Relax body fully, keeping mind relaxed and alert to sensations in body.
DURATION: Minimum 3 to 5 minutes.
DETAILS: Place a round pillow under knees.

This practice was developed for E.G., a thirty-five-year-old woman who was referred to me by another student. She told me that she had gone to see a body worker who also prescribed Yoga exercises, and that she had been in serious pain ever since. The student who referred her to me had himself suffered a long history of low back pain. He told E.G. that in a few sessions with me he had learned a very simple practice that kept him pain-free. She was very hesitant about coming, but her friend convinced her she would be in good hands, and she called for an appointment.
In her first visit, I learned that she had had problems with her hips since she was a small child in Europe. She told me that she had had corrective surgery and had been in a cast for many months. She indicated that her pain was usually in the area of the hip socket and into the inner thigh. The movement of her legs at the hip was restricted. There was also some chronic pain in her low back.
E.G. told me that the body worker had given her a printed series of “hip” exercises. She practiced them for several days and had been in worse pain ever since.
E.G.’s emotions were very much on the surface, and she cried often and easily. She needed someone who would listen to her and relate to her where she was—not simply through some theoretical model. She spent a lot of time just talking about her physical and emotional condition. She confided in me that she was having a lot of difficulty in her marriage. She said her husband was very critical of her, and they argued often. She also told me that she wanted a baby, and he didn’t.
My feeling was that she needed to be reassured, relaxed, and nourished. Once she was stable and out of pain, there would be time to explore her hips more deeply. I explained to her that our approach was to start slowly and work progressively toward increased strength and stability. I told her that as she began to feel better in her body, she would start to feel better about herself and might even get some more clarity about her relationship.
Her first practice consisted of only a few simple postures and some deep relaxation. She called me several days after the first session, incredulous at how much better she felt after such simple exercises. E.G. came back to see me once a week for nearly six months. In that time she was able to work progressively deeper into the region of her hips without pain, and she no longer complained about her low back.
One day she came to tell me she was going back to Europe. I asked if her husband was going with her, and she told me that they had decided to take some time apart to reassess their relationship. The following practice was evolved over the last few sessions we had together before she left. The focus was to continue stretching and strengthening the musculature of her hips.
E.G. sent me a letter from Europe a few months later. She told me that she was happy to be home with her family and that her husband was planning to come over soon. They had missed each other and were hoping to make a new start. She told me she continues to work with the practice we developed and that she is more stable and pain-free than she can remember.
1.
POSTURE: Dvipāda Pītham, progressively widening feet.
EMPHASIS: To strengthen musculature supporting hip joint.
TECHNIQUE: Lie on back with arms down at sides, knees bent, and feet on floor, slightly apart and comfortably close to buttocks.
On inhale: Keeping chin down, press down on feet, raising pelvis up toward ceiling, until neck is gently flattened on floor.
On exhale: Return to starting position.
NUMBER: 6 times.
DETAILS: Begin with feet nearly together. After 2 times, widen feet to width of hips. After 2 more times, make feet slightly wider than hips.

2.
POSTURE: Ekapāda Ustrāsana variation.
EMPHASIS: To stretch musculature of upper and inner thigh, including iliopsoas and adductor groups. TECHNIQUE: Stand on right knee, with knee directly below hip, and on left foot, with foot directly below left knee. Hands on left knee.
On inhale: Lift chest upward as you lunge forward, stretching front of body from right thigh to right side of abdomen.
On exhale: return to starting position.
Repeat 4 times.
Then stay in position 4 breaths.
Repeat on other side.
DETAILS: On inhale: While moving forward, make a slight external rotation of back leg, bringing stretch into inner thigh.
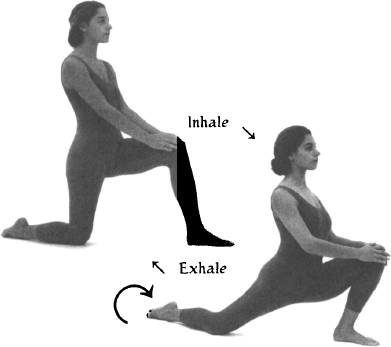
POSTURE: Vimanāsana (variation of Śalabhāsana).
EMPHASIS: To strengthen large muscles of back and buttocks, strengthening hip rotator muscles.
TECHNIQUE: Lie on stomach, with head turned to right, palms up by chest, and legs together.
On inhale: Lift chest, turning head to center, and lifting legs, opening them as wide as possible.
On exhale: Keeping chest and legs up, and legs straight, bring knees together.
On inhale: Open legs wide.
On exhale: Return to starting position
NUMBER: 6 times.
DETAILS: On exhale: Rotate hips inwardly to bring knees together.

4.
POSTURE: Cakravākāsana.
EMPHASIS: To gently stretch low back after previous back bend.
TECHNIQUE: Get down on hands and knees, with shoulders vertically above wrists and with hips above knees.
On inhale: Lift chest up and away from belly.
On exhale: Gently contract belly and round low back, bringing hips backward toward heels and bringing chest toward thighs.
NUMBER: 8 times.
DETAILS: On inhale: Lead with chest, keeping chin slightly down. Avoid compressing low back; rather, feel chest expanding. On exhale: Round low back without collapsing chest over belly. Avoid increasing curvature of upper back. Go progressively lower each time, but avoid going all the way down. Let chest lower toward thighs sooner than hips toward heels.
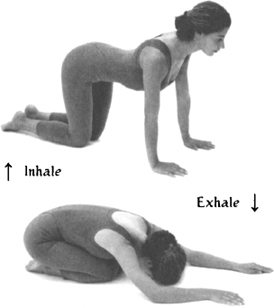
POSTURE: Supta Prasārita Pādāngusthāsana.
EMPHASIS: To stretch and contract musculature of inner thighs.
TECHNIQUE: Lie on back with knees lifted toward chest and with hands placed behind knees.
On inhale: With hands holding legs from behind knees, lift heels upward, straightening legs.
Exhale in position, placing hands on insides of knees, palms facing outward.
On inhale: Open legs wide, gently pushing legs apart with arms.
On exhale: Close legs, resisting slightly with arms.
Repeat 6 times.
Then stay with legs open 6 breaths.
DETAILS: Keep sacrum, chin, and shoulders down throughout movement. If legs are loose, hold balls of feet while staying in final position.

6.
POSTURE: Supta Pārśva Pādāngusthāsana.
EMPHASIS: To stretch musculature of inner thigh.
TECHNIQUE: Lie on back with right leg lifted up toward chest, knee bent, and right hand holding right knee. Left hand on left hip.
On inhale: Push right leg right toward floor, holding left hip down with left hand.
On exhale: Return to starting position.
Repeat 4 times.
Then, from open position, hold inside of knee with right hand.
On inhale: Extend right leg straight.
On exhale: Return to starting position.
Repeat 4 times.
Then stay in extended position 4 breaths.
Repeat on other side.
DETAILS: If possible, hold extended foot with its respective hand.
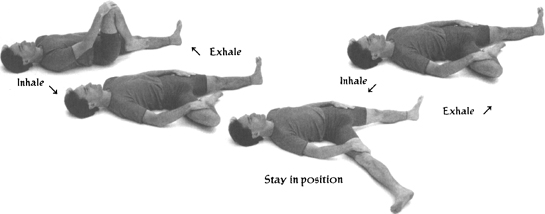
POSTURE: Supta Baddha Konāsana.
EMPHASIS: To contract muscles that were stretched by previous posture.
TECHNIQUE: Lie on back with knees bent and feet near buttocks. Open legs wide, bringing soles of feet together. Take up to sixty seconds to close knees together. Open legs again naturally.
NUMBER: 6 times.
DETAILS: Keep low back flat on floor while closing legs. Allow any trembling of legs that may occur.
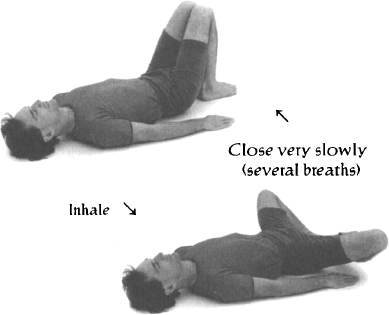
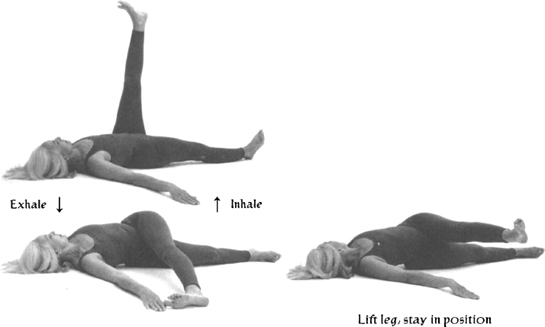
8.
POSTURE: Jathara Parivrtti adaptation.
EMPHASIS: To stretch and strengthen musculature of hip.
TECHNIQUE: Lie flat on back, with arms out to sides, and with left leg extended upward at an angle of ninety degrees to torso.
On exhale: Twist, bringing left foot to floor and toward right hand while turning head left.
On inhale: Return to starting position.
Repeat 4 times.
Then on inhale: from twisted position, lift left leg until parallel to ground, keeping left hip vertically above right. Hold 5 seconds.
On exhale: Return leg to floor.
Repeat 4 times.
Then lift left leg to parallel position again. Stay 4 breaths.
Repeat on other side.
DETAILS: While staying in position, explore a gentle external rotation of lifted leg, feeling work in hip abductors. Avoid straining neck.
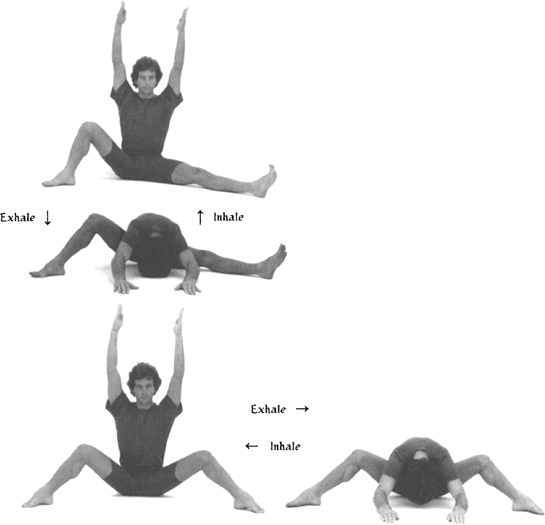
POSTURE: Upavistha Konāsana adaptation.
EMPHASIS: To stretch inner thighs and perineal floor.
TECHNIQUE: Sit with legs apart and extended forward and with arms overhead. Bend right knee so that right foot is comfortably flat on floor.
On exhale: Bend forward, bringing hands to feet and bringing chest between thighs.
On inhale: Return to starting position.
Repeat 4 times.
Repeat 4 times on other side.
Repeat 4 times with both knees bent.
10.
POSTURE: Śavāsana.
EMPHASIS: To rest.
TECHNIQUE: Lie flat on back, with arms at sides, palms up, and legs slightly apart. Close eyes. Relax body fully, keeping mind relaxed and alert to sensations in body.
DURATION: Minimum 3 minutes.

This practice was developed for P.O., a fifty-three-year-old flight attendant for a major U.S. airline. P.O. had gone on disability for a low back injury years earlier. She had come to see me, and we had worked together to get her back back into shape. Our work included techniques of breath and movement adapted to her body, as well as practical teachings from Yoga philosophy on the nature of the mind. She always told me how important those classes were for her in facing and overcoming her resistance to get off of disability. Against all expectations, she went back to work to finish out the remaining years she needed to get her early retirement benefits.
That accomplishment did a lot to boost her self-confidence and motivated her to learn more about herself. Though she had retired from the airline, she had a lot of energy and wanted to continue working. At my suggestion, she took courses at the community college in anatomy and physiology, and went on to become a licensed massage therapist in the state of Hawaii.
A few years later, P.O. came to see me complaining about recurring pains in her knees. I asked her what she had been doing, and she told me “a little massage, and a lot of gardening.”
Over the next several weeks, we developed the following course designed to strengthen the musculature surrounding the knee joint. P.O. called me a few months later to report that her pain was gone and that the practice had strengthened her legs and improved her awareness of her knees. She said that, “once again,” she was amazed at the effectiveness of these simple tools.
I learned a lot from P.O. She had been in A.A. for years before she came to work with me. She told me that, while A.A. had helped her pull herself out of a dysfunctional lifestyle, Yoga had helped her to visualize her future and to take concrete steps to realize her goals.
1.
POSTURE: Apānāsana.
EMPHASIS: To warm up low back without compressing knees.
TECHNIQUE: Lie on back with both knees bent toward chest and with feet off floor. Place each hand behind its respective knee.
On exhale: Pull thighs gently but progressively toward chest.
On inhale: Return to starting position.
NUMBER: 8 times.
DETAILS: On exhale: Pull gently with arms, keeping shoulders down on floor and relaxed. Press low back down into floor, and drop chin slightly toward throat. Progressively lengthen exhale with each successive repetition.
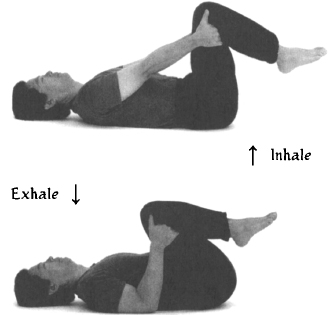
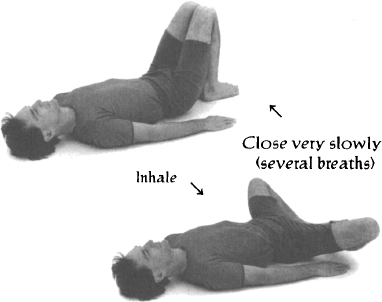
POSTURE: Supta Baddha Konāsana.
EMPHASIS: To strengthen musculature of inner thighs.
TECHNIQUE: Lie on back with knees bent and feet near buttocks. Open legs wide, bringing soles of feet together. Take up to sixty seconds to close knees together. Open legs again naturally.
NUMBER: 6 times.
DETAILS: While closing legs, keep low back flat on floor. Allow any trembling of legs that may occur.
3.
POSTURE: Dvipāda Pītham.
EMPHASIS: To strengthen musculature of hips and thighs.
TECHNIQUE: Lie on back with arms down at sides, knees bent, and feet on floor, slightly apart and comfortably close to buttocks.
On inhale: Keeping chin down, press down on feet and raise pelvis up toward ceiling, until neck is gently flattened on floor.
On exhale: Return to starting position.
NUMBER: 6 times.
DETAILS: On inhale: Lift spine vertebra by vertebra from bottom up. On exhale: Unwind spine, coming down vertebra by vertebra.
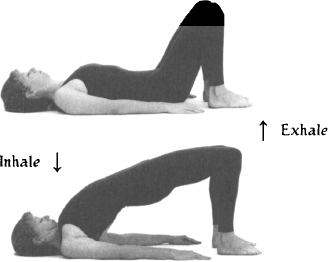
4.
POSTURE: Supta Eka Pādāngusthāsana.
EMPHASIS: To mobilize knee joint, and to stretch and strengthen surrounding musculature.
TECHNIQUE: Lie on back, with legs bent, left foot on floor, right foot lifted, hands holding right thigh behind right knee, and arms bent.
On inhale: Extend right leg upward, straightening arms.
On exhale: Return to starting position.
NUMBER: 6 times each side.
DETAILS: On inhale: Flex foot as leg is raised upward. Keep knee slightly bent. Push low back and sacrum downward. Keep chin down.
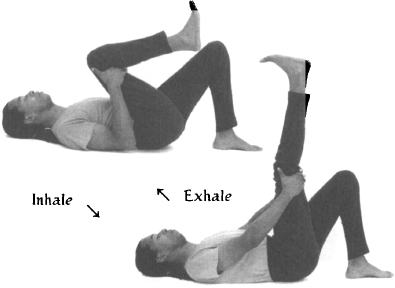
POSTURE: Ardha Śalabhāsana adaptation.
EMPHASIS: To strengthen the musculature of the legs, particularly at the back of the knees.
TECHNIQUE: Lie on stomach, with head turned to left and with palms on floor by chest.
On inhale: Lift chest and left leg, turning head to center.
On exhale: Stay in position.
On inhale: Slowly bend left knee, bringing heel toward buttock.
On exhale: Return to starting position, turning head to right and straigthening leg slowly.
Repeat 4 times each side, alternately.
Then stay up in position with both legs lifted and repeat 4 times.
DETAILS: Bend and straighten legs slowly.
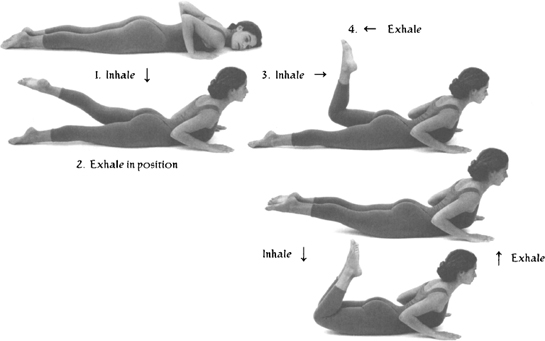
6.
POSTURE: Supta Pādāngusthāsana.
EMPHASIS: To stretch and relax lower back. To mobilize knee joint and to stretch and strengthen surrounding musculature.
TECHNIQUE: Lie on back with legs bent, knees lifted toward chest, hands holding thighs behind knee, and arms bent.
On inhale: Extend legs upward, straightening arms.
On exhale: Return to starting position.
NUMBER: 6 times.
DETAILS: On inhale: Flex feet as legs are raised upward. Slightly bend knees. Push low back and sacrum downward. Keep chin down.
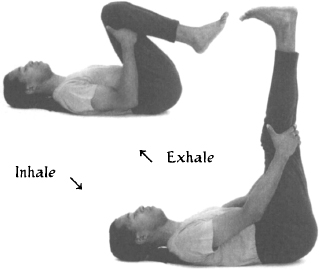
POSTURE: Jathara Parivrtti.
EMPHASIS: To stretch and strengthen musculature of hip and outside of thigh.
TECHNIQUE: Lie flat on back, with arms out to sides and with left knee pulled up toward chest.
On exhale: Twist, bringing left knee toward floor on right side of body while turning head left.
On inhale: Return to starting position.
Repeat 4 times.
Then, from twisted position, lift knee up off floor several inches, keeping left hip vertically above right. Hold 5 seconds. Lower knee to floor.
Repeat 4 times.
Repeat on other side.
DETAILS: While staying in position, explore a gentle external rotation of lifted leg, feeling work in the hip abductors. Avoid straining neck.

8.
POSTURE: Apānāsana.
EMPHASIS: To gently stretch low back without compressing knees.
TECHNIQUE: Lie on back with both knees bent toward chest and with feet off floor. Place each hand behind its respective knee.
On exhale: Pull thighs gently but progressively toward chest.
On inhale: Return to starting position.
NUMBER: 8 times.
DETAILS: On exhale: Pull gently with arms, keeping shoulders down on floor and relaxed. Press low back down into floor, dropping chin slightly toward throat. Progressively lengthen exhale with each successive repetition.

POSTURE: Supta Baddha Konāsana.
EMPHASIS: To strengthen musculature of inner thighs.
TECHNIQUE: Lie on back with knees bent and feet near buttocks. Open legs wide, bringing soles of feet together. Take up to sixty seconds to close knees together. Open legs again naturally.
NUMBER: 6 times.
DETAILS: Keep low back flat on floor while closing legs. Allow any trembling of legs that may occur.
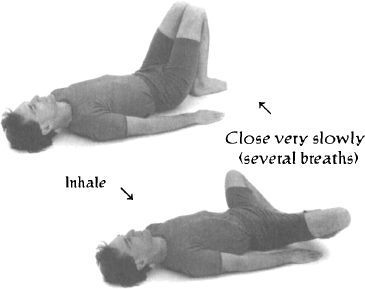
10.
POSTURE: Dvipāda Pītham.
EMPHASIS: To strengthen musculature of hips and thighs.
TECHNIQUE: Lie on back with arms down at sides, knees bent, and feet on floor, slightly apart and comfortably close to buttocks.
On inhale: Keeping chin down and press down on feet, raise pelvis up toward ceiling, until neck is gently flattened on floor
On exhale: Return to starting position.
NUMBER: 6 times.
DETAILS: On inhale: Lift spine vertebra by vertebra from bottom up. On exhale: Unwind spine, coming down vertebra by vertebra.

11.
POSTURE: Śavāsana with support.
EMPHASIS: To rest.
TECHNIQUE: Lie flat on back, with arms at sides, palms up, and with legs slightly apart. Close eyes. Relax body fully, keeping mind relaxed and alert to sensations in body.
DURATION: Minimum 5 minutes.
