
The human body holds more science secrets than we could learn in a lifetime. Even a simple thing like drinking a glass of water puts thousands of processes in play.
Rachel’s pick: It is great to see how important strong bones are with the experiment Bendy Bones (here). You can make a bone bend in unbelievable ways.
Holly’s pick: After dinner, one of my family’s favorite things to do is an impromptu concert with Singing Cups (here).
Jamie’s pick: Glitter Germs (here) is so fun because you can really see how germs spread with something as simple as the touch of a hand!

PREP TIME: 15 MINUTES
EXPERIMENT DURATION: 5 MINUTES
 At least 40 assorted gummy candies in 4 different colors
 20 toothpicks
 2 pieces of licorice
DNA is an acronym for deoxyribonucleic acid. These molecules tell the body how to develop and function. But what does DNA look like? We will make a model of a DNA strand using candy.
Divide the candies into piles by color. Then pair up the colors (example: green with red and blue with yellow).
Slide one pair of candies onto the center of each toothpick. Then, holding the licorice pieces, stick one end of the toothpicks into each piece of licorice, like railroad tracks. To make the double helix shape, simply give it a twist!
The licorice represents the “backbone” of the DNA. The gummy candies represent the nucleotides. The reason you used four colors of candy is that there are four different types of nucleotides.
The special shape of DNA is called a double helix. On the outside of the double helix is the backbone that holds the DNA together. There are two sets of backbones that twist together. Between the backbones are the nucleotides, which are always paired. A different nucleotide connects to each backbone and then connects to another nucleotide in the center.
Humans and cabbage share about 40 to 50 percent common DNA.
About 99.9 percent of the DNA of every person on the planet is exactly the same. It’s that 0.1 percent that is different that makes you unique and very special!

PREP TIME: 5 MINUTES PLUS OVERNIGHT
EXPERIMENT DURATION: 15 MINUTES
 Black permanent marker
 3 clear cups or glasses
 Dark-colored soda
 Fruit juice
 Water
Water
 3 white eggs, raw or hard-boiled
 Toothbrush
 Toothpaste
We will test what happens to teeth when we drink soda using eggshells as the stand-in for teeth.
With the marker, label one cup “soda,” another “juice” and another “water.” Fill each cup with the liquid you labeled it with. Place one egg in each cup and let them sit overnight.
In the morning, pour the liquids out of the cups, leaving the eggs in the marked cups so you can tell which egg soaked in which liquid. Examine the eggs to see how they have changed.
The egg in the soda, like your teeth, will become stained a dark color, and you might be able to see areas where the shell enamel is eroded and other areas where there are little pits in the eggshell.
The enamel on your tooth protects the soft inside, or “dentin.” When that is compromised or damaged, you will get a cavity (like the pits on the eggshell) and your mouth will begin to hurt.
• With a plain, dry toothbrush, try to brush the stains off of the eggs. Did they come off? Now wet the brush and try again with the toothpaste. See how important it is to brush your teeth!
For younger kids, try using a hard-boiled egg—less mess risk.
In Japan, you can buy eel-flavored soda, called unagi nobori—yum!


PREP TIME: 15 MINUTES
EXPERIMENT DURATION: 5 MINUTES
 Cup
Cup
 Pencil
 Paper
Paper
 Scissors
 Markers or crayons (optional)
 Tape or glue
 Straw
Straw
Our brains are super smart: they can figure out information faster than computers can! In this experiment, you’ll make a thaumatrope (a special toy) and see how your brain solves a “problem.”
Use a cup to trace equal size circles onto your paper and cut them out.
On your circles, draw two pictures that share an element. For example, you could draw a goldfish on one side and a bowl on the other, or you could draw a bird on one side and a cage on the other. Make a “sandwich” of the two pictures and tape or glue the straw between them.
Hold the bottom of the straw and rub your hands to twirl the straw. What happens to the image?
When you twirled the straw, the two pictures blended into one!
The pictures blended because of the persistence of vision. Your eye keeps a copy of the image or a memory of the image for  th of a second after the object is gone. As your toy spins, your brain interprets the series of quickly flashing images as one continuous image.
• Make a flip book. Use a small notebook and make a small image in the corners. In each image adapt it slightly from the previous image. We suggest using a dot, and each time move the dot. When you flip through the pages the principle of vision persistence makes it look like the dot is bouncing on your page.
Your brain is 70 percent water!


PREP TIME: 10 MINUTES
EXPERIMENT DURATION: 10 MINUTES
 Hand lotion
 Glass cup
 Soft bristle paintbrush or makeup brush
 Cocoa powder
 Clear tape
On our fingers are lots and lots of tiny wavy lines. These are fingerprints. In this experiment, we will make fingerprints on a glass and examine them, just like a detective might.
Rub some lotion on your hands. Grab the glass cup and try not to wiggle your fingers so your prints can be clean. Lift your fingers off the glass. Using the brush, dust a little cocoa powder onto the area of the cup where your hand was. What do you see?
Pick the best fingerprint and try to capture or transfer the print onto your tape by pressing the tape into the print carefully.
When you dusted the glass with cocoa powder, your fingerprints should have appeared!
The lotion on your hands soaked into the little crevices in your fingers, your fingerprints. Then when you touched the glass, the lotion transferred there. When you dusted your print with the powder, it stuck to the lotion. Voilà—visible fingerprints!
This is basically the same way detectives “dust” for fingerprints. The ridges on your fingertips have rows of sweat pores that constantly secrete perspiration. When you touch an object, that perspiration is transferred to the objects as a “print.”
• Instead of a glass, try transferring your fingerprints to other objects, such as a mirror. Can you get a fingerprint to stick to a rough object, such as fabric?
• Use ink on your finger to make a fingerprint on a balloon, then blow up the balloon to make your fingerprint super big.
No one else has fingerprints exactly like yours. Even identical twins don’t have the same fingerprints!

PREP TIME: 5 MINUTES
EXPERIMENT DURATION: 5 MINUTES
 Hand lotion (optional)
 Fine glitter
 Soap
Soap
 Paper towels
Colds, stomach bugs and flus are all caused by germs that are far too tiny to see with the naked eye; you need a microscope to see them. In this experiment, you’ll use glitter to see how germs spread from person to person.
Put some hand lotion on your hands and rub it in. Then sprinkle some glitter on your hands. Rub them together to coat your fingers. Now, let’s test how easy it is to catch your “glitter germs.” Try the following tasks: Touch your nose. Shake your friend’s hand. Wipe your hands off on your pants. Turn a doorknob. Did any glitter rub off?
Now rinse your hands with plain water. How much glitter came off? Next wash your hands with soap and water. Do another glitter check. Dry your hands with a towel. Is the glitter finally gone?
The glitter should have stuck to lots of things and been hard to rinse off with just water.
Just like the glitter was easily spread from person to person and object to object, germs are passed the same way. They hitch a ride on your fingers, and then they find their way into your body through your nose or mouth.
It is important to wash your hands after touching something that might have germs, such as when you use the bathroom or play outside. If you don’t, the germs can easily spread to more places and to other people and cause sickness.
• Grab a spray bottle and pretend to sneeze by squirting your bottle (ah-choo!). Where did the spray go? Try it again only this time put your hand over your “mouth” (the spray bottle). See how less spray and germs escape when you cover your mouth?
Use your foot or an elbow to flush the toilet or open a closed public bathroom door. The handles in most public bathrooms have 400 times more germs than the toilet seat. Yuck.

PREP TIME: 20 MINUTES
EXPERIMENT DURATION: 3 DAYS
 Spray bottle
 Water
Water
 1 teaspoon (5 g) sugar
 Loaf of bread
 Sandwich baggies
 Permanent marker
Germs exist even though they are so small that you can’t see them. In this experiment, we will grow germs found from our home—so we can see them.
Fill the spray bottle with water, add the sugar and shake the bottle until the sugar dissolves. Wash your hands and grab a piece of bread from the loaf. Spray it one time with the water. Then wipe the wet side of the bread on a surface in your house. Try the inside of your fridge, a doorknob, the inside of the kitchen sink, the toilet seat, etc. After you wipe a piece of bread on a “germ source,” drop it into a baggie, seal it and use the marker to label the bag.
Put the baggies in a dark place to be undisturbed for a couple of days.
The germs from the wiped surfaces stuck to the bread and became food for the mold on the bread.
• Cleaning is important! Wipe a germy area with the bread and bag it. Then clean that surface and do a second bread wipe and bag it. A few days later, compare the two bags. How effective was your cleaning?
To remove germs when you wash your hands, you should wash for 20 seconds. Think of a 20-second chorus and make that your “hand washing song.”
Have an experimental control group; spray one piece of bread then immediately put it in a baggie without wiping it on anything.

PREP TIME: 1 MINUTE
EXPERIMENT DURATION: 1 MINUTE
 Piece of paper
Your brain fills in information and can jump to conclusions when there are gaps or differences between what we see and/or experience. Your brain can combine information it receives based on certain things you’ve seen in the past. Most of the time it’s right, but sometimes your brain can be wrong!
Roll the paper into a tube. Hold the tube up to your eye and look through, keeping both eyes open. Lift up your hand with your palm facing you and move it closer to the end of the tube.
It might take a few seconds, but you will see a hole in your hand!
Your left and right eyes see and send different visual information to your brain. Usually, both of your eyes see about the same thing, so your brain has no problem combining the left and right images. But this trick forces your left and right eyes to see images so differently that your brain can’t blend them together correctly.
Are you left- or right-handed? You probably know the answer to that, but do you know whether you’re left- or right-dominant-eyed? Here’s an easy way to find out. Wink! Which eye did you use? That’s your dominant eye.


PREP TIME: 15 MINUTES
EXPERIMENT DURATION: 5 MINUTES
 Large, clean, empty plastic bottle
 Water
Water
 Large container with a flat bottom
 Plastic tube or hose
 Masking tape
 Measuring cup
 Permanent marker
Air is vital for life. Our lungs are what fill with air as we inhale. In this experiment we see how much air our lungs can hold.
Fill your bottle with water and fill the large container half full with water. With your hand on the top of your bottle, turn the bottle upside down and set it in the container of water. Try to keep the water inside the bottle! Carefully put one end of the tubing under the water inside the bottle.
While a friend holds the bottle in position, take the biggest breath you can and blow out into the tube. Empty every last air molecule out of your lungs!
As you blew the air out of your lungs, down the tube and inside the bottle, the water level in the bottle went down. The water in the bottle was replaced with air. That is how much air your lungs hold.
• Measure how much air you have. Put some tape on the side of your bottle, from bottom to top. Measure 1 cup (235 ml) water and pour it into the bottle, then mark the tape. Repeat measuring, pouring and marking until the bottle is full. Do the experiment and see how many cups of air are in your lungs.
Have a breathing contest! Who do you think has the biggest lung capacity? Compare lung volume between friends. Do bigger kids have bigger lungs?


PREP TIME: 5 MINUTES
EXPERIMENT DURATION: 3 DAYS
 Raw egg
 Glass container
 Vinegar
Eggshells are made of calcium carbonate. We can dissolve that shell, making the egg naked so we can see and touch the parts of a cell.
Place the egg in the container and cover it with the vinegar. Watch the egg for about 15 minutes—you should see bubbles form on the surface of the egg. Check the egg again after 8 hours and again after 3 days.
The eggshell will thin after about 8 hours and then completely disappear after 3 days. You can then see and touch the membrane covering the egg.
The shell of an egg is made of calcium carbonate, which is a base. When vinegar, an acid, covers the shell it breaks down the calcium, releasing carbon dioxide (gas). You see this in the bubbles.
• If water hydrates, what does sugar do? Have two separate cups, one with water and another with corn syrup (the main ingredient in many sodas). Put an egg into each cup. After a couple of hours in the jars you can see how osmosis causes the egg in the water to get even bigger and how the sugars in the corn syrup dehydrated (pulled water out of) the other egg.

PREP TIME: 5 MINUTES
EXPERIMENT DURATION: 5 MINUTES
 Pencil
 Paper
Paper
 A partner
 Blindfold
 Cotton ball
 Paper clip opened up into a “U” shape
 Ice cube
Did you ever wonder what part of your body feels and reacts the most? In this experiment, you will test your nerves and find out.
Using a pencil and paper, make a list of the places you will test on your partner, such as her arm, the bottom of her foot, her lip, her shin, under her arm, etc.
Blindfold your partner. Grab a cotton ball, paper clip and ice cube. Touch one item to different areas of your partner’s body. Ask her to touch the spot where you touched her with the item.
Did she correctly identify the areas that were touched? If so, mark the chart. If she was “off” (even by ½ inch [1.3 cm]) from the exact location where she was touched, note that as well.
Your partner may not have identified all the exact spots where she was touched, or may have felt the paper clip more accurately than the cotton ball, for example.
Our body has receptors in the skin to sense things, like cold, pressure or pain, and then send signals to the brain for a response. Some parts of our body do not respond as rapidly to cold or pain as others parts do.
• What happens if you touch two of those items on the same spot at once? For instance, can you feel both pain and cold at the same time in the same spot?
• Each touch receptor can send only one signal at a time. If two points touch the same neuron, it can still send only one signal to the brain. This means your brain will sense only one thing touching you, even when there are two.
Nerve signals carry frequencies that are different for different reactions. A pain signal gets a faster response because its frequency is higher, so your brain sees that as an important signal requiring an immediate action to stop the pain.


PREP TIME: 15 MINUTES
EXPERIMENT DURATION: 5 MINUTES
 Ruler
Ruler
 Scissors
 White piece of paper
 Colored construction paper
 Glue or tape
 Paper clip
The primary colors are red, yellow and blue. With these three colors, you can make all the other colors!
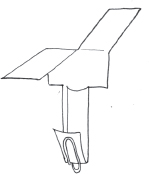
Measure and cut the white paper into 3 x 8½ inch (7.5 x 21.5 cm) strips. Hold the paper like a hot dog and cut a slit through the middle of your sheet. These flaps will be your helicopter’s “wings.” Glue or tape two different primary colors of construction paper to each helicopter wing.
Attach a paper clip to the bottom, for weight, as shown. What do you think will happen to the colors of the blades when the helicopter spins? Bend the helicopter wings back so it looks like a “T” and give it a whirl!
When you toss the paper helicopter into the air, it should spin and hover for a bit. As the copter is spinning, the colors should mix together. So for instance, if your blades are red and yellow, they should look orange.
The colors appear to mix because of persistence of vision. Your eye holds on to one image—for example, the red blade—while it is also seeing another image—the yellow blade. Then your brain combines the two colors, and you see orange!
• Add a fan that you can hold. Can you keep the helicopter afloat longer by pointing the draft from the fan at your helicopter?
Leonardo da Vinci drew a flying machine in 1493. It took 450 years for a helicopter to be built and flown.


PREP TIME: 5 MINUTES
EXPERIMENT DURATION: 10 MINUTES
 3 glasses
 Water
Water
 Vinegar
 Paper towels
Most of us hear sounds all day every day—so many, in fact, that we don’t even think about most of them. But did you know sound is caused by vibrations?
Fill each of your glasses with different amounts of water. Dip a finger into the water and use the wet finger to make slow circles around the rim of each glass. Listen to the sounds each of the different glasses makes depending on how much water is in it.
Now wash your hands in a little vinegar and dry them with the paper towels so your fingers are really clean. Do you notice a difference in the sounds you can make?
Your glasses will sound much louder and cleaner after you clean the oil and dirt from your fingers.
As you rub your finger on the rim of the glass, at first your finger sticks to the glass, and then it slides. This action creates a vibration inside the glass, which, in turn, makes a sound. Then those vibrations resonate together into sound waves, which you hear. As soon as the first few vibrations are produced, the glass resonates. You are making the crystals in the glass vibrate together and create one clear tone.
You probably noticed that the glasses with different amounts of water made different sounds and that you could make different sounds loud or soft by varying the pressure and speed of your finger.
When you washed with vinegar, besides your hands smelling like pickles, did you notice a change? Vinegar helps clean dirt and oil from your finger. A clean finger improves the stick-and-slide action that creates the vibration.
• Have friends and family fill glasses up with different amounts of water to make a musical symphony!

PREP TIME: 15 MINUTES
EXPERIMENT DURATION: 15 MINUTES
 Empty picture frame
 Something interesting to look at
 Dropper
 Water
Water
 Magnifying glass
A microscope is used to magnify small things to look larger so you can see them better. We will make our own microscope using a few things that can be found around the house.
Take the back off your picture frame and place your object under the glass. Add several drops of water to the glass over your object. This becomes your “lens.” Hold the magnifying glass over the drops of water and move the magnifying glass closer or farther away from the glass until the object is in focus and easy to see.
The object will look larger through the water drop and the magnifying glass than it would have looked using the magnifying glass alone.
You are using water to magnify objects. The water drops form the shape of a convex lens, which refracts light and converges it at the point where you can clearly see the image.
This is how scientists created very early microscopes. Modern microscopes have lots of lenses and allow us to see extremely small objects.


PREP TIME: 10 MINUTES
EXPERIMENT DURATION: 3 MINUTES
 Toothpick
 Small marshmallow
Our heart is a muscle that works all the time pumping blood through our body. In this experiment we will watch our pulse, or the pumps, of our heart.
Put the toothpick inside the marshmallow so that it stands up by itself without being held. Place the marshmallow stick over the inside of your wrist.
Your pulse will cause the toothpick to waver or move slightly whenever the blood pumps through your wrist.
The artery in your wrist is very close to the surface of your skin, so that a very light object placed over it will move when the blood pumps through it.
• Get a stopwatch and record how fast your pulse is. Now, do twenty jumping jacks and record your pulse a second time.
You can feel your pulse with just your fingers in your neck, just slide your fingers to the side of your Adam’s apple.
Your heart rate can vary between 60 beats a minute to over 200! It rises with exercise and is lowest while you’re sleeping.


PREP TIME: 10 MINUTES
EXPERIMENT DURATION: 2 DAYS
 Glass jar with a lid
 Vinegar
 Chicken bone
Calcium is what is in our bones that makes them hard and strong. In this experiment we will see what bones would be like if they didn’t have calcium.
Fill your jar with vinegar. Clean the meat off of your bone and put it into the jar. Put the lid on the jar and put it on the counter or somewhere where it will not be disturbed for a couple of days. After a couple of days, take your bone out and rinse it off (it will be slimy). Now try to bend it.
You can actually bend the bone.
The acid from the vinegar breaks down the calcium in the bones, forming bubbles of carbon dioxide. When the calcium is gone, the bone has no hard structure to it, so it bends.
• Instead of soaking the bone in vinegar, bake it in the oven at 275°F (140°C) for at least 2 hours (have an adult help with this). Remove it from the oven and after it has cooled try to bend it. What happened?
Why is it important to have strong bones? What do you think you would look like if your bones were bendable?
There are 270 bones in a human body when you are born, 26 of them are in a single foot. This means that over 20 percent of the bones in your body are in your feet!