Use up your small amounts of non-superwash wool yarn for these easy and fun-to-do ornaments. The felting takes care of uneven stitches, but you can leave them unfelted if you prefer. We’ve shown you a few samples here; once you get started you can probably think of dozens of ways to put these techniques to use. Even the kids can get into the act — it’s a perfect family project! For advice on how to felt, see Felting in the glossary.

BLdc (back loop double crochet). Work 1 double crochet into the back loop only.
FLdc (front loop double crochet). Work 1 double crochet into the front loop only.
picot-3. Ch 3, slip st in 3rd ch from hook.
standing BLdc (standing back loop double crochet). Beginning with slip knot on hook, yarnover, insert hook into back loop only of stitch indicated, yarnover, pull up a loop, (yarnover and pull through 2 loops on hook) two times.
standing sc (standing single crochet). Beginning with slip knot on hook, insert hook into stitch or space indicated, yarnover, pull up a loop, yarnover and pull through both loops on hook.
Ch 4, join with slip st to form a ring.
Rnd 1 (RS): Ch 3 (counts as dc), 15 dc in ring, join with slip st to top of ch-3. (16 dc)
Rnd 2: Ch 3 (counts as dc), dc in same st, *2 dc in next 2 dc, dc in next dc; rep from * around, join with slip st to top of ch-3. (27 dc)
Fasten off. Weave in ends.

Large Circle
Ch 4, join with slip st to form a ring.
Rnd 1 (RS): Ch 3 (counts as dc), 15 dc in ring, join with slip st to top of ch-3. (16 dc)
Rnd 2: Ch 1, sc in same st, 2 sc in next dc, *sc in next dc, 2 sc in next dc; rep from * around, join with slip st to top of ch-3. (18 sc)
Fasten off. Weave in ends.

Medium Circle
Make as for Large Circle through Rnd 1.
Fasten off. Weave in ends.

Small Circle

Make 1 Medium Circle each in A, B, D, and G. Felt the circles.
Hanging loop: Cut three 60"/1.5 m strands of E and work twisted cord (see glossary) approx. 22"/56 cm long. Insert unknotted end of twisted cord through center of one circle; leaving a 4"/10 cm tail of cord at bottom of circle, tie a loose overhand knot and snug it up next to circle to form spacer knot; *insert unknotted end of cord through center of next circle, tie spacer knot next to circle; rep from * for each remaining circle, omitting knot after last circle. Thread unknotted end of cord back down through center hole of all four circles. Adjust parallel ends of cord to leave an approximately 3"/7.5 cm loop at top of ornament. Tie doubled cord into an overhand knot near bottom circle. Cut both cords and unwind strands back to knot to form tassel.

Make 2 Small Circles in B. Make 2 Medium Circles in F. Make 1 Large Circle in D. Felt the circles.
Stack circles from small to large to small as shown in photo. Cut three 36"/91 cm strands of B and work twisted cord approximately 12"/30.5 cm long. Thread unknotted end of cord up through center of circles, then back down. Adjust parallel ends of cord to leave an approximately 21⁄2"/6.5 cm loop at top of ornament. Tie doubled cord into an overhand knot near bottom circle. Cut both cords and unwind strands back to knot to form tassel.

With D, ch 4, join with slip st to form a ring.
Rnd 1 (RS): Ch 3 (counts as dc), 15 dc in ring, join with slip st to front loop at top of ch-3 (16 dc)
Rnd 2: Ch 3 (counts as dc), FLdc in same st, (2 FLdc) in each dc around, join with slip st to top of ch-3. (32 dc) Fasten off.
Rnd 3: With WS facing and working into free loops of Rnd-1 sts, standing FLdc in any Rnd-1 stitch, FLdc in same dc, 2 FLdc in each dc around. (32 dc)
Fasten off. Weave in ends.
Make 2 Small Circles in F. Felt the circles, allowing edges of larger circle to cup outward.
Stack 1 Small Circle and one 3⁄4"/2 cm button on each side of cupped circle. With sewing needle and thread, sew in place. Hang with monofilament threaded through center of assembled circles.

With F, ch 4, join with slip st to form a ring.
Row 1 (RS): Ch 3 (counts as dc), 15 dc in ring; do not join, turn. (16 dc)
Row 2 (WS): Ch 3 (counts as dc), dc in same st, 2 dc in each st across; do not join. (32 dc)
Leaving a 5"/12.5 cm tail, do not fasten off in the ordinary way, but cut yarn and pull tail through last stitch.
With C, ch 4 loosely; slip tail of chain into beginning ring of first circle, join with slip st to form a ring. The beginning chain-rings of the two circles are now intertwined.
Work Rows 1 and 2 as for first circle.
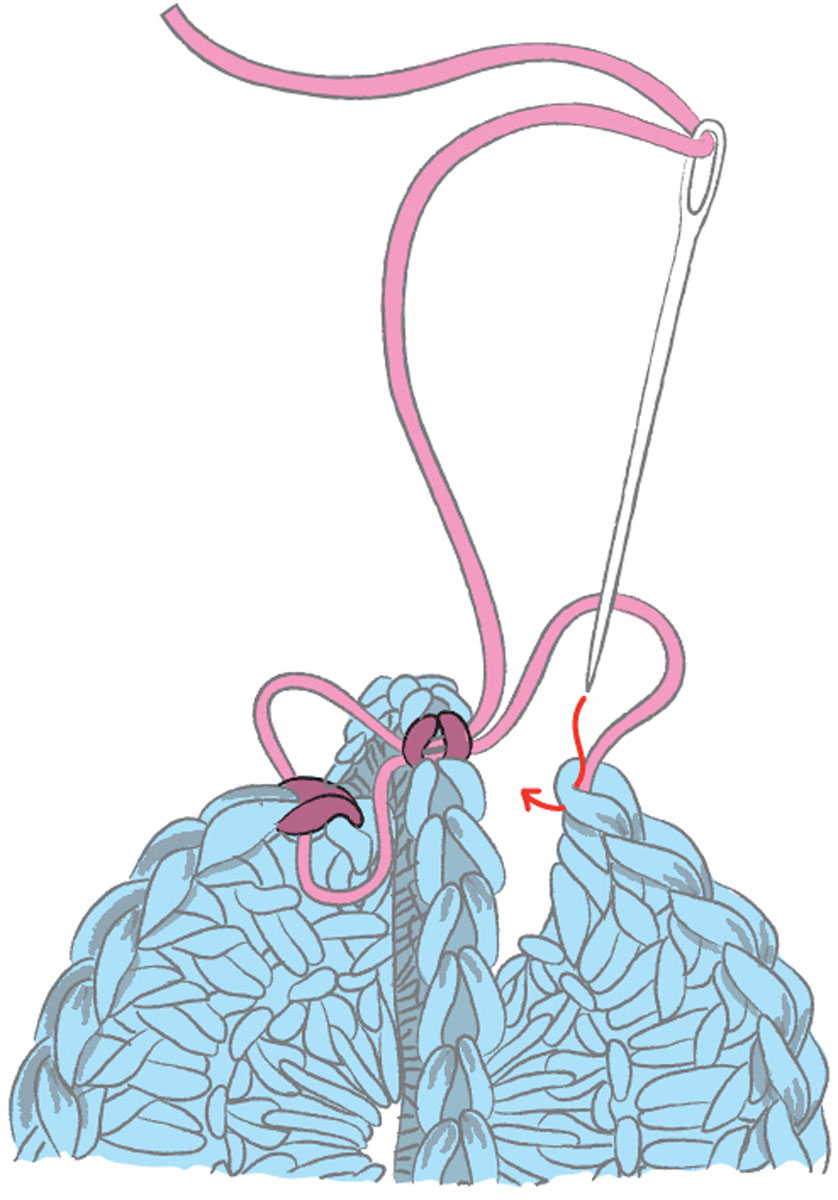
Thread yarn tail of first circle onto yarn needle. Insert needle under V of 16th dc of second circle, around 3rd ch of ch-3 of first circle, back under same dc of second circle, then back from top to bottom into last st of first circle to complete an invisible tapestry needle join (at right). Repeat invisible tapestry needle join to close second circle under 16th st of first circle. Weave in ends. Felt ornament. Hang with monofilament.
With F, ch 4, join with slip st to form a ring.
Rnd 1: Ch 4 (counts as dc and ch 1), (dc, ch 1) 10 times in ring, dc in ring, join with sc to 3rd ch of ch-4.
Rnd 2: Ch 1, sc in space formed by joining ch, *ch 1, picot-3, ch 1, sc in next space; rep from * around, omitting last sc, join with slip st to first sc.
Fasten off and weave in ends. Felt the circle.
Cut a 40"/1 m length of D. With yarn needle and leaving a 3"/7.5 cm tail on right side, thread D from right side to wrong side through center hole, over edge of ornament between two picots, and back through center hole; continue in this manner to wrap yarn around outside edge of ornament between each picot. When twelve wraps are complete, yarn tails will be on opposite sides. Thread yarn under a couple of wraps on wrong side, then back through center hole to right side. Tie ends in bow and trim ends. Hang with monofilament.
With C, ch 4, join with slip st to form a ring.
Rnd 1 (RS): Ch 3 (counts as dc), 15 dc in ring, join with slip st to top of ch-3. (16 dc)
Rnd 2: Ch 1, FLsc in same st, 2 FLsc in next dc, *FLsc in next dc, 2 FLsc in next dc; rep from * around, join with slip st to first sc. (24 sc) Fasten off.
Rnd 3: With F and working in Rnd-1 sts, standing BLdc in any st, BLdc in same st, 2 BLdc in each st around. (32 dc)
Fasten off. Weave in ends.
Make a second circle, leaving a 12"/30.5 cm yarn tail for sewing. Hold circles with wrong sides together. With MC, sew circles together using a running stitch (at right) just below the Vs at the top of the outer stitches.
Felt the circles. Hang with monofilament.
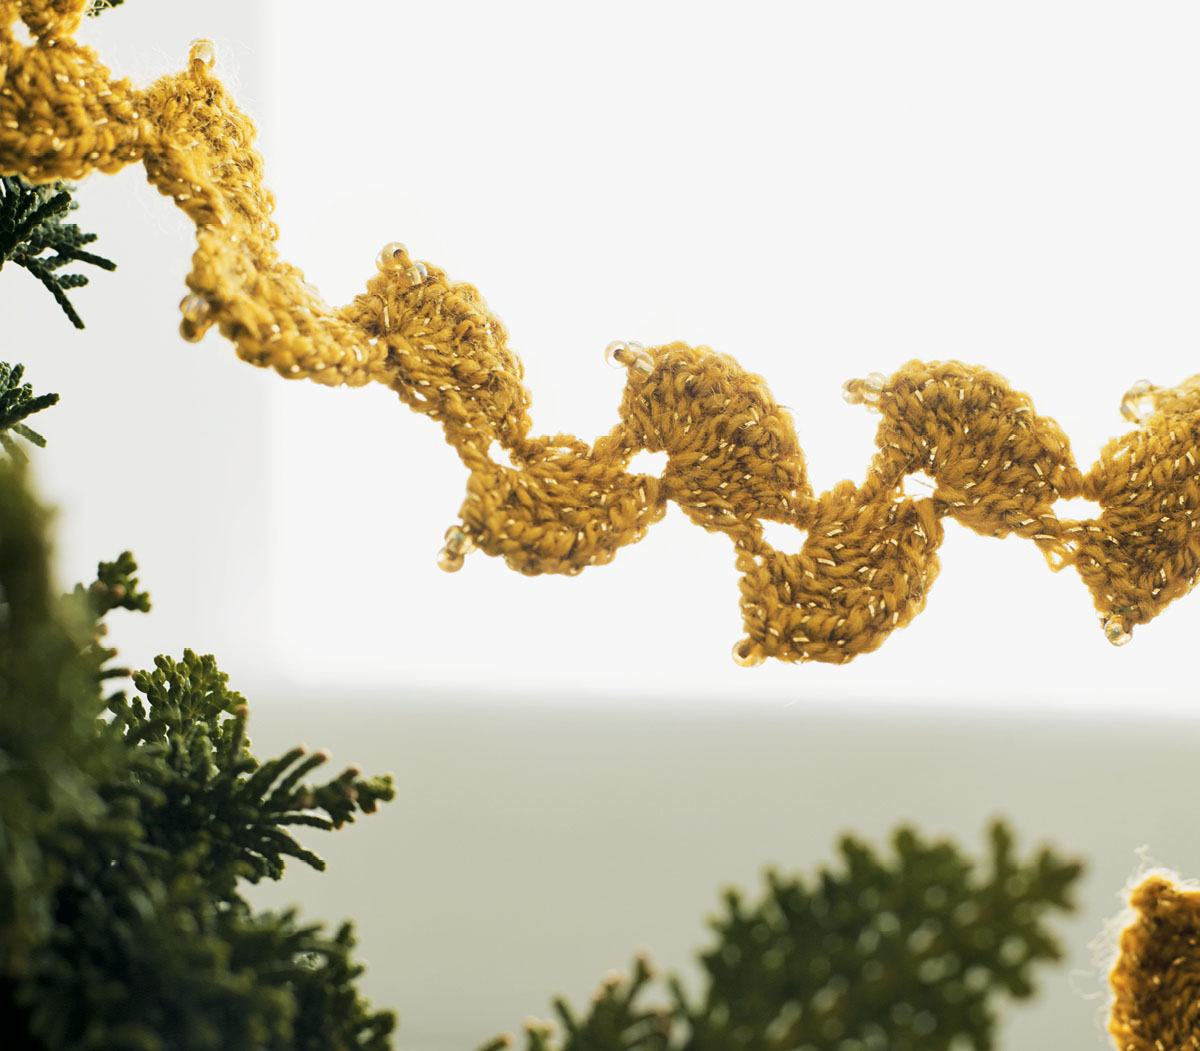
The simplest of stitch patterns turns into a surprisingly beautiful garland when worked in a metallic yarn with bead embellishments. Once the beads are strung, you’ll find this a portable and lightweight project. To make it even easier, omit the beads and just rely on the sparkly yarn for your glitz, or use a yarn with prestrung beads.
String 876 beads onto yarn. (See glossary.) Chain 4.
Row 1: Slide 3 beads up to hook, 7 dc in 4th ch from hook, turn.
Row 2: Ch 3 (does not count as dc), slide 3 beads up to hook, 7 dc in same st, turn. (7 dc)
Rep Row 2 for desired length. (Sample shown with 292 repeats total.)

Fasten off and weave in ends.
Designed by Kristin Omdahl
Each of these adorable angels can be whipped up in only a few minutes. You could decorate your tree with a dozen in one afternoon! The yarn’s wispy texture conjures the image of angels appearing out of the clouds. You can make 12 to 14 angels from these two balls of yarn (held together throughout). A whole choir of angels awaits!

3dtr-cl (3 double treble cluster). [(Yarnover) three times, insert hook into stitch indicated and pull up a loop, (yarnover, pull through two loops on hook) three times] three times, yarnover and pull through all four loops on hook.
4dtr-cl (4 double treble cluster). [(Yarnover) three times, insert hook into stitch indicated and pull up a loop, (yarnover, pull through two loops on hook) three times] four times, yarnover and pull through all five loops on hook.
picot-3. Ch 3, slip st in 3rd ch from hook.
TIP: If using a substitute yarn for the project, choose one that is lightweight and airy so the angels’ skirts hang correctly.

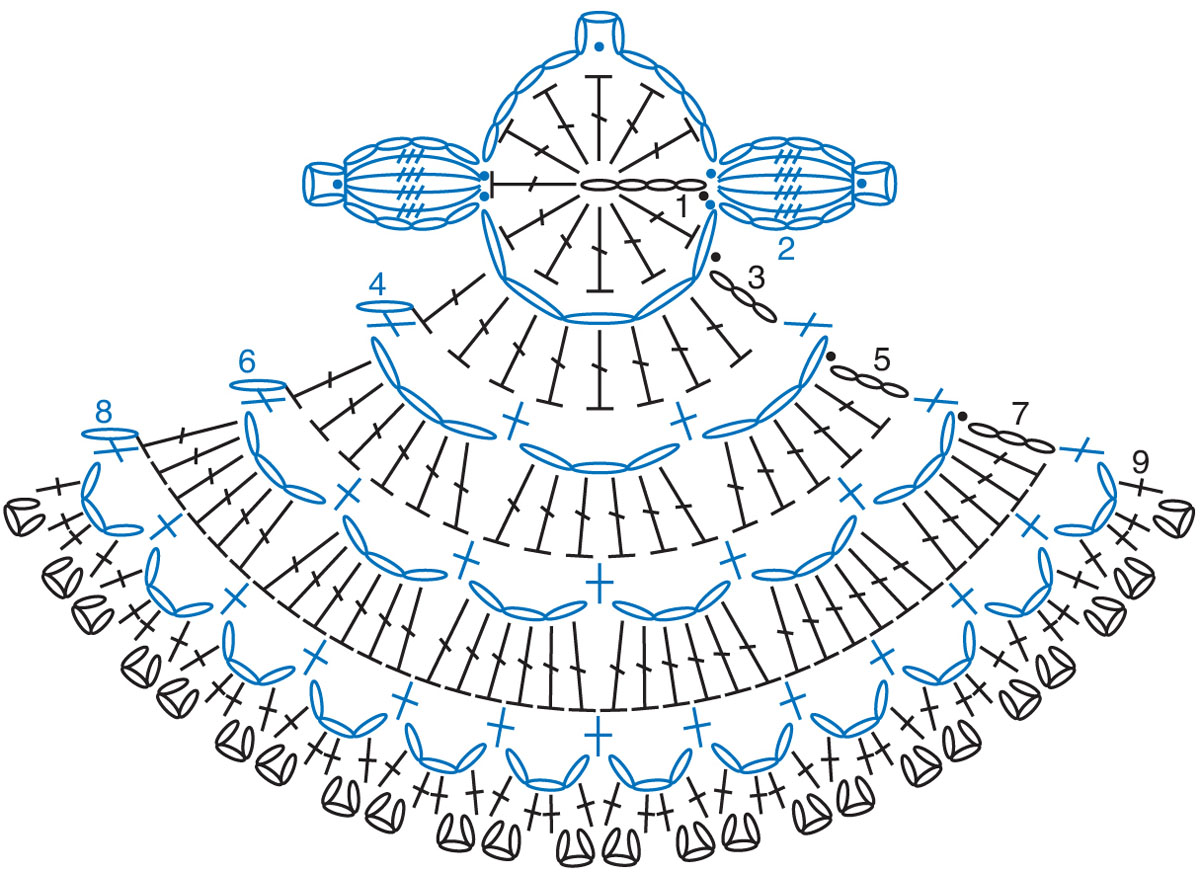
Rnd 1: Ch 4 (ch 3 counts as first dc), 11 dc in 4th ch from hook, join with slip st to top of 3rd ch at beg of round. (12 dc)
Rnd 2: Ch 5, 3dtr-cl in first st, ch 5, slip st in same st, ch 7, skip 5 sts, slip st in next st, ch 5, 3dtr-cl in same st, ch 5, slip st in same st, ch 5, skip last 5 sts, join with slip st in first st at beg of rnd, turn.
Row 3: Slip st in ch-5 space, ch 3 (counts as dc), 9 dc in same space, turn. (10 dc)
Row 4: Ch 3 (counts as dc), dc in same st, 2 dc in each dc across, turn. (20 dc)
Row 5: Ch 3 (counts as dc), dc in same st, dc in next dc, *2 dc in next dc, dc in next dc; rep from * across, turn. (30 dc)
Row 6: Ch 3 (counts as dc), dc in same st, dc in next 2 dc, *2 dc in next dc, dc in next 2 dc; rep from * across, turn. (40 dc)
Row 7: Ch 1, sc in same st, *ch 3, skip 2 dc, sc in next dc; rep from * across, turn. (13 ch-3 spaces)
Row 8: Ch 1, (sc, ch 2, 5 dc, ch 2, sc) in each ch-5 space across. (13 5-dc scallops)
Fasten off. Weave in ends.
Rnd 1: Ch 4 (ch 3 counts as first dc), 11 dc in 4th ch from hook, join with slip st to top of 3rd ch at beg of round. (12 dc)
Rnd 2: Ch 4, 4dtr-cl in first st, picot-3, ch 4, slip st in same st, ch 4, picot-3, ch 4, skip 5 sts, slip st in next st, ch 4, 4dtr-cl in same st, picot-3, ch 4, slip st in same st at base of cluster, ch 5, skip last 5 sts, join with slip st first st at beg of rnd, turn.
Row 3: Slip st in ch-5 space, ch 3 (counts as dc), 8 dc in same ch-5 space, turn. (9 dc)
Row 4: Ch 1, sc in same st, ch 3, skip 2 sts, sc in space before next st, ch 3, skip 3 sts, sc in space before next st, ch 3, skip 2 sts, sc in last st, turn. (3 ch-3 spaces)
Row 5: Slip st in first ch-3 space, ch 3 (counts as dc), 5 dc in same ch-3 space, 6 dc in each ch-3 space across, turn. (18 dc)
Row 6: Ch 1, sc in same st, ch 3, skip 2 sts, sc in space before next st, *ch 3, skip 3 sts, sc in space before next st; rep from * to last 3 sts, ch 3, skip 2 sts, sc in last st, turn. (6 ch-3 spaces)
Row 7: Slip st in first ch-3 space, ch 3 (counts as dc), 5 dc in same sp, 6 dc in each ch-3 space across, turn. (36 dc)
Row 8: Ch 1, sc in same st, ch 3, skip 2 sts, sc in space before next st, *ch 3, skip 3 sts, sc in space before next st; rep from * to last 3 sts, ch 3, skip 2 sts, sc in last st, turn. (12 ch-3 spaces)
Row 9: (Sc, ch 3, sc) two times in each space across. (24 ch-3 spaces)
Fasten off. Weave in ends.
Designed by Andee Graves
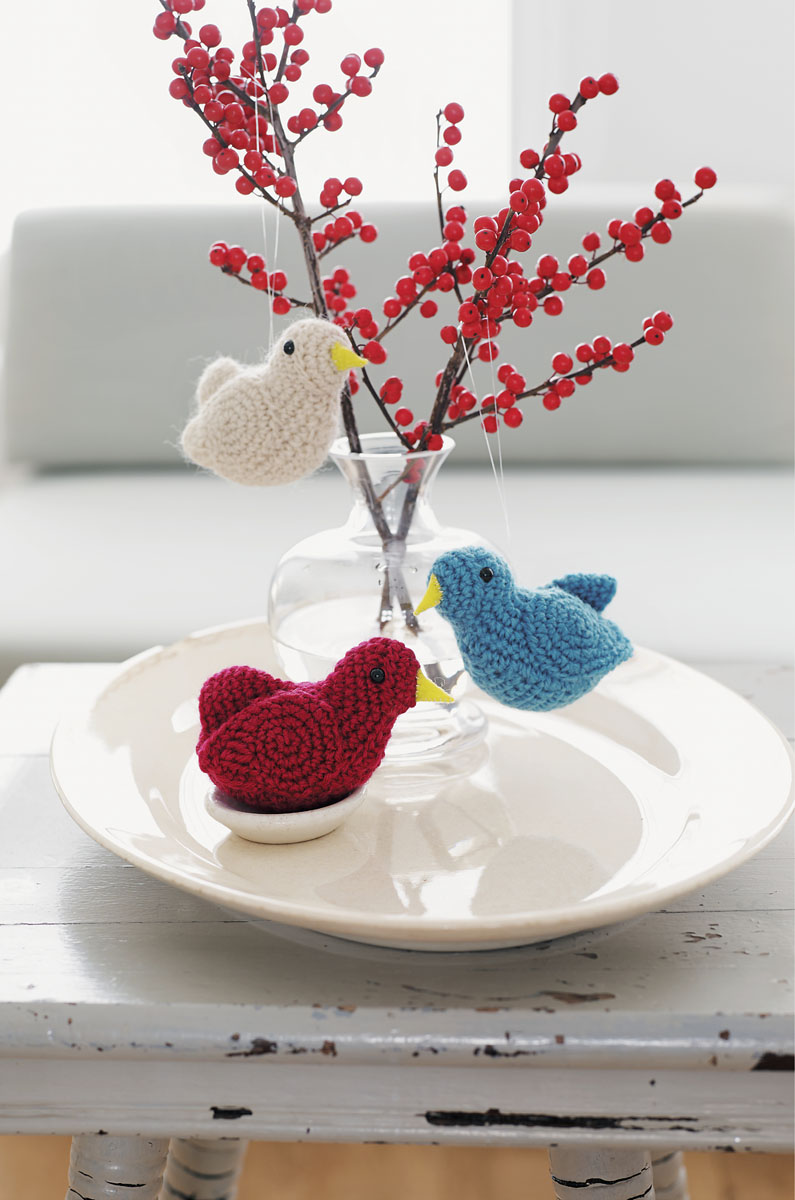
Decorate your home or tree with these beautiful little birds, a traditional symbol of hope and renewal that is perfect for celebrating the season. Best of all, you can crochet up a whole flock of little birds in an afternoon.
sc2tog (single crochet 2 stitches together). (Insert hook into next st and pull up a loop) two times, yarnover and pull through all 3 loops on hook.
sc3tog (single crochet 3 stitches together). (Insert hook into next st and pull up a loop) three times, yarnover and pull through all 4 loops on hook.
working into back bump of chain. With the wrong side of the chain facing, insert hook into the bumps on the back of the chain. (The right side of the chain is a series of Vs.)

Body
Rnd 1 (RS): Ch 2, 6 sc in 2nd ch from hook, join with slip st to first sc. (6 sc)
Rnd 2: Ch 1, 2 sc in each sc around, join with slip st to first sc. (12 sc)
Rnd 3: Ch 1, 2 sc in each sc around, join with slip st to first sc. (24 sc)
Rnd 4: Place marker in 12th st from join, ch 1, 2 sc in next 2 sc, *(sc next 3 sc, 2 sc next st) two times**, 2 sc next sc, 3 sc in marked sc (place marker in 3rd sc), 2 sc next 2 sc; rep from * to ** once, 2 sc in next sc, sc next st, join with slip st to first sc. (36 sc)
Rnd 5: Ch 1, (sc next 4 sc, 2 sc next sc) three times, sc next sc, 2 sc next sc, sc next sc, 3 sc in marked sc (remove marker), (sc next sc, 2 sc next sc) two times, (sc next 4 sc, 2 sc next sc) two times, sc next 2 sc, 2 sc next sc, join with slip st to first sc. (47 sc)
Rnd 6: Ch 1, (sc next 5 sc, 2 sc next sc) seven times, sc next 5 sc, join with slip st to first sc. (54 sc)
Rnd 7: Ch 1, (sc next 6 sc, 2 sc next sc) three times, sc in next 11 sc, (2 sc next sc, sc next 6 sc) three times, 2 sc in next st, slip st to first sc of round. (61 sc)
Rnd 8: Ch 1, (sc next 7 sc, 2 sc next sc) three times, sc next 4 sc, hdc next 5 sc, sc next 4 sc, (2 sc next sc, sc next 7 sc) three times, join with slip st to first sc. (62 sc, 5 hdc)
Fasten off. Place marker in 27th and 41st st.
Rnd 1: Ch 2, 6 sc in 2nd ch from hook, join with slip st to first sc. (6 sc)
Rnd 2: Ch 1, 2 sc each sc, join with slip st to first sc. (12 sc)
Rnd 3: Ch 1, (sc next 3 sc, 2 sc next sc) three times, join with slip st to first sc. (15 sc)
Fasten off, leaving a long tail for sewing.

Head
Row 1: Ch 2, sc in 2nd ch from hook, turn. (1 sc)
Row 2: Ch 1, 3 sc in sc, turn. (3 sc)
Row 3: Ch 1, sc in first sc, 2 sc next sc, sc next sc, turn. (4 sc)
Row 4: Ch 1, 2 sc in first st, sc next 2 sc, 2 sc next sc, turn. (6 sc)
Row 5: Ch 1, sc in next 6 sc, turn.
Row 6: Repeat Row 5.
Row 7: Ch 1, sc in next 2 sc, 2 sc in next 2 sc, sc in next 2 sc, turn. (8 sc)
Row 8: Ch 1, sc in next 8 sc, turn.
Rows 9–11: Repeat Row 8 three times.
Row 12: Ch 1, sc in next 2 sc, (sc2tog) twice, sc in next 2 sc, turn. (6 sc)
Rows 13 and 14: Repeat Row 5 two times.
Row 15: Ch 1, sc2tog, sc next 2 sc, sc2tog, turn. (4 sc)
Row 16: Ch 1, sc in first st, sc2tog, sc next st, turn. (3 sc)
Row 17: Ch 1, sc3tog, turn. (1 st)
Row 18: Ch 1, sc in next st.
Edging: Ch 1, turn 90 degrees to work along side, sc in side of next 6 rows, 2 sc in side of next row, sc in side of next 4 rows, 2 sc in side of next row, sc in side of next 5 rows, 3 sc in bottom of Row 1; turn to work along other side, starting with Row 2 sc in sides of next 5 rows, 2 sc in next row, sc in sides of next 4 rows, 2 sc in next row, sc in next 6 rows, slip st in top of next st. (41 sc)

Breast
Wings are worked in continuous rounds. Place marker at the first stitch of the round and move it up as you work the rounds.
Rnd 1: Ch 2, 6 sc in 2nd ch from hook. (6 sc)
Rnd 2: 2 sc in next 6 sc. (12 sc)

Wing
Rnd 3: (2 sc in next sc, sc in next sc) six times, then continuing part way around to finish rnd, hdc next sc, sc next sc, (sc, hdc) in next sc, dc in next st, (dc, tr, ch 4, sc) in next st, skip next st, slip st in next st. (21 sc, 2 hdc, 2 dc, 1 tr)
Rnd 4: Ch 1, sc in same st, sc in next st, (2 sc in next st, sc in next 2 sc) four times, sc in next 4 sc, (2 sc, ch 2, sc) in next st, skip 1 ch, sc in next 3 ch, slip st in first sc of rnd. (28 sc)
Fasten off, leaving a long tail for sewing.
Weave in beginning tails on all pieces.
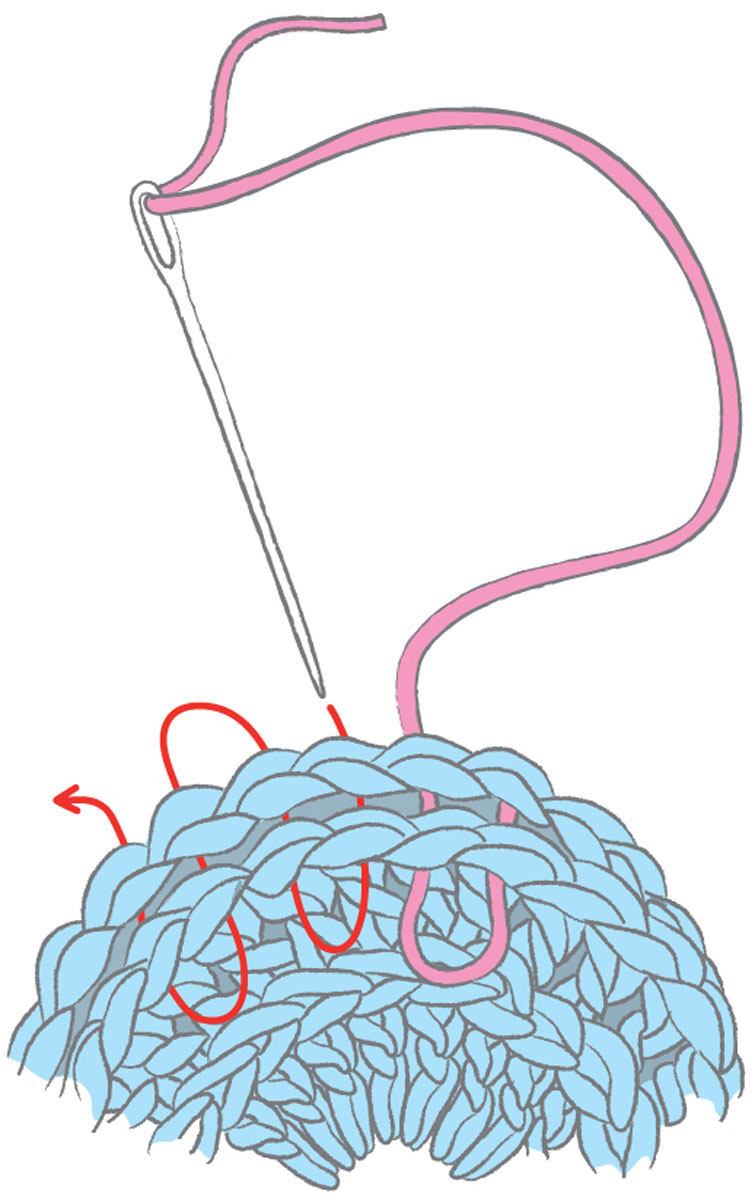
Sew Head to Body along sts 27–41 using ending tail; do not fasten off.
Place Breast with ending tail at base of Head wrong sides together to Body. Using remaining tail from Head and starting with same st as last st on Head, sew Breast to Body along one side of Breast. (21 sts) Weave in rest of tail from Head. Tip: On first st of Breast, sew through both st on Head and st on Body.
Insert safety eyes between 2 sc on either side of hdcs. Fill head with stuffing.
Using ending tail from Breast, sew opposite side of Breast to Body starting at Head (21 sts). Do not cut tail.
Stuff Body firmly through opening at tail. Fold tail flat, making sure all stuffing is in Body cavity. Use remaining Breast tail to sew a running stitch along base of tail to center round of Body to close opening. Weave in remaining ends.
Place Wings along sides and sew in place, stitching around rounded end.
Cut Beak shape from craft felt.
Referring to diagram, fold point B to point C. Starting at point A, whip stitch to close raw edges to points B and C. Then place Beak on bird’s Head. Weave in ends.
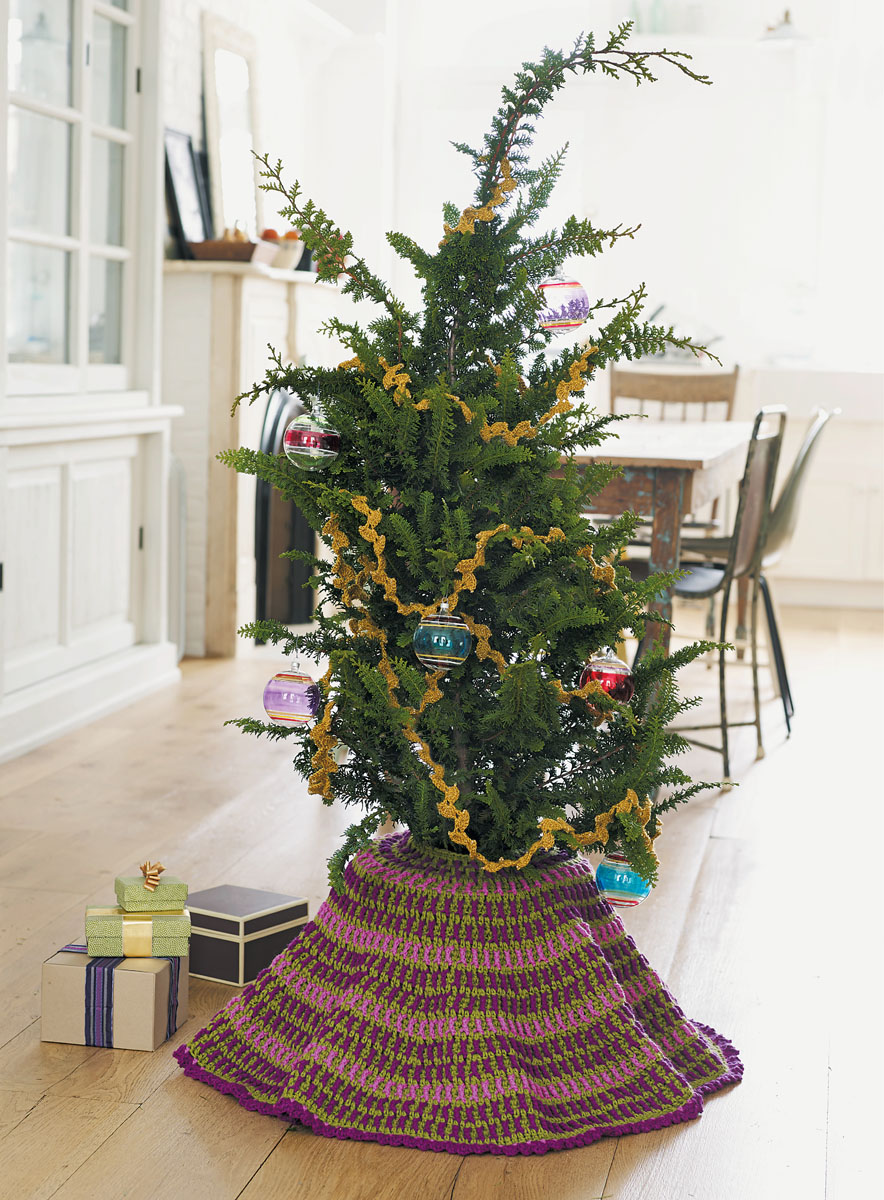
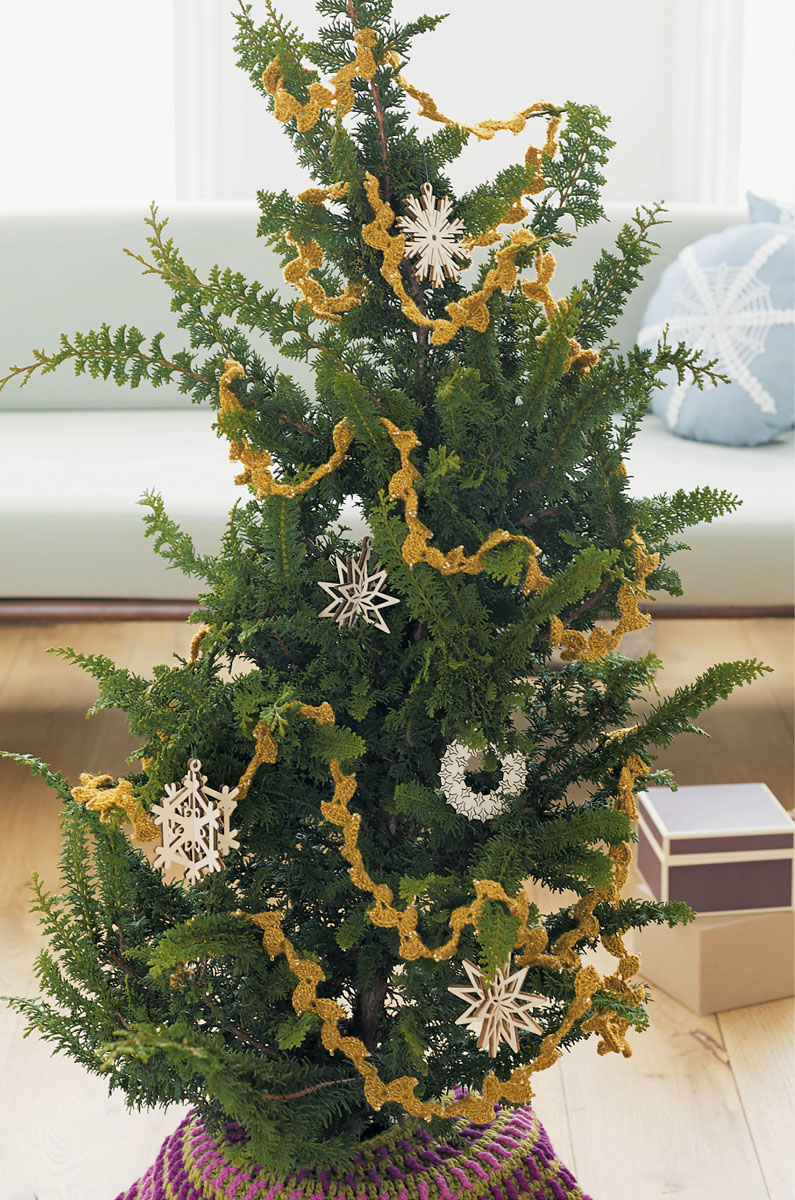
Add some contemporary color to your Christmas décor with this dimensional stitch pattern. The stitching is easier than it looks. The skirt will lie flat or drape nicely, as shown in the photo. It’s also easy to make the skirt larger to fit the size of your tree: Just continue in pattern to increase 24 stitches every three rounds.

FPtr (front post treble crochet). (Yarnover) two times, insert hook from front to back to front around post of stitch indicated and pull up a loop (yarnover and pull through two loops on hook) three times.
With MC, ch 19.
Row 1 (RS): Dc in 4th ch from hook and in each ch across, turn. (17 dc)
Row 2 (WS): Ch 3 (counts as dc here and throughout), dc in each dc across, turn.
Row 3 (RS): Drop MC loop and place on stitch marker if desired; draw up a loop of A in same st; with A, FPtr around post of next st 2 rows below, *ch 1, skip 1 st, FPtr around post of next st 2 rows below; rep from * across, ending slip st in top of turning ch of last row. Fasten off contrasting color. Do not turn.
Row 4 (RS, joining row): (See Joining Row below.) Replace MC st onto hook, ch 3 (counts as dc), dc in each st and ch-1 space to last st, dc in last st, turn.
Rep (Rows 2–4) three times. Fasten off. Note: Color sequence will vary.

Railing stitch gauge swatch.
NOTE: On Rows 4, 7, and 10, stitches are worked through double thickness of the last two rows.
Contrasting color rows are worked into the row below the previous row. The following row, in the background color, joins the top of the contrasting color stitches to the background. When working these joining rows, work through double thickness of last 2 rows, by inserting the hook through both the stitch or space of the contrasting color row and the corresponding background stitch in the preceding row, to join the pair of stitches.

With MC, chain 49.
Row 1 (RS): Dc in 4th ch from hook and in each ch across, turn. (47 dc)
Row 2 (WS): Ch 3 (counts as dc here and throughout), dc in each dc across, turn.
Row 3 (RS): Drop MC loop and place on stitch marker if desired; draw up a loop of A in same st; with A, FPtr around post of next st 2 rows below, *ch 1, skip 1 st, FPtr around post of next st in row below previous row; rep from * across, ending slip st in top of turning ch of previous row. Fasten off contrasting color. Do not turn.
Row 4 (RS, increase/joining row): Replace MC st on hook, ch 3, working through double thickness of the last 2 rows (see Joining Row on facing page), *2 dc in next st, dc in next st; rep from * to last 2 sts, 2 dc in next 2 sts, turn. (71 sts)
Rows 5 and 6: Rep Rows 2 and 3.
Row 7 (RS, increase/joining row): Replace MC st on hook, ch 3, dc in same st, *2 dc in next st, dc in next 2 sts; rep from * to last st, dc in last st, turn. (95 sts)
Row 8: Rep Row 2.
Row 9: With B, rep Row 3.
Row 10 (RS, increase/joining row): Replace MC st on hook, ch 3, *2 dc in next st, dc in 3 sts; rep from * to last 2 sts, 2 dc in next st, dc in last st, turn. (119 sts)
Rows 11 and 12: Rep Rows 2 and 3.
Row 13 (RS, increase/joining row): Replace MC st on hook, ch 3, *dc in next 2 sts, 2 dc in next st, dc in next 2 sts; rep from * to last 3 sts, dc in next st, 2 dc in next st, dc in last st, turn. (143 sts)
Row 14 and 15: Rep Rows 2 and 3.
Row 16 (RS, increase/joining row): Replace MC st on hook, ch 3, dc in same st, *2 dc in next st, dc in next 5 sts; rep from * to last 4 sts, dc in last 4 sts, turn. (167 sts)
Row 17: Rep Row 2.
Row 18: With B, rep Row 3.
Row 19 (RS, increase/joining row): Replace MC st on hook, ch 3, *2 dc in next st, dc in next 6 sts; rep from * to last 5 sts, 2 dc in next st, dc in last 4 sts, turn. (191 sts)
Rows 20 and 21: Rep Rows 2 and 3.
Row 22 (RS, increase/joining row): Replace MC st on hook, ch 3, *dc in next 3 sts, 2 dc in next st, dc in next 4 sts; rep from * to last 6 sts, dc in next 3 sts, 2 dc in next st, dc in last 2 sts, turn. (215 sts)
Rows 23 and 24: Rep Rows 2 and 3.
Row 25 (increase row, RS): Replace MC st on hook, ch 3, dc in same st, *dc in next 8 sts, 2 dc in next st; rep from * to last 7 sts, dc in last 7 sts, turn. (239 sts)
Row 26: Rep Row 2.
Row 27: With B, Rep Row 3.
Row 28 (increase row, RS): Replace MC st on hook, ch 3, *2 dc in next st, dc in next 9 sts; rep from * to last 8 sts, 2 dc in next st, dc in last 7 sts, turn. (263 sts)
Rows 29 and 30: Rep Rows 2 and 3.
Row 31 (increase row, RS): Replace MC st on hook, ch 3, dc in same st, *dc in next 10 sts, 2 dc in next st; rep from * to last 9 sts, dc in last 9 sts, turn. (287 sts)
Rows 32 and 33: Rep Rows 2 and 3.
Row 34 (RS, increase/joining row): Replace MC st on hook, ch 3, *2 dc in next st, dc in next 11 sts; rep from * to last 10 sts, 2 dc in next st, dc in last 9 sts, turn. (311 sts)
Row 35: Rep Row 2.
Row 36: With B, rep Row 3.
Row 37 (RS, increase/joining row): Replace MC st on hook, ch 3, dc in same st, *dc in next 12 sts, 2 dc in next st; rep from * to last 11 sts, dc in last 11 sts, turn. (335 sts)
Rows 38 and 39: Rep Rows 2 and 3.
Row 40 (RS, increase/joining row): Replace MC st on hook, ch 3, *2 dc in next st, dc in next 13 sts; rep from * to last 12 sts, 2 dc in next st, dc in last 11 sts, turn. (359 sts)
Rows 41 and 42: Rep Rows 2 and 3.
Row 43 (RS, joining row): Replace MC st on hook, ch 3, dc in each st and ch-1 space across; do not turn.
Row 1: Ch 1, sc evenly down edge of piece to foundation ch, 2 sc in corner st, sc in free loop of each foundation ch across, 2 sc in corner st, sc evenly down edge to beginning of last row; do not turn. Fasten off.
Row 2 (RS): With C, standing sc in first st of Row 43, ch 1, skip 1 sc, sc in next sc; rep from * across to corner; do not turn. Fasten off.
Row 3 (RS): With B, (standing sc, ch 3, 2 dc) in first space of previous row; *(sc, ch 3, 2 dc) in next space; rep from * across, slip st in last space. Fasten off.
Weave in ends.

