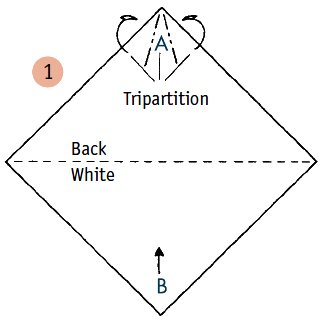
PART ONE
CREATIVE ORIGAMI
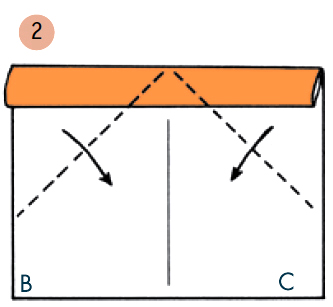
The Beauty of Origami Art
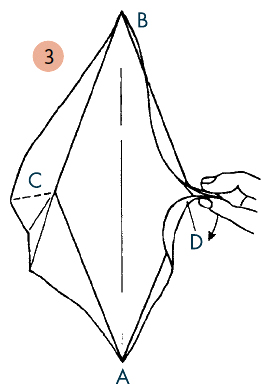
A rabbit foraging for food in a snowy landscape. The little creature is caught tense and motionless at the moment when, sensing danger, it is about to hop away.
A NOTE FROM THE AUTHOR
The origami pieces collated here were mostly created for a work that was published in monthly installments between 1954 and 1963. It was a work that marked a turning point in the history of this ancient Japanese art, opening as it did hitherto unimaginable horizons in the origami tradition. Unpublished models developed at a later stage from a combination of study and creation were added to the original selection from the monthly installments.
Over the years, I had received many requests from fans to bring together the most significant of my creations in one volume. I thus spent long hours reviewing all that I had ever produced in order to select from various sources those origami that to me seemed to speak to the heart with the greatest immediacy, that awakened feelings and emotions.
The creation of a piece of origami requires time. It may take as long as two or three years for a new model to take shape. In one instance, it took me no less than 23 years to develop a model, from the initial inspiration to the full development of the system of folds. Every single creation is the fruit of long and exhausting labor. It emerges from a series of variations created around the same theme until it expresses its own clearly perceptible character in every detail.
The symbols that I introduced to fold notation have been widely circulated and are now used in Japan and the rest of the world. Illustrations are of as great an importance to origami as a score is to the performance of a piece of music. It is possible to either provide highly rigorous and detailed instructions or to grant greater licence to individual expression. Each step can be developed in different directions allowing everyone to express their own sensibility when constructing a unique piece of origami.
I have dedicated my entire life to the study of origami, something that initially seemed impossible and incomprehensible. I thus feel that I owe profound thanks to all those in publishing and in the media in general who have understood and supported my efforts.
Akira Yoshizawa, August 1974

An origami baby elephant displayed at the exhibition Akira Yoshizawa: The World of Creative Origami, Sano Art Museum, Mishima, 2014.
THE FRONTIERS OF ORIGAMI
The beauty of origami arises from the way in which lines and surfaces are folded and shaped on paper. The challenge is to use a single sheet of paper, play around with its color or its various shades without applying any color at the end or cutting the paper or adding parts.
The sheet can be in the shape of an equilateral, right-angled or scalene triangle or a square, rectangle, rhombus, irregular quadrilateral or trapezoid. In short, any kind of polygon, from a triangle to a hexadecagon, is fine, although a circle or oval can work equally well.
As for size, we generally keep to the standard square sheet, which is the easiest to use, though in certain cases models may require sheets ranging from a few millimeters square to ones that are about 5 meters square. The thickness of the paper is proportional to its size.

COMPOSITE ORIGAMI
Composite forms are those in which two or more sheets are used, each folded separately until they reach a specific shape before they are joined to others to form a unique model. Once they are glued or combined together, the initially autonomous figures create a sort of mosaic or composite origami.

Two origami bison displayed at the exhibition Akira Yoshizawa: The World of Creative Origami, Sano Art Museum, Mishima, 2014.
THE ACT OF CREATION
What makes origami a work of art is the creation of a three-dimensional form. The pleasure of creation lies entirely in folding and refolding a simple two-dimensional sheet of paper in order to express a lyrical beauty through a volume of voids and masses in which all the parts are carefully balanced. It is important to take as much time as necessary to develop a project, choosing a theme that may consist of a figurative or abstract form, and selecting paper of a quality and color that is appropriate (and usually recommended in the instructions).
It does not matter whether the chosen theme belongs to the natural or spiritual world. The main thing is to take the immense beauty emanating from the teeming natural world around us and to fix it, in a kind of freeze-frame, in a creation made out of paper. This requires extraordinary technique, one that is capable of isolating a form, a movement, the essence of an object and which, in the case of a living creature, is able to express the characteristics of its skeleton and bearing and present all these things simultaneously.
This book will help you understand the difference between creative origami and the simple act of folding a piece of paper to obtain a form. If you are interested in creative origami, you will need to learn the various methods of folding and to fully master them.
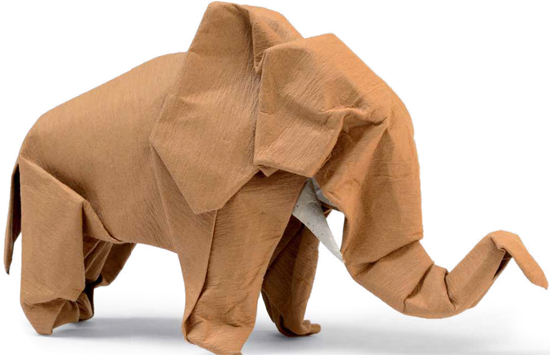
An origami elephant displayed at the exhibition Akira Yoshizawa: The World of Creative Origami, Sano Art Museum, Mishima, 2014.
Elves in a forest
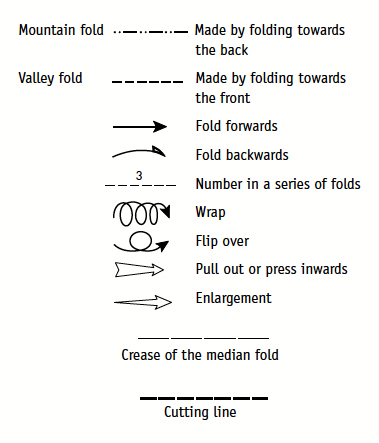
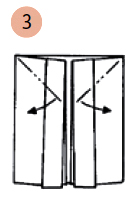
A GUIDE TO ORIGAMI FOLDING SYMBOLS

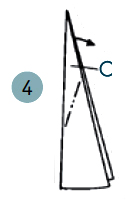
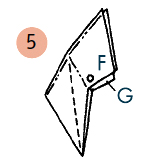
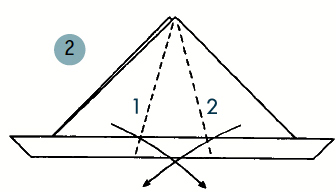
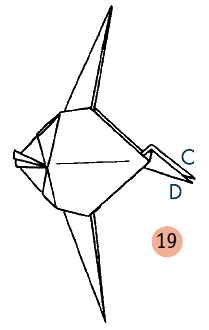
HOW TO MAKE AN INSIDE REVERSE FOLD
Valley fold F is often omitted as it consists of taking an already existing fold and folding it in the opposite direction.
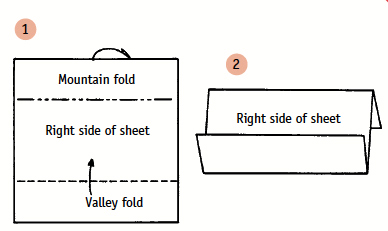

This fold is used for bird breasts and animal joints.
Hold the model down at the point labeled A and press in with your thumb, making sure not to flatten the fold at the point labeled ○, then make a crimp fold on a diagonal by pulling C.
In a sequence of folds, this symbol  indicates the end result.
The right and left sides of the sheet of paper are not indicated in the figures, but usually the right side is the one that remains on the outside after the first set of folds.
When two strips are superimposed, the symbol is placed only on the top one.
When it is necessary to repeat certain steps, these will be omitted.
When a drawing suffices to make something comprehensible, any other form of explanation is omitted.
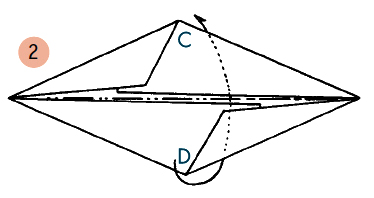
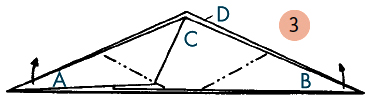
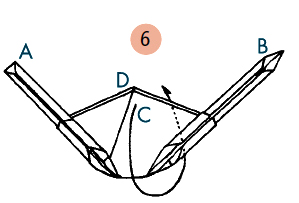
Corners and surfaces are labeled A, B, C,  , or, occasionally, with symbols that are more suitable.
When corners overlap in a fold, a small portion of the one at the bottom remains visible.
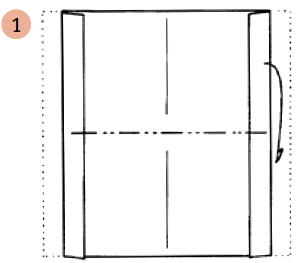
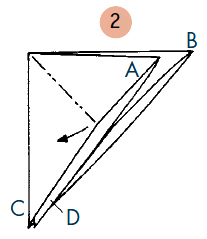
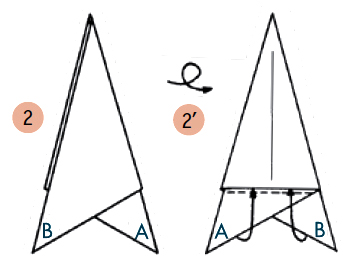
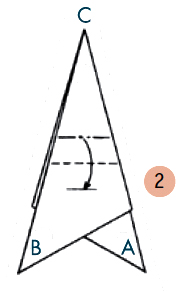
PREPARING THE FOLDING SHEET

Making an equilateral triangle and rhombus
from a square sheet
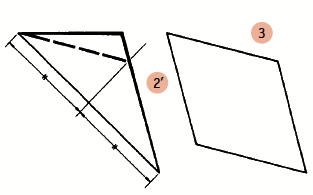
2’ is made simply by cutting 2 along line 1.
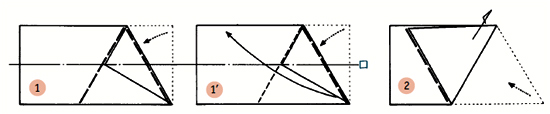
Making an equilateral triangle and rhombus
from a rectangular sheet
(For the hexagon, see page 82.)

Making a pentagon
from a square sheet

Cut into a right angle and open.
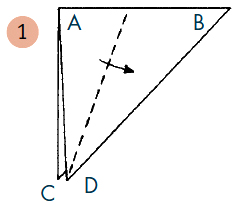
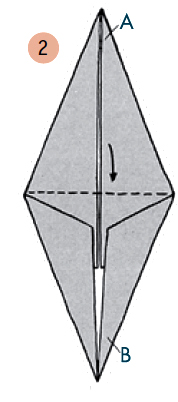
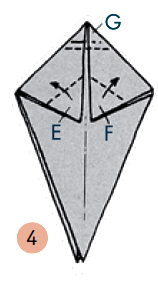
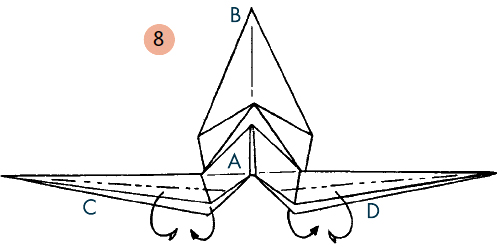
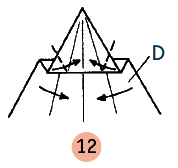
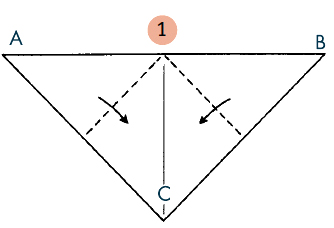
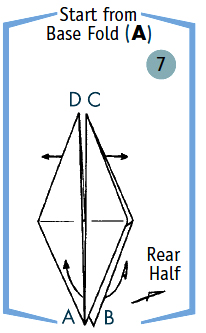
THE BASE FOLDS
In order to bring out the innate beauty of nature using the surface of a sheet of paper, to express the spirit that inhabits the forms existing in our world, requires dividing and subdividing this surface countless times and generating a precise number of angles by means of a series of folds from which the piece will finally emerge. The final result will thus depend in large part on your journey through the figures and folds.
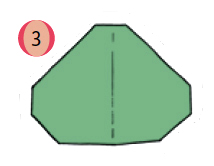
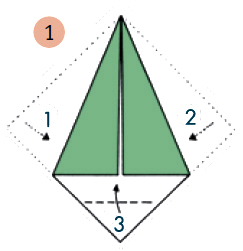
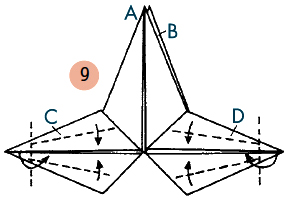
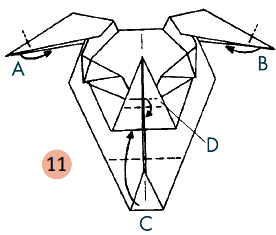
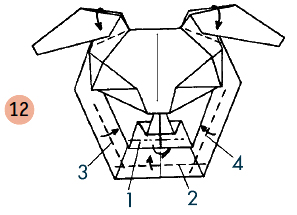
Examine the base folds illustrated on pages 40–3. Folds (A) and (B), for example, are extensively used to construct the so-called ‘square base’ from squares and rhombi to generate acute angles in order to create the heads, tails and legs of small birds or fish fins, as on angel fish.
Folds (C) and (d) can be used to create the same figures as those made by (A) and (B) but from a triangle. If applied to every corner, the folds can lead to the creation of such models as the cricket, dragonfly and shrimp.
In addition to these are the folds on page 142 that can be used to craft an aeroplane from a triangular sheet of paper, for example, or the ones on page 82 that can generate an iris from a hexagon. We have not illustrated those used with the pentagon, rectangle and other paper shapes.
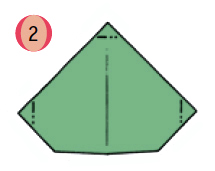
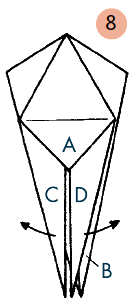
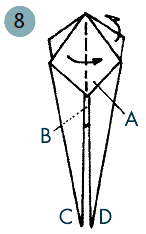
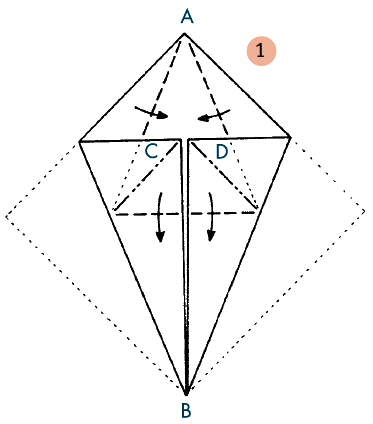
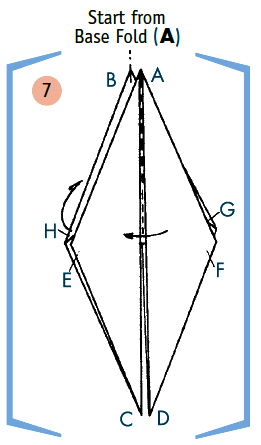
BASE FOLD (A)


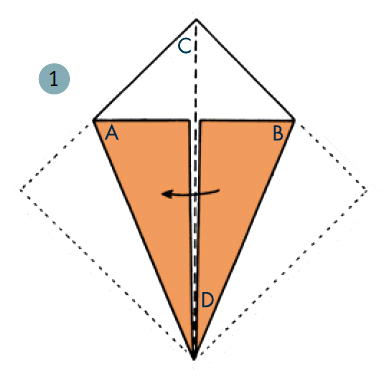
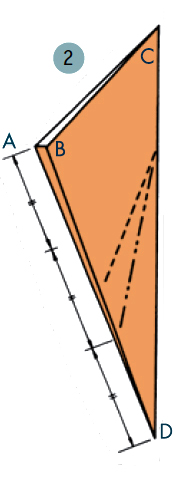
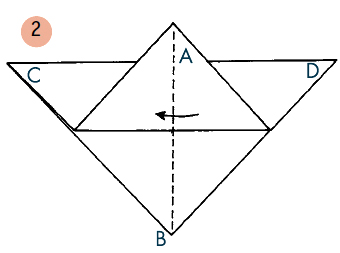
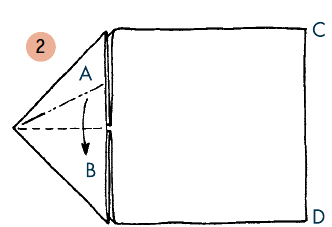
1 Fold a square sheet of paper along the diagonal, then fold it again, drawing A over B.
2 Unfold A, making it correspond with C and d.
3 repeat the same step on the rear with B.
4 Make folds 1, 2 and 3 in that order.
5 Unfold and pull in the direction of the arrow.
6 repeat the same steps on the rear with B.
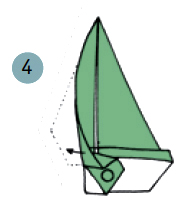
7 Here is the basic form (A).
SMAll BIRDS
Steps on pages 94–5.

Fish, birds, sea turtle, various mammals, masks, etc.
BASE FOLD (B)


1 Fold a rhomboid sheet along diagonal AB, then fold again, drawing A over B.
2 Unfold A, making the angle correspond to the median fold.
3 repeat the same step on the rear with B.
4 Make folds 1, 2 and 3 in that order.
5 Unfold A, lifting it up.
6 repeat the same steps on the rear with B.
7 Here is the basic form (B).
TWO TYPES OF FISH
Steps on pages 108–9.

Insects, fish, masks, whale, etc.
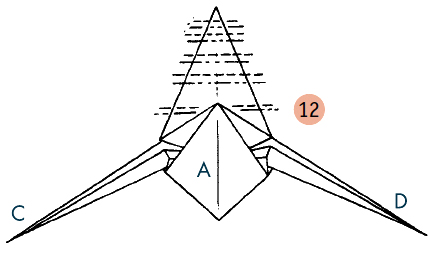
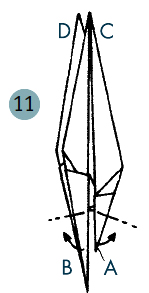
BASE FOLD (C)


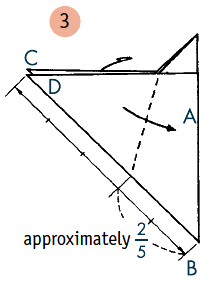
Take a sheet in the form of a right-angle triangle and fold it as in 1 , then, making another valley fold, align its free edges.
2 Unfold A to draw it over the median fold.
3 repeat the same step on the rear with B.
4 Make the folds in 4 .
5 Open A by lifting it up.
6 repeat the same steps on the rear with B.
7 The basic form (C).
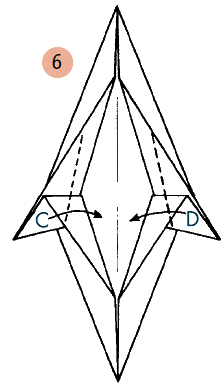
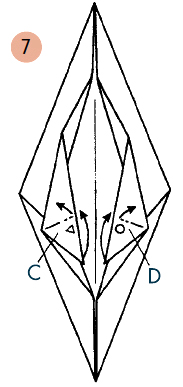
GRASSHOPPERS
Steps on pages 100–1.

Birds, insects, glider, flowers, etc.
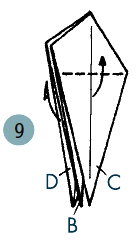
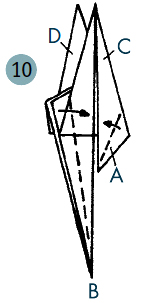
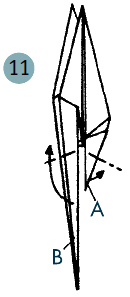
BASE FOLD (D)


Take a sheet in the form of an equilateral triangle and fold it as in 1 , then, making another valley fold, align its free edges.
2 Unfold A to draw it over the median fold.
3 repeat the same step on the rear with B, aligning corners B, C and d.
4 Make the folds in 4 and
5 .
6 repeat the same steps on the rear with B.
7 The basic form (d).
DRAGONFLY
Steps on pages 96–7.

Birds, insects, glider, helicopter, etc.
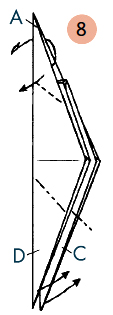
THE GLIDER
This glider typically flies slowly, wafting in the air. If the sheet is the thickness of an ordinary piece of copy paper, it is best to use a 6 x 6 in (15 x 15 cm) square, but if the thickness is altered the dimensions can be changed accordingly.
グライダー


INSTRUCTIONS
1 Take a square sheet of paper and, starting at the top, fold an eighth of the sheet twice.
2 Flatten out the rolled up section by passing your finger over it, then make folds in the direction of the arrows.
3 Press hard with your thumbnail on the already existent mountain fold, then fold its corner down.
4 Fold the sheet in half, making a mountain fold along the crease of the median fold, slightly pressing on the spine while taking care not to crush the little triangle on top.
5 Make a valley fold with C in the direction indicated by the arrow.
6 Fold side B. (If, in figure 5, you slightly push the little triangle on top to the left in such a way as to make it jut out further, the model will fly better.)
7 Here is the finished model. To make it fly, lift it at the point marked ○ in 5 and release it gently into the air.
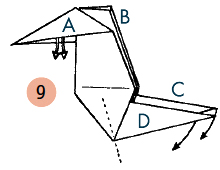
THE FLYING CARPET
Here is the flying carpet of fairy tales, which can also be made from a square sheet of paper.
魔 法のじゅうたん

While the glider can be flown outdoors, the flying carpet requires an enclosed space, or at least one where there is no wind.
INSTRUCTIONS
1 Take a square sheet of paper and, beginning with the top, fold an eighth of the sheet. repeat four times.
2 Pull B back from the crease made by the fold along the median.
3 Make valley folds with B and C, opening them in the direction indicated by the arrows.
Once you have gotten model 4 , lift it at the point labeled ○ in 3 , give it a slight thrust and release. do not use too much force.
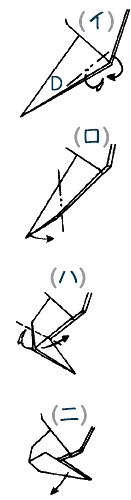
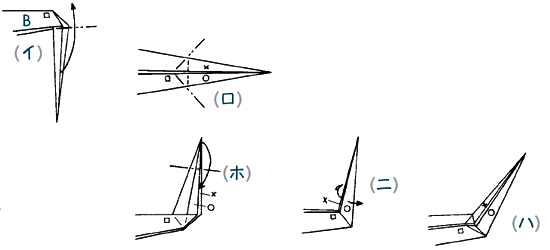
Note: the characteristic feature of this origami is its perfect balance, which allows it to remain suspended in the air for a long time. once you have folded the sheet, getting as far as figure 2, you can introduce variations of any kind you like to obtain figures イ, ロ, ハ and ニ.
The glider will also fly smoothly if made from a rectangular sheet, as in version ホ. In this case, the length of the sheet will be twice its width, but a well-constructed model in light paper can also work with a sheet three times its width. (experiments have shown that the model can fly even if constructed from a sheet of paper 20 times its width.)


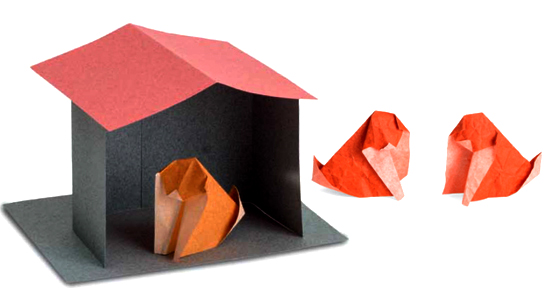
HOUSES AMONG TREES
Using different colored paper, you can construct houses and trees to form an entire neighborhood or village. The final result will depend on how you combine the various elements together.
おうちと木


INSTRUCTIONS FOR THE HOUSES
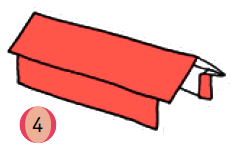
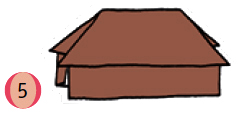
(イ) Fold a square sheet of paper in half horizontally, then stand it up.
(ロ) Complete this house, proceeding as in figures 1 and 2 .
(ハ) This version can be made by folding the corners of the roof of (ロ).
(ニ) Take a square sheet and proceed as in figures 1 , 2 and 3 , finally folding it so that it stands up.
(ホ) A variant is obtained from (ニ) by folding the corners of the roof inwards as in (ハ).
 If one of these models is made larger and another model is made smaller, such as (ホ) or (ニ), then a two-story building can be created by stacking them.
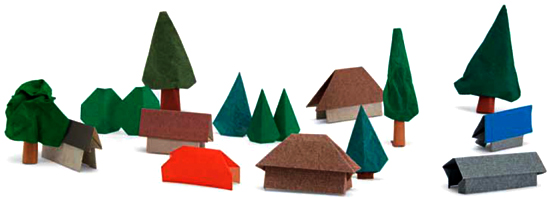
THE TREES (A)
THE TREES (B)
THE TREES (C)

THE TREES (D)


INSTRUCTIONS FOR THE TREES
(A) Take a square sheet and fold it along the diagonal, then complete the model by folding the bottom corner back.
(B) This model can be made from model (A) simply by folding back a tiny bit of the corner at the top as well as the left and right.
(C) After folding a square sheet along the diagonal, make folds 1, 2 and 3 in that order.
(D) Fold a square sheet as in figures 1 , 2 and 3 , then fold only the bottom part of the model in the direction of the arrow of 4 without smoothing out the fold, as shown in figure 5 . Finally, pressing down on the point labeled ○, open gently and pull towards the dotted line. Complete by folding the right side in the same manner.
You can use paper that is colored on only one side, or you can insert paper of a different color for the trunk.
Note: By using paper that has been crumpled then smoothened out you can obtain the effect of leafy foliage. Have fun imagining and composing a landscape by placing trees of a brighter green in the foreground and using paler shades for those in the distance.
BUTTERFLIES OF EVERY KIND
ちょうのいろいろ


INSTRUCTIONS
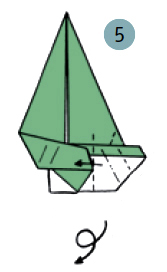
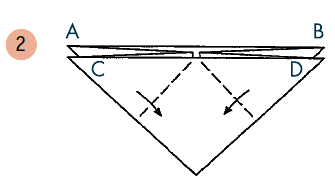
Butterfly (一) 1 Fold a square in half horizontally, then draw B to A.
2 Fold B in the direction of the arrow.
3 Make a mountain fold with A, making sure that the fold coincides with the one already made, as in figures 2 and 3 , so as to obtain figure 4 .
5 Here is the finished butterfly. Now gently press with your finger as shown in the figure, then release. The wings will move.
With an increase in the difference between the folds made in steps 2 and 3 and the median fold, the butterfly’s body will end up larger.
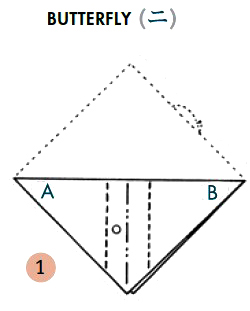

Butterfly (二) 1 Fold a square sheet along the diagonal. Now the procedure will be similar to that followed in model (一). This time, however, in order to obtain model 2 , you will need to make sure that the two folds between the body and the wings are parallel with the median fold.
For a child, a corner that is too sharp may be a hazard and cause pain on contact. For this reason, leave the folds that form the butterfly’s body a bit open and fold the ends of the wings inwards.


Butterfly (三) Fold a square sheet along the diagonal and pull the two superimposed flaps back as in 1 . By folding along the creases made by the mountain and valley folds, as in 2 , you will end up with figure 3 .


Butterfly (四) Stretch the model (三) as in figure 3 , then making a valley and a mountain fold do a crimp fold in order to obtain the front and rear wings.
4 Close the mountain and valley folds (the ones made first) once again in order to end up with model 5 .


Butterfly (五) Fold a square sheet horizontally 1 , then fold the bottom left and right corners symmetrically inwards. From this point on, follow the steps for model (四) in order to end up with the butterfly 4 .
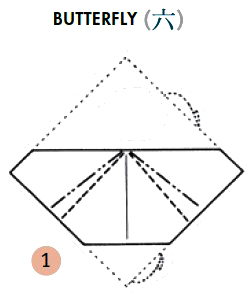


Butterfly (六) After folding the sheet along the vertical diagonal, match up the top and bottom corners, then fold backwards a bit over the horizontal diagonal.
Fold the bottom corner back as well, Finally, proceed as in variant (四)
in order to end up with 3 . In this model, the lightness of the butterfly’s wings are a notable feature.


Butterfly (七) Fold a square sheet diagonally as shown in figure 1 , then make the valley and mountain folds needed to obtain model 2 .
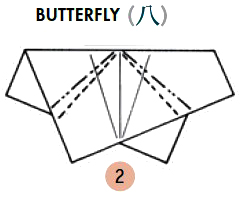


Butterfly (八) Open up the model of variant (七) and proceed as in figures 2 and 3 of variant (四) in order to end up with the butterfly 4 .
If the intersection between the horizontal and diagonal folds lies at the exact center of the sheet, then the left and right wings will overlap perfectly, but such precise correspondence is not very important to children. Let them enjoy the freedom of creating imperfect origami.
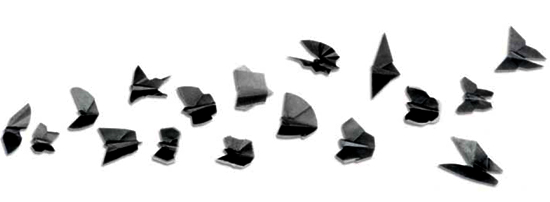
In the original black-and-white photo here, all the butterflies have been constructed according to the same procedure using triangular, rhomboid, square, rectangular, pentagonal, hexagonal, circular and oval sheets of paper, with parallel or radial folds.

An origami butterfly displayed at the exhibition Akira Yoshizawa: The World of Creative Origami, Sano Art Museum, Mishima, 2014.


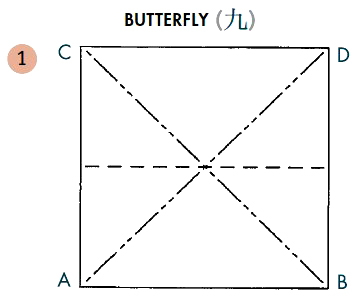
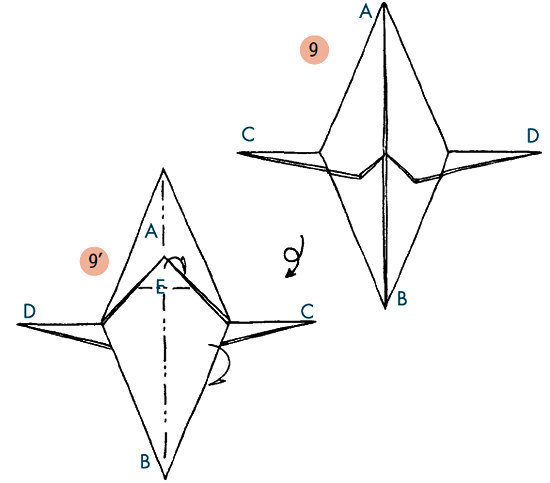
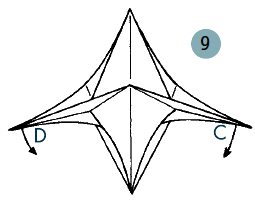
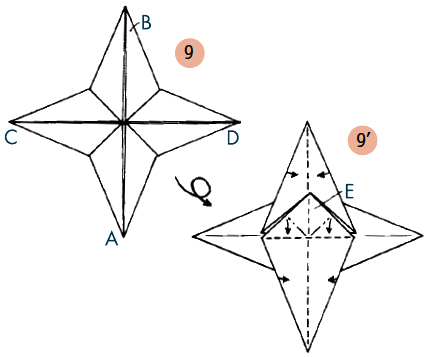
Butterfly (九)
1 Take a square sheet of paper and make the mountain and valley folds indicated in order to obtain figure 2 .
2 Fold C and D downwards in the direction indicated by the arrows.
3 Flip over to the other side.
3’ Make a valley fold, pulling it upwards.
4 Fold D and C downward in the direction of the arrows, pressing down and flattening out the triangular pockets that form on the left and right.
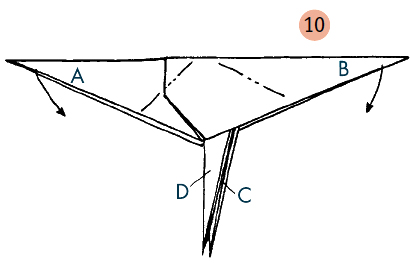
5 Shape the head by making a crimp in E.
6 Fold in half along the vertical axis.
7 Making a valley fold, shape the body and two wings.
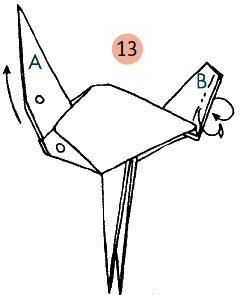
8 The finished butterfly.
SNAIL ON A LEAF
かたつむり

THE LEAF


INSTRUCTIONS FOR THE lEAF
For this model, use bright green paper to make a nice contrast with the color of the snail’s shell.
Take a square sheet and after folding it as shown in figure 1 fold it again in the direction of the arrows.
2 Now fold it in half.
3 Starting from the top, first make a valley then a mountain fold along the entire length to create an oblique wave. do it in such a way that the width of the folds gradually becomes smaller towards both the top and bottom.
4 Now unfold the sheet gently without wrinkling it.
5 Making sure not to crush the paper, use two fingers to twist one end to form a stalk, then shape the paper to resemble an actual leaf.
THE SNAIL


You can vary the form by making the neck thinner. By elongating it and setting it in a horizontal position, you will end up with a snail that is exerting force to pull its little house. If you pull the neck up, you will get a snail that is catching its breath after exerting itself.
INSTRUCTIONS FOR THE SNAIl
Use a square sheet that is white on one side.
Fold the sheet along the diagonal, unfold it, then fold it along the opposite diagonal without smoothing out the fold. Now, taking the intersection at the center as your point of reference, make the folds indicated in figure 1 , then fold in half again.
2 Fold approximately ¼ way from the middle.
3 Open the pocket on top.
4 Fold in the direction of the arrows. 5 Flip the sheet over.
5’ Open the pocket on top.
6 Fold in the direction of the arrows. 7 After making a crimp fold with corner E, fold B to the front and D to the back.
8 Fold F within the dotted line, drawing it upwards between A and d. repeat the same step with E, drawing it between B and C.
9 Fold F back from the dotted line. 10 Fold a small portion of F towards the outside and inflate the shell.
11 The finished snail.
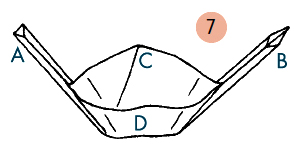
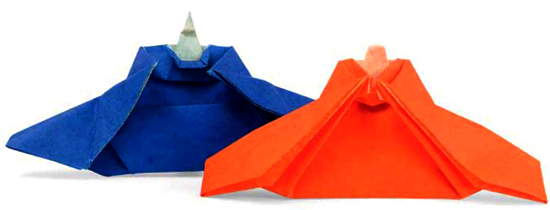
FAIRY TALE CROWNS AND CAPS
かんむりとぼうし
Let’s make fairy tale headpieces. If you make them the right size, you can actually wear them!
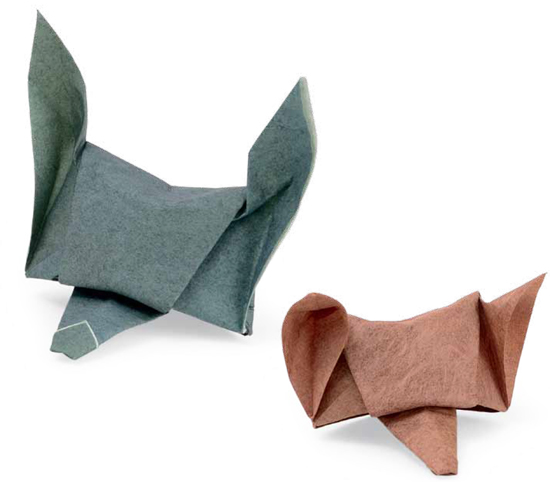
The photo on this page shows two head pieces: a wolf (above) and a badger (below).
Note: If using a lightweight paper, after completing and folding the crown or headdress, reinforce the borders by lining them on the inside with another type of paper. In the rabbit and snail headpiece, try to make the central core as low as possible.
INSTRUCTIONS
Try to imagine the features of an animal. The head is the part where the animal’s characteristics are most obvious. By making an origami and wearing it as a headpiece you will look a bit like that animal. Carefully observe what you would like to make, then begin. After learning the folding techniques illustrated in this section, you will be able to experiment to make all sorts of headpieces.
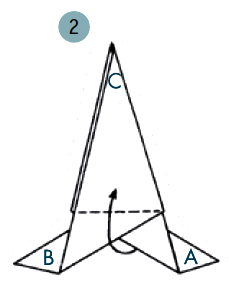
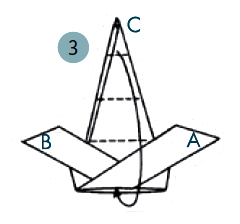
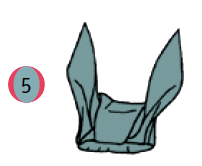
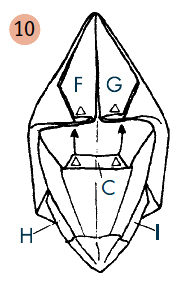
INSTRUCTIONS FOR RABBIT EARS
After refolding the base upwards, as in figure 1 , do steps 1 and 2 in that order.
2 Fold upwards.
3 Fold C and tuck it inside.
4 raise A and B, then shape the headpiece by expanding it from the inside and pressing down on it from above in order to obtain 5 .
For a child of five or six, the princess’s crown as well as the headpieces of the gnome and wizard require a 30 x 30 in (75 x 75 cm) sheet, those of the rabbit and snail an 31.5 x 31.5 in (80 x 80 cm) sheet, and the prince’s crown a 24 x 24 in (60 x 60 cm) sheet. In the case of the prince’s crown, the size may be adjusted to the head by increasing or reducing the width of the lateral folds in figure 2 . If, on the other hand, you use 3 x 3 in (8 x 8 cm) sheets, you can use them for finger puppets.
INSTRUCTIONS FOR WIZARD’S CAP
3 Follow instructions for the gnome’s cap as far as step 3 , then fold in half.
4 Fold C in the direction of the arrow.
5 Pull towards the dotted line, then fold the peak by reversing it on the exterior so as to end up with 6 .
INSTRUCTIONS FOR SQUIRREL EARS
Fold the ears of the rabbit as in figures イand ロ, then shape them by pinching them at the bottom with your fingers in order to obtain 6 .
RABBIT EARS


SQUIRREL EARS

WIZARD’S CAP
Starting from figure 3 of the gnome’s cap on page 60.


PRINCE’S CROWN


INSTRUCTIONS FOR PrINCE’S CROWN
Take a square sheet and make the indicated folds from figures 1 to 6 in that order.
6 Fold B to the back, making folds 1, 2 and 3 in that order.
7 Unfold at the bottom in the direction of the arrows, then shape by pressing the upper part in the direction of the arrows so as to end up with 8 .
GNOME’S CAP


INSTRUCTIONS FOR GNOME’S CAP
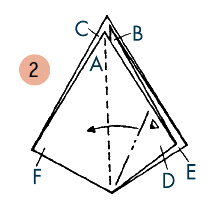
1 Take a square sheet of paper and fold it along the diagonal, then make folds 1 and 2 in that order.
2 Flip the sheet over.
2’ 3 Insert A and B into the pocket that has formed itself, then twist the peak lightly to obtain 4 .
PRINCESS’S CROWN
Starting from figure 2 of the gnome’s cap above.


INSTRUCTIONS FOR PrINCESS’S CrOWN
2 Follow the instructions for the gnome’s cap as far as step 2 , then make a crimp fold from a mountain and a valley fold.
3 lift A and B.
4 After making slight mountain folds with A, B and C by pinching them between two fingers, unfold them in the direction of the arrow. Shape them by lightly pressing them on the back in the direction of the arrow, as in 4’, in order to end up with 5 .
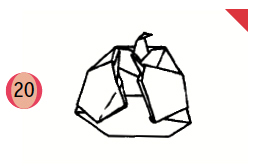
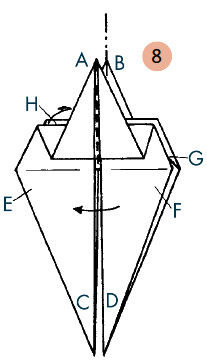
TIGER CUB
とらの子
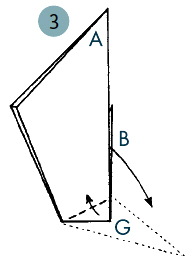
The tiger cub assumes different expressions based on the position of his head. He is made from two square sheets of paper—the head from one and the body from the other—and is then assembled.
THE BODY


INSTRUCTIONS FOR THE BODY
Take a square sheet of paper and fold it as in figure 1 , then again in the direction of the arrows.
2 Fold A towards the bottom.
3 Fold C and d, tucking them between A and B as indicated by the dotted lines.
4 Unfold C and D and, reversing them, draw them over the dotted lines.
5 Unfold the upper side of d. Fold as in figures
6 and 7 to form a thin tail as in 8 . Pull 8 as in figure 9 .
9 Make a valley and a mountain fold inwards on each side, modeling the body to expand it as shown in 10 .
Assemble 8 and 10 by attaching the head to extremity C of the body at the point folded backwards in 7 .
THE HEAD


INSTRUCTIONS FOR THE HEAD
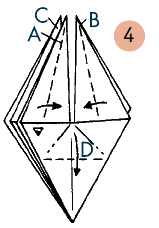
Take a square sheet and fold it as in figure 1 , then fold it in half.
2 Make a mountain and a valley fold on both sides, reversing the folds two or three times without smoothing them out too much.
3 Flip the sheet over.
3’ Make folds 1 and 2 in that order, folding D downwards.
4 lift up C.
5 Flip the sheet over.
5’ Fold A and B.
6 Unfold A and B.
7 Make mountain folds 1 and 2 in that order, folding towards the back, then unfold A and B so that they assume the shape of ears.
8 Fold C inwards, then insert a finger inside the nose and push it outwards in the direction of the arrows to expand the head.
TENGU MASKS
てんぐ
let’s make masks of the Tengu and Crow-billed Tengu, two goblins (small magic creatures) of Japanese folklore.
TENGU MASK


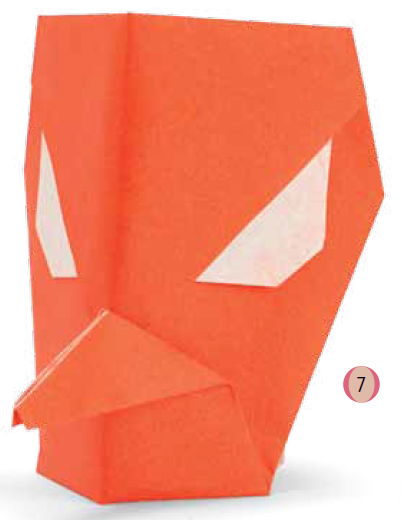
The Tengu is a goblin in popular Japanese folklore, halfway between a human and a bird.
INSTRUCTIONS FOR THE TENGU MASK
Take a square sheet of paper and fold it along the diagonal, then fold it again as in figure 1 , and finally fold C and D.
2 After folding a small portion of corners C and D inwards, cover with A.
3 Fold E and F backwards, then make mountain and valley folds, making a crimp fold in B.
4 Fold in half along the vertical axis. 5 Lift B in the direction of the arrow to obtain 6 .
7 The finished mask.
This Tengu mask is best if you use a sheet that is red on one side and white on the other. Insert gilt paper over the triangles of the eyes for a better overall effect. The size of the eyes and nose can be varied according to preference.
CROW-BILLED TENGU MASK


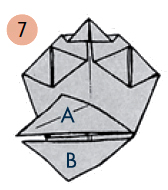


INSTRUCTIONS FOR THE CrOW-BIllEd TENGU MASk
Take a square sheet of paper and make the folds in figures 1 and 2 in that order.
3 Fold E and F towards the bottom.
4 Make a crimp fold with G, then fold E and F. 5 Fold A upwards.
6 Fold A and B only on the mountain part side in order to obtain 7 .
8 After making mountain folds with A and B, make them in the opposite direction, as in 6 and 7 .
9 Fold to taper A and B, then fold in half towards the rear, in the direction of the arrow. Shape the beak and eyes by doing steps 10 , 11 and 12 in that order.
Now the mask is finished 13 . By holding its cheeks, you can make it open and shut its beak.
GOLDFISH MOBILE
きんぎょ
The allure of these suspended mobiles is in
the harmonious rhythm of space that is achieved through
a careful play of form and movement.

Here a string is tied to some thin rods in order to reproduce the gentle fluttering of goldfish. The rods are staggered at different heights, creating the effect of a little family darting here and there. There is no need for a lot of fish. In fact, the mobile can be simplified by using only two or three fish (see pages 175–5).


INSTRUCTIONS FOR THE GOLDFISH
1 Fold a square sheet of paper as indicated by the dotted line, folding C and D just short of diagonal AB, then also fold E and F, and finally A towards the rear.
2 Pull out C and d, lifting them as far as the dotted line.
3 Make a crimp fold in both C and d.
4 After folding C and D inwards, in the direction of the arrows, make a valley fold.
5 Fold the sheet in half.
6 Fold G and H inwards starting from the line of the mountain fold, then fold C and d.
7 Pick up G and H with two fingers and turn them inwards in such a way as to obtain 8 .
9 keeping A on top of B, fold inwards.
10 Invert A and B from the dotted line.
11 Fold inwards in the direction of the arrows.
12 Invert only A downwards from the dotted line.
13 Fold B.
14 Fold the mouth inwards and the pectoral fins in the direction shown by the arrows, then open B from the line of the valley fold, bringing it over A. Mold everything to end up with 15 .

INSTRUCTIONS FOR THE SEAWEEd
1 Fold a thin strip of paper along its vertical axis.
2 Make a series of irregular crimp folds along its length.
ASSEMBlING THE MOBIlE
After hanging fish イand ロ and the seaweed from shaft (1), find the center of mass (C), making sure that the two ends are balanced, and attach the string there. Now, starting from the bottom, suspend 2, 3, 4 and 5 in that order, each time at the center of the mass. Fish イand ヘ are made in the same way as the carp on page 79, with a few modifications.
Model ホ is very easy to make because it does not have pectoral fins.
To ensure that the mobile is perfectly balanced, add a small weight to fish ヘ.
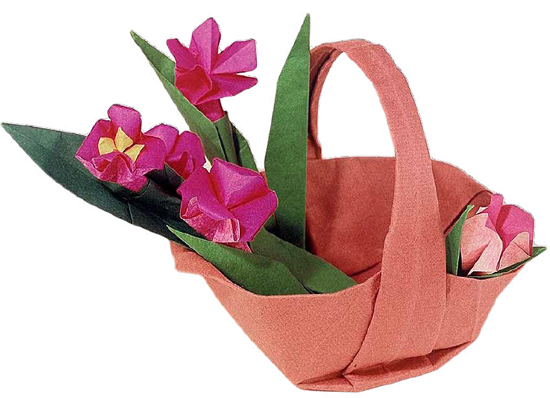
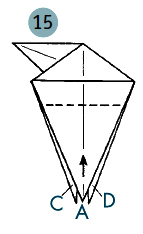
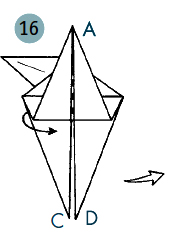
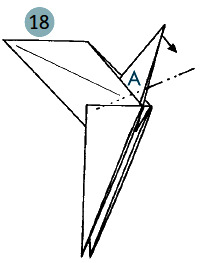
FLOWER BASKET
花かご


INSTRUCTIONS FOR THE FlOWErS
Take a square sheet of paper printed on one side. keeping the white side on top, make mountain and valley folds as in figure 1 to obtain the square base (with the color on the interior) of figure 2 .
2 Fold F and G towards the front and E and H towards the back.
3 Invert F and H, opening them in the direction of the arrows.
4 Make a mountain and a valley fold, executing the valley fold as in 5 and folding it inwards as in 6 .
6 Holding the model in the place marked x, insert a finger in the direction of the arrow and gently prise it open, raising only the upper edge. The flower’s corolla will open completely, as in 7 .
By using a smaller sheet of paper of a different color and folding it as indicated up to 2 , you will get a pistil that you can insert in the center of the flower in step 2 . Then complete the remaining steps.
THE LEAF

INSTRUCTIONS FOR THE lEAVES
Use a square sheet of leaf green paper and fold it as in figures 1 and 2 . Combine different leaves.
The sides of the sheets used for the flowers and leaves must be about one quarter the size of those of the sheet used for the basket.
Note: this flower model is usually made with pentagonal or hexagonal sheets. All flower origami require a basic step in which one part of the sheet is squeezed while the other opens out. (See the flower basket photo opposite.)


INSTRUCTIONS FOR THE BASKET
Take a square sheet of paper and fold it as in figure 1 , then fold it again in the direction of the arrows.
2 Fold D back.
3 Fold A and B, lifting them between B and C.
4 Unfold A and B in the direction of the arrows.
5 After folding the corner of A, wrap A and B’s sides in on themselves.
6 reverse C and D without smoothing out the folds, bringing the inside to the outside.
7 After inserting B into A as in figures 8 and 9 , smooth out the fold in such a way that the two ends do not come undone. Pinch corners E and F as in figure 10 , modeling them as in 11 so that they rest firmly on the surface.
12 The finished basket.
If you find it too difficult to invert the basket as shown in figure 6 you can simply expand it without inverting it, then join A and B. In the photo, the basket’s handle has been shaped to make it thinner at the top.
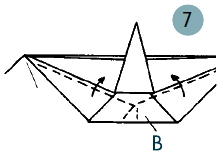
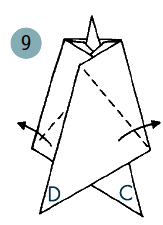
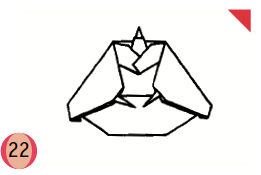
EMPEROR AND EMPRESS DOLLS
内裏雛
In Japan, various kinds of paper dolls have been created from time immemorial, evolving from early depictions of the human figures used in religious rites.
The first dolls were generally made from silhouettes cut out of paper and glued together. However, I wanted to create original and refined origami dolls in which the head was made without cutting the paper, a very difficult thing to do. Like all paper dolls, these are made with paper that is colored on one side, with the white side used for the face. The simple pattern of folds described here can be used to make different types of dolls.
As we are dealing here with an imperial couple, it is good to use colored Japanese paper (washi) but to avoid primary colors in order to produce a more elegant and refined effect.
THE EMPEROR


INSTRUCTIONS FOR THE EMPEROR
Use a square sheet of colored paper that is white on the back, making sure to choose a color that befits an emperor.
1 After folding corner A to subdivide it into three sections, lift B upwards.
2 Make folds 1, 2 and 3 in that order.
3 Unfold C and D and lift only the top layer of A on a diagonal.
4 lift A vertically.
5 Fold B upwards, then draw out the part labeled ○ behind A as you have already done on the right side.
6 Make a crimp fold close to the center of the sheet, then close by make a mountain and a valley fold, and finally make an outside reverse fold in the direction of the arrows to create the collar 7 .
8 Make an inside reverse fold with C and D from the line of the mountain fold, then flip over (after inserting C and d, reclose the flaps). Fold F as in figures 9 and 10 , then pull it gently and bring it over to the dotted line in 11 . repeat the steps made with F on the right side with E.
12 Matching up the designs on the front and back, fold to join ○ and the two x’s, then open the lower corners on the left and right to create the sleeve.
13 Pull the bottom section to the rear from the mountain fold line and straighten out the entire figure.
14 The finished emperor.
THE EMPRESS


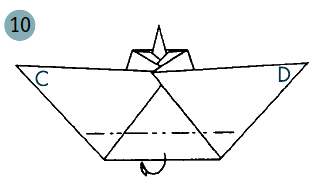


INSTRUCTIONS FOR THE EMPrESS
Repeat the steps for making the emperor up to figure 6 .
6 Join the top left and right corners with the corners marked by their respective symbols, making valley folds in the positions indicated, then shape B as in figures 7 and 8 to form the collar, then lay D on top of C.
9 Making a valley fold, raise C and D upwards on a diagonal.
10 Making a mountain fold, draw the lower part towards the back.
11 Gently pull corners C and D to meet the dotted line.
12 Fold both corners in the direction of their respective arrows.
13 Invert C and D inwards and fold the top corners towards the back to form sleeves.
14 reduce the size of the shoulders by pushing the part marked with ○ behind the sleeves, then smooth out thoroughly.
15 The finished empress.
The two dolls will automatically stand erect if you adjust the base so that it is perfectly flat. You can also support them by cutting out some cardboard and attaching it.
FIVE MUSICIANS
五人ばやし
Accompanying the ornamental dolls depicting the imperial couple and members of the court, which on the Japanese holiday of Hinamatsuri (doll’s day or Girl’s day) make a fine spectacle on top of a specially decorated platform, are five musicians that attract particular attention because of the movement that animates them.

In order to construct the musicians, I have prepared a series of steps that are identical for all. I differentiate them only in the final phase by altering their orientation and hand movements, thus expressing the elegant gestures that are typical of each musician.


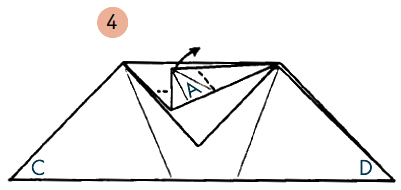


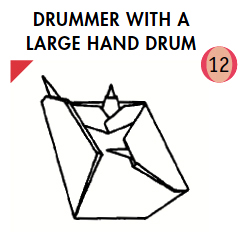
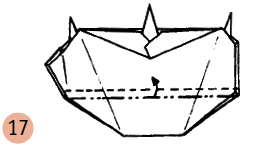
INSTRUCTIONS FOR THE DRUMMER WITH A LARGE HANd DRUM
Fold a square sheet of paper as in figures 1 to 5 .
6 Fold B by making folds 1 and 2 in that order, then using two fingers pull the flap marked by the x from the outside and invert it towards the left to form the collar.
7 Open pockets C and d. Make folds 8 , 9 and 10 in that order.
11 Fashion the head by making a crimp fold in A, then position the figure to express a sweeping motion, paying particular attention to the corner of folds C and d.
12 The finished model.
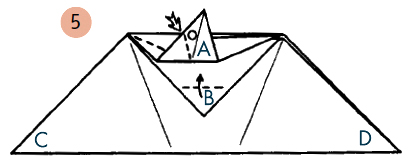
THE DRUMMER WITH A HAND DRUM


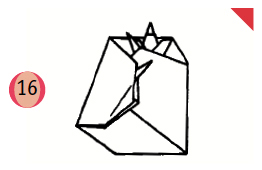
INSTRUCTIONS FOR THE DRUMMER WITH A HANd DRUM
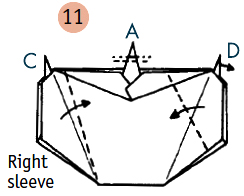
13 Start with the model in figure 11 with the open right sleeve.
Make the folds in 14 , then push the left shoulder inwards as in 15 , and finally close the right sleeve.
16 The finished model.
THE FLUTIST


INSTRUCTIONS FOR THE FlUTIST
Start with figure 14 , making fold 1.
17 Make a small crimp fold. Make the folds shown in 18 , then make an inside reverse fold with the shoulders and fold the head on a diagonal as in 19 .
20 The finished model.
THE SINGER

INSTRUCTIONS FOR THE SINGER
21 Fold the model created up to step 18 as in 11 , then, after making a crimp fold, fold the hands forwards in a quiet and relaxed position.
22 The finished model.
THE DRUMMER
INSTRUCTIONS FOR THE DRUMMER
Once you have finished the model of the singer, slightly lift the right hand as a finishing touch.
23 The finished model.
You can either make the musicians in blue, or else try to imagine them in various colors, each in tune with the timbre of his instrument.
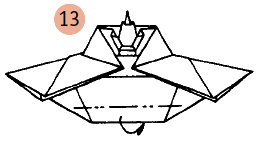
CHILDREN’S DAY CARP BANNER AND HELMET
こいのぼりとかぶと
On Children’s day, every house with a baby boy traditionally displays a carp-shaped banner (koinobori), the symbol of power and vitality, as well as warrior figures, emblematic of valor and courage. The baby boy wears a paper samurai’s helmet or cap.
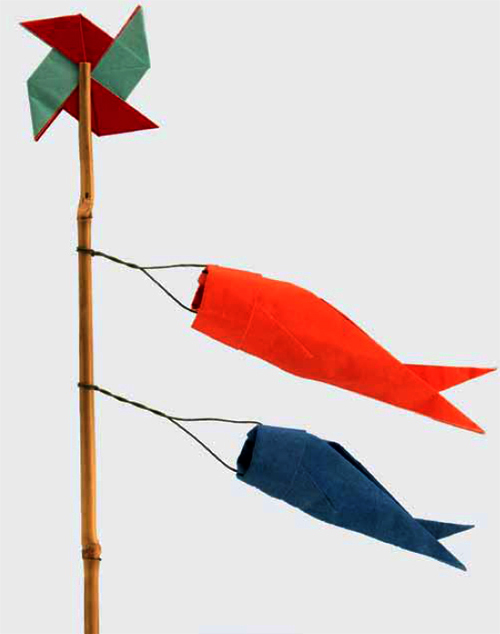
How satisfying it must be for children to manage to make an origami carp banner and helmet entirely on their own.
THE CARP BANNER


INSTRUCTIONS FOR THE CARP BANNER
1 Take a square sheet of paper and fold C and D as in the figure, then fold E and F.
2 Pull A to the back.
3 Pull C and D from inside E and F as far as the dotted line.
4 Make crimp folds in C and d.
5 Fold in the direction of the arrow.
6 Flip to the rear.
6’ After folding the sheet along the vertical axis in order to subdivide it into three sections, tuck G into pocket H as shown in figure 7 .
8 Insert one finger from above and thoroughly smooth out the parts on top of G and H, as in figure 9 , so that the two strips do not come apart.
9 Invert a thin portion of A and B inwards, as much on the diagonal as possible.
10 Pull B, then push the part marked ○ inside, shaping the model to end up with 11 .
THE PINWHEEL


THE HELMET


INSTRUCTIONS FOR THE PINWHEEl
1 Fold A and B in front and C and D on the back.
2 Fold E and F in front and G and H on the back.
3 Pull corners A and B out and over to the dotted line, then finish by pulling C and D out in the back.
INSTRUCTIONS FOR THE HElMET
After folding a square sheet of paper along the diagonal, fold a strip of it not far from the bottom upwards.
2 Make folds 1 and 2 in that order.
3 Fold upwards in the direction of the arrows.
4 Insert a finger from beneath and stretch AB apart, then finish folding as in figure 5 so as to bring C and D together.
6 The model seen from the front.
If made from an 31.5 x 31.5 in (80 x 80 cm) sheet, the helmet can be worn.
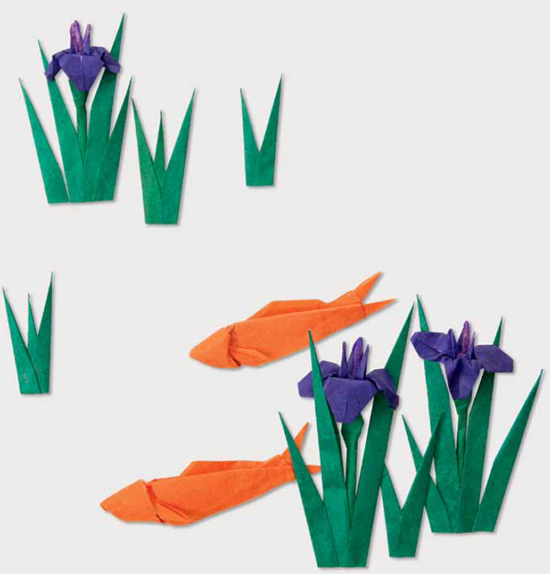
IRIS BLOSSOMS
菖蒲の花
HOW TO MAKE A HEXAGON OUT OF A SQUARE SHEET


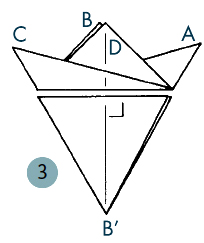
INSTRUCTIONS ON HOW TO MAKE A HEXAGON
1 Fold a square sheet of paper along the diagonal, then make folds 1 and 2.
2 Using B’ as the fulcrum, raise C on a diagonal in such a way that C’ meets with point E on line イ. Bend A towards the back.
3 Cut the sheet along the line perpendicular to the median fold, then unfold it.
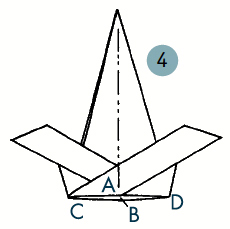
THE IRIS (A)
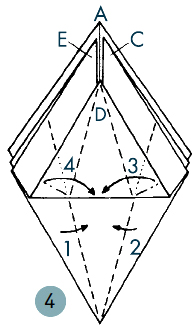


INSTRUCTIONS FOR THE IRIS [A]
1 Make mountain and valley folds in the hexagonal sheet to obtain the closed form of figure
2 .
2 Make inside reverse folds in the right and left corners from the lines of the mountain fold.
3 Make a crimp fold in d, then open the sheet and repeat the same steps done with d, with B and F.
4 Make folds 1, 2, 3 and 4 in that order.
5 repeat the steps done in 4 with B and F, which, like d, have already been folded inwards 3 .
6 Flip the sheet over.
7 and 8 Fold E down, twisting it, then repeat the same step with C. Shape the corolla by passing the petals between your fingertips.
9 The finished iris (A).
THE IRIS (B)


INSTRUCTIONS FOR THE IRIS [B]
Follow the steps in [A] as far as figure 4 , then fold only the left side of the bottom layer in the direction of the arrow.
5 Fold each corner down in the direction of the arrows.
6 Make folds 1, 2, 3 and 4 in that order.
7 repeat the steps done with D in 6 with B and F.
8 Shape the corolla by passing the petals between your fingertips.
9 The finished iris [B].
ANGEL FISH
エンゼルフィッシュ
An angel fish’s mouth is not that big but it is intentionally exaggerated here to make the relevant steps easier to follow. The effect will be more refined if you use gray, fine-grained Japanese paper (washi).


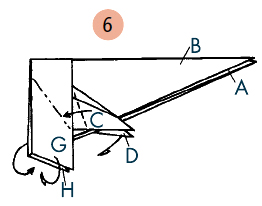
INSTRUCTIONS
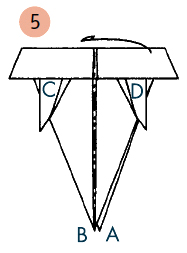
Start with Base Fold (A) on page 40.
7 Fold A and B down.
8 Make a mountain fold without flattening it out too much. reverse the fold two or three times in order to push E inside.
9 Make a valley fold with each corner in the direction of the respective arrows.
10 Bring G to the left and I from the back to the right, then fold E down as in figure 11 .
12 Pull up A and B horizontally outwards as far as the dotted line.
13 Fold the corners on the upper left, unfolding them in the direction of their respective arrows, then fold a thin portion of A and B inwards. 14 refold the summit inwards, between the two layers, starting from the dotted line, then fold H and I in the direction of the arrows and finish off the mouth.
15 Pick up mountain fold D with two fingers, as in figure 16 , and hoist it up between the two layers.
17 Hoist up C as you did d.
18 Fold C and D inwards, each from its respective mountain fold line, and turn them around.
19 lift D on the left, then lift C.
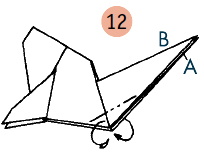
20 Curve A and B in the direction of their respective arrows from the point of the fin’s joint, then make a valley fold in C, reversing it towards the outside, and proceed as in figures
21 and 22 . Finally, insert the portion of D marked with the x inside the portion of C bearing the same symbol.
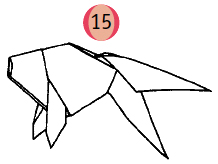
23 The finished fish.
Once you have mastered the basic steps, you can make your fish even more animated and graceful if, after folding F and G in step 9 , you pull them out and turn them into two pectoral fins. By making a variety of models, you can put together an elegant decorative mobile.
Note: While doing this model, be especially careful in step 12 not to exert too much pressure on the point where the dotted lines lie so that the overlap of the inner layers is not visible from the front. If you discover that fins A and B have turned out too short, don’t worry. Instead of an angel fish, you have made a porgy or sole.
An early black and white photograph of a group of angel fish constructed by Akira Yoshizawa.
CUCKOO
ほととぎす
To create a soft effect, use colored paper in a neutral tone backed in white. Also, since the scheme of the fold lines is rectilinear, reduce the rigidity by making sure that right angles and parallel lines do not form between each fold.


INSTRUCTIONS
1 Fold a square sheet of paper along the diagonal, then lift A upwards.
2 Fold in the direction of the arrow.
3 Fold C and D outwards, each from its respective valley fold line.
4 Fold E and F inwards, each from its respective mountain fold line. 5 Fold C and D from the valley fold line to the right and left respectively.
6 Make an inside reverse fold with B as in figure 7 from the line of mountain fold 1, then another reverse fold on the line of valley fold 2 in order to obtain 8 .
8 Make an inside reverse fold with A to form the head, then finish it by spreading open the wings.
9 The finished cuckoo.
WILD GEESE
がん
Now let’s make a wild goose, one of those migratory birds that can be seen shooting across a clear evening sky in a honking flock.


INSTRUCTIONS
Take a sheet of paper in the shape of an isosceles right-angled triangle.
1 Bring the two equilateral sides together and make a mountain and a valley fold on each of them, closing them as in figure 2 .
3 Flip over.
3’ Fold in the direction of the arrows.
4 Fold both sides in, matching up their respective symbols.
5 Flip over.
5’ Fold C and D down from the valley fold line so that the back of corners E and F form a small triangular pocket.
6 Fold in half, starting from the center.
7 On the neck, leave part A half open and make an outside reverse fold. On the tail, fold 1 on the inside, along the mountain valley line, then fold it in the opposite direction along the valley fold line.
8 Make an outside reverse fold in the direction of the arrows on B, then make a crimp fold on A, flattening out the end.
9 10 details viewed from the bottom.
11 The tail seen from above. Shape the wings with your fingertips.
12 The finished goose.
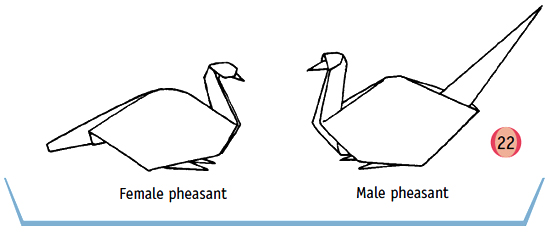
MALE AND FEMALE PHEASANTS
雉
The pheasant is the symbolic bird of Japan. It must be modeled in such a way that it captures its noble and elegant bearing.
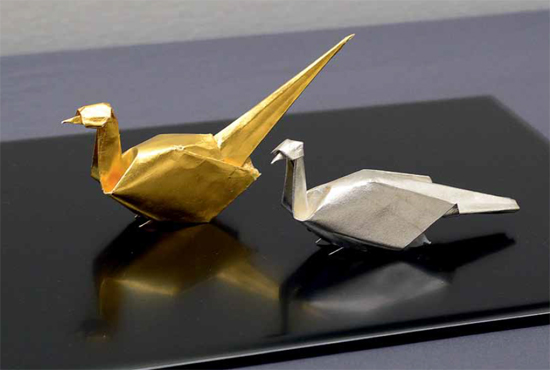
Male and female origami pheasants displayed at the exhibition Akira Yoshizawa: The World of Creative Origami, Sano Art Museum, Mishima, 2014.
THE PHEASANT


INSTRUCTIONS
Fold a square sheet of paper as in figure 1 , then fold it again in the direction of the arrows.
2 reopen the sheet and fold corners C and D downwards using two fingers as in figure 3 .
4 and 5 Make a valley fold holding on to C and D and rotating them towards the outside.
6 Fold C and D in the direction of the arrows.
7 and 8 letting symbols △ and ○ on C and D slide in the direction of the arrows, open pockets C and D and flatten them out. (The line of the fold on corners C and D corresponds to the fold executed in figure 6 .)
8’ Making a mountain and a valley fold, pull out D in the direction of the arrow.
9 Place symbol ○ over symbol □. repeat the steps done with D with C in order to obtain 10 .
10 After making valley folds 1 and 2, as in figure 11 , extend and fold in half along the vertical axis along the line of valley fold 3.
12 Fold along lines 1 and 2 without smoothing the fold out too much. reverse the fold two or three times in such a way as to push inwards the point where valley fold 2 was made in order to obtain 13 .
14 Fold a thin portion of B inwards in the direction of the arrows, then invert A between the two layers on a diagonal.
15 Pull B out and over to the dotted line, then extend A as in figure 16 .
16 Press in the direction of the arrows to form a pocket inside A, then pull out and lift as far as the dotted line in 17 .
18 Make an inside reverse mountain fold.
19 Pull out from beneath symbol ○, pulling towards the front and rear.
20 Make an outside reverse valley fold in the direction of the arrows.
21 Smooth out the fold and, making a crimp fold, create the head and beak.
22 The finished male pheasant.
To make the female, follow the instructions for the tail in the illustrations. Complete the steps until you have shaped the spine, then finish it off by folding a tiny portion inwards.
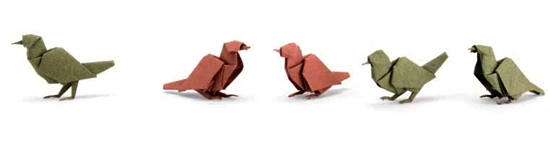
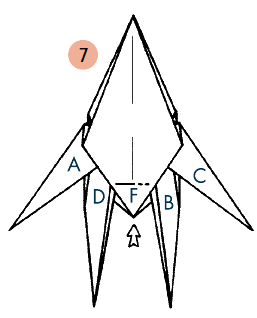
SMALL BIRDS
ことり
The aim here, as shown in the photo below, was to create a spring scene filled with lots of small, playful, chirping birds. To achieve this, all the birds must be of the same type or species. By varying the angles of the heads and legs, you can create different poses and expressions.


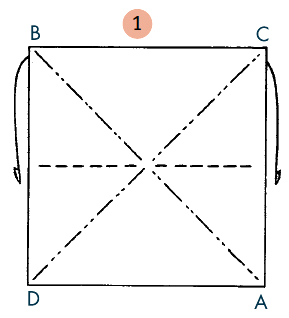
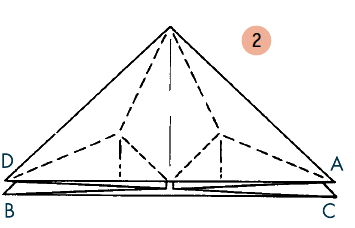
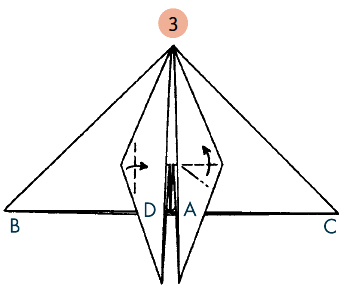
HOW TO CONSTRUCT THE LEG

INSTRUCTIONS
Start with Base Fold (A) on page 40.
7 raise C and D upwards horizontally.
8 After folding a thin portion of C and D inwards, fold B downwards.
9 Flip over.
9’ Make an inside reverse fold with E between the two layers, then fold in half.
10 Make an inside reverse mountain fold with A and B.
11 Invert A and B backwards, folding them inwards to correspond with the dotted line.
12 Fold the indicated corners inwards in the direction of the arrows.
13 After folding a thin portion of B inwards in the direction of the arrows, hold the model in the place marked by the symbol ○ and gently pull A in the direction of the arrow in order to inflate the chest as in figure 14 .
14 Invert A, C and D in the direction of their respective arrows.
15 Fold C and D and invert them, then open A slightly and smooth out the end to make a crimp fold as in 16 .
17 Open the head in the direction of the arrows, inverting them towards.
Take care that the right angles on the lines of the spine-head and spine-tail do not create rigid and square forms that belie the delicate softness of the bird.
If making the head is too difficult, leave everything as in 16’ since the model will turn out equally well. It is also not essential to shape the legs precisely when making the basic folds. You can simply leave a bit of space between one edge and the next and take care of the details when doing the finishing touches.
DRAGONFLY
とんぼ


INSTRUCTIONS
Start from Base Fold (D) on page 43.
7 Fold A and B down.
8 Fold C and D as in figure 9 .
Do the steps in figure 10 , then fold two thin sections of E as in 11 . Complete the wings with an inside reverse fold, paying careful attention to points C and D.
Make the folds shown in figure 12 , then flip over as in figure 13 .
13’ Fold F.
14 Fold and flatten F.
15 Repeat the steps made with F with G.
16 Fold the two small sections on the outside.
17 Fold corners F and G towards the center, then make a crimp fold in B.
18 Push F and G inwards in the direction of the arrows, then pull both sides from behind B.
19 After folding the two thin sections towards the median, insert into them the corners beneath symbol ○.
20 Complete the dragonfly by making valley folds in the two thin strips of its belly to reach 21 .
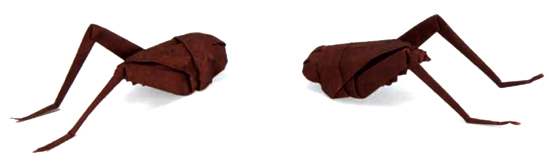
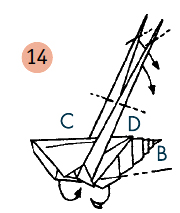
BELL CRICKET
すず虫
Let’s make some insects that are around in autumn, for example the bell cricket which the Japanese have loved since antiquity for its alluring song.

The models here show the cricket with folded wings.


INSTRUCTIONS
1 After folding a square sheet of paper as shown in the figure, fold it again to make it thinner.
2 Make mountain and valley folds in order to make a crimp fold.
3 Use two fingers to raise A to the lines of the valley and mountain folds. Place corner G over corner H and flatten them out.
4 Draw A downwards, making a valley fold to obtain 5 .
5 Fold G and H, then shorten B by folding it inwards over the lines of the mountain and valley folds.
6 Open pockets G and H, making them run towards the outside, then fold the lower corners on the back.
7 Starting from the dotted line, fold the piece with the symbol ○ inwards between the two layers, then fold I and J down.
8 Fold the upper corners towards the back.
9 Fold in half.
10 Raise I and J and shape them.
11 The finished bell cricket.
GRASSHOPPERS
こおろぎ
The green models depict four types of grasshopper, from left to right, kusakiri (Ruspolia lineosa), hishibatta (Tetrix japonica), umaoimushi (Hexacentrus japonicus) and kutsuwamushi (Mecopoda nipponensis).
The two brown models above depict insects produced by following the same steps as for the grasshopper but extending the part on B’s rear or folding it inwards at the end in order to taper it.


INSTRUCTIONS
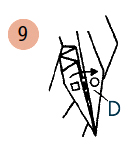
Start from Base Fold (c) on page 42.
7 Make an inside reverse fold with C and D, and raise them upwards.
8 Fold a thin portion of C and D.
9 Making a mountain and valley fold, lift D as in figure 10 , then repeat the same step with C.
11 Invert C and D, then fold A downwards.
12 Make a variety of crimp folds in B.
13 Make reverse inside folds with C and D, then shape the body by making a mountain fold.
14 Fold C and D downwards to form the legs, then finish up by folding the lower corners inwards.
15 The finished grasshopper.
You can make lots of tiny dry origami leaves and scatter them on a surface, then place one or more of these insects on top of them. To make the leaves, see the instructions on page 56.
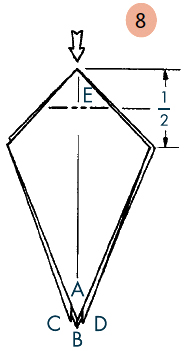
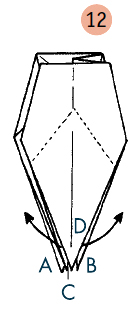
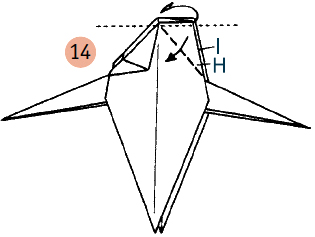
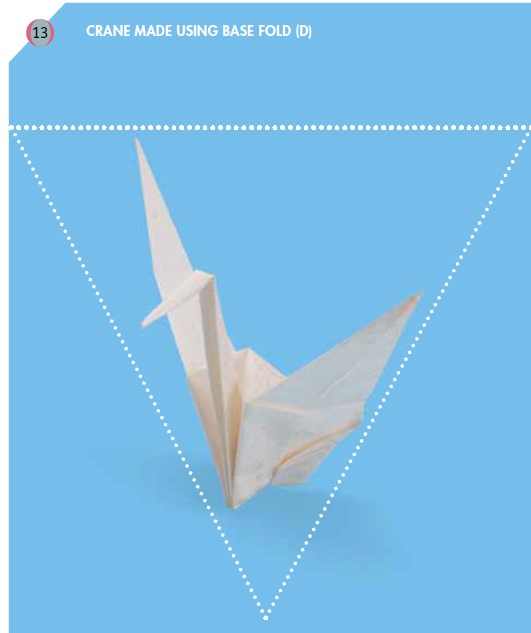
CRANE
BASE FORM AND VARIANTS
折づる

This is not simply a matter of creating different types of cranes. By applying the procedures, you can learn about and appreciate the ratio between the shape of the sheet and particular folds and their relationship to a particular theme.


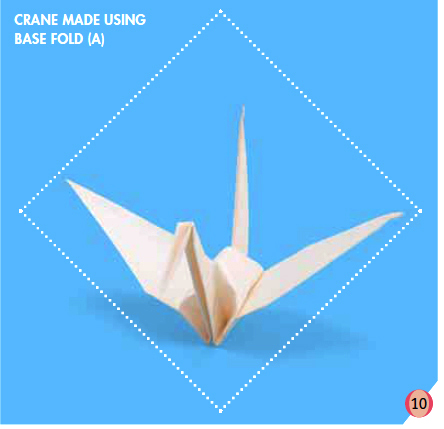


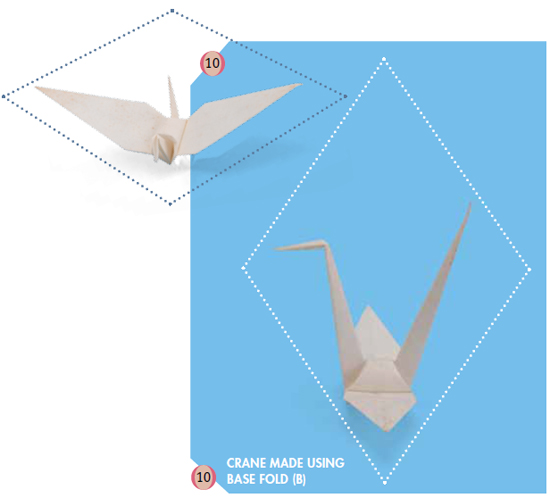
INSTRUCTIONS
In order to construct the crane from base folds (A), (B), (c) and (D) illustrated on pages 40–3, proceed as above.
Usually the head, tail and two wings are made from the four corners of the sheet, but it is also possible to come up with schemes that begin with base folds (c) and (D) in which only three corners are available.


FOX HEAD
きつねの面

If you move your fingers while holding the mask at points E and F, you will see its mouth and ears wiggle.


INSTRUCTIONS
After folding a square sheet of paper along diagonal AB, proceed as in figure 1 , bringing C and D downwards with one mountain and one valley fold.
2 Open C and D, making a valley fold.
3 Make a crimp fold following the proportions indicated in the figure.
4 Fold in half along the vertical axis.
5 Invert B between E and F.
6 Open B in the direction of the arrows and make a valley fold.
7 Finish up the model by twisting the end of the nose around itself, then shape the jaw by pressing on its end with your fingertips in order to flatten it out.
8 The finished fox head.
TWO TYPES OF FISH
さかな


INSTRUCTIONS FOR FISH (A)
Start from Base Fold (B) on page 41.
7 Fold A and B down.
8 Unfold both sides in the direction of the arrows.
9 Raise C and D up.
10 Make an inside reverse fold with A and B, then, for the size shown, fold C and D, then D’s point as in figure 11 and make a crimp fold.
12 Close the folds, keeping the end of D flat, then repeat the steps done with D with C.
13 Pull C and D downwards.
14 Fold corners F and G inwards.
15 Bring H and I to the back, then, after folding A and B in the opposite direction, fold the model in half along the vertical axis.
16 Make a reverse inside fold with corner E, then fold the two little corners of the chest inwards between the two layers. Finally, make an inside reverse fold with C and D from the mountain fold line, thus forming a nearly right angle with the line of the spine in order to obtain 17 .
FISH (A)


FISH (B)


18 After making an inside reverse fold with E in the direction of the arrow, open A slightly and shift the fold to form the pectoral fin, then repeat the same step on the back of B. Finally, refold C inwards, bringing it inside the dotted line to obtain 19 .
19 Make a mountain fold and firmly insert corner D superimposed over C between the two layers, then fold the rear section in the same way to attach the tail. Finally, shape the entire figure.
20 The finished variant (A).
INSTRUCTIONS FOR FISH (B)
Follow the steps for making variant (A) as far as figure 16 , then make an inside reverse fold with E, starting from the mountain fold line. Finally, fold a thin section of C superimposed on D inwards on as much of a diagonal as possible.
17 Using two fingers, pick up E and make an inside reverse fold between the two layers, then finish up A and on the rear B so that they assume the form of fins. Finally, form the tail by folding D on the inside of the dotted line and pulling it in the direction of the arrow.
18 The finished variant (B).
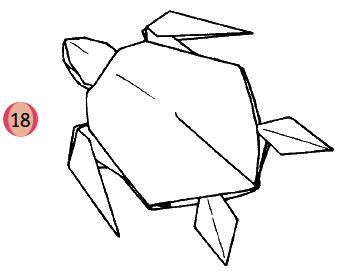
SEA TURTLE
海がめ


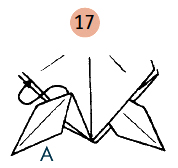
INSTRUCTIONS
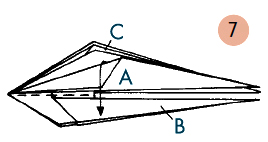
Start from Base Fold (A) on page 40.
7 Fold A and B downwards in the direction of their respective arrows.
8 Make an inside reverse fold with each of the four corners on the left and right, then lift C and D up to the dotted line.
9 Fold a tiny portion of C and D backwards on a diagonal so as to end up with 10 .
10 Following the direction of the arrows, make outside reverse folds with C and D, then make a mountain and valley in E to form a crimp. Flip over to the back.
11 Fold E as shown in the enlarged detail, then, using two fingers, lift A superimposed on B in such a way as to inflate the part on the rear (which will become the turtle’s spine). Finally, invert them on the left.
12 Pull out A.
13 Fold A in the direction of the arrow, then shape the central section into the form of a plate in order to obtain 14 .
14 Flip over to the back.
14’ (Side with the convex spine.) Making a valley fold, make an outside reverse fold with A in the direction of the arrow, then, after making a provisional valley fold with B, extend the end of it with a mountain fold so as to obtain the flat form of figure 15 .
15 After folding A in the direction of the arrow, make a mountain and valley fold in B in order to insert it between the body and the shell.
16 and 17 Making a valley and a mountain fold in A, smooth out its end and insert it beneath the shell, then shape them together.
18 The finished sea turtle.
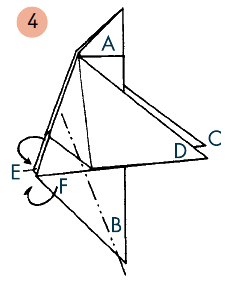
TWO TYPES OF SHRIMP
えび
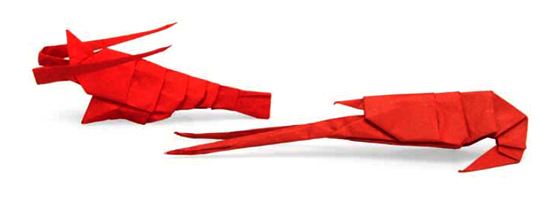


INSTRUCTIONS
Take a sheet in the form of an isosceles right-angled triangle and execute the folds in figures 1 , 2 and 3 in that order.
3 Extend.
4 Lift B up, inverting the direction of the folds.
5 Repeat the step done with B with A.
6 After folding A and B down with valley folds 1, turn them up with mountain folds 2.
7 Make a valley fold with イand ロ as in figure 8 .
9 Fold the little corners at the base of A and B.
10 Flip to the back.
10’ Fold D between the two layers with mountain fold 1, making sure not to fold A and B, then refold it inside with valley fold 2. Finally, make the tiny crimp folds in the lower area, one by one.
11 After making a mountain fold, make valley folds with E and F.
12 Bring G and H to the back with mountain folds ハ and ニ, then rotate them forwards with valley folds ホ and ヘ.
13 Fold in half along the median.
14 Gently push the parts with arrows 1 and 2 inwards, then carefully pull out 3, 4, 5 and 6 in that order to obtain the first variant of 15 .
For the second variant, in step 14 push the point with arrow 7 inwards in order to shape the head, then make an outside reverse valley fold with A and B. On the spine, press 1 and 2 inwards in the direction of the arrows, then firmly pull 3, 4, 5 and 6 in that order to round out the tail.
Finish up by pressing in the points marked with ○, along with the indicated mountain folds, in order to end up with the second variant of 15 .


SLED DOG
からふと犬

The Karafuto or Sakhalin husky dog breed was once employed in Antarctic regions. Thanks to its exceptional resistance and courageous nature, it was able to survive the tough winters of the South Pole.


INSTRUCTIONS
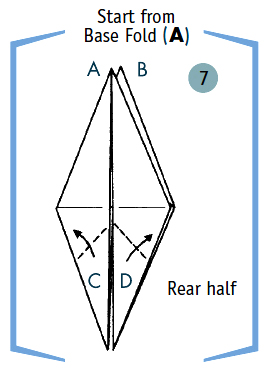
Start with Base Fold (A) on page 40, making one for the front half and another for the rear half, then put them together.
Start with the rear half
7 Fold C and D as in figure 8 , paying particular attention to the angle.
8 Making a mountain fold, bring C and D to the back (mountain folds C and D should not be perpendicular to the vertical median).
9 Fold A down.
10 Fold B and E.
11 Make a mountain fold in A, then, picking up the edge with two fingers as in figure 12 , make a valley fold so that A rises up and C and D come together 13 . You have thus formed the tail.
13 Pull C and D gently towards the dotted line.
14 and 15 Make all the folds in the direction of their respective arrows.
16 Fold the upper left corner inwards, then fold the end of the tail and invert D backwards, then repeat the steps done with D with C in order to obtain 17 .
After assembling 17’ with the front half, finish up the hind legs so that they correspond to the front ones as in figures 18 and 19 .


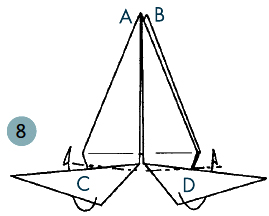
Front half
7 Raise C and D upwards.
8 Unfold C and D to the left and right.
9 After folding points C and D, make a valley fold in the direction of the arrows.
10 Carry D to the back, then insert the completed rear half into it so that the ○ and x on the front half coincide with those corresponding to them on the rear half as shown in figure 17 .
11 + 17’ Fold one part of the front legs, turning C and D in the direction of the arrows.
12 + 18 Unfold superimposed A and B in the direction of their respective arrows, raising them upwards from the valley fold line.
Complete the front half by constructing the head according to steps 13 through 17 , then reach 18 + 19 , proceeding as in the illustrations of the leg details.
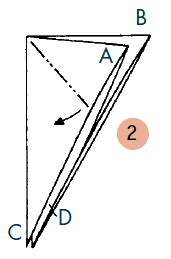
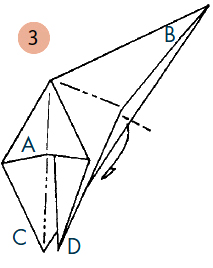
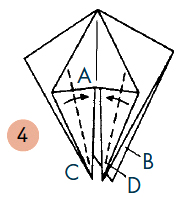
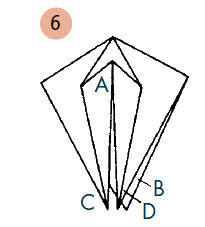
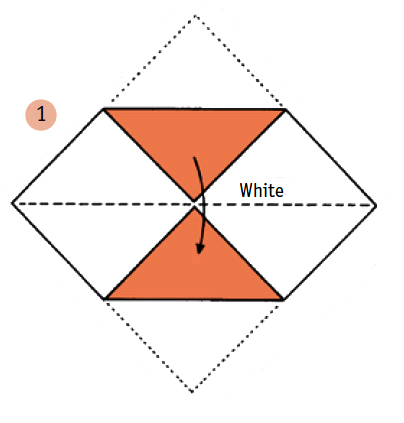
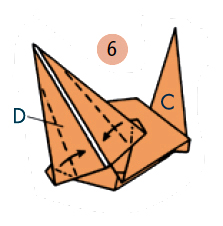
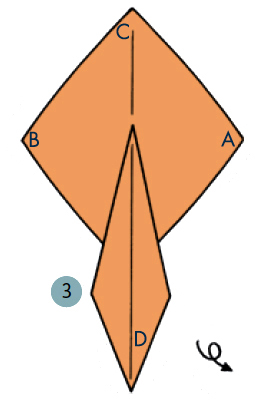
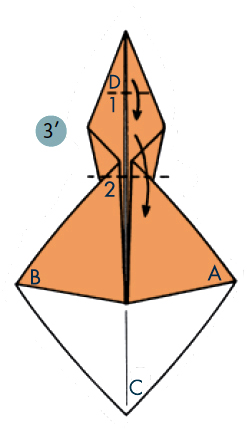
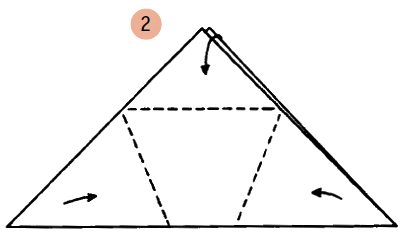
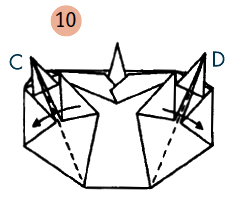
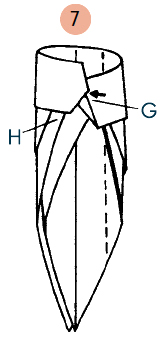
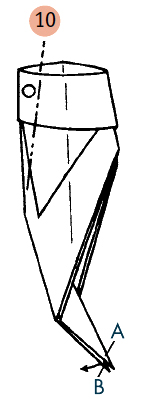
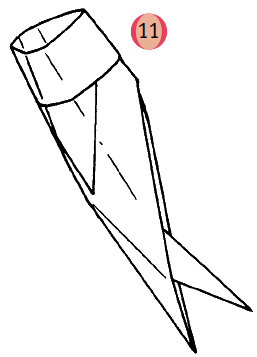
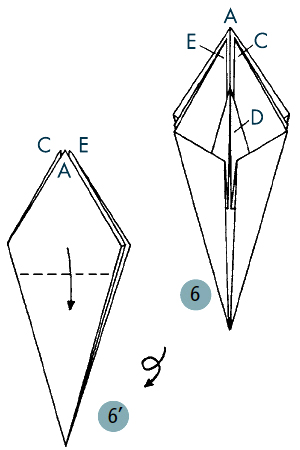
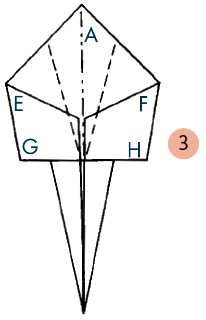
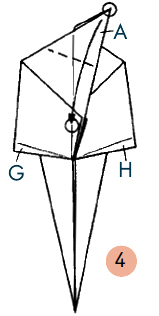
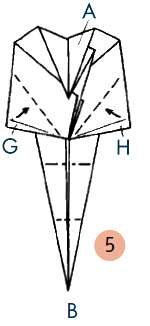
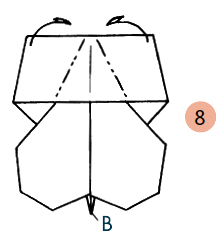
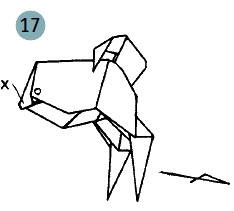
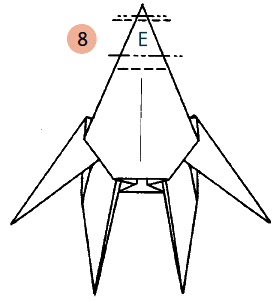
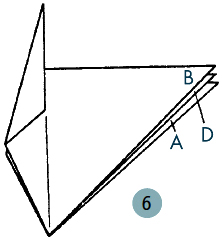
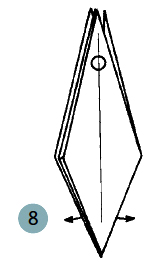
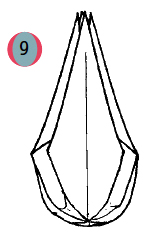
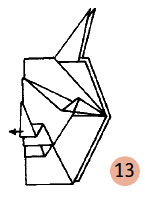
RABBIT IN THE SNOW
うさぎ
A white bunny is about to snatch a morsel of food that it has managed to find buried beneath a thick blanket of snow in the countryside. But, the story goes, another animal is on its tracks. How can it prevent itself from being seen?
The little creature is crouching, motionless, with bated breath. Danger approaches, closer and closer, and is but a hair’s breadth away when with a lightning quick leap the bunny succeeds in escaping its worst possible fate. Truly the rabbit's movements are of the kind that Zen would describe as “emanating from stillness.”
If you intend to make a little mobile or house decoration with this origami model, use fairly thick paper, such as lined Japanese paper (washi) that you have prepared by moistening its rear side uniformly with a damp tissue. Wait until the paper dries before beginning to work on the origami, passing your hand over the sheet repeatedly so that it does not sag at any point.


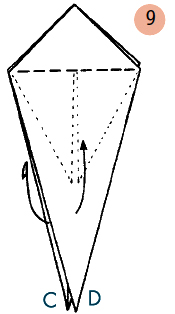
INSTRUCTIONS
1 Take a square sheet of paper and fold in half along the horizontal axis, then make a mountain and a valley fold to obtain the closed form of figure 2 .
2 Extend A as in figure 3 .
3 Make a mountain and a valley fold with A and draw C and D to the back.
4 and 5 Fold in the direction of the arrows.
6 Repeat the steps executed with A with B.
7 Extend A and B as in figure 8 and fold the part with the ○ symbol inwards.
9 Fold the two strips with the symbol inwards and fold the tip of corner E backwards.
10 Fold in half.
11 Invert F between G and H.
12 Make an inside reverse fold in the direction of the arrows, tapering F.
13 Form the tail by lifting F on a diagonal, then make a crimp fold corresponding to the neck in order to reach 14 .
15 Make a crimp fold corresponding to the belly by folding a mountain and a valley fold both on the top and bottom layers in order to inflate the body and round it out.
16 Fold a small portion of the tips of the ears inwards, fold the corners with the X symbol upwards and unfold the upper half of each ear, then model the muzzle by delicately pressing from above on the head towards the neck.
17 The finished rabbit.
By varying the size of the model, you can create an entire family of beautiful origami rabbits.
An early photograph of an origami rabbit folded by Akira Yoshizawa.
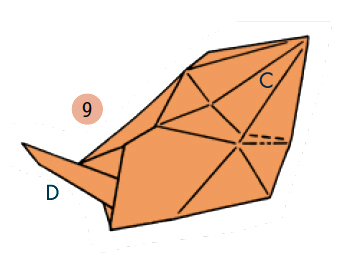
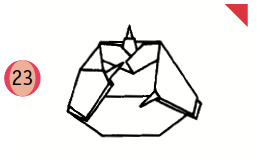
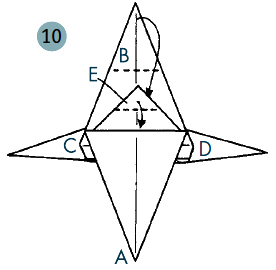
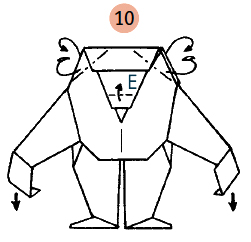
BEAR CUB
子ぐま


INSTRUCTIONS
Start with Base Fold (A) on page 40, making one for the front half and another for the rear half, then put them together.
Start with the front half
7 After folding B at the bottom, fold in half.
8 Make an inside reverse fold with A and fold C and D inwards.
9 Fold B to form the ears, fold C and D backwards inside the dotted line, then pull A from the inside.
10 Making folds 1 and 2, push inwards in the direction of the arrow, fold the point inwards, then make folds イ, ロ, ハ and ニ in that order to form the hind legs.
11 Fold the end of the chin and the legs to complete the front half 12 (see page 124).
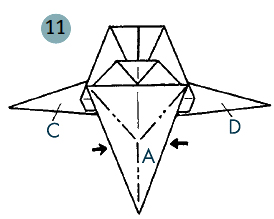
Rear half
7 Firmly pull C and D to make A and B appear as in figure 8 .
8 Fold C and D downwards as in figure 9 to obtain 10 .
10 Fold in half.
11 Make an outside reverse fold in B.
To join the front and rear halves, move aside outer layers E and F in the front half and fold back a thin portion of the inner corners on which you have superimposed the corners of the pocket of the rear half. Fold them one over the other and cover with the outer layers E and F.


12 Pull B from the inside in the direction of the arrows, then fold once again as in 13 in order to obtain 14 .
14 Unfold in the direction of the arrow. Form the tail by doing steps
15 through 19 .
19 Holding the section marked by the ○, gently pull C and D towards the dotted line.
20 Fold the top and bottom layers of the belly, then reverse C and D backwards.
21 Refold B inwards, then fold C and D.
22 Fold the end of the leg back to complete the rear half 23 .
By inserting the rear half between layers E and F of the front half, you will end up with the complete model created from 12 + 23 .
BABY GORILLA
ゴリラの子
In this origami model I wanted to depict one of those baby gorillas that visitors to Tokyo’s Ueno Zoo find so captivating. You can create different poses and expressions by modifying the folds of the limbs and head.


INSTRUCTIONS
1 Take a square sheet of paper and make mountain and valley folds to end up with 2 .
2 Make a mountain and a valley fold, drawing A and D downwards to obtain 3 .
3 Make the folds indicated in the direction of their respective arrows.
4 Draw B and C to the back, folding them as you did with A and D.
5 Fold in the direction of the arrows once again.
6 Holding AD and CB, gently pull the model towards the left and right to extend it.
7 Fold F inwards from the mountain fold line.
8 Make a crimp fold in E.
9 Fold E downwards and G and H inwards, proceeding as shown in the figures illustrating the details of the hand and foot.
10 Insert point E beneath the crimp fold that forms the front. Fold the left and right corners of the head inwards from the front and from the right, then finish up by pulling the hands downwards.
11 The finished gorilla.
The gorilla possesses a powerful skeleton and muscular system. For this reason, after completing the steps, insert a finger inside its body and inflate it to give it an even more robust appearance.
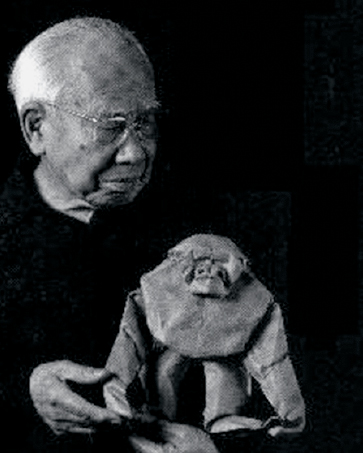
Akira Yoshizawa with one of his origami gorillas.
CHRISTMAS ORIGAMI
サンタクロース
Made out of soft, colored paper, the figure of Santa Clause can be pasted on a piece of cardboard to become a Christmas card, or function as a bookmark or embellish a gift-wrapped package.

The Santa claus figure can also be transformed into an attractive christmas tree ornament, along with the other christmas origami models shown here—candles, stars and stockings.

The Santa claus model shown here was made with two sheets of superimposed paper—a red one on top and a white one beneath. The top layer was turned up along the edge of the jacket and the cuffs to reveal the white. In this version, the hands and legs were created from the underlying sheet and the legs were given no crimp folds.
If you intend to hang this model as an ornament on a christmas tree, avoid folding the tip of the hat and the hand supporting the sack and omit the crimp fold on the legs.
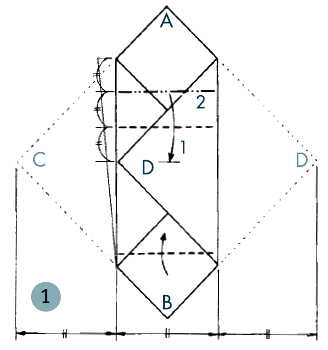
SANTA CLAUS


INSTRUCTIONS FOR SANTA CLAUS
Fold a square piece of paper along the diagonal to obtain figure 1 .
1 Fold A and B down.
2 Make E and F fall on the outside by folding down the median.
3 Pull C from inside D by bringing it over to the dotted line.
4 Fold C in the direction of the arrow.
5 Fold only the upper layer of B.
6 Fold G.
7 On the left side, repeat the same steps done with C and B with A and D.
8 Fold H and G, then D and B, pulling them forward, then fold A and C towards the back.
9 Fold D, unfold pockets H and G, fold back a tiny piece of the top corner, then make a crimp fold on each leg.
10 The finished Santa Claus (posing with his sack over his shoulder).
SANTA’S BAG


INSTRUCTIONS FOR SANTA’S BAG
Take a sheet of paper of the same size as that used for the Santa Claus and repeat the steps as far as figure 4 .
4 Making a mountain and a valley fold, draw C between layers E and F.
5 Fold C and E twice towards the outside in the direction of their respective arrows to turn the corners over themselves (see page 38, “A Guide to Origami Folding Symbols,” and obtain the model in figure 6 .
6 Repeat with A, B and C (eight folds in all).
7 Pull only the top layer to the right.
8 Holding the model at the point marked with ○, inflate the sack.
9 The finished Santa’s bag.
CHRISTMAS CANDLES


INSTRUCTIONS
Fold a square sheet of paper as shown in figure 1 , then make the indicated mountain and valley folds, one after another.
2 While making valley folds 1 and 2, extend the parts with the △ and ○ symbols.
3 Make a small crimp fold in A.
4 Fold two small portions of A as you did in step 2 .
5 Make a valley fold without pressing too hard.
6 Make a valley fold, inserting F inside E.
7 Shape the model into a cylinder.
8 The finished Christmas candle.
If you follow these steps, the flame will be the color of the paper you have used. If you want, you can make different kinds of candles by using paper of various hues that is colored on only one side. In this way, if the white side serves as the principal color, then the color of the flame will always be different. Alternatively, you can use white paper and insert a little piece of colored paper to show the flame.
CHRISTMAS STARS


INSTRUCTIONS
Start from Base Fold (A) on page 40.
7 Invert C and D respectively to the left and right.
8 Unfold C and D in the direction of the arrows, then on the back fold A towards the bottom.
9 Flip over.
9’ Unfold the pockets of E on the left and the right, flattening them out to obtain one central pocket.
10 Insert the corners inside pocket E following the direction of the arrows.
11 Flip over.
11’ Finish the model by making a mountain and a valley fold.
12 The finished Christmas star.
CHRISTMAS STOCKINGS


INSTRUCTIONS
Make the folds in figures 1 and 2 on a piece of paper.
3 Fold corner G to bring B down.
Fold 4 to obtain 5 , then reversing the direction of the folds push G in as in figure 6 .
6 Fold the end of B inwards, then unfold A as in figure 7 . On the inside, push C and D, which overlap on only one side, to form a pocket that you can close by folding A inwards.
8 The finished Christmas stocking.
A coarse-grained paper with a corrugated surface will create a softer effect. You can make large stockings and fill them with gifts.
DEMON MASKS
おにの面
Many demons populate the world of Japanese folklore and also frequently surface in children’s games. But is there such a thing as a good demon? In this origami, I have given it a try.


INSTRUCTIONS
Start from Base Fold (A) on page 40.
7 Make crimp folds by folding A forwards and folding B backwards.
8 Unfold F and H in the direction of the arrows.
9 Pull A and B, drawing them over the dotted lines, then make the two crimp folds by executing folds 1, 2, 3 and 4 in that order.
10 Pull I to the back, fold F, G and D in the direction of the arrows, then make a crimp fold in C.
11 Fold the lower corners of the eyes behind, then insert C beneath the upper jaw.
12 and 13 Fold in half, then finish up by extending the nose.
14 The finished demon mask.
Measurements are provided for the folds in steps 9 and 10 , though you need not follow them too precisely. Do not worry about spoiling the results. On the contrary, by varying the proportions, you will end up with lots of different demon faces.

The demons (oni) of Japanese mythology are not all of the same type. The can embody the spirit of ancestors and thus be benevolent or they can become an emblem of evil itself. Depending on how they are interpreted, origami depicting them can assume one or the other aspect. In both cases, however, the primary concern is to express a supernatural power. If your oni is an ancestral spirit, it must have a fixed and tranquil “face” so as to simultaneously instill fear and display its ability to protect. Demon masks derived from this basic model are used for the ritual of Namahage (New Year’s Day), when young men wearing straw cloaks and masks like these break into homes, screaming and frightening children. After being appeased with offerings of fish and saké by the head of the household, they go around bestowing blessings. Some demon masks protect people from evil spirits.
LION MASK
ししがしら
I wanted to make these lion heads to commemorate certain
popular festivals and ritual feasts that I attended as a child, which were held to ward off evil spirits and ensure a good harvest.

During Japanese festivals, a large banner will flutter at the entrance to the village and the notes of the flute and the banging of kagura drums, the sacred music of Shinto, will resound everywhere as dancers wearing traditional lion masks pour into the streets.


INSTRUCTIONS
Start from Base Fold (A) on page 40.
7 Fold F and H in the direction of their respective arrows.
8 Invert A and B respectively between E and F and between H and G, then make a crimp fold in D.
9 Unfold A and B in the direction of the arrows, inverting outwards, then fold I backwards. Finally, raise F and G as you make a mountain and a valley fold.
10 Lift C and D upwards, then fold F and G.
11 Make a crimp fold in D, then draw C beneath D and fold corners A and B inwards.
12 Fold to lift the ears forward, then finish up by making folds 1, 2, 3 and 4.
13 The finished lion mask.
If you grab the ears and move them, the lion will open his mouth. I wanted to make these lions seem to be smiling so that they could be used as auspicious decorations for New Year’s Day. If this is what you plan to do, make two facing each other, of which one—like those found at the entrance to many Buddhist temples—will have its mouth open and serve as the ancient charm against evil spirits. The masks were constructed from two sheets of superimposed paper, one red, the other black. The ears were made by folding the outer layer of red inwards in order to expose the black of the underlying sheet.
POWER BOAT
快速艇


INSTRUCTIONS
1 Take a square sheet of paper and bring A and B close to the median, then fold C and D in the direction of the respective arrows.
2 Fold D inwards, starting from the median point between D and E, then roll up C.
3 and 4 Fold in the direction of the arrows.
5 Roll up F and H, making folds 1 and 2 in order, then roll up G and I in the same way on the back.
6 Pull H and I downwards and make outside reverse folds in them, starting from the line of the valley fold.
7 Holding the point marked with the ○ symbol, unfold in the direction of the arrows to obtain
8 .
8 Flip over.
8’ keeping H and I level on the surface, join F and G.


9 To shape the hull, insert the index finger of your left hand in the rear part of G and your middle finger in the rear part of F and press from the front with your thumb, then fold H and I back in the direction of the arrows in order to hollow out the interior and make it flat.
10 Gently lift C and secure it in a way that the symbols labeling the figure meet up.
11 Shape by lifting J and k.
12 The finished power boat.
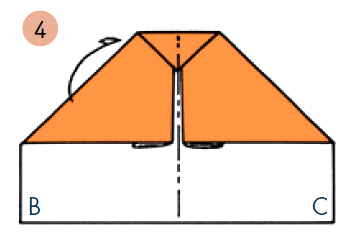
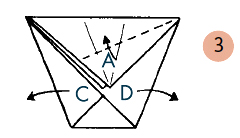
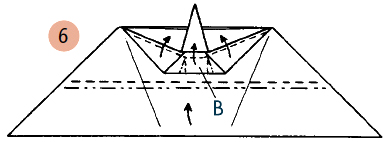
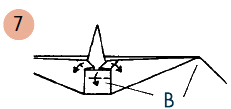
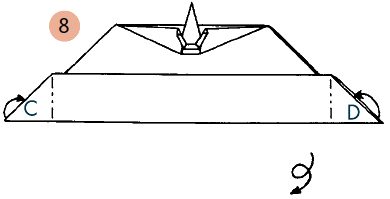
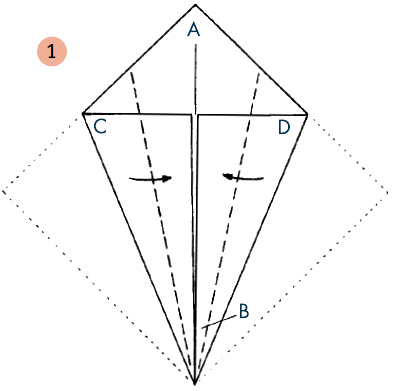
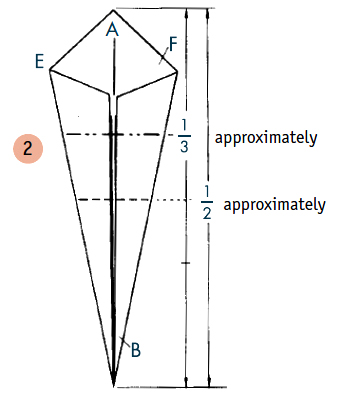
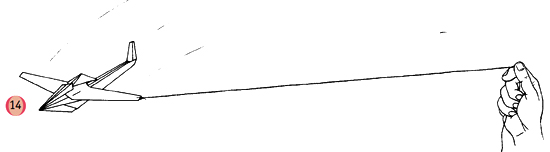
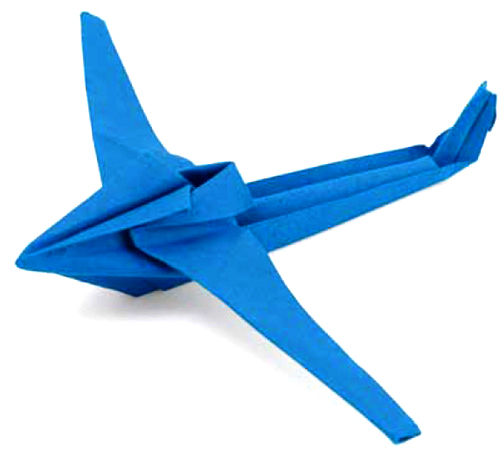
AEROPLANE
ひこうき


INSTRUCTIONS
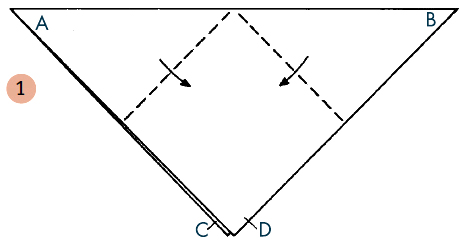
Take a sheet of paper of the shape of an equilateral triangle. After making a mountain and a valley fold as in figure 1 , obtain the closed form of figure 2 .
2 Open pocket D.
3 Repeat the step done with D with E and F.
4 Making a mountain and a valley fold, unfold D.
5 Repeat the steps done with D with the inner layers E and F.
6 Fold one part of B inwards, then fold only the upper layer of the corner on the left.
7 and 8 Fold in the direction of the arrows.
9 and 10 Fold the end of A about a third of the way up, inserting the part marked by the x symbol inside the one marked with the ○ symbol, as shown in the illustrations of the details.
10 Fold C backwards, setting it in the same position as A.
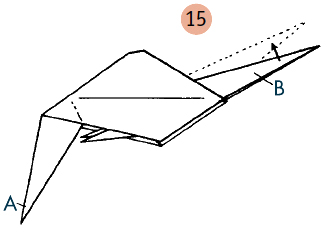
11 Pull F from inside in the direction of the arrow.
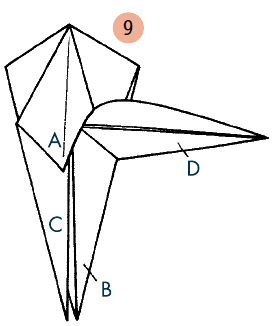
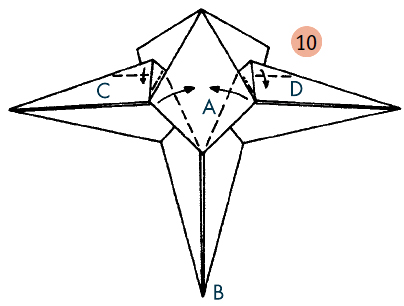
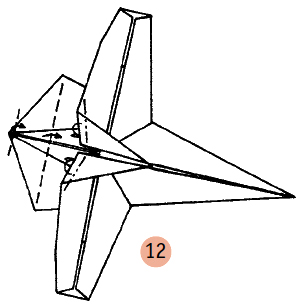
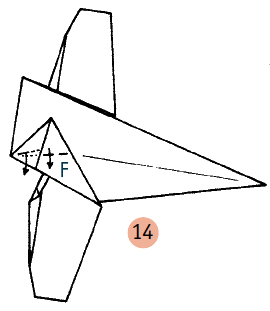
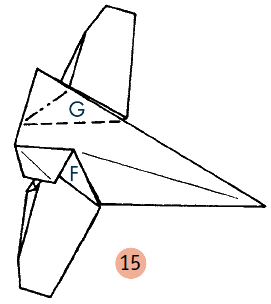
12 Inverting the direction of the fold, unfold it in the direction of the arrows.
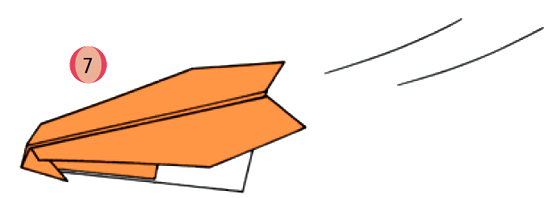
13 Unfold the snout in the direction of the arrows, reversing it towards the exterior, then fold B about one third of the way up and shape the tail by executing the steps in the order shown in the illustrations of the detail. Complete by extending wings A and C to the left and right.
14 The finished aeroplane.
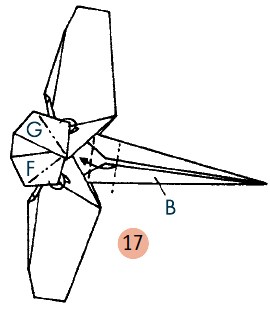
If you open the flaps gently in the upper part of B, as shown in the reference figure, the wings will become fixed. Stabilize them by sticking a toothpick into the snout, then insert a little hook to the end of one wing and tie a string to it. You can make the aeroplane fly up and down as in the illustration. Have fun creating this model using different types of paper. choose sheets that are approximately 12 x 12 in (30 x 30 cm).
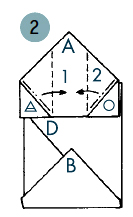
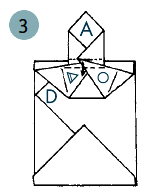
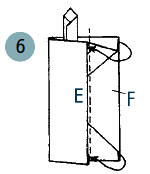
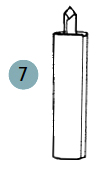
LIGHTHOUSE
燈台
when creating an origami, I am inspired not only
by the subject matter but also by the very process of folding,
and I am always fired by some emotion.
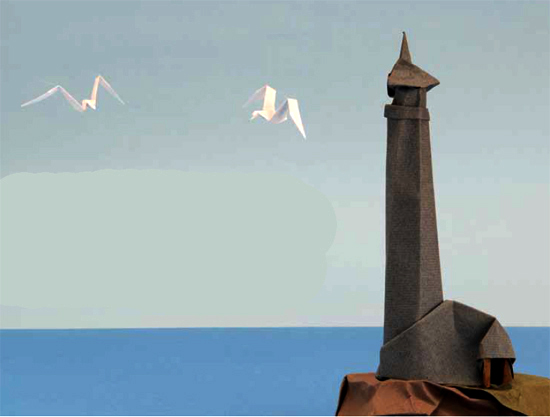
I wanted this lighthouse to arouse memories of the landscapes and seasons that I have experienced. Of course, in contrast to creating animals and birds, it was not easy to make the model expressive and enable its form to exude feeling.
However, as I conceived and worked on it, I thought about the solitary life of a warden who inhabits a lighthouse and the sea breezes that envelop it. Thus, I succeeded in transmitting, albeit through geometric structures, the sensations that a person may experience at viewing such a site.


INSTRUCTIONS
After folding a square sheet of paper as in figure 1 , join the lines marked by the △ and □ symbols on both sides of the median AB.
2 After making a valley fold, flip over to the other side.
2’ Fold B in order to fix point E. 3 and 4 Fold B from line EF in order to fix line G.
5 Making a mountain and a valley fold, make a crimp fold in A.
6 Flip over to the other side.
6’ Open pocket A, folding to obtain figure 7 .
7 Flip over to the other side.
7’ Folding in the direction of the arrows, raise A upright from behind.
8 Make a mountain and a valley fold in order to obtain figure 9 .
9 and 10 Fold in the direction of the arrows.
11 Lift A upwards and extend B.
12 Fold A inwards in the direction of the arrows, then fold B on both sides.
13 and 14 Insert F in pocket E, then lift the roof again and shape the entire piece.
15 The finished lighthouse.
CHILDREN FROM SNOWLAND
雪国のこども
Here are some lively little figures of children in a mountain village that is buried under a thick blanket of snow. They are well bundled up against the cold in heavy, hooded coats and padded pants and with their legs tucked inside snowboots.

Once you have mastered the basic steps, you can have fun devising a variety of poses.

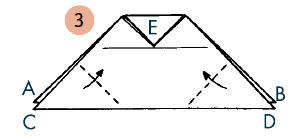

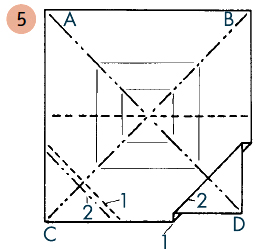

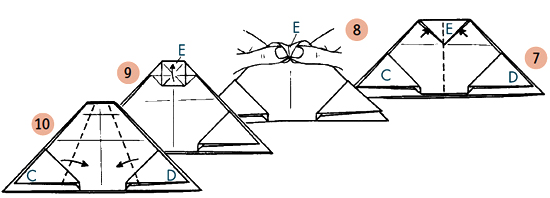
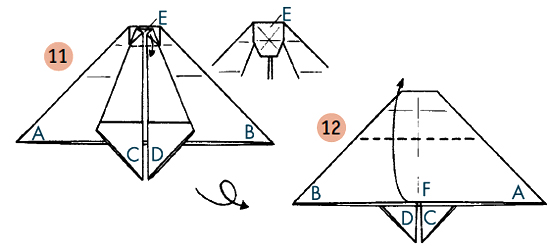

INSTRUCTIONS
1 Fold a square sheet of paper to obtain the closed form of figure 2 .
3 Make fold 1, extend, then fold 2.
3 Fold C and D. Unfold 4 .
5 Make a crimp fold in C as in D, then reclose the fold. The position of valley fold 1 is the same as that of the fold in the upper part of figure
2 .
6 Fold E.
7 After making the vertical fold, insert two fingers into the triangular pockets, following the direction of the arrows as in figure 8 , then open on both sides in such a way that corner E is extended and assumes the form of a square pocket as in figure
9 .
9 Fold in the direction of the arrow
10 Fold C and D.
11 After folding downwards in the direction of the arrow, flip over.
12 Making a valley fold, unfold only the top upper layer in the direction of the arrow. The position of the valley fold line is the same as in fold 1 in figure 2 .
13 Extend A and B to obtain the form of figure 14 .
14 Raise G upwards, and after making a mountain fold with A and B, unfold them, inverting them over E in the rear portion of F.
Traditional hand-made Japanese paper, known as washi, is ideal for making these origami children. It is often fabricated by artisans in these same mountain villages that are covered with snow for much of the year. Every sheet is made with infinite care and love. If exposed to snow at the right moment, the pulp of a particular species of mulberry, kozo, can be turned into a paper that is free of impurities and capable of transmitting a sense of softness. Each fiber reflects light, which leads to an extremely elegant effect.
The winter production of paper made with neri, a fluid extracted from a type of potato, is also of supreme quality. This translucent paper is used for shoji, the sliding screen doors in traditional Japanese homes, and is manufactured in the mountains of Nagano province. Treated with tannin and allowed to dry naturally, without sun, neri paper takes on the texture of fine, soft leather. If stretched out to dry in full sun, it will end up resembling the robust skin of a healthy youth.
Hodomura paper, produced in the mountains of Tochigi province, is also made from pure mulberry fiber, but due to a special treatment it has the texture of a sturdy cotton fabric. At one time, it was reckoned at international exhibitions to be the best in the world. Treated with tannin, it becomes very much like leather, while the dyeing processes and proper use allow it to improve the features and performance of paper to the highest level.
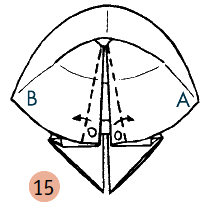


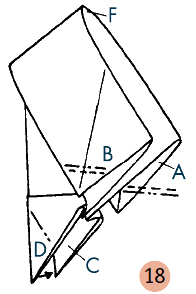
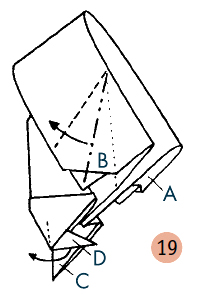
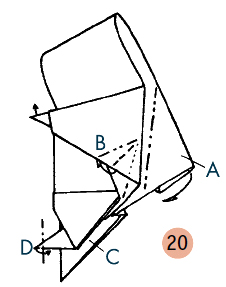
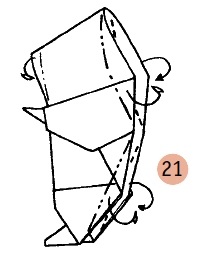

15 Turn up the flaps marked with the ○ symbol on the left and right.
16 Pull A and B to obtain 17 .
17 Pull F, rounding it out, then fold it in half along the median, passing fold F through your fingers. Make a mountain fold in A and B to obtain figure 18 .
18 Make a little crimp fold in A and in B, then fold D.
19 Fold B, raising the hand, then invert D inside the dotted line.
20 Fold the lower portion of B inwards to form the sleeve, then repeat the steps done with B and D with A and C.
21 Fold the four flaps inwards in the direction of their respective arrows and shape the whole piece.
22 The finished model.
PUPPY
こいぬ

The models on this page were folded by Kiyo Yoshizawa, the Master’s wife.


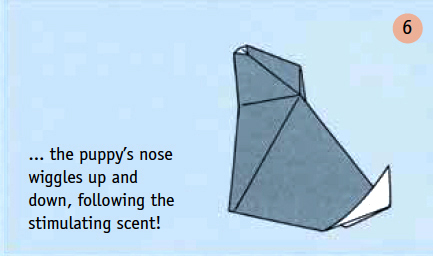

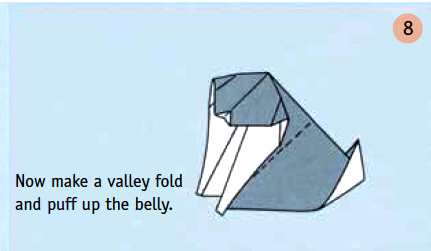
When providing instructions for these origami, use some tricks to make the process more fun.


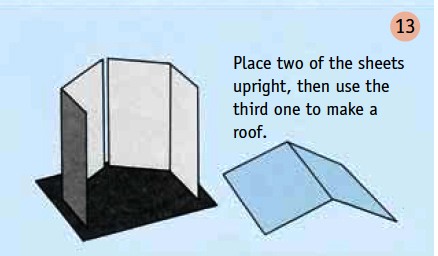

In figure 1 , the square sheet folded along the diagonal and set vertically recalls a seated animal. In this case, if the child is quite young, instead of asking what the figure resembles, sit next to him or her and together try to imagine a simple basic component that can be developed from the form.
In figure 2 , the point on top can be compared to a head, such that in figures 3 and 4 the central part of the sheet will become the body and the right point the tail. If this approach is taken, the meaning of each part with respect to the whole will naturally fall into place.
By crumpling, then smoothing out the paper, or slightly tearing the edges with your fingertips, you can create the effect of a bristly hide.
These origami figures can also be made with sheets that are not perfectly square, but rather irregular or rhomboid in shape.
The symbol which indicates the finished model is not used here. Every figure can be considered a model in itself, a possible variant.