Chapter 5
Week 1: The Foundational Practice to Relieve Tension and Enhance Flexibility
All of the foundational practices described for week 1 can be done either lying down on the floor or in your bed. This sequence is a simple, gentle warm-up for your body and mind, and can be used as a stand-alone practice or as a limbering-up practice for sequences introduced in later weeks.
Functional Benefits of the Foundational Practice
Releases tension. The Three-Part Breath exercise (see page 72) helps deepen and expand the breath, which can release tension-holding patterns that interfere with a fluid breath and help soothe the system.
Reduces risk of injury. Taking time to warm up all the major joints and muscles before a longer practice tunes us in to how the body is doing and may reduce the risk of injury.
Enhances flexibility of the spine. Gentle neck and spine rotations support our ability to perform many activities of daily living, including driving—as healthy rotation is essential to being able to back up a car and/or change lanes.
Encourages joint mobility. Taking each of the body’s major joints through a full range of motion can help enhance and maintain joint flexibility and function.
Induces relaxation. The ability to learn to “undo” tension in your body, mind, and emotional heart offers your entire being a welcome opportunity for deep rest.
The practices in this chapter and the ones that follow are available as downloadable audio at http://www.newharbinger.com/33643 .
This breath pattern is an invaluable tool for giving your body and mind a quick reset by intentionally guiding your belly, ribs, and chest to expand on the inhalation and fully relax on the exhalation. Sometimes called “diaphragmatic breathing,” it is often used therapeutically to reduce pain, anxiety, and sleep disturbance. The Three-Part Breath practice can be done anywhere and anytime, multiple times a day or at night. While you can do this practice in any position—lying down, sitting, or standing—it’s easiest to learn when you’re lying down or sitting in a reclined position. Try this breath for a few moments (5 to 7 complete rounds) and then notice how you feel.
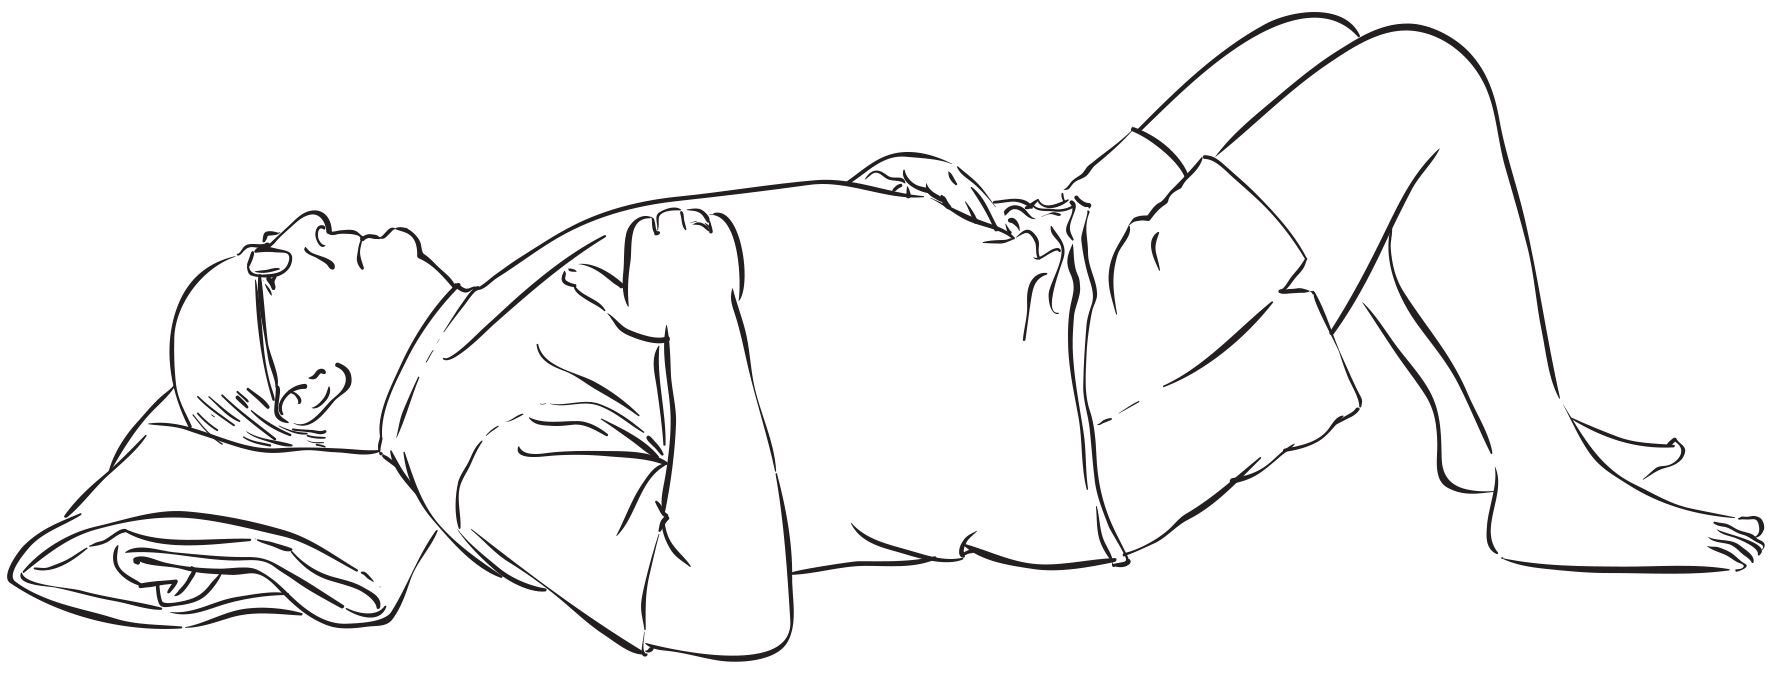
Figure 5.1 Three-Part Breath
- Part 1: Rest your hands on your belly, just below the navel. As you take your next breath in, let your belly soften and expand like a balloon. As you breathe out, let your belly sink toward your spine. Repeat 3 times.
- Part 2: Rest one hand on your ribs and one hand on your belly (see figure 5.1). With your next inhale, let your belly soften and feel your ribs expand to the left and to the right. As you exhale, let everything sink. Repeat 3 times.
- Part 3: Rest the hand that was on your ribs on your upper chest, just below your collarbones. As you breathe in, allow your belly to soften, your ribs to expand, and your upper chest to broaden. As you exhale, let everything go. Repeat 3 times. Spend a few moments here, with one hand on the chest and the other on the belly, exploring this three-part rhythm. Allow this full, easy breath to open and nourish your body.
As you release the Three-Part Breath pattern, take a moment to notice how your body responded, how your emotional heart responded, and how your mind responded to this breathing practice.
Note: Three-Part Breath is not meant to be used all the time during your practice. It should be done as a periodic reset for your body and mind.
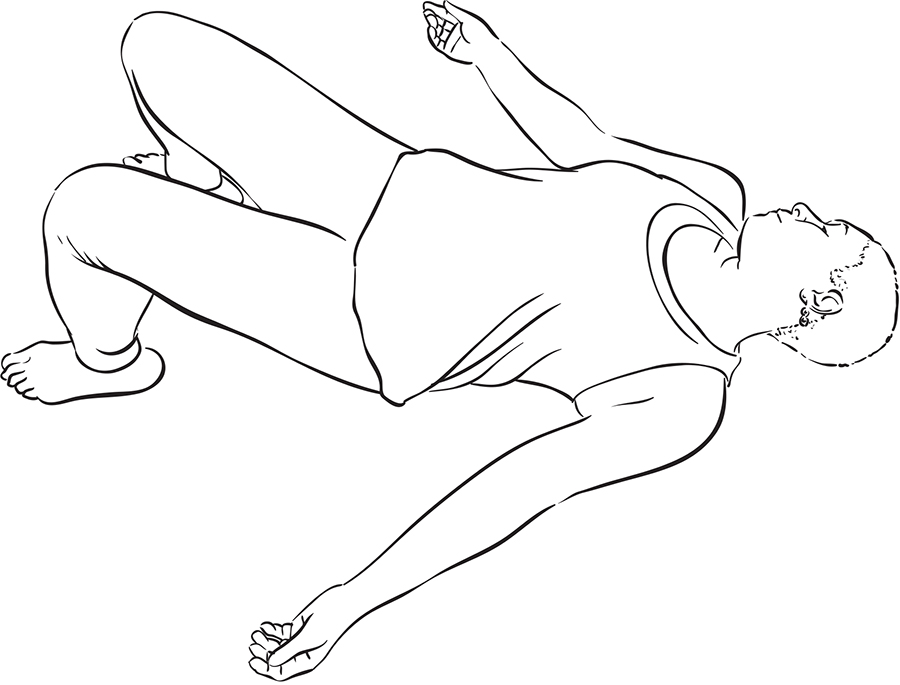
Figure 5.2 Neck Release
Setup
Lie on your back with your knees bent, soles of the feet flat on the ground, and arms at your sides. If your chin is higher than your forehead, place a folded blanket or towel behind your head so that your chin is at the same level—or slightly below—your forehead. Tune in to your breath.
- Inhale in place.
- Exhale and rotate your head to the right, looking over your right shoulder (see figure 5.2). Invite your left shoulder to be a little heavier.
- Inhale back to center.
- As you exhale, rotate your head to the left, looking over your left shoulder. Invite your right shoulder to be a little heavier.
- Repeat this for a few cycles of breath.
- Feel free to linger with your head rotated to the right and then left. Close your eyes, if you like, and feel into the sensations.
Remember
- • Try not to force your head in one direction or the other.
- • Be sure to keep the natural curve in the back of your neck. If you are elevating your head with a folded towel or blanket, make sure it’s not so high that your neck flattens.
- • Notice, without judgment, any differences between the movement to the right and to the left.
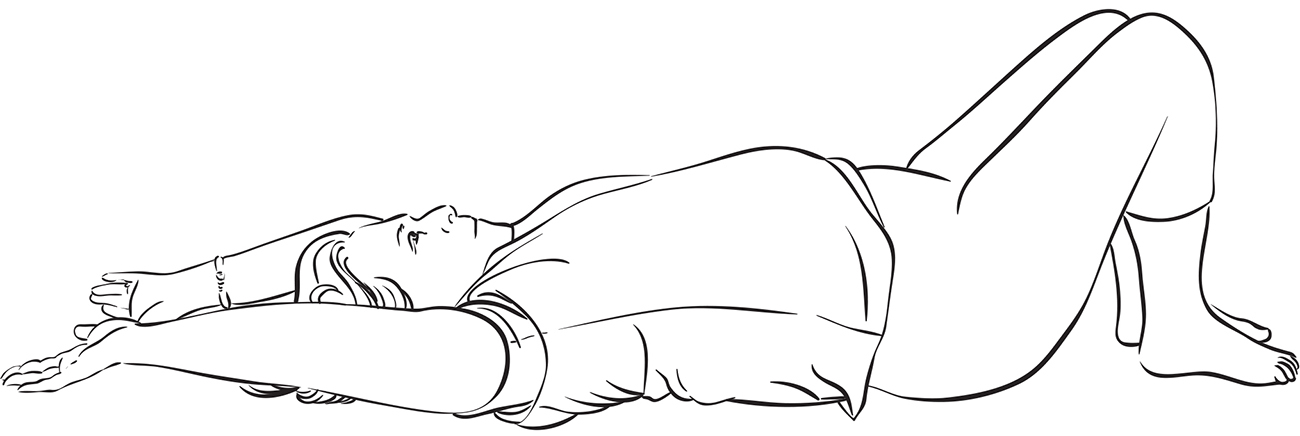
Figure 5.3 Arms Overhead
Setup
Lie on your back with your knees bent and the soles of your feet resting on the ground. Bring your arms alongside your body, palms facing down, and tune in to your breath.
Movement
- As you inhale, extend your arms up and overhead so the backs of your hands move toward the ground behind you, or as close to the ground as they will comfortably go (see figure 5.3).
- As you exhale, bring your arms back up and return them to the starting position, down along your sides.
- Repeat for a few cycles of breath.
- • Synchronize your movement with your breath so that your arms are moving toward your ears as you breathe in and toward your hips as you breathe out.
- • Feel free to bend your elbows as much as you need to for comfort.
- • Don’t worry if the backs of your hands don’t reach the ground. Just do the best you can without force or strain.
- • Enjoy the feel of your breath.
- • Take a moment to rest after you’ve finished, and try to notice any echoes of movement in your shoulders and arms.

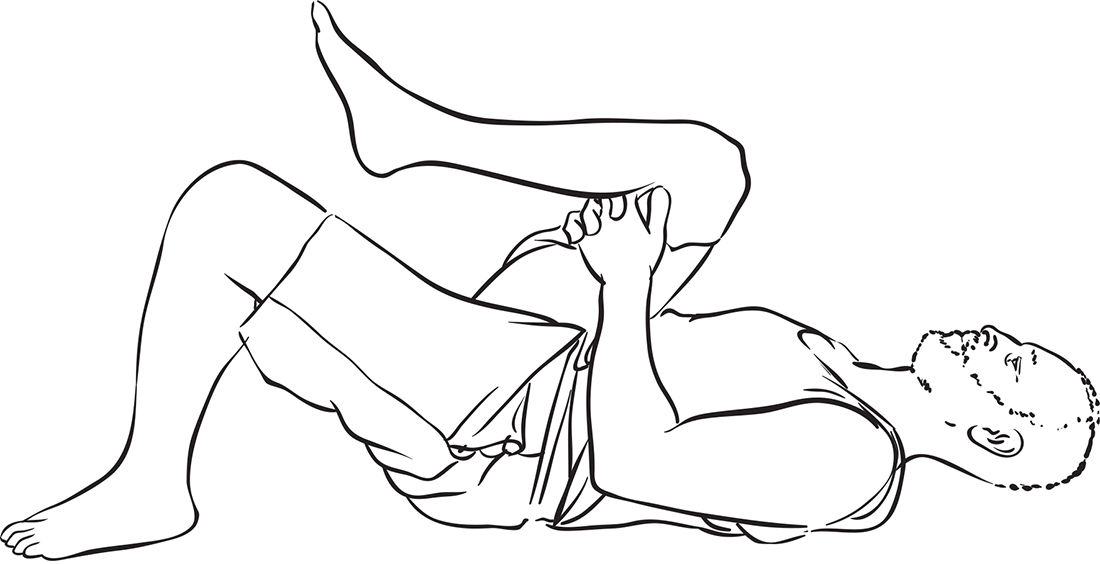

- Lie on your back with your knees bent, feet on the ground, and arms at your sides (see figure 5.4).
Movement
- Take an easy breath in.
- On an exhalation, hug your right knee into your chest—lightly holding your leg behind your right thigh (see figure 5.5).
- Stay here for a few breaths. Each time you exhale, draw your right thigh in toward your rib cage.
- Next, continuing to hug your leg, imagine that your big toe is a crayon and begin slowly drawing large circles in the air to wake up your ankles. When you’re ready, reverse the direction and draw a few more slow, easy circles going the other way. Then relax your foot.
- Inhale and extend your right foot up toward the sky, straightening your leg as much as you comfortably can (see figure 5.6).
- Exhale and bend your knee, bringing your foot back down by your buttocks.
- Repeat this movement for a few breaths—inhaling and extending the leg, exhaling and bending the knee.
- Next, keep your leg extended up in the air, with your leg as straight as is comfortable. Extend your foot toward the sky and drop your buttocks down toward the ground.
- Keeping your leg extended, flex your right foot so the heel lifts up to the sky and the toes reach toward your nose. Then point your right foot, so your toes reach up to the sky.
- Repeat this flexing and pointing a few times.
- Relax your foot and draw big circles in the air with your toes, taking your ankles through their full range of motion. Circle a few times in both directions.
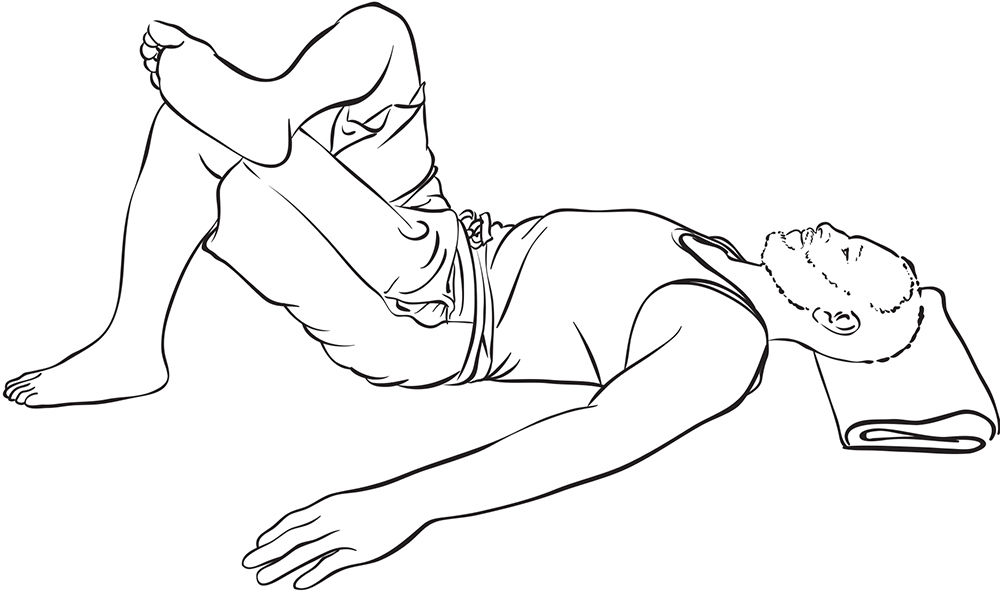
- Next, bend your right knee and bring your right ankle onto your left thigh (see figure 5.7). Flex your right ankle to maintain healthy alignment in your knee. Linger here, bringing your attention to any sensations that arise and inviting your breath to soften any places where you feel tension.
- When you are done, bring your right foot back to the ground, and rest here for a moment, relaxing and releasing. Notice if you feel any difference between your right side that you’ve just challenged, and your left side, which hasn’t had a turn yet.
- Now repeat the sequence with the left leg.
- When you are done, release both feet to the ground, knees bent, and relax for a few easy breaths.
Remember
- • If holding your leg is a strain on your shoulders or arms, use a strap behind your thigh to catch your leg, or rest your arms on the ground as you move your leg through the sequence.
- • As always, challenge yourself, but don’t strain—just do the best you can.
- • Synchronize your movements with your breath—inhale as you straighten your leg, exhale as you bend your knee.
- • Avoid holding your breath. Keep it flowing comfortably.
- • Notice where you feel the sensation of stretch and movement.
- • Notice where you feel the sensation of relaxing and releasing.
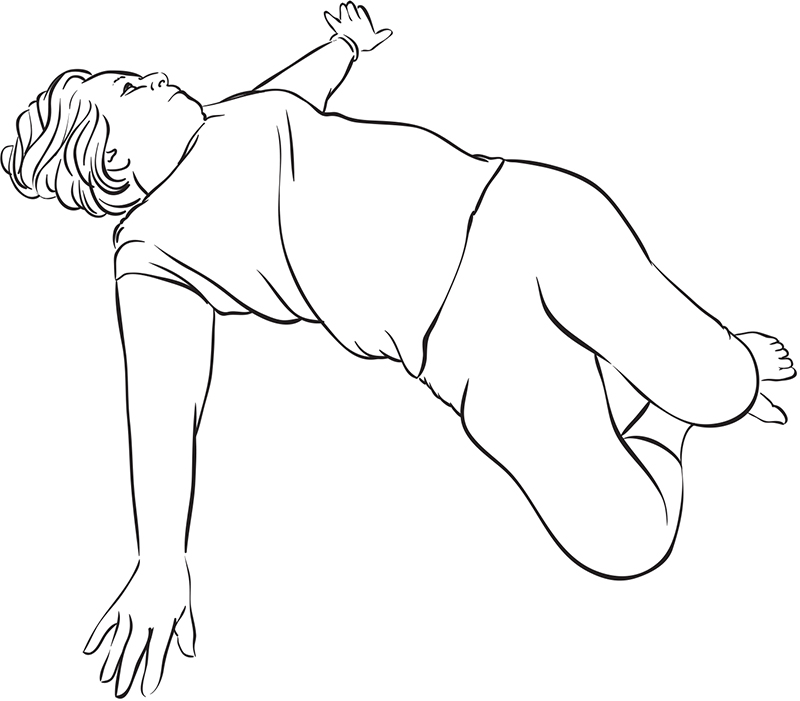
Figure 5.8 Supine Twist
Setup
Lie down with your knees bent and your feet about hip-width apart. Extend your arms out to the sides, palms up or down, whichever feels better.
Movement
- Rock your knees from side to side, slowly and gently. Be sure to keep your feet on the ground.
- Turn your head in the opposite direction of your knees, keeping your movement and your breath smooth and easy (see figure 5.8).
- Repeat a few times.
- Linger with your knees dropped to one side and your head rotated to the other. Rest here for a few breaths.
- As you inhale, fill your body with breath. Inhale into your hips, waist, ribs, and armpits.
- As you exhale, soften into the twist. Let each exhalation be an opportunity to release and let go.
- When you are ready, inhale your legs back to center and square yourself off.
- Then exhale and linger with your knees dropped to the other side. Rest here for a few breaths.
- When you are done, come back to center with bent knees and both feet on the ground, and relax.
Remember
- • When resting in the twist, feel free to place a rolled blanket or towel underneath your leg for support if your knee doesn’t comfortably reach the ground.
- • Do not force your leg to touch the ground.
- • Release the weight of your arms and shoulders into the ground as you gently rotate your spine above and below this area.
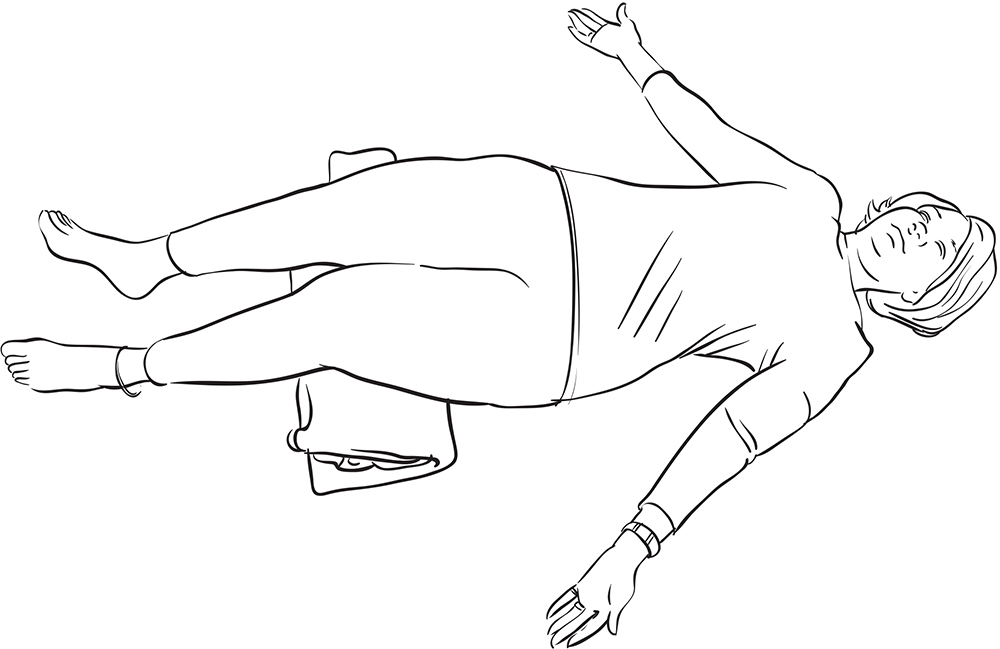
Figure 5.9 Relaxation pose
Setup
Rest with your legs straight or knees bent, whichever is most comfortable. Feel free to place a rolled blanket or towel under your knees. Let your hands relax by your sides, palms turned up or down, whichever position allows your shoulders to feel the most at ease (see figure 5.9). Close your eyes and give over the weight of your body to the ground.
Movement
- Take a full breath in and let it go with a sigh.
- Again, take a full breath in and release with a sigh.
- One last time, take a full breath in and exhale with a sigh.
- Become aware of the pool of sensation that is your body.
- Feel the sensations of your feet, your legs, your pelvis, your torso, your hands, your arms, your shoulders, your neck, and your head.
- Sense into your body as a whole, greet your body with kindness, and let it be.
- Become aware of the waves of your emotional heart.
- Sense the joy, the fear, the contentment, the anger, the sadness, the love.
- Feel the currents of your heart all at once, greet your heart with kindness, and let it be.
- Become aware of your thinking mind and the tendencies of your thinking mind.
- Recognize the remembering, the forgetting, the liking, the disliking, the comparing, the evaluating, and the creativity.
- Notice all of the tendencies of your thinking mind at once, greet your thinking mind with kindness, and let it be.
- For now, the invitation is to simply be .
Remember
- • The “undoing” is as important as the doing—learning how to let go and be still is as essential as learning how to move. Give yourself plenty of time for relaxation.
- • Consider setting a timer for 5 or 10 minutes—or however long you want to practice Relaxation pose—so you can completely surrender to the experience.