Chapter 6
Week 2: Standing Poses to Enhance Strength and Balance
As you progress to week 2, hopefully the foundational practices from week 1 are feeling more familiar. Continue using the Range-of-Motion Sequence to prepare your body for the more-demanding strength and balance poses you will be learning this week. Your practice will follow this outline:
- Begin with the Three-Part Breath exercise.
- Warm up with the Range-of-Motion Sequence.
- Explore the Standing poses in this sequence.
- Finish with Relaxation pose.
The standing poses give us practice in forming healthy habits on and off the mat, like hinging from our hips and bending our knees to keep length in our spine, rather than rounding our back forward.
Physically, standing poses help strengthen our legs, keep us grounded, and ease our ability to navigate a sometimes challenging environment. Metaphorically, these postures help build confidence, teaching us how to stand firmly on our own two feet.
Functional Benefits of the Standing Practice
Builds strength. Standing poses build dynamic strength, which can help maintain fitness for demanding activities, such as picking up your favorite toddler, walking your dog, and carrying grocery bags.
Establishes good body mechanics. The standing poses give us practice in developing healthy habits, like hinging from our hips and bending our knees to keep length in our spine rather than rounding our back forward. Also, learning to use the larger muscles of the thighs and buttocks to power our movements, rather than the smaller muscles of the back, is a “back-saving” technique that can be applied to various daily activities, from lifting a basket of laundry to getting in and out of a car.
Improves posture. Standing with good alignment offers stability, helps us radiate confidence, and enhances our ability to move through the world with ease.
As a reminder, you can download audio for week 2’s practice at http://www.newharbinger.com/33643 .

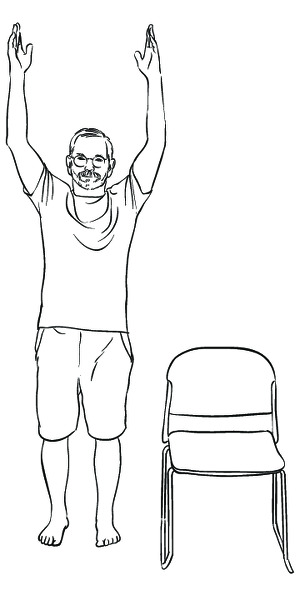
Figure 6.1 Mountain pose
Setup
Stand beside or behind your chair, close enough to lightly touch the back of the chair for support, if needed. Position your feet hip-width apart and snuggle the soles of your feet into the ground.
- Energize your legs, as if you were drawing up energy from the ground.
- Release your tailbone down toward the ground, lengthening your lower back.
- Gently draw your lower belly in and up, and lift your rib cage up off of your pelvis.
- Relax your shoulders down away from your ears, and allow your arms to rest by your sides.
- Extend the top of your head up toward the sky, so that your spine elongates.
- Let you chin be parallel to the ground, neither lifted nor tucked.
- Gaze softly toward the horizon, with your shoulders, throat, and face relaxed (see figure 6.1).
- Let the light of your heart shine forward.
- Take several slow, easy breaths, filling and emptying your lungs completely.
Remember
- • Feel yourself as strong and stable as a mountain.
- • Sense the simultaneous downward and upward energies: rooting your legs and lifting your spine.
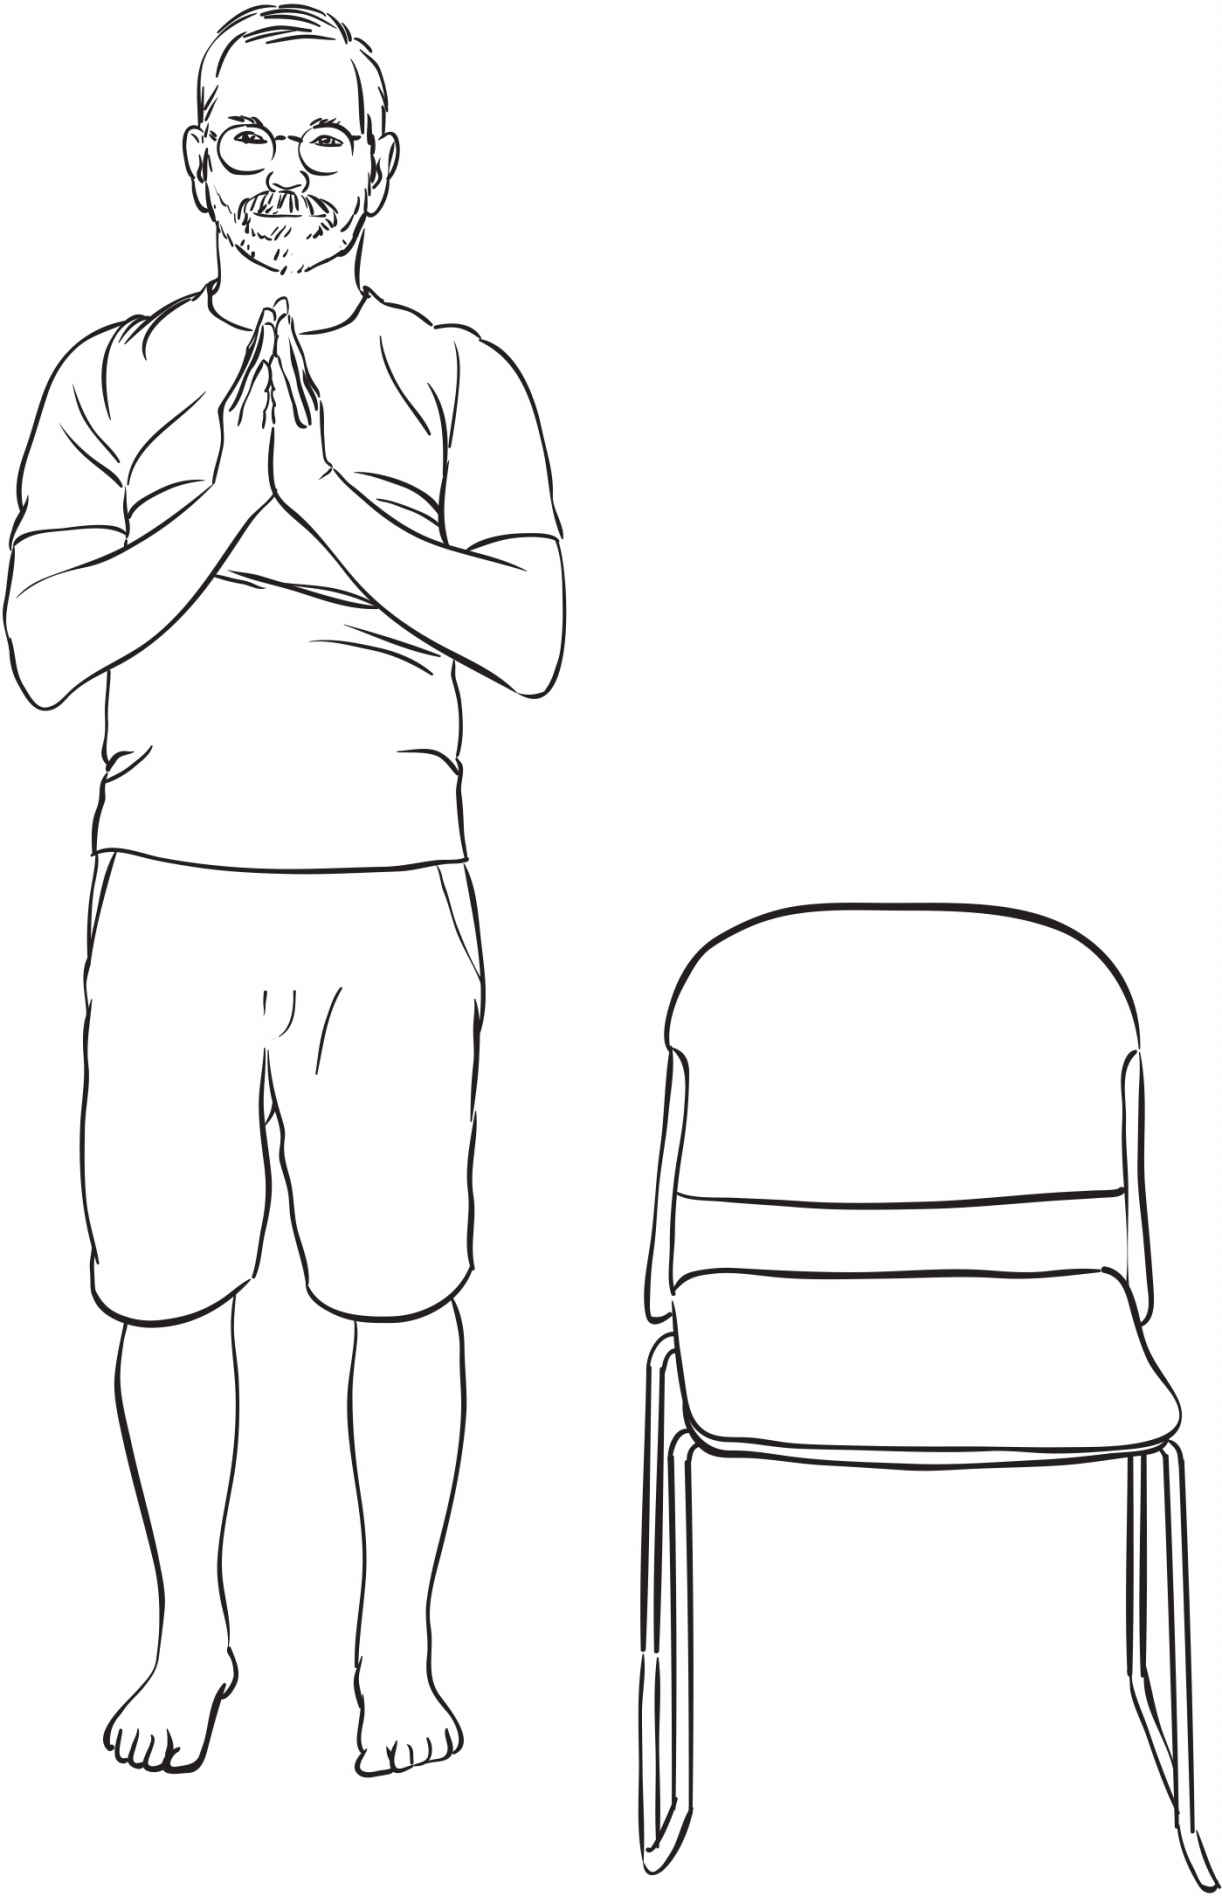
Stand beside or behind your chair in Mountain pose.
Movement
- Inhale as you lift your chest, rotate your palms out, and extend your arms out to your sides. Lift your arms only as high as your ears.
- Exhale and turn your palms down as you lower your arms, standing tall.
- Repeat a few times.
- Next, inhale your arms out to the sides and then up toward the sky as far as comfortably possible (see figure 6.2).
- Exhale as you bring your palms together and lower them into a prayer-like position in front of your chest (see figure 6.3).
- Repeat several times, moving with the breath. Imagine that you are gathering energy on your inhale and bringing the energy to your heart on your exhale.
- When you are done, pause to take a few breaths with your palms touching and the base of the thumbs at your breastbone.
Remember
- • Take this movement to a place that feels challenging but is not a strain.
- • Synchronize your movements with your breath.
- • Keep your shoulders as relaxed as possible throughout this practice. If you have restricted motion in your shoulders, feel free to lift your arms only slightly and/or modify the movement to suit your body.
- • Notice the quality of sensations that are present.
- • Notice the quality of emotions or thoughts that are arising. Try to simply let them be.
Caution
- • If you need to hold on to the chair to feel stable, try lifting one arm at a time.
- • You can also try this practice with your back against a wall for support.

Figure 6.4 Chair pose
Setup
Make sure your chair is firmly grounded on a nonskid surface, preferably against a wall if it is a lightweight chair. Stand in front of your chair, so that the backs of your legs are an inch or two in front of the chair. Come into Mountain pose with your feet hip-width apart and parallel to each other.
Movement
- Place the pinkie-finger side of your hands in your hip creases—the spots where your legs meet your torso.
- Inhale and lengthen up through the top of your head.
- Exhale as you bend your knees and hinge forward at your hips—keeping your spine long—while you extend your arms forward (see figure 6.4) and slowly lower yourself into the chair.
- Inhale as you sit tall in your chair.
- Exhale and root into the ground with your feet as you hinge forward at the hips and return to Mountain pose.
- Repeat a few times. As your strength builds, try lingering with your bottom just above the chair seat—hovering in Chair pose without actually sitting down for several breaths—and then return to standing.
- When you are done, return to Mountain pose.
Remember
- • Be sure to draw your bottom back far enough so that you can see your toes when you hinge your hips and bend your knees. This helps to keep length in your spine as well as to keep pressure off your knees.
- • The hip hinge is a very important anatomical landmark for learning how to lean forward without rounding your upper back, which is particularly significant for those with compromised bone.
- • This practice is very strengthening for the quadriceps—the muscles in front of your thighs. They are called the “muscles of independence” because the ability to get up and down from a chair is a crucial skill for being able to live independently.
Caution
- • This pose can feel rather demanding. Make sure you do not hold your breath.
- • If your knees are tender or particularly painful, you may want to try the “as if” version of Chair pose (see page 118).
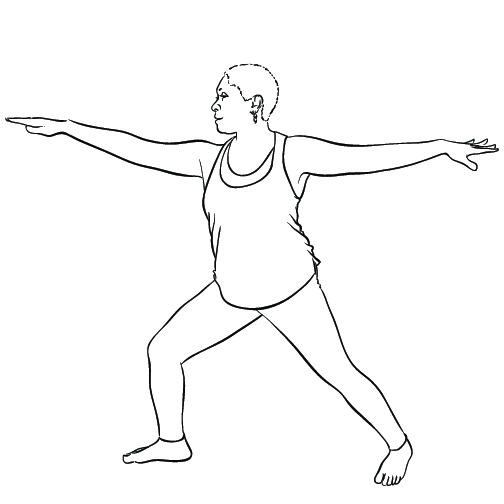
Figure 6.5 Warrior 2 pose
Setup
Stand behind your chair with your legs in a wide stance.
Movement
- Rotate the toes of your right foot 90 degrees to the right.
- Rotate the toes of your left foot about 15 degrees or so to the right. Gently root into your left heel.
- Inhale and extend your arms out to your sides while lengthening your spine upward.
- Exhale and bend your right knee until it is over your right heel and pointing in the same direction as the toes of your right foot.
- Rotate your head to look out over the fingers of your right hand (see figure 6.5).
- Inhale and straighten your right knee.
- Exhale and bend your right knee.
- Continue for a few breath cycles.
- Linger in the bent-knee position for a few breaths if you like.
- Repeat on the other side.
Remember
- • Make sure you can see your toes when you bend your knee—avoid bending the knee so deeply that you can’t see your toes.
- • Keep your bent knee pointing in the same direction as the toes to avoid straining your inner or outer knee.
- • Hold the chair lightly with one hand if you need support.
Caution
- • This is a large-muscle activity and can be demanding. Please keep your breath flowing comfortably. Avoid holding your breath.
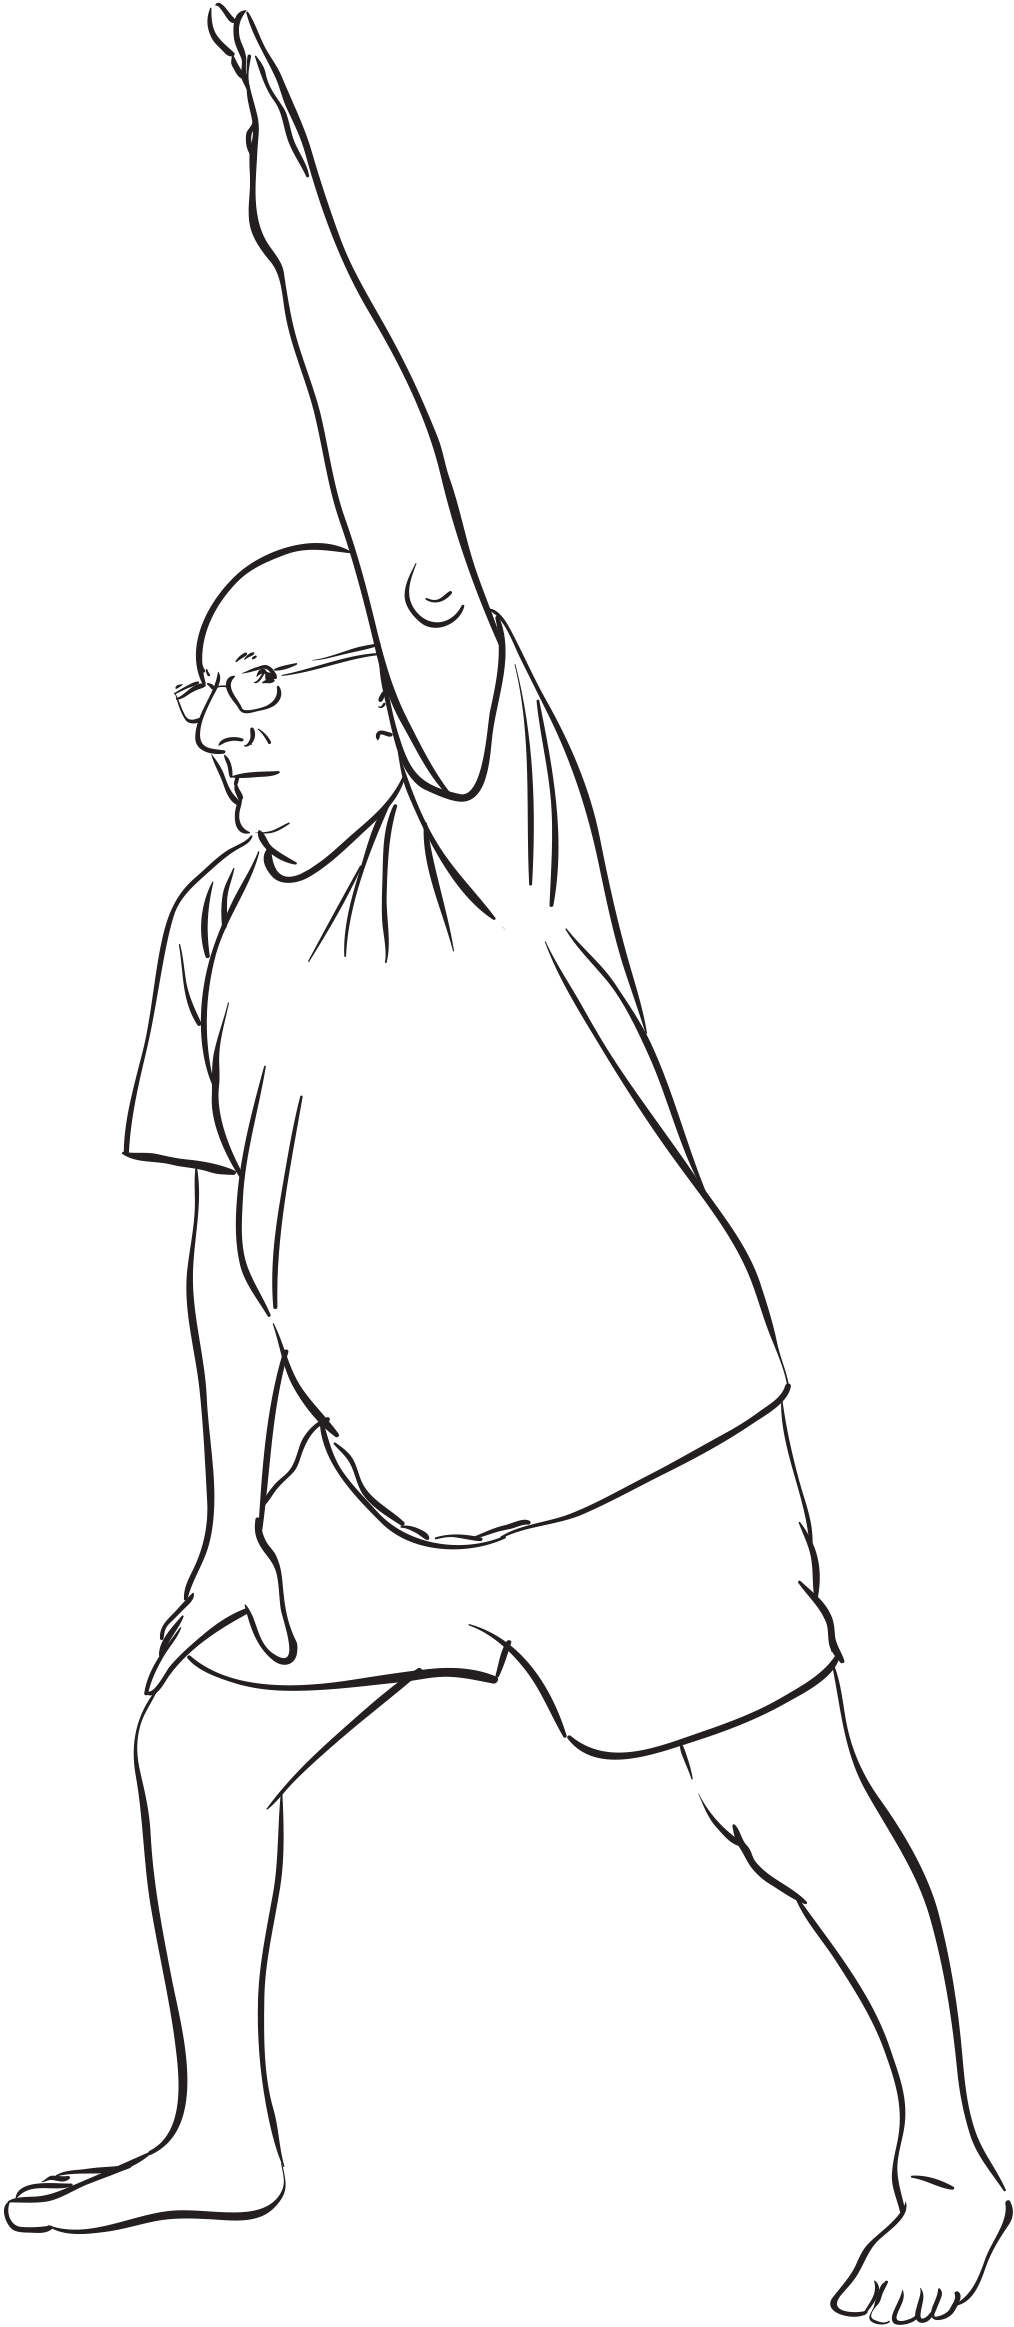
Setup
Stand behind your chair in a wide stance, as with Warrior 2 pose.
Movement
- Rotate the toes of your right foot 90 degrees to the right.
- Rotate the toes of your left foot about 15 degrees to the right. Gently root into the left heel.
- Inhale and extend your arms to the sides while lengthening your spine upward.
- Exhale and bend your right knee until it is over your right heel and pointed in the same direction as the toes of your right foot.
- Keep your breath flowing as you place your right hand on your right thigh.
- Extend your left arm toward the sky as high as is comfortable (see figure 6.6).
- Linger here for a few breaths. On each inhalation, allow your breath to nourish the entire left side of your body. On each exhalation lengthen your left side body, pressing down through your left heel as your reach up with your left hand.
- When you are ready to come out of the pose, straighten your right knee, lower your left arm, and bring your body back to center.
- Repeat on the other side.
Remember
- • Make sure you can see your toes when you bend your knee over your heel.
- • Keep your bent knee in line with your toes to avoid strain on your inner or outer knee.
- • If you have the range of motion and strength, try placing your forearm on your thigh to deepen the stretch.
Caution
- • This is a large-muscle activity and can be demanding—so please keep your breath flowing.
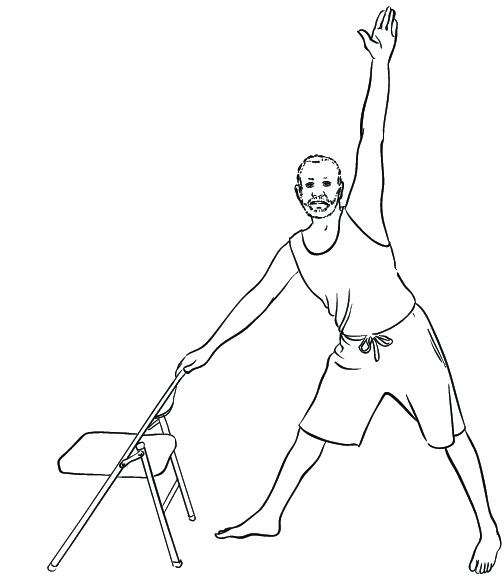
Figure 6.7 Triangle pose
Setup
Stand behind your chair in a wide stance, as with Warrior 2 and Side-Angle poses.
- Rotate the toes of your right foot 90 degrees to the right.
- Rotate the toes of your left foot about 15 degrees to the right. Gently root into your left heel. Keep your legs straight, but don’t lock your knees.
- Inhale and extend your arms to the sides while lengthening your spine upward.
- Exhale and root into your feet as you tilt your torso to the right, keeping both sides of your torso long and your legs straight.
- Lengthen your right arm toward your right leg. Let your right hand rest on the chair for support, if you like.
- Extend your left arm either out to the left or up toward the sky (see figure 6.7). Keep your gaze forward, keeping the front and back of your neck long.
- Linger here for several breaths, keeping your breathing steady and inviting any tense places to soften.
- To come out of the pose, relax your arm down and bring your body back to center.
- Repeat on the other side.
- When you are done, come to Mountain pose and notice what arises.
Remember
- • Keep both legs straight during this posture. It’s fine to let your knees be soft and not locked.
- • Be sure your top shoulder does not droop forward toward your chest. Feel broadness in your collarbones.
- • If the shoulder of the lifted arm is tensing toward the neck, invite your shoulder blades to come together in the back of your body to bring softness and ease to the base of your neck.