Chapter 11
Additional Practices to Enhance Vigor and Relaxation
Now that you’ve spent six weeks learning to Relax into Yoga, you might enjoy trying the following sequences for more challenge and variety. You can repeat one of these flowing sequences multiple times to build endurance and invigorate your body. Although both the flowing sequences as well as the relaxation sequence could be done as a stand-alone, focused practice, we recommend warming up with the practices from week 1 (Three-Part Breath and Range-of-Motion Sequence) and finishing with Relaxation pose.
As a reminder, you can download audio for these additional practices at http://www.newharbinger.com/33643 .
Functional Benefits of the Flowing Sequences
- Build strength and endurance. These flowing sequences of standing postures require continued use of the large muscles of the body, which—over time—can enhance your strength and stamina.
- Boost balance. The rhythmic movements in these sequences, particularly those asking you to step from two legs to one, can enhance your ability to keep your body upright.
- Offer brain training. The choreography of the flowing sequences challenges the brain to learn how to link postures together. Just like learning to dance, it can be great fun.

Figure 11.1

Figure 11.2

Figure 11.3

Figure 11.4
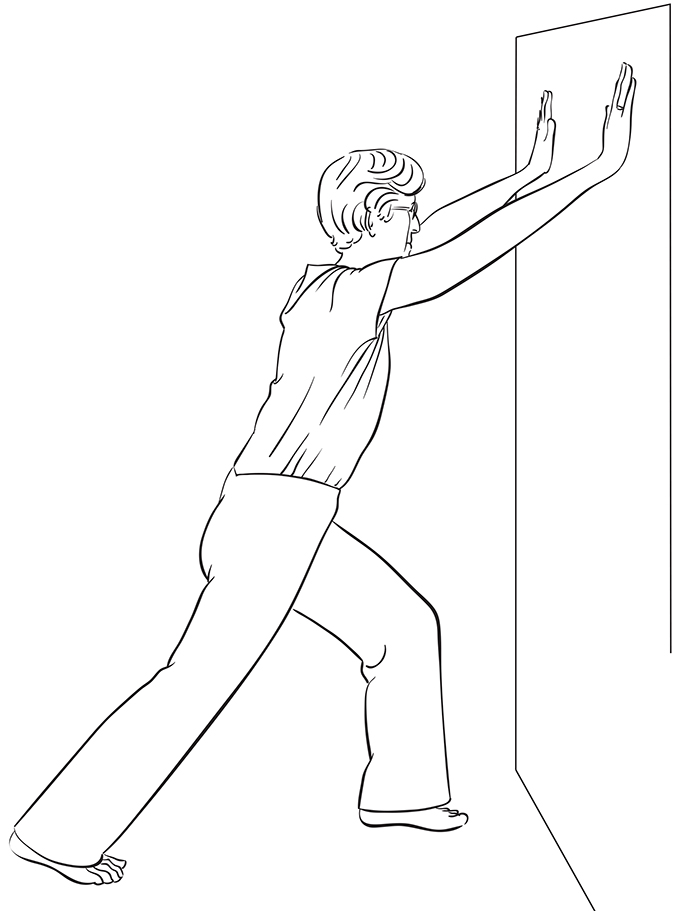
Figure 11.5

Figure 11.6

Figure 11.7
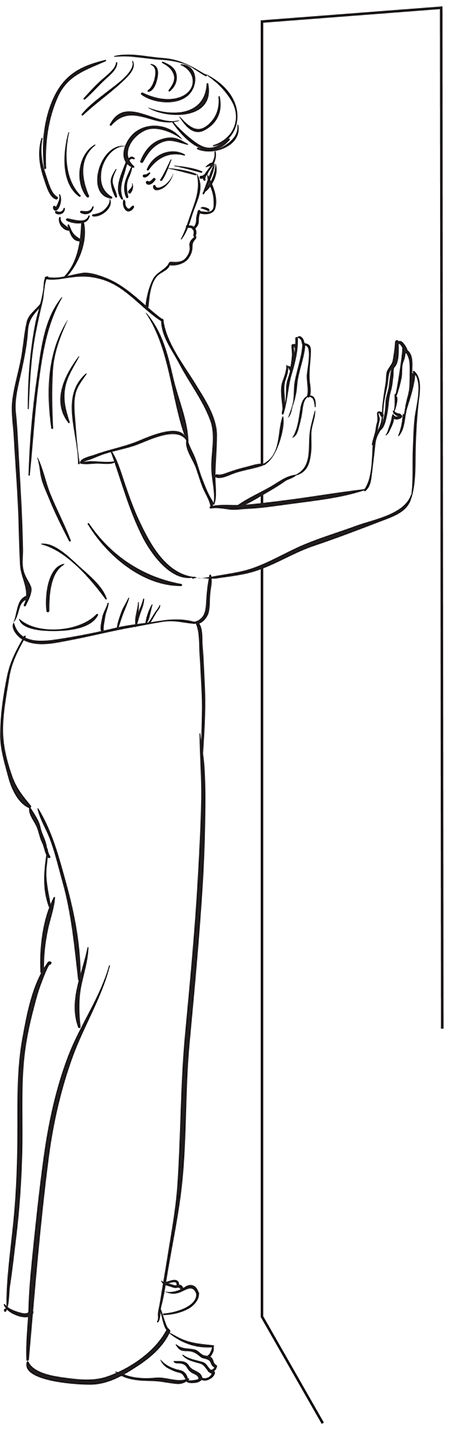
Figure 11.8
Figure 11.9
Figure 11.10
Stand tall facing a wall in Mountain pose, with your toes several inches from the wall (see figure 11.1). Feel the four corners of your feet anchor firmly into the ground. Slightly drop your tailbone, engage your belly, and lift your heart. Feel your breath.
Movement
- Sweep your arms out to the sides and over your head, landing your palms on the wall shoulder-width apart or as wide as is comfortable (see figure 11.2).
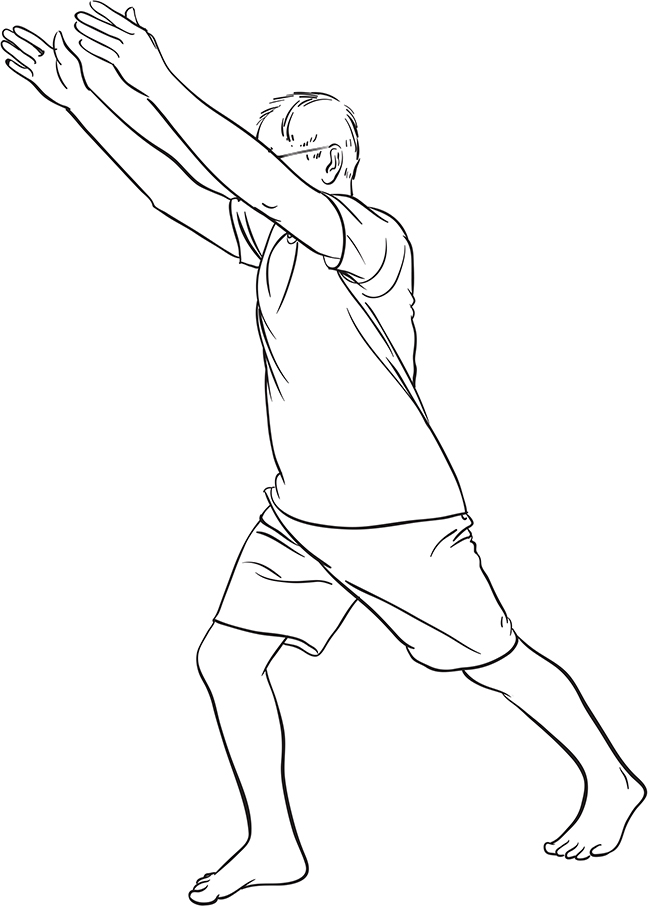
- Step your left leg back behind you as far as is comfortable, placing the ball of your foot on the ground and keeping the heel lifted.
- Bend your right knee, making sure that it does not bend so far forward that you can’t see your toes (see figure 11.3).
- Step your left foot forward a couple of inches.
- Step your right foot back beside your left.
- Bend your knees and extend your tailbone to the wall behind you, sliding your hands down the wall (keeping them shoulder-width apart) so you can lengthen your spine (see figure 11.4).
- Step your left foot forward toward the wall and slide your right foot back a few inches.
- Bend your left knee so it is over your ankle and aligned with your toes.
- Slide your arms back up the wall, still shoulder-width apart (see figure 11.5).
- Step your right foot forward by the left and slide your hands down the wall until they are in front of your ribs (see figure 11.6).
- Engage your belly and hug your elbows toward your body. Invite your shoulders back and down, and tilt your tailbone toward the ground.
- Bend your elbows to “lower” your straight body toward the wall, as if lowering into a push-up (see figure 11.7).
- Press the wall away with your hands (see figure 11.8) and slide your palms back up the wall as high as is comfortable (see figure 11.9).
- Sweep your arms out and down and return to Mountain pose (see figure 11.10).
- Feel free to continue for several more cycles of Sun Salutation at the Wall.
- • Keep your bent knee over your ankle and aligned with your second toe to avoid straining your knee.
- • Practice keeping your spine long when you extend your tailbone to the back wall. If you feel your spine curving in this position, bend your knees more deeply.
- • Pause between rounds and take an easy breath. Feel the ground below you and the sky above you. Find the strength of a mountain.
- • Become aware of the various responses of your body, mind, and heart to this sequence.
- • Avoid bending your knee so deeply that it goes beyond your toes. If you can’t see your toes when you look down, bend your knee less.
- • Avoid pushing your back heel to the ground. Rather, let the heel stay lifted.


Stand beside a chair close enough that you can hold on to the back of the chair for support, if necessary. Stand tall in Mountain pose.
Movement
- Bring your palms together in front of your chest.
- Shift your weight onto your right leg.
- Inhale and lift your left heel, ball of the left foot on the ground, as you extend your arms out to the side.
- Exhale and return to Mountain pose with palms together in front of your chest.
- Repeat this for a few breaths, building strength and balance in your right leg.
- Next, inhale and lift your left knee up so your left foot leaves the ground as you extend your arms out to the side. This is Crane pose (see figure 11.11).
- Exhale and return to Mountain pose with palms together in front of your chest.
- Continue this movement pattern for a few breath cycles.
- Next, inhale and lift your left knee up as you extend your arms out to the side.
- This time, exhale and step your left foot behind you as you lift your arms forward and up (see figure 11.12).
- On your next inhalation, bring your left knee forward and extend your arms to the sides in Crane pose (see figure 11.13).
- Exhale and return to Mountain pose with palms together in front of your chest.
- Continue for several breaths.
- For more challenge, step your left foot a bit farther behind you and bend your right knee as your sweep your arms forward and up. This is Crescent pose (see figure 11.14).
- Inhale and bring your left knee forward and your arms out to the side in Crane pose.
- Exhale and return to Mountain pose with palms together in front of your chest. Pause for a few breaths, simply breathing.
- Repeat on the other side: stand on your left leg and move your right leg.
Remember
- • Feel free to add the breath pattern after you become familiar with the sequence.
- • Explore the variation that is challenging but does not cause strain.
- • Use the chair for support if your balance is unsteady.
- • Keep your breath fluid.


 -->
-->Stand tall in Mountain pose.
- Inhale and sweep your arms out and up (see figure 11.15).
- Exhale and hinge forward from your hips as you bend your knees and extend your bottom back into Chair pose, bringing your hands to your thighs (see figure 11.16).
- Inhale and press your palms into your thighs as you straighten your legs and lengthen your back (see figure 11.17).
- Exhale and float your arms forward as you bend your knees and draw your bottom back into Chair pose (see figure 11.18).
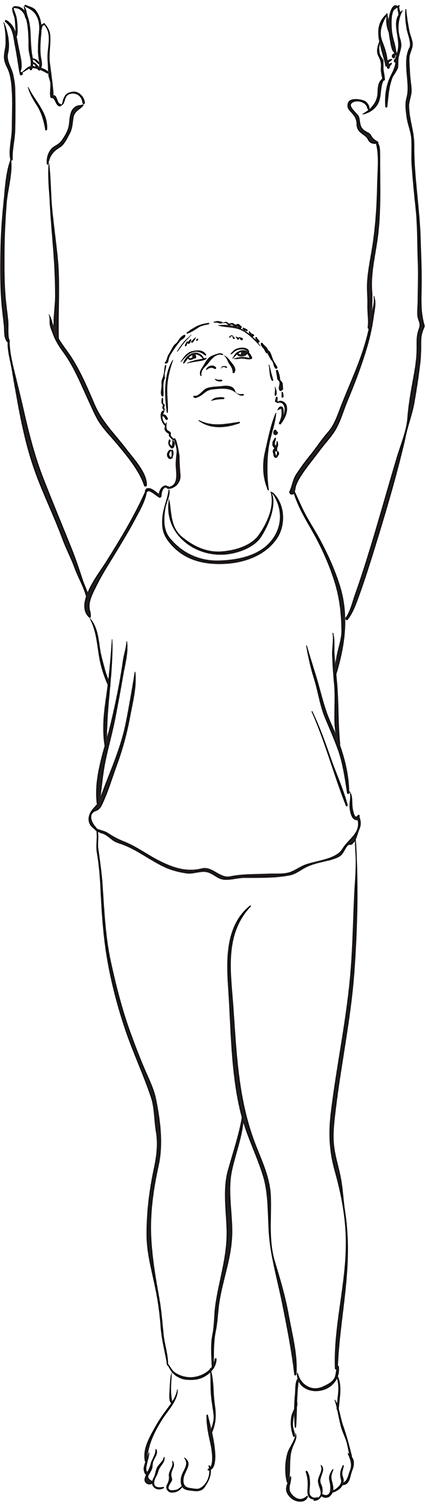
- Inhale and root into your feet, straighten your legs, and extend your arms out and up, gazing up and coming to standing (see figure 11.19).
- Exhale and sweep your arms out to the sides and come back to Mountain pose (see figure 11.20).
- Continue for several cycles, or as long as it feels nourishing.
- When you are finished, rest your palms on your chest for a few moments and feel the effect this practice has on your breath, your heart, your body, and your mind.
- • Keep your thighs parallel so your knees don’t collapse into each other.
- • Avoid rounding your back—keep a neutral spine (see “Healthy Body Mechanics,” page 52).
- • Feel free to rest whenever you need to.
Relax into Yoga cultivates the critical counterbalance of undoing, of slowing down, of savoring the moment and knowing more fully what life is presenting right now .
Functional Benefits of the Quieting Practices
- Ease tension. Deep, relaxed stretching can help release tension from body and mind.
- Enhance flexibility. Stretching tight muscles can improve joint mobility.
- Relieve pain. Relaxing in the presence of stretching sensations can help the brain and central nervous system learn a different response to the sensations of persistent pain.
- Calm the nervous system. Quieting practices can trigger the relaxation response, which involves a cascade of calming physiologic changes, including decreased heart rate, blood pressure, and breathing rate.
- Connect to quieter dimensions of experience. The stillness that can arise with the quieting practices can be a deeply welcome place of rest for body, mind, heart, and spirit.


Setup
Rest on your back with your knees bent and the soles of your feet flat on the ground. Have a strap nearby. Bring your arms alongside your body, palms down, and tune in to your breath.
Movement
- Bend your right knee toward your belly and place a strap around the ball or arch of your right foot.
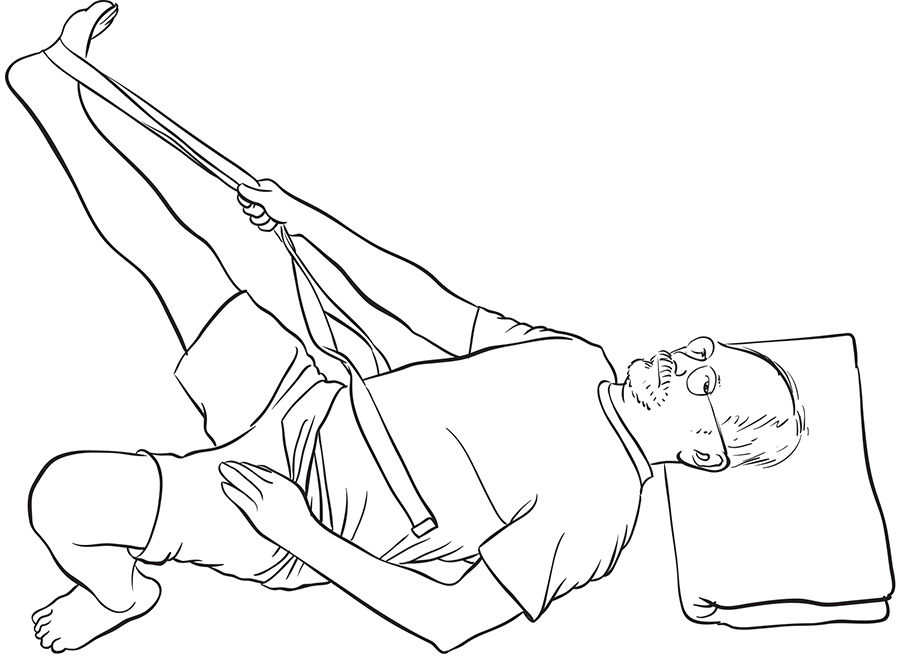
- Inhale and extend your right foot up toward the sky, straightening your leg as much as you comfortably can. Keep your left knee bent, with your left foot on the ground (see figure 11.21).
- Exhale and flex your right foot as you let your right thigh be heavy in the hip socket.
- Pause here for several breaths, extending up through your right heel and releasing down through your right hip.
- To deepen the stretch, extend your left leg along the ground, flexing your left foot and pointing your toes toward the sky (see figure 11.22).
- Take several breaths here.
- Take both sides of the strap in your right hand and place your left hand on your left thigh.
- Bend your left knee again so that the sole of your left foot is flat on the ground.
- Open your right leg to the right (see figure 11.23).
- Keep your left hip and buttock heavy on the ground and allow your left knee to drift slightly to the left to help you counterbalance the weight of your extended right leg. Place your left hand on your left thigh or hip to keep the left side of your pelvis from lifting up.
- Linger here for several breaths.
- Inhale and bring your right leg back to center.
- Exhale and allow your right foot to return to the ground.
- Repeat on the other side.
- • Extend the lifted leg only as long as is comfortable.
- • If your chin juts upward and the back of your neck feels crunched, place a folded towel under your head.
- • If you are unable (or prefer not) to get down on the ground, try this practice lying in your bed.
- • Keep your shoulders relaxed and on the ground. You may need to slide your hands down the strap to avoid creating stress in your hands, arms, and shoulders.
- • As you lengthen into the stretch, bring attention to the different qualities of sensation that are present.
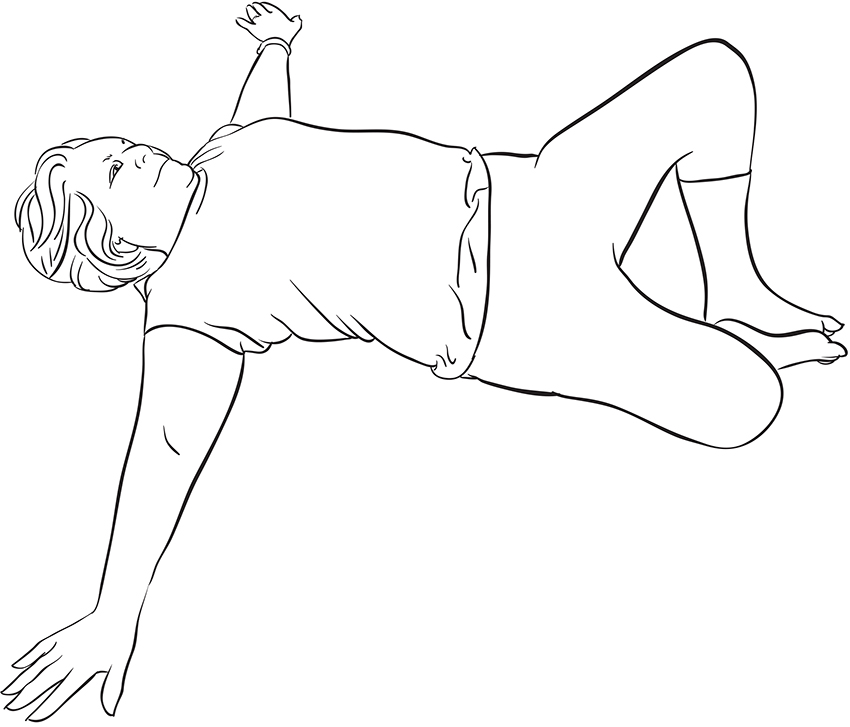
Figure 11.24

Figure 11.25
Rest on your back with your knees bent and the soles of your feet flat on the ground. You may want to have a couple of pillows nearby.
Movement
- Bring the soles of your feet together and let your knees open out to the sides.
- Extend your arms out to the sides (see figure 11.24). Your palms can be up or down, whichever feels best to you.
- Breathe into your hips and groin. If you are unable to relax in this position, tuck a pillow under each thigh for support (see figure 11.25).
- Linger here for several breaths, inviting your legs and hips to relax and release.
- When you are ready to come out of the pose, place your hands on your outer thighs and use the strength of your hands and arms to help return your thighs to the starting position.
Remember
- • Try this pose with and without a support under your thighs to see which variation invites greater relaxation.
- • Feel free to cover yourself with a blanket for comfort if you’d like to rest in this position for a little while.

Figure 11.26 Legs on a Chair pose
Setup
Rest on your back with your knees bent, feet flat on the ground, near a stable chair.
Movement
- Place your calves on the seat of the chair. Relax your arms at your sides (see figure 11.26).
- Breathe.
- Spend as much time here as feels comfortable.
- When you are ready, hug your knees to your belly.
- Place the soles of your feet flat on the ground and roll to one side.
- Pause here for a few breaths before coming up to a seated position.
Remember
- • If you have long legs, try placing your calves on the chair from the side rather than the front.
- • Place a pillow or towel under your head if your chin is jutting up.
Caution
- • If lifting your legs onto a chair feels uncomfortable, or if your legs are swollen from a condition such as congestive heart failure, you might try just slightly elevating your legs on a low surface, such as one or two pillows, rather than placing them on a chair. Please check with your physician if you are unsure whether this pose is appropriate for you (see “Partnering with Your Health Care Provider,” page 24).