Using the panes of the Sound panel, you can configure the sound system of your Mac in any of several ways.
Tip
Here’s a quick way to jump directly to the Sound panel of System Preferences—from the keyboard, without ever having to open System Preferences or click Sound. Just press Option as you tap the  ,
,  , or
, or  key on the top row of your Apple keyboard.
“Sound effects” means error beeps— the sound you hear when the Mac wants your attention, or when you click someplace you shouldn’t.
Just click the sound of your choice to make it your default system beep. Most of the canned choices here are funny and clever, yet subdued enough to be practical as alert sounds (Figure 8-17).
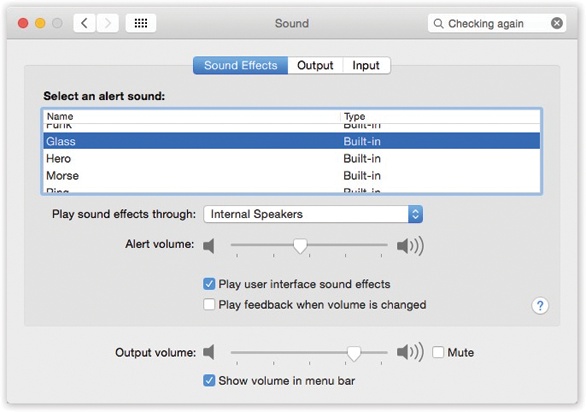
Figure 8-17. You can adjust your overall speaker volume independently from the alert-beep volume, thank goodness.
The other controls on the Sound Effects panel include these:
Play sound effects through: Intriguingly enough, you can specify one sound source (a speaker or headset) for most sound playback—and a different one just for your error beeps. That’s the one you specify with this pop-up menu.
Alert volume. The main volume slider for your Mac is the “Output volume” slider at the bottom of the Sound pane. The “Alert volume” slider is just for error beeps; Apple was kind enough to let you adjust the volume of these error beeps independently.
Play user interface sound effects. This option produces a few subtle sound effects during certain Finder operations: when you drag something off the Dock, into the Trash, or into a folder, or when the Finder finishes a file-copying job.
Play feedback when volume is changed. Each time you press one of the volume keys (
, , ), the Mac beeps (or, rather, pops) to help you gauge the current volume.That’s all fine when you’re working at home. But more than one person has been humiliated in an important meeting when the Mac made a sudden, inappropriately loud sonic outburst—and then amplified that embarrassment by furiously and repeatedly pressing the volume-down key, beeping all the way.
If you turn off this checkbox, then the Mac won’t make any sound at all as you adjust its volume. Instead, you’ll see only a visual representation of the steadily decreasing (or increasing) volume level.
“Output” means speakers or headphones. For most people, this pane lists only Internal Speakers (and a Balance slider for left-to-right stereo balancing).
This panel is more useful when you’ve connected external speakers, a Bluetooth or USB phone headset, or an AirPlay receiver like an Apple TV—and then clicked its name. All Mac audio now flows to that device. OS X will even remember your volume setting for each gadget independently.
This panel lets you specify which sound source you want the Mac to “listen to,” if you have more than one connected: external microphone, internal microphone, line input, USB headset, or whatever. It also lets you adjust the sensitivity of that microphone—its input volume—by dragging the slider and watching the real-time Input level meter above it change as you speak. Put another way, it’s a quick way to see if your microphone is working.
The “Use ambient noise reduction” is great if you make podcasts or use dictation software. It turns any mike into what amounts to a noise-canceling microphone, deadening the background noise while you’re recording.
If you’d prefer even more control over your Mac’s sound inputs and outputs, don’t miss the Audio MIDI Setup program in your Applications→Utilities folder.