The calendar program that was called iCal for many years is now called Calendar, so that it matches its name on the iPhone and iPad.
Calendar is not so different from those “Hunks of the Midwest Police Stations” paper calendars that people leave hanging on the walls for months past their natural life span.
But Calendar offers several advantages over paper calendars:
It can automate the process of entering repeating events, such as weekly staff meetings or gym workouts.
Calendar can give you a gentle nudge (with a sound, a dialog box, or even an email) when an important appointment is approaching.
Calendar can share information with Contacts, with Mail, with your iPod/iPad/iPhone, with other Macs, or with “published” calendars on the Internet. Some of these features require one of those iCloud accounts described in Chapter 15. But Calendar also works fine on a single Mac, even without an Internet connection.
Calendar can subscribe to other people’s calendars. For example, you can subscribe to your spouse’s calendar, thereby finding out when you’ve been committed to after-dinner drinks on the night of the big game on TV. You can also tell Calendar to display your online calendars from Google and Yahoo, or even your company’s Exchange calendar.
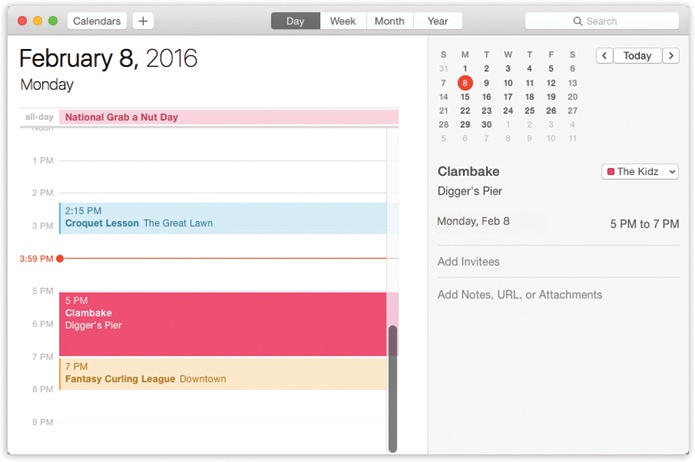
When you open Calendar, you see something like Figure 10-2. By clicking one of the View buttons above the calendar, or by pressing ⌘-1, ⌘-2, ⌘-3, or ⌘-4, you can switch among these views:
Day looks exactly like a day-at-a-time desk calendar. On the left side, you see today’s schedule on an hour-by-hour chart. On the right, you see the details of whichever appointment is selected.)
If you choose Calendar→Preferences, you can specify what hours constitute a workday. This is ideal both for those annoying power-life people who get up at 5 a.m. for two hours of calisthenics and for the more reasonable people who sleep until 11.
Week fills the main display area with seven columns, reflecting the current week. (You can establish a five-day work week instead in Calendar→Preferences.)
Month shows the entire current month. The time of each appointment is listed in gray off to the right of each square. Double-click a date number to open the Day view for that date.
If a Month-view square is too small to show everything you’ve got scheduled that day, you’ll see a notation at the bottom of the square, like “3 more…” Sometimes, making the window bigger (or full screen) helps make more room, or you can just double-click the date’s number to switch to Day view and see everything at once.
Year view displays the date numbers for the entire year (Figure 10-3).


In Week or Month view, double-click an appointment to see more about it, or even make changes to it.
Tip
In Week or Day view, Calendar sprouts a handy horizontal line that shows where you are in time right now. (Look in the hours-of-the-day “ruler” down the left side of the window to see this line’s little red bulb.) A nice touch, and a handy visual aid that can tell you at a glance when you’re already late for something.
Also in any view, you can switch into Full Screen view by clicking the green  button (top left). See The “Heads-Up” Program Switcher for more on Full Screen mode.
Tip
Each Calendar view scrolls smoothly and endlessly into the past or future. Day and Week views scroll horizontally; Month and Year views scroll vertically.
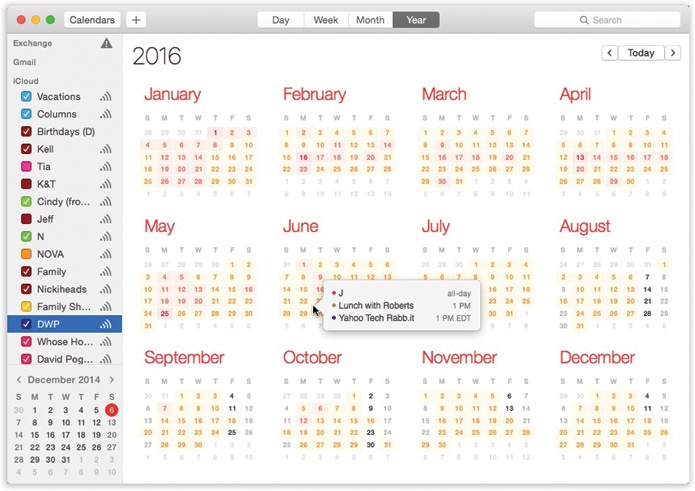
Figure 10-3. Year view shows the entire year. In Calendar→Preferences→Advanced, you can turn on “Show events in year view,” which actually means “Show me a ‘heat map‘ to indicate how hectic my schedule is.” You can single-click a date number to see a pop-out list of the appointments scheduled for that date.
The basic Calendar is easy to figure out. After all, with the exception of one unfortunate Gregorian incident, we’ve been using calendars successfully for centuries.
Even so, there are two ways to record a new appointment: using the mouse, or using the Quick Event box.
You can quickly record an appointment using any of several techniques, listed here in order of decreasing efficiency:
In Month view, double-click a blank spot on the date you want. Type the name of the event and a time slot—for example, Sales meeting 9am-4:30. (See The Quick Event way, below, for details on how Calendar interprets these time notations.)
In Day or Week view, double-click the starting time to create a one-hour appointment. Or drag vertically through the time slots that represent the appointment’s duration. Either way, type the event’s name inside the newly created colored box.
In Day, Week, or Month view, right-click (or two-finger click) a date and choose New Event from the shortcut menu. Type the event’s name.
Unless you use the drag-over-hours method, a new event believes itself to be one hour long. But in Day or Week view, you can adjust its duration by dragging the bottom edge vertically. Drag the dark top bar up or down to adjust the start time.
In many cases, that’s all there is to it. You’ve just specified the day, time, and title of the appointment. Now you can get on with your life.
In the Quick Event method, the program spares you the trouble of manually selecting dates, start times, and end times. Instead, the program understands notations like “7 pm Friday,” and puts your new appointment into the right time slot automatically.
To use this feature, press ⌘-N. Or click  (top left of the window) or choose File→New Event. The Quick Event box appears. Proceed as shown in Figure 10-4.
Note
Calendar proposes adding the new appointment to your default calendar—that is, the category you use most often (read on for details on these calendar categories). Supposedly, you’ve already told it which category is your preferred one by using the Calendar→Preferences→General→Default Calendar pop-up menu.
But as you add a new appointment this way, you can override that setting by holding down the button. You get a pop-up menu of your calendar categories; only after you click one do you see the Quick Event box shown in Figure 10-4.
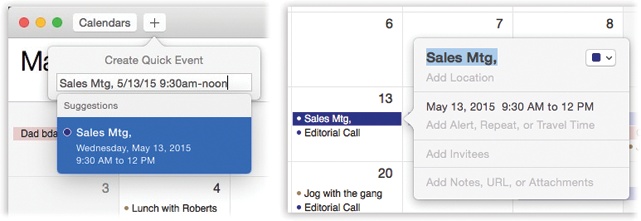
Figure 10-4. Left: Type a plain-English shorthand appointment. Press Return. Marvel as Calendar interprets the times you typed and inserts your meeting into the right time slot.
Into the Quick Event box, type the name of your appointment and its date and time. For example, you could type Report deadline Aug 12, or “Titanic 2: The Return” Sat 7 pm, or Cara date 11-11:15am.
When you press Return, Calendar interprets what you typed, using these rules:
If you didn’t specify an ending time, Calendar sets the appointment to 1 hour long.
If you didn’t enter any time information, then Calendar figures you meant an all-day event like a birthday, holiday, or deadline.
If you typed breakfast or morning, Calendar sets the appointment to start at 9 a.m.; lunch or noon, it starts at 12 p.m.; dinner or night, it starts at 8 p.m.
If you enter a weekday (for example, Chicago Monday), Calendar assumes you mean the very next occurrence of that day. (If that’s not what you want, enter the date, like Chicago Jul 3.)
If you enter a time but not a date or day (for example, Fishing 3:30 pm), Calendar assumes you mean today.
The Quick Event system has a feature that saves you time and typos: As you type, Calendar displays a menu of similar appointments you’ve entered in the past (Figure 10-4, left). If you click one, Calendar fills in all the details of the new appointment in one fell swoop, copying them from the earlier event.
As soon as Calendar interprets your shorthand and turns it into a real appointment, its details balloon opens automatically (Figure 10-4, right), so that you can clean up any errors and add more details.
No matter which method you use to create the basic event (the mouse way or the Quick Event way), you’re now presented with the information balloon shown at right in Figure 10-4. Here’s where you go to town filling in the details. (This same balloon will appear when you double-click any existing appointment later.)
Tip
You can also open the Info balloon by clicking an appointment and then pressing ⌘-E (which is short for Edit→Edit Event).
For each appointment, you can tab your way to the following information areas:
subject. That’s the large, bold type at the top—the name of your appointment. For example, you might type Fly to Phoenix.
calendar. A calendar, in Calendar’s terminology, is a subset—a category—into which you can place appointments. You can create one for you, one for family-only events, one for book-club appointments, and so on. You can hide and show these categories at will. Details begin on Deleting events; for now, note that the tiny colored square in the top-right corner of the Info bubble is a pop-up menu of your calendars.
location. This field makes a lot of sense; if you think about it, almost everyone needs to record where a meeting is to take place. You might type a reminder for yourself like My place, a specific address like 212 East 23rd, or some other helpful information, like a contact phone number or flight number.
As you type, Calendar busily consults Apple’s worldwide database of street addresses—and proposes a few matches, as shown in Figure 10-5 (top left). You’re under no obligation to choose one of these; you can ignore the suggestions and type “Casey’s treehouse,” for all Apple cares. But if you do choose from Apple’s list of proposals, some cool things happen.
For example, you get a little map (which you can click to open the Maps app for a bigger view), as shown in Figure 10-5 (top right). You get to see the current weather, so you know how much to bundle up. And you get to use the travel-time feature described below.
Note
The next few controls appear only when you expand the Info bubble to see the time and date information. To do that, click whatever time is listed now—or, if you’ve just tabbed your way to the times, press Return.
Figure 10-5. Here’s the life cycle of Calendar’s location and travel-time feature. Top left: To make the travel-time calculation work, you must choose from Calendar’s list of location suggestions, based on what you’ve typed. Top right: You get a map and weather report for that location. Bottom left: Calendar knows how long it will take to get there… Bottom right: …and will remind you when it’s time to get going!
all-day. An “all-day” event, of course, refers to something that has no specific time of day associated with it: a holiday, a birthday, a book deadline. When you turn on this box, you see the name of the appointment jump to the top of the Calendar screen, in the area reserved for this kind of thing.
starts, ends. You can adjust the times shown here by typing, clicking buttons, or both. Press Tab to jump from one setting to another, and from there to the hours and minutes of the starting time.
Note
The little calendar that pops up when you click the date is handier than typing a date manually.
For example, start by clicking the hour, and then increase or decrease this number either by pressing
 and
and  or by typing a number. Press Tab to highlight the minutes and repeat the arrow-buttons-or-keys business. Finally, press Tab to highlight the AM/PM indicator, and type either A or P—or press or —to change it, if necessary.
time zone. This option appears only after you choose Calendar→Preferences→Advanced and then turn on “Turn on time zone support.” And you would do that only if you plan to be traveling on the day this appointment comes to pass.
Once you’ve done that, a time zone pop-up menu appears. It starts out with “America/New York” (or whatever your Mac’s usual time zone is); if you choose Other, a tiny world map appears. Click the time zone that represents where you’ll be when this appointment comes due. From the shortcut menu, choose the major city that’s in the same zone you’ll be in.
Tip
The time zone pop-up menu remembers each new city you select. The next time you travel to a city you’ve visited before, you won’t have to do that clicking-the-world-map business.
Now, when you arrive in the distant city, use the time zone pop-up menu at the top-right corner of the Calendar window to tell Calendar where you are. You’ll see all of Calendar’s appointments jump, like magic, to their correct new time slots.
repeat. The pop-up menu here contains common options for recurring events: every day, every week, and so on. It starts out saying None.
Once you’ve made a selection, you get an end pop-up menu that lets you specify when this event should stop repeating. If you choose “Never,” you’re stuck seeing this event repeating on your calendar until the end of time (a good choice for recording, say, your anniversary, especially if your spouse might be consulting the same calendar). You can also turn on “After (a certain number of times),” which is a useful option for car and mortgage payments. And if you choose “On date,” you can specify the date when the repetitions come to an end; use this option to indicate the last day of school, for example.
“Custom” lets you specify repeat schedules like “First Monday of the month” or “Every two weeks.”
travel time. This item represents a breakthrough in common sense: It automatically builds travel time into Calendar’s understanding of any appointment. After all, it’s not very useful to get a reminder like “Lunch with Jenkins at 1 p.m.” 10 minutes beforehand if it takes half an hour to get there.
Now, then: If Calendar is to calculate travel time, it has to know where you’re starting out and where you’re going.
To figure out your starting point, the Mac consults your “me” card in the Contacts app (Contacts (Address Book)), and uses either your home address or your work address, depending on the time of day. (How does Calendar know when you’re at work? It cleverly uses the “Day starts at” and “Day ends at” settings in Calendar→Preferences→General.)
If you haven’t specified home and work addresses on your “me” card, then Calendar uses the current location of your Mac as the starting point. (And that works only if you’ve allowed the Mac to track your location; see Searching the Maps.)
For the arrival location, the Travel Time feature requires that you’ve accepted one of the Mac’s address suggestions, as described (Figure 10-5, top left).
Once all that’s done, the Travel Time pop-up menu shows you both the driving and walking times to your appointment. You can override these suggestions if you like; you can choose any time interval from 5 minutes to 2 hours, or choose Custom to plug in something not listed here.
The real payoff, of course, comes when you set a reminder for yourself; read on.
alert. This pop-up menu tells Calendar to notify you when a certain appointment is about to begin. Choose how much notice you want: “At time of event,” “5 minutes before,” all the way up to “2 days before.” If it’s a TV show, a reminder 5 minutes before airtime is fine. If it’s a birthday, you might set up a two-day warning, so there’s time to buy a present.
Actually, you can get a lot more particular than that. If you choose Custom, you can specify any advance-warning interval at all: “16 minutes before,” or “15 days after,” or whatever. (Yes, you can even set up an alarm to ring after the event—great if you want to follow up with something or check the oven.)
Here in Customland, you can also set any of four kinds of flags to get your attention. It can display a message (with a sound, if you like), send you an email, or open a file on your hard drive. (You could use this unusual option to ensure that you don’t forget a work deadline by having Calendar fling the relevant document open in front of your face at the eleventh hour.)
And if you’ve used the travel-time feature already described, Calendar even offers a choice called “When I need to leave” (Figure 10-5, lower right), which factors travel time into the reminder. (Alas, the Mac does not factor in traffic conditions.)
show as (busy/free/tentative/out of office). This little item shows up only if you’ve subscribed to a calendar server, like an Internet-based calendar (in geek-speak, a CalDAV server) or your company’s Exchange calendar. It communicates to your colleagues when you might be available for meetings.
Note
If your calendar comes from a CalDAV server, then your only options are “busy” and “free.” The factory setting for most appointments is “busy,” but for all-day events it’s “free.” Which is logical; just because it’s International Gecko Appreciation Day doesn’t mean you’re not available for meetings (rats!).
You might think: “Well, duh—if I’ve got something on the calendar, then I’m obviously busy!” But not necessarily. Some Calendar entries might just be placeholders, reminders to self, TV shows you wanted to watch, appointments you’d be willing to change—not things that would necessarily render you unavailable if a better invitation should come along.
invitees. If the appointment is a meeting or some other gathering, you can type the participants’ names here. If a name is already in your Contacts program, then Calendar proposes autocompleting the name for you.
If you separate several names with commas, Calendar automatically turns each into a shaded oval button. You can click it for a pop-up menu of commands like Remove Attendee and Send Email. (That last option appears only if the person in Contacts has an email address, or if you typed a name with an email address in brackets, like this: Chris Smith <chris@yahoo.com>.)
Tip
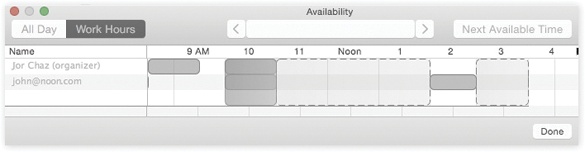
If you and your invitees are on the same CalDAV or Exchange calendar service—usually, coworkers at the same company—Calendar can show a “time map” of the invitees’ days, all in a handy scrolling window, so you can find a time when everybody’s free. To see this map, click the Available Meeting Times link beneath the addresses of the invitees you’ve specified, or choose Window→Availability Panel (see Figure 10-6).
Figure 10-6. Drag the vertical block (your proposed meeting) to a different time slot, or click Next Available Time to find when everybody’s free. Good luck.
Once you’ve specified some attendees, a Send button appears in the Info box. If you click it, Calendar fires up Mail and prepares ready-to-send messages, each with an iCal .ics attachment: a calendar-program invitation file. See the box below.
url. A URL is a Uniform Resource Locator—a web address, like www.apple.com. If there’s a URL relevant to this appointment, by all means type it here. Type more than one, if it’ll help you; just be sure to separate them all with commas.
note. You can type, paste, or drag any text you like in the note area—driving directions, contact phone numbers, a call history, or whatever.

Your newly scheduled event now shows up on the calendar, complete with the color coding that corresponds to the calendar category you’ve assigned.
Once you’ve entrusted your agenda to Calendar, you can start putting it to work. Calendar is only too pleased to remind you (via pop-up messages) of your events, reschedule them, print them out, and so on. Here are a few of the possibilities.
To edit a calendar event’s details, click to open its Info balloon (Figure 10-4).
And if you want to change only an appointment’s “calendar” category, right-click (or two-finger click) anywhere on the appointment and choose from the resulting Calendar shortcut menu. That way, you bypass the need to open the Info balloon.
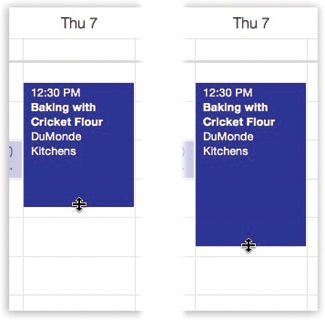
If an event in your life gets rescheduled, you can drag an appointment block vertically in a Day- or Week-view column to make it later or earlier the same day, or horizontally to another date in any view. (If you reschedule a recurring event, Calendar asks if you want to change only this occurrence, or this and all future ones.)
If something is postponed for, say, a month or two, you’re in trouble, since you can’t drag an appointment beyond its month window. You have no choice but to open the Info balloon and edit the starting and ending dates or times—or just cut and paste the event to a different date.
If a scheduled meeting becomes shorter or your lunch hour becomes a lunch hour-and-a-half (in your dreams), changing the length of the representative calendar event is as easy as dragging the bottom border of its block in any column view (see Figure 10-7).
To commit your calendar to paper, choose File→Print, or press ⌘-P. The resulting Print dialog box lets you include only a certain range of dates, only events on certain calendars, with or without To Do lists or mini-month calendars, and so on.
When you type into the search box at the top right of the Calendar screen, you’re offered some “search tokens” that indicate where you want to search for that phrase (in the name of an event, in its notes, location, and so on). The right-hand column offers a clickable list of search results. Figure 10-8 has the details.
To delete an appointment, click it and then press the Delete key. If you delete a recurring event (like a weekly meeting), Calendar asks whether you want to delete only that particular instance of the event, or the whole series from that point forward.
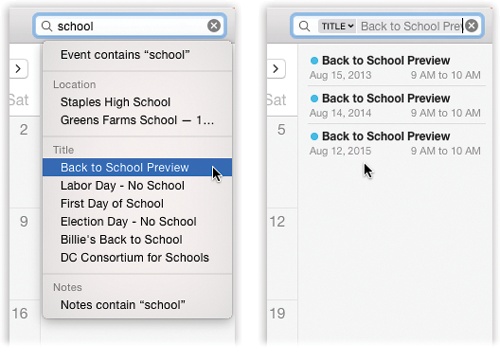
Figure 10-8. Left: Type into the search box; Calendar sprouts a list of suggestions (“Event contains ‘school,’” “Notes contain ‘school,’” and so on). Right: Click one to create a search token exactly like the ones that Spotlight and Mail use. They let you build up complex searches, bubble by bubble. Double-click any row of the list to jump to the corresponding event on the calendar and open up its summary balloon.
Calendar has calendars that let you organize appointments into subsets. They can be anything you like. One person might have calendars called Home, Work, and TV Reminders. Another might have Me, Spouse ’n’ Me, and Whole Family. A small business could have categories called Deductible Travel, R&D, and R&R.
And now, the Calendar Tip-O-Rama:
To create a calendar, choose File→New Calendar. You now have to specify where you want this category to live: On My Mac (meaning on your Mac), or on one of your online accounts, like iCloud, Google, Yahoo, or Exchange. Type a name that defines the category in your mind.
Note
When you set up an iCloud account either in System Preferences or when you first run El Capitan, Calendar automatically transfers your “On My Mac” categories to iCloud. You can no longer create categories that live only on your Mac. (There’s one exception: If you created your iCloud account in Calendar Preferences, then you can have an “On My Mac” category.)
To see your list of categories, click the Calendars button (upper left of the window). A Sidebar list appears, if it wasn’t already open.
Hide or show an entire category of appointments at once by turning on or off the appropriate checkbox in the Calendars Sidebar.
To change the color of a category, right-click (or two-finger click) its name in the Sidebar list. In the pop-up bubble, you choose a new color.
To specify your default calendar, choose Calendar→Preferences→General. Choose from the Default Calendar pop-up menu. (The Default calendar is the category that every new appointment falls into unless you change it. It’s also the category that other apps, like Mail, propose putting new appointments into.)
To assign a new appointment to a calendar, click the color swatch in the corner of its Info balloon.
To change an appointment’s calendar category, right-click (or two-finger click) the appointment’s name and choose a calendar name from the shortcut menu.
You may be able to make calendar groups, too. Those are containers that consolidate the appointments from several other calendars. For example, you could have a calendar group called Kids, containing the individual calendars for each of your offspring. Super-calendars like this make it easier to manage, hide, show, print, and search subsets of your appointments. (Sadly, this feature is available only for “On My Mac” categories, as described above—not for online accounts.)
To create a calendar group, choose File→New Calendar Group. Name the resulting item in the Calendar list; for the most part, it behaves like any other calendar. Drag other calendar names onto it to include them. Click the flippy triangle to hide or show the component calendars.
One of Calendar’s best features is its ability to post your calendar on the web, so that other people can subscribe to it, which adds your appointments to their calendars. Anyone with a web browser—or only people you designate—can also view your calendar, right online.
For example, you might use this feature to post the meeting schedule for a club that you manage, or to share the agenda for a series of upcoming financial meetings that all your coworkers will need to consult.
The steps for sharing a calendar depend on whether or not you have an iCloud account. Observe:
If you have an iCloud account: Proceed as shown in Figure 10-9. Note that you can specify whether each person can just see the appointments, or be able to edit them, too. That’s a delightful, two-way collaboration—a terrific way for a couple or a family to coordinate everyone’s calendars, for example.
Behind the scenes, Calendar sends an invitation to the recipient. If she has a Mac, iPhone, or iPad, she’ll see a notification right in Calendar ( ); otherwise, she’ll get the invitation by email. Once she clicks the invitation and clicks Accept, your shared calendar shows up on her machine.
Later, you can modify the settings (Figure 10-9, bottom). Or you can stop sharing with someone by clicking the  next to a calendar name; clicking a person’s name; and then pressing the Delete key.
Tip
You can also share an iCloud calendar at icloud.com. Just click the icon beside a calendar’s name.
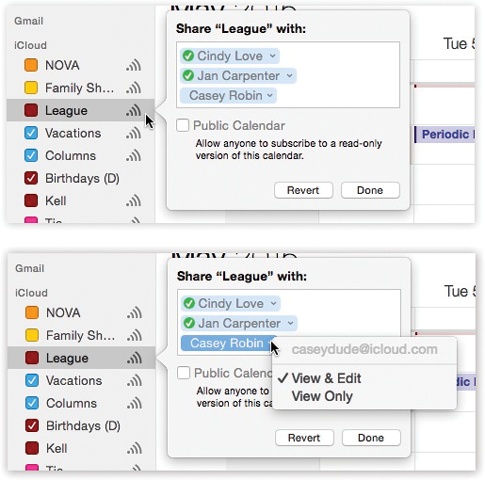
Figure 10-9. Top: Point to the name of the iCloud calendar you want to publish; click the “shared” icon () that appears next to its name. In the pop-out panel, enter the email address of the lucky recipient (it must be someone you’ve entered into your Contacts). You can invite several; just keep trying addresses. The Public Calendar option means that the whole Internet can see this calendar category (if they know the secret URL). Bottom: Use the  to specify whether a person can see your appointments (View Only) or make changes to them, too (View & Edit). After the recipient has accepted the invitation, click the icon again; this time, a green checkmark appears next to the person’s name.
If you don’t have an iCloud account: If you don’t have iCloud, then you’ll need a website of your own, where your online calendar can be hung. And it has to be a WebDAV-compatible server (ask your web-hosting company). You know what? It might just be easier to sign up for a free iCloud account and do it that way.
In any case, begin by making sure that the Calendars list is open. Click the calendar you want to share. Choose Edit→Publish Calendar. (This command doesn’t appear if you have an iCloud account, since the sharing mechanism is so much simpler with iCloud.)
Tip
You have to perform this step individually for each calendar category. If you want to publish more than one calendar simultaneously, then create a calendar group, and publish that.
A dialog box appears. This is where you specify your web address, its password (if necessary), and how your saved calendar is going to look and work. If you turn on “Publish changes automatically,” then whenever you edit the calendar, Calendar connects to the Internet and updates the copy there. (Otherwise, you can right-click the calendar’s name and choose Refresh whenever you want to update the web copy.)
When you click Publish, your Mac connects to the web and then shows you the web address (the URL) of the finished page, complete with a Send Mail button that lets you fire the URL off to your colleagues.
Tip
Whenever you want to send someone the subscription information, click the calendar category you’ve published and choose Edit→Send Publication Email. Calendar will prepare an outgoing email message containing details on subscribing to your calendar.
To stop publishing that calendar, click its name in the Calendars pop-up list and then choose Edit→Stop Publishing.
Often, websites publish calendars that you can bring into Calendar. Maybe you use Tripit.com to manage your flights and hotel reservations. Maybe you’ve found a calendar you like at www.icalshare.com—a schedule of rocket launches, trade shows, National Hockey League games, NASCAR races, soccer matches, the Iron Chef and Survivor TV shows, holidays, or whatever.
Each of these web calendars has its own address. To subscribe, choose File→New Calendar Subscription. In the Subscribe to Calendar dialog box, paste the address of the published calendar.
You can also provide your own name for this category, specify how often you want your own copy to be updated (assuming you have a full-time Internet connection), and indicate whether or not you want to be bothered with the publisher’s alarms and notes.
When it’s all over, you see a new “calendar” category in your left-side list, representing the published appointments.
If you maintain a calendar online—at Google, Yahoo, or Facebook, for example—you may take particular pleasure in discovering how easy it is to bring those appointments into Calendar. It’s one handy way to keep, for example, a husband’s and wife’s appointments visible on each other’s calendars.
Setting this up is ridiculously easy. Choose Calendar→Preferences→Accounts. Click below the list. Enter your Google, Yahoo, or Facebook address (for example, psmithers@gmail.com) and password. Click Create.
In a minute or so, you’ll see all your Google, Yahoo, or Facebook events show up in Calendar. (Each web calendar has its own heading in the left-side list.) Better yet: It’s a two-way sync; changes you make to these events in Calendar show up on the web, too.
Here’s the real magic of Calendar, iCloud, and the rest of Apple’s software archipelago: Your calendar can be autosynced among all your machines, like your iPhone, iPad, and Macs. Add an appointment on your phone, change an appointment on your iPad, whatever—all your other gadgets are wirelessly and automatically synced to match. See Handoff for details on this amazing setup.