This unsung little program was originally designed to download pictures from a camera and then process them automatically (turning them into a web page, scaling them to emailable size, and so on). Of course, after Image Capture’s birth, iPhoto came along, generally blowing its predecessor out of the water.
Even so, Apple includes Image Capture with OS X for these reasons:
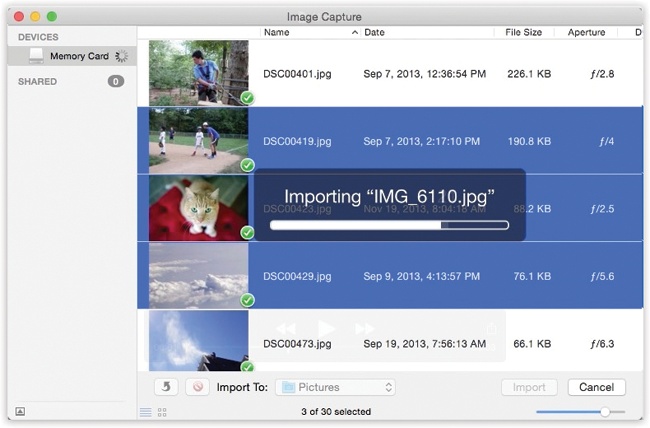
Image Capture is a smaller, faster app for downloading all or only some pictures from your camera (Figure 10-16). The Photos app can do that nowadays, but sometimes that’s like using a bulldozer to get out a splinter.
Image Capture can grab images from scanners, too, not just cameras.
Image Capture can download your sounds (like voice notes) from a digital still camera; Photos can’t.
You can open Image Capture in either of two ways: You can simply double-click its icon in your Applications folder, or you can set it up to open automatically whenever you connect a digital camera and turn it on. To set up that arrangement, open Image Capture manually. Using the “Connecting this camera opens:” pop-up menu, choose Image Capture.
Tip
Image Capture remembers your setting here separately for each camera. For example, you can set it up so that when you connect your fancy SLR camera, Aperture opens; when you connect your spouse’s pocket camera, Photos opens; and when you connect your iPhone, Image Capture opens, so you can quickly grab the best shots and email them directly.
Once Image Capture is open, it looks like Figure 10-16. When you connect your camera, cellphone, or scanner, its name appears in the left-side list. To begin, click it. After a moment, Image Capture displays all the photos on the camera’s card, in either list view or icon view (your choice).
Use this pop-up menu to specify what happens to the imported pictures. Image Capture proposes putting photos, sounds, and movies from the camera into your Home folder’s Pictures folder. But you can specify any folder (choose Other from the pop-up menu).
Furthermore, there are some other very cool options here:
Photos. Neat that you can direct photos from your camera to Photos via Image Capture. Might come in handy when you didn’t expect to want to load photos into your permanent collection, but you change your mind when you actually look them over in Image Capture.
Preview opens the fresh pictures in Preview so you can get a better (and bigger) look at them.
Mail sends the pix directly into the Mac’s email program, which can be handy when the whole point of getting the photos off the camera is to send them off to friends.
Build web page creates an actual web page of your downloaded shots. Against a dark-gray background, you get thumbnail images of the pictures in a web page document called index.html. Just click one of the small images to view it at full size, exactly as your website visitors will be able to do once this page is actually on the web. (Getting it online is up to you.)
Note
Image Capture puts the web page files in a Home folder→Pictures→Webpage on [today’s date and time] folder. It contains the graphics files incorporated into this HTML document; you can post the whole thing on your website, if you like.
Image Capture automatically opens up this page in your web browser, proud of its work.
MakePDF. When you choose this option, you wind up with what looks like a Preview window, showing thumbnails of your photos. If you choose Save right now, you’ll get a beautiful, full-color PDF of the selected photos, ready to print out and then, presumably, cut apart with scissors or a paper cutter. But if you use the Layout menu, you can choose different layouts for your photos: 3 x 5, 4 x 6, 8 x 10, and so on.
And what if a photo doesn’t precisely fit the proportions you’ve selected? The Crop commands in the Layout menu (for example, “Crop to 4 x 6”) center each photo within the specified shape and then trim the outer borders if necessary. The Fit commands, on the other hand, shrink the photo as necessary to fit into the specified dimensions, sometimes leaving blank white margins.
Other. The beauty of the Image Capture system is that people can, in theory, write additional processing scripts. Once you’ve written or downloaded them, drop them into your System→Library→Image Capture→Automatic Tasks folder. Then enjoy their presence in the newly enhanced Import To pop-up menu.
Tip
You can set up Image Capture to download everything on the camera automatically when you connect it. No muss, no options, no fuss.
To do that, connect the camera. Click its name in the Devices list. Then, from the “Connecting this camera opens” pop-up menu, choose AutoImporter. From now on, Image Capture downloads all pictures on the camera each time it’s connected. When the downloading process is complete, a little green checkmark appears on the thumbnail of each imported photo.
Clicking Import All, of course, begins the process of downloading the photos to the folder you’ve selected. A progress dialog box appears, showing you thumbnail images of each picture that flies down the wire.
If you prefer to import only some photos, then select them first. (In list view, you click and Shift-click to select a bunch of consecutive photos, and ⌘-click to add individual photos to the selection. In icon view, you can both ⌘-click and Shift-click to select individual photos.) Then click Import.
If you own a scanner, chances are good that you won’t be needing whatever special scanning software came with it. Instead, OS X gives you two programs that can operate any standard scanner: Image Capture and Preview. In fact, the available controls are identical in both programs.
To scan in Image Capture, turn on your scanner and click its name in the left-side list. Put your photos or documents into the scanner.
Note
You can share a scanner on the network, if you like, by turning on Scanner Sharing in System Preferences→Sharing. That’s sort of a weird option, though, for two reasons. First, what do you gain by sitting somewhere else in the building? Do you really want to yell or call up to whomever’s sitting next to the scanner, “OK! Put in the next photo!”?
Second, don’t forget that anyone else on the network will be able to see whatever you’re scanning. Embarrassment may result. You’ve been warned.
Now you have a couple of decisions to make:
Separate and straighten? If you turn on “Detect separate items” in the Scan Size menu, then OS X will perform a nifty little stunt indeed: It will check to see if you’ve put multiple items onto the scanner glass, like several small photos. (It looks for rectangular images surrounded by empty white space, so if the photos are overlapping, this feature won’t work.)
If it finds multiple items, Image Capture automatically straightens them, compensating for haphazard placement on the glass, and then saves them as individual files.
Where to file. Use the “Scan to” pop-up menu to specify where you want the newly scanned image files to land—in the Pictures folder, for example. You have some other cool options beyond sticking the scans in a folder; for example, you can send the resulting images to Photos, Preview, or Mail.
Once you’ve put a document onto or into the scanner, click Scan. The scanner heaves to life. After a moment, you see on the screen what’s on the glass. It’s simultaneously been sent to the folder (or post-processing task) you requested using the “Scan to” pop-up menu.
As you can see, Apple has tried to make basic scanning as simple as possible: one click. That idiotproof method gives you very few options, however.
If you click Show Details before you scan, though, you get a special panel on the right side of the window that’s filled with useful scanning controls (Figure 10-17).
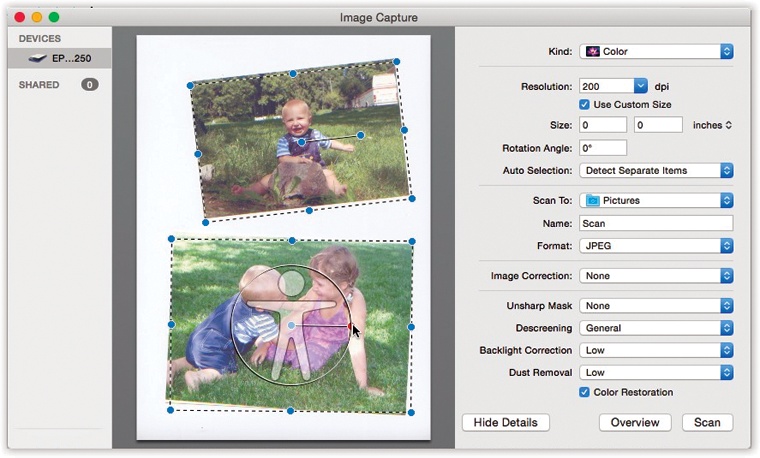
Figure 10-17. When you use the Show Details button, you get a new panel on the right, where you can specify all the tweaky details for the scan you’re about to make: resolution, size, and so on. See how the photos have dotted lines around them? That’s because Detect Separate Items is turned on. These will be scanned into two separate files.
Here are some of the most useful options:
Resolution. This is the number of tiny scanned dots per inch. 300 is about right for something you plan to print out; 75 is standard for graphics that will be viewed on the screen, like images on a web page.
Name. Here you can specify how you want each image file named when it lands on your hard drive. If it says Scan, then the files will be called Scan 1, Scan 2, and so on.
Format. Usually, the file format for scanned graphics is TIFF. That’s a very high-res format that’s ideal if you’re scanning precious photos for posterity. But if these images are bound for the web, you might want to choose JPEG instead; that’s the standard web format.
Image Correction. If you choose Manual from this pop-up menu, then, incredibly, you’ll be treated to a whole expando-panel of color-correction tools: brightness, tint, saturation, a histogram, and so on.
Opening the Details panel has another handy benefit, too: It lets you scan only a portion of what’s on the scanner glass.
Once you’ve put the document or photo into the scanner, click Overview. Image Capture does a quick pass and displays on the screen whatever is on the glass. You’ll see a dotted-line rectangle around the entire scanned image—unless you’ve turned on “Detect separate images,” in which case you see a dotted-line rectangle around each item on the glass.
You can adjust these dotted-line rectangles until you’ve enclosed precisely the portion of the image you want scanned. For example, drag the rectangles‘ corner handles to resize them; drag inside the rectangles to move them; drag the right end of the line inside the rectangle to rotate it; preview the rotation by pressing Control and Option.
Finally, when you think you’ve got the selection rectangle(s) correctly positioned, click Scan to trigger the actual scan.
Note
These instructions apply to the most common kind of scanner—the flatbed scanner. If you have a scanner with a document feeder—a tray or slot that sucks in one paper document after another from a stack—the instructions are only slightly different.
You may, for example, see a Mode or Scan Mode pop-up menu; if so, choose Document Feeder. You’ll want to use the Show Details option described above. You may also be offered a Duplex command (meaning “Scan both sides of the paper”—not all scanners can do this).