Suppose somebody new joins your little Mac family—a new worker, student, or love interest, for example. And you want to make that person feel at home on your Mac.
Begin by opening System Preferences (Chapter 8). In the System Preferences window, click Users & Groups. You have just arrived at the master control center for account creation and management (Figure 11-2).
To create a new account, start by unlocking the Users & Groups panel. That is, click the  at lower left and fill in your own account password.
Now you can click  beneath the list of accounts. The little panel shown at bottom in Figure 11-2 appears.
As though this business of accounts and passwords wasn’t complicated enough already, OS X offers several types of accounts. And you’re expected to specify which type each person gets at the moment you create an account.
To do that, open the New Account pop-up menu (Figure 11-2, bottom). Its five account types are described on the following pages.
If this is your own personal Mac, then just beneath your name on the Users & Groups pane of System Preferences, it probably says Admin. This, as you could probably guess, stands for Administrator.
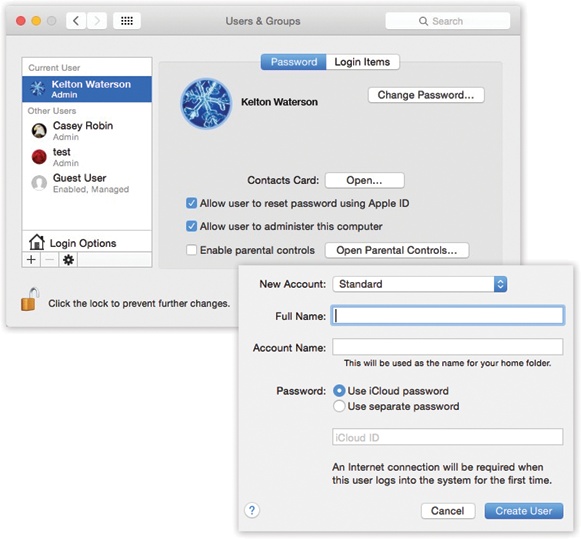
Figure 11-2. Top: The screen lists everyone who has an account. From here, you can create new accounts or change passwords. If you’re new at this, there’s probably just one account listed here: yours. This is the account OS X created when you first installed it. You, the all-wise administrator, have to click the to authenticate yourself before you can start making changes. Bottom: In the account-creation process, the first step is choosing which type of account you want to create.
Because you’re the person who originally installed OS X, the Mac assumes that you are its administrator—the technical wizard in charge of it. You’re the teacher, the parent, the resident guru. You’re the one who will maintain this Mac. Only an administrator is allowed to do the following:
Install new programs into the Applications folder.
Add fonts that everybody can use.
Make changes to certain System Preferences panes (including Network, Date & Time, Energy Saver, and Startup Disk).
Use some features of the Disk Utility program.
Create, move, or delete folders outside of your Home folder.
Decide who gets to have accounts on the Mac.
Open, change, or delete anyone else’s files.
Bypass FileVault using a recovery key (Logout Options).
The administrator concept may be new to you, but it’s an important pill to swallow. For one thing, you’ll find certain settings all over OS X that you can change only if you’re an administrator—including many in the Users & Groups pane itself. For another thing, administrator status plays a huge role when you want to network your Mac to other kinds of computers, as described in the next chapter. And, finally, in the bigger picture, the fact that the Mac has an industrial-strength accounts system, just like traditional Unix and recent Windows operating systems, gives it a fighting chance in the corporations of America.
As you create accounts for other people who’ll use this Mac, you’re offered the opportunity to make each one an administrator just like you. Needless to say, use discretion. Bestow these powers only upon people who are as responsible and technically masterful as yourself.
Most people, on most Macs, are ordinary Standard account holders. These people have everyday access to their own Home folders and to the harmless panes of System Preferences, but most other areas of the Mac are off limits. OS X won’t even let them create new folders on the main hard drive, except inside their own Home folders (or in the Shared folder described starting on Sharing Across Accounts).
A few of the System Preferences panels display a padlock icon (). If you’re a Standard account holder, you can’t make changes to these settings without the assistance of an administrator. Fortunately, you aren’t required to log out so that an administrator can log in and make changes. You can just call the administrator over, click the padlock icon, and let him type in his name and password (if, indeed, he feels comfortable with you making the changes you’re about to make).
A Managed account is the same thing as a Standard account—except that you’ve turned on Parental Controls. (These controls are described later in this chapter.) You can turn a Managed account into a Standard account just by turning off Parental Controls, and vice versa.
That is, this account usually has even fewer freedoms—because you’ve limited the programs this person is allowed to use, for example. Use a Managed account for children or anyone else who needs a Mac with rubber walls.
This kind of account is extremely useful—if your Mac is on a network (Chapter 12).
See, ordinarily, you can log in and access the files on your Mac in either of two ways:
This arrangement was designed with families and schools in mind: lots of people sharing a single Mac.
This setup gets a little silly, though, when the people on a home or office network each have their own computers. If you wanted your spouse or your sales director to be able to grab some files from you, you’d have to create full-blown accounts for them on your Mac, complete with utterly unnecessary Home folders they’d never use.
That’s why the Sharing Only account is such a great idea. It’s available only from across the network. You can’t get into it by sitting down at the Mac itself—it has no Home folder!
Finally, of course, a Sharing Only account holder can’t make any changes to the Mac’s settings or programs. (And since they don’t have Home folders, you also can’t turn on FileVault for these accounts.)
In other words, a Sharing Only account exists solely for the purpose of file sharing on the network, and people can enter their names and passwords only from other Macs.
Once you’ve set up this kind of account, all the file-sharing and screen-sharing goodies described in Chapter 12 become available.
A group is just a virtual container that holds the names of other account holders. You might create one for your most trusted colleagues, another for those rambunctious kids, and so on—all in the name of streamlining the file-sharing privileges feature described on Sharing Any Folder. The box on the facing page covers groups in more detail.
For years, OS X offered a special account called the Guest account. It was great for accommodating visitors, buddies, or anyone else who was just passing through and wanted to use your Mac for a while. If you let such people use the Guest account, your own account remained private and un-messed-with.
Note
The Guest account isn’t listed among the account types in the New Account pop-up menu (Figure 11-2). That’s because there’s only one Guest account; you can’t actually create additional ones.
But it’s still an account type with specific characteristics. It’s sitting right there in the list of accounts from Day One.
In the early days of the Guest account, there was a problem: Any changes your friend made—downloading mail, making web bookmarks, putting up a raunchy desktop picture—would still be there for the next guest to enjoy, unless you painstakingly restored everything back to neutral. The Guest account was like a hotel room shared by successive guests. And you were the maid.
Today, though, any changes your guest makes while using your Mac are automatically erased when she logs out. Files are deleted, email is nuked, setting changes are forgotten. It’s like a hotel that gets demolished and rebuilt after each guest departs.
As noted, the Guest account is permanently listed in the Users & Groups panel of System Preferences. Ordinarily, though, you don’t see it in the login screen list; if you’re normally the only person who uses this Mac, you don’t need to have it staring you in the face every day.
So to use the Guest account, bring it to life by choosing Guest User and then turning on “Allow guests to log into this computer.” You can even turn on the parental controls described on Parental Controls by clicking Open Parental Controls, or permit the guest to exchange files with your Mac from across the network (Chapter 12) by turning on “Allow guests to connect to shared folders.”
Just remember to warn your vagabond friend that once he logs out (and acknowledges the warning), all traces of his visit are wiped out forever.
At least from your Mac.
All right. So you clicked the button. And from the New Account pop-up menu, you chose the type of account you wanted to create. (If you chose a Managed with Parental Controls account, you’ve also specified the age of this person.)
POWER USERS’ CLINIC: Creating Groups
Changing permissions settings on a networked Mac, or one with a lot of account holders, is a lot easier if you sweep all your minions into subsets called groups.
This process used to require a complicated series of Unixy steps that, if not performed carefully, could seriously foul up your Mac.
But in OS X, you can create a group as easily as you’d create an account. And in the same place: the Users & Groups pane of System Preferences.
Click the tiny in the lower-left corner. When prompted, type in your administrator’s name and password, and then click OK. The Mac is just making sure that somebody with a clue is at the helm.
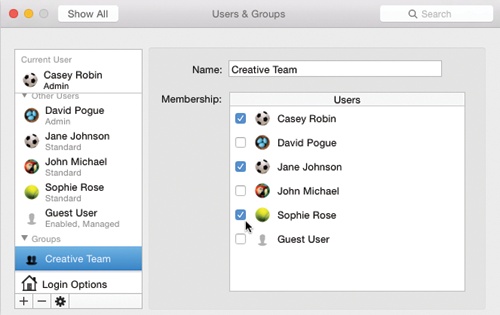
Now click the button as though you were about to create a new account. But from the New Account pop-up menu (shown at bottom in Figure 11-2), choose Group. Type a name for the new group (Accounting, Kids, or whatever), and then click Create Group.
Now you see something like the list shown here: checkboxes for all this Mac’s account holders. Turn on the checkboxes for the ones you consider worthy of being a part of this group.
You can create as many groups as you like. Later, when it comes time to share a folder or file, you’ll save time by choosing a group name instead of setting these permissions one person at a time.
Now, on the same starter sheet, it’s time to fill in the most critical information about the new account holder:
Full Name. If it’s just the family, this could be “Chris” or “Robin.” If it’s a corporation or school, you probably want to use both first and last names.
Account Name. You’ll quickly discover the value of this Account Name, particularly if your name is, say, Alexandra Stephanopoulos. It’s meant to be an abbreviation of your actual name.
When you sign into your Mac in person, you can use either your full name or account (short) name. But when you access this Mac by dialing into it or connecting from across the network (as described in the next chapter), the short version is more convenient.
As soon as you tab into this field, the Mac proposes a short name for you. You can replace the suggestion with whatever you like. Technically, it doesn’t even have to be shorter than the “long” name, but spaces and most punctuation marks are forbidden.
Use iCloud password. In the old days, you’d make up a new password for logging into your own Mac. And you can still do that—by choosing “Use separate password,” described next.
But you can instead use your iCloud password—the password you’ve already got memorized as part of your Apple ID (your Apple account). Why learn two passwords instead of one?
If this idea appeals to you, turn on “Use iCloud password,” and tell the Mac your iCloud email address (in the iCloud ID box). From now on, you’ll be able to sign into the Mac using that password. (As a message here lets you know, you’ll need an Internet connection the first time you log in this way, so the Mac can go online to confirm your iCloud account details.)
Use separate password. Maybe you don’t have an iCloud account. Or maybe you want a simpler password for logging into your Mac (or no password). In that case, choose this option.
You’re supposed to type this password twice, to make sure you didn’t introduce a typo the first time. (The Mac displays only dots as you type, to guard against the possibility that somebody is watching over your shoulder.)
The usual computer book takes this opportunity to stress the importance of a long, complex password—a phrase that isn’t in the dictionary, something that’s made up of mixed letters and numbers. This is excellent advice if you create sensitive documents or work in a big corporation.
But if you share the Mac only with a spouse, or trusted colleagues in a small office, you may have nothing to hide. You may see the multiple-users feature more as a convenience (keeping your settings and files separate) than a protector of secrecy and security. In these situations, there’s no particular urgency to the mission of thwarting the world’s hackers with a convoluted password.
In that case, you may want to consider setting up no password—leaving both password blanks empty. Later, whenever you’re asked for your password, just leave the Password box blank. You’ll be able to log in that much faster each day.
(The first box says “Required,” but it lies; no password is actually required. After setting up this new account and clicking Create User, the Mac asks if you’re sure you don’t want to make up a password; just click Continue and get on with your life.)
Tip
Actually, having some password comes in handy if you share files on the network, because Mac A can store your name and password from Mac B—and therefore you can access Mac B without entering your name and password at all. So consider making your password something very short and easy, like the apostrophe/quote mark—the’ key. It’s a real password, so it’s enough for Mac A to memorize. Yet when you are asked to enter your password—for example, when you’re installing a new program—it’s incredibly fast and easy to enter, because it’s right next to the Return key.
Password Hint. If your password is the middle name of the first person who ever kissed you, for example, your hint might be “Middle name of the first person who ever kissed me.”
Later, if you forget your password, the Mac will show you this cue to jog your memory.
When you finish setting up these essential items, click Create User.
You then return to the Users & Groups pane, where you see the new account name in the list at the left side.
Three final decisions await your wisdom:
Allow user to reset password using Apple ID. If this person ever forgets his password, he’ll be offered, on the login screen, a chance to recover it by entering his Apple ID. Nice little safety net. (Available only for accounts for which you’ve entered an Apple ID, of course.)
Allow user to administer this computer. This checkbox lets you turn ordinary, unsuspecting Standard or Managed accounts into Administrator accounts, as described above. You know—when your kid turns 18.
Enable Parental Controls. Parental Controls refers to the feature that limits what your offspring are allowed to do on this computer—and how much time a day they’re allowed to spend glued to the screen. Details are on Parental Controls.
The usual sign-in screen (Figure 11-1) displays each account holder’s name, accompanied by a little picture.
When you click the sample photo, you get a pop-up menu of Apple-supplied graphics; you can choose one to represent you. It becomes not only your icon on the sign-in screen, but also your “card” photo in the Contacts program and your icon in Messages.
If you’d rather supply your own graphics file—a photo of your own head, for example—just drag it directly out of its Finder window and onto the “picture well” (Figure 11-3). Use the cropping slider below the picture to frame it properly.
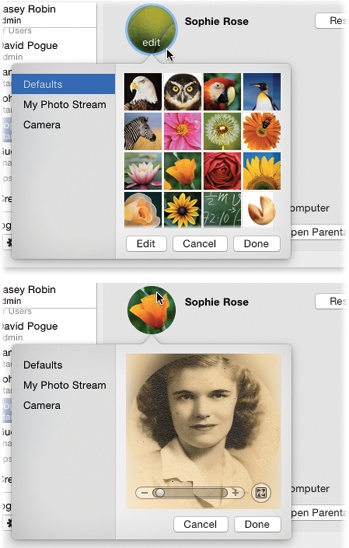
Figure 11-3. Once you’ve selected a photo to represent yourself (top), you can adjust its position relative to the square “frame” (bottom), or adjust its size by dragging the slider. Finally, when the picture looks correctly framed, click Done. (The next time you return to the Images dialog box, you can recall the new image using the Recent Pictures pop-up menu.)
Or you can click the existing image to open a pop-up panel. As shown in Figure 11-3, you have three more options here:
Choose one of the Defaults. Apple starts you off with a selection of account photos, intended to represent various personalities: eagles, flowers, chalkboard math, basketball, and so on.
My Photo Stream. Here are the last 1,000 photos you’ve taken with, or imported into, your Mac (Photos). Click one, and then click Edit to adjust its size and framing within the circle.
Camera. Click the Camera
 button. The Mac counts down from 3 to help you get ready, and then takes the picture. You can enlarge or shrink it; drag to move it within the circular frame; click the
  button to apply a special color or distortion effect to it; or click to try again.
In each case, click Done to enshrine your account photo forever (or until you feel like picking a different one).
There’s one additional setting that your account holders can set up for themselves: which programs or documents open automatically upon login. (This is one decision an administrator can’t make for other people. It’s available only to the person logged in at the moment.)
To choose your own crew of self-starters, open System Preferences and click Users & Groups. Click your account. Click the Login Items tab. As shown in Figure 11-4, you can now build a list of programs, documents, disks, and other goodies that automatically launch each time you log in. You can even turn on the Hide checkbox for each one so that the program is running in the background at login time, waiting to be called into service with a quick click.

Figure 11-4. You can add any icon to the list of things you want to start up automatically. Click the button to summon the Open dialog box, where you can find the icon, select it, and then click Add. Better yet, if you can see the icon in a folder or disk window (or on the desktop), just drag it into this list. To remove an item, click it in the list and then click the  button.
Don’t feel obligated to limit this list to programs and documents, by the way. Disks, folders, servers on the network, and other fun icons can also be startup items, so that their windows are open and waiting when you arrive at the Mac each morning.