It might have taken years, but Apple has finally acknowledged a fundamental fact of American life: Many of us have families.
If you have kids, it’s always been a hassle to manage your Apple life. What if they want to buy a book, movie, or app? They have to use your credit card—and you have to reveal your iCloud password to them.
Or what if they want to see a movie that you bought? Do they really have to buy it again?
Not anymore. Once you’ve turned on Family Sharing and invited your family members, here’s how your life will be different:
One credit card to rule them all. Up to six of you can buy books, movies, apps, and music on your master credit card.
Ask before buying. When your kids try to buy stuff, your phone pops up a permission request. You have to approve each purchase.
Younger Appleheads. Within Family Sharing, you can now create Apple accounts for tiny tots; 13 is no longer the age minimum.
Shared everything. All of you get instant access to one another’s music, video, iBooks, and app purchases—again, without having to know one another’s Apple passwords.
Find one another. You can use your phone to see where your kids are, and vice versa (with permission, of course).
Find one another’s phones. The miraculous Find My iPhone feature (Find My Mac, Find My iPhone) now works for every phone in the family. If your daughter can’t find her phone, you can find it for her with your phone.
Mutual photo album, mutual calendar, and mutual reminders. When you turn on Family Sharing, your Photos, Calendar, and Reminders apps each sprout a new category that’s preconfigured to permit access by everyone in your family.
You can turn on Family Sharing either on the Mac (in System Preferences→iCloud) or on the phone. Since this book is about the Mac, here are the steps to do it there (Figure 15-12).
In System Preferences→iCloud, tap Set Up Family. Read about the juicy features, and then click Continue. The next screen asks you to confirm that you are the sage adult, the Organizer—the one with the power, the wisdom, and the credit card. Click Continue (unless it’s listing the wrong Apple ID account, in which case you can fix it now).
On successive screens, you read about the idea of shared Apple Store purchases; you’re shown the credit card that Apple believes you want to use; you’re offered the chance to share your location with the others. Each time, read and click Continue or Confirm.
Finally, you’re ready to introduce the software to your family.
Click the  button at lower left. Then:
If the kid has an iCloud account and is standing right there with you in person: Type in her name or email address. (Your child’s name must already be in your Contacts; if not, go add her first. By the way, you’re a terrible parent.)
You’re asked to confirm that you’re actually present with her by entering the security code for your credit card. When you click Continue, she can now enter her iCloud password on your Mac to complete her setup (Figure 15-12, bottom).
Figure 15-12. Top: The iCloud pane of System Preferences is the central hub of Family Sharing planning. The setup process involves a bunch of dialog boxes, but at least you have to walk through them only once. Middle: Adding a new member to your circle starts with an email address. Bottom: If the prospective family member is standing with you, she can enter her password on the spot. (That doesn’t mean you’ll learn what her password is; your Mac stores it but hides it.)
On the next screen, she has a couple of decisions to make (Figure 15-13, bottom).
If the kid has an iCloud account but isn’t with you at the moment: Type in her email address. Click Send an Invitation.
Your little darling gets an email at that address. She must open it on her Apple gadget—the Mail app on the iPhone, or the Mail program on her Mac, for example.
When she hits View Invitation, she can either enter her iCloud name and password (if she has an iCloud account), or get an Apple ID (if she doesn’t).
Once she accepts the invitation, she can choose a picture to represent herself; tap Confirm to agree to be in your family; enter her iCloud password to share the stuff she’s bought from Apple; agree to Apple’s lawyers’ demands; and, finally, opt in to sharing her location with the rest of the family.
If the kid is under 13: Your kid doesn’t have an iCloud account, because until Family Sharing came along, you had to be over 13 to get an iCloud account. No longer!
Choose “Create an Apple ID for a child who doesn’t have an account.” Click Continue. On the screen that follows, you’ll enter the kid’s name and birthdate (Figure 15-13, top).
Make up a name and password for the new iCloud account, too. Decide whether you want the family to be able to see where the kid is at all times. Click Continue.
On the Parent Privacy Disclosure screen, enter the security code for your credit card yet again (to prove that you’re you, and not, for example, your naughty kid).
On the next screen, you choose and answer three security questions for this new iCloud account. Click Continue. Then more legalese on two screens (click “I agree,” and then Agree).
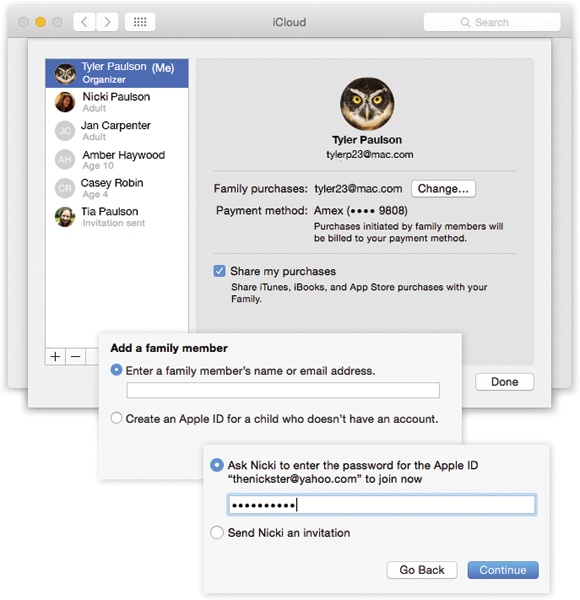
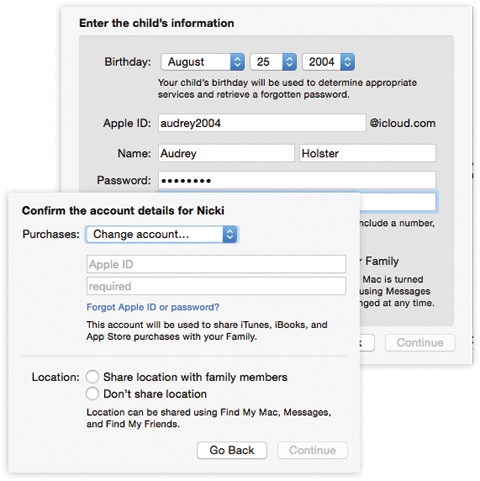
Figure 15-13. Top: You’ll notice that the dialog box requires a birth year that confirms your kids’ age under 13. If your kid is over 13, you should set up an iCloud account in the usual way—at iCloud.com, for example, or in System Preferences→iCloud. Bottom: A newly added family member has some decisions to make. First, the Purchases pop-up menu lets her specify her iCloud address—the one whose purchases she’ll be pooling with the family. (It’s usually the same address you just specified, but not always.) Second, here she can turn on location sharing. In other words: The rest of the family will be able to see where she is, using Messages, Find My Mac, and the Find My Friends app on the iPhone or iPad.
You can, of course, repeat this cycle to add additional family members, up to a maximum of six. Their names and ages appear on the Family screen.
From here, you can click someone’s name to perform stunts like these:
Delete a family member. Man, you guys really don’t get along, do you? Anyway, click the
 button.
Turn Ask To Buy on or off. This option appears when you’ve selected a child’s name. If you decide your kid is responsible enough not to need your permission for each purchase, you can turn this option off.
Turn Parent/Guardian on or off. This option appears when you’ve selected an adult’s name. It gives Ask To Buy approval privileges to someone else besides you—your spouse, for example.
Turn “Allow [this person] to see your location” on or off. Do you want this person to be able to see where you are (by using Messages, Find My Mac, or Find My Friends)?
Once kids turn 13, by the way, Apple automatically gives them more control over their own lives. They can, for example, turn off Ask To Buy themselves, on their own Macs or phones. They can even express their disgust for you by leaving the Family Sharing group. (On her own phone, for example, your daughter can visit Settings→iCloud→Family, tap her name, and then tap Leave Family. Harsh!)
Once everything’s set up, here’s how you and your nutty kids will get along.
Purchases. Whenever one of your kids (for whom you’ve turned on Ask To Buy) tries to buy music, videos, apps, or books from Apple—even free items—he has to ask you (Figure 15-14).
Furthermore, each of you can see and download everything that everyone else has bought. To do that, open the appropriate program: App Store, iTunes, or iBooks. Click Purchased, and then tap the family member’s name, to see what he’s got; tap the
 to download any of it yourself.
Tip
Anything you buy, your kids will see. Keep that in mind when you download a book like Tough Love: Sending the Unruly Child to Military School.
However, you have two lines of defense. First, you can hide your purchases so nobody sees them. On the Mac, in iTunes, click iTunes Store; then click the relevant category (
 , @, whatever). Click Purchased (right side). Point to the thing you want to hide, click the
  , and click Hide. Second, remember that you can set up parental control on each kid’s Mac or phone, shielding their impressionable eyes from R-rated movies and stuff. See Parental Controls.
Where are you? Go to iCloud.com and click Find My iPhone (see Find My Mac, Find My iPhone) to see where their phones are right now, which may or may not be with their owners. Or, on an iPhone or iPad, use the Find My Friends app to see where in town (or in the world) your posse is right now.
Note
If one of you needs secrecy for the afternoon (Apple sweetly gives, as an example, shopping for a gift for your spouse), open System Preferences→iCloud. Click Manage Family. Click the person you want to hide from. Turn off “Allow [this person] to see your location.” Now you’re untrackable until you turn the switch on again.
Photos, appointments, and reminders. In Calendar, Photos, and Reminders, each of you will find a new category, called Family, that’s auto-shared among you all. You’re all free to make and edit appointments in this calendar, to set up reminders in Reminders (“Flu shots after school!”), or to add photos or videos (or comments) to this album; everyone else will see the changes instantly.

Figure 15-14. Your kid can’t download anything from one of Apple’s stores without your OK. You’re notified about the purchase on your phone or Mac, and you can decline it or click Review to read about it on its Store page. If it seems OK, you can tap Approve. You also have to enter your iCloud password to prevent your kid from sneaking over to your Mac or phone and approving his own request. (If you don’t respond within 24 hours, the request expires. Your kid has to ask again.)