In the real world, VIPs are people who get backstage passes to concerts or special treatment at business functions (it stands for “very important person”). In OS X, it means “somebody whose mail is important enough that I want it brought to my attention immediately when it arrives.”
So who should your VIPs be? That’s up to you. Your spouse, your boss, and your doctor come to mind.
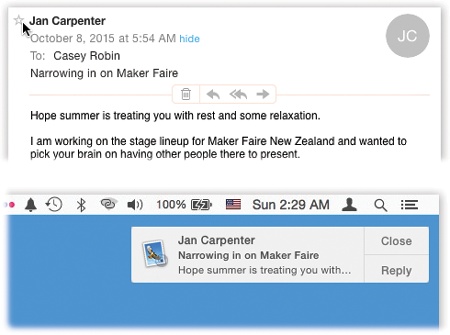
To designate someone as a VIP, follow the steps shown in Figure 16-18. From now on, lots of interesting things happen:
A new mailbox, called VIPs, appears in your mailboxes list. Click it to see all the mail from all your VIPs (even messages you’ve deleted). Or click the flippy triangle to see your VIPs’ names, each representing messages from that person.
Figure 16-18. Top: To designate a VIP, open a message she’s sent you. Point to her name. A hollow star appears; click there. The star darkens. (Or choose Add to VIPs from the pop-up menu that appears when you point to her name.) Note: If that person one day insults you, fires you, or dumps you, then you can remove her VIP status by clicking that same star again. Bottom: OS X can alert you when VIP messages arrive—and you can reply right on the spot.
A new menu button called VIPs appears on your Favorites toolbar. Click to see all VIP messages, or click the
 to see a pop-up menu of all the VIPs’ names. Here again, the point is that you can jump to the messages from just that person.
If you use iCloud, the same person is now a VIP on all your other Macs (running Mountain Lion or later), plus iPhones and iPads (running iOS 6 or later).
Best of all, you can set up your Mac so that when a new message from a VIP comes in, an alert bubble appears in the top-right corner of your screen (Figure 16-18, bottom). That feature, of course, is part of the Notification Center, and it’s described in Chapter 8. See the box on the previous page for instructions on setting this up.
