A typed chat works like this: Each time you or your chat partner types something and then presses Return, the text appears on both of your screens.
Messages displays each typed comment next to an icon, which can be any of these three things:
A picture the other person added. If the buddy added her own picture—to her own copy of Messages, a Jabber program, AOL Instant Messenger, or Yahoo Messenger—then it will be transmitted to you, appearing automatically in the chat window. Cool!
A picture you added. If you’ve added a picture of that person to the buddy list or to Contacts, you see it here instead. (After all, your vision of what somebody looks like may not match his own self-image.)
Generic. If nobody’s done any icon dragging of any sort, you get a generic silhouette icon.
To choose a graphic to use as your own icon, click the round picture to the right of your own name at the top of the buddy list. From the pop-up palette, you can choose, as your avatar, any of Apple’s Defaults (nature shots), Recents (chat photos you’ve used recently), My Photo Stream (your own recently taken pictures), Faces (if you’ve set this feature up in Photos), or Camera (take a new picture right now).
In most cases, you’re offered an Edit button. It opens a little adjustment window where you can fiddle with the size and centering of your headshot.
Feel free to build an array of graphics to represent yourself—and to change them in midchat, using this pop-up palette, to the delight or confusion of your conversation partner.
Typing isn’t the only thing you can do during a chat. You can also perform any of these stunts:
Format your text. You can press ⌘-B or ⌘-I to make your next typed utterance bold or italic. Or change your color or font by choosing Format→Show Colors or Format→Show Fonts, which summons the standard OS X color or font palettes. (If you use some weird font that your chat partners don’t have installed, then they won’t see the same typeface.)
Insert a smiley. When you choose a face (like Undecided, Angry, or Frown) from this quick-access menu of smiley options (at the right end of the text-reply box), Messages inserts it as a graphic into your response.
On the other hand, if you know the correct symbols to produce smileys—typing :) produces a yellow happy face, for example, and <3 produces a red heart—you can save time by typing them instead of using the pop-up menu. Messages converts them into smiley icons on the fly, as soon as you send your reply.
Send a file. Drag a file’s icon from the Finder into the box where you normally type. (This trick works well with pictures and movies, because your conversation partner sees them right in his Messages window. And it can handle files as big as 100 megabytes.)
Adjust the type size. Use the commands in the View menu to make all type larger or smaller—or just press ⌘-plus or ⌘-minus.
Get Info on someone. If you click a name in your buddy list and then choose Buddies→Show Info, you get a little info window about your buddy where you can edit her name, email address, and picture. (If you change the picture here, you’ll see it instead of the graphic your buddy chose for herself.)
See all the attachments. This one’s really cool; see Figure 18-6.
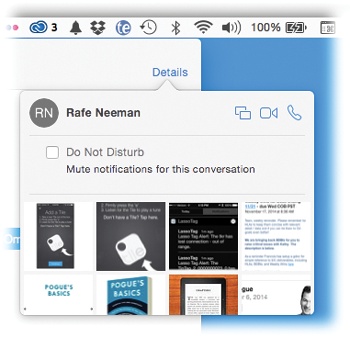
Figure 18-6. If you click the Details button at the top right of the window, you get to see a mosaic of every attachment you’ve ever exchanged with this correspondent—file, photo, video, whatever. Double-click one to open it. No more scrolling back through thousands of pages of typed text to find something you remember getting! This Details panel also gets you access to buttons that begin screen sharing, phone calling, or video chatting with this lucky individual.
Send a sound clip. A special button appears whenever you’re exchanging iMessages with a fellow Apple gadget owner: a
 button to the right of the typing box. It lets you quickly shoot over an audio bite as easily as you’d type something.
Just click the
, say what you want to say, and then click the square Stop button. Now you can play it back ( ), Cancel it, or Send it.
What you said is instantly transmitted to your buddy as an audio recording.
If the recipient has an iPhone with iOS 8 or later, he can listen just by lifting the phone to his head. And then, get this: To reply, he doesn’t have to touch anything or look at the screen, either. He just holds the phone to his head again and speaks! Once he lowers the phone, his recording shoots back to you.
Sometimes, an audio recording is just better than a typed message, especially when music, children, animals, or a lot of emotion in your voice are involved.
See where the other guy is. If you’re chatting with an iPhone owner, that same Details panel might reveal a map that shows his current location in the world. (The map appears only if he’s turned on “Share my location” on his phone.)
Stop the notifications. If this person is bombarding you with texts, you can make your Mac stop dinging and showing a notification bubble with each one. Click Details; click Do Not Disturb. Now those messages will flow into Messages, but you won’t be bugged about each one.
Juggle conversations. You can keep a bunch of chats going simultaneously, thanks to the individually listed chats at the left side of the window. Just don’t forget which chat you’re in before you say something snarky!
There’s nothing to stop you from inviting several people to a single chat (Figure 18-7). Just click the Compose button ( ) as usual. Enter the desired chat partners’ names one at a time in the To field, pressing Return or adding a space after each one.
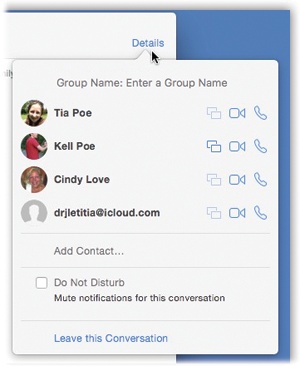
Figure 18-7. If you click where it says Group Name, you can type a new name. That should make it easier to identify this conversation later in the list of chats at the left side of the window. (The Details button doesn’t appear until somebody has actually said something in this chat.) You can also add or remove participants, even after the group chat is under way. To remove someone, ⌘-click his name in the Details panel; choose Remove from Conversation. To add a new member, click Add Contact. Do Not Disturb means that new texts from this group won’t trigger notifications on your Mac. And if the bickering becomes more than you can stand, you can excuse yourself and leave the chat by clicking “Leave this Conversation.”
Tip
If you’ve created a group in Contacts, you can also just enter the group’s name. Everybody in it is instantly part of the chat.
Now you’ve got yourself a party line. Anything anyone types, everybody sees. Be careful what you say, will you?
Many of the enhancements in Messages pertain to group chats (defined as “three or more participants”). And all of them are hiding in the new panel that appears when you click Details at top right (Figure 18-7).