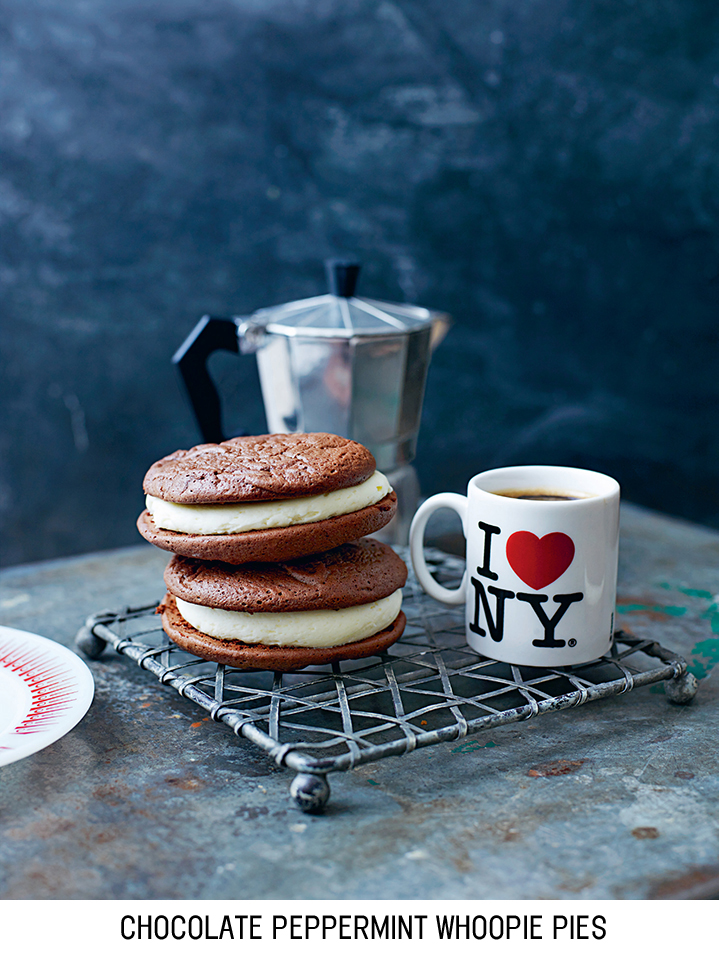
CHOCOLATE PEPPERMINT WHOOPIE PIES
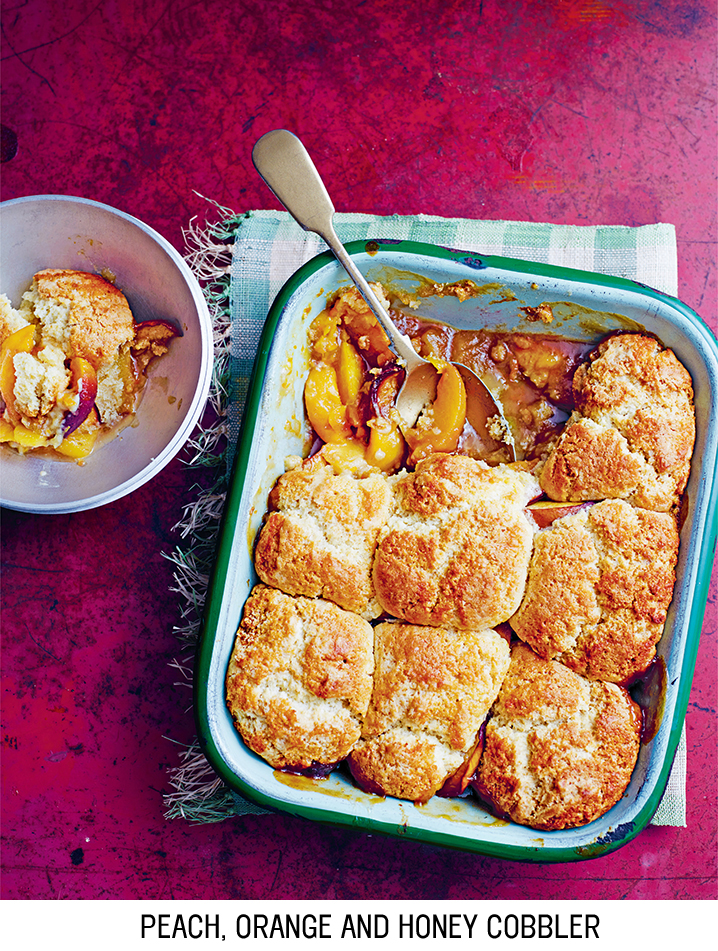
PEACH, ORANGE AND HONEY COBBLER
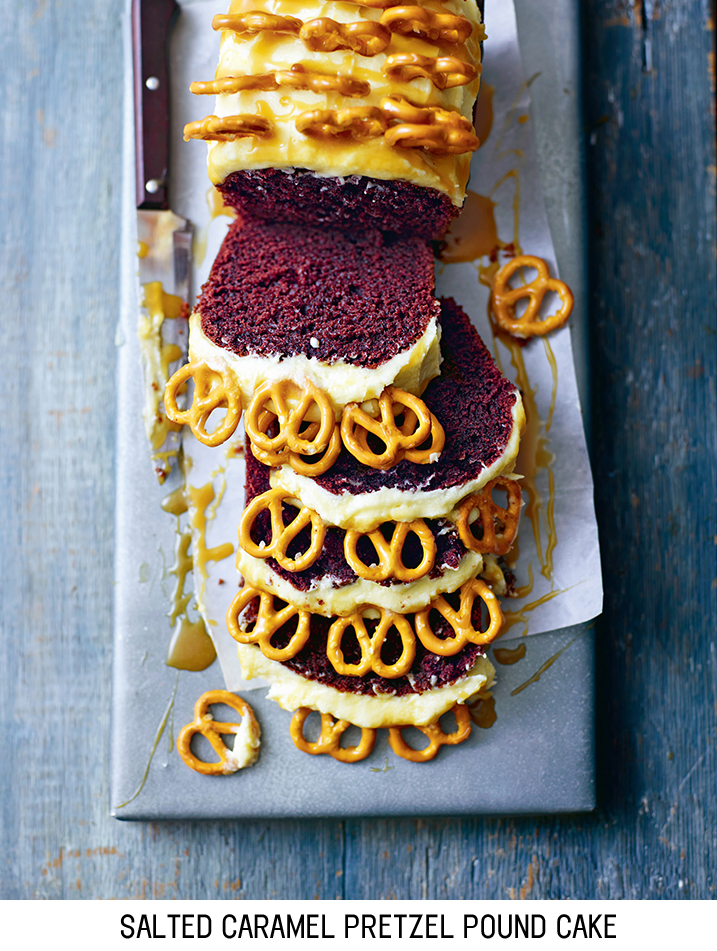
SALTED CARAMEL PRETZEL POUND CAKE
STRAWBERRY AND BASIL SHORTCAKES
BLACK CHERRY AND CHOCOLATE CUPCAKES
Someone once told me that the smell of vanilla, particularly the smell of vanilla when used in baking, has been scientifically proven to make people happier. It’s something to do with them associating the smell with childhood memories of baking with their grandma, or something along those lines.
My grandma never used to bake with us but gave us Chinese takeaway, chips and Wagon Wheels instead, which, in my view, made her both badass and ahead of her time. So while I might not associate vanilla smells with memories of happy families and childhood, I still love it more than I can say, so those scientists must be on to something.
Baking is such an institution in the States that it’s hard to pick a shortlist of recipes that show it off properly, but I think this chapter offers a pretty good representation. You’ve got the diner desserts of the South with Lemon chess pie as well as pure New-England treats like Chocolate peppermint whoopie pies or Boston cream pie. Baking is the ultimate expression of comfort – both in the fact that it is in and of itself a comfort food and that so many of these sweet treats are twisted and transformed versions of their European ancestors. Immigrants to the States would bake as a way of strengthening their cultural roots, which in turn created cookies, cakes and pies that were more American than ever. There may be nothing more American than apple pie, but that’s probably because that pie was originally French or German or Austrian and got twisted, tweaked and transformed into something uniquely of the U.S. of A.
When it comes to baking, I can see why many people would rather find a nice bakery, where they also do takeaway coffee and free wifi, rather than whipping out measuring spoons and myriad of cake tins. Coming from one of the laziest people in the world, who often considers getting dressed an unnecessary formality on a Sunday, take it from me, I hear you. And there are some things that professional bakers, or baking nerds, do better because of their experience.
So that is why all the recipes in this chapter are very much ones that I think baking should be about. They are all pretty much these two things: 1) Straightforward, with minimal faffing about and convenient tin shapes to line (if you’ve ever tried to line a bundt tin, you will know what I’m talking about); and 2) They are all balanced in flavour.
Things like herbs or salt can take the edge off something on the verge of becoming sickly sweet and give it another dimension that lifts the whole bake. I don’t have an overly sweet tooth, so cakes that are pure sugar with nothing else to bring to the party really bore me. They leave you feeling droopy, tired and worst of all, sick. No dessert should ever make you feel like you would have been better off without it. You should only feel that way if you make like a truffling pig and gorge on half the brownie pan in one go. Been there, my friend. Beeeeeen there.
I’ve lived in Florida twice and it’s probably my favourite place. It has some of the most diverse food scenes I’ve ever come across – from Cuban stews and sandwiches in Little Havana to Jamaican home cooking and everything in between.
Key lime pie is a fantastic example of this. Key limes are a type of lime found on the Keys that are about one-third of the size of what we know as regular limes… or Persian limes if you want to give them their true jazzy name. They have a stronger smell and punchier acidity, and make for the most gorgeous, sharp, creamy dessert known on either side of the Atlantic.
SERVES 6
FOR THE PIE
100g ginger nut biscuits
150g digestive biscuits
125g salted butter, melted
397g can condensed milk
4 egg yolks
zest of 5 limes
juice of 2 limes
1 tablespoon white rum (optional)
250ml double cream
1 tablespoon icing sugar
➊ Preheat the oven to 190°C/gas mark 5. Blitz the ginger nut and digestive biscuits in a food processor until really fine. Stir through the melted butter and tip into a 22cm pie dish.
➋ Using your fingers, press the biscuit into the corners and up the sides of the dish to form a crust, then bake for 10 minutes. Remove from the oven and leave to cool fully.
➌ In a large bowl, beat together the condensed milk, egg yolks, lime zest and juice, and rum, if using, until you have a smooth, lime-speckled mix. Pour into the pie dish and leave to set in the fridge for a minimum of 3 hours.
➍ When the pie is set, whip the cream and icing sugar together to form soft peaks and pile high on the centre of the pie. Enjoy in hearty slices.
If you grew up in the States and were a member of the Girl or Boy Scouts, s’mores would have been your bread and butter – or to put it more accurately – your graham crackers, toasted marshmallow and chocolate. S’mores are a campfire necessity. Super-easy to make, dangerously delicious and seductively moreish. Their very name is a smooshing together of ‘some more’. Need I say s’more?
SERVES 8
FOR THE CHEESECAKE
100g whole blanched hazelnuts
250g digestive biscuits
good grating of whole nutmeg
160g salted butter, melted
100g dark chocolate (minimum 70 per cent cocoa solids), broken into small chunks
500g full-fat cream cheese
60g icing sugar, sifted
1 teaspoon vanilla bean paste or 2 teaspoons vanilla extract
300g Nutella
125g mini marshmallows
➊ Preheat the oven to 180°C/gas mark 4. Line the base of a loose-bottomed 23cm cake tin with baking parchment.
➋ Pour the hazelnuts into a dry frying pan and toast over a medium heat until golden. Tip into a food processor with the biscuits and nutmeg and blitz until the mixture resembles fine breadcrumbs.
➌ Stir the melted butter through the biscuit mix and tumble into the prepared cake tin, pressing firmly into the edges (I find a potato masher works brilliantly here). Bake the base for 15 minutes, then leave to cool completely.
➍ Melt the chocolate in a heatproof bowl set over a pan of boiling water (don’t allow the base of the bowl to touch the water) then leave it to cool slightly. Meanwhile, pop the cream cheese, icing sugar, vanilla and Nutella in a bowl or freestanding mixer and beat together until smooth. You should want to jump right into that bowl and swim around devouring it all. If you don’t feel that urge, keep beating.
➎ Pour in the melted chocolate, mixing constantly, then spoon the mixture on top of the biscuit base and smooth around the top. Pop the cheesecake into the fridge to set for a minimum of 3 hours, although overnight is best.
➏ Once set, arrange the marshmallows over the top and blowtorch until they are lightly scorched and take you back to nights in front of the campfire.
The story goes that Amish women – whose job it mostly was to stay at home, raising babies and baking cookies – would often have a little extra cake batter left over from a long stay at the stove and make these treats to put in their husbands’ lunch boxes. The husbands would then (apparently) yell ‘Whoopie!’ and so, low and behold, the whoopie pie was born. Do I necessarily believe this tale? No. But I do love the idea that any grown man, Amish or not, yells ‘Whoopie!’ at the sign of a baked treat at lunch.
MAKES 8 PIES
FOR THE PIES
125g unsalted butter, cut into cubes
150g dark chocolate (minimum 70 per cent cocoa solids), broken into small chunks
220g caster sugar
3 eggs, lightly beaten
1 teaspoon vanilla bean paste, or 2 teaspoons vanilla extract
255g plain flour
20g cocoa powder
½ teaspoon baking powder
¼ teaspoon salt
250g unsalted butter, softened
500g icing sugar, sifted
2 teaspoons peppermint extract
3 tablespoons milk
➊ Preheat the oven to 160°C/gas mark 3. Line a large baking tray with baking parchment.
➋ To make the pies, melt the butter and chocolate together in a heatproof bowl set over a pan of simmering water, and leave to cool slightly.
➌ In a separate bowl, whisk together the caster sugar, eggs and vanilla until light and frothy then pour the melted chocolate and butter in, whisking constantly.
➍ In a large mixing bowl, combine the flour, cocoa powder, baking powder and salt, and add to the chocolate mix a spoon at a time, making sure it is well incorporated.
➎ Using an ice cream scoop, spoon 16 even blobs of pie mix onto the prepared baking tray. The mixture will look quite loose at this point. Leave them plenty of room to grow and bake for 10–12 minutes until just cooked through. Leave to cool completely on a wire rack.
➏ Meanwhile, make the buttercream frosting. In a freestanding electric mixer, beat the butter for about 4 minutes until really soft and fluffy. Add the icing sugar and beat again, covering the machine with a tea towel to prevent icing sugar explosions. Continue beating the butter and sugar until the mixture turns white and super-soft – this can take up to 5 minutes of continuous beating interspersed with occasional spatula scraping. Add the peppermint extract and milk, and beat on a high speed until fully blended.
➐ To build each pie, pipe a liberal swoosh of frosting onto the flat side of one half. Sandwich the top with the other half, et voila, you are halfway to being Amish.
To those who ask the somewhat rhetorical question ‘Is there anything more American than apple pie?’, I challenge with a ‘Yes. Yes there is. Come with me, sir, and let me show you the wonder that is pumpkin pie’.
I know it can seem weird to those who have only ever seen pumpkins hollowed out with candles in them or roasted as a savoury vegetable to imagine them in a dessert, but hear me out.Let’s all think back to our old friend cheesecake and what a vast array of confused faces he faced upon arrival. And look how we love him now! It can be done. Give pies a chance.
SERVES 6
FOR THE PASTRY
250g plain flour, plus extra for dusting
½ teaspoon salt
1 tablespoon caster sugar
2 teaspoons ground cinnamon
140g cold unsalted butter, cut into 1cm cubes
2 egg yolks
FOR THE FILLING
425g can pumpkin purée
2 tablespoons maple syrup
1 teaspoon ground mixed spice
½ teaspoon ground nutmeg
¼ teaspoon ground cloves
zest of 1 orange
zest of 1 lemon
3 eggs, lightly beaten
pinch of salt
100g soft light brown sugar
200ml double cream, plus 300ml for whipping
1 tablespoon icing sugar
➊ To make the pastry, blitz the flour, salt, caster sugar, cinnamon and butter in a food processor until the mixture resembles fine breadcrumbs.
➋ Tip the mixture into a large bowl and add the egg yolks and 3 tablespoons of cold water. Stir very quickly using a blunt knife and bring together with your hands. Knead quickly to make it into a flat disc, then cover with clingfilm and chill for 30 minutes.
➌ Preheat the oven to 190°C/gas mark 5. Once cold, roll the pastry out onto a lightly flourd surface to 3mm thick and use it to line a 22cm pie dish. Press the pastry into the corners and cover with baking parchment. Fill with baking beans and blind bake for 20–25 minutes until cooked through on the sides. Remove the parchment and beans and cook for a further 5 minutes to dry out the base. Remove from the oven, then reduce the temperature to 160°C/gas mark 3.
➍ For the filling, mix the pumpkin purée, maple syrup, spices and zests of both fruits in a freestanding electric mixer. Add the eggs, salt and brown sugar and the 200ml of cream, mixing as you go. Pour the filling into the pastry case and bake for 40–50 minutes until the centre is set. Remove from the oven and leave to cool fully.
➎ Whip the remaining 300ml of cream with the icing sugar to pillowy, soft peaks and pile high on the centre of the pie. Serve in generous slices.
Just to confuse you, this is a cake, not a pie. It’s also the official State dessert of Massachusetts. I can’t decide if I love it even more because of this or if I actually just love the fact that there are ‘Official State Desserts’. One tip here, have all your ingredients measured out alongside your equipment ready to go.
SERVES 6
FOR THE CAKE
4 eggs
½ teaspoon vanilla extract
125g caster sugar, plus extra for dusting
60g salted butter, melted and cooled, plus extra for greasing
125g plain flour, plus extra for dusting
FOR THE CRÈME PÂTISSIÈRE
300ml milk
3 egg yolks
1 teaspoon vanilla bean paste or 2 teaspoons vanilla extract
60g caster sugar
20g plain flour
20g cornflour
100ml double cream
FOR THE CHOCOLATE GANACHE
125ml double cream
200g dark chocolate (minimum 70 per cent cocoa solids), broken into small chunkss
1 tablespoon golden syrup
➊ Preheat the oven to 180°C/gas mark 4. Grease and line a 22cm loose-bottomed cake tin and dust with a little caster sugar followed by flour.
➋ For the cake, place a heatproof bowl over a pan of simmering water. Add the eggs, vanilla and sugar, and whisk on full whack for about 5 minutes until the mixture has tripled in volume and is light and mousse-like. Remove the bowl from the pan and continue whisking until it’s cool. Pour the cooled butter around the edge and fold in.
➌ Sift the flour over the top of the mixture and fold in. Again, don’t wreck it by bashing away like a mad man. Fold, fold. Scrape the batter into the tin and bake for 30–35 minutes until a skewer inserted into the centre comes out clean. Leave to cool in its tin on a wire rack.
➍ Meanwhile, make the crème pâtissière. Bring the milk just to a simmer in a small saucepan, then remove from the heat. In a small bowl, mix together the egg yolks, vanilla, sugar, plain flour and cornflour. Add the warm milk, a splash at a time, beating out any lumps. Pour back into the pan and bring to the boil, whisking constantly. It will go lumpy after a minute or so, then stir it like crazy to get all the lumps out. Let it bubble for a further minute to cook out the flour. Scrape the custard into a bowl and leave to cool.
➎ Meanwhile, whip the cream to very soft, light peaks. Once the custard has cooled, whisk through the whipped cream and set aside.
➏ Now for the ganache. Boil the cream in a saucepan and put the chocolate chunks and golden syrup in a heatproof bowl. Pour over the cream and stir until the chocolate has melted and you have a gloriously glossy mixture.
➐ Split the cake in half horizontally and pile the custard onto one half, spreading to the edges. Top with the other half and pour the chocolate ganache all over the exposed surface pushing it right over the edges and letting it drip down the sides.
In the south, Georgia especially, where they are famous for their glorious, gleaming peaches, cobblers come in two types. One is cakey and almost like a sweet, fruity ‘toad in the hole’, where the batter rises around the filling once in the oven. This is the other one, with a biscuit topping, something much more akin to a doughy scone. Proudly dotted all around the top of the fruit, the cobbler scones scream ‘Eat me now!’.
SERVES 4–6
FOR THE FRUIT
411g can peach slices
500g (about 3 large) fresh peaches, stoned and sliced into 2cm-thick wedges
½ teaspoon ground cinnamon
100g soft light brown sugar
¼ teaspoon salt
zest of 2 oranges
juice of 1 orange
1 tablespoon semolina
FOR THE BISCUIT TOPPING
240g plain flour, plus extra for dusting
60g granulated sugar
1½ teaspoons baking powder
85g unsalted butter, plus extra for greasing
50g ground almonds
200ml double cream
2 tablespoons clear honey, plus a little extra for drizzling
➊ Preheat the oven to 180°C/gas mark 4. Butter a 26cm square pie or lasagne dish.
➋ To prepare the fruit, drain the tinned peaches and put in a large mixing bowl. Add the fresh peaches. Throw in the cinnamon, brown sugar, salt, orange zest and juice, and mix well. There will be a deep-brown liquor in the bottom of the bowl, with the fruit gleaming like little golden half moons on top.
➌ Sprinkle the semolina into the prepared pie dish, covering the base evenly, then tumble in all the fruit and liquor.
➍ Now, you’re ready to make the biscuit topping. Blitz the flour, granulated sugar, baking powder, butter and almonds in a food processor until the mixture resembles a pale crumble mix. Add the cream and honey, and blitz until you have what looks like a thick cake batter.
➎ Scrape the batter out onto a floured surface, making sure your hands are suitably dusted too. Pull off little portions and roll gently into balls a little smaller than a tennis ball. (I usually work to nine for a dish this size, in three rows of three.) Place on top of the peaches, and drizzle with a little extra honey.
➏ Bake for 40–50 minutes until all the biscuits are golden and crunchy on top and the fruit is just bubbling through. Serve.
Okay, spoiler alert. This is not strictly a pound cake. But, saying that, it comes pretty damn close and is a real showstopper with minimal effort. Any cake that has an equal proportion of sugar, flour, eggs and butter is a pound cake as these used to be a pound (or 450g) of each. That’s a lot of eggs. And a lot of cake in general, which is why this one isn’t strictly a pound cake but it still provides you with comfort and joy, which is its main purpose really.
SERVES 8
FOR THE CAKE
75g unsalted butter, softened, plus extra for greasing
200g caster sugar
150ml soured cream
2 eggs, lightly beaten
½ teaspoon vanilla bean paste or 1 teaspoon vanilla extract
200g plain flour
35g cocoa powder
¼ teaspoon bicarbonate of soda
¾ teaspoon baking powder
¼ teaspoon salt
30ml milk
FOR THE BUTTERCREAM FROSTING
125g unsalted butter, softened
250g icing sugar, sifted
½ teaspoon vanilla bean paste or 1 teaspoon vanilla extract
1½ tablespoons milk
125g small, snack-sized salted pretzels
FOR THE SALTED SAUCE
80g soft light brown sugar
85ml double cream
30g unsalted butter
½ teaspoon salt
➊ Preheat the oven to 180°C/gas mark 4. Grease and line a 22 x 11.5 x 7cm loaf tin with baking parchment.
➋ Start by making the cake. In a freestanding electric mixer bowl, beat together the butter and caster sugar for about 5 minutes until light and fluffy. Mix together the soured cream, eggs and vanilla in a jug.
➌ In a mixing bowl, combine the flour, cocoa powder, bicarbonate of soda, baking powder and salt. Add the soured cream mix and the flour mix to the butter and sugar alternately, making sure to scrape down the sides of the bowl occasionally. Lastly, add the milk to loosen the mixture slightly, then scrape it into the prepared tin. Bake for 50–60 minutes until a skewer inserted into the centre comes out clean. Leave to cool in the tin on a wire rack for 10 minutes before turning out and leaving to cool fully.
➍ Meanwhile, make the frosting. Beat the butter in a bowl until soft and fluffy. Add the icing sugar and beat again for about 4 minutes until the frosting is bright white and pillowy. Add the vanilla and milk, and beat until fully mixed in, then set aside.
➎ To make the caramel sauce, mix all the ingredients together in a small pan and heat gently until the sugar has dissolved. Boil the caramel for 1 minute before turning off the heat and leaving to cool. Let it drop in temperature enough so that you have a thick, drizzle-able sauce.
➏ To frost the cake, spread a generous amount of the frosting over the top of the loaf and arrange the pretzels on top. Drizzle with the salted caramel sauce before serving in hearty slabs.
The story behind the beginnings of the lemon chess pie is about as charming as any Southern gentleman. Apparently, a woman walked into a diner and asked her waitress what desserts were on that day. The server, in her thick South Carolina accent replied ‘Just pie’ which sounded to the Yankee diner like ‘Chess Pie’, which she ordered, loved and the name stuck.
Lemon chess pie is very similar to a French tarte au citron, with its citrus–cream filling, but has a spoonful of cornmeal for added bite and a cloud of whipped cream for good measure.
SERVES 6
FOR THE PASTRY
250g plain flour, plus extra for dusting
2 tablespoons caster sugar
pinch of salt
140g cold unsalted butter, cut into 1cm cubes
2 egg yolks
FOR THE FILLING
160g caster sugar
50g plain flour
1 tablespoon fine ground cornmeal
4 eggs
60g salted butter, melted and cooled
160ml double cream
juice and zest of 3 lemons
➊ To make the pastry, blitz the flour, sugar, salt and butter in a food processor until the mixture resembles fine breadcrumbs.
➋ Tip into a large bowl and add the egg yolks and 3 tablespoons of cold water. Stir together very quickly using a blunt knife, then bring together with your hands. Give the pastry a good, quick knead to make it into a flat disc, then cover with clingfilm and chill for 30 minutes.
➌ Preheat the oven to 190°C/gas mark 5.Once cold, roll the pastry out on a lightly floured surface to 3mm thick and use it to line a 22cm pie dish. Press well into the corners and cover with baking parchment. Fill with baking beans and blind bake for 20–25 minutes until cooked through on the sides. Remove the parchment and beans and cook for a further 5 minutes to dry out the base. Remove from the oven and reduce the temperature to 170°C/gas mark 3.
➍ For the filling, mix the sugar, flour and cornmeal together well. Add the eggs one at a time, beating well after each addition. Pour in the melted butter, cream and lemon juice and zest. The mixture will look quite loose. Pour the filling into the pastry case and bake for 35–40 minutes until the centre is set. If the crust begins to look a little dark partway through, cover it with foil and return to the oven.
➎ Leave the tart to cool before slicing and eating; this is best eaten just a little warm.
I don’t have the world’s biggest sweet tooth, so the herbaceous hint in these shortcakes suits me down to the ground. They are sweet, obviously, but the aromatic basil just takes the edge off them being too saccharine.
Shortcakes are a kind of sconey cake, where you don’t overwork the dough and keep the butter cold so that the final cakes are super-flaky, tender and… well… short. Pile them high with fruit, whipped cream and more whipped cream until they are so tall you can’t see over the top of them.
MAKES 8 SHORTCAKES
FOR THE SHORTCAKES
310g plain flour, plus extra for dusting
½ teaspoon salt
1 tablespoon baking powder
50g caster sugar
150g unsalted butter, cut into 1cm cubes
1 egg
150ml double cream
1 teaspoon vanilla bean paste, or 2 teaspoons vanilla extract
1 egg yolk, for glazing
1 tablespoon milk, for glazing
FOR THE STRAWBERRY FILLING
400g strawberries, hulled and chopped into quarters, plus 200g strawberries, hulled and sliced
50g caster sugar
a small handful of fresh basil leaves, thinly sliced
250ml double cream
2 tablespoons icing sugar
➊ Preheat the oven to 190°C/gas mark 5. Line a baking tray with baking parchment. To make the shortcakes, blitz the flour, salt, baking powder, sugar and butter in a food processor until the mixture resembles fine breadcrumbs.
➋ In a jug, whisk together the egg, cream and vanilla, and with the motor still running, add this to the flour mix. Once it has come together, turn out onto a floured surface and knead lightly to form a smooth dough.
➌ Roll the dough out to 2cm thick and, using a 9cm cookie cutter, stamp out eight shortcakes. You may need to re-roll the dough in between cuts. Place the shortcakes on the prepared baking tray, leaving room for them to grow.
➍ Mix together the egg yolk and milk for glazing and brush the top of each cake. Bake for 20–25 minutes until cooked through and golden – they should have a natural crack along their middles. Transfer to a wire rack and leave to cool.
➎ For the strawberry filling, put 400g of strawberries, the caster sugar and 140ml of cold water in a saucepan and bring to a simmer. Give the strawberries a good mush occasionally to soften. Once the sauce has simmered for about 10 minutes, blitz well and pass through a fine sieve to remove any seeds. Then pop it into a clean bowl and stir through the basil and the remaining 200g of strawberries.
➏ Whip the cream and icing sugar together until you have soft peaks. Split each cake in half along its middle, using that natural crack as a guide. Spread one half with a generous spoonful of strawberry sauce and a healthy dollop of whipped cream. Top with the other half and devour with glee.
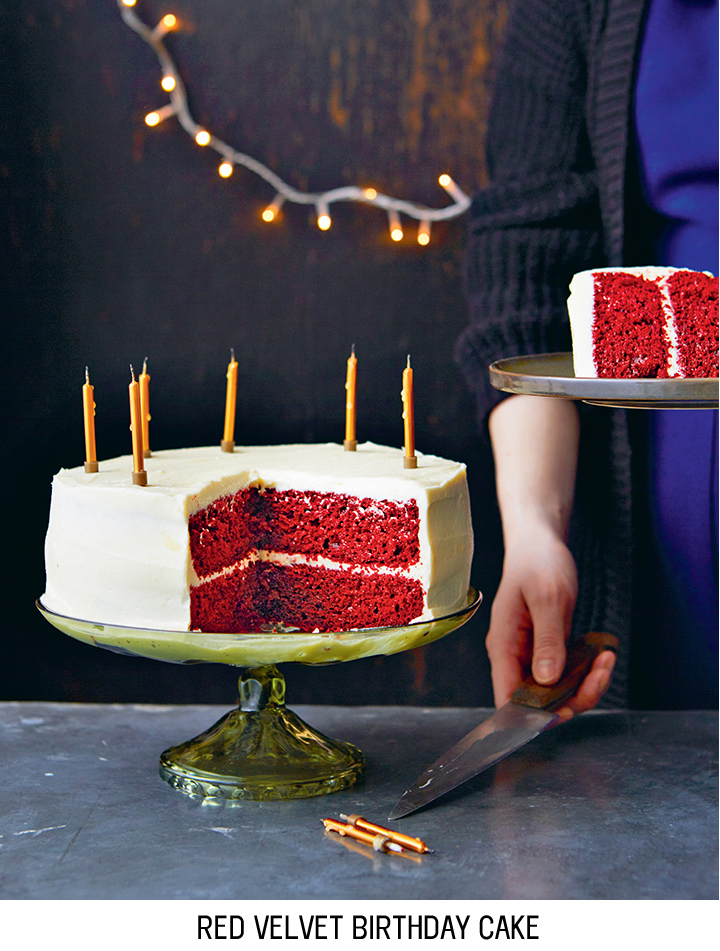
A lot of people think that red velvet is a true Southern recipe but there’s no definitive proof that it was invented in the South. You can get phenomenal red velvets all over the US which all contain some of the same key ingredients to make them a little bit special. The vinegar cuts through the rich taste and the touch of cocoa powder makes the cake incredibly rich and decadent without being an out and out chocolate cake.
And then, there’s the colour. You must use a concentrated food colouring gel here and not any cheap crap from the ‘Home Baking’ aisle of your local supermarket. It will be far too watery and weak, leaving you with something more appropriately titled ‘Sludge brown velvet cake’.
SERVES 8
FOR THE CAKE
390g plain flour
290g caster sugar
1 tablespoon baking powder
½ teaspoon salt
3 tablespoons cocoa powder
½ teaspoon bicarbonate of soda
245ml soured cream
2 eggs
1 teaspoon white wine vinegar
1 tablespoon red food colouring gel
1 teaspoon vanilla bean paste, or 2 teaspoons vanilla extract
240ml vegetable oil, plus extra for greasing
FOR THE CREAM CHEESE FROSTING
300g unsalted butter, softened
300g icing sugar, sifted
½ teaspoon vanilla extract
840g full-fat cream cheese
➊ Preheat the oven to 180°C/gas mark 4. Grease and line two 23cm loose-bottomed cake tins with baking parchment.
➋ To make the cake, mix the flour, caster sugar, baking powder, salt, cocoa powder and bicarbonate of soda in a freestanding electric mixer bowl.
➌ In a separate jug, put the soured cream, eggs, vinegar, food colouring and vanilla. With the motor running, add the oil to the flour mix and beat until mixed in. Then add the soured cream and egg mix and beat until you have a smooth, flowing batter. Divide the batter between the cake tins and smooth out on top. Bake for 22–25 minutes until a skewer inserted into the middle comes out clean. Leave the cakes to cool in their tins for 10 minutes, then release them and leave to cool fully.
➍ For the cream cheese frosting, beat the butter in a freestanding electric mixer bowl for about 5 minutes until really soft. Then sift in the icing sugar and beat again until smooth and mixed in. (The sugar can go flying at this point so cover the machine with a tea towel.) Next, mix in the vanilla and lastly stir in the cream cheese. Don’t overmix as it can become very runny, very quickly.
➎ Once the cakes have cooled, trim the tops to make a flat surface and place one layer on a plate. Spread a generous amount of frosting on top and crown with the second layer. Spread the remaining cream cheese frosting all over the top and sides before diving in.
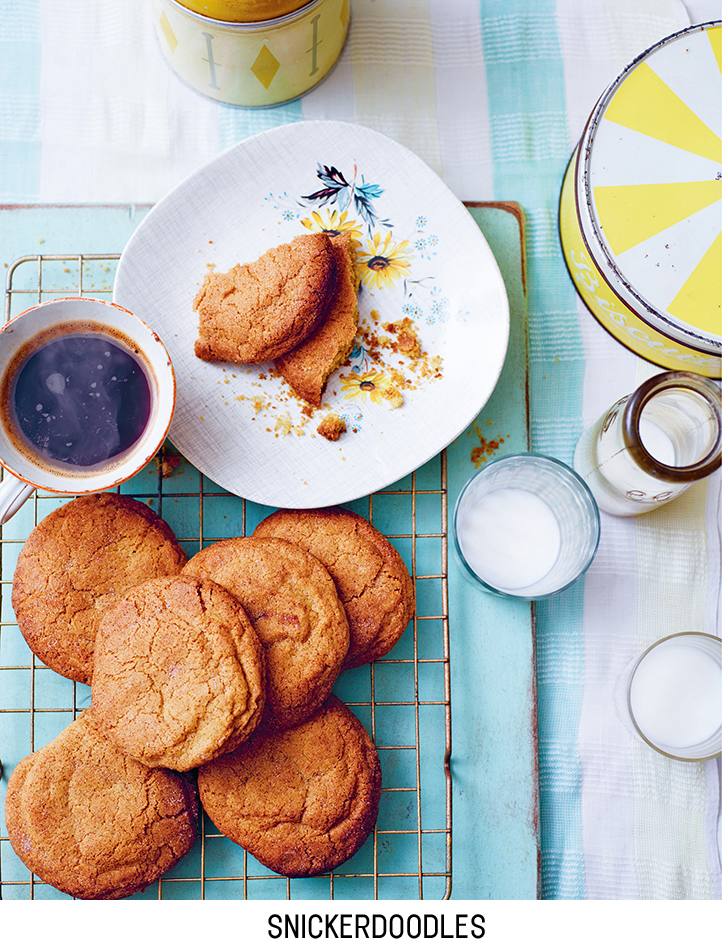
Snickerdoodles are a cinnamon-rolled sugar cookie popular all over the States but particularly in New England. Their name has a history that is so much greater than just someone thinking up a kooky term. ‘Schneckennudel’, which translates as ‘snail cookie’ because of its swirly shape, is a kind of German cinnamon bun. German immigrants to Pennsylvania and New England brought with them their luggage, their dreams of a new life and most importantly (I mean, I never travel without these) their baked goods. The name went through the Chinese whispers chain and came out as ‘Snickerdoodle’.
These cookies are characteristically fluffier than a traditional chocolate chip. They are also gigantic, so this batch only really makes eight cowpat-sized cookies. If you want to make mini ones, just bake them for 5 minutes to keep them soft in the middle. And please call them Snickerdoodlettes.
MAKES 8 GIGANTIC COOKIES
FOR THE COOKIES
150g unsalted butter, softened
80g soft light brown sugar
80g caster sugar
1 teaspoon vanilla bean paste, or 2 teaspoons vanilla extract
1 egg
225g plain flour
½ teaspoon bicarbonate of soda
¼ teaspoon salt
FOR THE CINNAMON SUGAR
1½ teaspoons ground cinnamon
100g golden caster sugar
➊ Preheat the oven to 180°C/gas mark 4. Line 2 large baking trays with baking parchment. To make the cookies, beat together the butter and both sugars in a freestanding electric mixer for about 5 minutes until light and fluffy. Scrape down the sides regularly using a spatula.
➋ Add the vanilla and egg, and beat again until fully incorporated. Sift in the flour, bicarbonate of soda and salt, and stir gently to bring everything together.
➌ For the cinnamon sugar, mix together the cinnamon and sugar in a small bowl. Divide the cookie dough into eight even-sized pieces. Roll each piece into a ball and coat fully in cinnamon sugar.
➍ Place four cookie balls onto each prepared tray, leaving space for them to spread. Gently press each ball until it’s flat and about 1cm thick.
➎ Bake for 12–15 minutes until golden and slightly cracked on top. Transfer to a wire rack and leave to cool, then dip into glasses of ice-cold milk to eat.
When I was twenty, I spent a summer working at Walt Disney World in Florida. There was a restaurant in the park modelled after the Hollywood Brown Derby in, well, Hollywood. This restaurant (the real one) used to be the place where all the movie stars would hang out. I never went to the real one, most likely because I wasn’t a 1930s starlet, but the one in Florida was my dream eatery. One of the signature dishes from the Derby (the real and the pretend one) was their grapefruit cake, made for an unnamed actress who wanted cake but still wanted something healthy with fruit in it. I may not have eaten at that fancy restaurant all that much, but I can have the cake any time I want.
SERVES 8–10
FOR THE CAKE
350g unsalted butter, softened, plus extra for greasing
350g caster sugar
5 eggs, lightly beaten
350g self-raising flour
2 teaspoons baking powder
pinch of salt
1 teaspooon vanilla bean paste or 2 teaspoons vanilla extract
zest of 2 pink grapefruits
5 tablespoons pink grapefruit juice
FOR THE FROSTING
300g unsalted butter, softened
300g icing sugar, sifted
840g full-fat cream cheese zest of 2 pink grapefruits
½ teaspoon vanilla extract
touch of tangerine food colouring
➊ Preheat the oven to 190°C/gas mark 5. Grease and line two 22cm loose-bottomed cake tins with baking parchment.
➋ For the cake, beat together the butter and caster sugar in a freestanding electric mixer for about 5 minutes until light and fluffy. Add the eggs a little at a time, beating well after each addition to make sure they are fully incorporated.
➌ Mix the flour, baking powder and salt together in a bowl and add this to the butter mixture a spoonful at a time. Lastly, add the vanilla, grapefruit zest and juice. Divide the batter equally between the cake tins, smooth the tops and bake for 25–30 minutes until golden on top and a skewer inserted into the centre comes out clean. Leave the cakes to cool in their tins for 10 minutes before releasing them and letting them cool completely on wire racks.
➍ To make the frosting, beat the butter in a bowl for about 4 minutes until utterly soft and yielding. Then add the icing sugar, covering the bowl with a tea towel before beating in well. Continue mixing until it turns white and fluffy, which can take up to 5 minutes. Turn the cream cheese through the mixture, combining thoroughly before mixing in the zest, vanilla and food colouring. The mixture should turn the kind of colour you might call ‘Tangerine Dream’.
➎ Lay the first layer of cake on a board and spread a liberal amount of frosting on top, right to the edges. Top this with the second layer, bottom-side facing up so that you have a completely flat surface on the top of the cake. Frost all over the top and sides of the cake with the remaining frosting, and dig in. Ideally with a large pot of fresh coffee nearby.
Some things may be retro but they are legendary for a reason. Legwarmers? Yes. Wham? So many hits. Black Forest gateau? Please, pass me a fork and don’t move me from this sofa. Cherries and chocolate are just dreamy together. Just a smidge of liquor makes these extra-delicious with a rich, cocoa-heavy base – you can’t go wrong.
MAKES 12 CUPCAKES
FOR THE CUPCAKES
120g dried sour cherries
400ml just-boiled water
200g plain flour
50g cocoa powder
1½ teaspoons instant espresso powder
1 tablespoon baking powder
¼ teaspoon salt
80g unsalted butter, softened
280g caster sugar
2 eggs, lightly beaten
1 teaspoon vanilla bean paste or 2 teaspoons vanilla extract
200ml milk
FOR THE FROSTING
250g unsalted butter, softened
500g icing sugar, sifted
2 teaspoons Kirsch
3 tablespoons milk
purple and red food colouring gels
➊ Preheat the oven to 180°C/gas mark 4. Line a 12-hole cupcake tin with paper cases.
➋ For the cupcakes, soak the cherries in the just-boiled water for 20 minutes. Meanwhile, mix together the flour, cocoa, espresso and baking powders and salt in a large bowl.
➌ In a freestanding electric mixer, beat togethe the butter and caster sugar for about 5 minutes until light and fluffy. Scrape down the sides occasionally. Add the eggs a little at a time, whisking well after each addition. Add the vanilla and then alternate with spoonfuls of the dry ingredients and milk, whisking until you have a smooth, thick batter.
➍ Drain the cherries from their water and roughly chop them. Stir through the batter and then divide between the cupcake cases. I find an ice-cream scoop with a scraping attachment is best here. Failing that, just make sure you only fill the cases about two-thirds full. Bake for 15–20 minutes until a skewer inserted into the centre of the cakes comes out clean. Leave the cupcakes to cool fully on a wire rack while you make the frosting.
➎ Beat the butter in a bowl for about 4 minutes until soft and fluffy. Add the icing sugar and beat again for a further 4 minutes until the frosting is bright-white and pillowy. Pour in the Kirsch and milk, and beat until fully mixed. Stir through a mixture of purple and red food colouring to make a vibrant, cherry-red colour – but go little by little. Food colouring gel packs a punch, so you won’t need much.
➏ Spread the frosting on the cupcakes any way you like. You could use a piping bag and go mad with your nozzle selection… or… you could be like me and indulge in the rustic approach. Simply smoosh a generous blob onto the top of each cake. Maybe decorate with a sprinkle or two. The decorating cupboard is your oyster.