
WHAT IT TAKES
Time: 1 weekend
Skill level: Intermediate
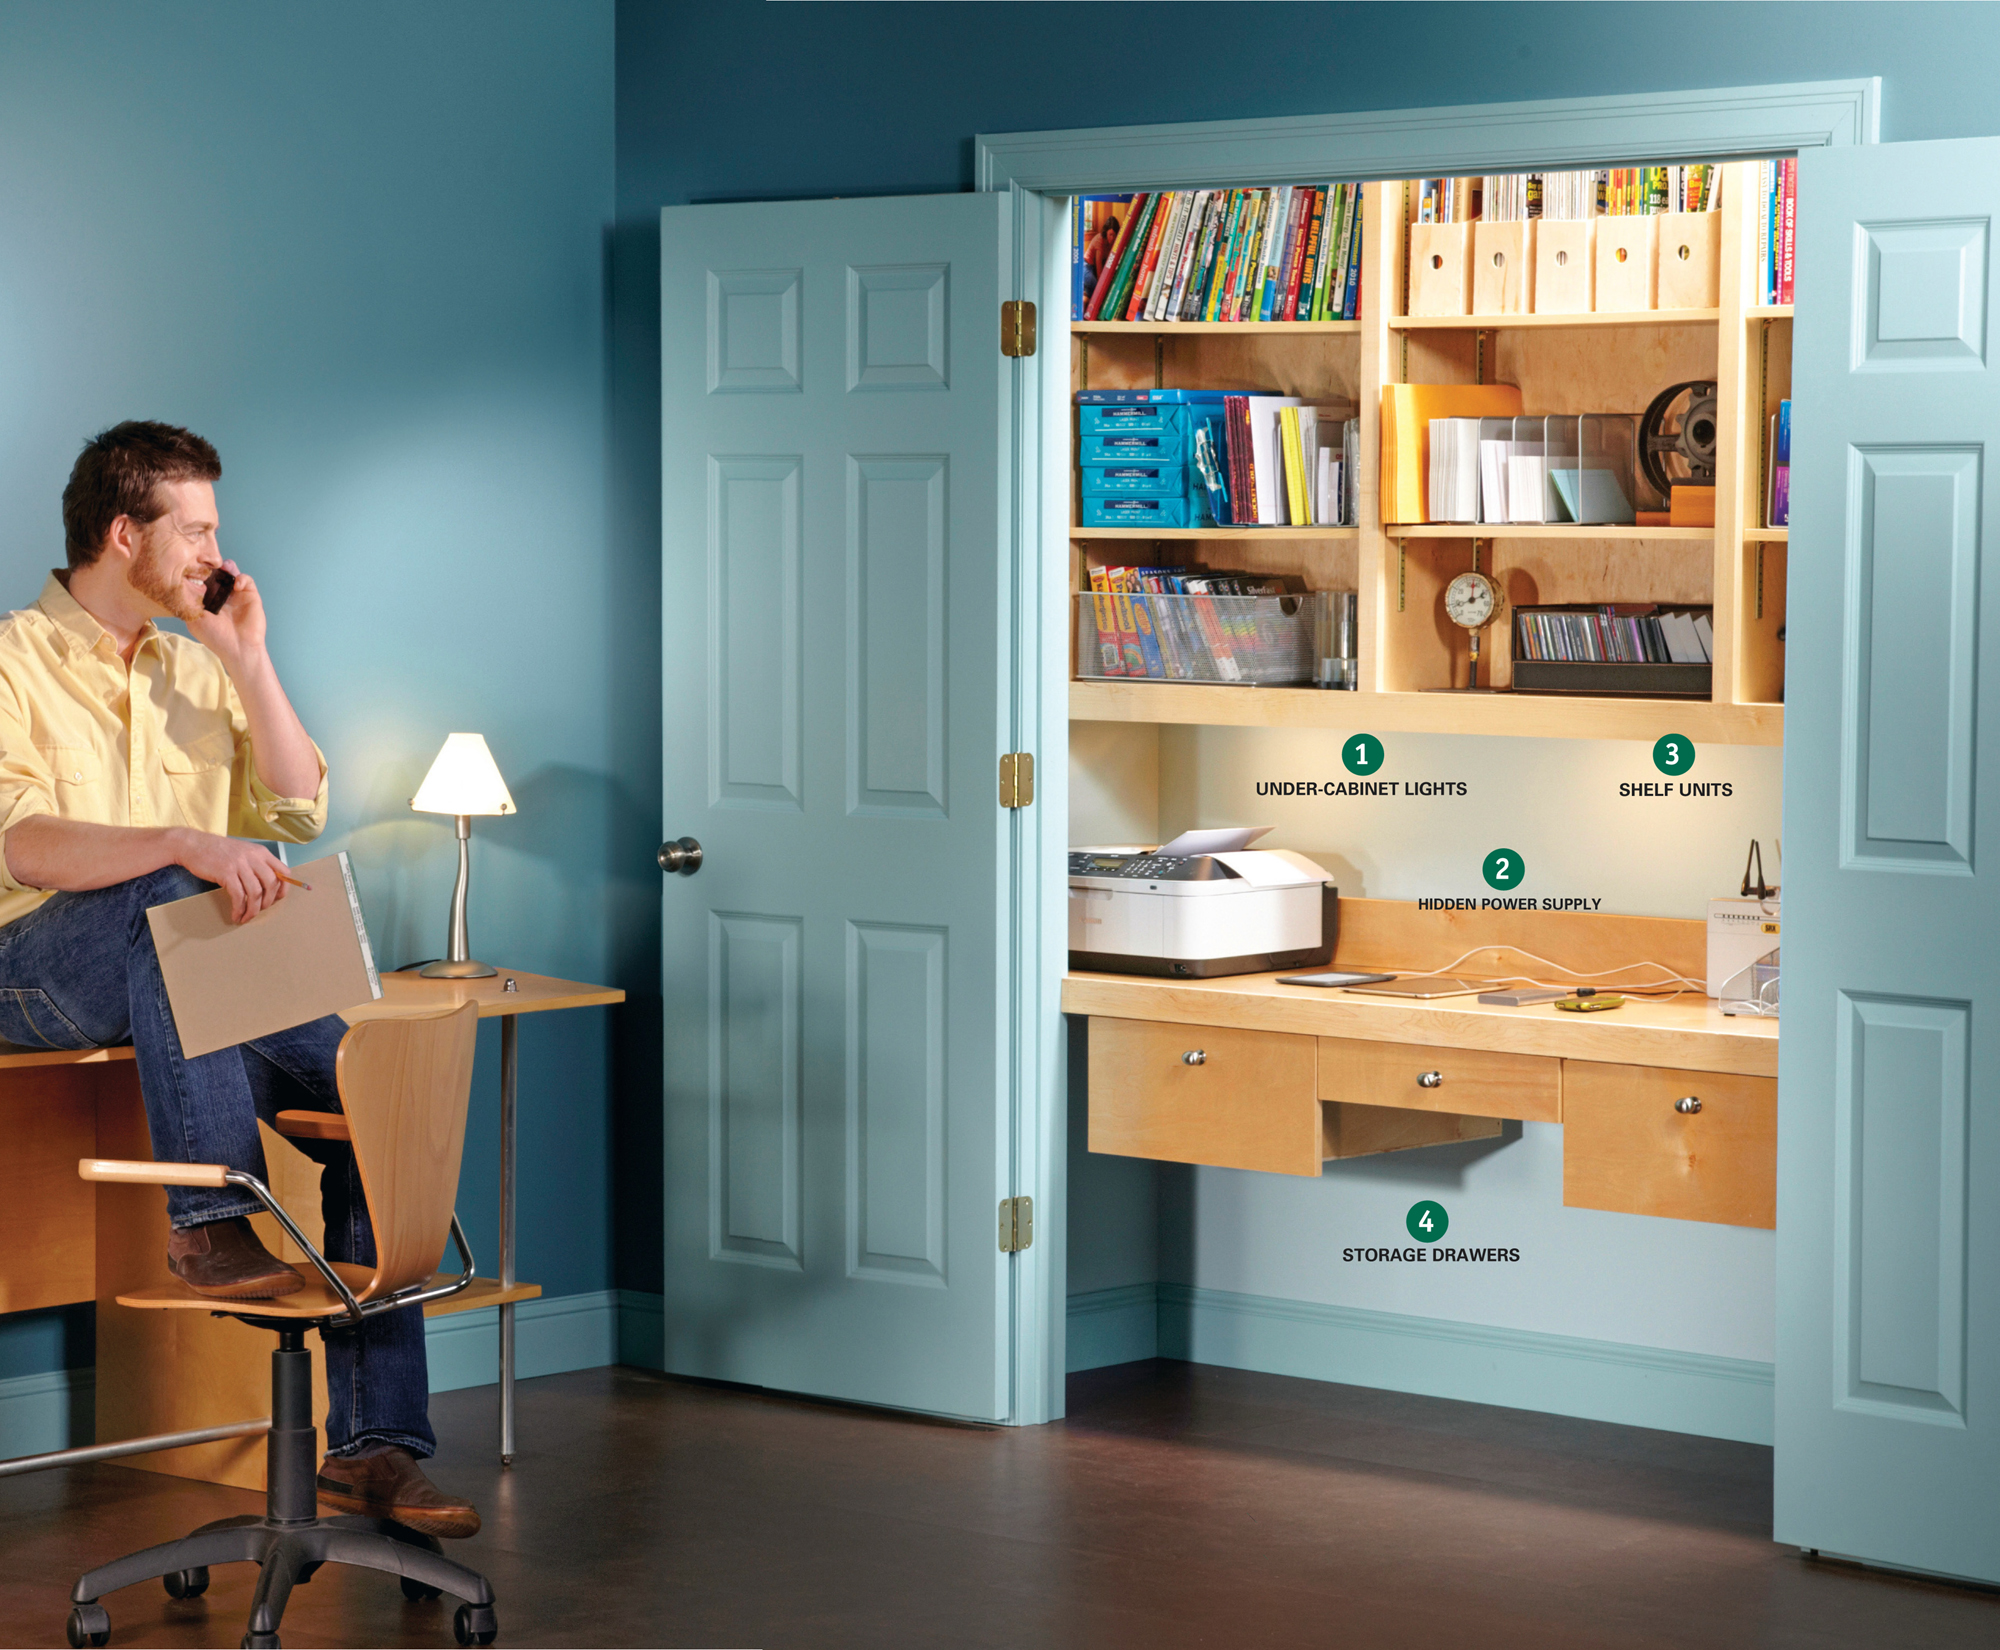
Is your home office a mess? Do you need a spot to organize your kids’ schoolwork and projects? Or do you just want to get your office stuff out of sight when you have guests? We’ll show you how to solve all these problems by converting a spare closet into a super-organized space.
In this story, we’ll show you how to build and install wall shelf cabinets, a countertop and under-mount drawers, including how to adjust the dimensions to fit these projects in your closet. We’ll also show you an easy way to conceal all those cords that usually dangle down behind the desk. We’ve included a Materials List, but you’ll have to adjust the quantities to fit your closet. The project shown here is constructed with birch plywood and boards and cost us about $400.
Simple construction, fantastic features
1 Brighten up your work surface with under-cabinet lights.
2 Hide the cords with a power strip tucked behind a backsplash.
3 Easy-to-build shelf units create tons of storage space.
4 The world’s simplest drawers hang under the countertop.
This is a great project for any intermediate to advanced DIYer. There’s no complicated joinery—the wall shelves and drawers are just wooden boxes that are screwed together. We used a table saw to cut the plywood, a narrow-crown staple gun to attach the shelf backs and drawer bottoms, and an 18-gauge nailer to attach the face frames. If you don’t have these tools, you can use a circular saw and straightedge guide to cut the plywood, and a good old-fashioned hammer and nails. It will just take a little longer.
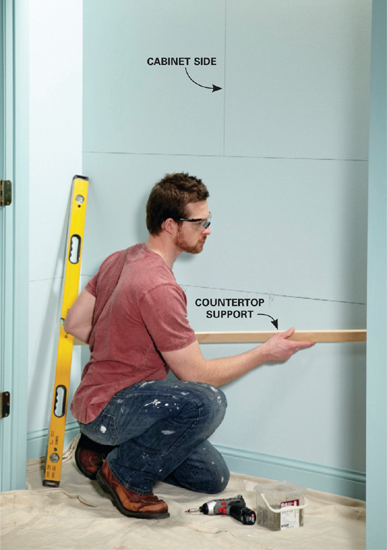
Start by measuring the distance between the side walls. Keeping in mind that 32 in. is about the maximum width for a plywood shelf, decide how many shelf units you need. To figure out exactly how wide each cabinet should be, subtract 1-1/2 in. from the total measurement and divide the remainder by the number of cabinets. This will leave a 3/4-in. space between the cabinet and the wall at each end that you’ll cover with the face frame. This 3/4-in. space makes it easy to install the shelf cabinets in the closet without worrying about an exact fit. We needed three 27-1/2-in.-wide cabinets to fit our 84-in.-wide closet. We built the cabinets 47-3/4 in. tall. If you have standard 8-ft.-tall walls, the cabinets will reach the ceiling. After you do the calculations, double-check your math by drawing lines on the closet wall. Draw a level line 28-1/2 in. from the floor to mark the bottom of the 1-1/2-in.-thick countertop. Then draw another line 47-1/2 in. from the floor for the bottom of the wall cabinets. Finally, draw vertical lines for the sides of the cabinets.
You’ll also have to decide how wide to make the drawers. You can use the technique we show here to build drawers in a size and configuration that will work best in your closet. The key is to build the frame and mount the drawer slides before you build the drawers. Then you can measure between the slides (Photo 8) and build the drawers to fit.
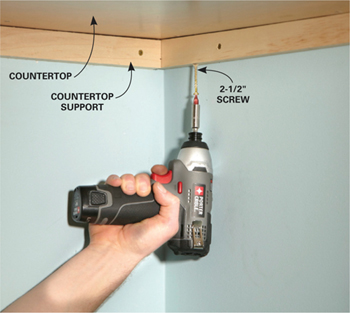
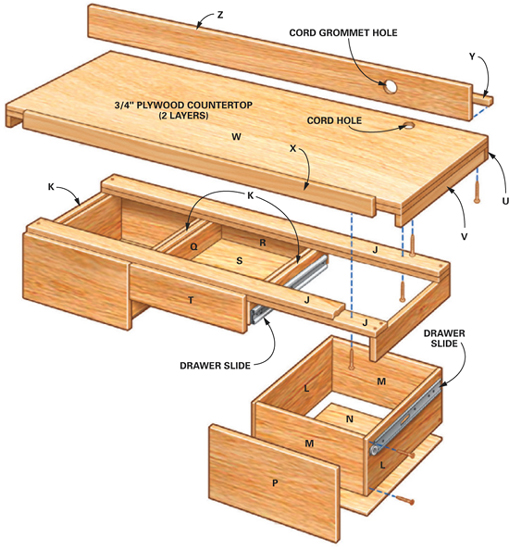
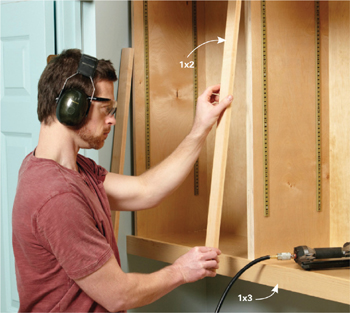
The countertop is two layers of plywood that are glued and screwed together. It rests on cleats that are screwed to the wall studs. Start by measuring the closet interior at the level of the countertop. Use a framing square to check the corners. Deduct 1/4 in. from the length and depth to allow for the top to fit easily. You can cover any gaps with the backsplash. Transfer these measurements to your plywood and cut out the two pieces. Use less-expensive plywood for the bottom if you like. Screw 1x2 cleats to the back, side and front walls to support the top (Photo 1). Then drop the top into place and attach it from underneath with 2-1/2-in. screws (Photo 2). Finish the front edge with a 2-1/4-in.-wide board (Photo 3).
Start by cutting the parts from the 4 x 8-ft. sheets of plywood. If you’re using a table saw, keep the good side of the plywood facing up as you cut the parts. If you’re using a circular saw, face the good side down so that any splintering or chipping won’t show. We think it’s easier to finish the parts before you assemble them.
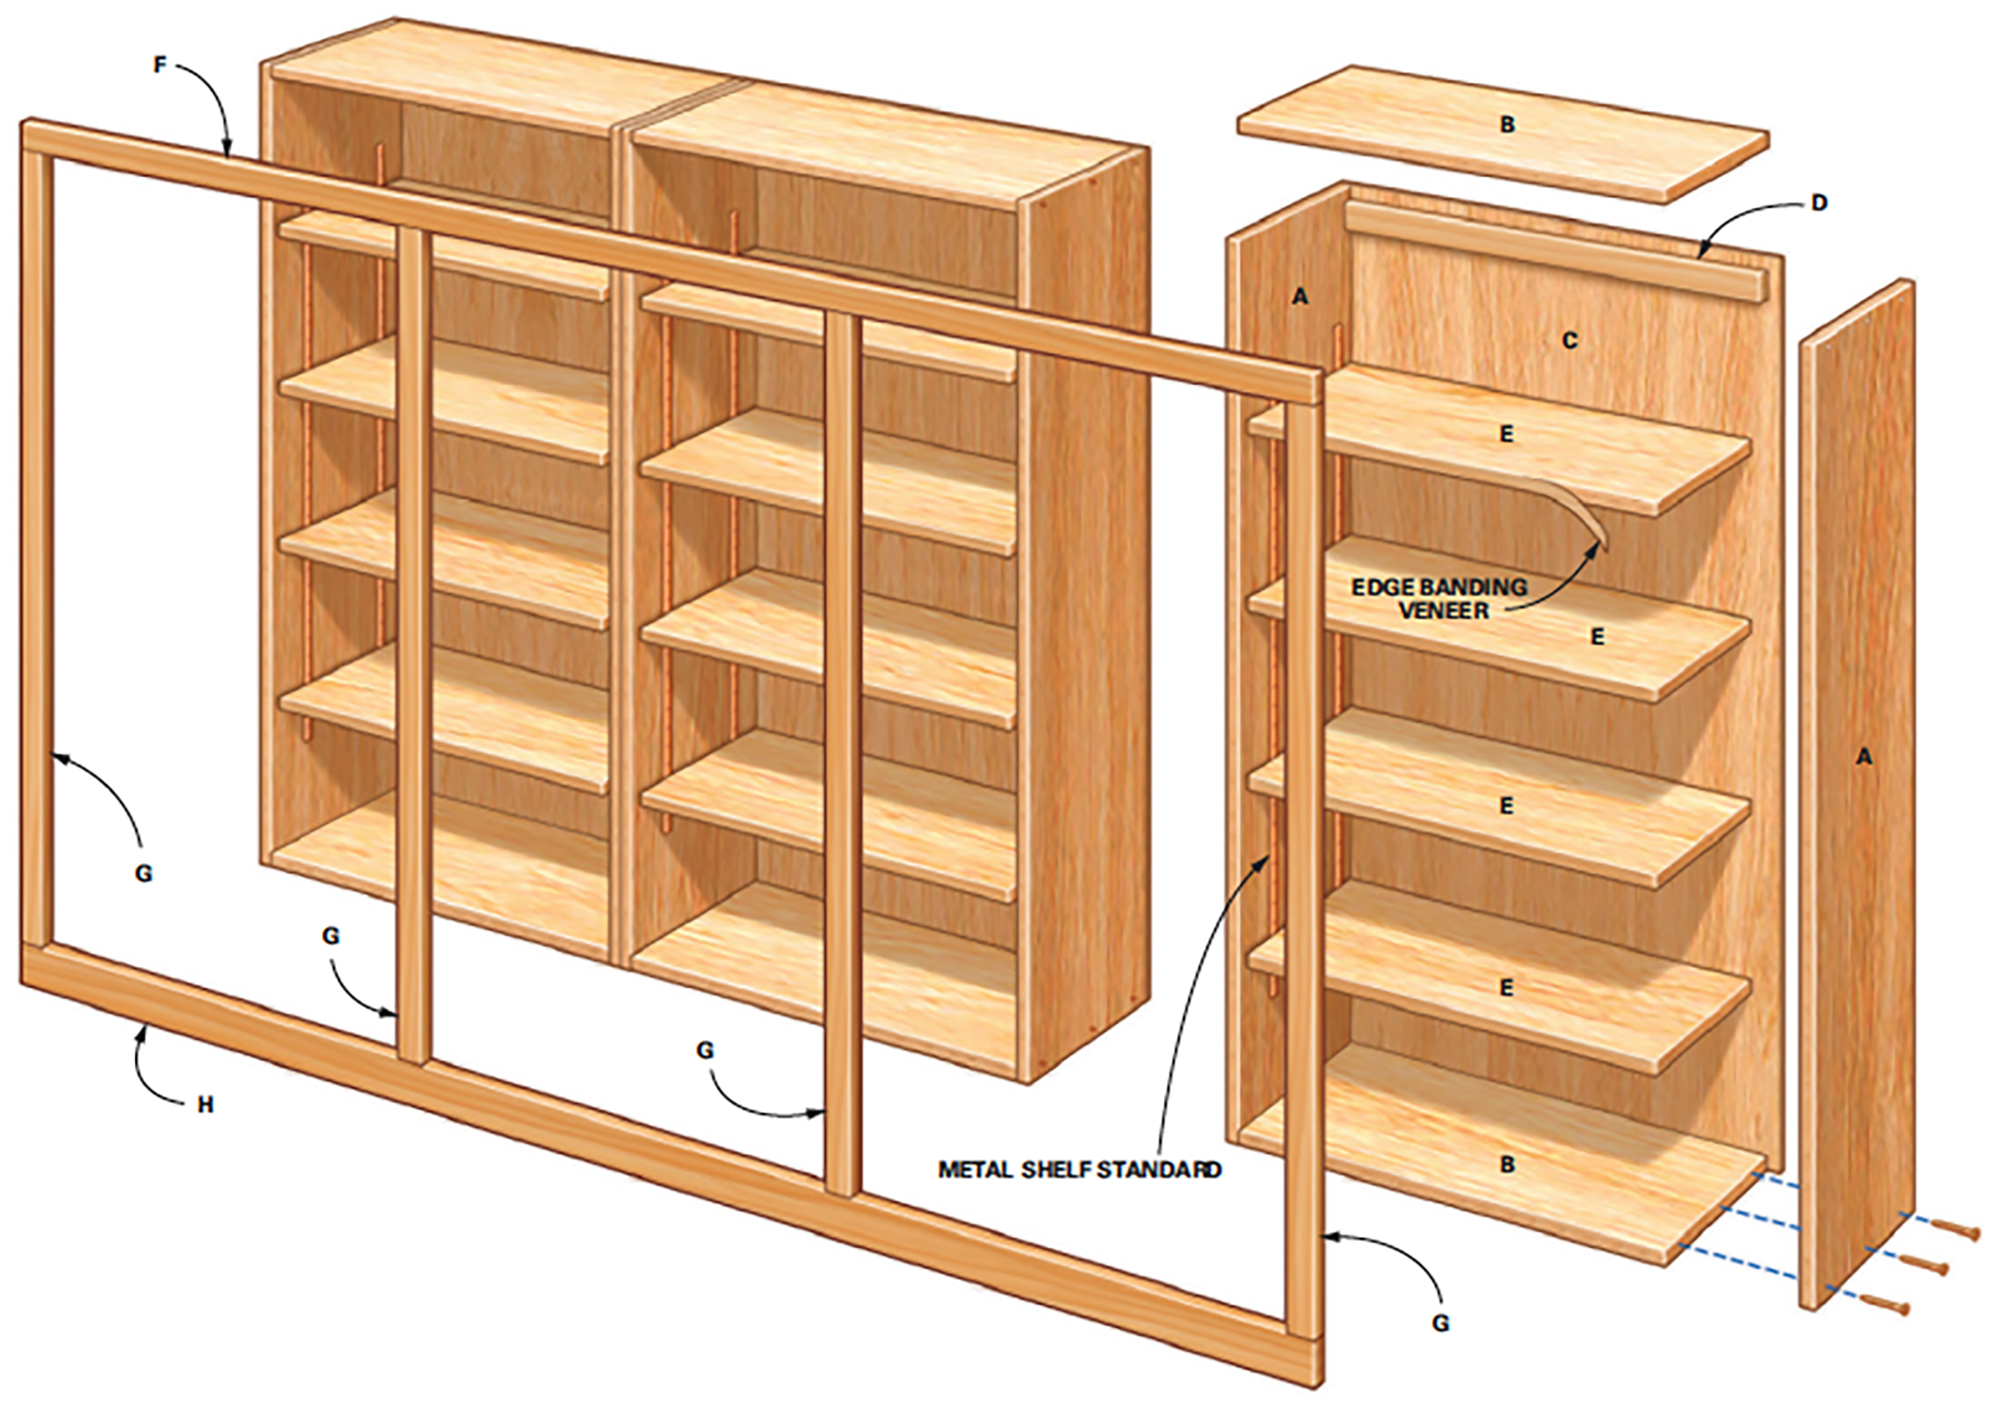
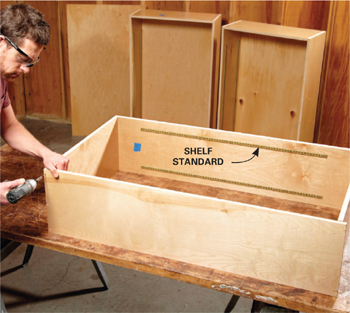
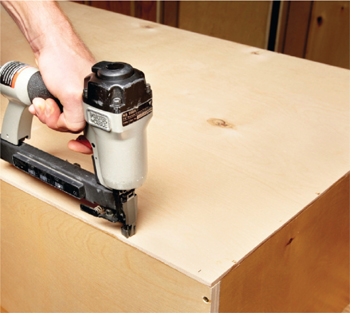
It’s also easier to install the shelf standards to the cabinet sides before you put the cabinet together. Make sure the shelf standards are oriented the right way. We put a piece of masking tape on the top of each side to keep track. Here’s a building tip you can use for the cabinet and drawer boxes: Nail the cabinet sides to the top and bottom before you drill pilot holes for the screws. The nails hold the parts in perfect alignment while you drill the holes and drive the 1-5/8-in. screws. Screw the sides to the top and bottom (Photo 4). Then nail on the back. If you were careful to cut the 1/4-in. plywood back accurately, you can square the cabinet by aligning it with the back before nailing it on (Photo 5). You’ll cover the front edge of the cabinets with a wood face frame after they’re mounted (Photo 7). Finish the front edge of the plywood shelves with iron-on edge banding. For complete instructions on installing edge banding, go to familyhandyman.com and search for “edge banding.”
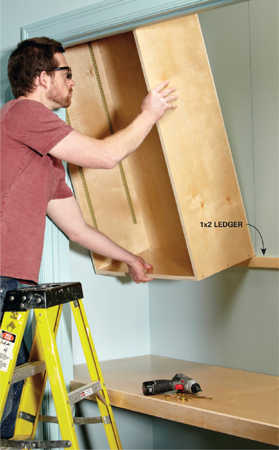
Start the cabinet installation by screwing a 1x2 ledger to the wall to support the wall cabinets. Align the top edge of the board with the 47-1/2-in.-high level line and drive a screw at each stud location. Next, measure from the vertical lines to the center of the wall studs, and transfer these measurements to the hanging strip at the top of each wall cabinet so you’ll know where to drive the cabinet installation screws. Hang the cabinets by resting the bottom edge on the ledger, tipping them up against the wall, and driving 3-in. screws through the hanging strip into the studs (Photo 6). Secure the bottom of the cabinets by driving a nail or screw down into the ledger. Connect the fronts of the cabinets by hiding 1-1/4-in. screws under the shelf standards. Complete the installation by nailing on the face frames (Photo 7). We used a 1x3 for the bottom face frame to hide the under-cabinet lighting.
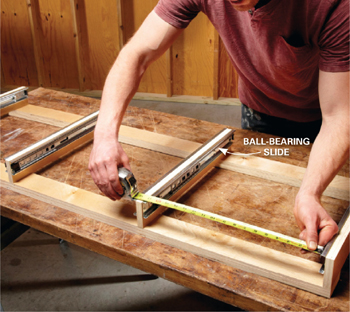
You can buy drawer slides that mount directly to the underside of a desk or countertop, but we’ll show you another method that allows you to use high-quality, side-mounted drawer slides. We bought these full-extension ball-bearing slides at the local home center. They cost about $15 per drawer. But you can substitute less-expensive epoxy-coated slides to save some money. You’ll have to measure your closet to figure out the drawer sizes. Just make sure the drawers clear the open closet doors.
Building the drawer support frame is straightforward. Start by laying two of the stringers (J) side by side and marking the location of the drawer dividers (K) on them. Ball-bearing slides are not very forgiving, so measure and attach the drawer dividers carefully so the dividers are perfectly parallel when the frame is assembled.
For our 24-in.-deep countertop, we used 20-in. drawer slides. We cut the drawer dividers (K) 20 in. long and built the drawer boxes 20 in. deep. If your closet is shallower, use shorter slides and adjust these dimensions to match. The drawer slides have two parts. One mounts to the dividers and the other to the drawer. Remove the part that attaches to the drawer according to the included instructions. Then screw the part of the slide with the ball bearings to the dividers, aligning the bottom edges. The center dividers will have drawer slides on both sides. Screw through the stringers (J) into the drawer dividers (K) to build the frame. Be careful to keep the front of the drawer slides facing forward. Then add the second layer of stringers (J). Check the frame against a framing square as you screw it together to make sure it’s square. When the frame is complete, measure between the slides to determine the drawer sizes (Photo 8).
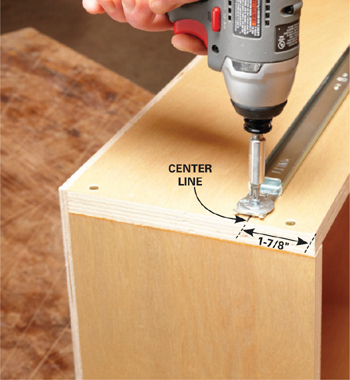
Build the drawers by screwing through the sides into the fronts and backs, and then gluing and nailing on the plywood bottom. Nail one edge of the bottom to the drawer box. Then use a framing square to square the drawer box before nailing the other three edges. To attach the drawer slide to the drawers, we first drew lines 1-7/8 in. down from the top edges of the drawers (Photo 9). (You may have to adjust this distance to match your drawer slides. The dimension isn’t critical as long as there’s about a 1/4-in. clearance between the drawer and the stringer when the drawer is mounted.) Then sight through the screw holes in the slides to center them on the line before attaching them with the included screws.
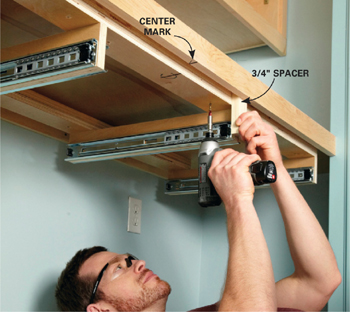
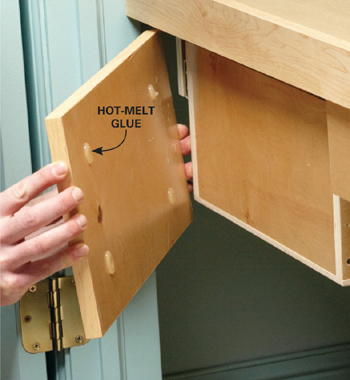
Finish the drawer installation by attaching the frame to the underside of the countertop (Photo 10) and installing the fronts. Hold the drawer frame back 3/4 in. from the back of the countertop edging. Install the drawers by lining up the slides and pushing them in. Photo 11 shows a tip for aligning the drawer fronts. The hot-melt glue holds the fronts temporarily. Attach them permanently by opening the drawers and driving four 1-1/4-in. screws through the drawer box into the drawer front from the inside.
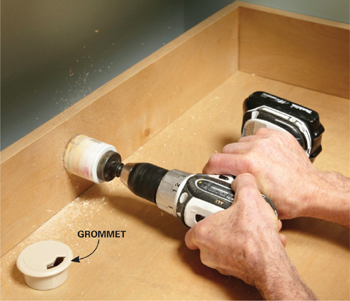
Here’s a handy method to hide cords and still have easy access to them. Simply mount a backsplash board about 4 in. from the back wall to create a cord trough. Figure B shows how we used a cleat to attach the backsplash. Drill holes through the face and install cord grommets to allow cords to pass through. We found 2-in. cord grommets at the home center, but since they were a loose fit in the 2-in. hole, we held them in place with a dab of silicone caulk. Lay a multi-outlet power strip behind the backsplash for extra outlets. We drilled a hole through the countertop so that we could plug the power strip into a wall outlet. You can also nail backsplash boards to the end walls for a more finished look.
Cutting list
KEY |
PCS. |
SIZE & DESCRIPTION |
Shelf cabinet |
|
|
A |
6 |
11-1/4" x 47-3/4" x 3/4" plywood sides |
B |
6 |
11-1/4" x 26" x 3/4" plywood top, bottom* |
C |
3 |
27-1/2" x 47-3/4" x 1/4" plywood back |
D |
3 |
1-1/2" x 3/4" x 26" hanging strip |
E |
12 |
11-1/4" x 25-5/8" x 3/4" plywood shelves* |
F |
1 |
1-1/2" x 84" x 3/4" face frame |
G |
4 |
1-1/2" x 48" x 3/4" face frame ** |
H |
1 |
2-1/2" x 84" x 3/4" face frame |
Drawer frame |
|
|
J |
4 |
3" x 57" x 3/4" plywood stringers |
K |
4 |
3" x 20" x 3/4" plywood dividers |
Drawers |
||
L |
4 |
7-1/4" x 20" x 3/4" plywood sides |
M |
4 |
7-1/4" x 15-1/2" x 3/4" back and front* |
N |
2 |
17" x 20" x 1/4" plywood bottoms* |
P |
2 |
18-7/8" x 9" x 3/4" plywood fronts* |
Q |
2 |
2-1/4" x 20" x 3/4" plywood sides |
R |
2 |
2-1/4" x 15-1/2" x 3/4" back and front* |
S |
1 |
17" x 20" x 1/4" plywood bottom* |
T |
1 |
18-7/8" x 3/4" x 4" plywood front* |
Countertop |
||
U |
1 |
1-1/2" x 3/4" x 84" back support |
V |
2 |
1-1/2" x 3/4" x 23-1/4" side supports |
W |
2 |
24" x 84" x 3/4" plywood countertop ** |
X |
1 |
2-1/4" x opening width x 3/4" face |
Y |
1 |
1" x 3/4" x 84" cleat |
Z |
1 |
4-3/8" x 84" x 3/4" backsplash |
* Based on full 3/4" plywood. Adjust if your plywood is slightly thinner.
** Cut to fit.
Figure B Drawer and countertop construction
These components are sized for a 7' x 2'-deep closet. Adjust dimensions to fit your closet.
ITEM |
QTY. |
4' x 8' x 3/4" plywood |
4 |
4' x 8' x 1/4" plywood |
2 |
1x2 x 8' boards |
7 |
1x3 x 8' board |
1 |
1x3 x 6' board (rip to 2-1/4") |
1 |
1x6 x 8' board (rip to 4-3/8" for parts Y and Z) |
1 |
Shelf standards |
6 |
Shelf clips |
48 |
20" full-extension drawer slide sets |
3 |
Iron-on veneer edging |
48 ft. |
1-1/4" screws |
|
1-5/8" screws |
|
2-1/2" screws |
|
3" screws |
|
Finish nails or nail gun pins |
|
Wood glue |
|
Cord grommets |
|
1
Mark the walls and attach the countertop supports. Draw level lines for the bottom of the countertop and cabinets. Draw vertical lines to indicate the sides of the cabinets. Then screw countertop supports to studs at the back and sides of the closet.
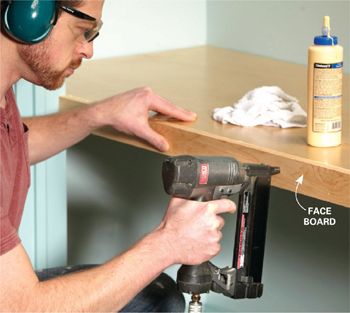
3
Cap the front edge. Glue and nail a board to the front edge to cover the plywood and add strength. Wipe off glue squeeze-out with a damp rag.
4
Assemble the wall cabinets. Mount shelf standards on the cabinet sides before assembly. Then screw the sides to the bottom and top with 1-5/8-in. screws. Drill pilot holes to prevent the plywood from splitting.
5
Square the cabinet with the plywood back. Use the plywood back as a guide for squaring the cabinet. Apply a bead of glue. Nail one edge of the plywood back to the cabinet side. Then adjust the cabinet box as needed to align the remaining edges and nail these.
7
Finish the fronts. Nail a 1x3 to the lower cabinet edge to create a valance for under-cabinet lighting. Nail 1x2s to the cabinet top and sides to cover the raw plywood edges.
9
Mount the drawer slides. Draw a line parallel to the top of the drawer to indicate the center of the drawer slide. Line up the slide by centering the line in screw holes. Attach the slide with the screws provided.
10
Hang the frame under the countertop. Make center marks on the frame and the underside of the counter and align them. Then use a spacer to set the frame 3/4 in. back from the countertop edging and drive the screws.
11
Glue on the drawer front. Starting with the center drawer front, dab on hot-melt glue and press it against the drawer. Quickly center the drawer front 1/4 in. below the countertop edge. Hold it still for about 10 seconds until the glue cools. Now position the other two drawer fronts. Drive screws from the inside.
Wiring your closet—get help online!
We’re not showing how to wire your closet office here, but chances are you’ll want to add at least one electrical outlet and possibly cable, phone or network wiring. We’ve got tons of how-to information at our Web site to help you with these projects (you'll find one approach here). Go to familyhandyman.com and enter one of the search terms below.
To add an outlet, search for “electrical outlet.” But keep in mind that the new National Electrical Code requires that closet outlets be arc fault protected. This means you’ll have to either connect to or add a circuit that’s protected by an arc fault circuit interrupter (AFCI). While you’re adding wiring, don’t forget about closet lighting (search for “lighting”). And for information on how to install coax, phone and Cat5e cable, search for “cable.”
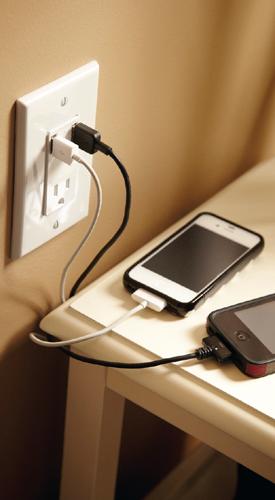
The standard outlet worked great for a hundred years with only a few changes. But in the age of portable devices, it needed a complete redesign. The reinvented outlet has one standard receptacle for old-fashioned needs and two ports for high-tech gizmos. Just plug in your USB cable and walk away. A smart chip inside the outlet adjusts output to suit your device, so there’s no need for the wall-wart adapter that came with the device. The maximum output is 2.1 amps—that’s enough to charge two phones or one tablet. And of course, you can always plug an adapter into the old-fashioned receptacle to charge a third device. The Leviton T5630 is one brand. It installs like a standard outlet and is sold at home centers.