
WHAT IT TAKES
Time: 1 weekend
Skill level: Intermediate
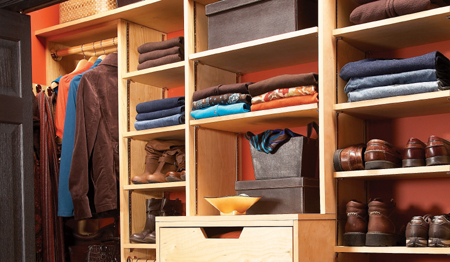
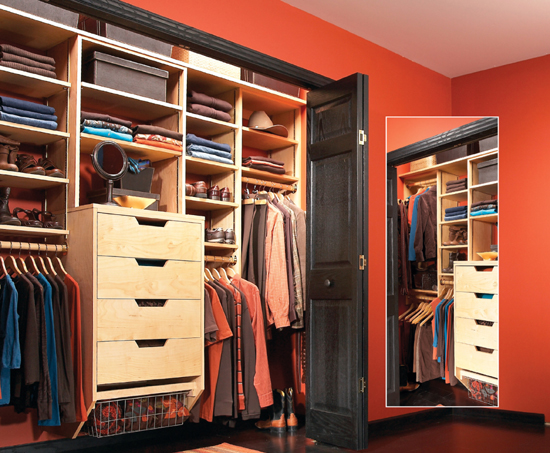
If you have to dig through a mountain of clothes to find your favorite sweatshirt, it’s time to take on that messy closet. This simple-to-build system organizes your closet with shelf, drawer and hanging space for your clothes, shoes and accessories. Buying a closet system like this would cost you at least $500, but you can build this one for about half that.
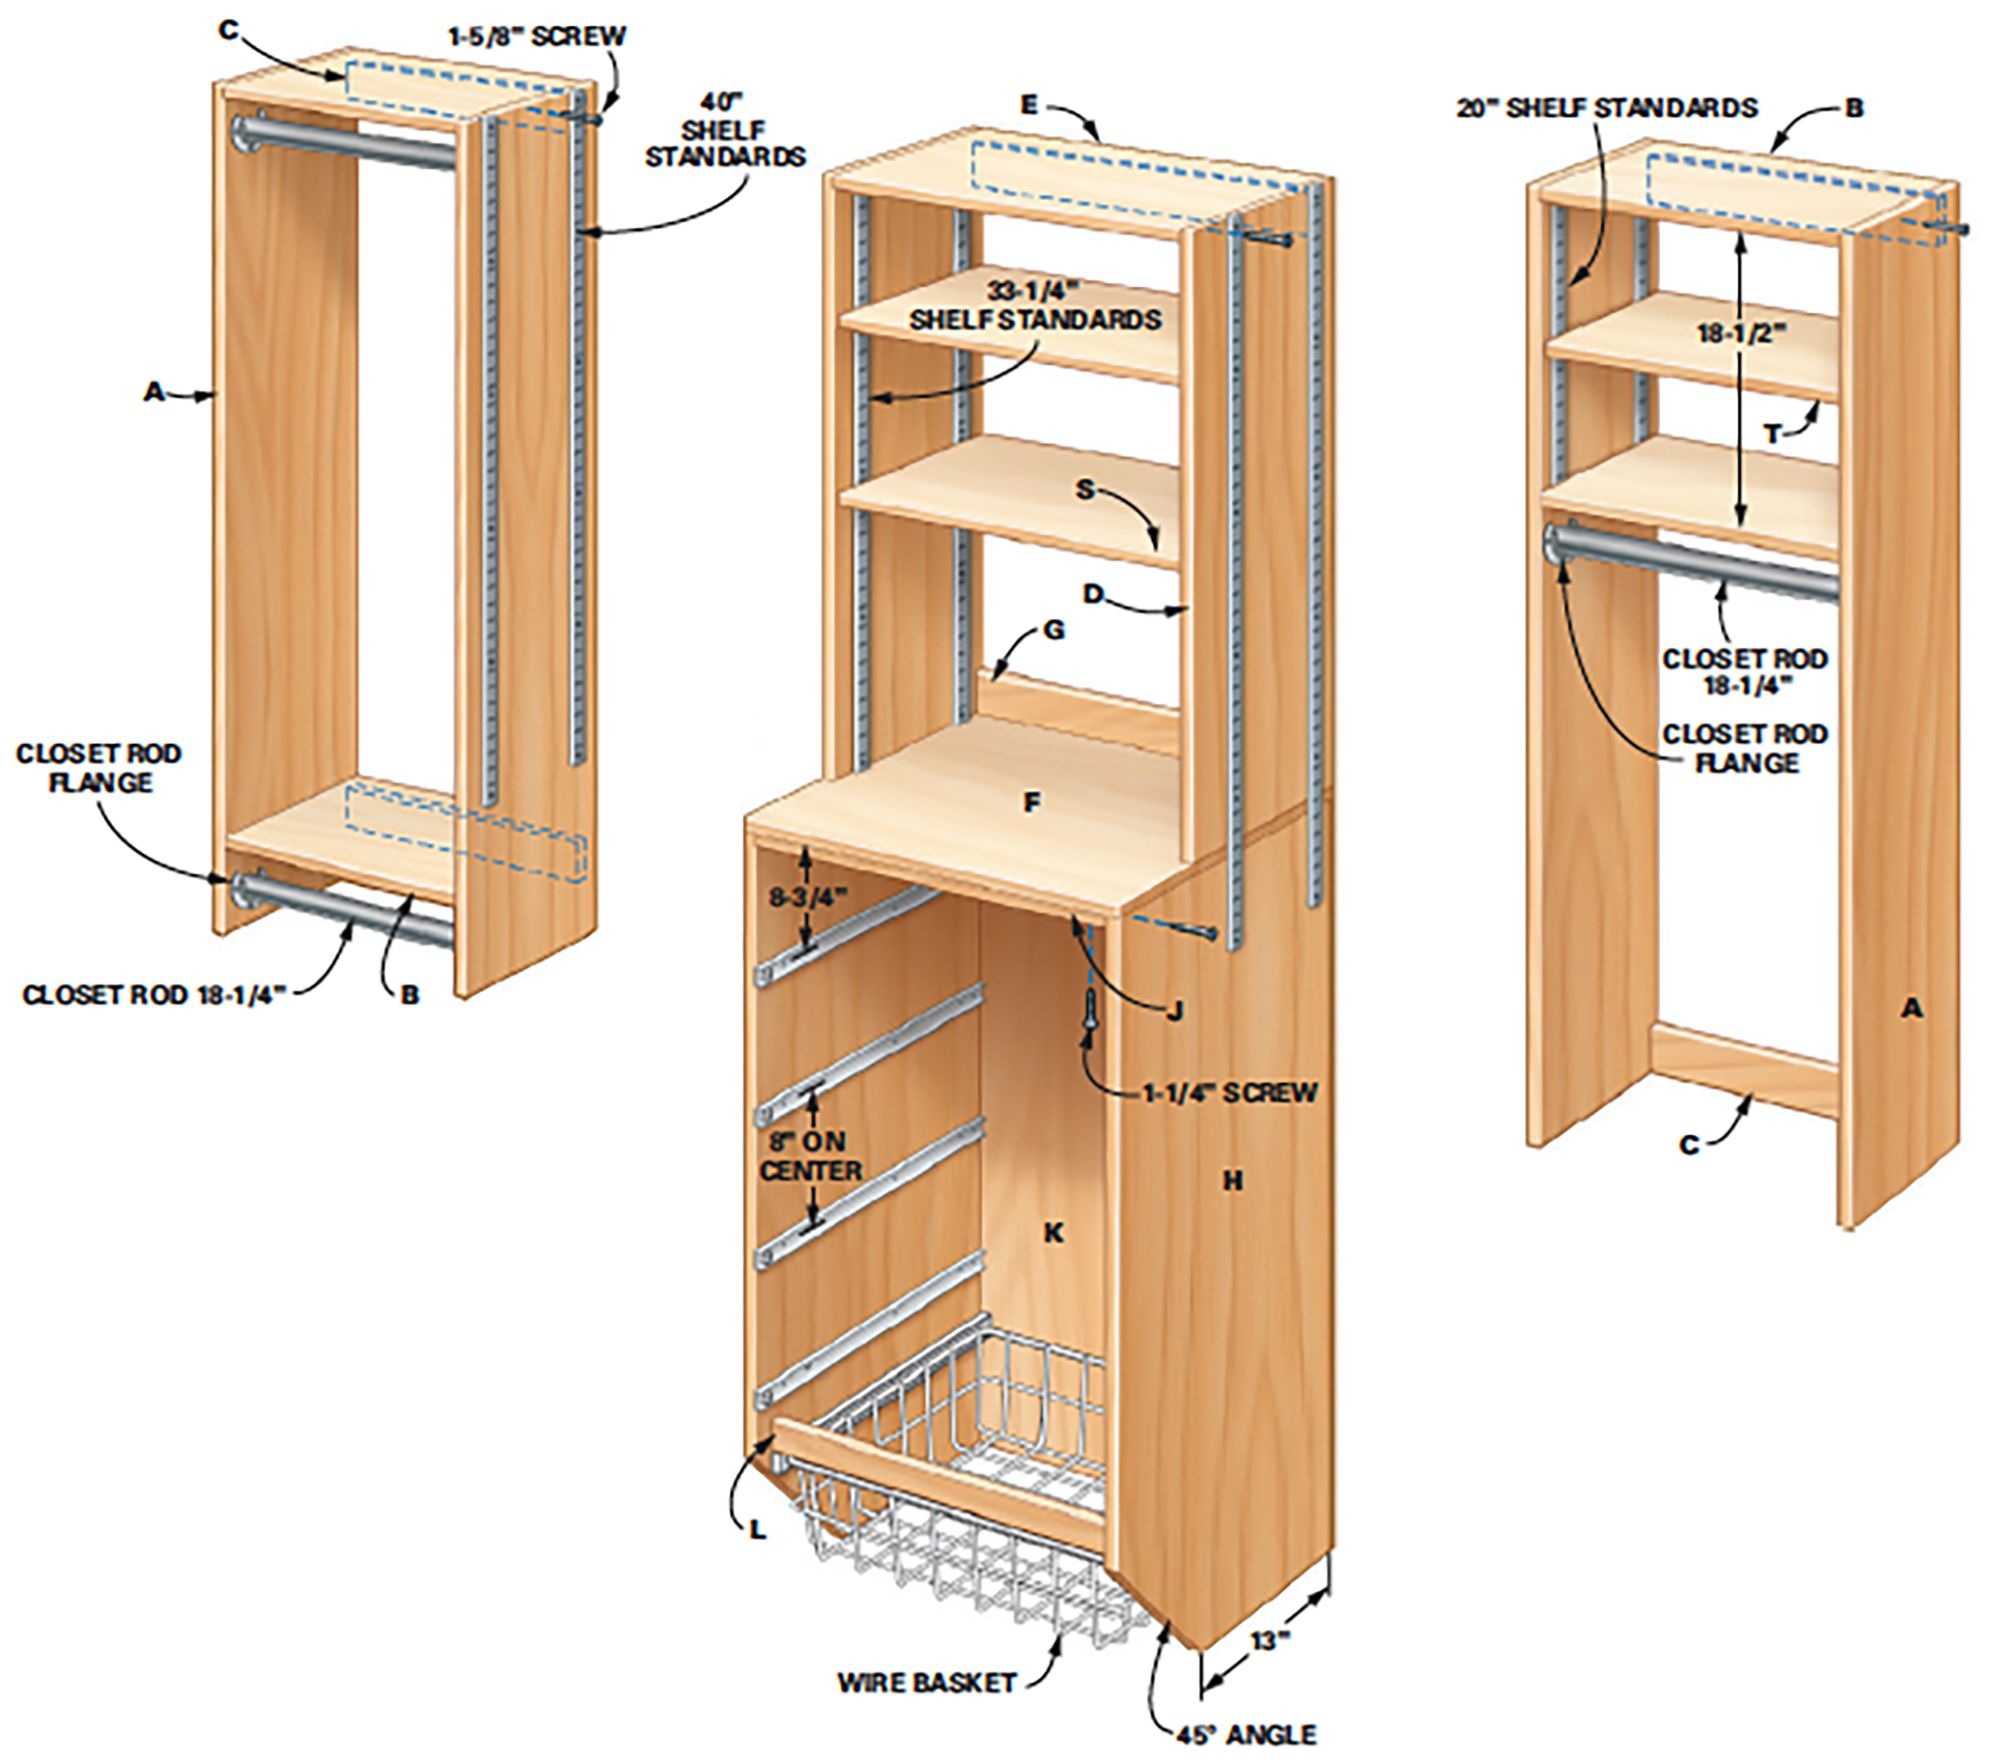
This system is really just four plywood boxes outfitted with shelf standards, closet rods or drawers. Here it is built for an 8-ft.-wide closet with an 8-ft. ceiling, but it’ll work in any reach-in closet that’s at least 6 ft. wide if you adjust the shelf width between the boxes or change the box dimensions.
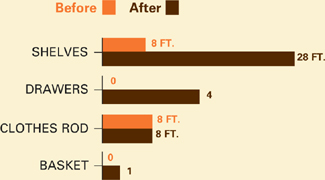
Three times the storage—and more!
Three times the storage in the same space may sound impossible, but just look at the numbers
Storage Space Comparison for 8-ft. Closet
You can complete this project in a weekend. Spend Saturday cutting the lumber, ironing on the edge banding and applying the finish. Use your Saturday date night to clean everything out of the closet. That leaves you Sunday to build and install the new system.
This entire system was built with birch plywood. The cost, including the hardware for the drawers, shelves and closet rods, was around $300 (see Materials List). You could use MDF or oak plywood instead of birch. Everything you need for this project is available at home centers.
Start by cutting all the parts to size following Figure C and the Cutting List. The corner box sides are slightly narrower than 12 in., so you can cut off dings and dents and still cut four sides from a sheet of plywood.
You won’t be able to cut the shelves that fit between the boxes to length until the boxes are installed (the shelves need to be cut to fit), but you can rip plywood to 11-7/8 in. and cut the shelves to length later.
Once the parts are cut, apply edge banding (iron-on veneer) to all the edges that will be exposed after the boxes are assembled (Figure A). Build a jig to hold the parts upright. Place a part in the jig. Then cut the edge banding so it overhangs each end of the plywood by 1/2 in. Run an iron (on the cotton setting) slowly over the edge banding. Then press a scrap piece of wood over the edge banding to make sure it’s fully adhered. Trim the edges with a veneer edge trimmer. Visit familyhandyman.com and search for “edge banding” for instructions.
Lightly sand the wood and your closet rod with 120-grit sandpaper. Wipe away the dust with a tack cloth, then use a paint pad to apply a coat of polyurethane on everything except the drawer parts (Photo 1). This inexpensive pad will let you finish each part in about 20 seconds. Let the finish dry, then apply a second coat.
It’s easier to install the drawer slides and the shelf standards that go inside the boxes before you assemble the boxes. Use a framing square to draw reference lines on the drawer unit sides for your drawer slides (see Figure A). The slides are spaced 8 in. apart, centered 8-3/4 in. down from the top of the box. Keep the slides 3/4 in. from the front edge (this is where the drawer faces will go). Use a 7/64-in. self-centering drill bit to drill pilot holes and screw the slides into place (Photo 2).
You’ll need your wire basket now (available at home centers). Attach the glides for the basket 3 in. below the drawer slides. If your basket is narrower than 22-1/2 in., screw a cleat to the box side so the basket will fit.
Now attach the shelf standards. You can cut them with a hacksaw, but an easier way is to use a metal blade in a jigsaw. Place two or more standards together so the numbers are oriented the same way and the standards are aligned at the ends. Tape the standards together where you’re going to make the cut, then gang-cut them with your jigsaw (Photo 3).
Screw the standards to the inside of the box sides, 1 in. from the edges. Keep the standards 3/4 in. from the top (that’s where the box tops go). Be sure the numbers on the standards are facing the same way when you install them—this ensures the shelves will be level.
Use a brad nailer to tack the boxes together following Figure A and Photo 4. If you don’t have a brad nailer, use clamps. Then screw the boxes together. Use 1-5/8-in. trim screws because the screw heads are small and unobtrusive (you can leave the screw heads exposed). Here are some tips for assembling the boxes:
■ Attach the screw strips to the box tops first, then add one side, then the bottom shelf, and then the second side.
■ Drill 1/8-in. pilot holes to prevent splitting. Stay 1 in. from edges.
■ If your cuts are slightly off and the top, bottom and sides aren’t exactly the same width, align the front edges.
■ The boxes will be slightly wobbly until they’re installed in the closet, so handle them with care.
■ The middle bottom box has a back. Square the box with the back, then glue and tack the back in place.
■ After the corner boxes are assembled, screw shelf standards to the side that doesn’t abut the wall (it’s easier to install the standards before the boxes are installed).
Cut the drawer sides and bottoms (see Cutting List). Assemble the sides with glue and 1-in. screws. To square the drawers, set adjacent sides against a framing square that’s clamped to your work surface. Glue and tack the drawer bottom into place (Photo 5). Then set the drawer slides on the drawers, drill pilot holes and screw the slides into place.
Install the drawers in the box. Getting the drawer faces in their perfect position is tricky business. If the faces are even slightly off-center, the drawer won’t close properly. To align them, place double-sided tape over the drawer front. Starting with the top drawer, center the drawer face in the opening (Photo 6). You should have about a 1/8-in. gap on both sides and the top. Press the face into the tape. Take out the drawer and clamp the face to the drawer to keep it stationary. Drive two 1-in. screws through the inside of the drawer into the face.
Now install the boxes. Start by drawing a level line in the closet, 11 in. down from the ceiling. This will give you just over 10 in. of storage space above the closet system after the top shelf is installed. Then mark the stud locations on the wall with tape.
Don’t assume your closet walls are plumb—they’re probably not. So you can’t just place a box in a corner without checking for alignment. Hanging the boxes is a two-person job, so get a helper. Start with the corner boxes. Align the top of the box with your level line on the wall. Have your helper plumb the box with a level while you drive 2-1/2-in. screws through the screw strip into the wall at the stud locations (Photo 7). Attach the other corner box the same way.
Find the center of the wall, then make a mark 12 in. on one side of the center mark. That’s where your shelf unit will go. Again, have your helper plumb the box while you align it with your marks and screw it to the wall.
Prop up the drawer unit on spacers so it’s tight against the shelf unit. Align the edges, then clamp the boxes and screw them together (Photo 8). Drive screws through the screw strip into the wall.
Then place the top shelf over the boxes. This shelf barely fit into place. If yours won’t fit, you’ll have to cut it and install it as two pieces. Make the cut near one end, over a corner box, so it’s not noticeable. Screw the shelf to the box tops with 1-1/4-in. screws.
Then attach shelf standards along the sides of the shelf and drawer units (Figure A). Cut the adjustable shelves to length to fit between the corner boxes and the middle boxes. Finally, screw the closet rod flanges into place, cut the closet rod to size and install the rods.