 Custom Knitting
The one thing that I hear from so many of my students is that they love to knit, but they only make shawls, scarves, baby blankets, baby sweaters, and hats. The main reason is because whenever they try to make a garment for themselves, it never fits properly.
The first step to making a garment that fits is to understand your body type, and in order to do that you must know how to measure your body correctly.
Included in this section are instructions for four different sweaters, arranged in order of difficulty based on the stitch pattern. After the basic instructions for each pattern are instructions for how to increase and decrease the stitch pattern and how to adjust the shape of the sweater to suit different body types. Once you have determined your body type, read through the instructions, choose a project, and pick up your needles. Be patient, check your gauge, and measure often. You can do this!

Understanding Body Types
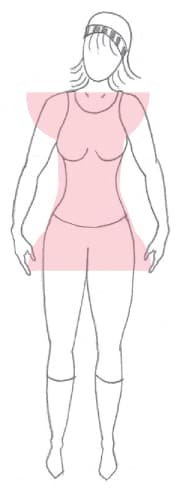
There are many different body shapes, but most of us fall into one of four main body types.

Classic Rectangle: The hips and chest are balanced and the waist is not deeply defined. This is the most common body type.
TIP If you are a Rectangle Shape, you may want to give the appearance of a smaller waistline. You can do this by simply decreasing a few stitches at the waist, working for about 2 inches (5 cm), then increasing back to the original stitch count. Another trick for narrowing at the waist is to use smaller needles through this area. This works particularly well if the pattern is a large multiple of stitches and difficult to increase and decrease.

Triangle (sometimes called Pear Shape): The hips are proportionately larger than the chest and shoulders, and the waist is somewhat defined.
TIP If you are a Triangle Shape, there are a few things that you can do to balance the hip line and smaller chest. You can add small shoulder pads or add interest, such as a ruffle or other embellishment near the neckline, to draw attention upward
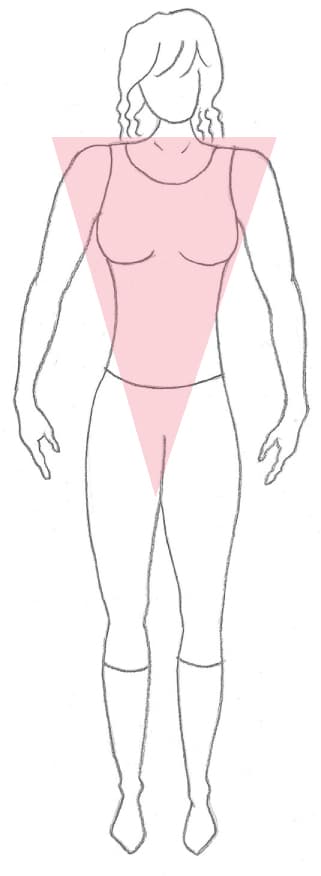
Inverted Triangle: The upper body is proportionately larger with broad shoulders. This body type has an ample chest and wide back, with slim hips.
TIP If you are an Inverted Triangle, there are a few things that you can do to create balance. You might like to add a V-neck, or add different edges to the bottom of a garment.

Hourglass: The chest and hips are well balanced and the waist is very defined. The shoulders align with the hips and the upper body is proportionate in length.
TIP If you are an Hourglass figure, you might want to embrace your curves, and shape the waistline by increasing and decreasing.
Taking Measurements

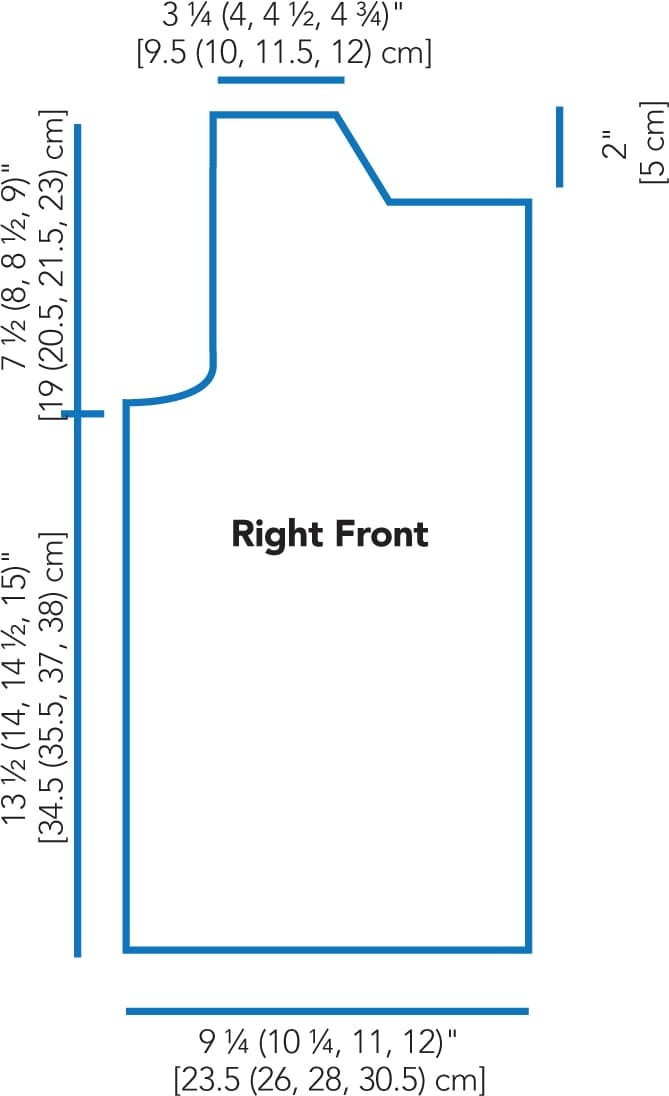
Before you begin a project, measure yourself and draw a diagram with your measurements, so that you can readily see where the pattern needs to be adjusted. For example, look at the schematics following the sweater patterns on pages 16, 30, 51, and 66. These show the measurements of the final knitted pieces for each design, assuming one has knit in the correct gauge.
HOW TO MEASURE YOUR BODY
Take your measurements over undergarments for accuracy, using a flexible tape measure. Enlist the help of a friend. When measuring the chest, waist, and hips, make sure to keep the tape measure parallel to the floor all around.
1. Chest/Bust. Place the tape measure under the arms, across the widest part of the back and fullest part of the chest/bust line.
2. Waist. Tie a string or piece of narrow elastic around your middle and allow it to roll to your natural waistline. Measure at this exact location. Leave the string in place as a reference for measuring the hips and back waist length.
3. Hips. Measure around the fullest part.
4. Back Waist Length. Measure from the prominent bone at the base of the neck down to the waistline string.
5. Cross Back. Measure from one shoulder crest across the back to the other.
6. Sleeve Length. Take two measurements here: With your arm at your side, measure from the shoulder crest to the wrist bone. Then, with your arm slightly away from your body, measure from the armpit to the wrist.
7. Sleeve diameter. Measure around the fullest part of your upper arm.
Adjusting Sleeve Measurements
If you have a slightly wider upper arm measurement than the pattern calls for, there are a few things that you can do to correct the problem.
First, you must determine how the sleeve pattern increases. Generally the increases are about every two inches (five centimeters), gradually shaping from a cuff to the upper arm. If you need more room in the upper arm area, you can make more increases by placing the increase rows closer together, say about every one and one half inch (four centimeters), until you reach the desired width. You will then have to decrease the added stitches in the cap area. The difficulty of the pattern and the multiple of stitches will determine how to make the increases.
Instructions are given for how to make increases and decreases for each of the stitch patterns used in the four designs. If you need to make the sleeves longer or shorter than the pattern calls for, this can also be achieved by changing the spacing between increases.
Little Shells Cardigan

The Little Shell pattern is one of the easiest stitch patterns to adjust for fit. This lovely open fabric not only turns a classic cardigan shape into something special, it works up quickly, has a soft drape, and lends itself to further embellishment.

Note: Pattern is multiple of 7 plus 2.
BACK
With size 4 needles, cast on 86 (100, 114, 128) sts. Work seed st border as follows:
Row 1: *K1, p1, rep from * across row.
Row 2: *P1, k1, rep from * across row. Rep Rows 1 and 2 for 1" (2.5 cm).
Change to size 6 needles and work patt as follows:
Row 1: Knit.
Row 2: Purl.
Row 3: K2, *yo by wrapping yarn over needle to back then to front again, p1, p3tog, p1, yo, k2, rep from * across row.
Row 4: Purl.
Rep Rows 1-4 until piece measures 121/2 (13, 13, 131/2)" [32 (33, 33, 34.5) cm] from beg, ending with Row 4.
Armhole Shape
Bind off 5 (5, 7, 8) sts at beg of next 2 rows. Making sure to keep patt as established, dec 1 st each side every other row 2 (2, 2, 2) times. Work even in patt on 72 (86, 96, 108) sts until armhole is 71/2 (8, 81/2, 9)" [19 (20.5, 21.5, 23) cm].
Shoulder Shape
Bind off 20 (24, 26, 28) sts at beg of next 2 rows. Bind off rem 32 (38, 44, 52) sts.
LEFT FRONT
With size 4 needles, cast on 49 (56, 63, 70) sts. Work seed st border as Back. Change to size 6 needles and work as follows:
Row 1: Work Row 1 of patt to last 5 sts, place marker on needle, cont seed st patt on last 5 sts.
Row 2: Work seed st on first 5 sts, patt Row 2 until end of row.
Cont in this manner, keeping 5 sts at Front edge in seed st and rem sts in patt, until 121/2 (13, 13, 131/2)" [32 (33, 33, 34.5) cm] from beg, ending at arm side.
Armhole Shape
Bind off 5 (5, 7, 8) sts at beg of armhole edge, cont patt to end of row. Making sure to keep patt as established, dec 1 st at armhole side every other row 2 (2, 2, 2) times—42 (49, 54, 60) sts. Keeping Front edge in seed st, cont until armhole is 51/2 (6, 61/2, 7)" [14 (15, 16.5, 18) cm, ending at Front edge.
Neck Shape
Bind off 19 (21, 24, 28) sts at Front edge, finish row. Making sure to keep patt as established, dec 1 st at neck edge every other row 3 (4, 4, 4) times. Work even on rem 20 (24, 26, 28) sts until armhole is same as Back. Bind off.

RIGHT FRONT
Before starting Right Front, mark Left Front for 7 buttonholes, evenly spaced, starting at center of bottom seed st border and planning to have the seventh buttonhole added when 1" (2.5 cm) neck border is completed.
With size 4 needles, cast on 49 (56, 63, 70) sts.
Work seed st border as for Back. Change to size 6 needles and work as follows:
Row 1: Work seed st on first 5 sts, place marker, work Row 1 of patt until end of row.
Row 2: Work patt Row 2 to last 5 sts, seed st on last 5 sts.
Cont in this manner, keeping 5 sts at Front edge in seed st, rem sts in patt and working a buttonhole at marked spots as follows (seed st on 2 sts, yo, k2tog, seed on last st) until 121/2 (13, 13, 131/2)" [32 (33, 33, 34.5) cm from beg, ending at arm side.
Armhole shape
Bind off 5 (5, 7, 8) sts at armhole edge, cont patt to end of row. Making sure to keep patt as established, dec 1 st at armhole side every other row 2 (2, 2, 2) times. Keeping Front edge in seed st, cont until armhole is 51/2 (6, 61/2, 7)" [14 (15, 16.5, 18) cm], ending at Front edge.
Neck Shape
Bind off 19 (21, 24, 28,) sts st at Front edge, finish row. Making sure to keep patt as established, dec 1 st at neck edge, every other row 3 (3, 4, 4) times. Work even on rem 20 (24, 26, 28) sts until armhole is same as Back. Bind off.
Sleeves (make 2)
With size 4 needles, cast on 44 (51, 58, 58) sts. Work seed st border as for Back for 1" (2.5 cm). Change to size 6 needles. Work in patt, inc 1 st each side every 1" (2.5 cm) 13 (14, 15, 16 times) keeping inc sts in St st until there are enough sts to form a new patt. Work even on 70 (79, 88, 90) sts until Sleeve is 151/2 (16, 161/2, 17)" [39.5 (40.5, 42, 43) cm].
Cap Shape
Bind off 5 (5, 7, 8) sts at beg of next 2 rows. Dec 1 st each side every other row 11 (12, 13, 13) times. Bind off 2 sts at beg of next 4 (4, 6, 6) rows. Bind off rem sts.
FINISHING
Sew shoulder seams.
Neckband
With RS facing and size 4 needles, pick up 5 sts along seed st border, 19 (21, 24, 28) along bound-off edge of Right Front, 6 (7, 8, 9) sts along Right side neck shaping, 32 (38, 44, 52) sts along Back bound-off sts, 6 (7, 8, 9) sts along Left side neck shaping, 19 (21, 24, 28) sts along Left Front bound-off neck sts, 5 sts along seed st border—92 (104, 118, 136) sts. Work in seed st for 1 row, make last buttonhole on next row, cont seed st until neck border is 1" (2.5 cm). Bind off in patt.
Set in Sleeves
Mark center of sleeve cap, match center with shoulder seam, pin cap in place, easing in as you sew. Sew underarm seams. Sew on buttons.
Blocking
Lay on a padded surface, sprinkle with water, pin into shape using rust proof pins, allow to dry.


Classic Rectangle body type: pieces on blocking board


Customize the Fit
INCREASING AND DECREASING THE LITTLE SHELLS PATTERN
With a pattern like Little Shells, which has a small multiple of stitches, there are a number of ways to increase stitches.

You can keep the added stitches in stockinette stitch (1 row knit, 1 row purl) and keep the pattern only in the center.
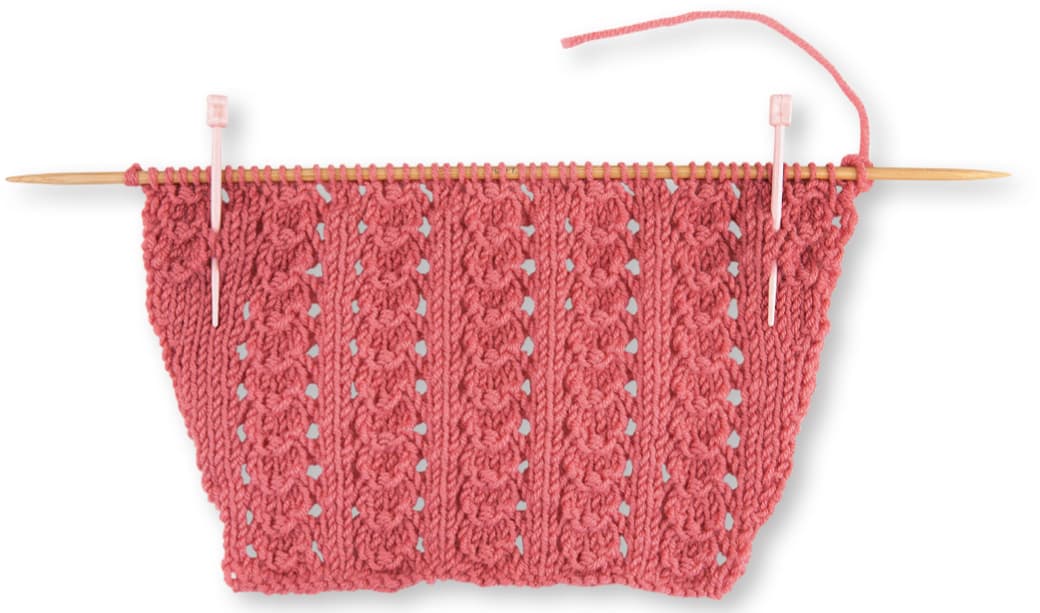
You can keep the added stitches in stockinette stitch until you have enough stiches to form a new pattern, or you can work partial patterns each time that you increase.
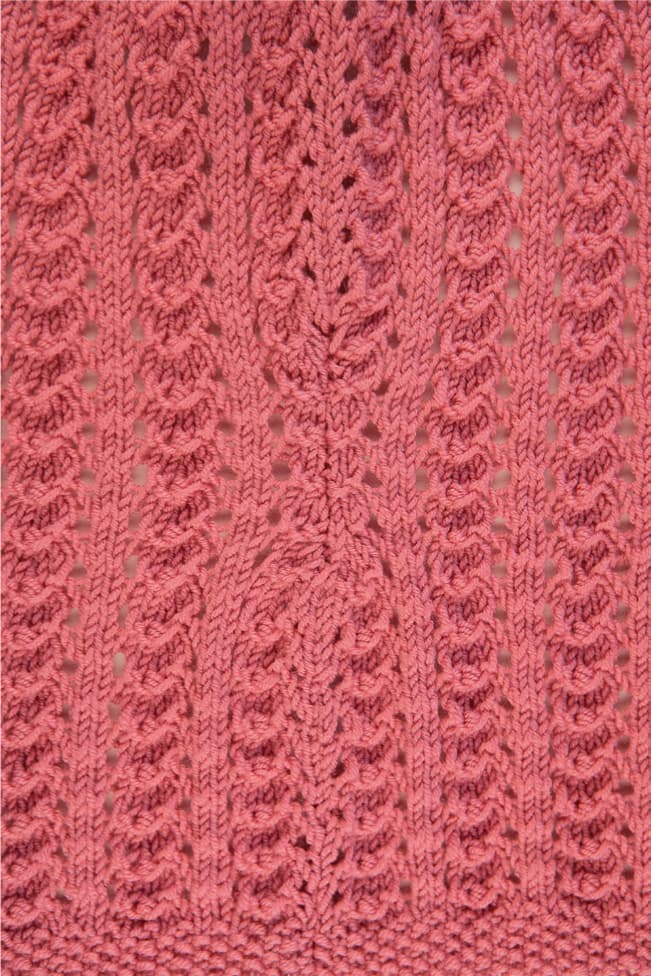
To decrease, eliminate a stitch from the pattern each time a decrease is made.


Triangle body type: pieces on blocking board


Inverted Triangle body type: pieces on blocking board

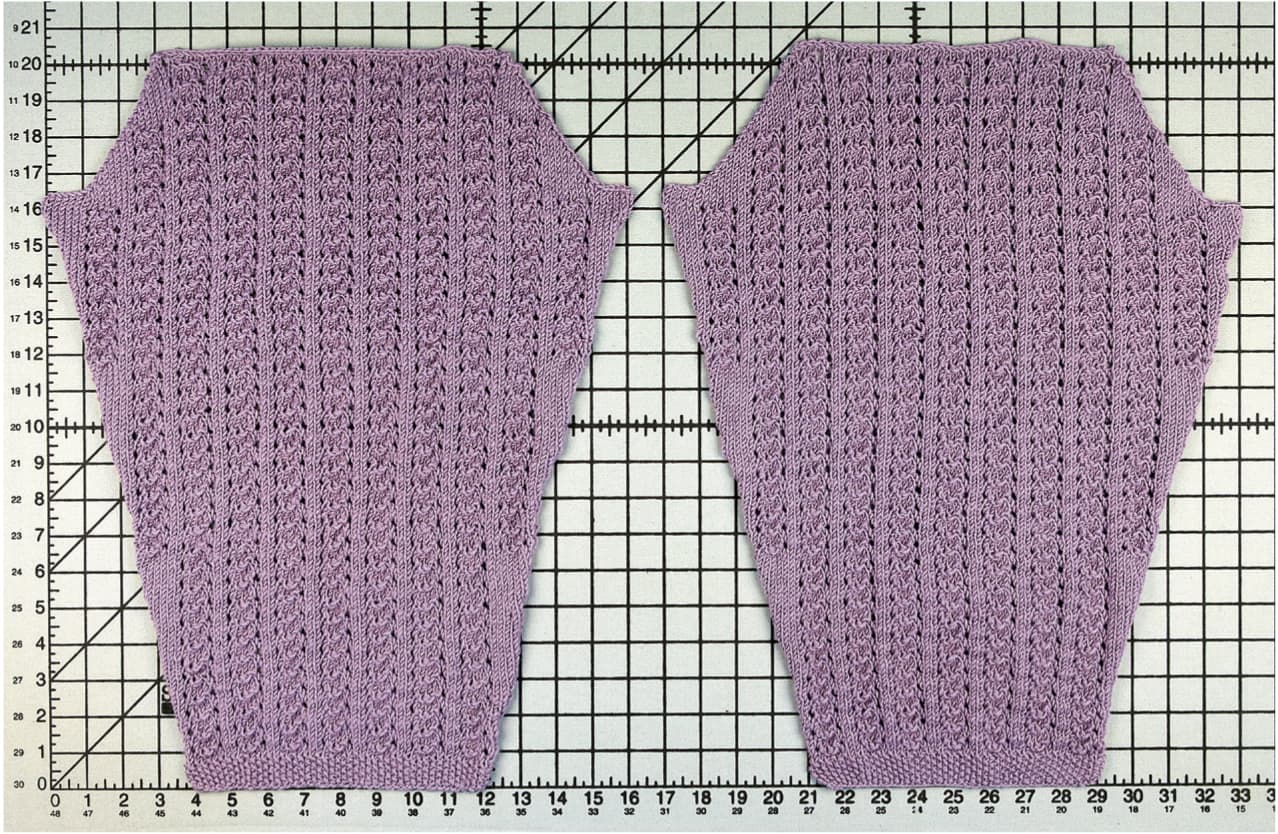


Hourglass body type: pieces on blocking board


Traveling Vines Pullover

There are many open, lacy knit pattern stitches that require a large multiple plus the use of many yarn-overs to complete the pattern. Traveling Vines is one of these patterns. The large multiple plus the use of many yarn-overs makes customizing the fit of these garment patterns quite difficult. I find that changing the needle size, rather than increasing or decreasing stitches, works quite well and is much easier to manage.

Notes: Pattern is multiple of 8 plus 2. If through back loop (tbl) is stated, knit or purl through the back loop of the stitch; however if through back loop is not stated, knit or purl in usual manner.
All slip stitches are slipped pwise.
BACK
With size 6 needles, cast on 90 (106, 122, 138) sts. Work patt as follows:
Row 1: K1, *yo, k1 tbl, yo skp, k5, rep from * to last st, k1.
Row 2: K1, *p4, p2tog tbl, p3, rep from * across to last st, k1.
Row 3: K1, *yo, k1 tbl, yo, k2, skp, k3, rep from * to last st, k1.
Row 4: K1, *p2, p2tog tbl, p5, rep from * to last st, k1.
Row 5: K1, *k1 tbl, yo, k4, skp, k1, yo, rep from * to last st, k1.
Row 6: K1, *p1, p2tog tbl, p6, rep from * to last st, k1.
Row 7: K1, *k5, k2tog, yo, k1 tbl, yo, rep from * to last st, k1.
Row 8: K1, *p3, p2tog, p4, rep from * to last st, k1.
Row 9: K1, *k3, k2tog, k2, yo, k1 tbl, yo, rep from * to last st, k1.
Row 10: K1, *p5, p2tog, p2, rep from * to last st, k1.
Row 11: K1, *yo, k1, k2tog, k4, yo, k1 tbl, rep from * to last st, k1.
Row 12: K1, *p6, p2tog, p1, rep from * to last st, k1.
Rep Rows 1–12 until piece measures 121/2 (13, 13, 131/2)" [32 (33, 33, 34.5) cm] from beg.
Armhole Shape
Bind off 8 (8, 8, 8) sts at beg of next 2 rows. Making sure to keep patt as established, cont even in patt on 74 (90, 106, 122) sts until armhole is 71/2 (8, 81/2, 9)" [19 (20.5, 21.5, 23) cm].
Shoulder Shape
Bind off 18 (24, 26, 28) sts at beg of next 2 rows. Place rem 38 (42, 54, 66) sts on holder to be worked later for neckband.
FRONT
Work same as Back until armhole measures 5 (51/2, 6, 61/2)" [12.5 (14, 15, 16.5) cm], ending with a WS row.
Shape Neck
Next Row (RS): Work across 18 (24, 26, 28) for left neck, turn. Work on these sts only, making sure to keep patt as established, until armhole measures same as Back. Bind off.
With RS facing, place center 38 (42, 54, 66) sts on holder for center neck, join yarn and work rem 18 (24, 26, 28) sts for right neck until piece measures same as Back. Bind off.
SLEEVES (MAKE TWO)
With size 4 needles, cast on 50 (58, 66, 74) sts. Work patt same as Back for 2″ (5 cm).
Change to size 6 needles and cont in patt, inc 1 st each side every 1" (2.5 cm) 12 (12, 12, 12) times), keeping inc sts in St st. Work even for 74 (82, 90, 98) sts until sleeve is 171/2 (18, 18 1/2, 19)" [44.4 (45.5, 47, 49.5) cm]. Bind off loosely. (It is very important that this bind off is done loosely; if necessary, use a larger needle to bind off.)
FINISHING
Sew left shoulder. With RS facing, using size 4 needles, join yarn at right Back neck, k38 (42, 54, 66) sts from Back neck holder, pick up and k7 (8, 9, 10) sts along left neck edge, k38 (42, 54, 66) sts from Front holder, pick up and k7 (8, 9, 10) sts along right neck edge—90 (100, 126, 152) sts. Work in St st (purl 1 row, knit 1 row) for 11 rows Using size 6 needles, bind off loosely in knit.
Sew right shoulder seam and edges of neckband. Allow neckband to roll naturally to Front.
Sew in sleeves: Fold Sleeve in half, mark the center, pin in place with center of Sleeve at shoulder seam and end of bound off edge of Sleeve at inner edge of bound-off underarm sts, then sew in place. Sew underarm seams. Weave in ends.

Blocking: Place garment on a padded surface, sprinkle with water, pat into shape, pinning points of patt using rust-proof pins. Repeat for the embellishments. Allow to dry.
Sew the leaves and flower to the left front shoulder.

Classic Rectangle body type: pieces on blocking board

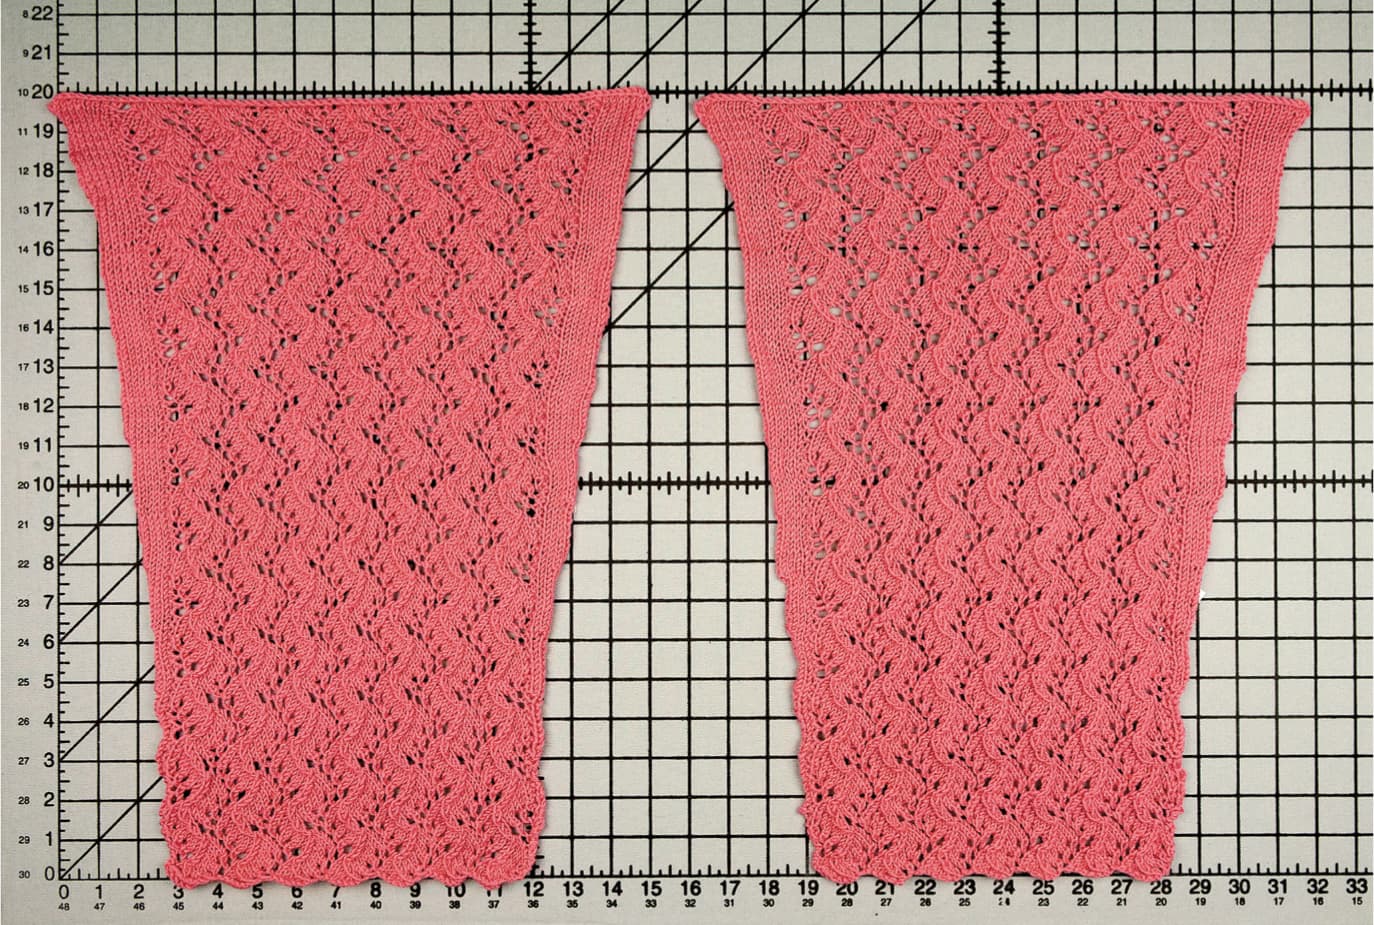


Customize the Fit

Traveling Vines is a difficult pattern to increase and decrease and still keep the pattern going, so it is advisable to keep any added stitches in Stockinette Stitch.
When decreasing and increasing, such as in the hour glass shape, use larger and smaller needles to decrease and keep the pattern stitches the same.


Triangle body type: pieces on blocking board


Customize the Style
A pullover style can be changed to a cardigan.
FRONTS
Divide the Front of Pullover in half (when turning a pullover into a cardigan by dividing the Front in half, be sure to take into consideration the multiple of the stitch pattern. If only a few stitches are needed, they may be kept in stockinette stitch or reverse stockinette stitch) add 5 stitches to each Front, to accommodate a garter stitch border. Continue working in pattern, shaping arm sides as back. When armhole is 5 (5.5, 6, 6.5)" [12.5 (14, 15, 16.5) cm] bind off neck edge leaving 16, (24, 26, 28) sts at arm side.
Continue working on these stitches until same as back to shoulder.

Collar: Using the #6 needle, cast on the same amount of stitches as back of garment plus 10 more stitches. Work garter stitch for 1" (2.5 cm), continue to work pattern as for back, keeping 5 stitches each side in garter stitch, for 4"(10 cm), bind off.
EMBELLISHMENTS
Using the #6 needle, make 4 small leaf motifs page 105.
Small Leaf ties (Make 2): work a 3 stitch I-Cord (page 107) for 8" (20.5 cm), increase 1 st each side (5 sts) continue to work a small leaf motif at end of cord.
Assembly: After Garment is sewn together, mark center of collar, and center back of neck. Pin right Side of collar to wrong side of garment, matching center and having ends of collar at very end of seed stitch border, sew collar in place. Turn top edges of Front and Collar to right side of sweater and tack down. Arrange the Small Leaf Ties and remaining Leaves as in photo.


Inverted triangle body type: pieces on blocking board


Detail of increases under arm
Customize the Style
To customize the style of this sweater, divide the Front of Pullover in half (when turning a pullover into a cardigan by dividing the Front in half, be sure to take into consideration the multiple of the stitch pattern) it may be necessary to add a few stitches. Continue working in pattern, shaping arm sides back. When armhole is 5 (5.5, 6, 6.5)" [12.5 (14, 15,16.5) cm] bind off neck edge leaving 16, (24, 26, 28) sts at arm side.
Continue working on these stitches until same as back to shoulder, bind off.
FRONT BORDERS
Left Front: When garment is all sewn together, using the #4 needle, with right side facing you, pick up stitches along Left Front edge, work garter stitch (knit every row) for 5 rows, bind off.
Right Front: Before starting Right Front, place markers on Left front border for 5 button placements, having bottom button about 4" (10 cm) from bottom, top button 1/2" (1.3 cm) from top.

Soft ruffle at neckline
Row 1 and 2: Knit.
Row 3 (Buttonhole Row): Knit, working first part of Two-Row Buttonhole (page 88) using markers as guide for placement.
Row 4: Knit, working second part of Two-Row Buttonhole.
Row 5: Knit.
Bind off.
RUFFLE NECK
Row 1: Using # 6 needle, with right side facing you, start at beginning of pattern on Right Front, and leaving Right Border free, pick up stitches from bound-off edge, side of neck, back, Left side neck edges, and Left bound-off stitches, leaving Left Border free.
Row 1: Purl.
Row 2: Knit.
Row 3: * K3, inc 1 st in next st, rep from * to end.
Row 4: *K2, inc 1 st in next st, rep from * to end.
Row 5: K1, inc 1 st in next st, rep from * to end.
Row 6: Knit.
Row 7: Bind off in knit.


Hourglass body type: pieces on blocking board


Customize the Style

Drop Stitch Edging forms a gentle, lacy ruffle
To customize the style of this sweater, divide the Front of Pullover in half (when turning a pullover into a cardigan by dividing the Front in half, be sure to take into consideration the multiple of the stitch pattern) it may be necessary to add a few stitches. We also added the Drop Stitch Edging (page 99), which requires some figuring. It is important to remember that one third of the stitches will be dropped, so add one third more stitches to your cast on number. Continue working, in pattern, shaping arm sides as back. When armhole is 3 (31/2, 4, 41/2)" [7.5 (9,10,11.5) cm], bind off neck edge leaving 16, (24, 26, 28) sts at arm side.
Continue working on these stitches until same as back to shoulder, bind off.
When garment is sewn together, using #4 needles, right side facing you, pick up stitches around neckline, work k1, p1 in ribbing for 1" (2.5 cm), bind off in ribbing.
Front Border: This border is done in single crochet, using a #5 crochet hook. See page 83 for Crochet Borders. If you do prefer, any knit border from one of the other cardigans may be substituted.
LEFT FRONT
Row 1 and 3: Starting at top Left Front, work 1 row sc down to end of Drop Stich Edging , ch 1, turn.
Row 2 and 4: One sc in each sc to top, ch 1, turn.
Row 5: 1 sc in each sc to end of row, ch 1, do not turn.
Row 6: Work 1 row reverse sc to end of row.
Right Front: Before starting Right Front, mark Left Front for 6 buttonholes, placing top buttonhole about 1/2" (1.3 cm) from top and bottom buttonhole about 31/2" (9 cm) from bottom.
Row 1: Starting at bottom of Right Front, work 1 row sc up to top of Ribbed border, ch 1, turn.

Row 2: One sc in each sc to end of row, ch 1, turn.
Row 3: Begin Buttonholes, work sc to first marker, ch 2, sk 2, *work sc to next marker, ch 2, sk 2, rep from * until 6 buttonholes are made, sc to end of row, ch 1 turn.
Row 4: Complete Buttonholes, work sc to first ch-2 space, work 2 sc in space, *sc to next ch-2 sp, 2 sc in ch-2 space, rep from * to last ch-2 sp, sc to end of row, ch 1 turn.
Row 5: 1 sc in each sc, ch 1, do not turn.
Row 6: Work 1 row reverse sc to end of row, fasten off.
Pineapple Twist Cardigan

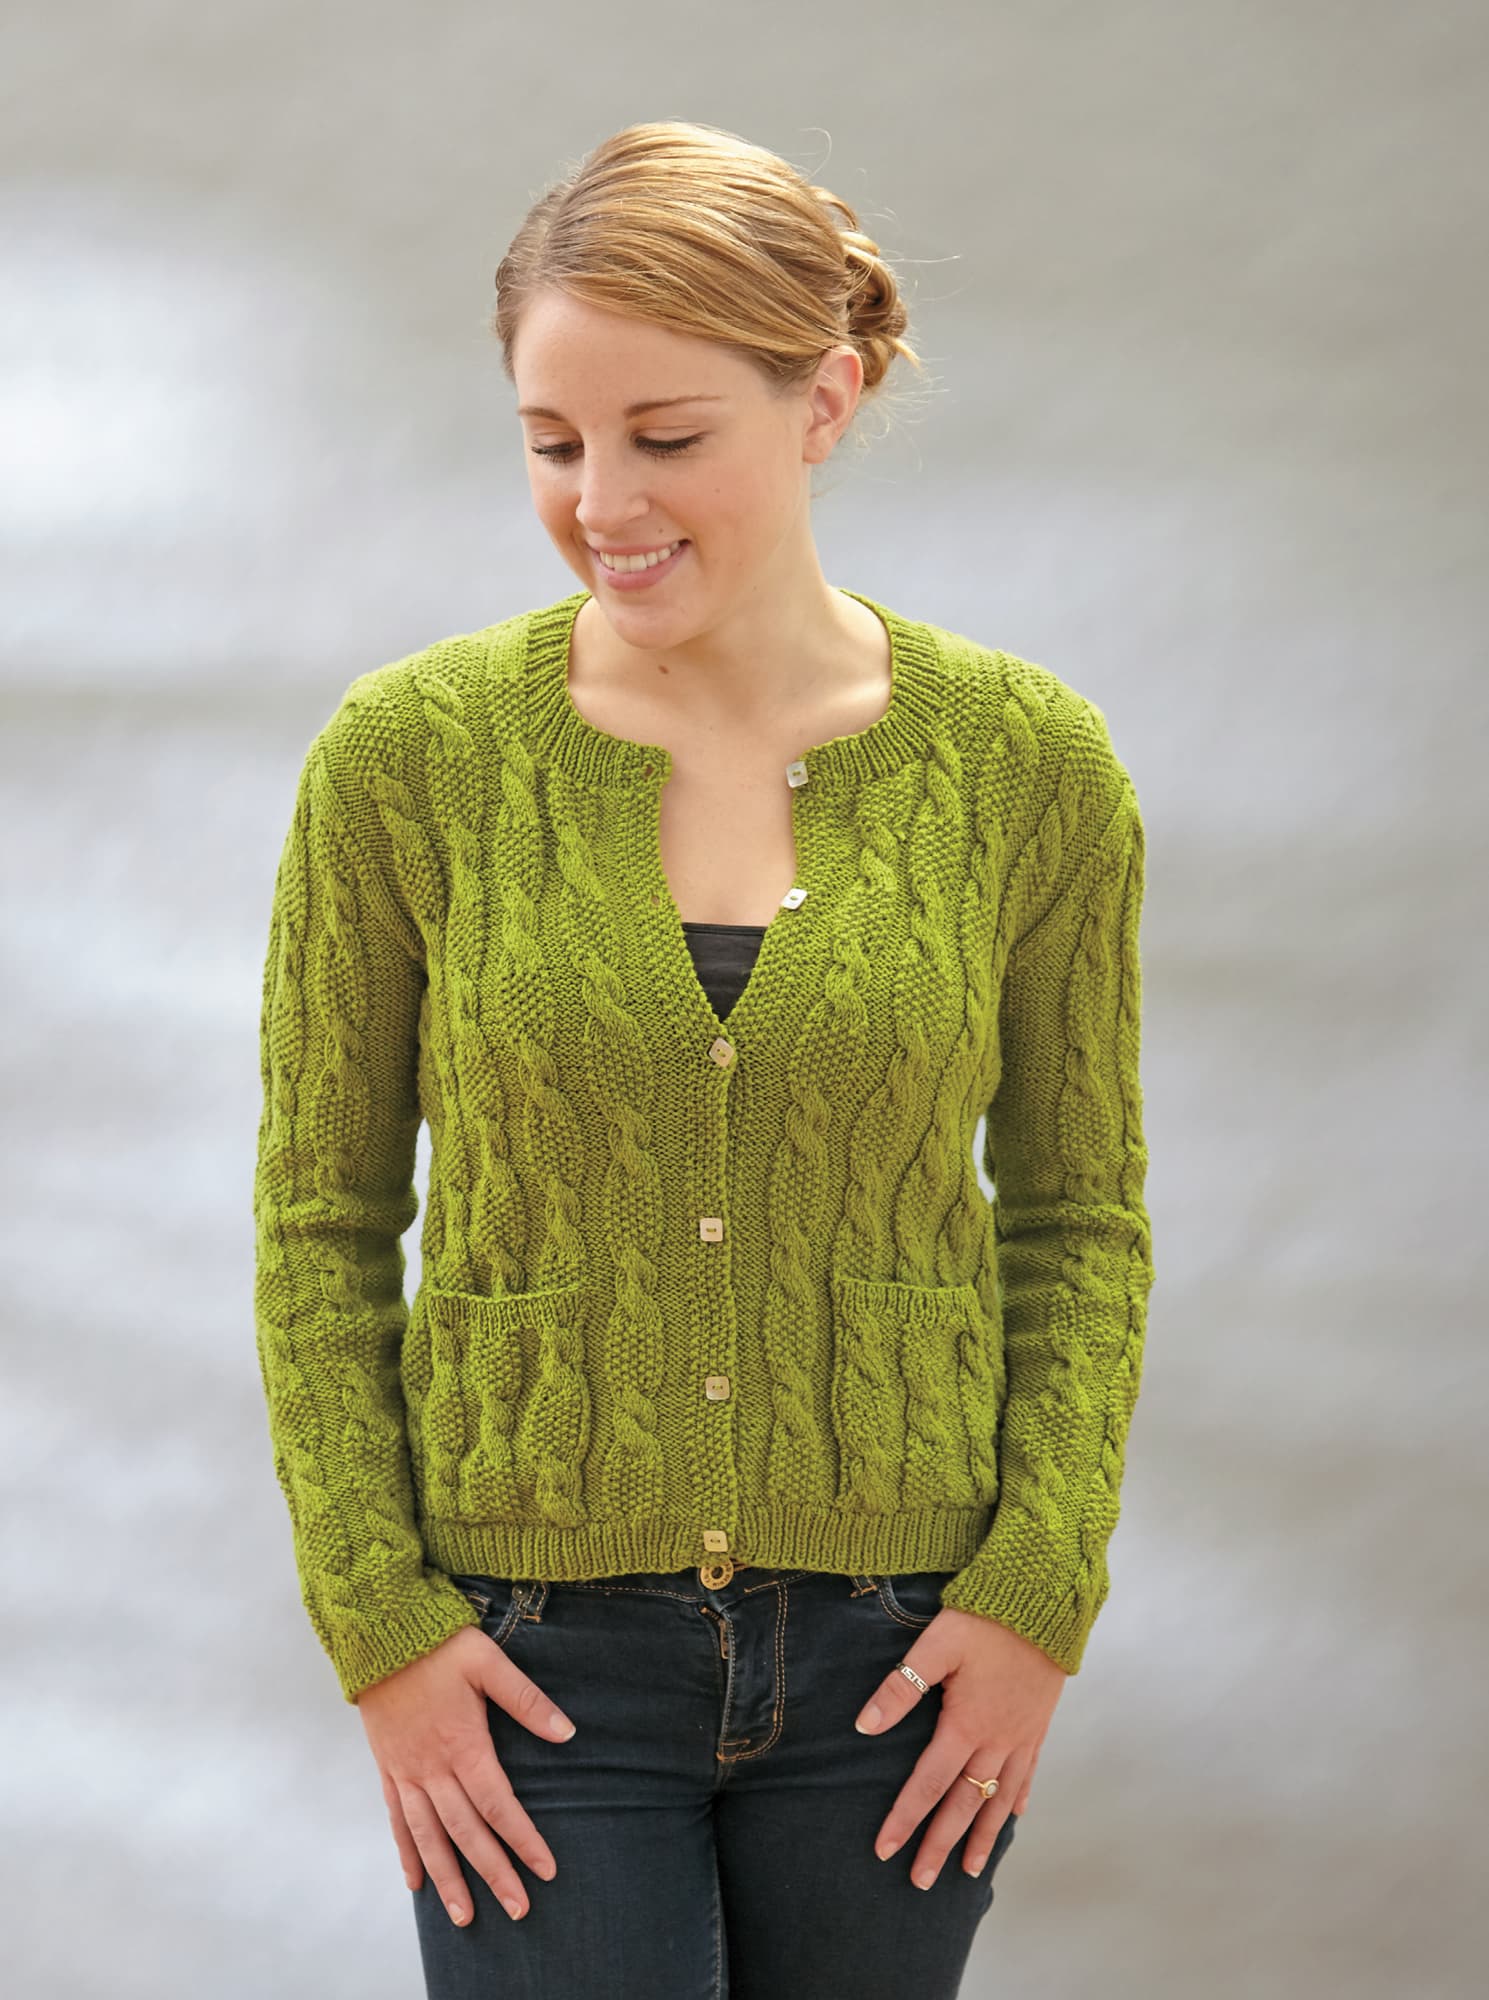
Pineapple Twist is a pattern that will test your knitting skills. While not the easiest of stitch patterns, it does produce a very impressive fabric, and when you finish this cardigan, your friends will be asking “did you really make that?” This pattern can be shaped in a few different ways, by increasing and decreasing stitches at the ends, or by increasing or decreasing the number of stitches between the twists.
BACK
With size 4 needles, cast on 115 (125, 135, 145) sts. Work k1, p1 ribbing for 11/2" (4 cm).
Purl one row, inc 10 sts evenly across row—125 (135, 145, 155) sts.
Change to size 6 needles and work as follows:
Note: Pattern is worked between markers on M, L, XL; stitches on sides are worked in stockinette stitch.
Row 1 (RS): K0 (5, 10, 15), place marker, *p4, seed st on next 7 sts**, p4, k7; rep from * across, ending last rep at **, p4, place marker, k0 (5, 10, 15).
Row 2: P0 (5, 10, 15), *k4, seed st on 7 sts, k4**, p7; rep from * across, ending last rep at **, p0 (5, 10, 15).
Row 3: Same as Row 1.
Row 4: Same as Row 2.
Row 5 (first twist row): K0 (5, 10, 15), *p4, seed st on next 7 sts**, p4, slip next 4 sts to cable needle, hold to front of work, k next 3 sts, k4 sts from cable needle; rep from * across ending last rep at **, p4, k0 (5, 10, 15).
Row 6: Same as Row 2.
Row 7: Same as Row 1.
Row 8: Same as Row 2.
Row 9: Same as Row 1.
Row 10: Same as Row 2.
Row 11 (second twist row): Same as Row 5.
Row 12: Same as Row 2.
Row 13 (change row): K0 (5, 10, 15), *p4, k7, p4**, seed st on next 7 sts; rep from * across ending last rep at **, k0 (5, 10, 15).
Row 14: P0 (5, 10, 15), *k4, p7, k4**, seed on next 7 sts; rep from * across, ending last rep at **, p0 (5, 10, 15).
Row 15: K0 (5, 10, 15), *p4, k7, p4**, seed st on next 7 sts; rep from * across, ending last rep at **, k0 (5, 10, 15).
Row 16: Same as Row 14.
Row 17 (twist row): K0 (5, 10, 15), *p4, slip next 4 sts to cable needle, hold to front of work, k3, k4 from cable needle, p4**, seed on next 7 sts; rep from * across, ending last rep at **, k0, (5, 10, 15).
Row 18: Same as Row 14.
Row 19: Same as Row 15.
Row 20: Same as Row 14.
Row 21: Same as Row 15.
Row 22: Same as Row 14.
Row 23 (twist row): Same as Row 17.
Row 24: P0 (5, 10, 15), *k4, p7, k4**, seed st on next 7 sts, k4; rep from * across, ending last rep at **, p0 (5, 10, 15).
Rep Rows 1–24 for patt until 13 (13 1/2, 14, 14 1/2)" [33 (34.5, 35.5, 37) cm] from beg.
Armhole Shape
Making sure to keep patt as est, bind off 5 (6, 7, 8) sts at beg of next 2 rows—115 (123, 131,139) sts. Cont in patt, dec 1 st each side every other row 2 (2, 2, 2) times—111 (119, 127, 135) sts. Work even until armhole is 7 1/2 (8, 8 1/2, 9)" [19 (20.5, 21.5, 23) cm].
Shoulder Shape
Bind off 32 (34, 36, 38) sts at beg of next 2 rows. Bind off rem 47 (51, 55, 59) sts.
LEFT FRONT
With size 4 needles, cast on 58 (63, 68, 73) sts.
Row 1: K1, p1 in ribbing until last 5 sts, place marker, seed st on last 5 sts (Front border).
Row 2: Seed st on first 5 sts, ribbing to end.
Rep Rows 1 and 2 for 11/2" (4 cm), ending at Front edge.
Next row: Seed st on first 5 sts, purl rem sts, inc 6 sts evenly spaced—64 (69, 74, 79) sts.
Change to size 6 needles, work as follows:
Row 1: K0 (5, 10, 15) place marker, work patt Row 1 until last 5 sts, seed st on last 5 sts.
Row 2: Seed st on first 5 sts, patt Row 2 until last 0 (5, 10, 15) sts, purl rem sts.
Cont in this manner, keeping 5 sts at Front edge in seed st and sts between markers in patt same as Back until armhole is same as Back, ending at arm edge.
Armhole Shape
Bind off 5 (6, 7, 8) sts at beg of next row, then cont patt to end of row.
Making sure to keep patt as established, dec 1 st at arm side every other row 2 (2, 2, 2) times. Work even on rem 57 (61, 65, 69) sts until armhole is 5 1/2 (6, 6 1/2, 7)" [14 (15, 16.5, 18) cm], ending at Front edge.
Neck Shape
Bind off 18 (20, 22, 24) sts at beg of next row, then cont patt to end of row. Making sure to keep patt as established, cont to dec 1 st at neck edge, every other row 7 times. Work even on rem 32 (34, 36, 38) sts until armhole measures same as Back. Bind off rem sts.
RIGHT FRONT
Before beginning Right Front, mark Left Front for six buttonholes evenly spaced, starting at center of bottom border and allowing for top buttonhole to be worked in center of Neck border. As you work the seed st border, work a two-row buttonhole as shown on page 88 by each marked place on Left Front.
With size 4 needles, cast on 58 (63, 68, 73) sts,
Row 1: Seed st on first 5 sts, (Front button band), place marker, K1, p1 ribbing to end of row.
Row 2: K1, p1 ribbing to last 5 sts, seed st on 5 sts.
Rep Rows 1 and 2 for 1 1/2" (4 cm), ending at arm side.
Next Row: Purl across first 53 (58, 63, 68) sts inc 6 sts evenly spaced, then work seed st, on last 5 sts—64 (69, 74, 79) sts.
Change to size 6 needles work as follows:
Row 1: Seed st on first 5 sts, work patt Row 1 until last 0 (5, 10, 15) sts, k rem sts.
Row 2: P0 (5, 10, 15), patt to last 5 sts, seed on last 5 sts.
Cont in this manner, keeping 5 sts at Front edge in seed st and sts between markers in patt same as Back until armhole is same as Back, ending at arm edge.
Armhole Shape
Bind off 5 (6, 7, 8) sts at beg of next row, then cont patt to end of row.
Making sure to keep patt as est, dec 1 st at arm side every other row 2 (2, 2, 2) times. Work even on rem 57 (61, 65, 69) sts until armhole is 5 1/2 (6, 6 1/2, 7)" [14 (15, 16.5, 18) cm], ending at Front edge.
Neck Shape
Bind off 18 (20, 22, 24) sts at beg of next row, then cont patt to end of row. Making sure to keep patt as est, cont to dec 1 st at neck edge, every other row 7 times. Work even on rem 32 (34, 36, 38) sts until armhole measures same as Back. Bind off rem sts.
SLEEVES (MAKE 2)
Cast on 58 (60, 62, 64) sts. Work K1, p1 ribbing for 1 1/2" (4 cm). Purl one row, inc to 59 (63, 67, 71) sts. Work as follows:
Row 1 (RS):, K0 (2, 4, 6), place marker on needle, *p4, seed st on next 7 sts**, p4, k7; rep from * ending last rep at **, p4, place marker, k0 (2, 4, 6).
Row 2: P0 (2, 4, 6), *k4, seed st on 7 sts, k4**, p7; rep from * end last rep at **, p0 (2, 4, 6).
Cont in this manner, working patt rows as on Back, and at the same time, inc 1 st each side at 1" (2.5 cm) above border and every 1 1/2" (4 cm) thereafter, keeping added sts in stockinette st, 10 times—79 (83, 87, 91) sts.
Work even in patt as established until Sleeve measures 16 (16, 16 1/2, 16 1/2)" [40.5 (40.5, 42, 42) cm] from beg.
Cap Shape
Bind off 5 (6, 7, 8) sts at beg of next 2 rows. Cont in patt, dec 1 st each side every other row 12 (13, 14, 15) times—45 (45, 45, 45 sts). Bind off 2 sts at beg of next 4 rows. Bind off rem 37 (37, 37, 37) sts.

POCKETS (MAKE 2)
With size 6 needles, cast on 33 sts.
Row 1 (RS): P2, place marker, work patt Row 1 until last 2 sts, p2.
Row 2: K2, patt Row 2 until last 2 sts, k2.
Cont in this manner, keeping 2 sts at each edge in reverse stockinette st and 29 sts between markers in patt until piece measures 4 1/4" (11 cm).
Change to size 4 needles. Work in K1, p1 ribbing for 3/4" (2 cm). Bind off.
FINISHING
Sew shoulder seams.
Neckband
With RS facing you and a size 4 needle, starting at top Right Front, pick up 18 (20, 22, 24) sts along bound-off edge, 16 (16, 16, 16) sts along side of neck, 47 (51, 55, 59) along Back bind off, 16 (16, 16, 16) sts along side of neck, 18 (20, 22, 24) sts along top of Left Front—115 (123, 131, 139) sts. Work in ribbing for 1" (2.5 cm), Bind off in patt.
Set in Sleeves: Mark center of Sleeve cap and match center of Sleeve cap to shoulder seam. Match armhole bound-off sts on Sleeve and body, pin, easing into shape, then sew in Sleeve cap. Sew underarm Sleeve and body seams.
Sew pockets in place. Sew on buttons opposite button holes.
Blocking: Lay garment on a padded surface, sprinkle with water and lightly pat into shape, pin if necessary. Pressing this pattern with a steam iron is not recommended.

Classic Rectangle body type: pieces on blocking board


Customize the Fit
When increasing this pattern, it is best to keep the added stitches in Stockinette Stitch (1 row knit, 1 row purl) but use the purl side as the right side of work, as it fits in better with the pattern.
When decreasing this pattern, keep pattern as established, eliminating one stitch each time a decrease is made.


Triangle body type: pieces on blocking board


Customize the Style

Pullover with turtle neck
To customize the style of this sweater, we turned it into a pullover with a cozy turtleneck and added a seed stitch border to bottom instead of ribbing. Begin by following the Back instructions, until shoulder measurement is reached. Shape Shoulder and Neck as follows: at the beginning of the next 2 rows bind off 22 (24, 26, 28) sts, bind off remaining 67 (71, 75, 79) sts.
Work Front same as back until armhole is 3" (7.5 cm) shorter than Back. Shape neck as follows: Making sure to keep pattern as established, work across 37 (39, 41, 43) sts, join a new ball of yarn, bind off center 37 (41, 45, 49), work remaining 37 (39, 41, 43) sts. Working each side with separate balls of yarn, and making sure to keep pattern as established, decrease one stitch at neck edges, every row 15 times. Work even on remaining 22, (24, 26, 28) sts until same as Back to shoulder, bind off.
You will need circular needles #4 and #6 to add the turtleneck. Using the #4 circular needle, starting at right shoulder, right side facing you, pick up 67 (71, 75, 79) stitches along back of neck, 15 (15, 15, 15) along side of Left Front, 37 (41, 45, 49) center Front, 15 (15, 15, 15) along right side of neck 138 (142, 150, 158) sts. Working in the round, k1, p1 in ribbing for 3" (7.5 cm), change to the #6 needle, continue ribbing for 3" (7.5 cm) more, bind off loosely in ribbing.


Inverted Triangle body type: pieces on blocking board


Customize the Style

Left open, this style balances narrow hips and wide shoulders.
To customize the style of this sweater, omit 5 seed stitches for the Front Border. Make 2 Large Garter Stitch Scallop Borders (page 103) as follows:
For Left Front: With #6 needles make a border to fit front edge from bottom to top when slightly stretched. Mark scallops for 5 evenly spaced buttons.
For Right Front: Work as for Left Front, using the markers as a guide, make a two-row buttonhole (page 88) in rows 8 and 9 of marked scallops. Sew Borders to Fronts of sweater.
Collar: Using #4 needles, cast on 126 (130, 134, 138) sts, k1, p1 in ribbing for 1" (2.5 cm), change to the #6 needles, continue ribbing until collar is 4 (4, 41/2, 41/2)" [10, (10, 11.5, 11.5) cm] bind off loosely in ribbing.
Mark center of collar and center of back neck, pin collar in place, matching centers and having ends of collar inside Front borders, sew in place.
Sew on buttons.


Hourglass body type: pieces on blocking board

Climbing Leaf Hoodie

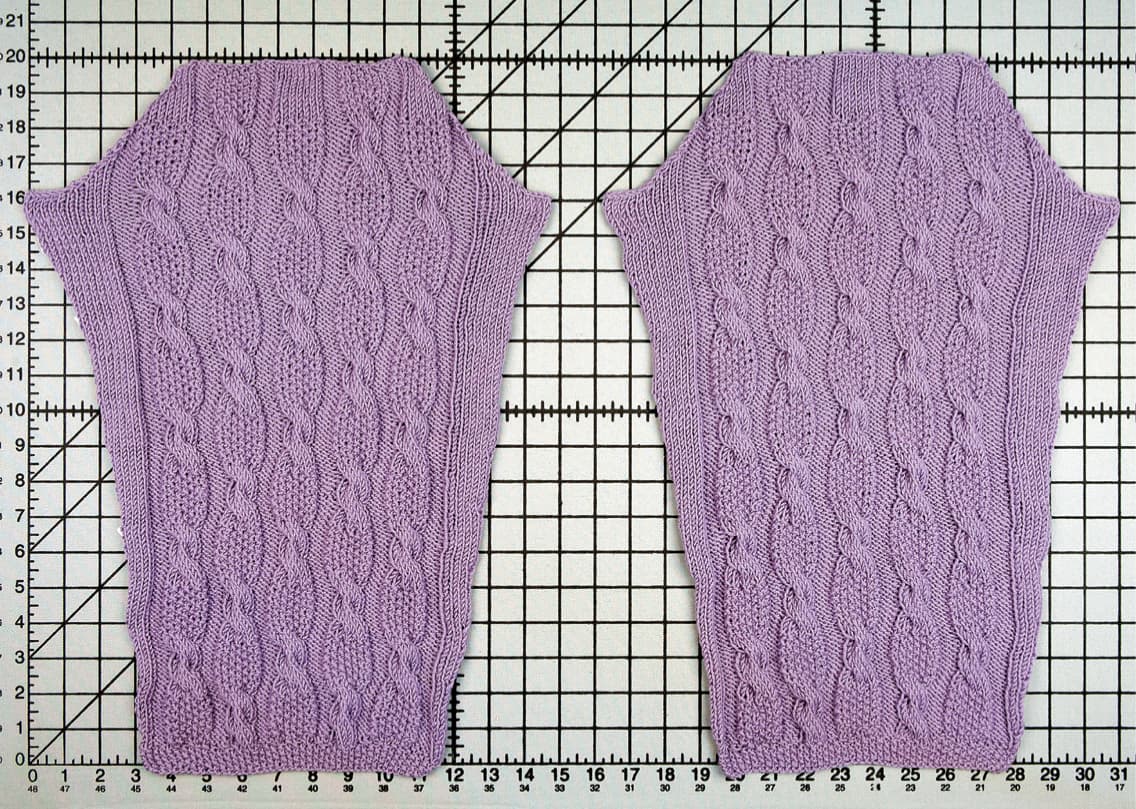
The Climbing Leaf pattern is for the experienced knitter. The pattern does have quite a few rows and a large multiple, but once the pattern is established and you see it emerge, it becomes easier. The best way to customize this pattern is by increasing or decreasing the sides and keeping the extra stitches in Stockinette Stitch or Reverse Stockinette Stitch.

BACK
Using size 4 needles, cast on 96 (106, 116, 126) sts. Work K1, p1 ribbing for 5 1/2" (14 cm) for all sizes, inc 1 st at end of last row—97 (107, 117, 127) sts.
Change to size 6 needles and work patt as follows:
Row 1: P0 (5, 10, 15), *patt Row 1 on next 29 sts, ** p5, rep from * twice, ending last rep at **, p0 (5, 10, 15).
Row 2: K0 (5, 10, 15), *patt Row 2 on next 29 sts, k5**, rep from * twice, ending last rep at **, k0 (5, 10, 15).
Cont to rep Rows 1 and 2, working patt rows on the 29 sts as established, until 131/2 (14, 141/2, 15)" [34.5 (35.5, 37, 38) cm] from beg.
Armhole Shape
Bind off 4 (5, 6, 7) sts at beg of next 2 rows. Dec 1 st each side every other row 2 (2, 2, 2) times—85 (93,101, 109) sts. Work even until armhole is 7 1/2 (8, 8 1/2, 9)" [19 (20.5, 21.5, 23) cm].
Shoulder Shape
Bind off 20 (22, 24, 26) sts at beg of next 2 rows. Bind off rem 45 (49, 53, 57) sts.
Front Note: When a pattern has such a large repeat, it is difficult to just divide it in half for each front, so some adjustments have to be made in side stitches. If at all possible, it is best to place main section of a pattern so that it is not cut off by armhole or neck decreases.
LEFT FRONT
Using size 4 needles, cast on 49 (54, 59, 64) sts. Work K1, p1 ribbing as Back, inc 1 st at end of last row—50 (55, 60, 65) sts. Change to size 6 needles and work patt as follows:
Row 1 (RS): K0 (5, 10, 15), k3, p5, patt Row 1 on next 29, p5, k8.
Row 2: P5, k3, k5, patt Row 2 on next 29, k5, k3, p0 (5, 10, 15).
Cont to rep Rows 1 and 2 above for Left Front, working patt rows on the 29 sts as established, until same as Back to armhole, ending at arm side.
Armhole Shape
Bind off 4 (5, 6, 7) sts at beg of next row, cont in patt to end of row. Making sure to keep patt as established, dec 1 st at arm side every other row 2 (2, 2, 2) times—44 (48 (52, 56) sts. Work even until armhole is 5 1/2 (6, 6 1/2, 7)" [14 (15, 16.5, 18) cm], ending at neck edge.
Neck Shape
Bind off 18 (20, 22, 24) sts at beg of next row, then cont in patt to end of row. Making sure to keep patt as established, cont to dec 1 st at neck edge every other row 6 (6, 6, 6) times. Work even until same as Back to shoulder. Bind off rem 20 (22, 24, 26) sts.
RIGHT FRONT

Using size 4 needles, cast on 49 (54, 59, 64) sts. Work K1, p1 ribbing as Back, inc 1 st at end of last row—50 (55, 60, 65) sts. Change to size 6 needles and work patt as follows:
Row 1 (RS): K8, p5, patt Row 1 on next 29, p5, k3, k0 (5, 10, 15).
Row 2: P0 (5, 10, 15), k3, k5, patt Row 2 on next 29, k5, k3, p5.
Cont to rep Rows 1 and 2 above for Right Front, working patt rows on the 29 sts as established, completing Right Front as for Left front.
SLEEVES (MAKE 2)
Using size 4 needles, cast on 48 (54, 58, 64) sts. Work k1, p1 ribbing as Back, inc 1 st at end of last row—49 (55, 59, 65) sts. Change to size 6 needles and work patt as follows:
Row 1 (RS): K2 (5, 7, 10), k3, p5, patt Row 1 on next 29 sts, p5, k3, k2 (5, 7, 10).
Row 2: P2 (5, 7, 10), k3, k5, patt Row 2 on next 29 sts, k5, k3, p2 (5, 7, 10).
Cont to rep Rows 1 and 2 above, working patt rows on the 29 sts as established, inc 1 st each side every 1"(2.5 cm) 7 (8, 9, 10) times—63 (71, 77, 85) sts. Work even until sleeve is 16 (16, 17, 17)" [40.5 (40.5, 43, 43) cm] from beg.
Cap Shape
Bind off 4 (5, 6, 7) sts at beg of next 2 rows. Making sure to keep patt as established, dec 1 st each side every other row 11 (12, 13, 14) times—33 (37, 39, 43) sts. Bind off 2 sts at beg of next 4 rows. Bind off rem 25 (29, 31, 35) sts.
HOOD
With size 4 needles, cast on 106 sts for all sizes. Work k1, p1 ribbing for 1" (2.5 cm), inc 1 st at end of last row—107 sts. Change to size 6 needles and work patt same as for Back Medium size until 13" (33 cm) from beg. Bind off 34 sts at beg of next 2 rows. Keeping center sts in patt as established, work for 5" (12.5 cm) more. Bind off.
FINISHING
Sew shoulder seams. Mark center of Sleeve cap and pin to shoulder seam. Pin armhole bound-off edges of Sleeve cap to armhole edges of Back and Front. Ease Sleeve cap in place, pin, and sew. Sew underarm Sleeve and body seams.
Sew top of Hood seams. Mark center back of Hood and center back of neck. Pin Hood in place starting at front edges, then sew Hood in place.
Fronts and Hood Border (made all in one piece)
With RS facing you, starting at bottom Right Front, pick up 110 (110, 126, 126) sts from bottom to neckline, pick up 70 sts along right side of Hood, pick up 34 sts along center top of Hood, pick up 70 sts along left side of Hood, pick up 110 (110, 126, 126) sts along Left Front to bottom—394 (394, 426, 426) sts. Knit 4 rows. Bind off loosely.
Prepare Zipper: Work a Blanket Stitch as show on Page 85 on each side of zipper. Pin zipper to Fronts, using the Woven Seam as shown on page 79, sew zipper in place.
Blocking: Lay garment flat on a padded surface, sprinkle with water, pat into shape. Steaming is not recommended for this pattern.

Classic Rectangle body type: pieces on blocking board


Back view of hoodie

Hood



Customize the Fit


Triangle body type: pieces on blocking board


Inverted Triangle body type: pieces on blocking board


Hourglass body type: pieces on a blocking board


Customize the Style

Pico Hem around neckline
To customize the style of this sweater, we made it into a pullover and eliminated all borders. Begin by using the #6 needles and go right into the pattern. Make the Front the same as Back until the armhole is 31/2 (4, 41/2, 5)" [7.5 (10,11.5,12.5) cm]. Shape Neck as follows:
Work across 20 (22, 24, 26) sts, join a new ball of yarn, bind off center 45 (49, 53, 57) sts, work remaining 20 (22, 24, 26) sts. Being sure to keep patt as established, working each side on separate ball of yarn, work till same as Back to shoulder, bind off.
Neckband: Sew Shoulder Seams. Starting at Right shoulder, right side facing you, and using a circular # 4 needle, pick up 45 (49, 53, 57) sts across back of neck, pick up 16 sts left side, pick up 45, (49, 53, 57) sts across center front, pick up 16 sts on right side of neck—122 (130, 138, 146) sts. Work Picot Hem (page 99).

Drop Stitch Edging forms a gentle, lacy ruffle
Sleeve and Bottom Borders: With a #6 needle, make 3 pieces of Leaf Edge Trim (page 102), to fit around bottom and each sleeve. Sew short ends to each other, pin in place, and sew to sweater.


