THE SQUAT AND THE DEADLIFT—the subjects of the previous two chapters—offer you simple, efficient ways to increase the strength, size, and endurance of your lower-body muscles. Both movements start and end with your feet parallel to each other and about shoulder-width apart. But most of the things you do in life—from walking or jogging to tennis, basketball, or rock-climbing—involve putting one foot in front of the other. You would think the symmetry of the movement would even out over time; you’d take the same number of steps with each leg, with more or less the same level of difficulty, and the two legs would end up with more or less equal strength and range of motion.
Ha!
My guess is that everyone reading this has a series of imbalances. One leg is stronger than the other. One hip has more mobility. One knee bends and straightens more easily. One ankle is more likely to roll in or out.
These aren’t character flaws. They’re the cost of doing business as an ambulatory human. But they are a problem, and the problem doesn’t fix itself. It goes one direction until the asymmetry leads to chronic pain or an injury that requires surgical intervention. Many of you are already there.
The good news is that these imbalances can be modified. Alwyn’s workouts, by themselves, will go a long way toward rebalancing your strength and mobility, and improving your overall coordination and athleticism. But before we get to the exercises, let’s try a test called the in-line lunge (yet another from Gray Cook) to see where you are now.
You’ll need a light, straight object, like a broomstick or dowel rod, and some masking tape. Measure the distance from the bump just below your kneecap to the floor. (It’s about 17 inches for me.) Tear off that much tape and stick it to the floor in a straight line.
Stand over the tape and place your left heel at one end and your right toes at the other. It’s crucial that both feet are on the same line. Hold the broomstick vertically against your back with both hands so it touches the back of your head, the space between your shoulder blades, and the midline of your glutes. Your right hand will hold the top of the stick behind your neck and your left hand will hold it in the small of your back.
Lower your right knee so it touches the tape on the same line as your left heel and right toes. Rise to the starting position. The goal is to descend and rise without wobbling or leaning to either side. The broomstick should remain in contact with all three spots and perpendicular to the floor. Do as many as you can, then switch legs, reverse your hands on the broomstick, and repeat.
Consider that your trial run. Rest for a minute, then try it again, this time shooting for 10 to 15 slow, controlled reps with each leg. If possible, have a partner watch for form. In the absence of an observer, use the focus test: Keep your eyes focused on a single spot directly in front of you; if your eyes slip off target, you can bet that you lost your alignment at some point.
How did you do? If you got more than 10 perfect reps with each leg, and your body feels fine (not stiff or cramped), you’re qualified to do any exercise in this chapter. Your challenge is to use them in a way that allows for higher reps in Phase One, a heavier load in Phase Two, and combination of higher reps and faster tempo in Phase Three.
Those who didn’t fare as well will need to start at Level 1 and work your way up.
 Split squat
The exercise itself is simple enough, as you can see. The trick is figuring out what to do with your arms. If you can do at least one set of 15 with your body weight, you’ll need to do the exercise with dumbbells, which you hold at arm’s length at your sides. But if you need to work up to that point, you can either start with your arms at your sides, your hands on your hips, or your hands behind your head in the prisoner grip, as shown here.
Supported split squat
Can’t yet do the basic split squat? Stand next to something sturdy—a pole or the edge of a solid piece of furniture. When your left leg is forward, as described earlier, rest your left hand lightly on the support. Lower yourself until the top of your left thigh is parallel to the floor, and then return to the starting position, using the support as little as possible. Do as many as you can, up to 15. For your next set, switch sides and support yourself with your right hand.
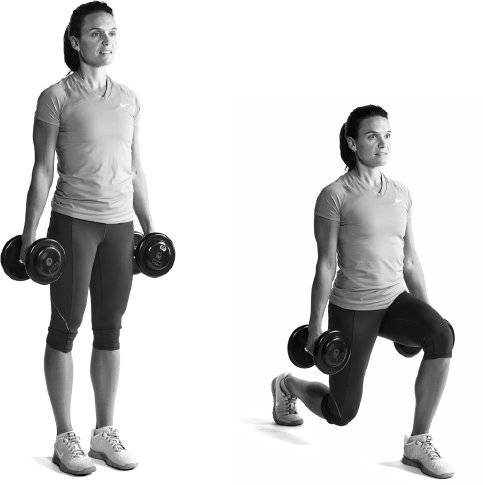
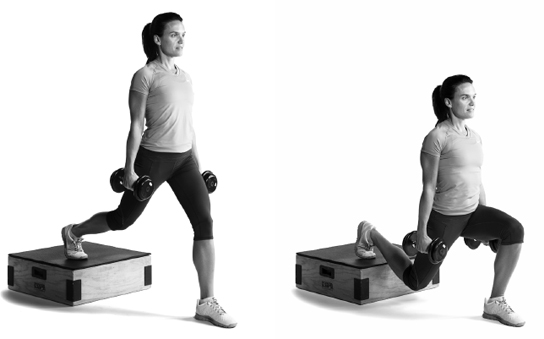
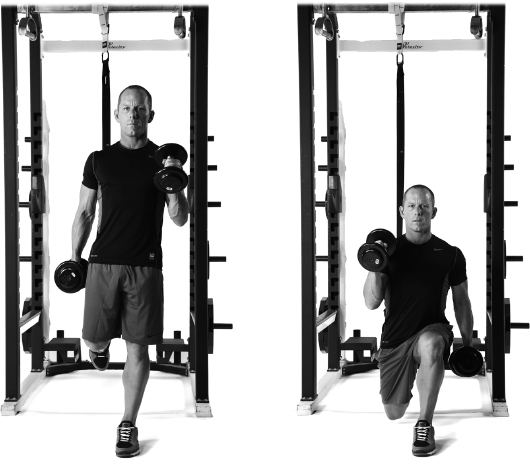
Dumbbell reverse lunge
This is a terrific Phase Two exercise because it allows you to use fairly heavy weights without knee strain.
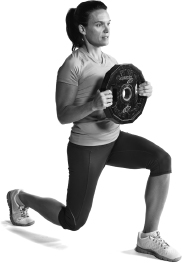
Goblet reverse lunge
Holding dumbbells at your sides for high-repetition sets can do a number on your gripping muscles. You can get around that by holding a dumbbell or weight plate against your chest with both hands.
COOL VARIATION #2
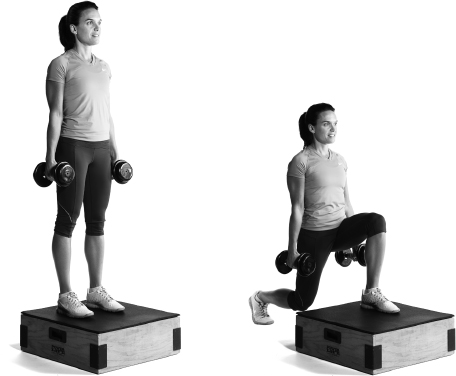
Reverse lunge from step
Start with both feet on a box or step that’s about 6 inches high. Step back with your right foot and lower yourself into a deeper lunge. Your left thigh will end up below parallel to the floor. Finish the set as described above. The extra range of motion challenges your mobility and balance, and potentially leads to faster muscle development. You’ll certainly use your lower-body muscles in a different way, with a bigger role for your supporting muscles. For some reason, I always seem to get better calf development when I include this variation in my workouts.
COOL VARIATION ON THE VARIATION
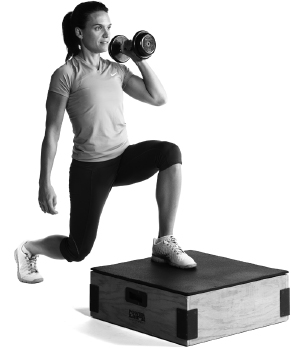
Offset-loaded reverse lunge from step
This time, hold a single dumbbell in your left hand at shoulder height as you step back with your right foot. Switch the weight to your right shoulder when you step back with your left. The offset weight develops core stability along with the challenges to your balance and mobility.
LEVEL 3
Split squat, rear foot elevated
If you’re doing this for high reps in Phase One, you might want to start with just your body weight. You can put your hands at your sides, on your hips, or in the prisoner grip behind your head. If you use weights, you can either hold dumbbells at your sides or hold a dumbbell or weight plate with both hands against your chest.
Most lifters doing this for the first time will feel an uncomfortable stretch in the quadriceps of the trailing leg. You want to go easy at first with the range of motion, gradually expanding it to give your lower body a better workout.
UNIVERSALLY DESPISED VARIATION
Bulgarian split squat
This is the same exercise, only with your rear foot elevated on a bench or step that’s at least 12 inches high, and with the instep of that foot resting on the bench, rather then the toes. You can use any of the loading variations described earlier: body weight, dumbbells, or goblet. Lifting your rear foot higher increases the range of motion, which means you’re getting a much tougher workout. Just make sure that the discomfort you feel (and you will feel discomfort, guaranteed) is in the muscles rather than the knee joints. You’ll hate the exercise but love the results. This may be the single best exercise in the program for developing the quadriceps.

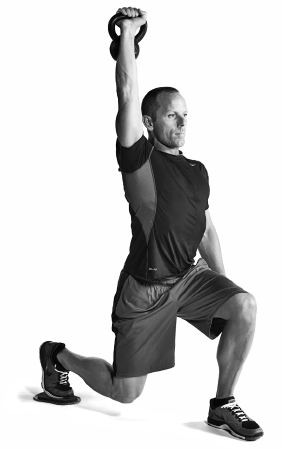
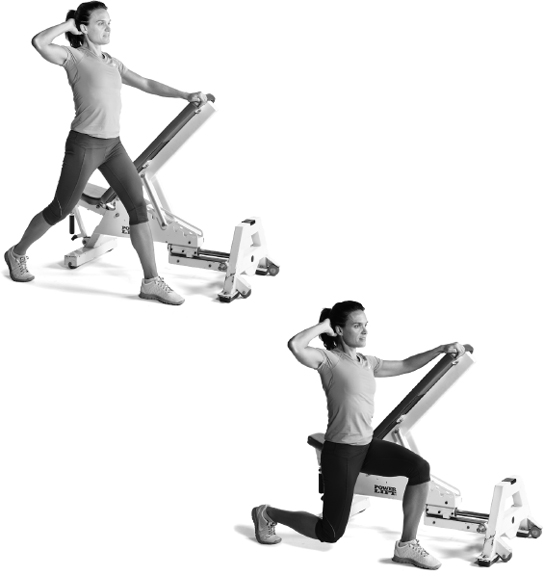
Suspended split squat
Attach the TRX (or any suspension-training system) to a chin-up bar or overhead support. With your back to the straps, put your right foot into a loop and hop forward with your left until you’re in a comfortable position for split squats. Drop down into the lunge position and push back up. Do your reps, switch legs, and repeat.
You have a few options with your arms. At first you may want to hold them out to your sides for balance. When you’re comfortable with the movement you can drive your arms up in a running motion. So when your left leg is forward, you drive your right arm up on the descent, and your left arm up as you rise. When your right leg is forward, you drive with your left arm on the descent.
Once you’re comfortable with that, you can hold a pair of dumbbells as you do the lunge with the running motion. It’s one of my favorite exercises for fat loss, and an option for Phase Three.
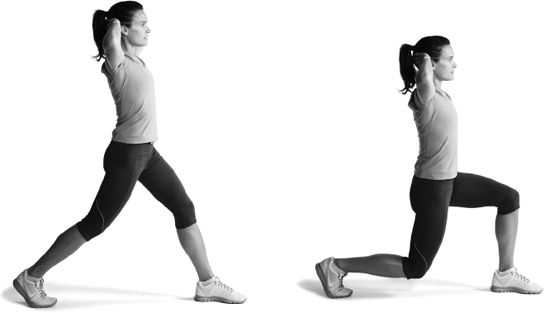
Forward lunge
For many, this will be an easier exercise than the Level 3 split squat. But the fact that you find it easy doesn’t mean you’re qualified to do it. Go back to the in-line lunge test at the beginning of the chapter. Can you get 10 to 15 reps with each leg, holding the broomstick in place? If not, you have no business doing a forward lunge with somewhat heavy weights, and Alwyn doesn’t want you doing this exercise without a challenging load (in addition to your body weight). You don’t yet have the stability, balance, and mobility you need. Whatever problems you have in your lower body that keep you from doing the in-line lunge will only be exacerbated by doing this exercise before you’re ready for it.
Conversely, it may be a surprisingly difficult exercise for some of us who have knee pain, even if we’re otherwise fully qualified. Split squats and reverse lunges take some pressure off the kneecap of the forward leg, but when you step forward all the force goes right into that joint.
In Advances in Functional Training, Mike Boyle notes that knee pain is rarely a problem that originates in the knees. It could have a long list of causes beginning in the ankles or hips. Tightness or restricted mobility above or below can pull on the knee’s tendons and produce pain that disguises its source. Alwyn’s program, by itself, may take care of the problem, especially if you’re diligent with your pre- and post-workout exercises. But if it doesn’t, knee pain is your signal that you aren’t yet ready for this exercise.
For those who are:
Walking lunge
I scratch my head when I see this exercise used in entry-level workout programs. I’ve always considered it an advanced lunge variation—one I rarely do in my own workouts—and Alwyn agrees. This is the first time he’s included it in the NROL series, even though we’ve featured some extraordinarily challenging (dare I say “badass”?) exercises. But if you’re ready for it, here it is:

Lunge-a-palooza
The lunge is probably the most versatile exercise in the program. If we had more space and a bigger budget, I could include at least a dozen more lunge variations that I’ve used in my own workouts. I’m sure Alwyn knows five for each one I could come up with.
Here are some of the ways you can create a more advanced version of any of the exercises we’ve show in this chapter: