CONTENTS
• Legs of Steel (the ‘Strong as You Look’ series)
• Can you build good legs with plyometrics?
• Russian farmer walk for stubborn calves
• Powerful legs without squats?
• A shortcut to perfect squats
• Shoulder friendly heavy squatting
• No more bowing knees in the squat!
• Heavy lifting, easy on the knees
• Can you let your knees slip forward when squatting?
1. Parallel squat
2. One-legged deadlift
3. Pyramid deadlift
4. One-legged dumbbell calf raise
Do you know what a ‘mullet’ means in powerlifting lingo? A sissy who trains his legs with leg extensions, leg curls, leg presses, and occasional high squats with Malibu Ken and Barbie poundages and a color coordinated belt. Whiny, pseudo-intellectual explanations of why and how deeper or heavier squats would hurt his knees and back are the sure ID of a mullet.
The following program is NOT for mullets. It will make you a better man or woman while forging the best legs of your lifetime. Enjoy the pain!
It should not surprise you that a leg specialization program builds on the foundation of squats. Not Smith machine squats, not nose bleed high squats, but powerlifting legal parallel squats. In case you ‘no comprende’ what ‘parallel’ is: the crease where your thighs meet your abdomen drops below the top of your knee. Anything else is wishful thinking. Ask a power-lifter to watch you and do not get mad if your best squat suddenly loses 100 pounds when you are forced to go the distance. You could also look online for a beeper that straps on to the top of your thigh and does not squawk until you have broken parallel.
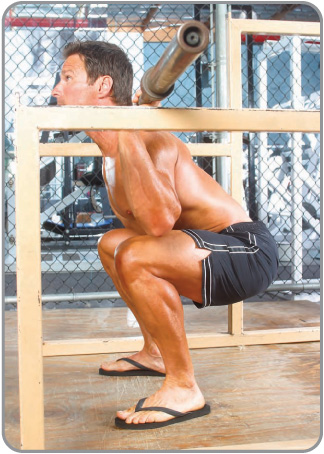
This is parallel. Anything less is wishful thinking.
The secret to breaking the parallel is pulling yourself down with your hip flexors. Here is how to learn this skill. Lie on your back with your legs straight. Place your hands on your hip flexors, right below your ‘lower abs’. Have your training partner hold on to your ankles and provide some resistance. Arch your lower back – the opposite of a crunch – and press your tailbone into the deck. Slowly pull your knees all the way up to your chest against your buddy’s resistance. Note the hip flexor contraction.
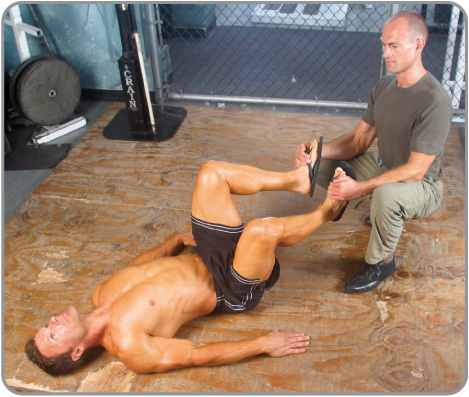
The partner hip flexor activation drill.
Actively pull yourself down and back with your hip flexors instead of passively yielding to the gravity.
When you squat recreate the above sensation: actively pull yourself down and back with your hip flexors instead of passively yielding to the gravity. You will instantly go deeper, improve your control of the weight, and tighten up the arch in your lower back. This results in a bigger, deeper, and safer squat.
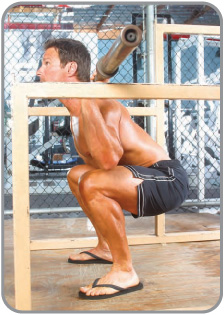
But let us start from the beginning. Wedge yourself under the barbell. Keep the bar low on your back, there is no sense in scraping your vertebrae. Grip the bar close to your shoulders for better stability. Do not emulate heavyweight powerlifters; they hold their hands close to the plates because big and tight dudes cannot do it any other way.
Inhale, tighten up your whole body, and squeeze the bar off the pins. Face away from the mirror! Or else.
Back out while staying tight and breathing shallow. Did I mention, do not even think about wearing a belt? Consider it mentioned.
Set up your feet slightly wider than your shoulders, slightly turned out and tracking your knees.
Look straight ahead at a point that is level with your eyes when you are standing up. Keep your eyes on that spot for the duration of the set.
Take another breath, pressurize your abdomen, brace yourself even more, and pull yourself into the ‘hole’ – power speak for the parallel depth.
Keep your weight on your heels or on the entire surface of your feet, but never on your toes. Push your butt back to load the hamstrings and keep your shins as upright as possible. Never let your knees bow in.
Once you have hit the legal depth, grunt and push your feet down into the deck while driving your traps up into the bar. Make sure that your hips do not shoot up before your head. Enjoy the pain!
Recommended sets and reps: 3x6
Stay tight and keep your abdomen pressurized.
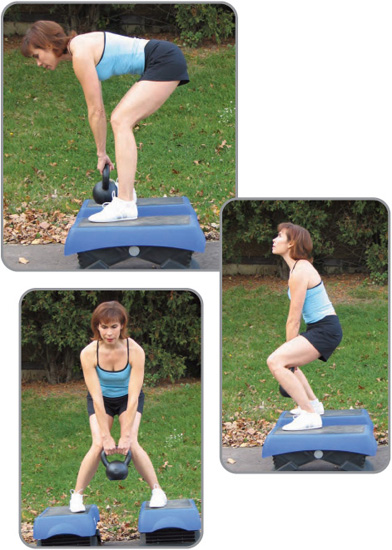
The one-legged deadlift introduced by Harry L. Good in his 1940 course The Keynote to Great Strength is one of my favorite drills. It is an excellent assistance exercise for the deadlift and a hamstring blaster second to none. You will never give the leg curl machine another look once you have tried the one-legged dead.
You may pull almost any weight: a barbell, a pair of dumbbells or kettlebells, a sandbag. Face the weight with one foot centered and the other elevated behind you. Your shin should be an inch or so behind the bar. If you pull two bells stand between them.
Fold at your hip and semi-squat. Do not let your knee extend over your toes or buckle in. Grab the weight. Take a normal breath, pressurize, and lift.
Keep your weight evenly distributed on your foot. You do not need to be paranoid about the back arch; unlike its two-legged brother, this type of deadlift is very forgiving and lets you get away with pulling with a slightly rounded back. Two reasons: a much lighter poundage and an intense midsection contraction, ‘a virtual belt’, enforced by the one-legged pull’s challenging balance.
You will find that you have to contract the glute on the working side very intensely to maintain your balance. Flex it to break the bell off the floor and cramp it even harder at the lockout. It will not take you long to realize that you have discovered one of the most effective glute exercises in existence.
If you start losing balance, catch yourself by landing your airborne foot. Carry on once you have got your equilibrium back. Unlike the regular deadlift, the one legged version enables you to lower the weight slowly safely so your neighbors will stop calling the police.
The one legged DL also does a fine job of strengthening your ankles, at least if you lift barefoot. Just grip the deck hard with your toes, keep the muscles around your ankle and on the bottom of your foot tight, and make sure that the inside of your foot does not buckle down towards the floor.
Another great advantage of the one-legged dead is it requires very little weight. That makes it an ideal leg exercise for a home or hotel gym.
Recommended sets and reps: 3x6 per leg
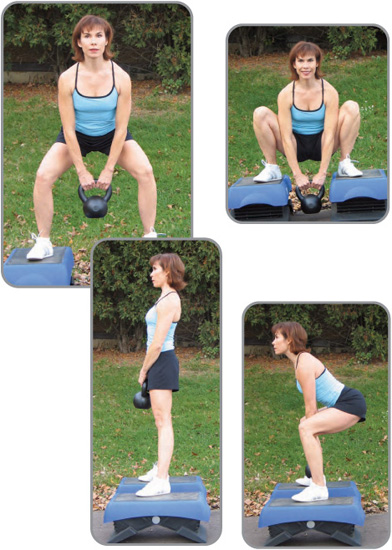
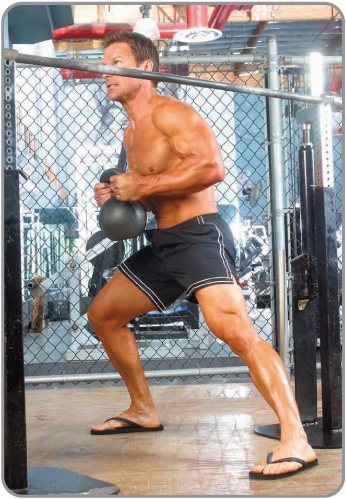
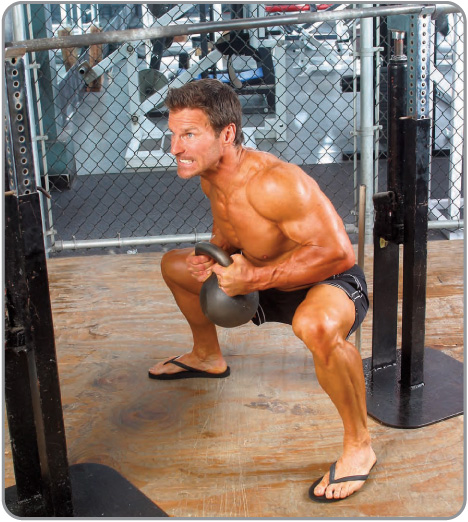
Russian powerlifters stand on two sturdy boxes, squat down in a wide stance with a weight in their hands and do a killer a squat-deadlift combo. It has a curious name of the ‘pyramid deadlift’, probably because you are perched up on top of a tall structure. Boris Sheyko, the coach of the Russian National Men’s Powerlifting Team, uses this forgiving drill to teach the perfect squat and deadlift form to beginners while developing the necessary flexibility. He has the lifter hold a kettlebell in straight arms between his legs.
A dumbbell would not work because it bumps into your body and does not allow you to stand up all the way. If you do not have a kettlebell you may use the low cable stack with almost any handle that does not hit your knees and two boxes or hard benches.
The exercise is much simpler than either the traditional SQ or DL because the weight is perfectly balanced below the musclehead’s center of gravity; not above (SQ) or in front (DL). Which is why it is okay to practice for high reps; the form is not likely to deteriorate.
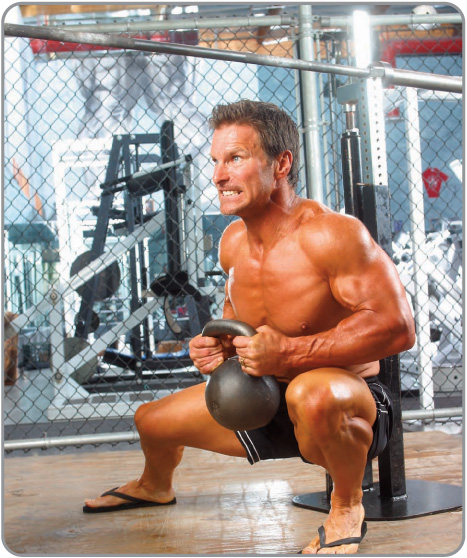
The keys to fine performance. Take a stance as wide as your flexibility allows and turn your feet out somewhat. But remember that your knees must always track your feet and never bow in! Look straight ahead rather than up or down. Do not let your hips shoot up before your head. Push your butt back and keep your shins close to vertical. Those are the basics. Now for the fine points.
‘Pull your hips out of their sockets’ on the way down as if you are pushing the walls apart with your knees.
Once you have gone down as deep as you can let out a sigh of relief and you will sink even deeper. Inhale on the way up. This peculiar breathing pattern would not apply to any power exercises with a lot of weight.
As your flexibility improves slowly widen your stance. Eventually an average sized trainee should be able to place his feet as far apart as the inside plates of a barbell.
Recommended sets and reps: 2x20-25
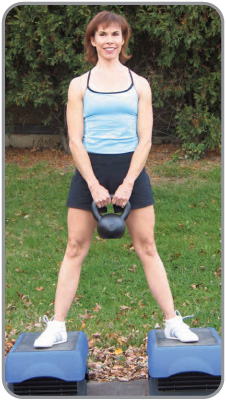
Senior RKC instructor Andrea Du Cane pulling a pyramid deadlift.
Take a stance as wide as your flexibility allows and turn your feet out somewhat.
Poor form. Always look up.
Poor form. Do not collapse the knees.
By now you should be pretty smoked. If you have been stuck in a rut in the calf development department you had better do the following calf workout some other time, for instance after your chest or arm session. If your calves are not too bad, finish the job now.
Nothing fancy, just the basic one-legged dumbbell calf raise. Stand on the ball of your foot on the edge of a step. Hold a dumbbell or a kettlebell in your hand on the working side hand. Hold on to something stationary for balance with your other hand.
Go down and get a good stretch. If you drew a line through your toes it would be parallel to the ground. In other words, keep your ankle at neutral and do not let your foot buckle in. Not complying could lead to health problems down the road. Ask your chiropractor for details.
Pause for a second – this will make the exercise harder and reduce the soreness – and push up all the way. Another pause. Another push.
For active recovery do an easy set or two of unloaded heel raises on both feet the day after.
Recommended sets and reps: 3x10 per leg
Q: Should I squat with a towel? The bar hurts my back.
Somebody call the w-a-a-ambulance! A towel will make the bar dangerously unstable, at least with heavy weights. And since light weights are not worth squatting, just say no to the towel. Put some meat on your upper back and learn how to fit the bar snugly into the groove below your posterior delts. The Hise shrug outlined in the Back installment of the Strong as You Look series will help you with both.
Q: I love front squats but they hurt my wrists. What should I do?
First, never do more than three reps per set. Second, ask a weightlifter to show you how to rack the bar properly. If weightlifters are scarce in your parts get a copy of Arthur Dreschler’s outstanding Weightlifting Encyclopedia. Kettlebell front squats rack very easily with average flexibility and can be safely done for high reps. I demonstrate the kettlebell front squat in the More Russian Kettlebell Challenges DVD.
Q: What is wrong with the leg press machine?
Where do I start? The leg press puts you in an unnatural position where your knees extend but your hips do not (your legs do line up with your body). In a study by Canadian researcher Digby Sale, strength gains on the leg press had no meaningful carryover to the squat, read a functional movement.
The hip sled can be dangerous, especially if you bring your knees too close towards your chest as is typical among muscleheads. Your tail comes off the pad and your rounded lower back has to bear the brunt of the unrealistic poundage. This type of flexion is the number one cause of disc herniations.
Last but not least, the sled and most other machines do not challenge your stabilizing muscles. With very few exceptions (e.g. Dr. Michael Yessis’ gastro-ham-glute machine or Dick Hartzell’s Jump Stretch deadlift platform) exercise machines belong on the junk pile of history next to Communism.
You sport some decent pipes, pardner, and respectable pecs, but your scrawny and flabby legs look like they could have been adopted. Sure, you could get away with the tank top plus bulky sweats look in the winter. But you are not going to fool anyone when the Fahrenheits start peaking. Do not let the beach season catch you with your pants down! Get acquainted with the squat cage right now.
Fortunately, unlike some other body parts, legs can be transformed from soft mediocrity to awesome muscularity in a matter of weeks. But you will have to wave a tearful good-bye to leg presses, Smith machines, and other gimmicks and do some real work.
The following routine, although it contains only two exercises, the squat and a unique football drill, will do more for your paws in four weeks than all the chrome hardware at your gym in a decade.
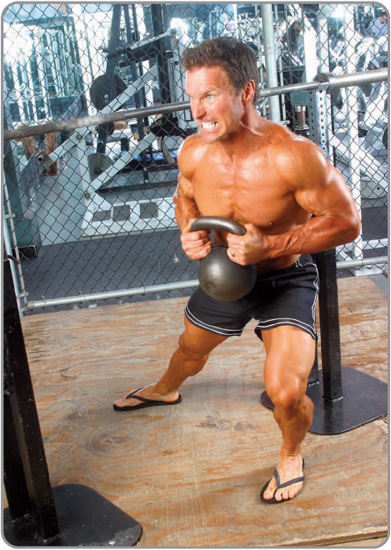
Kick off your leg day with the ‘renegade lunge’, a cool drill from the arsenal of NFL strength and conditioning consultant John Davies. Stand sideways near a plank set at your waist level, for instance a power rack pin. Squat down until your head is lower than the plank and push off the leg furthest from the plank like a speed skater. Your body will lunge under the pin. Make sure that you are tracking your feet with your knees and that you are not doing anything exotic to twist and hurt your knees. Stay tight and in control; do not thrash around. And watch your head, Inspector Clouseau!
Stand up on the other side. Straighten out completely and push your hips forward. Squat down and go back under the pin. That was one rep. Do a total of three repetitions. Walk around and relax your legs for a couple of minutes. Pretend that you are shaking water off your legs like a dog, to release the lactic acid and tension. Russian athletes from all sports swear by such relaxation exercises (see my Fast & Loose DVD).
Lower the pin a notch and perform another set. Then lower it for one last time and do the last, third set. Every workout do three progressive sets, hopefully starting deeper every time until you have developed the flexibility and strength of a mutant.
The renegade lunge.
Muscularity, symmetry, and cuts will come as a part of the package deal. So will the athletic ability. “From a sport specific standpoint,” states Coach Davies, the author of Renegade Training for Football (Dragon Door Publications, May 2002), “I haven’t found anything better to assist in lateral movements.” If you are an athlete, a soldier, or simply living hard, you will benefit greatly from the renegade lunge. Jim Reading, the fitness advisor to the US Marine Corps base in San Diego, showed me ‘the patch’, an outdoor log structure where he puts his son and his baseball buddies through moves like the renegade lunge. We discussed rigging up a similar course for the Marines; limbo drills are a custom fit for infantrymen who spend a lot of time crouching down.
Fortunately, unlike some other body parts, legs can be transformed from soft mediocrity to awesome muscularity in a matter of weeks.
Although Coach Davies has his players hold a kettlebell in their hands for extra resistance I am sure he would make an exception in your case and let you get away with bodyweight only since you have fifty squats in your near future. That is right, tens sets of five! And to top it all off you will be doing it three times a week! Yes, you must go an extra mile for extraordinary and quick gains. No cowardice camouflaged with pseudo-intellectual discussion about overtraining is accepted. Just do it. Or else.
Make sure that you are tracking your feet with your knees and that you are not doing anything exotic to twist and hurt your knees. Stay tight and in control; do not thrash around.
That is right, tens sets of five! And to top it all off you will be doing it three times a week! Just do it. Or else.
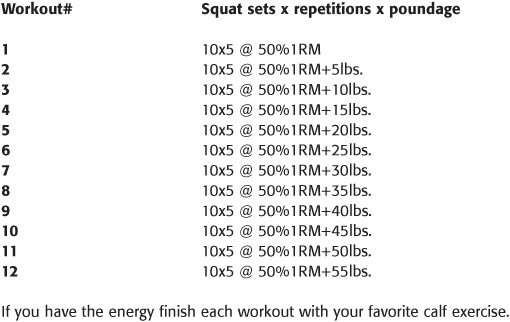
THE ‘HOT WHEELS IN FOUR WEEKS’ WORKOUT
Train three times a week, on Mondays, Wednesdays, and Fridays. Start each workout with 3x3 of lateral limbo lunges. Follow up with squats.
The bad news is, you will be doing more squats in one month than you have done in the last year. The good news, you will be starting out at only half of your max squat. If your squat PR is 250 pounds 10x5 @ 125 pounds is not exactly a killer.
Take brief breaks between sets, between thirty seconds and two minutes. The Monday workout will start easy but the pump will catch up in a hurry. Do not forget to load up on protein, calories, and sleep in the aftermath. If you do not get enough you will not grow.
You will be sore on Wednesday. Ignore it. Tell someone who cares. Add five pounds to your 50% and squat again. You will be adding a fiver every workout if your one rep max is between 150 and 250 pounds. If you squat less than 150 add five pounds every other session. If you put up between 250 and 500 pounds add ten pounds per workout. And if you squat more than five wheels your experience will tell you how much weight to add.
More soreness and another weight increase on Friday. Keep the pressure up and by the end of the second week you will not be getting nearly as sore. Forced to perform, your legs are adapting. And growing.
But before charging your squat cage, please review the following fine points on technique. The squat, although supposedly such a basic, is hardly ever done properly.
Start by finding a comfortable squatting stance. Do not emulate the stance of the biggest guy in your gym. His build, strength, and flexibility are different from yours and copying his groove will do you no good.
Here is how to find a squatting stance for your body only. Squat down on your haunches or as deep as you can. Shuffle your feet in and out and play with the angle your feet are facing out. Persist until you find a position where your feet are planted flat and solid and your knees are tracking your feet. You should be comfortable enough in this position to be able stay in it for a couple of minutes, without propping yourself with your arms against your knees. ‘The catcher’s crouch’, is that what you call it?
Occasionally you may vary your squatting width for the sake of variety or addressing weak links but mostly stick to the stance you have just found, your safest and most powerful one. Keep in mind though that it might change as your flexibility improves and you add muscle mass to your legs. Retest yourself every couple of months.
Another comment on the squat technique. Do not confuse a ‘straight’ back with an ‘upright’ back. It is impossible to do a full, even a parallel, squat with an upright back if you keep your heels planted as you are supposed to and do not let your knees extend over your feet. It is plain physics and it is easy to test. Sit in a chair with your shins nearly vertical. Now try to get up without either bringing your feet underneath you or leaning forward. It will not happen, Comrade, you will land on your butt.
So quit challenging the natural law and do not be afraid to squat bent over, as long as your spine stays straight (not vertical). Start your squats by pushing your butt back as far as possible and sit back – not down! – at the point where your glutes cannot back up any more without toppling you.
Descend at least to parallel. That means until the crease on the top of your thigh drops below the top of your knee. Have someone check you, a big dude whom you cannot cower into sweet-talking you. You will be unpleasantly surprised that a big bite has been taken out of your squat PR once you hit the legit depth or the ‘hole’. Many big-big bodybuilders who claim 700-pound squats cannot get up with 500 when forced to hit the legal depth. Join the recovering high squatters club.
It is very likely that in the beginning you will be unable to hit the hole in good form, even with a light weight. Either your knees will slip way forward and you will not be able to go any lower, your heels will come up, or your back will round and your butt will tuck in. Unless you are exceptionally tight you should be able to overcome this by contracting your hip flexors.
Here is how it is done. Stand on one foot with your knee up in the air. Push down on your knee with your hands and feel the muscles on top of your thigh tense up. Remember that feeling and try to reproduce it when you are descending into a squat. Literally pull yourself down with your hip flexors. You will instantly notice that you can hit a greater depth with better form and control.
Pay attention to the above tips and you will be rewarded with respectable squatting power, the legs to show for it, and superior training safety. Follow the outlined routine and be amazed at the improvement you will see in just a month.
There is no reason why you have to quit the ‘hot wheels’ program after four weeks. Stay on it as long as you can keep adding weight to your squats without increasing the rest periods beyond three minutes. Then you may choose to peak your squat strength with a basic powerlifting routine or switch to something altogether different. Leg power to you!