A SAMPLE LADDER WORKOUT
CONTENTS
• The Russian Special Forces Ladder to Power
• The Evil Russian’s ‘Hit the Deck’! Program
• Grip-ups, Spider-ups, and Pinch Grip Pushups
• The Lizard and ‘Walk the Dog’
• How to make bodyweight neck bridges harder
• Gymnastic rings for bodybuilders
• Ace the Marine pullup test with ‘the Russian rest/pause’
• Should I do weighted pullups to up my bodyweight pullups reps?
• Superstrict pullups – the hard way
Time and time again, I have made the point: the ticket to muscles and might is to increase the training volume while staying relatively fresh.
One powerful approach to boosting the loading volume was practiced in the Soviet Special Forces. The Spetsnaz requirement of eighteen dead hang pullups with ten kilos, or twenty-two pounds, of body armor demanded smart training. So between the classes – firearms training, foreign languages, and less friendly ‘special disciplines’ – we would file out to the pullup bars and perform what we called ‘ladders’. I do a pullup, you do one. I do two, you match me, etc. until one of us cannot keep up. Then, if we still had time, we started over. 1, 2, 3, 4, 5, 6, 7, 8, 9, 10… 1, 2, 3, 4, 5, 6, 7… 1, 2, 3, 4, 5. We totaled hundreds of pullups almost daily without burning out. And the extreme PT tests of our service became a breeze.
Since the Evil Empire went out of business I have been training various elite military units and law enforcement agencies in the US. The ladders have been delivering the goods just as reliably as they did on the other side of the old Iron Curtain. A Recon Marine, and vet of the first Gulf War, boosts his impressive twenty pullups to thirty-five.… A Texas SWAT cowboy goes from twenty-five pullups to forty.… A boy fresh out of high school climbs the ladder all the way to the coveted Navy SEAL trident… Naturally, people who are not in spec ops shape do even better. Improving from ten to twenty pullups in a couple of months is typical.
The ladder enables the trainee to maximize the volume without burning out, because only the top sets of each ladder are tough. You get a respite by starting over on the bottom rung. For that reason it is important that once you have climbed to the top you start over on the bottom, e.g. 1, 2, 3, 4, 5, 1, 2… rather than work down: 1, 2, 3, 4, 5, 4, 3, 2, 1. The pyramid approach rapidly builds up the fatigue and compromises the volume. The ladder, on the other hand, enables the strong man or woman to’ grease the groove’ of his or her chosen feat with extraordinary volume. 1+2+3+4+5 = 15. Repeat this series eight times – not a great feat unless you are a heavyweight – and you have totaled 120 pullups! Try to stuff that many in a workout with any other structure and you will fail miserably (for example, the popular approach of doing as many sets to the limit as it takes to get the target number, say 12, 10, 9, 7, 7, 5, 4, 2, 1, 1, 1,).
There are two types of ladders: competitive and preset. The former terminates when you or your partner cannot top the last set. The rest intervals are naturally timed: you go whenever the other comrade jumps off the bar. Two or more comrades can compete. If you train alone, time your breaks by imagining that you are competing with one or more other guys.
The preset ladder requires you to work up to the specified number of reps, e.g. five if you could have made it to seven, and start all over. Although not as much fun, this variation generally delivers more reliable progress because your odds of burning out are lower. You could follow the preset ladder format when you train by yourself and sprint up the competitive ladder when joined by your training buddy.
Although the classic ladder is primarily a strength endurance and muscle building technique, some Russian experts such as Bondarchuk state that the cumulative effect of many low intensity sets has a somewhat similar effect to that of a heavy load. In other words, expect that your strength will go up with your strength endurance and muscle mass. Indeed, ladders in ‘uniform two’, or the boots plus the fatigue pants, noticeably improved our pulling strength with weapons and gear on the obstacle course. But you will do even better strength wise if you choose a more direct approach. Take a 5-6RM weight and perform series of 1, 2, 3 reps. Take one-minute breaks and keep up the sequence till fatigue.
There is no law that says you must go up one rep at a time. With higher rep exercises, you can jump a few of the steps every set, for instance 5, 10, 15, and 20 pushups for a comrade who can do fifty or 3, 6, 9, 12, 15 for someone who can do twenty-five.
The ladder is highly adaptable to any trainee and definitely is not limited to pullups. The number of sets and series is up to you. So is the training frequency, the weight, and the exercises. You may climb the ladder daily or take a day or two off between the sessions. It goes against my totalitarian nature, but you have the freedom to design your own ladder workout. I will outline a sample workout though to make your task easier.
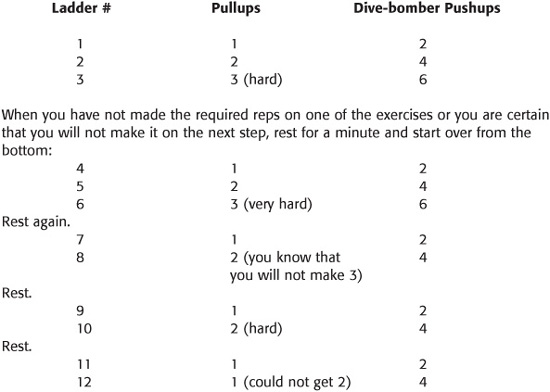
Here is a competitive ladder workout made up of pullups and dive-bomber pushups done in a circuit. Keep going from one exercise to the next, resting no longer than it takes your training partner to do his set. When you have petered out on one drill, rest a minute and start over. Let us presume that you max out at 10 pullups and 20 dive-bombers. This calls for single rep jumps on pullups and two-rep steps on pushups. Hit the deck!
You are smoked! If you cannot get more than a single on the second set, the gig is up. Go stretch and rest. The competitive ladder pushes you to the limit so you will need to rest two days before hitting it again or do a very light workout the day after. You get the idea. The ladder is a power cycle compressed from twelve weeks to twelve minutes. Periodization, miniaturized to fit into a single workout. And best of all, you do not need to be a Russian Special Forces operator or a Recon Marine to up your strength and mass with ladders. It is as simple as one-two-three.
Before the bench press was a twinkle in some early powerlifter’s eye, the pushup was the measure of a man. One hundred separated the men from the boys. Still does. How will you rate?
Pretty good, if you follow my program.
Where heavy resistance training builds the contractile proteins, high volume low intensity loading such as pushups kicks into growth other wheels of the muscle machinery. The volume of sarcoplasm, muscle cell jello-like filler, goes up. Mitochondria, the muscle cells’ energy plants, get buff. Capillaries spread their tentacles throughout the muscle.
Even though capillaries, the muscle’s ‘plumbing’, make up but a fraction of the muscle’s girth, they serve a VIP function in bulking your myofibrils, or ‘real muscle’, when you get back to heavy training. Here is how it works.
A British study by Schott et. al (1995) concluded that greater exposure of muscle cells to various metabolites, or ‘muscle engine exhaust fumes’, leads to greater gains in strength and mass. It has been suggested by some experts that the more extensive a muscle’s vascularity, the more the muscle will be soaked in intra-muscular metabolites and growth factors. And the more it will grow.
At least, up to a point. According to Soviet research (Zalesskiy & Burkhanov, 1981), vascular network development generally cannot keep up with muscle hypertrophy. So if you want to keep on growing beyond the easy first gains, you must find a way of developing your vascular network.
This is where super high reps come in. Lüthi et. al (1986) discovered that heavy training has no effect on capillarization. Tesch et. al (1984) added that Olympic weightlifters and powerlifters, athletes who favor low rep training with long rest periods, display capillary density that is even lower than that of untrained subjects! And Sjøogard (1984) stated that enhanced capillarization is the result of endurance training (could this explain why your legs gain mass so much easier than your arms?). So hit the deck, Comrade!
The program is self-explanatory. Just drop and give me a specified percentage of your last PR at given time intervals throughout the day. For instance, if you managed fifty pushups on your test, do twenty-five on the day that calls for 50% relative intensity. On Mondays test yourself for one set and do easy sets for the rest of the day.
Time the breaks between your sets but do not have a fit if you missed your date with the concrete here and there. Make it up if you can; do not sweat it if you cannot. Do your sets from the time you get up until an hour before your bedtime. Naturally, most comrades with real jobs will have a couple of gaps in their day when they cannot drop and pump out pushups. Do not worry about it; just get back on schedule when the boss looks the other way.
Note that you are supposed to go to the limit only once a week. High rep sets to exhaustion are a lot more dangerous then they look. The tension in the stabilizing muscles is not enough to protect the joints and the connective tissues; the latter really get it in the shorts. So do not mess with the outline; stay well within your ability except on the test days! Do not worry, you will make great gains without doing a jackhammer on the last rep, dripping sweat, and making macho faces.
The prescribed regimen requires that you say no to any other upper body work with the exception of pullups or chinups. Either of these military favorites will hit the muscles missed by the pushups and balance out your shoulders. The choice of a pullup regimen is up to you.
A word on pushups for reasons other then getting buff or becoming one of the few good men. Pushups are no good for strength unless you can barely manage a couple. The old faithful are useful however for developing shoulder endurance for select sports such as boxing. Prizefighters are traditionally fond of pushups; they believe that this exercise improves their punching power. Indeed it does, although not in the manner they believe it does. Relaxed shoulders are critical to fluid transmission of power from the hip into the fist. Anyone who has put on a pair of gloves and climbed into the ring knows that holding your guard up and punching for a few rounds exhausts the shoulders. A fatigued muscle is a tight muscle. Punches deteriorate into pushes when the delts get tired. Which is why the last rounds of a professional boxing bout look like an amateur brawl. And which is why prizefighters ought to faithfully stick with their tried and true pushup.
Whether you are training for the boxing ring or something else, proper pushup technique will amplify your gains.
Place the weight near the bases of your palms rather than closer to the fingers. If the traditional technique hurts your wrists you have a couple of options. The yuppie choice is a set of pushup handles or a pair of hex-shaped dumbbells. The manly alternative is to do your pushups the karate way, on your knuckles. If you do not plan on kicking butt in the near future you may do your pushups on the full surfaces of the fist (shame on you). But the proper martial arts knuckle pushup calls for resting your weight only on two knuckles of each fist, those of the index and the middle fingers for bare-knuckle fighters. You will find that this manly technique will strengthen your wrists in a hurry. No, your forearms will not look any better, but your bench will go up because your noodle thin wrists will stop screaming for mercy and wraps.
In the Soviet Special Forces we knocked off knuckle pushups on concrete, but you would be wiser to do your knuckle pushups on a surface that has some give, for instance grass or a rubberized gym floor. Make sure that the floor is clean; dirt particles can do a number on your baby soft skin.
The grip width is up to you; you may vary it from set to set.
Keep your butt tucked under; this will make your pushups look crisp and protect your back from sagging and hurting.
Do not constrict your chest; keep it wide open. The range of motion will be slightly reduced, the pecs will be pre-stretched for more power, and you are less likely to hurt our shoulders that way.
Synchronize your breathing with your movement. Failing to do so in an endurance event is the kiss of death. Under the circumstances it is most natural to inhale on the way down and exhale on the way up. Imagine how your breath or ‘Chi’ flows out of your stomach into your arms. Do not underestimate the power of such visualization. There is plenty of evidence that the choice of a breathing pattern has a profound effect on performance.
Try to rest your muscles on the way down; a good endurance athlete knows how to let his limbs recover between strides. Find your rhythm ASAP and stick to it. Rhythmical activity takes a lot less energy than a non-rhythmical one, thanks to something called ‘the central pattern generators’ in your nervous system.
Take advantage of the elastic rebound on the bottom. This is not a bench press meet; you will not get red-lighted if you fail to pause.
When you are almost at the end of the rope – this applies only to your 100% test sets! – it is time to pull out the heavy artillery of the ‘High-Tension Techniques’ explained in my book The Naked Warrior. These HTT are so powerful that the elite military and law enforcement personnel I train routinely add 10-15 reps to their very impressive pushup maxes in just one or two days.
I repeat, these nukes are supposed to be deployed only during your test sets! Or for very difficult, low rep exercises. If you are trying to master the one-arm pushup or an out of shape friend of yours is struggling with regular pushups, the high-tension techniques will save the day.
If you do not wear a uniform and don’t box, do not stay on a pushup diet too long. Two weeks is about right. Why risk a shoulder injury from overuse? Besides, according to Russian scientists Nikityuk & Samoylov (1990), repetition lifting of a submaximal weight promotes sarcoplasmic hypertrophy (fake muscle) while breaking down the contractile protein (real muscle). Can’t have that.
One of the best approaches that will enable you to have your cake and eat it too, is alternating two-week cycles of pushups with two-week low rep strength cycles. This Russian rotation schedule is superior to doing everything at once, e.g. doing your pushups as back off sets following your bench presses and dips. Mixing up high tension and high rep stimuli in one workout confuses the body; the muscles are not certain what they should adapt to. The new approach enables you to shock your muscles into specific adaptation with a laser focus and then hit them from the flank with a fresh stimulus when they expect it the least.
Eventually you may opt for a more rigorous routine such as the one outlined below or build your own based on it. The rules are simple:
• Never come close to failure except when testing your max.
• Vary the reps and the rest periods between the sets daily.
• Adjust the load to your recovery ability.
• Build up cumulative fatigue.
• Taper down before a peak.
Here you have it, Comrade, your complete guide to pushup excellence. Put it to work and fill out your shirt before the month is up! In one of his famous courses Charles Atlas promised that you will add at least an inch to your chest in just ten days of practicing pushups without strain every morning and evening. This advice may not sound trendy in our age of hi-tech machines, ‘total muscle failure’, and training once in a blue moon, but it will work its magic for you just the same.
Hit the deck, trooper! Gimme a hundred!
Once in a blue moon I come across a training program that is simple, effective, soundly rooted in science, and easily adaptable to anyone. The NASA Pushup Program is one of these few.
The following routine is aimed at maxing out one’s pushups, but don’t turn that dial if your goals lie elsewhere! The author, Laurence Morehouse, Ph.D. helped design the conditioning programs for US astronauts. Grasp his logic and you will become a better strength coach. And if the only athlete you coach is yourself, so what?
If you had to learn only one thing from this article, let it be this – traditional progressive overload does not work. Or rather, it works only up to a point. “… you can’t keep adding one more repetition a day,” explains Dr. Morehouse, the founding director of the Human Performance Laboratory at UCLA. “The day comes when you can’t do more. The big mistake in any kind of training is to set a number and try to achieve that number and assume that, if you do, you’ve done your training. You may by chance be getting just the right training effect – but you are probably getting either too much of a strain or too little training effect.”
And even if the workout is perfect for you, it is not going to work forever. The physiological law of accommodation states that an organism stops adapting to a training stimulus after a period of time, usually 2-6 weeks. Your body figures, “Hey, it hasn’t killed me, why bother to adapt?” At this point a change in the program is called for.
You can tinker with the three basic components of overload: volume, intensity, and density.
Volume is the total number of repetitions in a workout. For instance, you have done 10 sets of 20. The volume equals 10 x 20 = 200.
Intensity, in the context of high rep pushups or girevoy sport, is a percentage of your best result. If 40 reps is your max, then 20 reps corresponds to 50% intensity.
Density refers to the amount of work done in a unit of time. Doing one set of 20 pushups every fifty minutes is a denser workout than 1x20 every hour.
“Ideal training involves changing just one of many variables, until that variable reaches a constant,” writes Dr. Laurence Morehouse. “Then you change another, and then another until you reach your goal.”
Dr. Morehouse did design one pushup program that makes use of all three of the overload variables. A student, at Dr. Morehouse’s class on conditioning for maximum performance, made a bet that in two month’s time he would be able to do 100 consecutive pushups, 40 being his ceiling at the time.
Every day the trainee would do 200 pushups, twice as many as his target number. He started with sets of 20 pushups, or 50% of his current maximum. He did one set every hour.
If you cannot do that many each hour, adjust the repetitions to your abilities while keeping the daily total at 200. It might take you longer than ten hours to reach the daily goal. It is OK. Add a pushup to each set every day until you can do ten sets of 20.
Then start reducing the time between the sets, say five minutes every hour, until you cannot recover sufficiently between sets to pump out your 20 reps. It is a signal to increase the time between sets slightly and start gradually adding more reps.
Repeat the process until you have reached your goal. Test your max occasionally after a day or two of rest.
Day 1, every hour for 10 hours:
x15, 15, 15, 15, 15, 15, 15, 15, 15, 15
Day 2, every hour:
x16, 16, 16, 16, 16, 16, 16, 16, 16, 16
Day 3, every hour:
x17, 17, 17, 17, 17, 17, 17, 17, 17, 17
Day 4, every hour:
x18, 18, 18, 18, 18, 18, 18, 18, 18, 18
Day 5, every hour:
x19, 19, 19, 19, 19, 19, 19, 19, 19, 19
Day 6, every hour:
x20, 20, 20, 20, 20, 20, 20, 20, 20, 20 – Reached 10x20. Start reducing the rest intervals between sets by 5 min a day.
Day 7, every 55 min:
x20, 20, 20, 20, 20, 20, 20, 20, 20, 20
Day 8, every 50 min:
x20, 20, 20, 20, 20, 20, 20, 20, 20, 20
Day 9, every 45 min:
x20, 20, 20, 20, 20, 20, 20, 20, 20, 20
Day 10, every 40 min:
x20, 20, 20, 20, 20, 20, 20, 20, 20, 20
Day 11, every 35 min:
x20, 20, 20, 20, 20, 20, 20, 19, 19, 19 – Can’t keep up 10x20. Time to increase the rest intervals by 10 min and concentrate on adding reps.
x21, 21, 21, 21, 21, 21, 21, 21, 21, 21
Day 13, every 45 min:
x22, 22, 22, 22, 22, 22, 22, 22, 22, 22
Day 14, every 45 min:
x23, 23, 23, 23, 23, 23, 23, 23, 23, 23
Day 15, 16: rest
Day 17: max test: 1x47. Continue the progression the next day.
Day 18, every 45 min:
x24, 24, 24, 24, 24, 24, 24, 24, 24, 24
Day 19, every 45 min:
x25, 25, 25, 25, 25, 25, 25, 25, 25, 25
Day 20, every 45 min:
x26, 26, 26, 26, 26, 26, 26, 25, 25, 25 – Can’t keep up adding a rep every day. Back off on the reps a little and start cutting time.
Day 21, every 40 min:
x25, 25, 25, 25, 25, 25, 25, 25, 25, 25
Day 22, every 35 min:
x25, 25, 25, 25, 25, 25, 25, 25, 25, 25
Day 23, every 30 min:
x25, 25, 25, 25, 25, 25, 25, 24, 24, 23 – Can’t keep up 10x25.
Increase the rest intervals by 10 min and add reps.
Day 22, every 40 min:
x26, 26, 26, 26, 26, 26, 26, 26, 26, 26
Day 23, every 40 min:
x27, 27, 27, 27, 27, 27, 27, 27, 27, 27
Day 24, every 40 min:
x28, 28, 28, 28, 28, 28, 28, 28, 28, 28
Day 25, every 40 min:
x29, 29, 29, 29, 29, 29, 29, 29, 29, 29
Day 26, 27: rest
Day 28: max test:
1x50. Continue the progression the next day.
“Ideal training involves changing just one of many variables, until that variable reaches a constant. Then you change another, and then another until you reach your goal.”
Repeat this until your memorize it.
In this day and age owning a set of decent pipes and defined abs announces that one is ‘in shape’. In shape for what, I would like to know? Call me old-fashioned, but I refuse to give the ‘in shape’ designation to anyone with soft hands and a weak grip. Hand strength is a hallmark of a physical culturalist who has arrived.
Any road warrior can figure out some sort of pushup for the upper body, an abs move, and something for the legs. But can you smoke your forearms and steel your fingers anywhere, anytime? Now you can.
The grip as shown by Brad Johnson.
Photos courtesy ExtremeBodyweightTraining.com
This move comes highly recommended by S. Bogdasarov, Distinguished Coach of the USSR. Stand one step away from a wall. Keeping your legs and torso straight, lean on it with your locked arms, your palms flush on the wall. Now come up on your fingertips by gripping the surface of the wall and moving your hand towards the inside of your wrist. The movement of the hand is identical to that in a barbell wrist curl. The major difference is the involvement of the fingers. Move slowly. Increase the difficulty by shifting your feet further from the wall and/or using one arm at a time. Do not overdo it; give your tendons time to get conditioned.
The spider-up.
‘Crimping’ Don’t!.
Photo courtesy Brad Johnson and ExtremeBodyweightTraining.com
I learned the next two drills from ingenious fanatic of bodyweight strength training, Brad Johnson. “Place a cloth on a hard, smooth floor and get into fingertip push-up position. Begin with your fingers in a wide claw position and then pull all of your fingers toward the center until they meet each other. Return to starting position… Be careful to keep your fingers bent at the first joint to reduce the chances of injury.”
Let us face it: unless you are a kung fu master, you are a long way from doing the spider in the pushup position. So rest most of your weight on your knees and your free hand, and work one arm at a time. You will be able to give yourself exactly the right amount of resistance by shifting your weight forward or back. And if things suddenly get hairy, you can quickly unload your fingers by leaning towards your free hand.
Brad employs the ‘pivot point variation’ technique extensively to customize the resistance of bodyweight exercises. PPV “refers to the age old technique of dropping your knees to the ground in order to reduce the load in a push up,” explain Rick Osbourne and Brian McCaskey in their book Pull Your Own Weight. “With the old standard method, you have two potential pivot points: 1) your knees, and 2) your feet. And, strangely enough, it can be a long ways from your knees to your feet when you’re ready to make progress… simply use a small bench that can be placed under your body at any point between your hips and your feet. When the bench is moved toward your hips, resistance is reduced. As your strength increases, the bench should gradually be moved toward your toes. Eventually, of course, the idea is to eliminate the PPV bench altogether…”
One more time: do not do hyperextend your fingers and thumb! Rock climbers have learned the hard way that ‘crimping’, as they call this type of cheating, will do your joints no good. Keep your digits slightly flexed, as if you are gripping a ball. It is much harder and safer this way.

Fanatic of bodyweight strength training does a pinch grip pushup.
Photos courtesy ExtremeBodyweightTraining.com
If you know a thing or two about the old time physical culture, you must have heard about pinch gripping. Lifting two forty-five pound York Barbell plates sandwiched together with their smooth surfaces outward with one hand is a classic test of pinch grip strength. But what if no plates are handy? As usual, veteran gymnast Brad Johnson has the answer. The man got a couple of short 2x4s (about six inches) and laid them on the floor. He pinch gripped both boards hard between his thumbs and fingers and started doing pushups. Ingenious.
Grip like a vise, so your fingers do not slip and do not cheat by resting your weight on your palms. And make sure to start in a very easy position, e.g. off your knees. There is no dishonor in starting on the wall so even less of your weight is on your fingers. That way you will not even need a board; just pinch grip a narrow doorway with one hand and spot yourself with the other. The further you move your feet away from your working hand, the harder the exercise.
Do not extend your elbow completely; as your body becomes nearly vertical the pressure on your fingers falls off. Better do short, slow half reps with your chest close to your hand. Pinching an open door is even more challenging, just beware of the risks of training in an unstable environment.
Attention! The above exercises will load your fingers, thumbs, and wrists in a manner you are not accustomed to. Novelty is good because it means explosive new muscle growth. But it is also a double-edged sword that could get you injured. So start by doing just a couple of very easy low rep sets of all three drills, e.g. four sets of four. Practice almost every day and build up slowly enough to avoid any joint soreness or pulled tendons. Iron claws will be your reward.
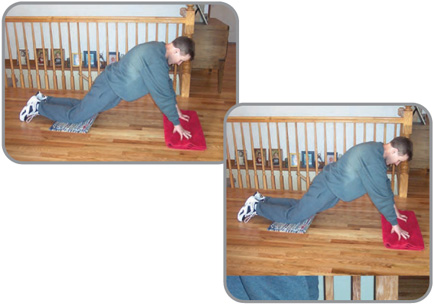
I do not care for lunges. Never have, never will. First, they are never done right. Second, they have a lightweight, ‘aerobics, spinning, and toning’, kind of reputation. Can’t have that.
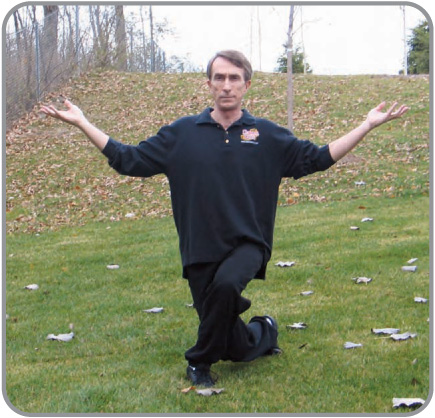
Enter the evil alternative to the lunge: the Dragon Walk. It is a Chinese Chi Kung exercise that I learned from my friend and author of The Five Animal Frolics videos, John Du Cane. John knows a thing or two about training on the road and in unfamiliar places. Born in South Africa, he soon moved with his parents to Sierra Leone and then to a boarding school in England. When studying in Cambridge, Du Cane drove a VW bus to the Middle East, places like Afghanistan and Iran. He lived in a yoga community in India for five years and in a few other exotic places after that before landing in the US. All along, in environments most unfriendly for staying in shape, John has been consistently improving his terrific physique reminiscent of Mikhail Baryshnikov or Bruce Lee. The dragon walk has been one of his secrets.
Ideally, practice outdoors. Go barefoot or wear thin-soled flat shoes common among martial artists. Turn your palms up, bend your elbows to about forty-five degrees, and hold your hands out to your sides slightly above your shoulders. This alignment is supposed to help you accumulate the mysterious ‘Chi’ energy. Even if you do not believe in that sort of thing, still stick to the recommended arm position. It will aid you in keeping your chest open, your shoulders down, and your back upright.
Let your shoulders relax away from your ears and imagine that your head is suspended from the ceiling by a string, the neck long and loose. Keep your back ramrod straight and upright for the duration of the drill! If you bend over, you are not a dragon but a smaller and weaker mythological critter. A leprechaun comes to mind.
Contrary to the bodybuilding mythology, you may practice every day. Just make sure to make some days much easier than others.
Take a medium length step with one foot forward and across the body. Do not point your foot straight ahead but a little outward. Your front foot is planted, your rear one is on its ball.
You will have to experiment with the length of your step to get it right. If you remain vertical as instructed, it is a brutal position.
I highly recommend John Du Cane’s The Five Animal Frolics and Qigong Recharge DVDs.
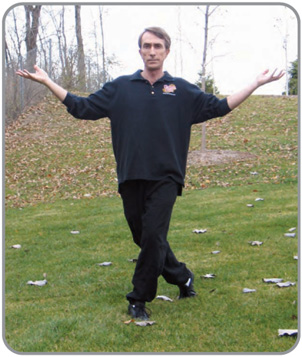
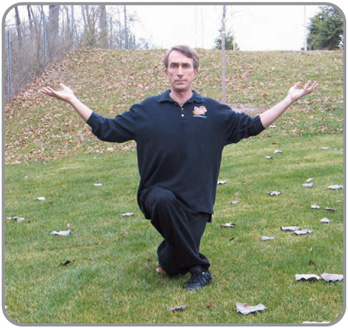
Take a medium length step with one foot forward and across the body. Do not point your foot straight ahead but a little outward. Your front foot is planted, your rear one is on its ball. Make sure that your knees are always tracking your feet. Sink down – stay upright! – and let your rear knee come down to within an inch of the ground. Touching the deck is cheating.
Now comes the interesting part. The knee that is catching up must end up exactly outside your leading ankle. You will have to experiment with the length of your step to get it right. If you remain vertical as instructed, it is a brutal position. Pause there for a moment to drive the point home.
Be sure to study the photos. Now walk! Expect to stumble around for a while until you find the groove. Trust me, it is worth the trouble. Look straight ahead. If you cannot help bending over, squeezing your glutes and driving your hips forward will help.
It will not take you long to find out that this martial arts secret exercise delivers cut and muscular legs with staying power. And makes you a better man or a woman in the process. To give you something to shoot for, John Du Cane can dragon walk for an hour straight! John also happens to be the man who had the rare honor of teaching a Chi Kung seminar at the Arnold Schwarzenegger Fitness Expo. So plan to dedicate years to work up to his level. Your best bet is to build up the load in the rest-pause fashion. Take a few steps. As soon as you feel that the next rep might be not up to the draconian standard, stop. Relax and shake the tension out of your legs as if you are shaking water off, then carry on.
Contrary to the bodybuilding mythology, you may practice every day. Just make sure to make some days much easier than others. And if you decide to incorporate the dragon walk into a standard bodybuilding routine, do it instead of leg extensions and similar silliness as a ‘finisher’.
Enjoy the pain!
Full contact fighters are known for their outstanding strength, conditioning, and physiques. Which is why many of the exercises featured in the Naked Warrior series come from martial arts and this technique is no exception. Slow kicks over a chair have been made popular by kickboxing legend Bill ‘Superfoot’ Wallace. Way into his fifties, Superfoot is still a formidable fighter with a cut to ribbons body. It is almost comical how Bill, who lives on a steady diet of hamburgers (hold the cheese!) and fries, puts ephedra-popping kids young enough to be his grandchildren to shame with his abs.
The kickboxing champion practices super slow kicks in order to enhance his power, precision, and flexibility. The side effect of his training is highly defined legs and hips. It would be unrealistic to expect you to emulate Superfoot’s state of the art moves from the get go. Instead we shall apply his drill’s basic principle to two of the most basic kicks, front and back. You need to learn how to crawl before flying; you can always get Wallace’s videos from Superfoot.com once you get hooked.
The front kick. Practice barefoot. Hold the back of a chair for balance – something you should part with eventually, like a bike’s training wheels – and raise your knee as high as your solar plexus. Keep the knee of the leg you are standing on slightly bent and tracking the foot. Turn the foot out at an approximately forty-five-degree angle to the direction of the kick.
Slowly extend your airborne leg and ‘kick’ an imaginary target with the ball of your foot or the entire surface of your foot. Pull your toes back. Tense your whole body when you have connected with the virtual target, then slowly return your foot to the ground by retracing its path back. Relax momentarily and repeat on the other side.
Performance pointers. Don’t turn your hips but keep them square to the target. Pinching an imaginary coin with your cheeks will help. Press hard into the deck with your stationary foot and imagine that you are wedging yourself in between the target and the ground.
Reread the last sentence; it is extremely important.
Tense your abs hard. Don’t lean back or forward. One subtle karate tip that never fails to make a huge difference in my military and law enforcement courses is to point your belly button slightly up by shortening your ‘lower abs’. You will not get all these subtleties at once; it is alright, just be persistent in your practice. Eventually do your slow kicks over an elevation; work up to the back of a chair. Naturally, this type of active flexibility will not come overnight.
Strength, height, and precision are the goals of this drill. Which means do not keep cranking out mindless sloppy reps. Do one kick at a time and rest for as long as necessary to make the next one perfect. Shoot for the total of twenty-five reps per leg every other day. Stretch your hip flexors afterwards.
The back kick. You have been ‘attacked’ from behind and you kick back like a mule. Look over your right shoulder and raise your right knee until your heel is pointing at the ‘target’. Your kicking foot should be angled approximately forty-five degrees down and flexed toward its knee. Your stationary foot is pointing straight away from the target and the knee is slightly bent.
Slowly kick back and lean forward at the same time. The back kick is very powerful and it generates a lot of recoil; the lean helps you counter it and generate even more power. Keep your eyes on your target, which should be knee to waist high. Eventually you may practice high back kicks, not very useful in a real trouble but great for competition and conditioning.
At the point of impact ‘wedge’ yourself between the deck and the ‘attacker’. Tense your both glutes as hard as possible and drive your hips forward. Retrace your kick back to the ground. Superset your front and back kicks with the same leg. Between the two of them, these kicks will work your hips and thighs very thoroughly.
More sophisticated kicks – side, round, hook, axe, crescent, and reverse crescent – may be practiced in the same fashion: slow, tight, with the abs locked on ‘impact’. However, I would prefer that you learned these from a martial arts instructor. You would have to go out of your way to hurt yourself with slow front and back kicks; this is not the case with the rest.
For instance, during the roundhouse kick the knee of the base leg must be protected from the torque by either a pivot until the heel points at the target or by a counter rotation of the torso. If it sounds complicated, it is. And failing to learn these subtleties is what hurt many folks during the cardio kickboxing craze a few years ago. So knock on your local dojo’s door if you want to go an extra mile. Otherwise just stick to the front and back kicks.
Slow kicks are far from being the only powerful and innovative moves in Bill Wallace’s strength and conditioning arsenal. Even if you are not a martial artist, you will do yourself a favor if you pick up a copy of his book Dynamic Stretching & Kicking from Superfoot.com.
There is a term in the military, ‘individual movement technique’. Only movie actors and third world insurgents stand tall and shoot from the hip; professional soldiers eat dirt, keep a low profile, and make the other guy die for his country.
The Russian Spetsnaz uses five types of low IMT. Move on all fours behind low cover such as tall grass, otherwise crawl on your belly. Stay on your side when dragging a wounded comrade or a prisoner. Flip on your back in a ravine, when expecting an ambush, or when covering a leaving team. Finally, there is ‘the Lizard’.
Unique to the former Soviet spec ops community, the lizard is the fastest, the most silent, and the hardest low movement technique. It is used to approach a sentry. The operator slings his AK on his back, assumes a low pushup position, and quickly runs like a lizard over to the enemy with a knife in his teeth. Why am I telling you all this? – Because this deadly maneuver also happens to be an excellent exercise for your upper body and waist. Tactical efficiency alone would not explain the glee in the DIs’ eyes. The drill is evil!
Hit the deck and let us start. With your elbows bent at ninety degrees take a step forward with your left arm. Then a step with your left foot. Bring your knee forward far enough to twist your waist like a reptile’s. Repeat the sequence with your right arm and then your right leg. At any point your weight should be supported by three points: arm-arm-leg, or arm-leg-leg. Move! Lizards do not drag their bellies or hind paws like overfed crocs; they run! And don’t even think about lifting your head or semi-straightening out your elbows! At a Russian Special Forces training base you would be punished with a painful whip of a thin metal rod. Right where it counts.
Don’t expect to succeed at once; the lizard takes practice. But it is well worth it as your painfully pumped pecs, arms, and waist will soon find out. Don’t count the reps; go for distance instead. Belly flop and rest, like a reptile in cold weather, between spurts.
Repetition bodyweight squats are the mainstay in martial artists’ conditioning. They build leg and cardiopulmonary endurance, burn fat, and toughen one up. Unfortunately, not every pair of knees can handle them.
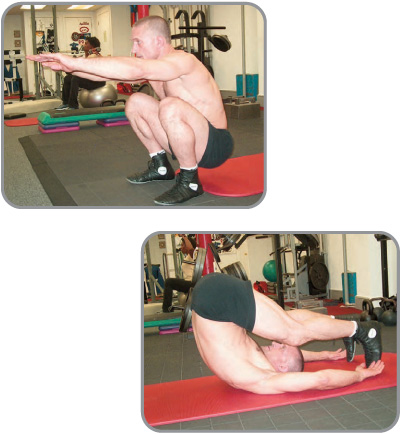
Not any more. Enter the ‘deck squat’ or ‘rock-up squat’, a recent rage among Brazilian Jiu Jitsu players, mixed martial artists, and Recon Marines.
To work up to a deck squat start by sitting on a curb, your hips pushed as far back as possible, your body folded over, and your arms reaching forward for counterbalance. Touch down, rock back, immediately rock forward, and get up without hesitation.
Steve Maxwell, RKC Sr. does the deck squat.
Photos courtesy Maxercise.com
Do not move your feet underneath you or cross them. Do not let your knees bow in either. Finally, do not let your knees slip forward and try to keep your shins vertical. This is the secret to unloading your knees while working the rest of your body hard. The patella tendon is not smashing the kneecap into the joint. Besides, the knee is further protected from the rear by hamstring tension when the shin is vertical.
The deck squat is to the regular bodyweight squat what the box squat is to the standard barbell squat. Coached by Louie Simmons, powerlifter Matt Dimel who blew out his patella tendons with conventional power squats rehabbed himself by squatting to a box and went on to lift over a thousand pounds!
If you are a big fellow or gal, hold a light weight such as a five pound plate in front of you for counterbalance. And do not be afraid to use momentum; this is not a strength exercise.
Crank up your reps. Your legs will get shaky and you will feel like coughing up a hairball. When you have had it, walk around to let your heart rate come down and come back for more punishment.
After a couple of workouts try the deck squat proper – to the deck. BJJ world champion Steve Maxwell, MS, RKC Sr. explains the drill succinctly. “The rock-up squat is one of my favorite exercises for my martial arts classes… It’s like combining a pullover, a situp, and a squat all in one move. Done in high sets… it is a tremendous cardio movement.”
If you are wondering what does the pullover have to do with the deck squat, Steve brings the kettlebell behind his head on the bottom of each rep, then pulls it forward, sits up, and finally rocks up.
Practice on a surface that gives a little, such as a wrestling mat, grass, or a thick carpet. Use your momentum and keep moving or you will not get up. Holding a weight for a counterbalance is almost a must in the beginning.
Once you do enough reps you are likely to cut corners on the negative and literally fall and roll. Do not slow down, relax and go with the flow as long as you land softly rather than slam on your rear end. Do not worry; you will get enough work on the way up. Here is your opportunity to learn how to fall properly while getting conditioned.
Some comrades will have to stick with the curb or box rock-up squat as the repeated ‘tucking the tail in’ of the deck squat would not agree with their backs. (Repeated flexion may jack up the discs.) Even if you are not one of them, it is a good idea to do a few back bends between your sets.
Russian life is hard and it produces hard people. Many conveniences Americans take for granted are rare luxuries in the countries of the former Soviet Union. Washing machines and dryers, for instance. Most Russian women still wash and wring out their laundry by hand! They usually do not get much help from their husbands unless their husbands are Sambo players.
Sambo stands for SAMOzaschita Bez Oruzhiya, ‘self-defense without weapons’, a Russian martial art and sport similar to judo. Its practitioners are not better husbands; they have a selfish reason. They know that twisting wet clothes, especially the tough jackets they train and compete in, develops a vise-like grip. Besides, you cannot help using the rest of your upper body muscles, especially the abs, the pecs, and the lats. The result is a body of stone.
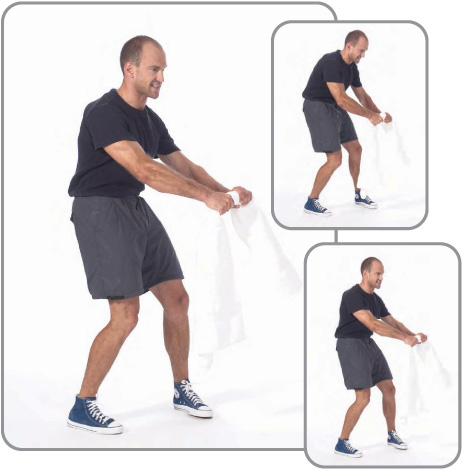
The Russian laundry.
I do not really see any of you doing laundry by hand, but you can find a towel anywhere, wet it, and wring it out. Somehow it is more fun when it is not a household chore. Fold a wet towel, the more times the harder. Start wringing it out. Forcefully exhale as you twist the towel. Pretend that the air flows through your hands. Don’t let the pressure go to your head. Turn your toes slightly in and keep your legs tense as bowstrings. Tuck in your tailbone and tense your glutes. Flex your abs, but do not suck them in. Note how your torso muscles tense and your body ‘winds up’. Pay attention to how the action starts in your lower abdomen and spirals through your armpits, the pecs and the lats, into your arms. Press your shoulders down away from your ears and do not let your elbows flare. Feel incredible overall tension.
Rest briefly, rewet your towel, and wring it out in the opposite direction. Try to get every bit of water out of the towel. Do as many sets as you wish, until your muscles from the waist up feel thoroughly worked. Remember that the more times you fold the towel and the drier you wring it the greater the overload. In a pinch this exercise will work with a dry towel, but not quite as well.
Make sure to practice Fast & Loose style relaxation exercises between sets. ‘Shake water’ off your limbs, jog loosely in place, etc. Such moves are an essential part of all Russian athletes’ regimens. It is a fact that improving your relaxation skills will make you a more efficient animal. Also relax briefly between each twist. You should not feel any pressure in your head or get dizzy.
For variety you can wring out the towel behind your back, over your head (you had better be on the beach), hold it vertically rather than horizontally, etc. A more localized variation of the drill is drying out a washcloth and eventually a hand towel with one hand. Gather it up into a progressively smaller ball into your hand. Behold the power pump in your forearms!
This out of the box Russian exercise offers a number of unexpected benefits in addition to a thorough upper body workout anywhere, anytime. It teaches you good body mechanics for max strength.
Russian military hand-to-hand combat instructors mention three important principles of power generation: ‘summation’, ‘wave’, and ‘corkscrew’. The first two refer to the essential skill of initiating any effort from the core and then dynamically passing it into the striking limb while adding force from every muscle on the way. If any muscle along the power route fails to kick in, you have, in the words of boxing coach Steve Baccari, RKC of PowerBehindthePunch.com a ‘power leakage’. The strength goes down the drain. It is as true in the bench press as it is on the boxing ring or the wrestling mat.
Mangling a towel will teach you to seamlessly ‘chain’ the effort of all your muscles together. This will pay off in many strength exercises. Not only will you get stronger, your training will also become safer. In addition to robbing you of strength, ‘power leakages’ also create weak links where injuries are likely to occur. Say no to the ‘leakage’. Say yes to the ‘linkage’.*
The third principle of martial power is the ‘corkscrew’. A threaded firearm is superior to a smooth-barreled one. Rotation or spiral tension increases the stability and power of almost any action. This is the essence of the corkscrew principle. Gripping the rifle while isometrically twisting both hands in opposite directions made a dramatic difference for bayonet fighting in the Marine Corps Martial Arts Program. The Marines’ thrusts became more powerful and harder to deflect.
The same is true for gym exercises. Try ‘breaking’ the bar when benching and your BP will go up, once you get the hang of it, because the corkscrew action engages more muscles and makes the weight more stable. You have, in effect, created your own Smith machine. The Russian sambo drill will teach you how to apply this corkscrew.
Because the towel wringing drill does not have an eccentric component it will not make you too sore and you can practice it almost every day. And when you leave the Russian laundromat dripping with sweat, your torso will look like Bruce Lee’s during his striking pauses in the middle of fight scenes.
Comrade, have you heard of the ‘tiger bend’? It is a superman variation of the handstand pushup that makes you press up from an elbow stand, where your parallel forearms and palms are planted flat on the floor while your body is in up the air. “The tiger bend is… a terrific strength feat,” promises Bob Hoffman’s old magazine. “… The movement develops exceptional triceps, the only fault however, you must be a good balancer to perform it.”
Indeed, unless you are a mutant, you have a snowball’s chance in hell of eking out even a single tiger bend. Fortunately, you can improvise a much easier version of this triceps killer in your hotel room. Dennis ‘the Yukon Hercules’ Weis (DennisBWeis.com) recommends it in one of his excellent books.
Do a pushup off your forearms planted parallel about four inches apart, your fingers pointed forward. Tighten up and push up so your elbows clear the deck. Lock out without letting your elbows flare out. Lower yourself in the same groove until your elbows rest on the floor under your body. Do not fall through the last inch or two; this tough portion of the range of motion is most productive! Unless you have weak elbows – enjoy!
You can vary the effect of the exercise slightly by placing your elbows underneath you and bending your arm almost to the point where your forearms touch your bis or planting them further forward and reducing the elbow flexion. Experiment!
Beware: rocking forward to start a rep is a forced rep at best; you will build more muscle if you press up without cheating.
The tiger bend pushup Photos courtesy ExtremeBodyweightTraining.com
The tiger bend pushup can be customized for different levels of strength. Elevate your feet if you can hack it; elevate your hands if the floor version is too hard. You can also practice off your knees.
The toughest variation of the tiger bend pushup calls for using only one arm. You may point your fingers slightly in and your elbow slightly out but do not let your elbow flare out any more when it clears the deck.
As if that was not hard enough, you can shift more of your weight to your hand and almost overbalance forward. You can also make the one arm tiger bend pushup easier by lifting your hips and rocking back on your feet. And easier yet by pushing up from your knees. Calisthenics, or ‘cals’ as they are known in the military, are very versatile.
In any type of the tiger bend pushup, keep you reps under five per set (not that you are likely to manage more anyway). Since your elbows are not used to the intense overload of the tiger bend, start out with the total of ten reps per workout and gradually build up the volume. It is imperative that you employ the high-tension techniques for maximum safety and performance: tense your glutes and abs, squeeze your thighs together, etc.
Go get ‘em, tiger!