I have my fabulous assistant Rachel to thank for the name of this cake – Dazzle Drops were chocolate treats much loved by her and her brother when they were little. Decorate your dazzle drops with sprinkles in a single colour for a sophisticated look, or in a dazzling selection of shades for a more dramatic effect.
chocolate dazzle drop cake
|
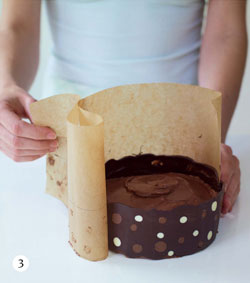
1 quantity Basic Chocolate Cake (page 11) 1 quantity Chocolate Meringue Buttercream (page 17) dazzle drops 100 g/3½ oz. dark/bittersweet chocolate, chopped 100 g/3½ oz. white chocolate, chopped 100 g/3½ oz. milk chocolate, chopped assorted coloured sugar sprinkles/nonpareils two 23-cm/9-inch round cake pans, greased and baselined with greased baking parchment 2 large baking sheets, lined with (uncreased!) baking parchment piping bag, fitted with a star nozzle/tip serves 12 |
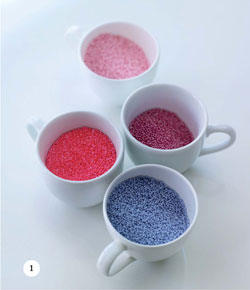
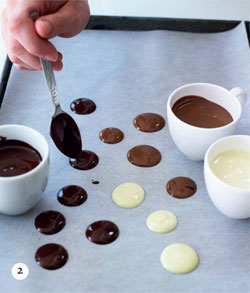
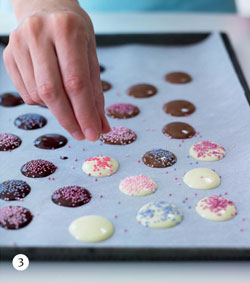
Preheat the oven to 180°C (350°F) Gas 4. Prepare the Basic Chocolate Cake mixture as described on page 11. Divide the mixture evenly between the prepared pans and spread level with a palette knife. Bake the cakes on the middle shelf of the preheated oven for 25 minutes or until a skewer inserted into the middle comes out clean. Let cool in the pans for 3–4 minutes, then turn out onto a wire rack to cool completely. While the cakes are cooling, make the chocolate dazzle drops. Melt the 3 types of chocolate in separate heatproof bowls set over pans of barely simmering water, stirring until smooth. Do not let the base of the bowl touch the water. Dazzle drops look all the more dazzling with a vibrant and contrasting selection of coloured sprinkles/nonpareils. (1) Using a teaspoon, dollop small spoonfuls of dark/bittersweet, white and milk chocolate onto the prepared baking sheets. They can vary in size, and be aware that they will spread slightly as they settle. Continue until you have used up all the melted chocolate. (2) Scatter sprinkles/nonpareils over all the molten chocolate drops and let set until hard. (3) To assemble the cake, place one of the cake layers on a serving dish and spread an even layer of Chocolate Meringue Buttercream over it. Top with the second cake layer and gently press the cakes together. Spread almost all the remaining chocolate meringue buttercream evenly over the top and side of the cake using a palette knife. Spoon the remaining chocolate meringue buttercream into the piping bag and pipe shell shapes around the top edge of the cake and small rosettes around the bottom edge. Press the chocolate dazzle drops over the top and side of the cake to cover. |
This cake with its garden of summer blooms and fluttering butterflies would be just the ticket for a birthday party or even a christening tea. You will need to prepare the butterflies and flowers for this cake at least 24 hours in advance. If you are using gum paste, you will find that it is much easier to work with and it will dry much quicker than ready-made royal icing. I have kept the decoration on the butterflies and flowers very simple, but you could always pipe more intricate patterns using royal icing in contrasting colours.
summer garden cake
|
200 g/7 oz. white gum paste assorted food colouring pastes icing/confectioners’ sugar, to dust 1 quantity Royal Icing (page 15) 1 quantity Basic Vanilla Cake (page 11) 1 quantity Meringue Buttercream (page 16) 3 tablespoons good lemon curd (to make your own, see page 17), strawberry jam or raspberry jam assorted butterfly- and flower-shaped cutters three 20-cm/8-inch round cake pans, greased and baselined with greased baking parchment disposable piping bags serves 12 |
Make the butterflies and flowers at least 24 hours before you bake the cake. See page 20 for instructions on how to make them. Use the gum paste tinted in whichever colours you like using food colouring pastes, and make the butterflies and flowers in varying sizes and colours. Once the basic butterfly and flower shapes have dried sufficiently, decorate them with royal icing. Make up small batches of icing in various shades to suit the colour palette you have chosen and spoon them into disposable piping bags. Snip the ends to fine points and pipe decorative patterns over the butterflies and flowers. Let dry for at least a couple of hours before using to decorate the finished cake. When you are ready to make the cake, preheat the oven to 180°C (350°F) Gas 4. Prepare the Basic Vanilla Cake mixture as described on page 11. Divide the mixture evenly between the prepared pans and spread level with a palette knife. Bake the cakes on the middle shelf of the preheated oven for about 25 minutes or until a skewer inserted into the middle comes out clean. Let cool in the pans for 3–4 minutes, then turn out onto a wire rack to cool completely. Meanwhile, use a little food colouring paste of your choice to tint the Meringue Buttercream – stir it in gradually until you get the pale shade you like. To assemble the cake, place one of the cake layers on a serving dish. Spread 2–3 tablespoons of Meringue Buttercream over it, carefully spread half the lemon curd evenly over the top and cover with a second cake layer. Gently press the cakes together. Repeat this process. Spread the remaining meringue buttercream evenly over the top and side of the cake using a palette knife. Refrigerate for 30 minutes. When you are ready to serve the cake, decorate with the butterflies and flowers, pressing them gently into the buttercream. |
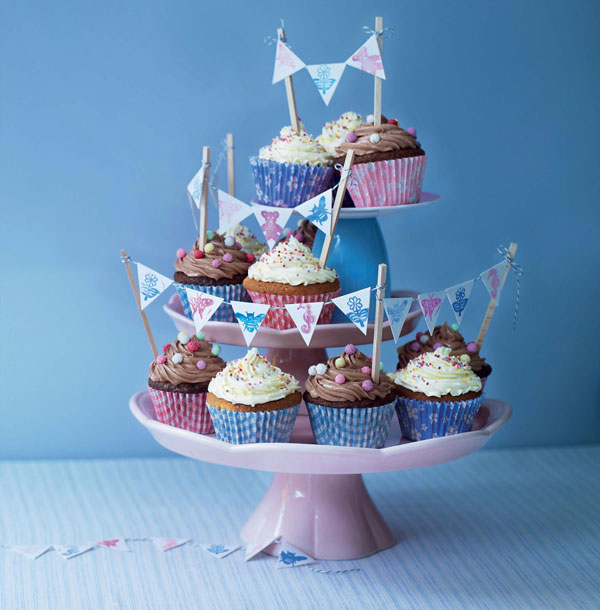
No cake book would be complete without at least one recipe for cupcakes. And no party would be complete without some pretty nostalgic bunting strung from pillar to post. So here I’ve combined the two to make homemade bunting cupcakes. I’ve used rubber stamps with picture shapes to decorate the bunting triangles, but you could try spelling out names or simply using patterned paper. Rubber stamps in alphabets, numbers and shapes are widely available in good artist supply stores and online, and ink pads now come in a dazzling rainbow of colours.
cute cupcakes with bunting
|
1 quantity Basic Vanilla Cake (page 11) 1 quantity Basic Chocolate Cake (page 11) 1 quantity Meringue Buttercream (page 16) 1 quantity Chocolate Meringue Buttercream (page 17) assorted coloured sugar sprinkles/nonpareils two 12-hole muffin pans, lined with pretty paper cupcake cases paper or card for making bunting fine ribbon or coloured string glue 2 large piping bags, fitted with star nozzles/tips wooden skewers or thin sticks makes 24 |
Preheat the oven to 180°C (350°F) Gas 4. Prepare the Basic Vanilla Cake mixture as described on page 11. Divide the mixture evenly between 12 cupcake cases and bake on the middle shelf of the preheated oven for about 20 minutes or until a skewer inserted into the middle comes out clean. Let cool in the pans for 3–4 minutes, then turn out onto a wire rack to cool completely. Prepare the Basic Chocolate Cake mixture as described on page 11 and bake as above. Meanwhile, make the bunting. Using plain or pretty patterned paper or card, cut out small, equal-sized diamond shapes – whatever size and however many you like – and fold them in half to make double-sided triangles. Leave them plain or draw/stamp pictures on them. Take a length of fine ribbon or string and slip the folded triangles over it at regular intervals. Stick each folded triangle shut with a dab of glue. Spoon the Meringue Buttercream into one piping bag and pipe generous swirls of frosting onto each cold vanilla cupcake. Scatter sprinkles/nonpareils over the top. Repeat this process with the Chocolate Meringue Buttercream and chocolate cupcakes. Arrange the cupcakes on pretty cake stands. Work out where you want the bunting to go, then tie the lengths of prepared bunting to wooden skewers or thin sticks and push gently into the cupcakes so that the flags flutter above the cakes. |
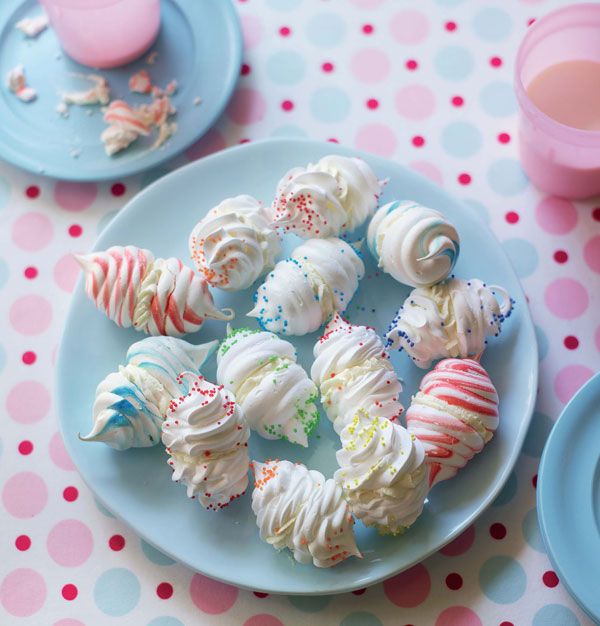
I don’t think I know a child that can resist a pile of colourful mini meringues – and these ones are sure to bring smiles to little faces at any birthday party. I have decorated half of the meringues with coloured sugar sprinkles and marbled the rest with red or blue food colouring. No matter how many you make or in which colours, these meringues will disappear in a wink of an eye.
super-duper disco meringues
|
meringue mixture 300 g/1½ cups caster/superfine sugar 150 g/⅔ cup egg whites (about 4 large) a pinch of salt to decorate 2 food colouring pastes in colours of your choice assorted coloured sugar sprinkles/nonpareils 600 ml/2½ cups double/heavy cream clean craft brush 3 large piping bags, fitted with plain and/or star nozzles/tips 3 large baking sheets, lined with baking parchment makes about 30 |
Preheat the oven to 200°C (400°F) Gas 6. To make the meringue mixture, tip the sugar into a small roasting pan and place on the middle shelf of the preheated oven for about 5 minutes or until hot to the touch. When the sugar is ready, turn the oven temperature down to 110°C (225°F) Gas ¼. Meanwhile, whisk the egg whites in the bowl of a stand mixer until frothy. With the motor running on low speed, tip the hot sugar onto the egg whites in one go. Turn the speed up to medium–high and whisk for about 8 minutes or until the meringue is very stiff, white and cold. Divide the mixture between 3 bowls. Using a clean craft brush, paint 3 fine, straight lines of one food colouring paste on the inside of a piping bag, going from the nozzle/tip toward the opening. Fill the bag with one-third of the meringue mixture. Pipe small (3–4-cm/1¼–1½-inch) meringues onto a prepared baking sheet in spirals. Try to make them all roughly the same size. Repeat this process with another third of the meringue mixture, using a different colour in the piping bag. Fill the third piping bag with the remaining meringue mixture and pipe plain, uncoloured swirls of meringue onto the third baking sheet. Scatter sprinkles/nonpareils lightly over the plain meringues. Bake all the meringues in the preheated oven for about 40–45 minutes. You may need to swap the baking sheets around the shelves halfway through cooking so that all the meringues cook evenly. Remove from the oven and let cool on the baking sheets. Whip the cream until just stiff, then spoon into one of the cleaned piping bags. Pipe the cream onto the base of half of the meringues. Sandwich with another meringue and arrange on a serving dish. |
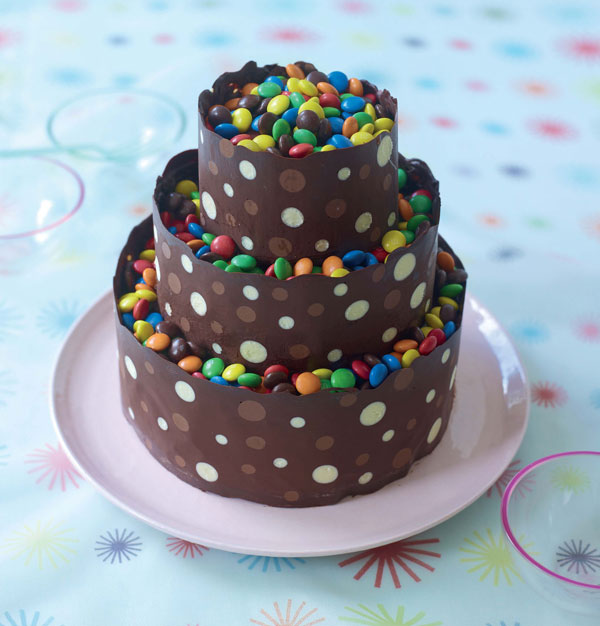
I won’t lie and tell you that this is a cinch to make. The polka-dot collars require patience and a cool, but not too cool kitchen do not attempt this if your kitchen is steaming hot. However, when all’s said and done, this is a real crowd pleaser!
chocolate polka-dot tower
|
1 quantity Basic Chocolate Cake (page 11) 1 quantity Chocolate Fudge Frosting (page 15) 100 g/3½ oz. white chocolate, chopped 100 g/3½ oz. milk chocolate, chopped 300 g/10 oz. dark/semisweet chocolate, chopped assorted coloured, candy-coated chocolate drops two 20-cm/8-inch round cake pans, greased and lined with greased baking parchment 15-cm/6-inch round cake pan, greased and lined with greased baking parchment 10-cm/4-inch round cake pan, greased and lined with greased baking parchment 3 sheets of baking parchment 2 disposable piping bags serves 10–12 |
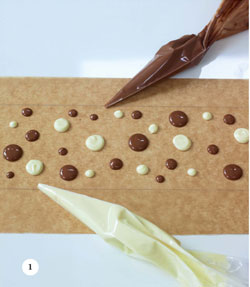
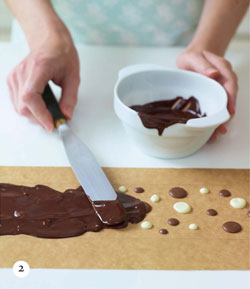
Preheat the oven to 180°C (350°F) Gas 4. Prepare the Basic Chocolate Cake mixture as described on page 11. Divide the mixture evenly between the prepared pans, filling them two-thirds full, and spread level with a palette knife. Bake on the middle shelf of the preheated oven for about 20–30 minutes, depending on their size, until a skewer inserted into the middle comes out clean. Let cool in the pans for 3–4 minutes, then turn out onto a wire rack to cool completely. Spread 3–4 tablespoons of Chocolate Fudge Frosting over one of the 2 largest cakes, then sandwich with the other largest cake. Spread an even layer of the frosting over the top and side of the cake using a palette knife. Cut the medium cake in half horizontally using a long serrated knife, spread 3 tablespoons of the frosting over it and sandwich with the other layer. Spread frosting over the top and side. Cover the smaller cake with frosting. Measure the circumference and height of each cake. Draw a rectangle slightly longer and slightly higher than each cake on the sheets of baking parchment. Flip the paper over. There’s no need to cut along the lines yet. Melt the white and milk chocolates in separate heatproof bowls set over pans of barely simmering water, stirring until smooth. Do not let the base of the bowl touch the water. Spoon each melted chocolate into separate piping bags and snip the ends to fine points. Pipe dots of varying sizes over each sheet of paper within the lines. Let set completely. (1) Melt the dark/semisweet chocolate as above and let cool to room temperature. Carefully, so as not to disturb the dots, spread the melted chocolate within the measured rectangle, completely covering the dots. Try to make the bottom edge quite straight but don’t worry if the top is a little wonky. Repeat with the other 2 sheets of paper. (2) Let cool until almost set. It’s a fine line between being too hard and too soft – it should be pliable but no longer melted. Trim the paper near the bottom line. Take the largest strip and wrap it around the largest cake, chocolate side to the cake. Completely encase the cake and carefully peel away the paper. Hold it in place until you are sure that it is firmly stuck to the cake. (3) Repeat with the other cakes. Let set completely, then stack the cakes one on top of another. Scatter the chocolate drops between the chocolate collar and the cake just before serving. |
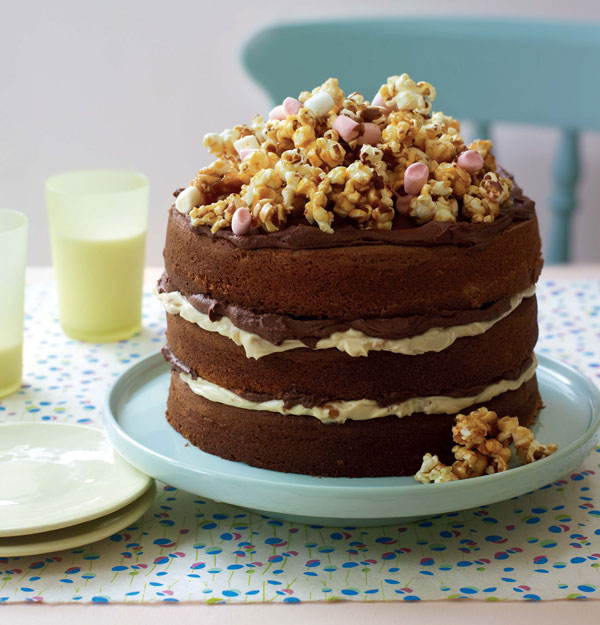
If a Snickers bar was to become a cake, then this is what it would taste like. The salted caramel popcorn topping is possibly a tad indulgent with its chocolate chips, mini marshmallows and peanuts, but I would never suggest that you eat this every afternoon – this is a celebration cake after all. You could leave out the popcorn if you like, but where’s the fun in that?
peanut butter & chocolate cake
with salted caramel corn
|
350 g/2⅔ cups plain/all-purpose flour 3 teaspoons baking powder 1 teaspoon bicarbonate of/baking soda 150 g/10 tablespoons butter, soft 100 g/½ cup crunchy peanut butter 350 g/1¾ cups (caster) sugar 4 large eggs, lightly beaten 1 teaspoon vanilla extract 250 ml/1 cup buttermilk, room temperature 125 g/¾ cup chocolate chips ½ quantity Chocolate Fudge Frosting (page 15) peanut butter frosting 200 g/6½ oz. cream cheese 50 g/3½ tablespoons butter, soft 75 g/⅓ cup peanut butter 1 teaspoon vanilla extract 4 tablespoons maple syrup salted caramel popcorn 50 g/¼ cup (caster) sugar 25 g/2 tablespoons butter 50 g/2 cups plain popcorn (popped weight) 50 g/⅓ cup roasted peanuts 50 g/⅓ cup chocolate chips 50 g/⅔ cup mini marshmallows three 20-cm/8-inch round cake pans, greased and baselined with greased baking parchment serves 12 |
Preheat the oven to 180°C (350°F) Gas 4. Sift together the flour, baking powder and bicarbonate of/baking soda. Cream the butter, peanut butter and sugar in the bowl of a stand mixer until really pale and light – at least 3–4 minutes. Gradually add the beaten eggs to the creamed butter in 4 or 5 additions, mixing well between each addition and scraping down the bowl from time to time with a rubber spatula. Add the vanilla and mix to incorporate. Gradually add the sifted dry ingredients to the cake mixture alternately with the buttermilk. Mix until smooth, then fold in the chocolate chips. Divide the mixture evenly between the prepared cake pans, scraping the mixture from the bowl using a rubber spatula. Spread level with a palette knife and bake on the middle shelf of the preheated oven for about 20–25 minutes or until a skewer inserted into the middle comes out clean. Let the cakes cool in the pans for 3–4 minutes, then turn out onto a wire rack to cool completely. To make the peanut butter frosting, beat the cream cheese until smooth. Add the butter, peanut butter, vanilla and maple syrup and beat again until creamy. To make the salted caramel popcorn, put the sugar and 1 tablespoon water in a small, heavy-based saucepan over low heat and dissolve the sugar without stirring. Once dissolved, increase the heat and continue to cook until the syrup turns into an amber-coloured caramel. Take the pan off the heat and add the butter, swirling to make a smooth butterscotch. Quickly pour the butterscotch over the popcorn and stir well so that it starts to stick together in clumps. Add the peanuts (chopped, if you prefer), chocolate chips and marshmallows. Place one of the cake layers on a serving dish and spread half the peanut butter frosting over it. Carefully spread one-third of the Chocolate Fudge Frosting over that. Cover with a second cake layer. Repeat this process, finishing with the last cake layer and the remaining chocolate fudge frosting on top of that. Pile the salted caramel popcorn on top just before serving. |
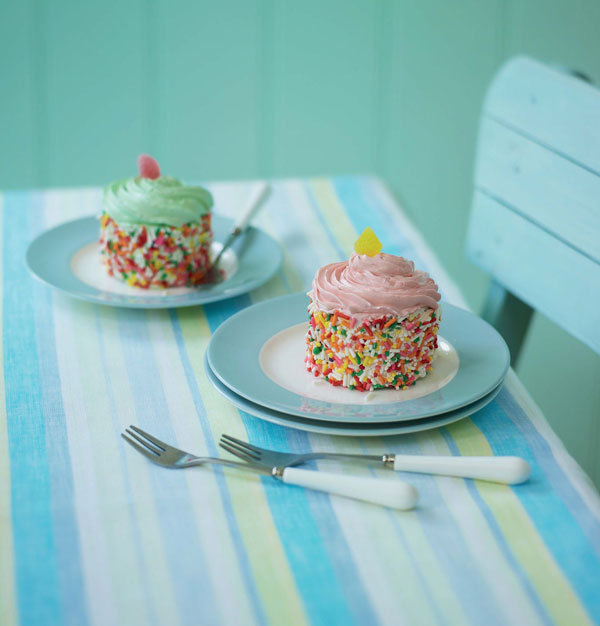
Sometimes smaller is better, and these little gems of cake are no exception. They are perfect for a kids’ party, as they are just enough for little hands and they can be packaged into pretty boxes to take away as favours. They do need to be prepared a day in advance, so plan accordingly. However, that does mean you will have less to worry about on the day of the party!
mini iced gem cakes
|
1 quantity Basic Vanilla Cake (page 11) 4 tablespoons strawberry jam 1 quantity Meringue Buttercream (page 16) assorted food colouring pastes coloured sugar strands/jimmies assorted, coloured gummy sweets/candies 20 × 30 × 4-cm/8 × 12 × 1¾-inch baking pan, greased and lined with greased baking parchment 6–7-cm/2½–3-inch round cookie cutter piping bag, fitted with a star nozzle/tip makes 12 |
Preheat the oven to 180°C (350°F) Gas 4. Prepare the Basic Vanilla Cake mixture as described on page 11, then transfer to the prepared baking pan and spread level with a palette knife. Bake on the middle shelf of the preheated oven for about 30 minutes or until a skewer inserted into the middle comes out clean. Let cool in the pan for 3–4 minutes, then turn out onto a wire rack to cool completely. Wrap the cold cakes in clingfilm/plastic wrap and set aside until the following day. The next day, when you are ready to assemble the cake, gently heat the strawberry jam to make it a little runnier, then strain it to get rid of any lumps. Unwrap the cake and stamp out 12 circles using the cookie cutter. Brush the sides of each cake with a little of the jam. Divide the Meringue Buttercream between 4 bowls and tint each one a different colour using the food colouring pastes. Using a palette knife, spread some meringue buttercream neatly around the side of each cake. Roll the sides in sugar strands/jimmies until evenly coated. Spoon one colour of buttercream into the piping bag and pipe a lovely swirl on top of each cake. Repeat with the remaining buttercream and cakes. Press a gummy sweet/candy on the top of each cake just before serving. |
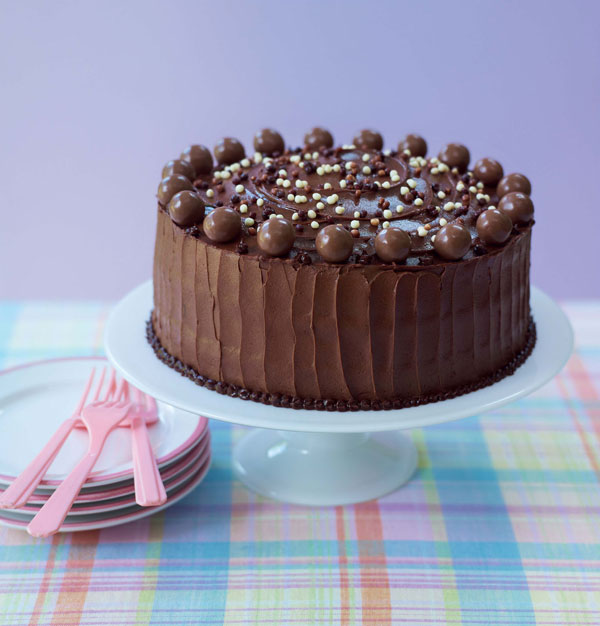
With 3 layers of malted milk-flavoured cake, then a filling and covering of milk chocolate frosting, this is the cake equivalent of a huge bag of Maltesers or Whoppers.
malted chocolate cake
|
250 g/2 cups plain/all-purpose flour 2 teaspoons baking powder ½ teaspoon bicarbonate of/baking soda a pinch of salt 150 g/10 tablespoons butter, soft 225 g/1 big cup (caster) sugar 3 large eggs, lightly beaten 1 teaspoon vanilla extract 175 ml/⅔ cup buttermilk 2 tablespoons malted milk powder 150 g/5 oz. milk chocolate-coated malted milk balls (Maltesers/Whoppers) assorted chocolate sprinkles/nonpareils malted chocolate frosting 200 g/6½ oz. dark/semisweet chocolate, finely chopped 150 g/5 oz. milk chocolate, finely chopped 250 ml/1 cup double/heavy cream 50 g/⅓ cup malted milk powder 2 tablespoons golden syrup 175 g/1½ sticks butter, soft three 20-cm/8-inch round cake pans, greased and baselined with greased baking parchment disposable piping bag serves 10–12 |
Preheat the oven to 180°C (350°F) Gas 4. Sift together the flour, baking powder, bicarbonate of/baking soda and salt. Cream the butter and sugar in the bowl of a stand mixer until really pale and light – at least 3–4 minutes. Gradually add the beaten eggs to the creamed butter in 4 or 5 additions, mixing well between each addition and scraping down the bowl from time to time with a rubber spatula. Add the vanilla and mix to incorporate. Gradually add the sifted dry ingredients to the cake mixture alternately with the buttermilk. Mix until smooth, the fold in the malted milk powder. Divide the mixture evenly between the prepared cake pans, scraping the mixture from the bowl using a rubber spatula. Spread level and bake on the middle shelf of the preheated oven for about 20 minutes or until a skewer inserted into the middle comes out clean. Let the cakes cool in the pans for 3–4 minutes, then turn out onto a wire rack to cool completely. To make the malted chocolate frosting, tip the chopped chocolates into a medium heatproof bowl. Put the cream, malted milk powder and syrup in a small, heavy-based saucepan over medium heat and whisk to combine. Stir occasionally until the cream just comes to the boil. Pour into the bowl of chocolate, stir and set aside to allow the chocolate to melt. Once melted, stir until silky smooth and leave until cold and starting to firm up. Gradually beat in the butter, one tablespoon at a time, until glossy and smooth. Lightly crush about 100 g/3½ oz. of the milk chocolate-coated malted milk balls. Place one of the cake layers on a serving dish and spread 3–4 tablespoons of the malted chocolate frosting over it, then scatter half the malted milk balls on top. Cover with a second cake layer. Repeat this process, finishing with the last cake layer. Spread all but 3 tablespoons of the remaining frosting evenly over the top and side of the cake using a palette knife. Spoon the reserved 3 tablespoons malted chocolate frosting into the piping bag and snip the end to a fine point. Pipe dots around the bottom edge of the cake and around the top edge too, if you like. Arrange the whole malted milk balls and chocolate sprinkles/nonpareils on top of the cake just before serving. |
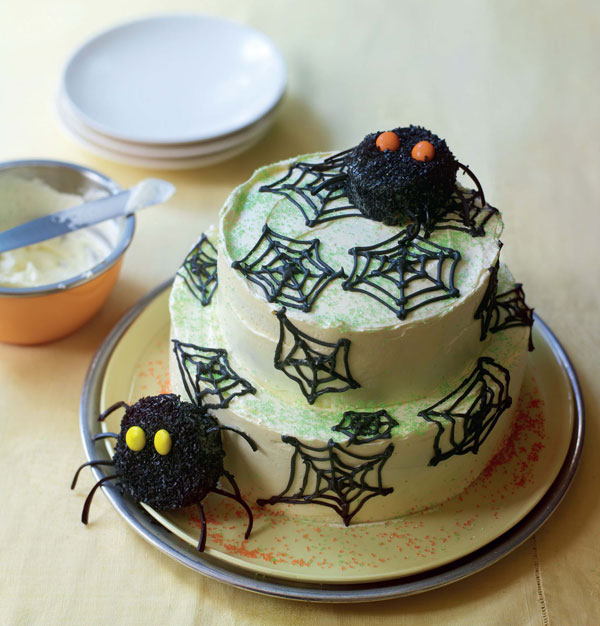
The innocent-looking white frosting on this cake hides a spooky surprise underneath. The cake mixture is divided in two and tinted orange and green, then marbled together before baking. If you don’t want to make the spider cupcakes you could always decorate the cake with spooky toy spiders and other ghoulish Halloween figures.
creepy halloween cake
|
1 quantity Basic Vanilla Cake (page 11) orange food colouring paste green food colouring paste 1 quantity Meringue Buttercream (page 16) black food colouring paste 2 tablespoons black sprinkles/nonpareils or sanding sugar green and/or orange sanding sugar 250 g/2 cups royal icing sugar/mix thin liquorice shoelaces mini orange or yellow candy-coated chocolate drops two 20-cm/8-inch round cake pans, greased and baselined with greased baking parchment 15-cm/6-inch round cake pan, greased and baselined with greased baking parchment muffin pan, lined with 2–3 cupcake cases disposable piping bag serves 8–10 |
Preheat the oven to 180°C (350°F) Gas 4. Prepare the Basic Vanilla Cake mixture as described on page 11. Divide the cake mixture between 2 bowls, and using the food colouring pastes, tint one bowl bright orange and the other bright green. Using a tablespoon, drop alternate spoonfuls of the 2 mixtures into the prepared cake pans, filling them halfway up. Fill the cupcake cases with alternate tablespoons of the cake mixtures, too. Tap the cake pans sharply on the work surface to level the mixture and drag a round-bladed knife through the 2 mixtures to create a marbled effect. Tap the cake pans on the work surface again. Repeat this process with the cupcakes in the muffin pan. Bake everything on the middle shelves of the preheated oven for about 20–35 minutes, depending on their size, until a skewer inserted into the middle comes out clean. Let cool in the pans for 3–4 minutes, then turn out onto a wire rack to cool completely. Tint 4 tablespoons of the Meringue Buttercream black using the food colouring paste. To assemble the cake, place one of the larger cake layers on a serving dish and spread an even layer of the untinted buttercream over it. Top with the second, larger cake layer and gently press the cakes together. If the top cake has a domed surface, use a long serrated knife to trim off the dome and make it completely level. Spread a thin layer of untinted buttercream over the top and side of the cake, then refrigerate for 10 minutes. Cover the cake with another thin layer of untinted buttercream. Now repeat this process with the smaller cake layer. Peel the cupcake cases off the cupcakes and slice the cupcakes in half horizontally. Cover them with the black buttercream and scatter with the black sprinkles/nonpareils or sanding sugar evenly over them to coat. Place the smaller cake on top of the larger cake. Sprinkle green and/or orange sanding sugar over the cake. Make up the royal icing as described on page 15 and tint black using the food colouring paste. Spoon the black icing into the piping bag and snip the end to a fine point. Pipe spider’s webs all over the cake. Press short lengths of the liquorice into the sides of the cupcakes as spider’s legs and give each spider 2 orange or yellow eyes with the candy-coated chocolate drops. Arrange the spiders around the cake to serve. |