For the best results when embarking on any baking, there are a few golden rules that you’d be wise to follow.
Make sure that you weigh and measure the ingredients accurately. Use measuring spoons where necessary as regular cutlery can vary enormously in size – the teaspoon that I use to stir my tea is not necessarily the same size as yours.
Prepare your cake pans according to the recipe before you even start to mix the cake ingredients. I use unsalted butter and nonstick baking parchment to grease and line my pans and sometimes a light dusting of flour if necessary.
If you are using moulded or kugelhopf pans, which are harder to grease, I suggest that you pop the empty pans into the fridge for 15 minutes before brushing the insides with melted butter and dusting with flour. This will help you to be certain that every corner and fold has been thoroughly greased.
When making traditional fruit cakes, I recommend that you wrap the outside of the cake pan in a collar of a double thickness of either brown paper or baking parchment and tie it securely with kitchen twine. This will prevent the outside of the cake browning too quickly during the longer cooking time.
Preheat the oven to the correct temperature using an oven thermometer if possible. This will give you greater accuracy and is all the more important if your oven is on the temperamental side. Position the oven shelves at the correct height in the oven for your pans.
Have all your ingredients ready at room temperature – this generally applies to any dairy produce such as butter, buttermilk, sour cream, milk and eggs.
I find it easier to make my cakes using a stand mixer. It not only makes light work of creaming butter and sugar together, it also whips up beautiful meringues, and in a fraction of the time than it would take by hand. Failing that, you can also use an electric hand whisk.
Rubber spatulas are also an essential part of a cake baker’s kit, making it easy to scrape down bowls and to ensure that every last spoonful of cake mixture makes it into the cake pans, and not onto the fingers and into the mouths of any willing helpers/washer-uppers you may have around.
If you are making multiple cake layers from one batch of mixture, I would suggest that you weigh the batter evenly into the prepared pans to ensure that each cake layer will be the exact same depth once baked.
When you are planning to stack layers of cake or make a cake that should be completely flat on top, if the baked cake has risen, you will need to level it off using a long serrated knife to create a perfectly flat surface.
350 g/2⅔ cups plain/all-purpose flour
3 teaspoons baking powder
1 teaspoon bicarbonate of/baking soda
a pinch of salt
225 g/2 sticks butter, soft
350 g/1¾ cups (caster) sugar
4 large eggs
1 teaspoon vanilla extract
250 ml/1 cup buttermilk, room temperature
two 23-cm/9-inch or three 20-cm/8-inch round cake pans, greased and baselined with greased baking parchment
Preheat the oven to 180°C (350°F) Gas 4.
Sift together the flour, baking powder, bicarbonate of/baking soda and salt.
Cream the butter and sugar in the bowl of a stand mixer until really pale and light – at least 3–4 minutes.
Lightly beat the eggs and vanilla together. Gradually add to the creamed butter in 4 or 5 additions, mixing well between each addition and scraping down the bowl from time to time with a rubber spatula.
Add the sifted dry ingredients to the bowl alternately with the buttermilk. Mix until smooth.
Now turn to the relevant recipe and continue with the instructions, or if you want to bake the cake, divide the mixture evenly between the prepared pans and spread level with a palette knife. Bake the cakes on the middle shelf of the preheated oven for about 25 minutes or until a skewer inserted into the middle comes out clean.
Let cool in the pans for 3–4 minutes, then turn out onto a wire rack to cool completely.
basic chocolate cake
125 g/4 oz. dark/bittersweet chocolate, chopped
300 g/2⅓ cups plain/all-purpose flour
25 g/3 tablespoons cocoa powder
2 teaspoons bicarbonate of/baking soda
½ teaspoon baking powder
a pinch of salt
125 g/1 stick butter, soft
200 g/1 cup (caster) sugar
200 g/1 cup packed light brown soft sugar
4 large eggs, beaten
2 teaspoons vanilla extract
225 ml/1 cup sour cream, room temperature
175 ml/¾ cup boiling water
two 23-cm/9-inch or three 20-cm/8-inch round cake pans, greased and baselined with greased baking parchment
Preheat the oven to 180°C (350°F) Gas 4.
Melt the chocolate in a heatproof bowl set over a pan of barely simmering water, stir until smooth, then let cool slightly.
Sift together the flour, cocoa powder, bicarbonate of/baking soda, baking powder and salt.
Cream the butter and both sugars in the bowl of a stand mixer for 3–4 minutes.
Gradually add the beaten eggs to the creamed butter in 4 or 5 additions, mixing well between each addition and scraping down the bowl from time to time with a rubber spatula. Add the vanilla and melted chocolate and mix again until combined.
Mix one-third of the sifted dry ingredients into the mixture, then half the sour cream. Repeat this process and finish with the last third of dry ingredients. Mix until smooth. Slowly pour in the boiling water and mix until smooth.
Now turn to the relevant recipe and continue with the instructions, or if you want to bake the cake, divide the mixture evenly between the prepared pans and spread level with a palette knife. Bake the cakes on the middle shelf of the preheated oven for about 25 minutes or until a skewer inserted into the middle comes out clean.
Let cool in the pans for 3–4 minutes, then turn out onto a wire rack to cool completely.
50 g/3 tablespoons butter
50 g/½ cup ground almonds
150 g/1 cup plus 3 tablespoons plain/all-purpose flour
1 teaspoon baking powder
a pinch of salt
6 large eggs
150 g/¾ cup (caster) sugar
1 teaspoon vanilla extract
two 23-cm/9-inch or three 20-cm/8-inch round cake pans, greased and baselined with greased baking parchment
Preheat the oven to 180°C (350°F) Gas 4.
Melt the butter and let cool slightly.
Sift together the ground almonds, flour, baking powder and salt.
Put the eggs, sugar and vanilla in the bowl of a stand mixer and whisk on medium–high speed until the mixture has trebled in volume, is thick, pale, very light and will leave a ribbon trail when the whisk is lifted from the bowl.
Using a large metal spoon, gently fold the sifted dry ingredients into the egg mixture. Pour the melted butter around the inside edge of the bowl and gently fold in.
Now turn to the relevant recipe and continue with the instructions, or if you want to bake the cake, divide the mixture evenly between the prepared cake pans, spread level and bake on the middle shelf of the preheated oven for about 20 minutes or until golden, well risen and a skewer inserted in the middle comes out clean.
Let cool in the cake pans for a couple of minutes before turning out onto a wire rack to cool completely.
light fruit cake
100 g/⅔ cup undyed glacé cherries
50 g/⅓ cup blanched almonds
50 g/⅓ cup mixed candied peel
75 g/½ cup dried cranberries (optional)
500 g/1 lb. mixed dried fruit (sultanas, [golden] raisins and currants)
grated zest of 1 lemon
grated zest of 1 orange
275 g/2¼ cups strong white bread flour or plain/all-purpose flour
50 g/½ cup ground almonds
1 teaspoon baking powder
a pinch of salt
225 g/15 tablespoons butter, soft
150 g/¾ cup golden caster/raw cane sugar
75 g/⅓ cup golden syrup/light corn syrup
3 large eggs, lightly beaten
2 tablespoons brandy or milk
deep, 20-cm/8-inch round cake pan, lined with a double layer of greased baking parchment
extra baking parchment
kitchen twine
Preheat the oven to 150°C (300°F) Gas 2.
Wrap the outside of the cake pan in a double thickness of baking parchment and secure with kitchen twine.
Rinse the glacé cherries under warm water, thoroughly pat dry on kitchen paper/paper towels, cut in half and tip into a large bowl. Roughly chop the almonds and add to the bowl along with the mixed candied peel, dried cranberries, mixed dried fruit and the grated lemon and orange zest. Mix well and set aside.
Sift together the flour, ground almonds, baking powder, and salt.
Cream the butter, sugar and syrup in the bowl of a stand mixer until really pale and light – at least 3–4 minutes.
Gradually add the beaten eggs to the creamed butter in 4 or 5 additions, mixing well between each addition and scraping down the bowl from time to time with a rubber spatula.
Add the sifted dry ingredients to the bowl using a large metal spoon. Add the dried fruit mixture and the brandy, stir to thoroughly combine and spoon into the prepared cake pan, scraping the mixture from the bowl using a rubber spatula. Spread level and bake just below the middle of the preheated oven for 1 hour 40 minutes or until a skewer inserted in the middle of the cake comes out clean. If the top of the cake is browning too quickly, loosely cover with a sheet of baking parchment.
Let cool completely in the cake pan on a wire rack. When cold, wrap in clingfilm/plastic wrap until ready to decorate.
classic rich fruit cake
150 g/1 cup undyed glacé cherries
200 g/1⅓ cups raisins
200 g/1⅓ cups currants
200 g/1⅓ cups sultanas/golden raisins
100 g/⅔ cup mixed candied peel, finely chopped
100 g/⅔ cup roughly chopped almonds
2 teaspoons mixed spice/apple pie spice
2 teaspoons vanilla extract
grated zest and juice of 1 lemon
grated zest and juice of 1 orange
200 ml/¾ cup brandy, marsala or whisky
200 g/1⅔ cups plain/all-purpose flour
50 g/½ cup gound almonds
1 teaspoon baking powder
a pinch of salt
250 g/2 sticks butter, soft
200 g/1 cup light muscovado sugar
50 g/3 tablespoons golden syrup/light corn syrup
4 large eggs, beaten
deep, 23-cm/9-inch round cake pan, lined with a double layer of greased baking parchment
baking parchment
kitchen twine
Wrap the outside of the cake pan in a double thickness of baking parchment and secure with kitchen twine.
Rinse the glacé cherries under warm water, thoroughly pat dry on kitchen paper/paper towels, cut in half and tip into a large saucepan.
Add the dried fruit, almonds, spice, vanilla, grated orange and lemon zests and the juice and brandy to the saucepan. Set over low–medium heat and warm until the liquid is just below boiling. Immediately remove from the heat, stir and leave until cold and the fruit has become plump, juicy and has absorbed almost all the liquid about 3–4 hours. Stir the mixture every 3 minutes or so while cools.
Preheat the oven to 150°C (300°F) Gas 2.
Sift together the flour, ground almonds, baking powder and salt.
Cream the butter, sugar and syrup in the bowl of a stand mixer until really pale and light – at least 3–4 minutes.
Gradually add the beaten eggs to the creamed butter in 4 or 5 additions, mixing well between each addition and scraping down the bowl from time to time with a rubber spatula.
Add the sifted dry ingredients to the bowl using a large metal spoon. Add the dried fruit mixture and any remaining liquid, stir to thoroughly combine and spoon into the prepared cake pan, scraping the mixture from the bowl using a rubber spatula. Spread level and bake just below the middle of the preheated oven for about 2 hours or until a skewer inserted in the middle of the cake comes out clean. If the top of the cake is browning too quickly, loosely cover with a sheet of baking parchment.
Let cool completely in the cake pan on a wire rack. When cold, wrap in clingfilm/plastic wrap until ready to decorate.
No self-respecting celebration cake is complete without its finger-licking frosting and filling. And for some eager cake-eaters that I know, the frosting is the best part and they will happily scoop up spoonfuls without needing even a crumb of cake! I’m mentioning no names… Most of these frostings can be piped into elaborate swirls and rosettes or simply spread in generous swooshes using a palette knife. Or eaten straight from the bowl if your name is Kate.
Once the cake is baked and you’ve made the frosting, it’s a good time to get the kids involved. Only attempt this if you are happy for your cake to look a little less refined and a little more lovingly homemade! If it’s a surprise for Father’s Day or a a birthday, for example, kids will love to help out and get messy with a piping bag. Start with something very simple, like the Lemon Poppy Seed Cake on page 28, or let them roll the Mini Iced Gem Cakes in the sugar strands/jimmies on page 62. Older or more confident children might like to try piping the rosettes around the Chocolate Dazzle Drop Cake on page 50. However, do be wary of letting children lick the spoon if the frosting contains raw eggs.
chocolate ganache
This rich chocolate frosting is an ideal partner for a more sophisticated cake. Give it the quality it deserves by using chocolate with 70% cocoa solids.
200 g/6½ oz.dark/bittersweet chocolate, finely chopped
225 ml/1 cup double/heavy cream
2 tablespoons light brown soft sugar
50 g/3 tablespoons butter, diced
Put the chocolate in a medium bowl.
Put the cream and sugar in a small saucepan and heat until only just boiling and the sugar has dissolved. Pour the hot cream over the chocolate and let melt for 5 minutes. Add the butter and stir gently until smooth. Let thicken to the desired consistency before using.
cream cheese frosting
Always use good-quality cream cheese for frosting, as some brands are more salty than others, and add the honey or maple syrup according to taste.
300 g/10 oz. cream cheese
50 g/3 tablespoons butter, soft
2–3 tablespoons (clear) honey or maple syrup
1 teaspoon vanilla extract or the seeds from ½ vanilla pod/bean
Tip the cream cheese into a bowl, add the butter and mix until smooth. Gradually add the honey or maple syrup to taste. Add the vanilla and mix until smooth.
I like to use this frosting for kids’ cakes as it is a less intense chocolate hit, but it’s by no means any less delicious. It can be used as a filling and frosting for either chocolate or vanilla cakes – just don’t forget to pile on the chocolate shavings or sugar sprinkles.
350 g/12 oz. dark/semisweet chocolate, chopped
225 g/15 tablespoons butter, diced
175 ml/⅔ cup milk
1 teaspoon vanilla extract
350 g/3 cups icing/confectioners’ sugar, sifted
Melt the chocolate and butter in a heatproof bowl set over a pan of barely simmering water. Do not let the base of the bowl touch the water. Stir until smooth and thoroughly combined. Remove from the heat and cool slightly.
In another bowl whisk together the milk, vanilla and sugar until smooth. Add the melted chocolate and butter and stir until smooth. Let thicken to the desired consistency before using.
chocolate cream frosting
This is a silky, luscious affair and is ideal for use on smaller, delicate cakes.
100 g/½ cup (caster) sugar
½ teaspoon instant coffee granules or coffee extract
4 large egg yolks
1 teaspoon vanilla extract
200 g/6½ oz. dark/bittersweet chocolate, chopped
300 g/2½ sticks butter, soft
Tip the sugar into a small pan with 6 tablespoons water. Bring to the boil to dissolve the sugar, then boil steadily for 2–3 minutes until slightly thickened. Dissolve the coffee granules in 1 teaspoon boiling water and add to the syrup. Alternatively, add the coffee extract straight to the sugar syrup.
Place the egg yolks and vanilla in the bowl of a stand mixer and whisk to combine. Whisking constantly, pour the hot syrup into the yolks in a steady stream. Continue whisking on high speed until the mixture is thick, cold and will hold a ribbon trail when the whisk is lifted from the mixture.
Melt the chocolate in a heatproof bowl set over a pan of barely simmering water. Do not let the base of the bowl touch the water. Let cool slightly.
Gradually add the butter to the egg mixture, beating well between each addition. Add the cooled chocolate and stir to thoroughly combine.
royal icing
You can make royal icing using raw egg whites, but if you prefer not to, royal icing sugar/mix is available from supermarkets and sugarcraft stores.
1 large egg white
250–300 g/1¾–2⅓ cups icing/confectioners’ sugar, sifted
Using a balloon whisk, beat the egg white until foamy. Gradually add the icing/confectioners’ sugar and whisk until the desired stiffness is reached – for piping, the icing should hold a solid ribbon trail when the whisk is lifted from the bowl. Cover with clingfilm/plastic wrap until ready to use.
An easier method of making royal icing is to use royal icing sugar/mix. This is perfect if you prefer not to use raw egg whites, too. It contains dried powdered egg white and simply needs sifting into a bowl and beating or whisking with cold water until the desired consistency is achieved.
The perfect frosting for a delicately flavoured base, this encases a cake in a cloud of soft meringue without overpowering and taking over. You must use this as soon as it’s made, as it will set as it cools, making spreading impossible.
250 g/1¼ cups caster/superfine sugar
4 large egg whites
a pinch of salt
sugar thermometer
Put all the ingredients with 1 tablespoon water in a medium heatproof bowl set over a pan of simmering water. Whisk slowly with a balloon whisk until the sugar has dissolved and the mixture is foamy. Continue to cook and whisk until the mixture reaches 60°C/140°F on a sugar thermometer – about 4 minutes.
Quickly pour the mixture into the bowl of a stand mixer and whisk on medium–high speed for 3 minutes, or until thick and glossy. Use immediately.
meringue buttercream
This is my all-time favourite frosting. For a buttercream it’s surprisingly light due to the addition of meringue. It’s enormously versatile and can be flavoured with vanilla, lemon or coffee extract, or even strawberry jam and lemon curd. It’s important to add the butter only once the meringue is cooled otherwise it will melt and make the frosting curdle.
275 g/1⅓ cups caster/superfine sugar
4 large egg whites
a pinch of salt
350 g/3 sticks butter, soft and diced
1 teaspoon vanilla extract or the seeds from ½ vanilla pod/bean
sugar thermometer
Put the sugar, egg whites and salt in a medium heatproof bowl set over a pan of simmering water. Whisk slowly with a balloon whisk until the sugar has completely dissolved and the mixture is foamy. Continue to cook and whisk until the mixture reaches 60°C/140°F on a sugar thermometer – about 4 minutes.
Quickly pour the mixture into the bowl of a stand mixer and whisk on medium–high speed for 3 minutes, or until cooled, thick, stiff and glossy. Gradually add the butter, beating constantly, until the frosting is smooth. Fold in the vanilla and use immediately.
chocolate meringue buttercream
This is a slightly lighter alternative to Chocolate Fudge or Chocolate Cream Frosting and is perfect for piping. If you have any left over, it can be stored in the fridge for a couple of days. Bring back to room temperature and beat until smooth before using to top a batch of cupcakes or whatever takes your fancy. I would use chocolate with 70% cocoa solids for this frosting.
300 g/10 oz. dark/bittersweet chocolate, chopped
225 g/1 cup plus 2 tablespoons caster/superfine sugar
4 large egg whites
a pinch of salt
350 g/3 sticks butter, soft and chopped
sugar thermometer
Melt the chocolate in a heatproof bowl set over a pan of barely simmering water. Do not let the base of the bowl touch the water.
Put the sugar, egg whites and salt in a medium heatproof bowl set over a pan of simmering water. Whisk slowly with a balloon whisk until the sugar has completely dissolved and the mixture is foamy. Continue to cook and whisk until the mixture reaches 60°C/140°F on a sugar thermometer – about 4 minutes.
Quickly pour the mixture into the bowl of a stand mixer and whisk on medium–high speed for 3 minutes, or until cooled, thick, stiff and glossy. Gradually add the butter, beating constantly, until the frosting is smooth. Fold in the melted chocolate and use immediately.
mocha meringue buttercream
Make the Chocolate Meringue Buttercream as described above. Add 2–3 teaspoons instant coffee granules dissolved in 1 teaspoon boiling water when you add the melted chocolate.
rum or brandy syrup
150 g/¾ cup (caster) sugar
3 tablespoons rum, brandy or Amaretto
Tip the sugar into a small saucepan with 150 ml/⅔ cup water. Bring slowly to the boil over medium heat, stirring to dissolve the sugar. Continue to simmer for 2–3 minutes until slightly thickened. Remove from the heat and add the rum, brandy or Amaretto. Let cool before using. Any leftover syrup will keep well in an airtight container or screw-top jar in the fridge for a couple of weeks.
hazelnut liqueur syrup
50 g/¼ cup (caster) sugar
125 ml/½ cup water
70 ml/5 tablespoons hazelnut liqueur, such as Frangelico
Heat the sugar and water in a small saucepan to dissolve the sugar, then bring to the boil and continue to cook until the syrup has reduced by half. Remove from the heat and add the hazelnut liqueur. Stir and let cool before using.
lemon curd
This is an ideal way of using up leftover egg yolks if you’ve been making meringues or meringue frosting. But seeing as homemade lemon curd is so utterly delicious anyway, I would suggest making it and then using up the leftover egg whites to make meringues!
6 large egg yolks
grated zest and juice of 3 lemons
175 g/¾ cup plus 2 tablespoons (caster) sugar
75 g/5 tablespoons unsalted butter
a pinch of salt
Combine the egg yolks, lemon juice, sugar and butter in a medium heatproof bowl set over a pan of simmering water. Do not let the base of the bowl touch the water. Whisk the mixture to combine, then stir constantly for about 5–7 minutes until thickened and the curd will coat the back of a wooden spoon.
Remove from the heat and pass through a fine nylon sieve/strainer into a bowl. Add the lemon zest, stir until smooth and cover the surface of the curd with clingfilm/plastic wrap to prevent a skin from forming. Let cool completely, then refrigerate until firm before using.
piping bags
If you are new to piping, I would recommend that you practise piping on some baking parchment first to get a feel for how the frosting behaves.
Piping nozzles/tips and bags come in a variety of sizes and shapes. With a small selection of nozzles/tips you can create myriad patterns. As for the piping bags, I would suggest that you have one or two larger, plastic-coated piping bags (rather than woven or cloth), which are ideal for piping meringues. You should also have a stash of plastic disposable piping bags for smaller decorative projects. These come in multipacks and are invaluable for fine patterns, dots, writing, outlines, etc. You simply fill them with the frosting, snip off the end to a fine point and get piping!
I find special nozzles for making leaf shapes and star-shaped nozzles/tips in assorted sizes are fantastically useful and can be used in a variety of ways to create simple yet pretty results.
ready-to-roll icing
Ready-to-roll royal and fondant icing can be found in most supermarkets. It comes in blocks of varying sizes and is widely available in white or ivory, as well as many colours from specialist sugarcraft suppliers (see page 128). However, it is easy to tint using food colouring pastes. Fondant icing sets slightly softer than royal icing, but they are interchangeable in most recipes.
When covering a cake with royal or fondant icing, you ideally want a silky-smooth surface without lumps, bumps or creases (although these can usually be hidden with strategically placed ribbons, flowers and piping).
Carefully roll the icing out to an even thickness on a work surface that’s dusted with icing/confectioners’ sugar. The icing needs to be large enough to cover the top and sides of the cake in one piece. Roll the icing around and over the rolling pin and unroll it over the cake from the back of the cake to the front (or left to right) ensuring that it is centred and that there is an equal amount of icing covering all sides. Dust your (clean) hands with more sugar and use the palm of your hands to gently smooth the icing into place, getting rid of any creases as you go. Use a small, sharp knife to trim off any excess icing from the bottom of the cake.
embossing
Use embossing tools to create eye-catching patterns on either gum or sugar paste, fondant or royal icing. They are available from cake decorating stores or online and usually come in geometric shapes, fancy patterns, flowers and leaf shapes. Alternatively, look around your kitchen and you’ll find embossers in unlikely places: the fine side of a grater, the underside of antique silver cutlery and the points of piping nozzles/tips.
using dowel rods & stacking tiered cakes
For cakes that require extra support when being stacked, you’ll need to use dowelling, which is available from cake decorating and sugarcraft suppliers. Dowel rods are plastic supports about the thickness of a pencil which can be cut to size using small shears. This acts as a set of pillars inside the finished cake onto which the next cake (on a cake board) will sit without sinking into the cake below. See page 100 for step-by-step pictures and instructions on stacking tiered cakes using dowel rods.
crystallizing flowers & fruit
This is an incredibly simple yet stunning way to decorate cakes and requires no specialist kit or artistic genius.
If you are using fresh flower petals, make sure they are cut from fresh, non-toxic, unsprayed and untreated flowers, and better still, cut from your own garden.
Rose petals, small rose buds, pansies, violets, primroses and nasturtiums all make beautiful crystallized petals. See page 78 for imstructions on crystallizing roses, for example.
Fresh berries and fruit are also perfect for crystallizing. Try grapes, red and white currants, cherries, cranberries, physallis/cape gooseberries and even small apples and pears. The cake on page 112 is a lovely example of how best to showcase crystallized fruits.
Once made, petals and fruits will dry and harden in about 2–4 hours and they are best used within 48 hours of making, as their colour will start to fade.
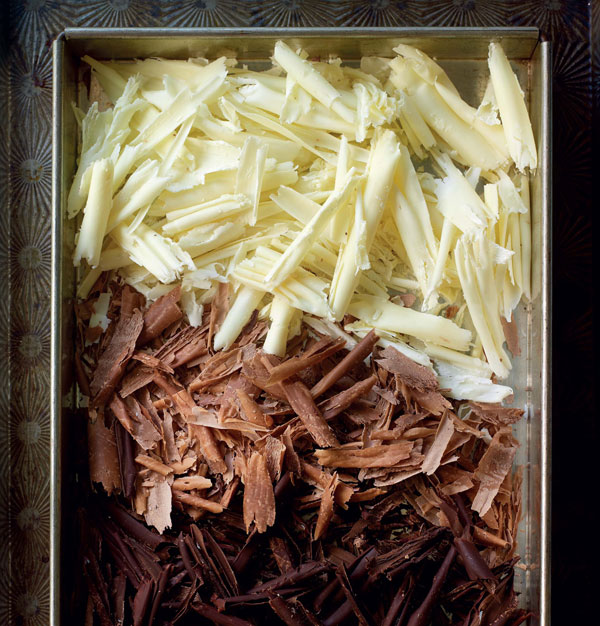
chocolate shavings
Showering a cake with chocolate shavings is a simple yet stunning way of decorating a cake (it also hides a multitude of icing sins!).
Break 250 g/9 oz. milk, dark/bittersweet or white chocolate into pieces, tip into a heatproof bowl and set over a pan of barely simmering water. Do not let the bottom of the bowl touch the water. Melt the chocolate and stir until smooth. Pour the chocolate onto the underside of a baking sheet and spread to a depth of around 5 mm/¼ inch using a palette knife. Let set in a cool place.
Set the baking sheet on a damp tea towel on the work surface to prevent it from slipping. Hold a large kitchen knife in both hands and at a right angle to the chocolate. Drag the knife, across the set chocolate, towards you to make shards, shavings and curls of chocolate. Use a palette knife or fish slice to transfer the curls to another baking sheet or shallow box and chill until needed. Continue until all the chocolate has been shaved.
For a cheat’s method, simply use a vegetable peeler to shave small curls off a bar of chocolate – the effect is not as dramatic, but just as delicious!
chocolate plastique
Chocolate plastique is an amazingly easy way of creating shapes. Using only chocolate and liquid glucose, you can effectively make a modelling dough with which to construct intricate flowers, butterflies and many other motifs. See page 28 for instructions.
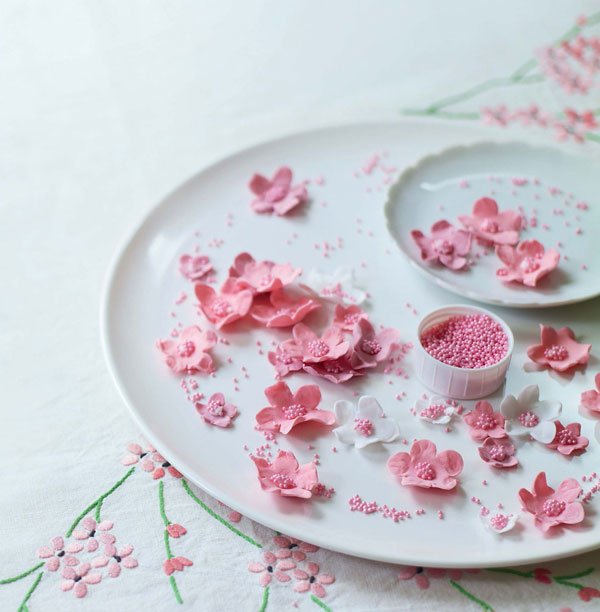
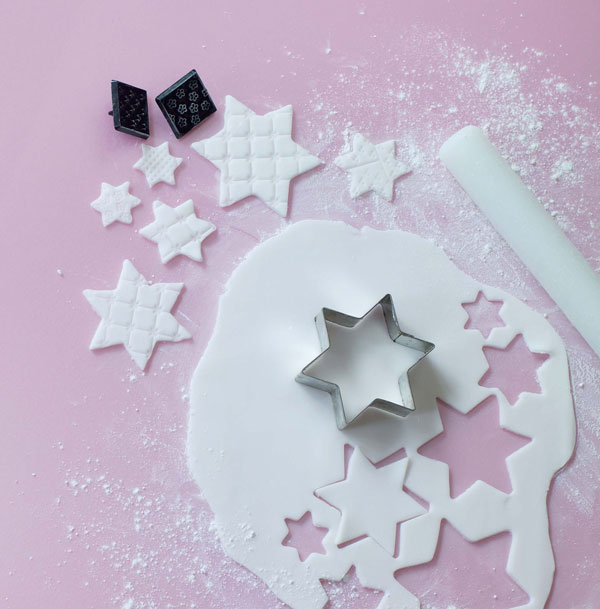
making shapes with gum paste
When making flowers or other shapes to decorate a cake, I find that edible fine modelling paste such as gum or florist paste is the best thing to use. It generally comes in small packs and usually in white or ivory, although it is also available in a small range of colours. It is, however, easy to tint whichever shade you like using food colouring pastes. It is readily available at sugarcraft suppliers or online (see page 128).
Break off a small amount of paste at a time and keep the remainder tightly covered with clingfilm/plastic wrap to prevent it from drying out. Very lightly dust the work surface with icing/confectioners’ sugar or rub a little groundnut or sunflower oil onto the area you are working in. Using a small rolling pin, roll out the gum paste as thinly as possible – roughly 1 mm/ inch thick – and stamp out shapes or petals using cutters. Use your fingers to bend and shape the leaves or petals and then let dry on a tray or baking sheet covered with nonstick baking parchment. Repeat with the remaining gum paste. See page 52 for some beautiful gum-paste butterflies and flowers.
Decorate gum-paste shapes with finely piped dots of tinted royal icing left plain or adorned with sprinkles/nonpareils.
If you can’t get hold of gum paste, you can use ready-to-roll royal or fondant icing, however it lacks the delicacy of gum paste and is not as easy to use. You will also find that it will not roll out as thinly and it takes longer to dry.