
Steak makes a carnivore’s heart pound faster, and pork grabs top honors at barbecue competitions. But where’s the glory in poultry? When’s the last time you heard a food lover wax rhapsodic about a grilled chicken breast? Or a competition pit master take top honors with turkey or duck? Well, I cry fowl, and I’m not alone. Pollo al mattone (chicken under a brick) is one of the glories of Italian grilling. (Learn how to grill it under a salt brick.) Poulet rôti à la broche (rotisserie chicken) holds a sacred spot at French Sunday supper. From Peruvian cumin- and chile-scented pollo asado to Chinese barbecued duck, poultry ranks high elsewhere in the world’s grill cultures. Come to think of it, and closer to home, more and more of us now smoke-roast that centerpiece of the Thanksgiving dinner: turkey. In this chapter, you’ll learn how to grill, spit-roast, and smoke-roast superlative poultry. Cry fowl. Do it often.
POULTRY
Note: The USDA recommends cooking chicken and turkey to at least 165°F.

with Drip Pan Potatoes

Yield: Serves 2 to 4
Method: Rotisserie/spit-roasting
Prep time: 15 minutes
Grilling time: 1¼ hours
Grill/Gear: A grill with a rotisserie. You also need butcher’s string; 2 basting brushes; a large (9-by-13-inch) aluminum foil drip pan; and an instant-read thermometer. Note: Although it’s not typically French, if you want a wood smoke flavor, add 2 hardwood chunks or 1½ cups wood chips (if using the latter, soak in water to cover for 30 minutes, then drain) to the fire.
Shop: Your rotisserie chicken will be only as good as the bird you start out with. Organic to be sure. One good source is Smart Chicken (smartchicken.com). Even better if it’s a local farm-raised heritage breed like a Rhode Island Red, Plymouth Rock, or Araucana.
Insider tip: The secret to a great rotisserie chicken is to baste it often with herb butter. If you want a completely over-the-top rotisserie chicken, stuff some of that butter under the skin, as described in the turkey recipe. (For the chicken, don’t melt the butter, but beat the shallots and herbs into room temperature–soft butter.) Don’t have a rotisserie? Cook the bird using indirect grilling.
Whenever my wife and I visit France, we have a ritual on the day of our departure from Paris. We stop at a local street market to buy a rotisserie chicken to eat on the way home. The French make the world’s best rotisserie chicken—often with little more by way of seasonings than sea salt and butter. The quality of the bird helps: The French put a high premium on flavorful farm-raised breeds. But above all, it’s the internal and external basting that results from the slow gentle rotation of the chicken on the rotisserie. Then, there’s the heat source: a wood fire in the countryside, gas in the cities, but always live flames. The following chicken owes its extraordinary flavor to a generous basting with tarragon-shallot-lemon butter. If you’ve always found roast chicken underwhelming, this one will make you a convert.
Ingredients
For the Chicken
1 roasting chicken (3½ to 4 pounds), preferably organic
Coarse salt (sea or kosher) and freshly ground black pepper
3 large shallots, peeled and minced
2 sprigs tarragon or other herb
2 strips fresh lemon zest for the cavity of the bird
For the Herb Butter
6 tablespoons (¾ stick) unsalted butter
2 tablespoons minced shallots (from above)
2 tablespoons chopped fresh tarragon, or other fresh herb
½ teaspoon finely grated fresh lemon zest
For the Potatoes
1½ pounds fingerling potatoes, scrubbed and blotted dry (cut any large ones in half on the diagonal)
4 sprigs fresh tarragon or other herb
1 tablespoon herb butter (from above)
Coarse salt (sea or kosher) and freshly ground black pepper
1. Prepare the chicken: Remove any giblets and large lumps of fat from inside the chicken. Season the front and main cavities with salt and pepper. Set aside 2 tablespoons of the minced shallots and place the remainder, plus 2 tarragon sprigs and the 2 strips of lemon zest, in the cavity. Truss the chicken by tying the ends of the drumsticks together with butcher’s string. Fold the wing tips under the body. This gives the bird a neat cylindrical form so it will roast evenly. Generously season the outside of the bird with salt and pepper. Place the bird on a wire rack in the refrigerator and let it air-dry for 2 hours. This is optional, but it helps crisp the skin.
2. Make the herb butter: Melt the butter in a saucepan over medium-low heat. Add the reserved 2 tablespoons minced shallots, 2 tablespoons chopped tarragon, and ½ teaspoon grated lemon zest and cook over medium-high heat until the shallots lose their rawness, 2 minutes. Do not let brown. Set aside.
3. Place the potatoes and 4 sprigs of tarragon in an aluminum foil drip pan. Stir in 1 tablespoon of the herb butter and salt and pepper.
4. Set up your grill for spit-roasting following the manufacturer’s instructions and heat to medium-high.
5. Spit the chicken from side to side (not from front to back), securing it to the spit with the rotisserie prongs. I’m not sure I can explain the physics of spitting the chickens side to side instead of front to back, but most of the world’s grill masters do it this way, and the bird does seem to come out juicier. Pour 2 tablespoons of the herb butter into a ramekin and brush it on all sides of the chicken.
6. Affix the spit with the chicken onto the rotisserie motor. Place the drip pan with the potatoes under the chicken (the spuds will roast in the chicken drippings). If using wood chunks or chips, add them to the coals. Switch on the motor.
7. Spit-roast the chicken until the skin is browned and crisp and the meat in the thigh reaches at least 165°F on an instant-read thermometer. (Insert it into the deepest part of the thigh, without letting it touch the bone.) Don’t worry if the temperature goes higher: Overcooking just makes the bird more tender. Start basting the chicken with the remaining herb butter after 20 minutes, and baste it every 20 minutes. Use a different basting brush from the one that touched the raw chicken. Give the potatoes a stir while you’re at it. Depending on the size of the bird and the potatoes, the cooking time will be 1 to 1¼ hours. Baste the chicken one last time before you take it off the fire.
8. Transfer the chicken to a cutting board and let it rest for 5 minutes or so. Carefully remove the chicken from the spit. Re-season the potatoes. Carve the bird and serve it with the potatoes on the side.
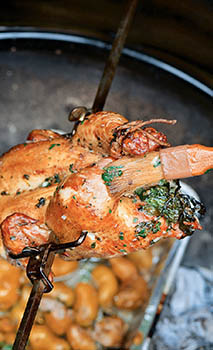
Note that the chicken is secured to the rotisserie through the sides. Brush it often with the melted herb butter.
With Creamy Salsa Verde

Yield: Serves 2 to 4, and can be multiplied as desired
Method: Indirect grilling
Prep time: 15 minutes to make the marinade and spatchcock the chicken, plus 3 to 5 hours to marinate the bird
Grilling time: About 40 minutes
Grill/Gear: Can be grilled over charcoal or gas. You also need kitchen scissors or poultry shears and an instant-read thermometer.
Shop: To be strictly authentic, you’ll need two typical Peruvian flavorings: aji amarillo and huacatay. The first is a piquant yellow chile with a mildly fiery bite. The second is a Peruvian black mint with an herbaceous minty flavor. Before you panic, know that both can be ordered from Amazon (or found at a Peruvian market). And that hot paprika makes a reasonable substitute for aji amarillo, and fresh spearmint or peppermint works fine in place of black mint.
Insider tip: It’s a challenge that faces most of the world’s grillers: How do you grill a whole chicken on a grill that lacks a lid? (Most of the world’s grills are open fire boxes without lids.) You could spit-roast it whole, as some Peruvians do. Or you could spatchcock it, that is, remove the backbone and open the bird up like a book. Spatchcocking has another advantage: It exposes more of the meat to the marinade and the searing heat of the fire. You’ll find step-by-step photos above on how to do it.
Peruvian chicken is one of the world’s poultry wonders—skin crisp, meat moist and tender, the bird strongly scented with garlic and cumin, with aji amarillo (yellow chile) to pump up the heat and huacatay (black mint) to dampen the fire. It is, in other words, some of the most flavorful chicken on Planet Barbecue. It even has its own day on the Peruvian calendar—July 21. Curiously, we have a Swiss farmer to thank for it. His name was Roger Schuler and his farm outside Lima was on the verge of bankruptcy. In desperation, he set up four tables at the farm and advertised “all you can eat” chicken for only 5 soles (about $1.95) to local workers. Today, Granja Azul (Blue Farm) seats 450; the chicken still comes “all-you-can-eat,” but it now costs 55 soles ($16.25). It’s worth it.
Ingredients
For the Wet Rub
4 cloves garlic, peeled and coarsely chopped
2 teaspoons coarse salt (sea or kosher)
2 teaspoons pimentón (Spanish smoked paprika) or sweet paprika
1½ teaspoons ground cumin
1 teaspoon freshly ground black pepper
1 to 2 tablespoons aji amarillo paste (see Shop) or 1 tablespoon hot paprika
1 tablespoon huacatay paste or finely chopped fresh mint
3 tablespoons fresh lime juice
2 tablespoons extra virgin olive oil, plus 1 to 2 tablespoons for basting
For the Chicken
1 whole chicken, preferably organic (3½ to 4 pounds)
Vegetable oil for oiling the grill grate
1. Make the wet rub: Pound the garlic and salt to a paste in a mortar with a pestle or place in a bowl and mash with a wooden spoon. Work in the paprika, cumin, pepper, aji amarillo paste, huacatay, lime juice, and olive oil. Alternatively, puree the ingredients in a blender or food processor fitted with a small bowl. Set aside.
2. Remove any giblets and large lumps of fat from inside the chicken. Place the bird, breast side down, on a cutting board.
3. Using kitchen scissors or poultry shears, cut through the flesh and bone along both sides of the backbone and completely remove the backbone. (Save it for chicken stock.)
4. Open out the bird (like opening a book) by gently pulling the halves apart. Using a sharp paring knife, lightly score the top of the breastbone. Run your thumbs along and under the sides of the breastbone and attached cartilage and pop them out.
5. Turn the bird over. Using a sharp knife, make a ½-inch slit in the skin between the lower end of the breastbone and the leg on each side. Stick the ends of the drumsticks through the slits. Spread the bird out flat, skin side down, in a baking dish just large enough to hold it. Breathe a sigh of relief: The hard part is over.
6. Pour the wet rub over the chicken, spreading it over the meat on both sides. (The bird should end up skin side up.) If you’re feeling ambitious, work some of the wet rub under the skin of the breasts and thighs. (Wear latex or other food-safe gloves.) Marinate the chicken, covered, in the refrigerator for 3 to 5 hours, or as long as overnight—the longer, the richer the flavor.
7. Set up your grill for indirect grilling (place a drip pan under the grate in the center), and heat the grill to medium-high. (Yeah, I know I said spatchcocking was developed to enable you to direct grill a whole chicken. But indirect grilling avoids the risk of flare-ups and produces an exceptionally moist bird.) When ready to cook, brush or scrape the grill grate clean and oil it well. Place the chicken, skin side up, in the center of the grate over the drip pan. Close the grill lid.
8. Indirect grill the chicken until the skin is golden brown and crisp and the meat is cooked through, 40 minutes, or as needed. Baste the chicken with olive oil halfway through. Use an instant-read thermometer to test for doneness; the internal temperature in the thickest part of the thigh should be at least 165°F. Transfer the chicken to a wire rack and let rest for a few minutes, then carve and serve with the Creamy Salsa Verde.
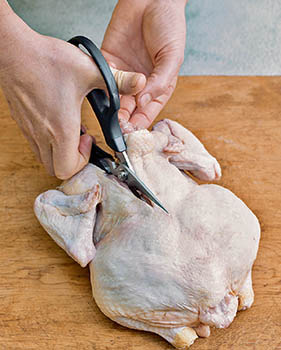
Using kitchen scissors, make a lengthwise cut in the chicken along the backbone from neck to tail.
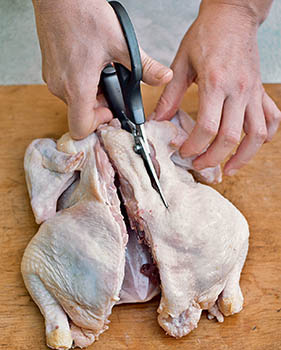
Repeat along the other side and remove the backbone. Open up the chicken like a book and remove the breastbone as instructed in Step 4.

Turn the chicken over and press down on the breast to flatten the bird.
Creamy Salsa Verde (Green Sauce)
Yield: Makes 1 cup
Tip o’ the hat to my assistant, Nancy Loseke, for this electrifying cilantro chile sauce, which is made creamy by the addition of mayonnaise.
Ingredients
¾ cup chopped fresh cilantro leaves
1 jalapeño pepper, stemmed, seeded, and coarsely chopped
1 scallion, trimmed, white and green parts coarsely chopped
1 clove garlic, peeled and coarsely chopped
1 tablespoon aji amarillo paste (see Shop), or 1 teaspoon hot paprika
1 teaspoon huacatay paste (see Shop), or 6 fresh mint leaves
¾ cup mayonnaise, preferably Hellmann’s or Best Foods
2 tablespoons fresh lime juice
Coarse salt (sea or kosher) and freshly ground black pepper
Place the cilantro, jalapeño, scallion, garlic, aji amarillo, and huacatay in a food processor (preferably fitted with a small bowl) and finely chop. Work in the mayonnaise, lime juice, and salt and pepper to taste; the sauce should be highly seasoned. Cover and refrigerate if not serving immediately, but try to serve it within 2 hours of making.
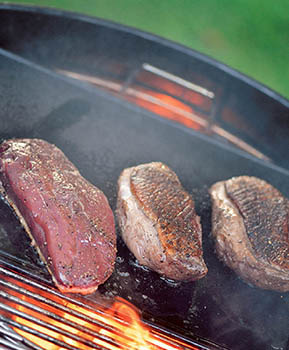
Chicken Breasts Grilled Under A Salt Brick
With Mediterranean Salsa
Yield: Serves 4
Method: Direct grilling under a salt brick
Prep time: 15 minutes, plus 30 minutes for marinating the chicken
Grilling time: 8 minutes
Grill/Gear: Can be grilled over charcoal, wood, or gas. You also need 2 salt bricks or 1 salt slab (available at barbecue and cookware shops or online from Amazon); heavy-duty grill gloves; and an instant-read thermometer.
Shop: As always, use organic chicken when possible. For a more interesting chicken breast, procure an “airline” cut (a boneless breast with the first joint of the wing attached).
insider tip: Warning: Do not make this recipe in cold weather. Hot salt bricks have been known to crack or explode when exposed to cold air.
Insider tip: These quick, easy chicken breasts can be grilled over charcoal or gas. But for the ultimate flavor, grill them over wood. It’s easier than you think: Simply fill your chimney with oak, hickory, or other hardwood chunks and light them as you would charcoal. Let the wood burn down to glowing embers and you’re in business.
Pollo al mattone (chicken under a brick) is one of the icons of Italian grilling; its origins are claimed with equal partisanship by Romans and Tuscans, and you find it across Italy. There’s more to the dish than mere showmanship (although that plays a role, too). The brick seems to seal in moisture and helps lay on killer grill marks. Plus, it looks cool, and you should never underestimate the importance of looking cool on the grill. The traditional press is a brick wrapped in aluminum foil. You’re going to up the ante—and the flavor—by using a brick or slab of Himalayan pink salt.
Ingredients
4 skinless, boneless chicken breasts, preferably organic (each 6 to 8 ounces)
Coarse salt (sea or kosher) and freshly ground black pepper
Hot red pepper flakes (optional)
3 tablespoons chopped fresh rosemary and/or sage
2 cloves garlic, peeled and minced
1 Meyer or regular lemon
¼ cup extra virgin olive oil
Vegetable oil for oiling the grill grate
1. Trim any sinews or excess fat off the chicken breasts and arrange the meat in a baking dish. Generously season the breasts on both sides with salt, pepper, hot red pepper flakes (if using), rosemary, and garlic. Finely grate lemon zest over the breasts on both sides, then squeeze the lemon juice over them. Drizzle olive oil over the breasts, turning to coat both sides. Marinate the chicken breasts in the refrigerator while you make the Mediterranean Salsa and light the grill.
2. Set up your grill for direct grilling and heat to high. Brush or scrape the grill grate clean and oil it well.
3. Drain the chicken breasts, then arrange on the grate, all at a 45-degree angle to the bars of the grate. Place the salt bricks atop the chicken, one brick per 2 breasts. Grill the breasts until browned on the outside and cooked through, about 4 minutes per side, rotating each breast a quarter turn after 2 minutes to create an attractive crosshatch of grill marks. The internal temperature should be 165°F. Check it with an instant-read thermometer—insert the probe through the side. Wear grill gloves to move the hot salt bricks.
4. Transfer the chicken to a platter or plates and serve with the Mediterranean Salsa spooned on top or on the side.
Yield: Makes about 2 cups
Think of this as salsa fresca from Mexico channeled by Provence, with olives and capers standing in for the jalapeños and fresh basil for cilantro.
Ingredients
2 large ripe red tomatoes, peeled, seeded, and finely diced
2 scallions, trimmed, white and green parts thinly sliced crosswise
¾ cup finely diced cucumber (preferably English cucumber—see Notes)
6 kalamata olives, pitted and chopped
1 tablespoon drained small brined capers
4 fresh basil leaves, thinly slivered (see Notes)
3 tablespoons best-quality extra virgin olive oil
½teaspoon finely grated fresh lemon zest
2 tablespoons fresh lemon juice (or more to taste)
Coarse salt (sea or kosher) and freshly ground black pepper
Place the tomatoes, scallions, cucumber, olives, capers, basil, olive oil, and lemon zest in a mixing bowl and gently stir with a rubber spatula to mix. Stir in lemon juice and salt and pepper to taste; the salsa should be highly seasoned.
Notes: English cucumber is a seedless variety that comes shrink-wrapped in plastic. If using conventional salad cucumbers, peel and seed before dicing.
The easiest way to sliver basil is to stack 4 or 5 basil leaves on top of one another and roll them into a tight tube from one side. Using a chef’s knife, cut the roll crosswise into the thinnest possible slices. Fluff the slices with your fingers to separate them into shreds.
with Spanish Ham, Manchego Cheese, and Saffron Butter

Yield: Serves 4
Method: Direct grilling
Prep time: 15 minutes
Grilling time: 8 to 10 minutes
Grill/Gear: Can be grilled over charcoal, wood, or gas. You also need 4 toothpicks lightly oiled with vegetable oil and an instant-read thermometer.
Shop: You’ll need to know about a few special ingredients for this one. Jamon serrano is Spanish ham (think Iberian prosciutto—you could substitute prosciutto in a pinch). Regular serrano ham will work just fine; for a real treat buy iberico or pata negra (two super premium grades of Spanish ham). Manchego is a tangy sheep’s milk cheese from the La Mancha region of Spain. If unavailable, use cheddar.
Insider tip: The easiest way to stuff the chicken breasts is to roll the ham around the cheese slivers, then stuff the rolls into the breast. This has the added advantage of giving you a cool-looking cross section when you cut into the breasts. Note: If you don’t have saffron, make a pimentón butter, using Spanish smoked paprika instead.
Chicken breast is the poultry cut serious grillers hate to love. It’s milder (make that blander) than dark meat, and it has an annoying tendency to dry out when exposed to the high dry heat of the fire. The following recipe uses two time-honored techniques for keeping grilled chicken breasts juicy and flavorful. You stuff them with Spanish ham and Manchego cheese, which makes them moist from the inside out. And you baste the breasts with saffron butter as they grill. For even more flavor, use breasts with the skin on (admit it: the skin is the part we like best) and/or the first wing joint still attached (the latter is called an airline cut).
Ingredients
For the Chicken
4 skinless, boneless chicken breasts (each 8 ounces)
8 thin slices serrano ham
4 ounces thinly sliced Manchego cheese, cut into matchstick slivers
Extra virgin olive oil, for brushing
Coarse salt (sea or kosher) and freshly ground black pepper
For the Saffron Butter
½ teaspoon saffron threads
2 teaspoons warm water
6 tablespoons (¾ stick) butter
1 shallot or garlic clove, peeled and minced
Vegetable oil for oiling the grill grate
2 tablespoons chopped fresh chives, for serving
1. Cut a deep pocket in the side of each chicken breast. Wrap a slice of ham around some cheese slivers to obtain a roll about ⅜ inch thick. Repeat to obtain 8 rolls.
2. Stuff 2 of these ham and cheese rolls into each chicken breast. (The rolls should run lengthwise.) Pin the pocket shut with an oiled toothpick. Lightly brush the outsides of the chicken breasts with olive oil and season generously on both sides with salt and pepper.
3. Make the saffron butter: Soak the saffron threads in 2 teaspoons of warm water for 5 minutes. In a small saucepan on the stovetop or the side burner of your grill, melt the butter over medium heat. Add the shallot or garlic and cook until just beginning to brown, 2 minutes. Do not let it burn. Stir in the saffron mixture.
4. Set up the grill for direct grilling and heat to high.
5. When ready to cook, brush or scrape the grill grate clean and oil it well. Arrange the chicken breasts on the grill running on a diagonal to the bars of the grate. Grill until browned on both sides and cooked through (the internal temperature should be 165°F), 4 to 5 minutes per side, giving each breast a quarter turn after 2 minutes to lay on a crosshatch of grill marks. Start basting the chicken breasts with saffron butter after 2 minutes and continue basting.
6. Transfer the chicken breasts to a platter. Drizzle the remaining saffron butter over them and sprinkle with chopped chives.

Hold the chicken breast flat with one hand and cut a deep pocket in the side. Be careful not to cut completely through to the other side.
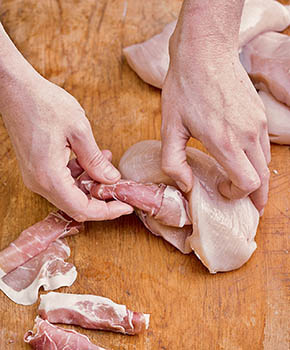
Insert 2 ham and cheese rolls in each pocket. Secure the pockets with oiled toothpicks.
Smoke-Roasted Game Hens
with Kentucky Fire Dip
Yield: Serves 4 as a main course
Method: Indirect grilling
Prep time: 15 minutes
Grilling time: 40 to 50 minutes
Grill/Gear: Can be grilled over charcoal or gas. You also need an instant-read thermometer and 2 hardwood chunks or 1½ cups chips (if using the latter, soak in water to cover for 30 minutes, then drain).
Shop: Organic game hens when possible. You could also use chicken quarters (the thigh and leg section), in which case, you’d need 8 for this amount of dip.
Insider tip: A Cornish game hen is a small young chicken (originally a cross between a White Rock and Cornish chicken) typically weighing 1½ pounds. Despite the name, it’s domesticated, not wild, and the bird can be female or male. Game hens taste pretty much like full-size chickens; their draw is that a whole bird serves one, so you get to savor both white and dark meat.
These smoky game hens began as a mash-up between two of my favorite lesser-known Southern barbecue specialties: chicken with white barbecue sauce in the style of Big Bob Gibson’s in Decatur, Alabama, and grilled pork steaks with vinegar dip from Monroe County, Kentucky. Both are dipped in a full-flavored vinegar sauce during and after cooking. Put them together and you get smoky, tender barbecued birds in a fiery dip that will send you lunging for a cold beer.
Ingredients
For the Game Hens
4 Cornish game hens (each about 1½ pounds), thawed if frozen
Coarse salt (sea or kosher) and freshly ground black pepper
Vegetable oil for oiling the grill grate
For the Kentucky Fire Dip
8 tablespoons (1 stick) unsalted butter
2 cups distilled white vinegar
2 tablespoons hot sauce, such as Frank’s RedHot
2 tablespoons freshly ground black pepper
2 tablespoons granulated sugar or packed brown sugar, dark or light, your choice
1 tablespoon cayenne pepper
1 tablespoon coarse salt (sea or kosher), or to taste
2 tablespoons finely chopped chives or scallion greens, for serving
1. Set up the grill for indirect grilling and heat to medium-high.
2. Spatchcock the game hens following the instructions. Very generously season each on both sides with salt and pepper.
3. Brush or scrape the grill grate clean and oil it well. Arrange the hens, skin side up, in a row in the center of the grate over the drip pan, away from the heat. Add wood chunks or chips to the coals. If working on a gas grill, use the gas grill smoking method. Close the grill lid.
4. Indirect grill the hens until the skin is browned and crisp and the meat is cooked through. Use an instant-read thermometer to test for doneness: The internal temperature in the thickest part of the thigh should be at least 165°F. The total grilling time will be 40 to 50 minutes.
5. Meanwhile, make the Kentucky Fire Dip: Melt the butter in a skillet or wide heavy saucepan over medium-high heat. Add the vinegar, hot sauce, pepper, sugar, cayenne, and salt. Reduce the heat and gently simmer for 3 minutes, whisking to dissolve the sugar and salt. Remove the dip from the heat and let cool slightly.
6. Ten minutes before the game hens are done, using tongs, dip each on both sides in the fire dip and return to the grill. Dip again the last 2 minutes and place game hens directly over the fire to sizzle the skin. Dip once more before serving. Sprinkle the hens with the chives and serve any remaining dip on the side.
Yield: Makes 8, enough to serve 4
Method: Indirect grilling
Prep time: 15 minutes
Grilling time: 30 to 40 minutes
Grill/Gear: Can be grilled over charcoal or gas. You also need butcher’s string and 2 hardwood chunks or 1½ cups wood chips (optional; if using the latter, soak in water to cover for 30 minutes, then drain); and an instant-read thermometer.
Shop: Chinese sausage is a small, hard, sweet pork sausage—hence its nickname “meat candy.” Look for it at Asian markets, or substitute your favorite hard sausage. Chinese ham is similarly sweet and salty: If unavailable, substitute Smithfield ham or Spanish serrano ham.
Insider tip: The chicken thigh is one of the best-kept secrets in poultry: moist, well-marbled, rich-tasting meat that costs a fraction of the more popular chicken breast. You can buy thighs boned already, but it’s easy to bone them yourself (see instructions in Step 1). The stuffing is limited only by your imagination. A Cubano version, for example, might feature smoked ham, Swiss cheese, slivered sweet pickles, and mustard.
Quick and easy to assemble, these chicken thighs explode with Asian flavors—sweet-salty Chinese sausage and ham, musky shiitakes, sesame oil, and spicy Chinese mustard—with one non-Asian ingredient to hold them together: fontina cheese. Indirect grilling gives you crackling crisp skin and a moist interior, and you never need to worry about flare-ups. The Chinatown Barbecue Sauce would make an excellent accompaniment (in addition to the mustard).
Ingredients
8 large skin-on chicken thighs (8 ounces each with bone; 6 ounces each if boneless)
Coarse salt (sea or kosher) and freshly ground black pepper
3 tablespoons Chinese sweet-hot mustard, plus ½ cup for serving
4 ounces fontina cheese, cut into matchstick slivers
4 ounces Chinese sausage, cut into matchstick slivers
4 ounces sliced Chinese ham or other smoked ham, cut into matchstick slivers
8 shiitake mushrooms, stems removed, caps wiped clean with a damp paper towel, then thinly sliced
2 scallions, trimmed, white part thinly slivered lengthwise; green part thinly sliced on the diagonal, for serving
2 tablespoons Asian (dark) sesame oil, or more as needed
Vegetable oil for oiling the grill grate
1. If using bone-in chicken thighs, make a lengthwise cut through the flesh on either side of and underneath the bone. Pull out and discard the bone. Season the inside of the thigh with salt and pepper and spread it with mustard. Fill each thigh with an equal amount of cheese, Chinese sausage, ham, sliced shiitakes, and slivered scallion whites. Close the thighs to envelop the stuffing and tie shut with butcher’s string. Brush the outsides of the thighs with sesame oil and season well with salt and pepper. Refrigerate until ready to grill.
2. Set up your grill for indirect grilling and heat to medium-high. Brush or scrape the grill grate clean and oil it well.
3. Arrange the chicken thighs skin side up on the grill grate. Add wood, if using, to the coals. If working on a gas grill, use one of the gas grill smoking methods. Close the lid.
4. Indirect grill the chicken thighs until the skin is sizzling, crisp, and golden brown, the cheese is melted, and the meat is cooked through, 30 to 40 minutes. The internal temperature should be at least 165°F on an instant-read thermometer.
5. Transfer the chicken thighs to a platter or plates and snip off and remove the strings. Sprinkle with scallion greens and serve with Chinese mustard.
Maple-Sriracha Chicken Drumsticks

Yield: Serves 4 to 6
Method: Smoke-roasting (indirect grilling)
Prep time: 10 minutes
Grilling time: 40 to 50 minutes
Grill/Gear: Can be cooked over charcoal or gas. You also need 2 hardwood chunks or 1½ cups wood chips (if using the latter, soak in water for 30 minutes, then drain); an instant-read thermometer; and a basting brush.
Shop: Organic chicken when possible.
Insider tip: These crisp, smoky drumsticks call for a technique I call smoke-roasting. You indirect grill them at a high temperature (to crisp the skin), while adding hardwood to generate a smoke flavor.
I like to think of the drumstick as a chicken wing with a handle. Easy to eat (easier than wings) and easy on your wallet, it’s an often overlooked cut that delivers a rich meaty flavor. My assistant, Nancy Loseke, came up with the sweet fiery maple-sriracha glaze. The Scotch whisky adds additional smoke flavor. It’s simple (only four ingredients), but astonishingly tasty.
Ingredients
Vegetable oil for oiling the grill grate
For the Chicken
12 large chicken drumsticks, preferably organic (3 to 4 pounds)
1 tablespoon coarse salt (sea or kosher)
1 tablespoon freshly ground black pepper
1 tablespoon hot red pepper flakes
2 tablespoons extra virgin olive oil
For the Glaze
6 tablespoons (¾ stick) unsalted butter
5 tablespoons pure maple syrup
¼ cup sriracha, or more to taste
3 tablespoons Scotch whisky (preferably single malt)
2 tablespoons finely chopped fresh cilantro, chives, or scallion greens, for serving
1. Set up your grill for indirect grilling and heat to medium-high. Just before cooking, brush or scrape the grill grate clean and oil it well.
2. Place the drumsticks in a large mixing bowl. Sprinkle with the salt, pepper, and hot red pepper flakes, stirring to coat well with the seasonings. Stir in the olive oil.
3. Arrange the drumsticks rounded side up in a single layer in the center of the grill. Add the wood to the coals. If working on a gas grill, use one of the gas grill smoking methods.
4. Close the grill lid. Indirect grill the drumsticks until the skin is crisp and well browned and the chicken is cooked through, 40 to 50 minutes. For maximum tenderness, cook the drumsticks to an internal temperature of 170°F.
5. Meanwhile, make the glaze: Melt the butter in a saucepan over high heat. Stir in the maple syrup, sriracha, and whisky and boil until the mixture is syrupy, 3 to 5 minutes. Set aside and keep warm.
6. About 5 minutes before the chicken is done, brush each drumstick on all sides with the glaze. Repeat just before removing the drumsticks from the grill. Arrange the drumsticks on a platter and pour the remaining glaze over them. Sprinkle with cilantro and serve.
Like They Make It in Tokyo
Yield: Serves 6 to 8 as an appetizer; 4 as a main course
Method: Direct grilling
Prep time: 20 minutes
Grilling time: 6 to 8 minutes
Grill/Gear: Can be grilled over charcoal, wood, or gas. You also need small (6-inch) bamboo skewers and heavy-duty aluminum foil folded into thirds, like a business letter, to make a grill shield.
Shop: In Japan, yakitori is usually made with dark meat (which is fattier and more flavorful than breast meat). But the teriyaki glaze keeps white meat moist, too. Extra points for skin on, which gives you extra richness. As always, organic chicken when possible. Mirin—sweetened rice wine—is available at Asian markets and most supermarkets. If unavailable, use sake or sherry and add a little more sugar.
Insider tip: Properly prepared yakitori comes lacquered with a sweet-salty glaze—the result of dipping the meat in the sauce twice—once during the cooking and again once the skewers are cooked. Japanese grill masters use the same pot of glaze (called tare) day after day, week after week, replenishing the ingredients as needed. Each successive dip of the chicken adds additional flavor to the glaze.
Yakitori (“grilled chicken” literally) is Japan’s national barbecue—enjoyed at innumerable grill parlors (many conveniently located in train stations), not to mention at family cookouts. In North America, we tend to marinate the meat before grilling, but in Japan it’s dipped in a flavorful glaze during and just after the cooking. This sears the sauce into the meat, resulting in shiny, sweet-salty, delectably aromatic chicken kebabs—some of the most flavorful on Planet Barbecue.
Ingredients
For the Sauce
1 cup chicken stock (preferably homemade)
1 cup soy sauce
½ cup sweet rice wine (mirin), sake, or white wine
½ cup granulated sugar (plus 2 tablespoons if using sake or white wine)
8 scallions, trimmed, the white part of 2 scallions gently crushed with the side of a cleaver, the green part thinly slivered on the diagonal for serving; the remaining 6 scallions cut crosswise into ½-inch pieces for skewering
2 slices fresh ginger (each ¼ inch thick), gently crushed with the side of a cleaver
1 clove garlic, peeled and gently crushed with the side of a cleaver
1 strip fresh lemon zest (½ by 2 inches)
For the Yakitori
1½ to 2 pounds boneless chicken pieces (dark meat or white, skin on or off—your choice)
Vegetable oil for oiling the grill grate
2 tablespoons sesame seeds, toasted, for serving (optional)
1. Make the sauce: Place the chicken stock, soy sauce, mirin, sugar, crushed scallion whites, ginger, garlic, and lemon zest in a nonreactive saucepan and bring to a boil over medium heat. Let the sauce simmer until syrupy, 6 to 10 minutes, stirring often to prevent scorching. Strain the sauce into a narrow deep saucepan you can place on the grill. (You want the sauce in the pot to be 3 to 4 inches deep.)
2. Make the yakitori (skewers): Cut the chicken into ½-inch cubes and thread onto skewers, alternating with pieces of scallion. Fill each skewer only halfway—leave the other half free as a handle. Intersperse lean pieces of chicken with fatty pieces or skin pieces. The chicken can be skewered several hours ahead; cover and refrigerate until ready to grill.
3. Set up your grill for direct grilling and heat to high. Brush or scrape the grill grate clean and oil it well. (A piece of chicken fat or skin held in tongs works great for greasing the grill grate.) Keep the sauce in the pot warm on one corner of the grill. If using a hibachi or other slender grill, arrange the chicken skewers on the grate so the handles hang over the edge. On a larger grill, place the aluminum foil grill shield on the grate and arrange the yakitori so that the meat is exposed directly to the fire and the bare skewers are protected by the grill shield.
4. Grill the yakitori until the chicken is mostly cooked (it will start to brown on the outside), about 2 minutes per side. Dip each skewer in sauce, then return it to the grate. Continue grilling until well browned on both sides and cooked through, another 1 to 2 minutes per side, 6 to 8 minutes in all. The sauce should cook to a shiny glaze and the meat should feel firm to the touch when done. Take care that it doesn’t burn. Meanwhile, boil the extra sauce for 2 minutes.
5. Dip each yakitori in the reboiled sauce one more time and transfer to a platter or plate for serving. Sprinkle with the reserved scallion greens and sesame seeds, if using. Serve any remaining sauce in small bowls as a dipping sauce.
with Fresh Cherry Salsa

Yield: Serves 4
Method: Plancha grilling
Prep time: 10 minutes for the duck; 10 minutes for the salsa
Grilling time: 4 to 7 minutes
Grill/Gear: Can be grilled over charcoal or gas. You also need a plancha (cast-iron griddle); 2 cherry wood chunks or 1 cup wood chips (optional; if using the latter, soak in water to cover for 30 minutes, then drain); and an instant-read thermometer.
Shop: Duck breasts are available at many supermarkets, or you can special-order them from your butcher or online from mapleleaffarms.com. Five-spice powder is a Chinese spice mix with the smoky, licoricy flavor of star anise. Find it in the spice aisle of your supermarket or online.
Insider tip: Imagine the perfect duck breast: dark, crisp skin; meat moist and rosy in the center. The best way to achieve this is to use a 2-step grilling process: First, brown the skin on a hot cast-iron plancha or skillet, then finish cooking the breast on the grill. For the full skinny on plancha grilling.
I like to think of duck breast as the beefsteak of poultry—a dark, rich red meat you serve medium-rare (certainly unlike chicken breast)—with an added benefit: crisp, bacon-like rich skin. I like to serve it with a fresh cherry salsa (duck has a natural affinity for red fruit), and you can build on the cherry theme by smoking the duck with cherry wood. If you don’t normally grill duck, this is a great way to try it, and it’s a lot easier and neater than cooking a whole duck.
Ingredients
4 skin-on boneless duck breasts (each 7 to 8 ounces)
1 tablespoon turbinado sugar, such as Sugar in the Raw, or granulated sugar
2 teaspoons coarse salt (sea or kosher)
2 teaspoons freshly ground black pepper
1 teaspoon Chinese five-spice powder
1 to 2 tablespoons Asian (dark) sesame oil
Vegetable oil for oiling the grill grate and plancha
Fresh Cherry Salsa, for serving
1. Trim any tendons off the duck breasts with a sharp knife. Score the skin on each breast in a diamond pattern. The cuts should be about ⅛ inch deep and ¼ inch apart. (Cut the skin only, not the breast meat.)
2. Make the rub: Combine the sugar, salt, pepper, and five-spice powder in a small bowl and stir to mix. Generously sprinkle the rub on both sides of each duck breast. Drizzle with sesame oil, turning to coat both sides. Let marinate in the refrigerator while you make the salsa and light the grill.
3. Set up your grill for direct grilling and heat to medium-high. Brush or scrape the grill grate clean and oil it well. Place a cast-iron plancha on the grate and heat it as well. To test whether it’s ready for grilling, sprinkle a drop or two of water on the plancha—if it evaporates in 1 to 2 seconds, the plancha is hot. Lightly oil the plancha. Add wood chunks or chips to the coals (if using). If working on a gas grill, use one of the gas grill smoking methods. When you smell smoke, you’re ready to go.
4. Arrange the duck breasts, skin side down, on the plancha. Sear until the skin is nicely browned and has begun to render its fat, 3 to 5 minutes. Close the grill to seal in the smoke.
5. Invert the breasts and move them from the plancha to directly over the fire. Cook until the meat side is seared and the duck is cooked to taste, 1 to 2 minutes for medium-rare. The internal temperature will be 130° to 135°F on an instant-read thermometer.
6. Serve the duck breasts whole or sliced crosswise and fanned out, with Fresh Cherry Salsa spooned over the meat or on the side.
Sear the duck breasts skin side down directly on the plancha.

To finish cooking, turn the duck breasts over and move them meat side down directly over the fire.
Yield: Makes 3 cups
In the summer, I make this salsa with fresh cherries. (Make your life easy: Procure a cherry pitter at a cookware shop or online.) Other fruit salsas that go well with duck would be made the same way with diced mangoes, peaches, or pineapple.
Ingredients
3 cups pitted fresh cherries (about 1½ pounds)
1 poblano pepper, seeded and cut into ¼-inch dice
1 to 2 jalapeño or serrano peppers, seeded (for spicier salsa leave the seeds in) and minced
1 tablespoon finely chopped candied ginger, or 2 teaspoons minced fresh ginger
2 scallions, trimmed, white and green parts thinly sliced crosswise
¼ cup chopped fresh mint or cilantro
3 tablespoons fresh lime juice, or to taste
1 tablespoon packed brown sugar, dark or light, or to taste
Combine the ingredients for the salsa in a mixing bowl and gently toss to mix. Correct the seasoning, adding lime juice or sugar to taste; the salsa should be sweet, sour, and very flavorful. This salsa tastes best served within 1 hour of mixing.
Bourbon-Brined Smoked Turkey Breast
Yield: Serves 6 to 8
Method: Smoke-roasting/indirect grilling
Prep time: 15 minutes plus 8 hours for brining the turkey breast
Grilling time: 1½ to 2 hours
Grill/Gear: Can be cooked over charcoal or gas. You also need 2 hardwood chunks or 1½ to 3 cups wood chips (if using the latter, soak in water to cover for 30 minutes, then drain); a jumbo resealable plastic bag; and an instant-read thermometer.
Shop: You’ll want a full breast—ideally with the breastbone intact but the ribs removed. Organic, of course, and fresh when possible. (Fresh—never frozen—turkey tends to be available around Thanksgiving and Christmas.) Prague powder No. 1, also known as pink salt or Insta-Cure No. 1, is a curing salt that contains 6.75 percent sodium nitrite. I’ve made it optional, but it will give your turkey breast a rich umami flavor reminiscent of ham. Procure it from your butcher or order it from Amazon.
Insider tip: The breast is the leanest cut of the turkey and hence the part most susceptible to drying out. There’s an easy solution (I use the word deliberately) for keeping it moist: Brine it. The sodium and chloride ions in the salt cause the meat to absorb and retain the brine. For an exceptionally moist spit-roasted or smoke-roasted whole turkey, brine it in this mixture for 24 hours before cooking.
Remember turkey breast—freshly roasted and carved off the bone? Unfortunately, the omnipresence of turkey roll (an awful product pumped full of water and preservatives, and often flavored with liquid smoke) has made real roasted turkey breast an endangered species—and with it a proper turkey or club sandwich. Here’s how to brine and smoke-roast a real turkey breast from scratch.
Ingredients
1 whole turkey breast (5 to 6 pounds), preferably bone-in
½ cup coarse salt (sea or kosher)
2 teaspoons Prague powder No. 1 (optional)
¼ cup pure maple syrup
1 quart hot water
1 quart ice water
¼ cup bourbon
Vegetable oil for oiling the grill grate
6 tablespoons (¾ stick) unsalted butter, melted, for basting
1. Thaw the turkey breast in the refrigerator, if frozen. Place it in a jumbo heavy-duty resealable plastic bag.
2. Place the salt, Prague powder (if using), maple syrup, and 1 quart of hot water in a large pot and bring to a boil, whisking to dissolve the salt crystals. Remove the pot from the heat and stir in the ice water and bourbon. Let the brine cool to room temperature, then pour it into the resealable plastic bag over the turkey breast. Place the sealed bag with the turkey in a large bowl (to contain potential leaks) in the refrigerator and brine for 8 hours, turning the bag several times so the breast brines evenly.
3. Drain the turkey breast, discarding the brine, and blot dry on all sides with paper towels.
4. Set up your grill for indirect grilling and heat to medium. Brush or scrape the grill grate clean and oil it well.
5. Place the breast in the center of the grill, skin side up. Add 2 wood chunks or 1½ cups chips to the coals, or use one of the gas grill smoking methods. Close the grill lid.
6. Smoke-roast the turkey until the skin is golden brown and the turkey is cooked through, 1½ to 2 hours, replenishing the wood chunks or charcoal as needed. Start basting the turkey with melted butter after 30 minutes, and baste every 30 minutes thereafter. The turkey breast is done when the internal temperature reaches 165°F on an instant-read thermometer. Baste one final time after the breast comes off the grill. (If the skin starts to brown too much, loosely tent the breast with aluminum foil. Do not wrap it tightly or you’ll make the skin soggy.)
7. Transfer the turkey breast to a cutting board or platter. Let rest for 5 minutes before carving. Delectable hot or cold.
Smoke-Roasted Turkey with Cognac Injector Sauce and Herb Butter or Truffles Under the Skin

Yield: Serves 8 to 10
Method: Indirect grilling
Prep time: 20 minutes
Grilling time: 3 to 3½ hours
Grill/Gear: Can be grilled over charcoal or gas. (For the most pronounced smoke flavor, use charcoal.) You also need a marinade injector; butcher’s string for trussing; an instant-read thermometer; and 6 hardwood chunks or 4½ cups wood chips (optional; if using the latter, soak in water to cover for 30 minutes, then drain).
Shop: In the best of all possible worlds, you’d use a fresh organic heritage turkey. Fresh birds tend to be available right before Thanksgiving. (If you use frozen, figure on one day of thawing in the refrigerator per 4 pounds of turkey.) Heritage turkeys are antique breeds raised for their flavor, not necessarily for their breast size. (One good source is marysturkeys.com.) Organic speaks for itself.
Insider tip: Here’s one holiday turkey you’ll never complain about being dry. To keep it moist, I use two techniques: injecting it with melted butter and broth and stuffing herb butter under the skin. For a completely over-the-top bird, buy a fresh truffle (white or black, winter or summer—your choice) and insert paper-thin slices under the skin. (If using truffles, omit the herbs.) Yes, I know European truffles are hideously expensive; American truffles from the Pacific Northwest are a lot more affordable. One source is foodsinseason.com.
This turkey takes me back to my cooking school days in Paris. French birds were leaner than their American counterparts, so we learned to stuff butter (and sometimes thinly sliced truffles) under the skin. The butter melted into the breast meat as the turkey roasted, producing an astonishingly moist and flavorful bird every time. To this I add two distinctly American techniques: injecting the bird with a sauce and indirect grilling. Succulence guaranteed. I’ve made the hardwood optional; if you like your turkey smoked (and who doesn’t?), add it. But if you use truffles, you may wish to omit smoking so you can focus on the truffles’ unique flavor.
Ingredients
For the Turkey and cognac Injector Sauce
1 organic turkey (12 to 14 pounds)
Coarse salt (sea or kosher) and freshly ground black pepper
5 tablespoons unsalted butter
5 tablespoons unsalted or low-sodium chicken broth, preferably homemade
1 tablespoon Cognac
For Stuffing under the Skin
10 tablespoons (1¼ sticks) cold unsalted butter, thinly sliced, plus 6 tablespoons (¾ stick), melted
1 bunch fresh sage leaves, stemmed, or tarragon sprigs, or 1 black or white truffle, thinly sliced
Vegetable oil for oiling the grill grate
1. Thaw the turkey in the refrigerator, if necessary. (Start 4 days early.) Remove the neck and giblets from both the front and main cavities (be sure to check both cavities). Remove and discard any lumps of fat from the main cavity. Blot the turkey dry inside and out with paper towels. Season the inside of the cavities with salt and pepper.
2. Make the injector sauce: Melt the butter in a saucepan over medium heat. Stir in the chicken broth and Cognac and let cool to room temperature.
3. Starting at the top of the neck cavity, tunnel your finger under the skin. Start with one finger, then two. Gently loosen the skin from the meat, taking care not to tear it. Gradually work your whole hand under the skin, loosening it from the breast meat, then the thighs. (Yes, I know this will feel weird the first time you do it; it gets easier with practice.)
4. Insert the butter slices between the skin and meat, positioning them over the thighs and especially over the breast. Insert sage leaves or tarragon sprigs (or truffle slices) under the skin, positioning them in an attractive pattern. Truss the turkey: Tie the ends of the drumsticks together with butcher’s string to give it an attractive shape. Fold the wing tips under the body.
5. Using an injector, inject the broth-butter-cognac mixture deep into the turkey, especially into the thighs, drumsticks, and deep into the breast. (See Grilling Hack.) Brush the outside of the turkey with the 6 tablespoons of melted butter and season generously with salt and pepper. Breathe that sigh of relief—the hard part is over.
6. Set up your grill for indirect grilling and heat to medium. Brush or scrape the grill grate clean and oil it well. For a smoke flavor, add half the wood chunks or chips to the coals. If working on a gas grill, use the gas grill smoking method.
7. Smoke-roast the turkey for 1 hour. Baste the turkey with some of the melted butter. Add charcoal and wood to the fire as needed. Continue roasting for another hour and replenish the charcoal and wood as needed. Smoke-roast the bird until the skin is a dark golden brown and the meat is cooked through, 3 to 3½ hours. Start basting the turkey with melted butter after 1 hour and baste every 30 minutes. The internal temperature in the thickest part of the thigh, taken without the thermometer touching the bone, should be at least 165°F. If the skin starts to brown too much, lay a sheet of aluminum foil over the bird. (Note that I said “lay.” Do not bunch the foil around the bird or you’ll make the skin soggy.)
8. Transfer the turkey to a cutting board or platter and baste with melted butter one final time. Let it rest for 5 to 10 minutes before removing the butcher’s string, carving, and serving.
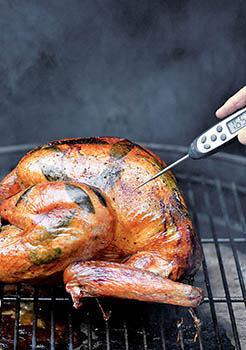
Use an instant-read thermometer to check for doneness.