11. Digital Processing & Filing
“Only through art can we emerge from ourselves and know what another person sees.” —Marcel Proust
After the pictures are taken there is still work to be done—digital processing, editing and filing, storage and backup. This work is vital if you ever hope to make your photographs findable, usable, and safe. One key component is Adobe Lightroom. There are many books that cover in great detail the use of this program. Obviously, I cannot provide such detail in just one chapter. However, I feel that this program is so important that I am going to go into some detail to get you started.
First of all, let me explain why Lightroom is vital in your workflow. When you work on a photo file in Photoshop, making adjustments and corrections, you should save a copy of the original file in case you want to go back to it and make different adjustments. Let’s say the original is a 30MB RAW file. Saving the manipulated file with a different name creates a duplicate of the same size—or possibly even larger, if you’ve saved a number of layers in Photoshop. If you work on thousands of files in this way, you can fill up your hard drives rapidly.
Lightroom works differently. When you work on an image, Lightroom does not actually apply your changes to the file right away. Instead, it saves the instructions for adjusting that image file. Those instructions take up a fraction of the space the file itself requires. This saves a huge amount of room on your hard drive. When you are ready to use the changes, you export the file and Lightroom applies the stored instructions and creates a file of the specified resolution and format. This means you can make and preview a large number of changes without altering the original. You won’t create a duplicate image file until you export it.
I strongly advise organizing your photo files before you begin importing them into Lightroom. This preparation could save you some time and grief later.
I recommend storing your photos on an external hard drive devoted entirely to images. If you have been putting your images in folders on the internal drive (which contains your various programs and operating system), move them to an external drive. Make sure that drive has the capacity to handle not just your existing photos, but those that you’ll be shooting in the near future. As your files grow, you can add external drives with greater capacity, transferring files from the old to the new.
I have two primary external drives. One is entirely devoted to images—those that I’ve shot over the years digitally along with scanned images from my older slide files. The capacity of this drive is currently 3TB; when I need to, I’ll get a 4 or 5TB drive and transfer all the files from the smaller one. I have two additional external 3TB drives that serve as my backups (yes, I have two backups) for this drive. The second primary external drive is also 3TB and it stores only my video files. There are two backup drives for this one, too. I rotate my backup drives between my home office and a safety deposit box in my bank. It makes sense to have at least one backup off-site.
You need to give careful thought to how you set up your files and folders—and you should do this before you start working with Lightroom. It will make it easier to find pictures, even though Lightroom has some excellent search and tagging capabilities. Above all, avoid filing your pictures by date! Why? How often can you remember what year and month you shot those outstanding photos of elk in Yellowstone—especially if you’ve made numerous trips to Yellowstone over the years? It makes much more sense to file by locale so that you can go to your “Yellowstone” folder and find those photos quickly—especially if they are in a subfolder labeled “Elk.”
Because I have traveled widely over the years, I have set up a folder structure that looks like this:
Country (folder; for the United States I just enter state name as folder)
State or region or province (for some countries, I skip this subfolder)
Locale (city, national park, landmark)
Optional subfolder (species, activity, etc.)
So my own folder structure looks like this:
G:\
Images
Alaska
Aleutians
Bering Straits
Chenik
Denali
Grizzly bears
Scenics
Tundra
(numerous other subfolders)
Antarctica
Antarctic Peninsula
(subfolders for penguins, etc.)
Falkland Islands
(etc.)
Argentina
Buenos Aires
Ushuia
(Continue to add state or country all the way down to Zimbabwe with appropriate subfolders)
You can have more subfolders, but I usually find it unnecessary except in certain circumstances. For example, under Tanzania where I spend a lot of time, I have subfolders for certain parks and reserves and under each I have subfolders for species—birds, elephants, wildebeests, zebras, etc. As you’ll see, Lightroom makes it easy to find those special pictures. You can, of course, modify this to suit your own needs. In fact, I have modified the file structure over the years and instead of a strict country/state/locale structure I also have certain folder categories such as “Autumn Foliage” because I like to access quickly some of my best autumn pictures that might be scattered over a few folders. Another is a folder labeled “Environmental Issues” and still another “DOCUMERICA” because I wanted quick access to many of the photos I shot for that project.
“I strongly advise organizing your photo files before you begin importing them into Lightroom.”
So you can see that you should set this up for whatever makes sense for you in terms of where and what you shoot. And do it all before importing into Light-room. Trust me, it will make it easier if you don’t have to change that structure later.
If you are satisfied with the file structure on your external drive, you can now import into Lightroom. Well, almost—a few more things first.
The basic structure of Lightroom is the catalog. This is your primary image database and contains all the information about your photos. There can be more than one catalog, but it makes sense to have only one so that all your pictures reside in one entity. Otherwise, you may find it frustrating to search for certain pictures across several catalogs. Would anyone ever need more than one catalog? If you are in partnership with another photographer, say a husband and wife team, you may want photos in separate catalogs. Maybe. Again, give some thought to how you will search for pictures later. You probably want all of them in one catalog for ease of searching. You can identify whose photos they are by file names or by metadata. But if you’re a single entity, use one catalog.
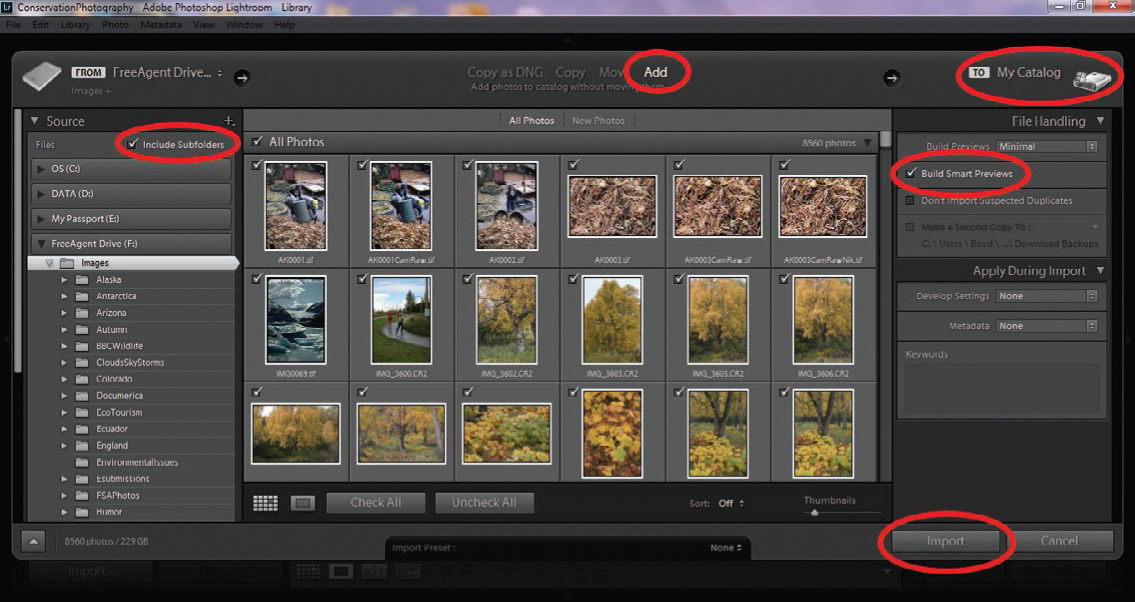
Import Settings. Before doing anything else, you should check on the default settings in Lightroom. Even if you don’t change anything, it’s good to have some understanding of what Lightroom does when you import photos. When I first began with Lightroom I left all the default settings as they were. Later I made a few changes, as shown in the image above (and described in the caption).
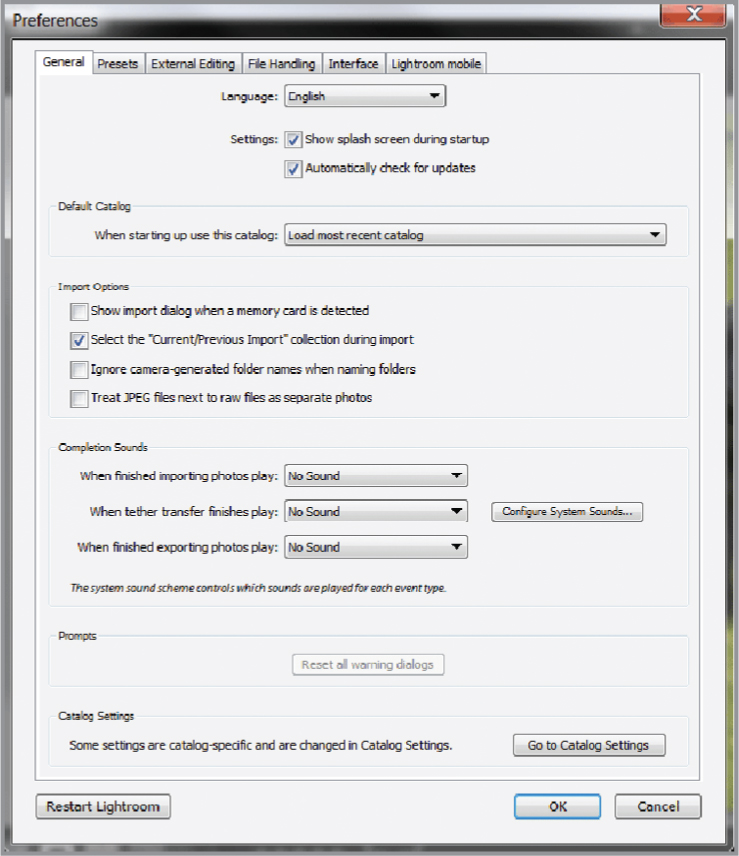
I unchecked “Show import dialog when a memory card is detected.” I found it an annoyance to have that screen pop up. I can import just by clicking the Import button and pointing to the card. Also, the last item under Import Options is “Treat JPEG files next to RAW files as separate photos.” I left that unchecked because, quite frankly, I never capture a JPEG with a RAW file in my camera settings. It wasn’t always the case, but today RAW files are recognized and their preview images are displayed, so the separate JPEG file is unnecessary and takes up hard drive space. In addition, Lightroom will ignore the JPEG file if there is already a RAW file.
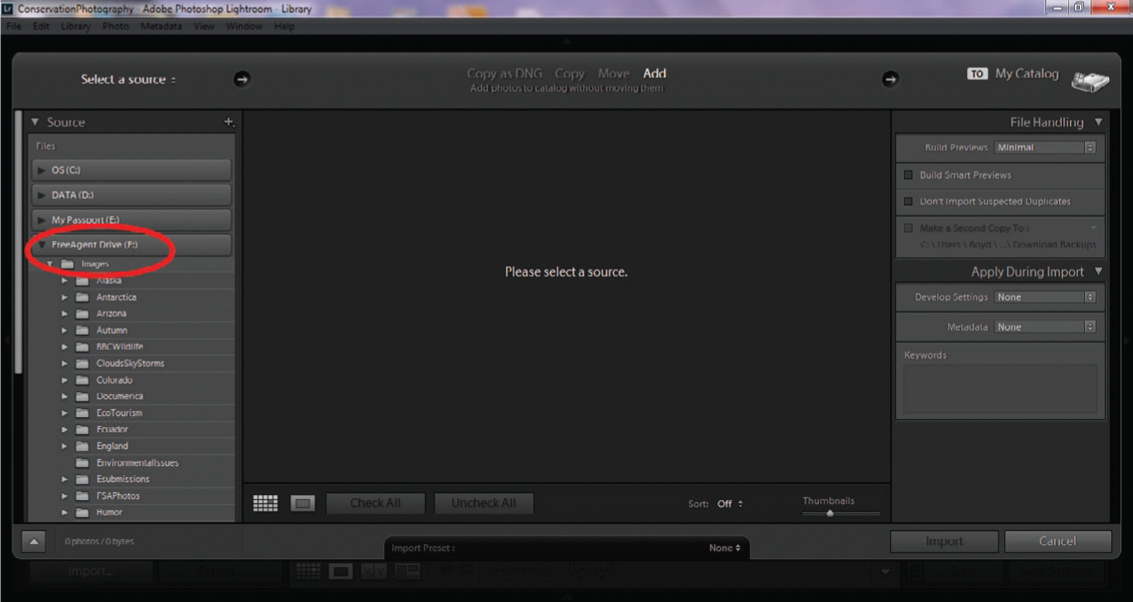
Select the “Images” folder on Drive F.
Check the box to include subfolders in the upload.
Before you click the Import button, I also suggest clicking on the Metadata tab (under Catalog Settings) and activating “Automatically write changes into XMP.” XMP stands for Extensible Metadata Platform. This is a file containing all the data about what you’ve done to the picture file in Lightroom, plus titles, descriptions, keywords, author information, and more. This data is normally stored in the catalog, but a secondary file can be created and stored with the picture file on your external hard drive. It’s just an additional level of backup and requires only a minimal amount of hard drive space (10KB or less).
The Import Process. Now you can click the Import button. First, you’ll be asked to select a source. Presumably, this will be your external hard drive with all your picture files in their appropriate folders. In this case, I selected Drive F and the Images folder. If it isn’t checked by default, be sure to check the Include Subfolders box (upper left of screen).
You may also wish to click on Build Smart Previews. This creates the preview files so you can review and work on pictures without needing the hard drive. This allows you to process images while traveling. This option will add considerably to the time it takes for Lightroom to complete the task, depending on how many photos you are importing—but it will be worth the wait. There’s a progress bar showing the extent of the import and, later, in the same place it will show the progress of the Build Smart Previews operation.
Once you’ve imported your files into Lightroom, you can begin exploring all the various features of the program. I can’t begin to give lessons on every feature in this complex program—whole books are devoted to this subject. But a few things here will help you get started. By default, you will be in the Library Module, one of seven modules available. The screen shots and captions below give you a quick overview.
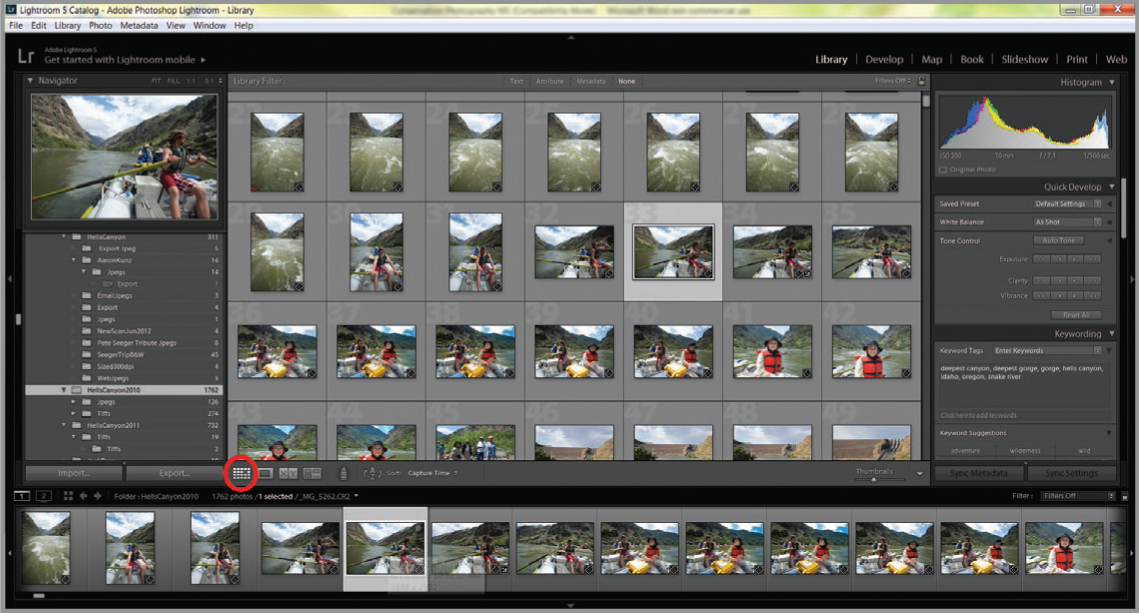
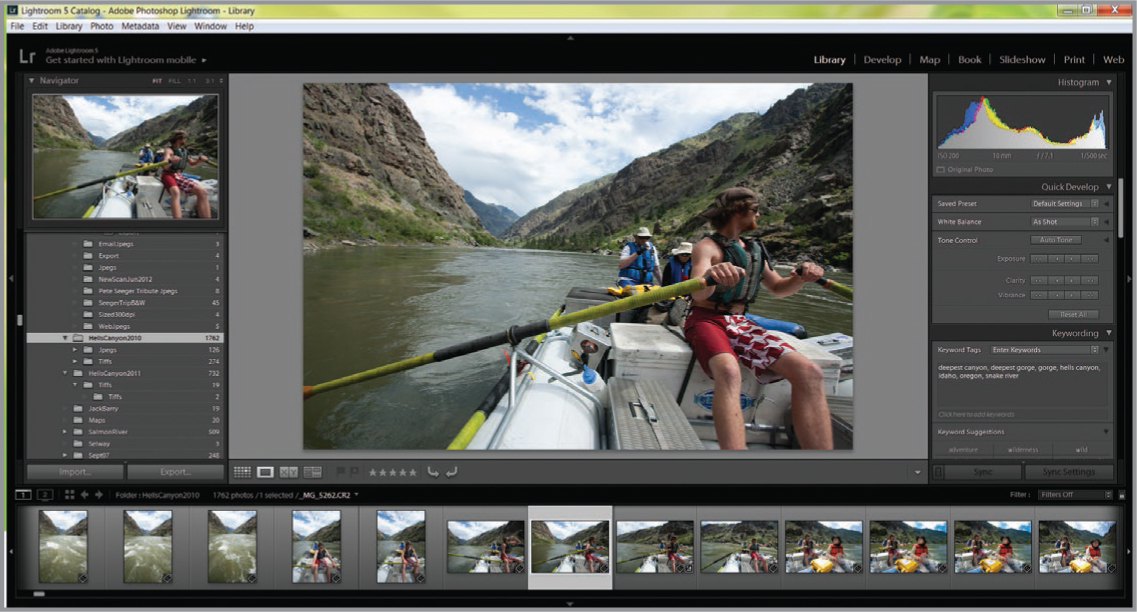
Add Keywords. One of the first things you’ll want to do is add keywords to your images. Lightroom makes this easy, especially if you wish to apply the same keywords to numerous images. In the Library Module, click on the Grid View. You can individually select certain images by holding down the Ctrl key (Cmd key on Mac) and clicking on the images one by one. In this case, all the images in this folder were made on a white-water raft trip in Hells Canyon on the Snake River on the Idaho–Oregon border. So I selected them all (Ctrl-A in Windows, Cmd-A in Mac). You can see here that I added a number of keywords that apply to all images. Those keywords are added to the metadata of all of the selected images. (Incidentally, this does not work in the Loupe View, even if you have all images selected in the bottom display panel. It only works in the Grid View.)

There are four panels. From left to right, the first is the Navigator Panel.
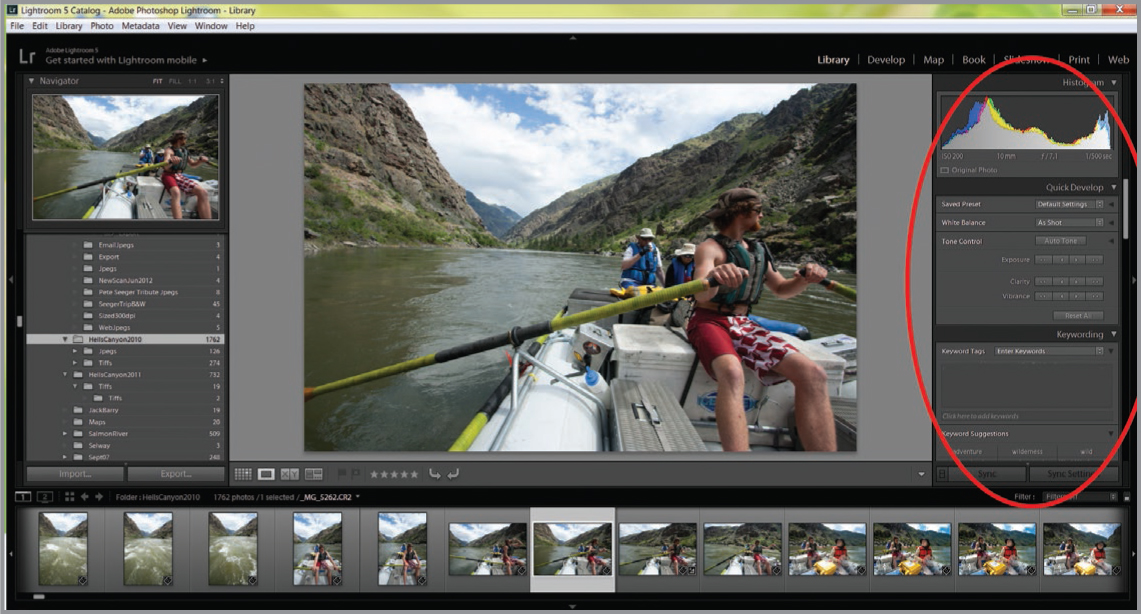
The panel on the far right contains information about the selected image.

The Display Panel has two modes: Loupe View and Grid View. The button is used to switch between the two views.
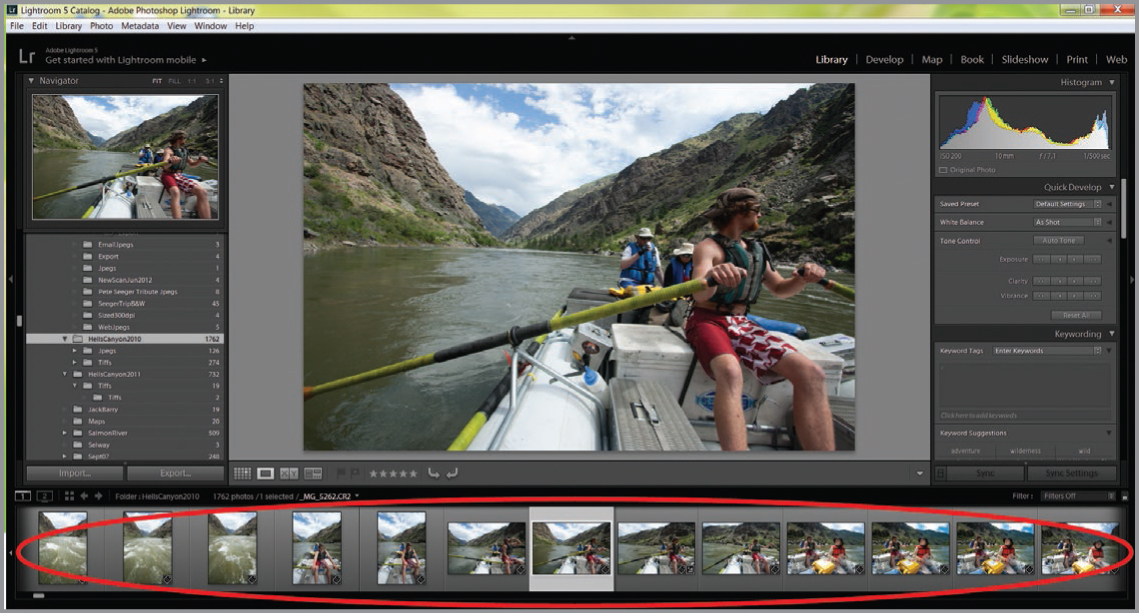
The bottom panel, the Filmstrip Panel, allows you to scroll through images quickly.
You can turn off the Navigator, Filmstrip Panel, and Information Panel by clicking on the small arrows. This gives more space to the center panel.
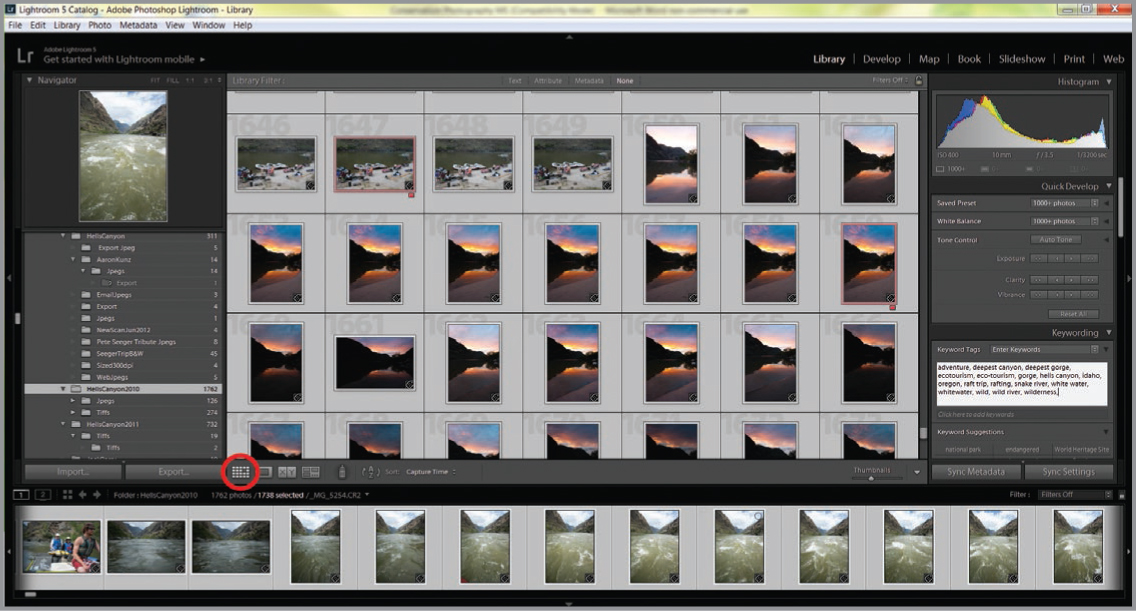
Assigning keywords that apply to all of the selected images.
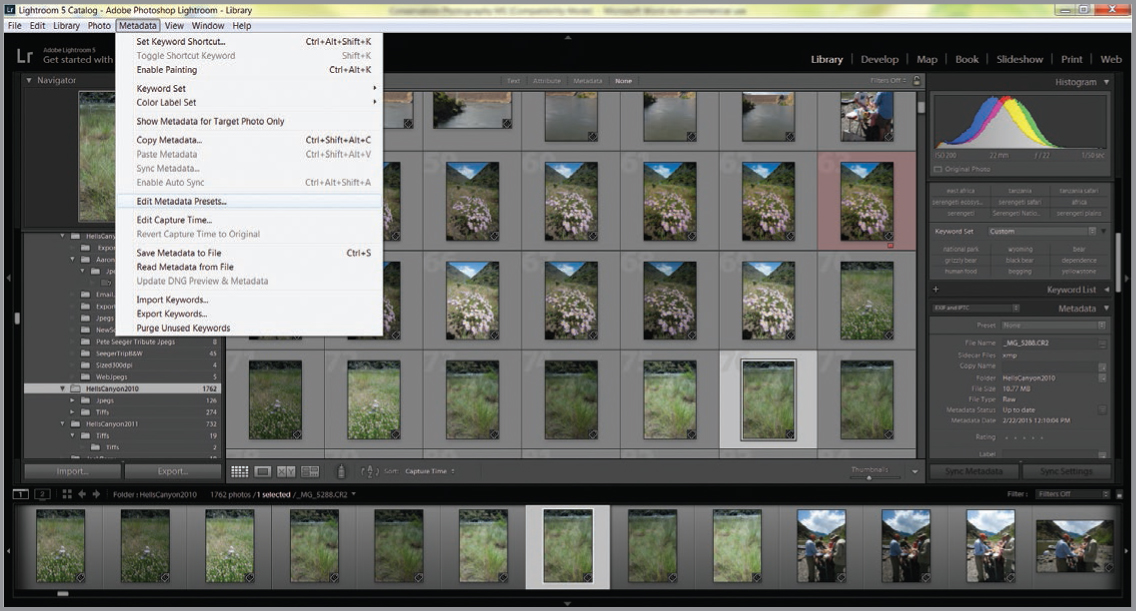
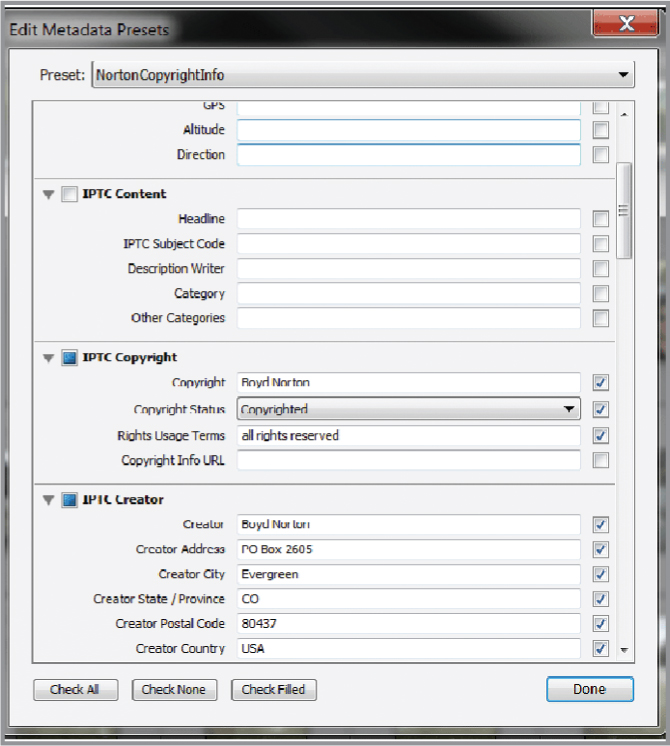
Create a preset to add personal metadata, such as copyright information and your contact information.
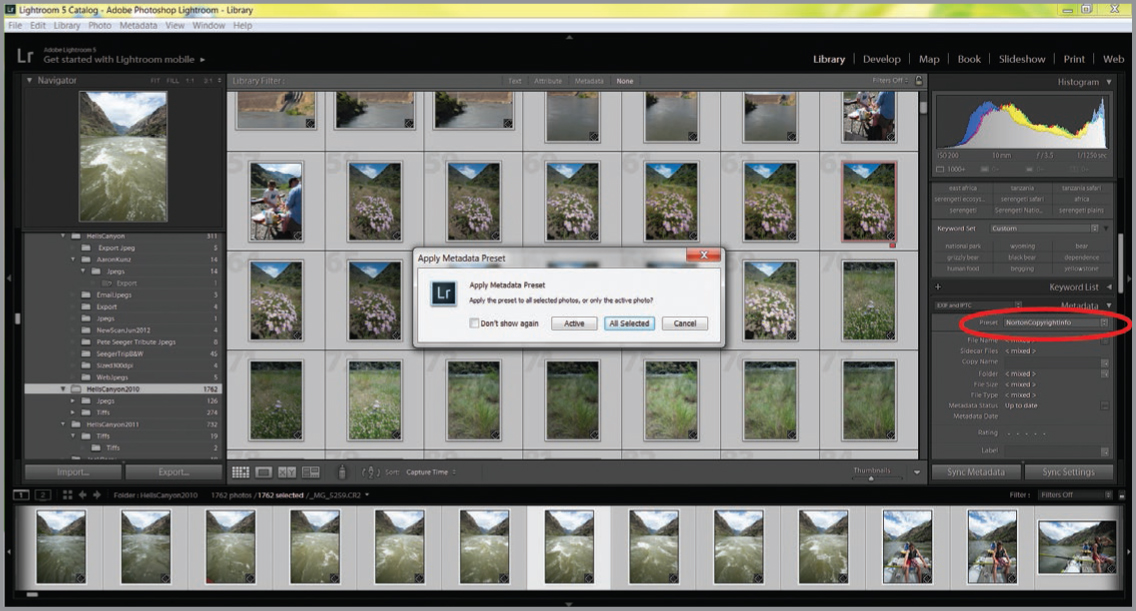
Apply a preset to selected photos.
You should also add your copyright and contact information. This is done by creating a Preset. With all the images selected, click on the Preset button and select the copyright/contact preset you’ve created. You’ll be asked if you wish to apply to “All Selected”—obviously, click yes. Incidentally, to save time later you can apply this preset every time you import new pictures into your catalog.
Rating Photos. In the Library Module, you can also rate your pictures (facing page, top row). There are several ways to denote special pictures for future uses. First there is a star rating, from zero to five stars (shortcut keys: 1 for one star, 2 for two stars, etc.). Alternately, you can Flag the photo (shortcut keys: P for pick, U for unpick). Another option is to add a color border to the picture to draw attention to it (Shortcut keys: 6 for red, 7 for yellow, 8 for green, 9 for blue). Later you can sort or filter pictures by their star rating, border color, or flagged status. This is very handy for finding and displaying only those special pictures.
Zooming. Another important feature, in the Library and Develop Modules, is the ability to zoom in and examine detail; in this case (facing page, second row) I have it set for the default of 1:1 zoom in one click.
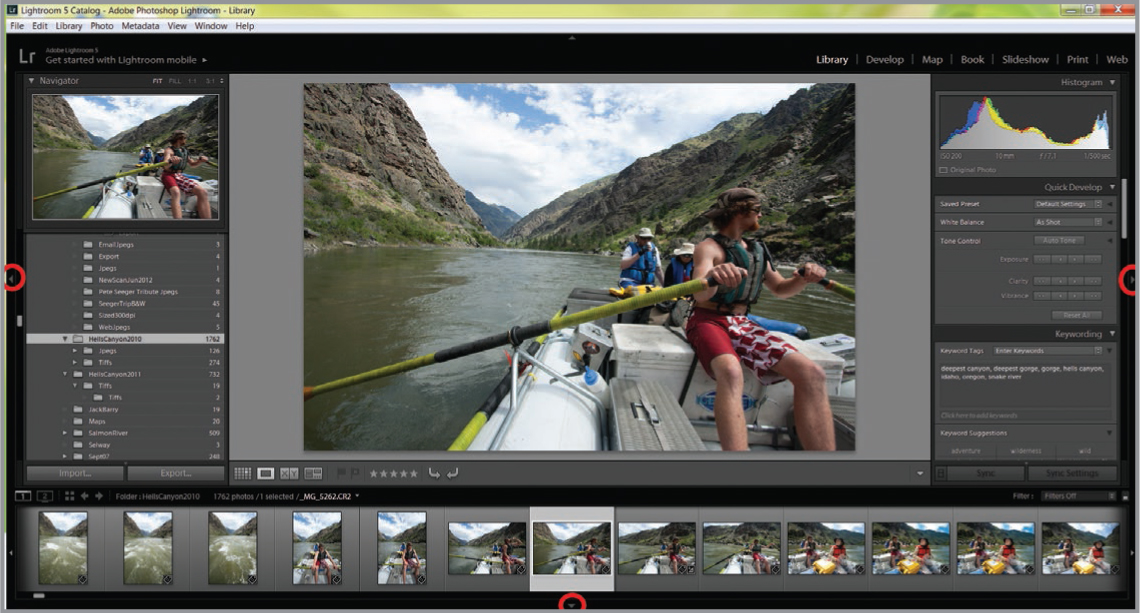
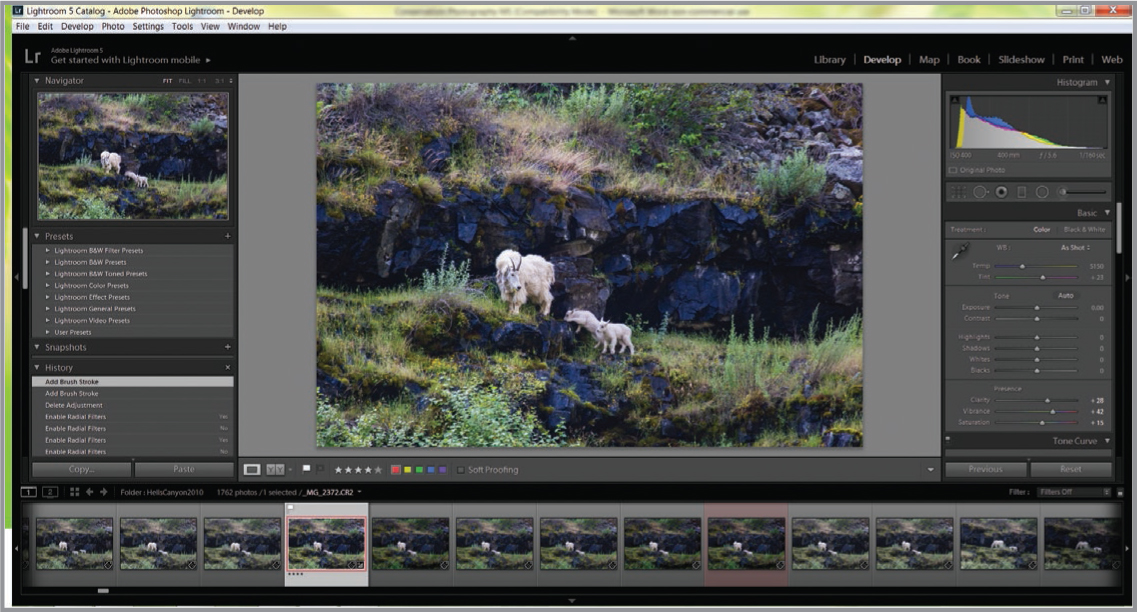
One of the greatest features of Lightroom is the Develop Module, where you can make adjustments and fine tune your images for later use. And don’t worry—you can reverse any changes because they are only virtual until you actually export the final, adjusted image. Even then, the original RAW file is maintained because your exported image file is separate from the information stored in Lightroom.
Let’s look at an image from a Hells Canyon rafting trip (facing page, right). First, I reduced the Highlights using the slider bar; the clouds appeared more dramatic with this adjustment. Next, I increased the Vibrance. This tool is designed to increase the saturation of more muted colors without increasing the saturated colors. This leaves skin tones pretty well unaffected (you don’t want hyper-saturated skin tones). I also increased the Saturation a small amount to enhance the blue sky. Finally, I moved the Clarity slider to adjust the contrast of the midtones without adding excessive contrast. Try experimenting with these various adjustments, but don’t overdo it. Grossly saturated, high-contrast images are a turn-off.
I gave this photo of a mountain goat in Hells Canyon a four star rating.
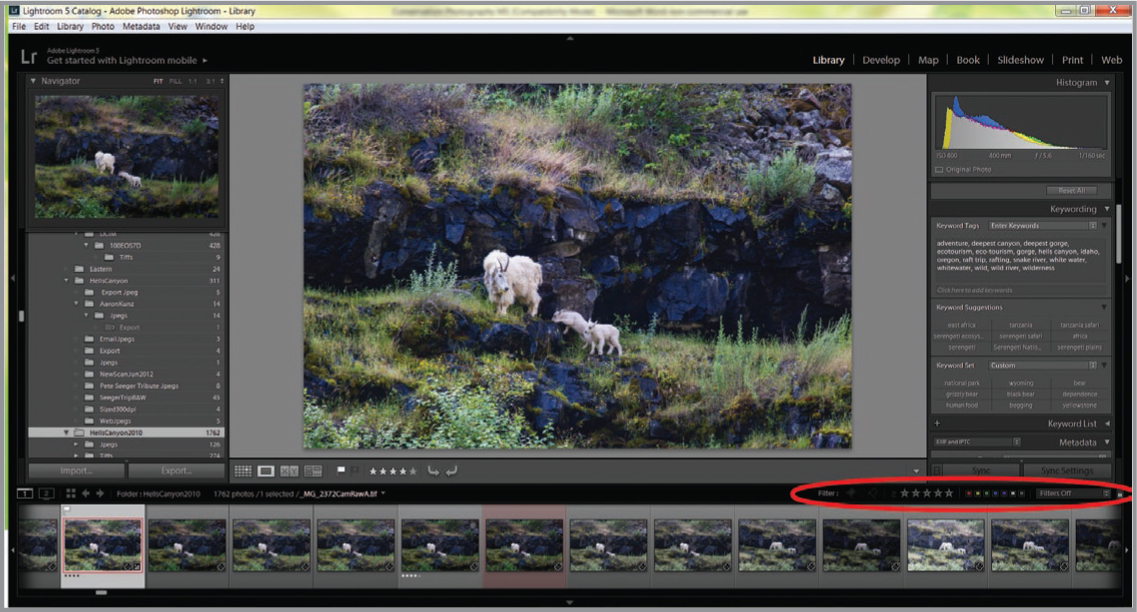
These ratings can be used to sort photos.
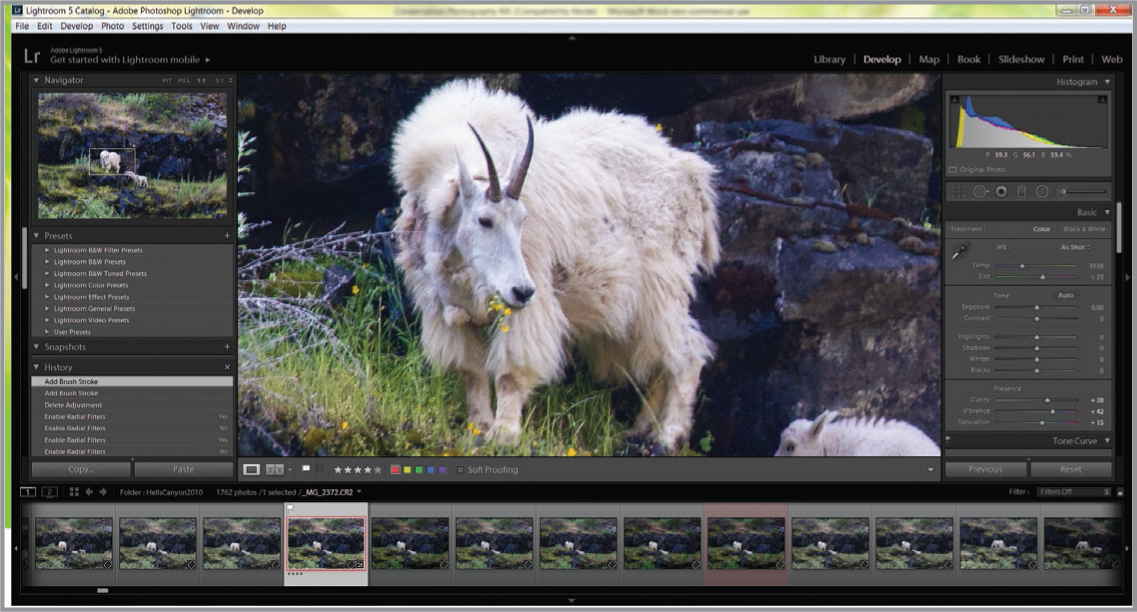
The small rectangle in the Navigator image shows the area covered in the zoom.
This is an unprocessed image from my Hells Canyon white water raft trip.
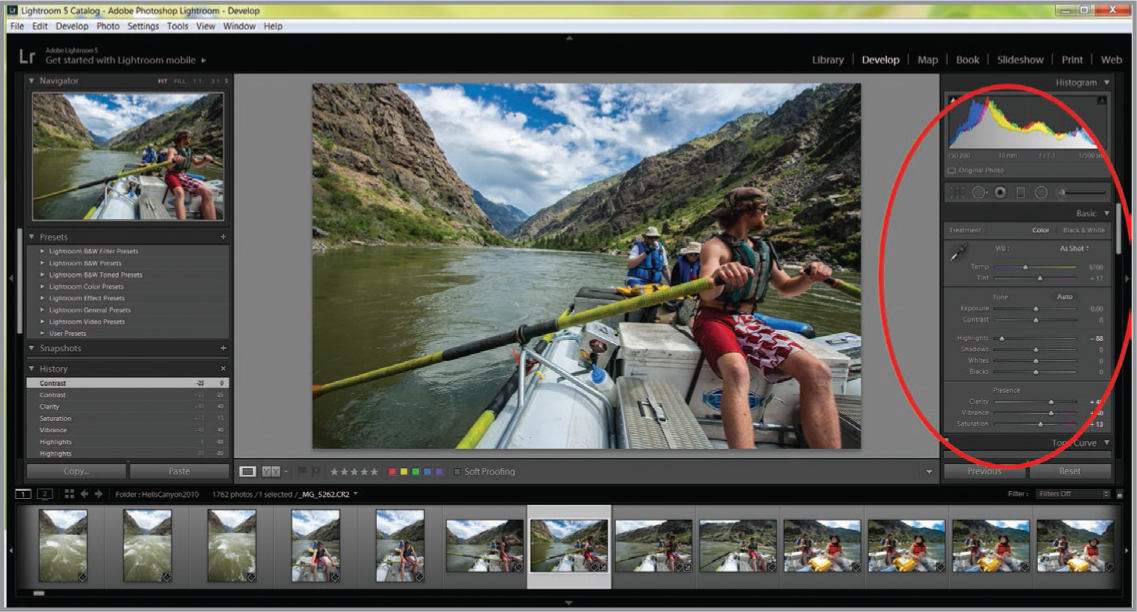
In the Develop Module, I made some changes.
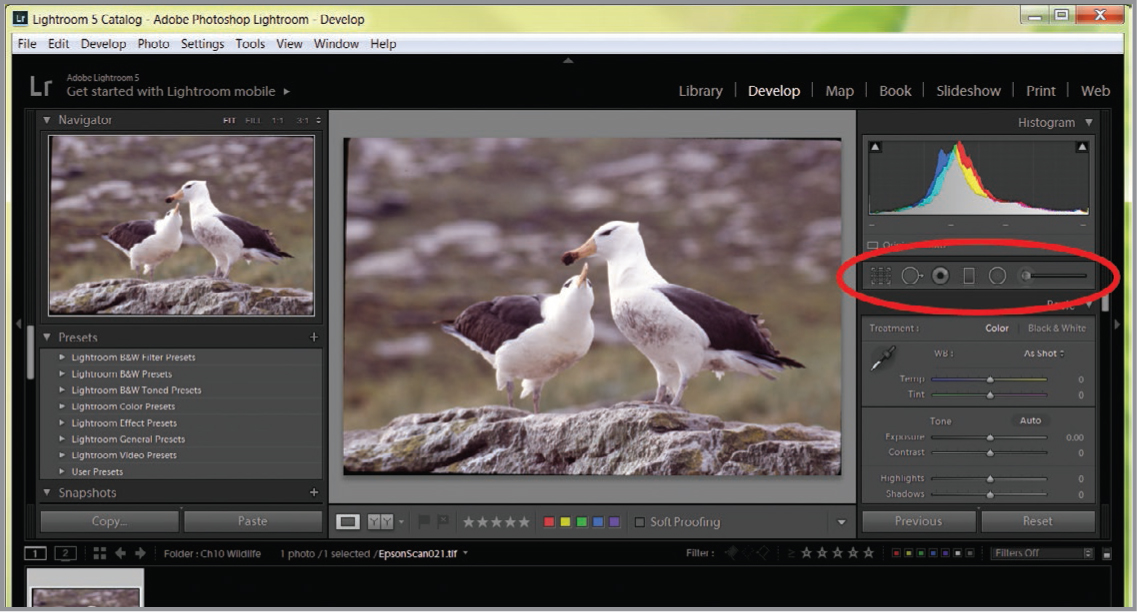
The secondary menu bar.
And there’s more—much more—in the Develop Module. Below the Histogram panel is a secondary menu bar. This secondary menu bar allows you to crop, remove spots, correct for red eye, apply graduated filters, and selectively apply most of the changes available for overall image corrections. From left to right the controls are: Crop Overlay tool (not only for cropping but also to rotate to straighten horizons); Spot Removal tool; Red Eye Correction tool; Graduated Filter tool; Radial Filter tool; and Adjustment Brush. The latter allows you to apply nearly all the corrections available in the main Develop mode (which applies changes to the whole image), but selectively to portions of the image.

The Map Module displays the exact location of one or more photos with GPS coordinates in the metadata. Shown here are photos in and around the Ngorongoro Crater in Tanzania. The GPS coordinates were added to the metadata in-camera when the photo was made. You can also add GPS information to photos by dragging them from the Filmstrip panel onto the map at the approximate place where you shot them.
Below that menu bar are some additional panels for applying overall changes to the image. These powerful tools include the Basic Panel for adjusting exposure, contrast, vibrance, saturation etc., the Tone Curve for manually fine-tuning tonal values, the Hue/Saturation/Luminance (HSL) panel for adjusting those parameters, Split Toning, Sharpening, Noise Reduction, and even removing chromatic lens aberrations. All are valuable, and you should familiarize yourself with them for future use.
The Map Module is of value if you record GPS coordinates in the metadata of your images. When working online, you can use Google Maps to display a map of the exact locale for one or more photos. The default view is a satellite photo of the location, but other views are Road Map (shows roads, geopolitical borders, and landmarks on a flat graphic background.); Hybrid (overlays roads on a satellite photo); Terrain (a graphical representation of the landscape); and Light or Dark (a light or dark low-contrast depiction of the road map data).
If you do not have GPS coordinates in your metadata, you can also add this information using the Map Module. Just find the approximate locale on the map where you remember making the photo(s), then select one or more photos in the Filmstrip Panel and drag them onto the map to the selected locale. You will then see the GPS information in the metadata. It’s a valuable feature.
The remaining modules in Lightroom may or may not be of use to you. For example, I’ve never used the Book Module because I never self-publish my books. However, this one could be of use if you want to create a collection of your finest photos of the area you are trying to protect. This book could then be given to local officials or congresspersons to enlist their aid in your battle.
Book Module. Using the Book Module, you can design photographic books and upload them to the on-demand print website Blurb.com. You can also save your books as Adobe PDFs or individual JPEGs. In this module, you have complete control over the layout and design of your book—whether it be a simple paperback portfolio or a hardcover coffee-table book. And it’s not just photos; text can be added easily for a complete work. There are powerful layout and design features in this module, so you will need to spend time studying the various options.
Slideshow Module. Using the Slideshow Module you can select layout templates, choose transitions, set playback options, add text to slides, and export the slide show as an MP4 video, a PDF, or as a series of JPEGs to use in other slide-presentation programs. The video option is particularly useful for embedding in a web page or blog. Perhaps the most valuable part of this module, from my standpoint, is to use it for easily creating time-lapse videos by assembling individual still frames shot on your DSLR or P&S camera. This is done using a downloadable add-on template.
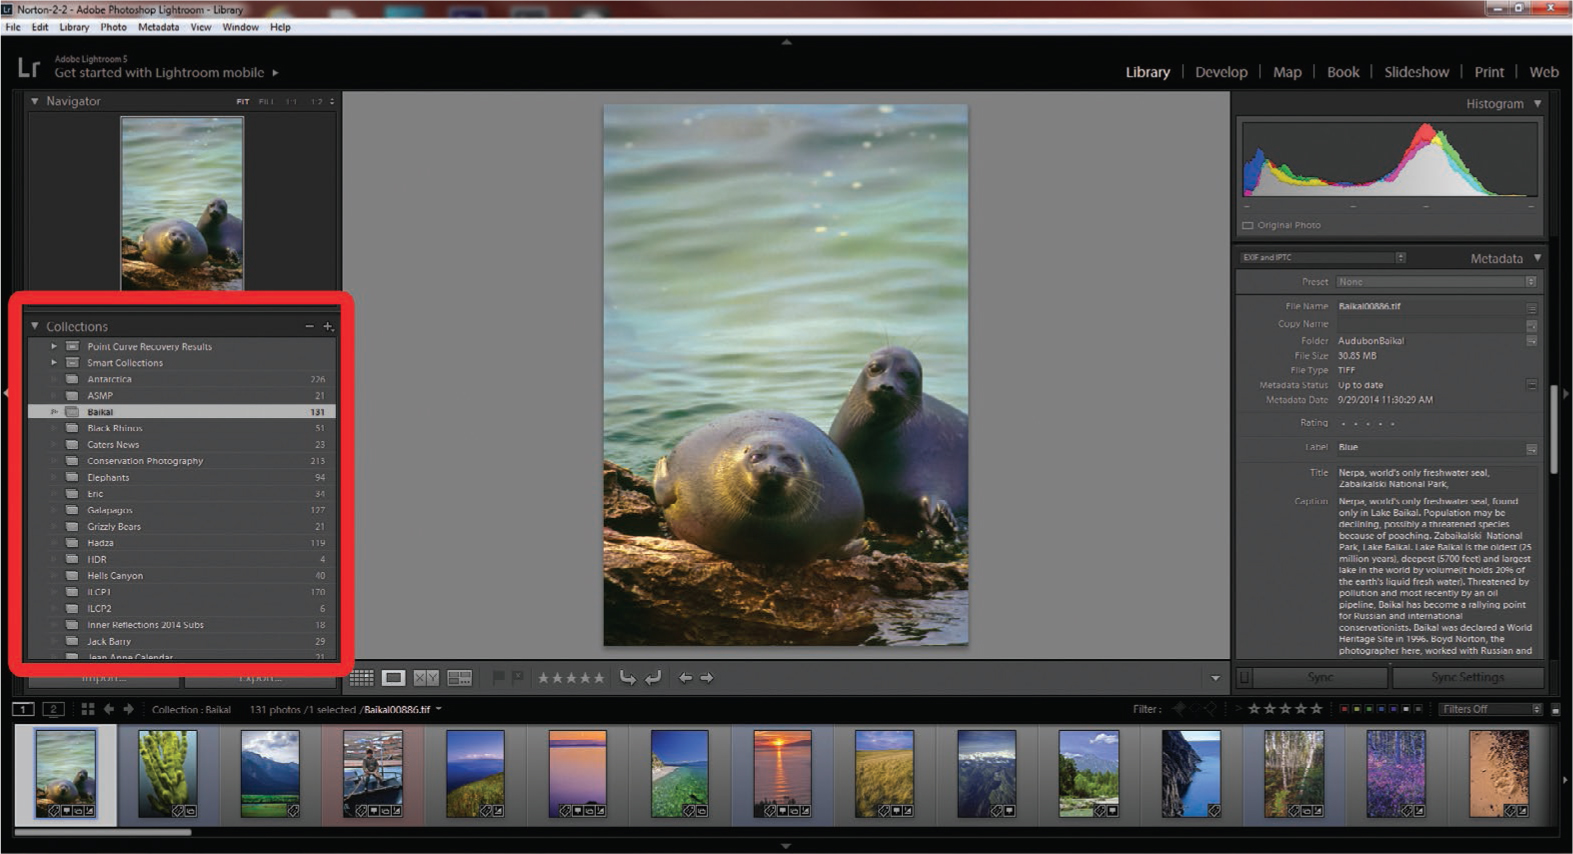
The Collections Module in Lightroom.
Print Module. This allows you to choose a wide variety of layouts for printing single photos of various sizes or multiple photos for contact sheets. Your custom layouts can be saved as templates for future use. There are many options in this module, allowing you to print with text, caption information, various borders and print sizes, overlays, and more. This is a valuable module for printing your work. Spend some time exploring the features—it is fairly intuitive and easy to use.
Collections. Collections are a great feature of Lightroom, and I use them frequently. If you’re like me, you may have certain specific subjects residing in a number of different folders on the hard drive. The same species of flower or bird, for example, might be in folders for different states or countries.
For example, I have thousands of African elephant photos—but they do not all reside in one elephant folder. Instead, they are in subfolders for Kenya, Tanzania, Botswana, and Namibia. I prefer to keep them in those subfolders because, in many cases, the elephants are in totally different ecosystems with different vegetation. I do not want elephant photos from Chobe National Park in Botswana mixed with elephants in Ngorongoro Crater or Serengeti in Tanzania because of the very different backgrounds of vegetation. That could be confusing when used in a book or magazine article about a certain locale.
However, if I have a picture request for elephants in general (not from a particular region in Africa), I create a temporary folder in the Collections part of Lightroom. Then, I go into the different folders in different countries and regions and click-drag selected images into that elephant Collection. This does not actually move the physical file on the hard drive. Instead, it creates a virtual image file in the Collections folder and I can use the usual tools for processing and making corrections on the images. Those processing adjustments and corrections (still completely reversible) are propagated back to the image file in the original folder. When I’m done processing and selecting the images, I can save them in an appropriate format in a folder somewhere on the hard drive, or I can have Lightroom upload them to Dropbox or some other cloud entity for distribution.
You will find that using Collections in Lightroom will really streamline your workflow.
Want to See Them Larger?
If you want a closer look at any of the screen shots from this chapter, please visit: www.amherstmedia.com/norton_downloads.html. There, you can download a PDF with large, high-resolution copies of the images that will enlarge easily on any screen.
When using Lightroom or Photoshop there is also another important consideration: ethics. I urge you not to manipulate your images beyond exposure, saturation, contrast, etc. Nothing can hurt your cause more than having someone discover that an image of yours has been manipulated by adding (or deleting) elements of it.
Case in point: A few years ago someone sent me a picture (found on the Internet) purporting to show how eco-friendly the Trans-Alaska pipeline was to wildlife. It was a shot of a grizzly bear strolling atop the pipeline somewhere near the facilities in Prudhoe Bay. Having spent a great deal of time in the company of grizzly bears in Alaska, and knowing something about bear behavior, I was suspicious. I magnified the photo to pixel level, and it was very noticeable that the pixels adjacent to the bear’s fur did not match those in the surrounding background of the image. Whoever did it was not very experienced at manipulating in Photoshop. Had they been, it might have passed muster. Nonetheless, it is important to maintain complete honesty in your photos—especially when they are used in an important conservation battle.
Have I ever manipulated photos? Yes. But I have never deliberately done so in order to lie about a situation—adding an element or person in a scene about pollution, for example. I have created logos and banners for websites by adding colorful skies to attract attention, but I make note that these are illustrations, not photos of real scenes. For example, the banner/logo for our non-profit Serengeti Watch website (www.savetheserengeti.org) is a composite image with several added elements, including a colorful dawn sky and certain animal silhouettes. Most people seeing it regard it as an illustration and not an actual photograph. If there’s any possibility that the image might be misconstrued, label it as manipulated or as an illustration that has been modified. Be honest.
“Nothing can hurt your cause more than having someone discover that an image of yours has been manipulated by adding (or deleting) elements of it.”
Here’s an astonishing statistic: 20 percent of entries into the 2014 World Press Photo competition were disqualified from the penultimate round of voting due to excessive manipulation. Why do I mention this? As a conservation photographer, you may have newsworthy pictures from time to time—and most news media syndicates have strict rules about photo manipulation. There have been numerous stories about pictures published that were later found to have been manipulated. For example, there was a photo of a polluting smokestack belching black smoke into the air, but it was later discovered that the photographer had added more smoke than was actually being emitted. Don’t destroy your credibility.