Fertility Harvesting and Cycling
The nation that destroys its soil destroys itself.
—, 1937
The State of Vermont soil maps say that I live on land composed of six to twelve inches of silty loam underlain by gravelly clay subsoil—not prime farmland but plenty good enough for growing fruit and nut trees and agreeable to raising vegetables as well. Yet for the past eight years, I’ve been gardening and planting trees across this site and have found only pockets of silty loam soil a few times; it’s almost totally just clay, some sandy soil, boulders, gravels, and more clay. Where’s all the topsoil—are the maps wrong?
Local elders in their 80s who have tended farm animals on this hillside have helped me complete a picture that should not be surprising, for it’s the story of this corner of the world’s landscape—and similar to much of the world’s. It begins with land clearing for timber extraction during colonial times, followed by potash production with the remnant forest combined with a sheep craze (two million-plus sheep in my tiny state of Vermont). Add to this a ravenous diet of ten to twenty-plus cords of wood per house for heat, followed by hardscrabble grazing in the early half of the twentieth century to send the rest of any remaining topsoil into the rivers and lakes. Overgrazing sparsely vegetated sloping land yields predictable results: massive transport of topsoil from the hillsides into this region’s great storm-water detention basin—Lake Champlain.
And Vermont’s soil story is no different from the rest of the United States, with the Gulf of Mexico catching the topsoil washing off the exposed heartland of America at a rate of about one billion dump-truck loads per year. Only a comet or large asteroid collision with Earth has ever destroyed so much biological capital so quickly.
The Great Soil Erosion of the nineteenth and twentieth centuries represents the most massive transport of material on Earth since the last ice age. My small ten acres on which, say, about eight inches of silt was lost, amounts to roughly twelve thousand tons of topsoil, or about 350 dump-truck loads. Standing at the sunset of the cheap-energy era, we now have to build a renewable society starting with about two hundred million fewer dump-truck loads of soil than the first European settlers to this region had.
Amazingly, most farming seems to go on as usual. We’ve managed to keep a small group of crops producing by trucking our fertility in from afar after extracting it from the ground, burning up ancient energy and fertility at once. As we begin to transition out of the cheap-energy era, the reality of Earth’s missing topsoil will be felt more deeply than we might imagine. Healthy soil is, of course, the foundation of any agriculture and culture; food can only be wrestled from the land via fossil fuel fertilizers and pesticides temporarily, at best. Societies have long existed without highways and electrical grids; it’s when the soil and water give out—or the climate shifts quickly—that civilizations collapse. This collapse may continue to be delayed for as long as fossil fuels can be substituted for soil, climate change is tolerable, or until potable water becomes scarce.
It’s becoming clear that one of the most direct ways humanity can simultaneously triage the soil–climate–water–human health emergency is through rapidly building topsoil. As we begin to digest the news about the role of topsoil as linchpin in ecological health and human resource sustainability, we are waking up to a world of new possibilities, including global carbon negativity, agricultural yield improvements (while simultaneously reducing inputs), flood mitigation, and biodiversity rehabilitation. Only topsoil formation does all of these things with enough amplitude to matter. Building topsoil is a deep solution that doesn’t create a multitude of new problems while attempting to solve the first one; in contrast, it actually solves many problems synergistically.
Disenchanted with the failure of each silver-bullet techno-fix, humanity is beginning to realize that the resource-generating system we need most has already been invented: Photosynthesis is the production, and soil is the storage. If being the “toolmakers” sustained humanity through the last epoch, evolving into soil makers and water purifiers might just get us through the next.
The more we learn about the living matrix underfoot, the more we understand it as a vast, synergistic composite of ingredients and processes. Although soil is composed of known substances such as minerals and particles from the underlying bedrock “parent material,” organic matter from plant and animal tissues, and water, we have just begun to understand the almost magical existence of living soil born from nonliving matter. Despite its many mysteries, we do know that soil is several things:
• It is the principal in our trust fund with Earth (the assemblage of species and water are also part of that inheritance).
• It is generative. Along with water, it is the living medium from which life stems (with the influx of sunshine).
• Its quantity and quality set Earth’s thermostat. Soil is where most of the carbon is: Two percent organic matter (carbon) in the top foot of soil represents more carbon than has been produced on the planet since the Industrial Revolution began. This amount of organic matter can be built in one growing season, easily, with sound land practices.
Solar photovoltaics, wind power, hydrogen fuel cells, smart grids, nanotech, clean coal—do these methods sound exciting? Maybe, but each of these creates a host of its own new problems. What if the best news in humanity’s prospects for a more livable future is not these and other new technologies manufactured from factories but ages-old living material manufactured by water, fungi, wind, and plants? How will soil (and biological systems in general) again become our baseline resource generator and storehouse? How can we enhance the soil system to sustain humanity’s resource needs while at the same time sopping up the excess carbon we’ve left in the atmosphere during the Great Fossil Fuel Party?
A century ago we began producing our resources with oil instead of soil. Now, we’re beginning to realize just how bad a deal this was; we needed the soil not just to produce our resources renewably but to temper our climate, sustain biodiversity, deal with drought, and maintain our health. But how can we possibly rebuild, say, three billion tons or a hundred million dump-truck loads of soil in the state of Vermont alone, maybe one trillion (yes, a trillion) dump-truck loads in the heartland of the United States? It takes a “natural” system hundreds of years to make just one inch of topsoil, so we need a way to make soil that’s a thousand, maybe ten thousand times faster than the historical rate of soil formation.
Is this possible? There’s only one way to find out, but the evidence is that it is indeed. Because of the sheer volume of matter needing to be converted into topsoil, any system that builds soil rapidly will utilize the most abundant and potent resources at hand, including:
• Subsoil (mineral source)
• Atmosphere (carbon dioxide/carbon and nitrogen source)
• Water (oxygen and nitrogen source and nutrient delivery)
• Sunshine (energy source for converting plant matter into soil organic matter)
• Nutrients (“wastes”): manures, urine, crop residues, woody biomass, food scraps, rock minerals, sand, and other available soil components (nutrients and organic matter)
• Tools (and human beings) to optimally utilize the above resources, measure soil formation, and utilize continual feedback for improved soil formation over time
Strategies are emerging for combining these ingredients to make fertile topsoil with great speed and to first capture and cycle all existing nutrients on the site that are available. These include compost, urine, and humanure; biochar; fungi; remineralization; cover cropping; intensive, tall-grass grazing; subsoil plowing and keyline agriculture; and cultivating deep-rooting perennials. Most if not all of these strategies can and should be combined. Some are suitable only on the farm scale, while others are more suitable at the home scale, and strategies vary according to the type of landscape in which soil formation is applied. The following is an overview of each approach and how we are utilizing it on the Whole Systems Research Farm.
Compost, Urine, Humanure, and Biochar
Composting is a no-brainer. No families or societies that maintained a direct and durable connection to their food and other basic resource systems over time (unless they were successful nomadic peoples) trashed their excess organic nutrients—including food scraps, urine, and feces. These “human effluents” are primary resources to keep the fertility cycle going, and landfilling such valuable assets would be as sensible as raking up the leaves falling onto the forest floor and hauling them off to the dump. Insane. Yet that’s what most industrial humans do today.
So if this is the opposite of resiliency and regeneration—the antithesis of what we’re after—what is the desired goal? A good friend and design colleague, Buzz Ferver, uses the following way to describe an integrated human–land fertility relationship that sees human beings as simply one step in the flow of water and nutrients: “You are a solar powered biological being, symbiotically co-evolved with plants, fungus and bacteria, primarily functioning to process and concentrate plant soluble nutrients in exchange for fruits, nuts, grains and other foods.” The primary strategies we’ve used for harvesting and cycling fertility—the basis of a productive and vitalizing ecosystem—are overviewed in this section.
Compost
All cycling of organic materials can be termed composting, but we use the term here as is commonly the case—to mean recycling of kitchen-, garden-, and barnyard-generated food scraps and other materials. Humanure use is also composting but will be treated separately in this section. Of all the topics in this book besides vegetable gardening, there is probably more written about composting than any other area. The literature is vast and complete, so I only wish to share the specifics of what we do on the research farm, or what we have learned about composting, where it is somewhat novel or departs from typical composting as most homesteaders know it. If you are new to composting, I would recommend you seek out some of the numerous resources available on it. Composting is a crucial transition skill and is as basic to any gardener, homesteader, or farmer as using a tape measure is to a carpenter. It’s also easy to do moderately well but difficult to do with true expertise—it’s challenging to make truly “correct” balanced soil.
We have tried various approaches to turning our kitchen, garden, and barnyard nutrients into soil over the years—from piles contained in pallets to piles contained by mesh screen/fencing to the simplest layered piles right on the ground. As with basically everything on this homestead, the best approach has proven to be the simplest. One caveat here: We don’t make perfect soil on this farm. We make pretty good garden soil and do so with minimal effort. For challenging applications such as seed germination, our soil is not ideal—it works, but damping off and slow seedling growth are common. We have a long way to go in this regard, and I plan to introduce larger quantities of leaf mold into the process in the hope that our germination mix improves.
For composting kitchen scraps the method we currently like the best is layering browns and greens in a three-sided container made with scrap pallets. We choose the pallets carefully for ones that don’t have very large gaps and don’t have treated lumber, which is rare around here anyway. We wire or nail or screw them together, with whatever materials are handy at the moment. We put a very tight-gapped pallet on the bottom first—that’s important, as so much good soil and nutrients tend to be lost out of a compost pile in this wet climate.
In the past two years, I’ve also experimented with using metal mesh to hold piles and think it could work better because there’s more aeration on the sides. I use 2"–4" galvanized metal fencing material that is excess from planting jobs (we use the same material for tree protection). I like the three-foot height, however, rather than the four-foot we use for tree protection. I simply make a cylinder with this material and layer up compostable material inside—usually a four- to five-foot diameter seems to work well.
I am experimenting this year with growing squash in the compost piles over the summer—they seem to volunteer there anyway, so we’ll see if they can yield a good crop. I just pulled the compost I’d need for the summer from the piles first and stored it in buckets. We layer up the pile over a month or three as it’s made, adding in kitchen scraps and garden weeds (if it’s gone to seed, we pile it in an area we call the “farm” compost for a very long-term breaking down). We use a large input of yard scythings from the most fertile area, especially the leach field, once or twice a year to really bulk up the piles, adding in those grasses while green. We scavenge leaves in the woods in the fall to add to the mix as well. During the growing season we also take some walks to gather comfrey, which is extremely valuable as a compost accelerator and mineralizer of the soil being made (because of its ability tap into deep layers of the soil horizon).
At times, when there is an excess of nutrients being made, we gather them up and add them to the compost piles to get more nitrogen and organic matter especially—as kitchen scraps don’t add up to much soil. Those bulkers and potentizers include barnyard manure and bedding mixed together and chicken manure–laden bedding from our movable chicken coop. The chicken manure especially helps to accelerate and heat up the compost pile, quickening its breakdown. Once a pile is done, we cover it with a few scraps of burlap to keep the bulk of rain from washing through the piles, thus diluting their value. We only turn piles on occasion, mostly letting time do the work. However, when we see a need for more soil quickly or need to consolidate piles, we will turn one pile from a container into the neighboring container, thus flipping over and aerating the contents well and making new space for a fresh pile.
We have never watered a compost pile here and don’t consider it better or worse to have the compost located in the sun or shade—though if I could choose, shade is probably better because of the stable temperatures and lack of drying. Locating the piles in the sun does give the added advantage of being able to grow in the piles themselves, utilizing the nutrients just sitting there in half-finished piles. Instead of sun/shade criteria, however, we locate the piles for complete ease of access and for consideration of what we want to fertilize downhill from the pile, as runoff is unavoidable unless you compost inside a shed or similar location.
Urine
Human urine is a near-perfect plant food, and a hydrated, healthy human being urinates a half dozen times a day or more. That’s hundreds of easy opportunities each season to feed back into the system that feeds you. Using urine as fertilizer on the homestead can only seem strange in a relationship between people and plants with incomplete cycles and distance, rather than connection. Raising plants without offering them back your excess nutrients is like being given a gift by someone repeatedly without returning the favor.
Because of failing septic systems and especially urban waste treatment systems, industrial humans are literally “pissing on” fish in the rivers downstream from their sewage treatment plants and the creatures of the sea into which that river flows. This is not proper nutrient cycling—animals don’t benefit from human urine, plants do. Concentrating human feces and urine into massive centralized systems not only deprives the land of the fertility from which these nutrients were derived, it loads the oceans with excess nutrients and toxins. This lineal flow is the opposite of the arrangement between land and sea that living communities rely on. Fortunately, if you live in a rural area, placing yourself in beneficial relationship with the living world around you is as easy as growing food plants, composting, and walking around the site to simultaneously water and feed the plants most in need of nutrients.
It is said that each human being excretes enough plant nutrients to grow enough plants to sustain him- or herself. This cyclic concept should not be surprising, as humans and plants have evolved with relationships between each other for millennia. Think of the synergy: What if it so happened that urine was toxic to plants, or that it simply didn’t contain nutrients plants need? Of course, just the opposite is true; all our excess bodily nitrogen goes into our urine—the same nitrogen that is often the limiting factor to plant growth. Coincidence? Doubtfully, but either way, the imperative is simple: Cycle value in the system—transform a waste from one element into food for another, always.
Urine is one of the most valuable resources generated on the homestead, and no human habitat firing on all of his cylinders would waste much of it. We have found it relatively easy to use urine during the growing season but hard to make optimal use of it during the long dormant season. When plants are growing—generally from about April to October—I urinate either directly on the base or near the base of trees and shrubs that need more fertility. I look out for the plants that are growing the slowest and fertilize those as a priority. I aim to grow twelve to twenty-four inches of new shoot per year on most fruit trees, a lot less on new nut trees, slightly more on older nut trees, and maybe six to twelve inches on most shrubs, aside from elderberry, which is super vigorous and can grow two feet per year easily for the first few years.
Not surprisingly, these are found more often the farther I walk from my zone 1 (kitchen, office, workshop, bedroom). When you find a plant in need of nitrogen, urinate at the base of it—the younger the plant, the closer to the base the better, because of its limited root development. As plants get older I like to fertilize them farther out from the base. Avoid depositing urine in the same spot over and over again or repeating use on the same plant. When you do fertilize with urine, get the liquid gold in deep, where the plant roots can access it. During or before a real rainstorm, you can spread more broadly on the surface.
Using human urine on plants entails walking around the landscape to a larger extent than we might otherwise. And while it’s easy to cycle your fertility back into the landscape during the growing season, the dormant season presents another challenge entirely. In my cold climate, for six to seven months of the year, storing urine presents several challenges. First, although sterile when it leaves your body, urine becomes highly active and odoriferous quickly—read, overnight. Odor is a challenge, if you’re storing in buckets or jars. Second, urine tends to lose its nitrogen quickly into the air. So come spring the amount of nitrogen actually available for plants would be questionable.
I have come to the following approach as my best current method for solving the winter fertility-extension challenge. First, I urinate outside at the base of wood-chipped plants when possible in the winter months. I do not know for sure how much of the nutrients will be available for the plant come spring, but it seems to do some good and is a nonpolluting way of releasing the nutrients.
Another great use of winter urine is inoculating biochar, which is made in my woodstove. This is one way of achieving the necessary step of activating and “charging” the biochar and serves an equally important function of nutrient storage. It seems, from what little research on the subject I’ve done, that some of the nitrogen will vaporize by spring, but some will remain locked up by the potent nitrogen-absorbing biochar (pure carbon). Then come spring the biochar is mixed into garden soil, where the winter’s fertility can be extended across the growing season.
I have enough mixed results with biochar to feel as though I am still a number of growing seasons away from feeling confident in the above strategy of urine-inoculated char as a soil amendment in beds directly. I would think this material as a compost amendment would be very good but have reservations about direct-bed additions, as I’ve seen biochar do weird things to vegetables in garden beds—mainly in the form of slowing plant growth immensely in the early stages of transplanting and growing from seed.
Another more recent experiment we are doing with urine on-site is to fertilize our just-built Jean Pain wood chip water-heating mound. The Pain mound offers a fantastic opportunity to deposit high-nitrogen urine in a location that can actually absorb it for the long winter and utilize it, since these mounds are an enormous carbon-rich store of material: They need nitrogen to fully compost in short order. While the goal of the Pain mound is not compost primarily (it is heat)—though it’s certainly a secondary goal—the mound offers an opportunity, like a “bedded pack” becoming popular with innovative graziers in recent years. For more information, see the “Compost Hot Water Heating System” sidebar in chapter six.
A bedded pack is simply a thick, high-carbon layer of organic matter—whether it be brown hay, wood chips, sawdust, shavings, or the like. Such a carbon diaper is more able to absorb a massive influx of nitrogen than anything else. And like the Jean Pain mound, the bedded pack heats up because of the microbial composting action, offering animals (typically cows in this application) a warm spot to rest in the winter. For us fertilizing the Pain mound is about as simple as it gets: Deposit urine in a small container if it’s too cold to go outside in the middle of the night, and pour it into the mound during the day. You can also urinate directly on the mound itself. We put the nitrogen-rich duck water from the barn into the mound as well.
We’ll know a lot more about how this approach works in the coming year, but for now we can say that it’s probably going to work very well at least for a composting and nutrient-capture approach. Signs that the nitrogen is helping the heat production process are good—the mound is only three weeks old, and already it’s at about 140°F.
Humanure
We started cycling solid human effluent only a year ago here because of reliance on an already in-place septic system for such. (This is one reason to build your homestead from scratch, rather than having to retrofit and, in the meantime, be forced to incorporate a senseless system.). Our humanure system in its early stages consists of a composting toilet (an old Clivus), which is large enough to collect a year or more of manure. The human feces and sawdust/planer shavings migrate and are pulled downhill with a wooden raker, so we can keep them from getting freshened by new material. The breakdown of the material continues in this bottom area before that material is scooped out of the hatch to be composted further, for at least another year, mixed with grass clippings, leaves, comfrey, and the like, in the outdoor pallet or metal mesh piles I described above. I add biochar to the bottom of the compost toilet receptacle to sop up the extra carbon- and nutrient-laden water/urine/funk, which percolates through the pile and to the bottom.
I have not used the humanure yet but will report back with results in the next edition of this book. I am sure it will be rich, high-organic-matter compost that should be fantastic. We will treat this material separately from the other compost and make sure it is more thoroughly finished before using. We’ll also tend to focus its use away from root crops, most likely. And we’ll do all we can to encourage visitors who might be on pharmaceutical drugs to use the conventional septic. Cycling your “waste” into food certainly makes you think about what you put into your body.
Biochar
New research is being done on biochar, an ancient soil ingredient that has the potential to substantially increase agricultural production while helping to reverse climate change via long-term soil carbon storage. This ingredient is often referred to as terra preta, char, and agrichar. Biochar is made through a process called pyrolysis: creating charcoal through the burning of dried plant material under controlled low-oxygen, low-temperature conditions. Roughly half of the organic carbon found in crops can be returned to the harvest location by turning the crop residue into biochar and integrating it into the soil.
Biochar increases soil moisture retention, facilitates beneficial microorganisms, and radically reduces nutrient leaching by binding nutrients securely to persistent carbon molecules. Unlike compost, biochar is incredibly persistent in the soil and is often found in soil deposits from fires that occurred thousands of years earlier. Compost, on the other hand, is metabolized by organisms in the soil and lasts a few years or fewer, with much of the original carbon deposition released back into the atmosphere and lost from the soil. Charcoal stays in soil for millennia, allowing us to make long-lasting deposits into the soil carbon bank. When we inoculate the char with biological activity and nutrients (biochar), we also add a nutrient-laden sponge into the soil horizon off which plants can feed for long periods of time.
Think of biochar as a doubly whammy of goodness for the soil and a major climate benefit. We’ve made biochar very simply via outdoor brush pile fires and in our woodstoves. The latter results in a more optimal char, but the former is a yield from a farm activity that wants to happen regardless of the char yield. When we clear land we make slash piles. We use some of the slash, the common term in rural New England for treetops left behind or used for other purposes aside from milling during logging operations, as modified hugelkulture beds where we install the woody debris on the downhill side of berms below swales—or simply willy-nilly incorporated into the swale berm.
However, there is always more slash than we can integrate in this way. This slash gets piled around the landscape, usually dried for a few months or more, then sometimes burned, but not mostly to ash. We ready ourselves before the fire with buckets and sometimes hoses, ideally before a serious rainstorm. Since the pile wants to burn right down to ash (not a very useful or permanent soil amendment), we need to ensure that the burn stops before that point and leaves us with a large amount of char. In practice much ash is made, but if we have plenty of hands and water, we can usually douse the fire about three-quarters of the way into its normal burn cycle and end up with large amounts of charred wood. That charcoal is then very useful in swale-berm incorporation and in more pure biochar making.
I have started to call this hybridization between biochar and hugelkulture that has emerged over the years as a matter of course on my farm hugelchar. We pick out the best, most thoroughly charred pieces and crush them in buckets using sapling mashers—bringing that material into the vegetable garden soil flow, rather than leaving it in the rough less-perfect-soil demands of the perennial system. We’ve also put these large pieces of charred wood on a tarp and driven over them with a tractor. In both cases we end up with nice, small aggregate and powder—ideal char from which to inoculate and make biochar. The woodstove approach simply involves pulling embers from the firebox of the stove while using the stove. We then quench the embers with water or urine to explode the structure of the char (increasing its surface area) and let the material cool. We powder it by hand as in the above example and urinate in that material or pour compost tea into it. That material can then be used in garden beds, when tree planting, in compost piles, and so on after it has absorbed the nutrients for a couple of days.
A note of caution when using char is important to mention: Char or poorly made biochar can stunt your plants in a spectacular manner. The ability of char to absorb nutrients and water is widely accepted, and after poorly inoculating char the first time I used it, I can attest to this, unfortunately, from a negative affect. Excited about biochar, I hastily applied some to garden beds near my house after soaking the char in some urine water for a night. This was in the fall before putting the garden to bed for the winter. We then transplanted kale and other hardy early-season vegetables into this bed in the early spring. For a month these plants did not grow a millimeter. I’ve never seen anything like it—complete state of suspended animation. My girlfriend at the time, and primary garden grower, almost had my head—she had been skeptical of my haphazard garden soil experiments since day one.
Moral of the story: make sure your char is fully charged with nutrients and water before applying to the soil, and if you want to be very careful, consider mixing the biochar with compost first, then aging for months or even a year or two to ensure that the soil is “corrected” before growing vegetables in it. This soil “correctness” is not a specific chemical or physical composition, although you know many soils are “incorrect” when you see them—partially decomposed woody debris, leaves, or food scraps are classic signs. Soil that is truly correct and ready for vegetables is a somewhat mysterious thing that I am still learning much about.
For instance, after almost fifteen years of making compost, I still cannot make a germination/potting mix that performs very well with little to no transplant shock of starts and little to no damping off or that encourages very rapid growth. I have used Vermont Compost Company’s famous compost and Fort V mix for this use for years, although not consistently, always wanting to use my own carefully made compost. Finally, this spring I was sick of poor seedling performance and was chatting with a friend, a very talented grower, about it. He said, “I gave up on making my own potting mix years ago; Karl Hammer knows how to make it, I don’t!”
It all clicked at that moment. Making soil is hard. My friend is a fantastic grower—his gardens are stunning with vigorous, lush plants and little disease or pests. And even he has trouble making his own germination mix. While I felt better about myself after speaking with him, it does leave me somewhat disconcerted. Seedling mix is a fundamental food-production material; needing to buy it each year is not a model of resiliency. Since Vermont Compost Company is close and I have a good stockpile of their soil on hand (it’s not particularly perishable), I am not terribly concerned. My own compost also does germinate viable plants, just poorly relative to what’s possible. However, the entire gardening season is made much more sluggish than necessary by having suboptimal potting mix. This weak link in my own home resiliency system is high on my list to address.
Fungi: Quiet Ally to the Whole System
Fungal roots—mycelium—feeding on one of many wood chips at the farm
Fungi process and feed on woody debris much like plants feed on soil. And in the cold-temperate climates of the world, which contain some of the world’s great forests, woody debris is often much more abundant than good soil. Fungi play a crucial role in breaking down this woody material, cycling it into soil and other components that in turn plants can utilize. Some of these plants are trees, which in turn make more woody debris, thereby feeding the cycle endlessly.

A student in a Whole Systems Skills workshop practices one of the steps in shiitake mushroom cultivation: drilling holes for the fungal mycelium to be inserted into. This process is immensely aided by using a hyper-speed drill bit for an angle grinder rather than a conventional drill and boring bit.
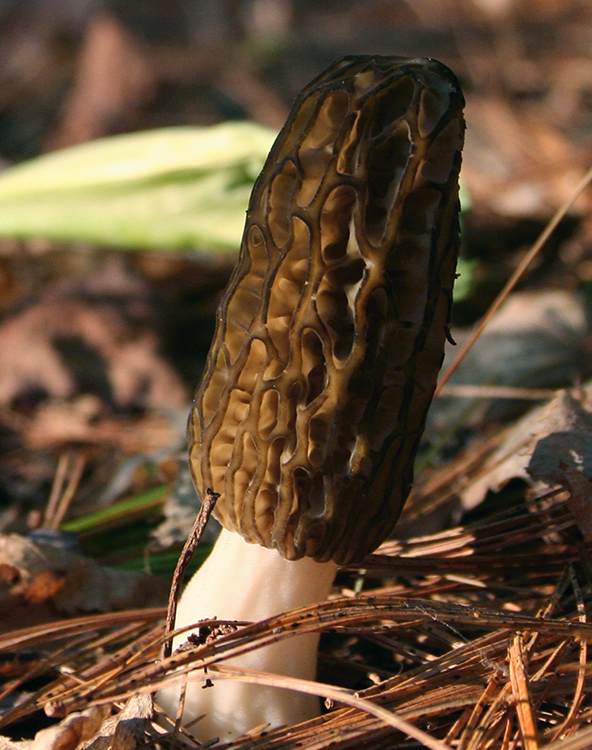
Morel mushrooms growing six months after we prepared the site with a burn and inoculation via sawdust spawn
During the last decade or so, people are putting together a picture of the crucial and immense role fungi play in ecosystem health and resilience. Researchers such as Paul Stamets have found evidence that mycelium—the roots of fungi—can cover vast distances in the soil and actually seem to have the ability to transfer nutrients from one area where they may be abundant to areas that are lacking. It’s as if they can balance out entire areas of an ecosystem by intermediating the nutrient and energy flows so the system as a whole can thrive most optimally.
Paul Stamets calls mycelium “nature’s Internet,” noting this incredible capacity for fungal networks to actually serve as a web of fundamental connections in an ecosystem. Healthy forest systems have been observed to contain immensely large and intricate webs of mycelium, with some studies concluding that a mile of mycelium can be found in one cubic inch of healthy forest soil.**** Whatever the emerging details of the science of fungi may be, the implications for the regenerative designer-doer are the same: Harness the fungal force—it’s powerful, works to make systems more resilient, and offers food and medicine yields as a bonus.
We have facilitated the growth of fungi and its roots, mycelium, in various ways on the farm—some have been more persistent in their positive results over time than others. Taken as a whole, wine cap stropharia was the most spectacular, easiest, and fastest fungi to work with but seemed to stall out after two to three years, while shiitake takes more work but seems to be more resilient and reliable over time. It’s also easier to be a source for your own logs (used as substrate for shiitake) than for wood chips (used as substrate for wine cap), in that a chain saw is fairly essential for many tasks, while a wood chipper is a pain and expensive to own at best.
Jackie Pitts and Kristen Getler wax the inoculum-filled holes along with the log ends to retain moisture and prevent competition from other decomposers.
Our wine cap (Stropharia rugosa annulata, or the Garden Giant) facilitation started when we began to plant this site about seven years ago. We used bare-root trees, which we dipped in a specially prepared root dip containing humic acid, beneficial bacteria, liquid kelp, fish emulsion, and various mycorrhizal and other fungal organisms. We planted all the bare-root trees by first dipping them in buckets of water and this root dip, followed by a heavy mulching of wood chips. We didn’t realize at the time that every tree we planted was also a biological inoculation of fungi across the site. This much became clear about three months after planting, when in midsummer droves of mushrooms began sprouting up all over the place. Many of these reached large sizes—up to that of a dinner plate.
We marveled at the growth of these but didn’t know they were edible until a friend of mine and a soil-fungi aficionado, Buzz Ferver, was walking around with me and asked, “Why aren’t you harvesting all of that stropharia!?” We began to and found ourselves awash in wine caps for the following two years. At many times throughout the summer, when the rains were just right, we would be able to harvest a couple of shopping bags full at least once a week just going around the mulch rings in zone 1. The flushes were so abundant for the first couple of years that many of these mushrooms formed and went by before we could even get to them
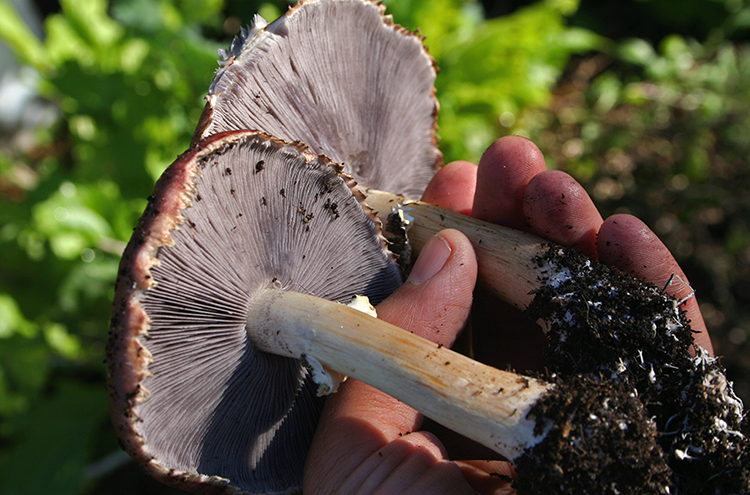
Wine cap stropharia mushroom (Stropharia rugosa annulata): We harvest from vegetable garden soil in large quantities.
.
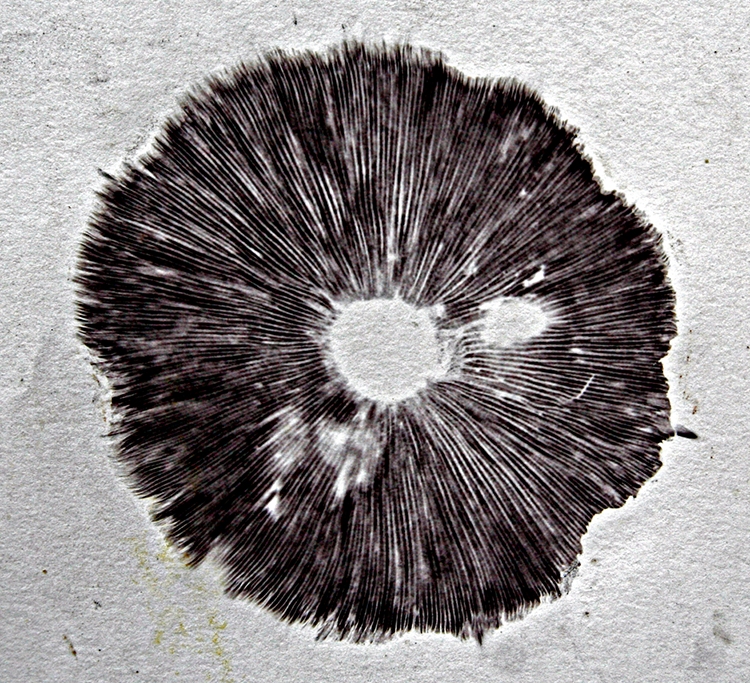
Spores released from the rapidly reproducing wine cap mushroom captured on a piece of bond paper
Wine caps, however, don’t keep well, and you have a very small window of harvest to actually get them in good condition. They are best while still burgundy but after they’ve opened enough that they are at least silver dollar size (usually), often much bigger. As soon as they begin to go from a red-wine color to something more pale, they have started to go by. You will notice they release massive amounts of spores from their underside (gills) at this stage as well—harvest just before that happens. These mushrooms keep for a few days or fewer in the fridge and for only hours unrefrigerated—growing maggots within a day.
Paul Stamets has recommended using these mushrooms for fish production because of the immense number of flies one could grow on them, which is a great idea we’d love to try sometime. As we began to see the power of this fungi and its tendency toward this site, we started to “run” with the species, promoting it by offering it food in ever-expanding areas of the site, paving the way for its expansion with wood chip mulches.
The epic wine cap days of walking around each morning to massive flushes everywhere are no longer, however. I am not sure exactly why but surmise that these flushes no longer occur because of a combination between two factors—reduction in feeding the organism and complete/sufficient colonization of the site’s soils such that the fungi does not need to fruit (read reproduce) anymore. The first few years of site establishment, we kept up with mulching so the feedstock for the wine cap was continuous. We also began putting down large amounts of horse manure, in which wine caps seem particularly prone toward producing.
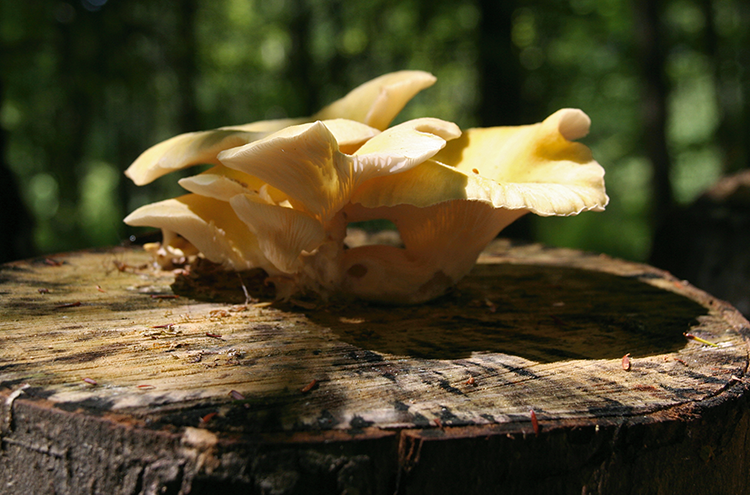
Golden oyster mushroom that we grow on totem pole–style production using otherwise low-value poplar wood
Remineralization
The land system, like the human body or any other system, is often limited in health and vigor by missing or insufficient nutrients, minerals, energy flows, water, and other components. We call such components “limiting factors” and are always trying to identify which are emerging, understand which have influenced the system in the past, and attempt to anticipate them before they arise in the future. Indeed, that’s much of the game of productive land management. For a long period of time, from the early biodynamicists to recent soil biologists and savvy farmers/gardeners, those working with land have realized that limiting factors often come in the form of missing soil minerals. Elements such as calcium and boron, along with other micronutrients, have been found to acutely affect plant growth—both negatively and positively depending on their balance in the system.
Remineralization is the movement and action to identify and ameliorate the limiting minerals in the soil ecosystem. This work is often best done through comprehensive soil tests to establish a baseline of data, followed by additions of key minerals that have been identified as lacking or present in imbalanced proportions. Most soils happen not to contain the optimal balance of soil minerals (and other nutrients) that should be identified as early as possible in site development. These minerals are heavily determined by your soil and parent material (bedrock) type. The USDA Natural Resources Conservation Service (NRCS) soil maps available for most of the United States have significant information regarding the underlying materials in each region, from which you can obtain many clues about what may be limiting factors in your soils.
Usually, experienced gardens and farmers in your area will be able to elaborate on what these limitations may be—in our area calcium is usually lacking. “Weed” and other plant identification is also a great way to understand what nutrients may be in abundance or lacking in your soil—check out the literature available on that subject, as reading the weeds is an important aspect of general ecological literacy and will greatly aid your land development and maintenance work for a lifetime.
Once you’ve established what components might be most limiting to your soils, it is time to set about amending them. One caveat: Some amending is useful no matter what your soils may be, and lacking a soil test, you can still rely on certain soil modifications to be helpful. These include organic matter additions/compost, nitrogen additions (often but not always), mineralogical additions (not all, but many minerals). Fans of remineralization often take the view that soils in general, due to a long legacy of abuse, are limited in many minerals and a general addition of broad-spectrum minerals is key to growing healthy plants and animals.
Whether this makes sense to you or you’d like to take a more calculated approach, the amendments are similar, with the following being favored. We’ve used many of them, and it’s too soon to say what kind of effect they’ve had on the system—we have also not run side-by-side trials to know. In general I subscribe to the remineralists’ view that our abused soils are lacking minerals and from even one-time additions can greatly gain in health for generations into the future. If you think of it in this way, you can imagine a soil’s being “released” to manifest its full potential, given the addition of something (mineral- or nutrientwise) that was limiting it. Favored amendments in remineralization include Azomite, Greensand, fish and kelp-based products, sea salt, and bone-based materials such as char. I highly recommend looking into these materials to find out more about the variations of their uses and other specifics.
Cover Cropping and Winter Cover
Cover cropping during the growing season, as part of good crop rotation, will probably be considered standard practice in life after the cheap-energy economy. Our age of peak oil holds a future in which imported growing media and nutrients in the form of soil, manure, and other fertilizers will be increasingly expensive or unavailable. Cycling fertility on site perpetually will be crucial in a postpeak future and will determine, in large part, the economic success of a farm and the viability of a homestead.
Since nitrogen is the most often relied upon off-site input, producing (or harvesting) nitrogen on-site via fertility farming will be central. Indeed, home and farm landscapes in general should be thought of as nitrogen-capturing nets, sopping up atmospheric nitrogen and scavenging excess soil nitrogen for plant growth and soil organic matter production. Nitrogen-fixing plants such as clover, vetch, pea, and myriad perennials are components of this system, as are animals; land committed to these resources represents a significant portion of the productive acreage in a regenerative landscape. This is why permaculturists are fond of planting at least one nitrogen-fixing plant for every “feeder” plant such as a fruit tree or berry bush. They serve as the fertility factory in the landscape, reducing or eliminating the need for fertility importing from off-site.
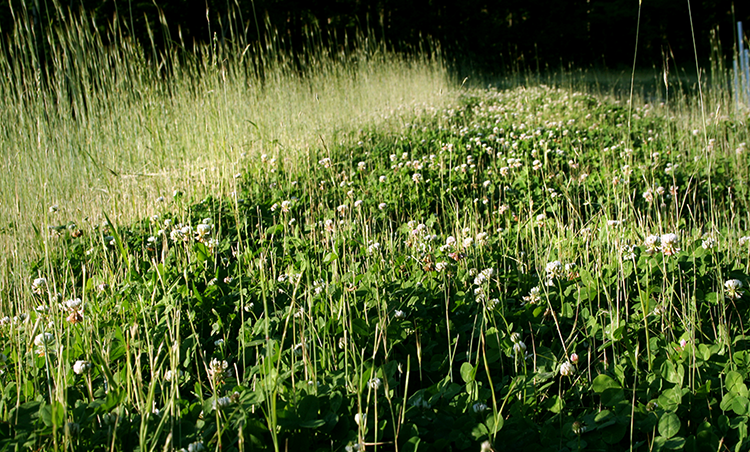
Pollinator heaven white clover amid an overstory of rye on a pond berm, less than three months after this was bare ground
It’s surprising how many organic home gardeners, and even organic farmers, tend their crops carefully throughout the season only to clean out the garden or field at the end of the year and leave exposed earth, spreading not a single pound of cover-crop seed, leaves, straw, hay, or other mulch. This simple task protects the soil from six months of rain, snow, and wind until the next gardening season. Without such cover, bare soil loses its finest and best material to the percussion of rain drops, the leaching effect of snow melt, and erosion by wind. In addition, a dormant-season planting of cover crops fixes nitrogen and sends organic matter (via roots) into the soil, boosting fertility and soil health for little cost and effort.†††† Some covers also aid in optimizing phosphorous, micronutrients, and other chemical levels in the garden. All cover crops contribute organic matter to the soil, the foundation of good soil and plant health. At WSRF we spread cover crops the day the garden is cleaned out at the end of the season, rake it in if necessary (depending on species), water if needed, and turn in the cover as soon as possible in the spring if it does not suffer winterkill. Buckwheat is one of my favorite covers (though it doesn’t fix nitrogen), because in my climate it winterkills reliably.
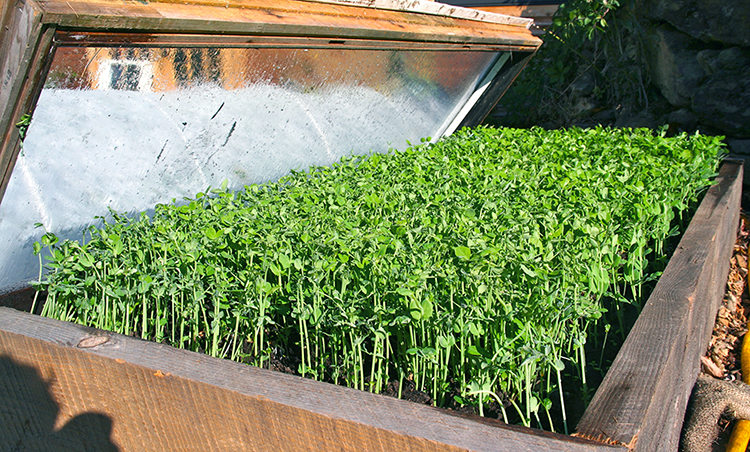
A cover crop of forage peas coming in strong with snow still occurring in early spring. A combination of raised bed, salvaged glass window for the cold frame, and a hardy plant allow a four- to eight-week jump on the normal growing season. The peas were used as a cover crop and turned in, as well as cut for salads multiple times first and regrown until tough.
While we have not dialed in a nearly perfect cover-cropping strategy, we have found that the following principles, when followed, result in consistent winter cover of our beds. Truly, the challenge is dealing with the cover (turning it in/grazing it down) in the spring.
• Sow a cover as soon as possible after cleaning the bed—crucial to get ahead of any weeds. We like to harvest, graze the bed very hard with chickens, then pull any remaining weeds with their roots and rake in a cover crop—especially oats or buckwheat.
• Use whatever is at hand for cover. We cover garden beds with tarps, membranes from pond work (EPDM works great), burlap, or simply mulch beds heavily in the fall to get a solid winter cover. This covering—but not cover cropping—has the advantage of protecting the bed from erosion while leaving you with a nice bare planting surface or seed bed in the spring but with the distinct disadvantage of no C and N capture and organic matter building as a result.
We are not zealots about using only straw for mulch. I’ve seen as much “weed” come up from straw as from hay, and the idea that hay isn’t clean but straw is is simply not true where I live. Straw is also not available locally here, as almost no one grows grain. I now make my own straw via the rice production, but that is not enough to mulch many beds heavily, though I am using it along with rice hulls as mulch and having great results.
• Turn the cover in early, or if you have enough materials, sheet mulch it. By “early” I do not mean necessarily when snow melts, but it should be done as early as is needed to kill the cover crop before you need to seed or plant the bed. When establishing new beds we will devote the resources needed to actually mulch each spring for one or two springs. This takes a lot of material but results in rapid bed formation. This looks like the following:
• Sheet mulch an area (usually grass) to kill existing vegetation using cardboard, burlap, straw, hay (we avoid newspaper due to the dyes and other likely chemicals).
• Add compost on top.
• Plant in that in year one—ideally, beans or other fast soil-builders and light feeders.
• Cover crop it heavily in the late summer or fall.
• Sheet mulch that cover crop the following spring, and repeat compost application.
I should note that this is one area of farm/homestead work in which we find that chickens have a distinct advantage over every other form of livestock we’ve tried (the other is in disturbing groundcovers to create seedbeds in pasture—essentially the same effect). We use sheep to graze down a really weedy bed and the ducks to keep snails and slugs out, but with their immense scratching effect, only chickens will truly turn over the bed, wreck all or most of the weeds, create a perfect seedbed, and fertilize the bed simultaneously. Turkeys would likely have a similarly positive disturbance, but we have not tried them yet.
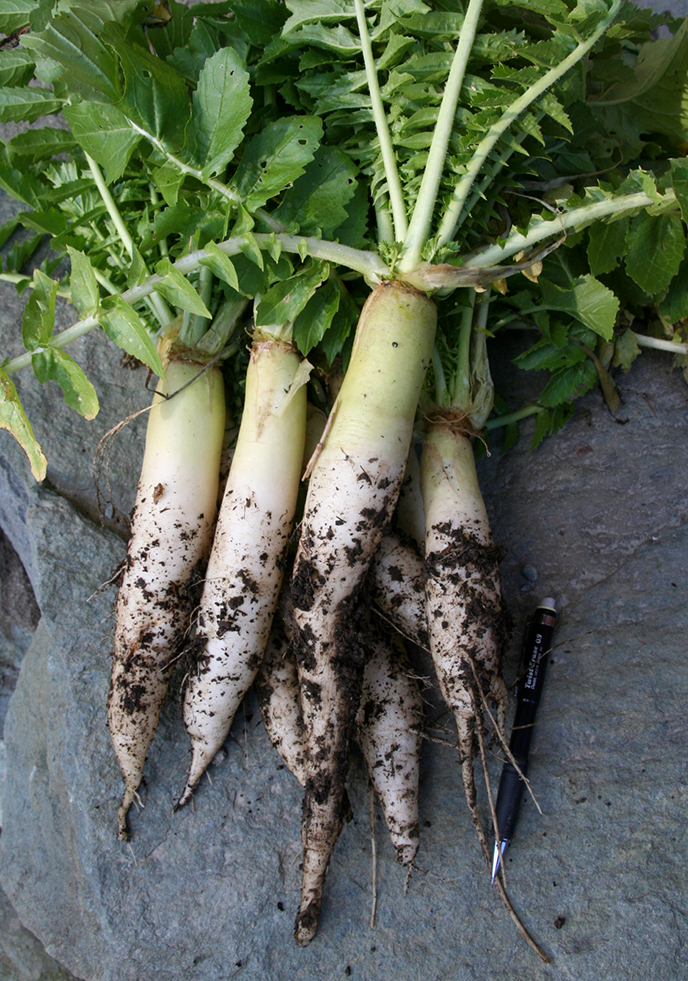
Daikon radish or tillage radish, sown via broadcasting lightly and often through the growing season, especially immediately after heavy grazing and earthwork disturbance. We never have to devote garden space to radish or turnip with this approach, and most rot in the fields, forming deep soil deposits.
Permanent Covers in Vegetable beds
An additional aspect of cover cropping that we have found some success with (but that seems to have even greater promise over time) is successional planting of vegetables through a cover crop—à la Masanobu Fukuoka‡‡‡‡ style. This approach involves seeding a crop such as squash, cucumber, tomato, kale, or most anything else that tends to leave a lot of open bed space or bare soil between plants for a large period of time during its establishment. These crops create major weed and soil-damage problems because they encourage so much bare soil for such long durations.
To avoid this we have tried planting buckwheat a few weeks after the squash or other vegetable gets established. Giving the squash a head start allows it, in theory, to get above the cover crop, before the cover then comes in behind it to fill out the bare soil. We have had this work to a functional but not nearly optimal degree. The cover crop (especially buckwheat) tends to get too high and shade the main crop too much. Ideally, we would use a very low-growing cover that can be broadcasted, is easy and cheap to make or acquire, is fast establishing, and is nitrogen fixing. Ideally, the seed could take a bit of shade as well.
This ideal seed would be something like white clover but much faster establishing and not perennial. White clover is a perfect plant in many respects, but it’s slow to establish. I’d like to try to maintain garden beds of permanent white clover, like Fukuoka did in his rice paddies, and also grow vegetables through the clover cover. It would likely require planting somewhat large and vigorous seedlings into the clovered bed, but that seems doable. The challenge in this approach would be the constant need to seed clover, as other plants come in constantly, and keeping the other taller grasses and other “weeds” out of the bed. In our climate I am not sure that the perfect groundcover for permanent cover in vegetable beds exists, but I will keep looking for one. The need for a successional cover to bolster crops is crucial to protecting and building soil while working an annual system. Much work needs to be done to improve this area of home and farm soil maintenance and enhancement.
There are many good resources for cover crops available online and in print form. Seek out the most appropriate covers for your phase of land development, your soils and climate, your particular cropping cycle, and other relevant aspects of the site’s system, such as animal forage needs.
Tall-Grass Grazing
Picture a ten-thousand-head mob of buffalo or wildebeests thundering across the plains of North America or the Serengeti. Is healthy topsoil what comes to mind? For most of us, steeped in conventional ecology and environmental science, the answer is, “Hell no!” Instead, we imagine ecological destruction from overgrazing and desertification. And in truth the association between grazing animals and land abuse is not unfounded: Poor grazing practices (not necessarily “overgrazing,” just poor grazing management) contribute greatly to the desertification of large areas of the earth, wrecking soil and water and leaving a high climate-change bill. But that’s different from the quick movement of densely packed animals through a landscape (otherwise known in agriculture as mob or stock grazing), as in the American West, Africa, and other places where deep-soil prairie lands and massive herds of animals coevolved.
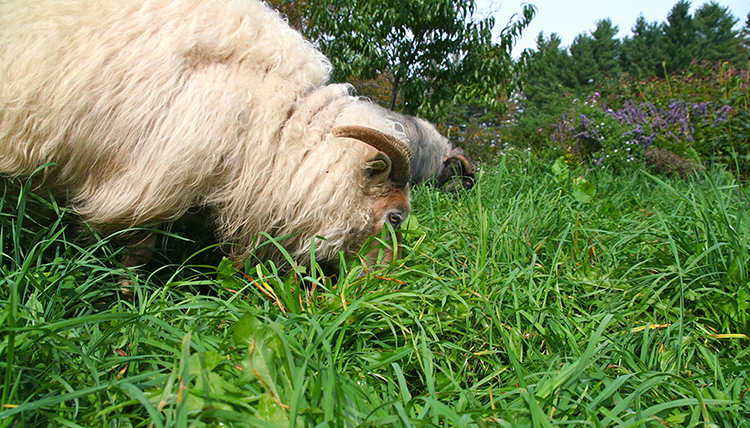
Sheep in a deep sward—mob stocking grazing animals for rapid soil formation and herd health
Low-labor, industrial grazing is typified by low-density animal stocking occupying the same land area over long periods of time. (Picture your typical pasture dotted with a few animals here and there.) This, while seemingly idyllic, is the opposite approach to regenerative grazing, which builds soil and grows the healthiest animals. Innovative graziers have recently been realizing that high-density, very short rotations (the cycles naturally performed by grazing herds for millennia) is a far more productive approach to managing pastureland. Enter intensive tall-grass grazing, mob stocking, or whatever your preferred term may be for regenerating the landscape through the application of grazing animals. When a large number of densely packed, heavy animals moves through a landscape quickly, occupying that landscape just once or twice a season, the following soil-building events tend to occur:
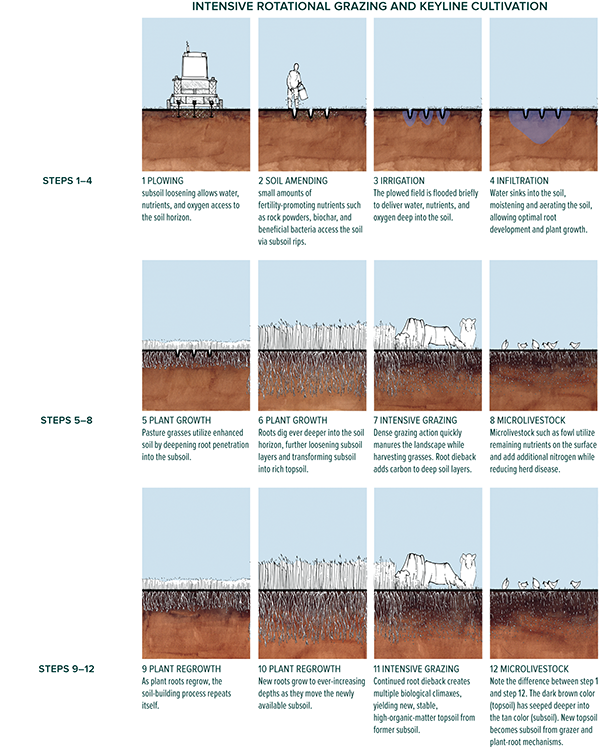
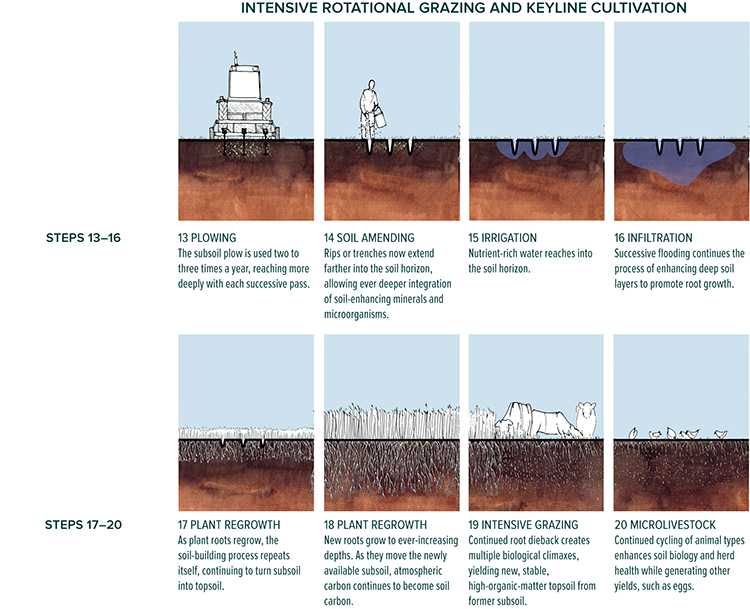
The process by which intensive rotational grazing and subsoil loosening encourage rapid and deep topsoil formation via the transformation of subsoil into organic matter–rich living topsoil Illustrations courtesy of Whole Systems Design, LLC
1. Tall grasses, with correspondingly deep roots, are grazed down to within a foot of the ground but not completely down to the ground; grazing to the putting green level damages the plant’s ability to rebound. Plant roots die back as a response to this pruning, leaving organic matter (carbon) in the soil strata. The deeper the roots have penetrated, the deeper into the soil this organic deposition occurs. And the taller the grass was before grazing, the deeper the roots were able to grow. This is the organic matter/carbon-pumping stage in the system, where atmospheric carbon is transported into the soil by plants. Think of tall-grass mob-stocked grazing as a potent carbon-negative conveyor belt reclaiming atmospheric carbon and putting it back into the earth from which it came.
2. Densely packed animals provide nitrogen in the form of urine manure as they graze. They also turn up clods of sod, allowing access for rainwater to bring the newly deposited nitrogen and biological activity (microbes in the manure) into the soil. Think of grazing animals as an enormous living rotovator spewing soil-enhancing nutrients behind them; that’s the action of a massive animal herd if allowed to move through, not loaf upon, a patch of ground. Rains wash the fertility and biological inoculants into the newly broken-up soil, where it can penetrate deeply and not run off the landscape, as it would more readily were the soil surface unbroken. This is the fertilizing and soil biology–enrichment stage of the process.
3. Grasses left standing six to twelve inches by the quickly moving herd rebound rapidly and are allowed to grow to hip height or taller before the herd is brought back again. This is the resting and regrowth/root-penetration stage of the system.
These three steps are the primary reason vast areas of land have been improved and sustained, not desertified, by the presence of massive animal herds. Modern “mob stockers” such as Joel Salatin and Abe Collins are applying this understanding to ecologically (“biomimetically”) manage their animal herds for the multifunctional production of meat, milk, soil fertility, drought resistance, greenhouse effect reversal, and the many other benefits of healthier, deeper soils. The take-home points here for the modern homesteader or restoration farmer are the following:
Let it grow! You only build soil as deeply as you can get plant roots to penetrate (what comes up must go down), so the taller you let your yard or pasture grow before it’s cut or grazed, the more soil you’re making (and CO2 you’re sequestering). Think of any areas in grass as pasture or vegetable gardens-to-be—areas where you want good soil. An upshot here is that mowing, if you mow, wants to happen three to six times per year, max. This begets the need for white clover and other low-growing groundcovers, unless you mind the prairie look in your front yard.
And to the extent that you can, manage your animals for short grazing periods in tall grass. Plan the grazing rotations carefully when your landscape allows.
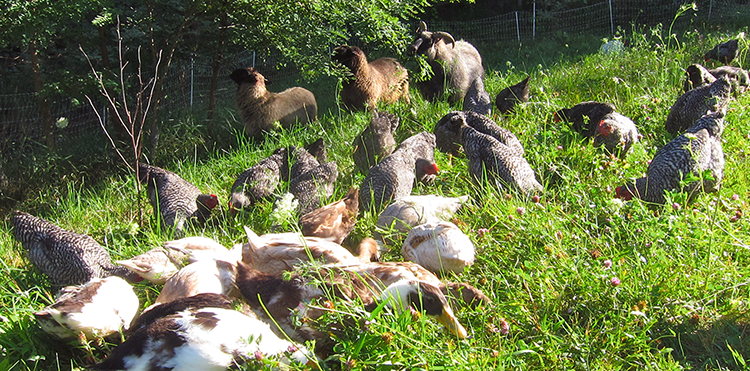
The research farm’s herd and flock hard at work on the bottom pond berm and lower fuelwood hedges, turning comfrey, clover, grasses, and black locust leaves into fertile soil, eggs, meat, and wool
Pasture Reclamation: Why Not to Let Your Field “Go”
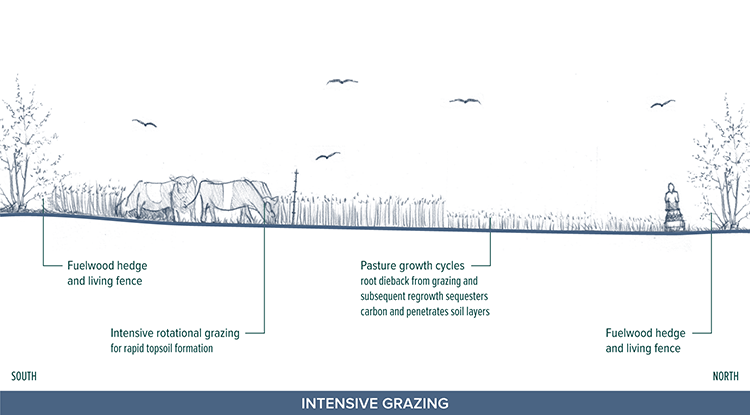
Intensive rotational grazing integrated with other productive land-use systems
The ten-acre beat-up old hillside farm I inhabit has presented us with various restoration challenges in the past nine years of site development. Of all these challenges, from poor soils to high water table, from slope to ledge, none has proven more intractable so far than redeveloping a good sward of grass (forage) in the former fields. When I first arrived in September of 2003, an acre or so around the house was nice thick grass, having been a mown lawn. Another two acres or so farther out of zone 1 was patchy grass but still mostly grass.
The remaining three to four acres of open land was a brush-hogged field that contained a lot of grasses, along with much fern and only a small number of woodies (since it was cut every year). Upon moving in I promptly decided that it was crazy to use fossil fuel to mow down the field every year, and I let it go. I figured at that point that “letting nature repair itself” was the best way to a healthier and more productive field in those five or so acres. I also nearly completely ceased mowing the area around the house.
Aside from ending up with a messier looking property as a whole, the results were surprising. Instead of increasing in diversity, the field as a whole became mostly goldenrod, poplar, willow, alder, and birch, with some pine and lots of brambles. Fern also came to dominate the “overstory” of the now fully abandoned field. The grass around the house became taller but patchier. After a few years I realized that I needed to at least weed whack the yard, as I did not have a scythe or the skills to use one back then. Within four to six years of “rest” (read abandonment), the lawn looked pretty sorry, with large patches of bare soil interspersed throughout, and the field looked even worse. What was at one time grassy pasture (a long time ago) and later a poor but grassy field was now becoming head high with brambles and pioneering tree species with a fern understory. Grasses became almost totally absent, and sedges (nonedible to grazing animals) moved in to occupy large areas of the field in the wetter locations.
By the time I realized that these four to six acres could be a useful part of the emerging small farm, the job of turning this area into a productive and more diverse pasture/tree crop system was much, much larger than it would have been if I had not let the field go to woodies, brambles, sedges, and ferns.
The movement to a less diverse and less productive state of the field was becoming clear to me in 2007 and 2008, but I did not yet have the time or motivation to graze. I knew, however, that some use of the field was needed to keep the woodies from overtaking the whole field. So I began scything the field in 2007, figuring that this mowing action would not only knock back woodies, fern, and goldenrod but would also promote some grass. After a year or two of this action, I began to realize that this knocking down of the “sward” (if you can call it that) was only serving to mulch the field and actually was counterproductive, as it was effectively suppressing new growth of the seed I was beginning to distribute. This mulch was also keeping new seed from even reaching the soil surface.
Forest to perennial polyculture (field) conversion: much of this frame was the dark understory of a white-pine monoculture, comprised of fern and pine needles one year before this photo was taken.
I realized after a year or so that knocking down hip-high goldenrod is a great way to keep everything but goldenrod from growing! I could have, and should have, been scything the field when plants were very young early in the season, but scything is tricky when plants are not a foot tall or higher. All in all the efforts at scything the field to get it into a better condition were unsuccessful and where the material was scythed when young, positive change was still painfully slow. Scything, I realize now, is not the same as mowing.
Aretha, one of our best Icelandic sheep, amid a tall stand of comfrey—one of her favorite and nutrient-rich foods at the homestead
I began grazing in 2009 with four sheep, and because of such poor-quality forage, and so little of it, I had to move them at least four times a week, and sometimes more than once a day, for the first two years. At this time I also began cutting saplings and hand-thinning brambles. In some areas I spread a small amount of lime, and over most of the field, I seeded massive amounts of seed at least a dozen times during the early and middle part of the growing season; species included white, red, ladino, and sweet blossom clover; hairy and crown vetch; purple top turnip; daikon radish; orchard grass; sheep fescue; winter and annual rye; field pea; alfalfa; and probably a few others at times. This seed was spread mostly by hand-broadcasting using lime, Greensand, Azomite, bonechar, and other materials as a carrier. I inoculated all nitrogen-fixing seed most of the time.
The seed was spread often before, during, and after grazing under the assumption that the animals could trample the seed into the ground, offering good soil-seed contact. Any areas then left bare after the animals were done would get seed spread onto them as well. Two to three applications of seed per heavy grazing area seemed as though it should revolutionize the field. I also even resorted to feeding seed to the sheep in small amounts of grain used as a nutritional supplement—later being told that sheep’s digestive abilities are so thorough that they would not dispense with any viable seed. The sheep were moved in electro-netting, and stocking density was high because I was aiming to create enough disturbance (both mechanically through eating and hoof action and biologically through manuring) that a new succession of plants could be initiated.
In the second summer I began to see a tiny amount of grasses emerging over most of the now-grazed area, and in a few small locations, the sward even looked half decent, with some clovers, vetch, and orchard grass emerging. But despite the grazing, heavy seeding, and light soil amending, most of the acreage had changed only a slight amount. At this rate it was going to take a decade to get to decent pasture. I persisted, however, and kept on with grazing, slowly seeding less and less.
After a second full season of grazing (with fewer animals, losing one in the pond and one to old age), the pasture emerged in the third spring with surprisingly little change from the year before. Larger areas contained some grasses, and the areas that had some grass density emerge earlier now looked like four sheep could feed for maybe a day in one 164-foot length of electro-netting.

Fire, one of the most rapid and successful land-renovation tools we’ve used at the farm in the journey from beat-up and abandoned thin field to lush pasture
But for the most part the third grazing season emerged in late April with a shockingly unimpressive change to the field. Ferns and goldenrod still dominated, despite the woodies being knocked back (mainly by hand-cutting and even some uprooting in the winter with a mini excavator). Seeing such little successional change in late April and early May of the third growing season, I realized that the ecosystem inertia of the old field was simply more powerful than the disturbance that we were applying. A greater degree of, and likely other types of, disturbances was needed to shift the species and their arrangement in this field from bramble, fern, sedge, and woodies to ones containing a much larger degree of grazeable grasses (along with the couple of dozen species of perennial food crops we were planting in the field).
So in early spring of the third grazing season, we started prescribed burns of the field when the weather allowed. Two such weather windows emerged, and we carried out what has so far seemed to be a successful burn of about one-third of the field. During this process we made firebreaks by raking dry herbaceous material into rows, which we burned first. Burning these lines then gave us a nonflammable break for the rest of the fire to hit and stop because of lack of fuel. The fires were initiated with a propane-powered flame weeder, and the weather allowed just enough air movement to promote a slow but steady burn of the one-hour fuels (dead fern, grass, sedge, and goldenrod, mostly) to move across the field.
At the time of writing this, it appears as if most of the dead material that was in effect mulching the field, and suppressing new growth, was burned off. Immediately after each burn, we seeded the area with a mix of forages described previously. We were lucky to have a wet spring period after the first burn, and within two weeks the burned zone was greening up very thickly.
The Benefits of Mowing
After growing up in suburbia, mowing has long been a bane of my existence. Naturally, mowing is a severely overused and abused land-management tool in the United States, and in no area is it more manifest in all of its spectacular wasteful and noisome glory than suburbia. So I had learned to hate mowers, mowing, and all things mown. And that’s why it has taken me almost years to realize that mowing actually has a wonderful disturbance power to it and that, when applied with the correct timing and severity, it can help transform certain successional phases into more productive and biodiverse communities quickly.
Here’s why mowing is so special and can do things that scything cannot and that grazing (often initially) has a tough time doing well: It reliably increases stem density, and it promotes grass. Stem density is the number of actual grass blades (or vetch, clover, or other stems) in a field per unit area. Just as with organic matter in soil, you want as much stem density as possible, within reason. When a field-growing plant, especially grass, is cut, it tends to shoot up other stems in an attempt to grow where it could not—the same way a pruned woody perennial plant tends to sucker or grow multiple shoots from a point where one stem was pruned.
Most fields are actually very low in stem density, even when the sward might grow tall and look lush. Given that you want as much fodder as possible and organic matter production (root growth and dieback) as possible, you want stem density to be high with as little patchiness in the sward as possible. The ability of mowing to increase stem density and promote grasses while discouraging woodies, sedges, and ferns shouldn’t be surprising—just look at many poor soil fields, sometimes even very wet ones: If they are mowed very often, the stem density is high, and it’s almost all grass and clover. That’s a perfect jumping-off point to start grazing.
Scything is problematic before stem density is high because it tends to mulch out and suppress new growth and the opportunity for it. If you harvest the cutting, it won’t do that, but then you’re pulling fertility from the field—not something you want to do when establishing new pasture on beat-up soils. Grazing is great for fertility, and it’s solar powered, but it’s unselective in general, with animals leaving the plants they don’t like—even in an intensive rotational setting, this happens significantly. Mowing is nonselective: You can roll in with a mower or walk in with a weed whacker, and for a small amount of fossil fuel (or human power if you use a push-powered mulching mower), you can cut down and chop up everything in the area. The chopping-up aspect is crucial and is what allows mowing to not suppress new growth, in contrast to scything. You can also mow a very low sward, which you cannot do with a scythe, and you can mow many times per year—far more than grazing unless you are okay with compromising animal health; you can mow a field a half dozen times or more in a season but grazing it that many times is terrible for parasite loading and nutrition.
And cutting back plants many times a season is crucial, in some areas like my field, to promoting the filling in of patches by stems from neighboring plants. This third year of pasture reclamation saw us grazing as intensively as in the last two years, with continued seeding and mowing behind the animals after they’ve manured and left behind a portion of the sward. The mowing in year three did significant good work for the pasture, and I am very glad that we took the time to do it. Without this mowing it would have been impossible to alter the course of succession in such an optimal way, and the momentum of goldenrod and fern in particular—above and beyond all other plants here—would have continued undisturbed enough to dominate the pasture.
Once stem density is high and the field composition is almost totally highly valuable fodder crops, the need to mow goes way down, truly ending up with little to no need: The animals will eat nearly everything, and what they don’t can be scythed and harvested or left—as the biological activity in the field will digest the dry matter remaining, and it will be such a small proportion of the field that the suppressive mulching effect won’t happen much, if at all.
The lessons I have learned during this pasture reclamation process are still occurring, but so far they include these:
• Abandoned poor-soil fields have a stubborn inertia—it is difficult to transition out of an assemblage of moss, fern, woody plants, and brambles. Doing so requires careful timing and significant disturbance force. The WSRF pasture reclamation project has been slower than necessary because I did not realize until recently the amount of force required (animal density, soil disturbance). I did realize early on the importance of timing after seeing May and June seeding take hold while any pasture we applied grazing and seeding from July on changed very slowly from one year to the next. April, May, and June are the windows of opportunity for serious pasture transition, given the coolness and wetness with which to establish new plants. The length of growing season remaining also helps with seeds broadcast early in the spring or summer.
• Manage the water early on: We’ve installed ponds, paddies, and swales in our field that change the hydrology, usually for the better. A high-water-table field is a tough condition, but we have managed to drop the table in certain areas while raising it in others. Areas where grass is desired should not have a water table near the surface because sedge proliferation is difficult to quell—and no one grazes sedge as far as I know. Consider ditching around a field to dry it out a little, then capturing the water lower down. In general this is not a recommended approach holistically, but it can help get grass going. A water table can be higher and grazing more sporadic once the sward is established with fewer ill effects.
• Seed early (for above reasons).
• Seed lightly and often: Weather for the week to two weeks just after seeding seems to be the largest determinant, along with soil germination surface condition, as to how successful a seeding will be. We have found that seeding a dozen or more times early in the year ensures some likelihood of hitting the right window with minimal seed waste and expense. Better to go light and have some of the seed take than go heavy and run a much higher risk of no seed taking because of weather.
• Seed immediately after disturbance: In keeping with a basic principle (see chapter two), we always are most successful when filling niches intentionally, and that requires filling them quickly after they are opened by a disturbance force. Seed requires soil contact to germinate, along with moisture and light to grow. The ideal scenario we are shooting for is (1) get seed-surface contact, (2) get moisture to seed, (3) get light to seed, and (4) get nutrition to seed. Seeding right after animals leave a paddock is great as it is during the rotation, so they press the seed into the soil (ruminants, not birds!).
• Mow early and often to get stem density high: This means early in each growing season but also early in site development if you are transitioning an old field back to pasture. You can do more with a field in April, May, and June than in July and beyond.
• Consider permanent fencing right away, and invest in it if you can (unless you have an endless labor supply). If we had done this early on, it would have already paid for itself many times over in the amount of labor we’ve put into moving electric netting.
• Consider feeding on pasture: a great way of getting nutrients into the field and ensuring bacterial proliferation over fungal presence, which is key for grass growth.
• Don’t let your field go! The wisdom of old Vermonters, and likely rural people everywhere, to never let a field go fallow for more than a year or so likely comes from a visceral place—from past experience that has seen how difficult and slow it is to get back to a pasture condition once a woodland succession begins. It’s also likely that such people knew very well the massive amount of work involved in transforming the land from forest to field originally.
Scything: The Most Resilient (Mechanical) Biomass Harvesting Method
Of all the hand-powered land development and maintenance tools I have used, the scythe is probably the most effective in terms of amount of work yielded per amount and quality of time spent performing the work. Splitting wood with a good ax and pruning small trees probably come in at a tight second and third place, respectively, in this hypothetical, but useful, contest. When I say “scythe” I am not referring to the hardware-store-variety heavy-handled tool—the American scythe—or a laborious chopping-at-vegetation activity. I am referring to the Austrian scythe—a slender instrument that when wielded in the correct sweeping motion results in an enjoyable, devastatingly effective means of mowing light brush and grass.
I have been using an Austrian scythe for about seven years, starting with the tool available from Scythe Supply in Maine, later adding a higher quality scythe from Scythe Works out of New Brunswick and British Columbia, Canada. These tools, except the blade, can also be made without enormous difficulty if you have good woodworking skills, but the process does require steam bending of the snath (shaft).
With a proper scythe, good technique, and a little conditioning, one can mow an acre or two of grass in a handful of hours or so. If the land is brushy, double that estimate. While a fuel-driven machine can certainly mow more land, it cannot do so well over highly varied and rocky terrain, and doing so is less beneficial for the body and mind than the Zen-like practice of scything. A scythe also costs a fraction of the cost of a mechanical mower and will outlast it a hundred times over if maintained well. It can also be completely maintained in-house with a few basic tools. The scythe, however, requires far greater skill than the mowing machine. Such is the general pattern with hand tools compared to power tools; the elegant, often slower, but long-term healthier solution requires more experience and skill than the easier, short-term, faster approach.
Proper scything equipment consists of a snath (shaft), handles, blade, and hardware attaching the blade to the snath. The handles should be fitted custom to the user; as with all fine tools and finely performed craft, the fit between user and tool is crucial. Sharpening equipment is equally essential, as the scythe only cuts well with a nearly razor-sharp blade. Lack of blade sharpness is certainly the most common error among new mowers, since sharpening a blade is actually quite difficult.
Any athletic person with good coordination can learn the scything motion well within a season of mowing, but getting a blade very sharp is something that often will take a number of seasons. I am still learning to get a decent edge a handful of years into scything, and I had a bit of varied blade-sharpening experience before beginning to scythe. The blade on a scythe is sharpened every five to ten minutes, depending on the hardness of what is being mowed, using a curved narrow whetstone that is carried submerged in water on a belt-mounted holder. While this sounds excessive, it’s actually the most efficient way to work, since sharpening only takes ten to thirty seconds, and a honed blade slices through the material with far less strain on user and tool.
After a dozen or two dozen hours of mowing, again depending on the quality of material being mowed and on the skill of the sharpener, the blade must be peened (thinned). This involves a hammer and small anvil-like tool or simply a curved-head hammer and the pounding of the blade’s edge very specifically so that metal is drawn out and thinned right at the edge of the entire length of the blade. Peening is not easy at first and is unique to scything for most of us. I don’t peen very often, but when I do it usually requires about five minutes per blade. I find that a jig supplied by Scythe Supply does makes peening easy because it simplifies the process. Thicker blades require a little more work—brush blades being the thickest, toughest blades compared to longer, thinner grass blades. The rougher your land, the thicker and shorter a blade you want, while the more tame and succulent your land, the finer the blade (and easier the mowing!).
The Scythe Book by David Tresemer is an invaluable resource for anyone interested in scything tools and proper technique. There are also a number of very helpful videos on YouTube showing highly developed mowers in action, particularly a video made by Peter Vido, founder of Scythe Works, of his daughter and master mower.
Scything involves a low sweeping motion, with the blade carried just above the ground in a broad arc, usually about the width of the height of the mower. The wider an arc one can mow, while still maintaining a balanced and efficient stance, the better. Mowing is accomplished more in width than in forward motion as the mower only steps forward short steps after each sweep of the scythe. With proper technique involving a strong but slow twist of the torso and application of core strength, a mower can mow without tiring for a few hours after some practice.
Traditionally—and in parts of the high Swiss Alps and other regions of Europe especially, mowing was always done from dawn, or even the predawn hours, into the midmorning, with all work finished before the grass dried thoroughly, when work became slow and dusty. The scythe operates much more efficiently on wet grass, and the cool of the morning makes for more effective and enjoyable mowing. We mow in the morning hours here and during or just after a rain.
Mowing in the rain is actually quite enjoyable, and one can do so safely with bare feet soaking up the health and goodness in the mown grass and damp earth. The health benefits of the scything movement and the contact with living systems that scything facilitates are immeasurable. The scythe shows us clearly how the enjoyability and health-influencing aspects of a task on the homestead and farm are often more important than the speed with which results are achieved. Is the job that slowly degrades one’s health but only takes an hour a day more effectively done than one taking three hours a day but that maintains the vigor of the person performing the task? Since the work on a farm and homestead is never truly complete, the imperative seems clear enough: We must enjoy and be invigorated by the bulk of the work we perform in life—no destination, just a journey.
Ducks, Chickens, Dogs, and Sheep
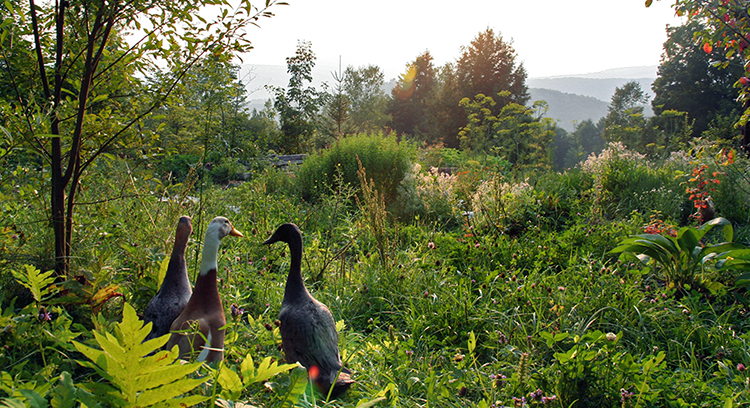
Some of the first ducks—Indian runners—at the homestead, taking in the view at sunset from a lush area of late summer pasture
In the development of the WSRF, we have thus far used three species of animal consistently: two birds—ducks and chickens—and one grazer—sheep. We tried goats and pigs but decided that the quantity and type of food they require is not a good match for the resource flows of this farm. Animals well fitted to a farm ecosystem must utilize an excess of a resource and transform that into a resource area that is lacking. For us that so far has been two things: (1) browse and forage (leaves and some grass) into soil and more grass, and (2) slugs, snails, and bugs into eggs and soil. This need for the transformation of one resource into others will always change over time and at some point here will go from seeking soil and more grass alone into seeking other yields such as meat, milk, and fiber. It is the system-establishment phase and the fact this land is an abused and abandoned farm that requires that as a foundation we establish healthier soils and a better sward of grass from which to raise future animals.
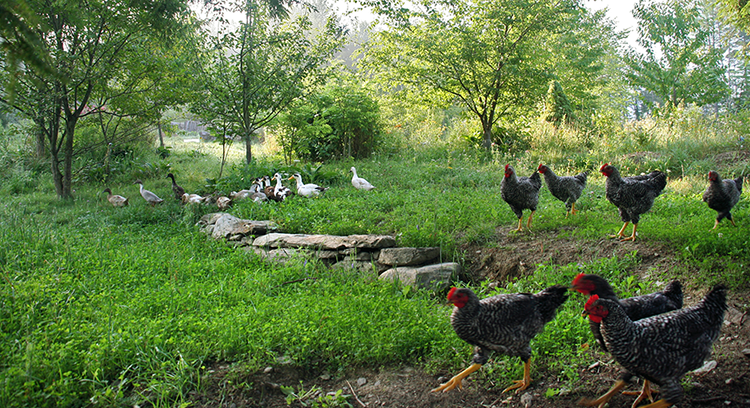
Kosher King meat birds (a.k.a. “the meaty ones”), along with Ancona ducks, enjoying the newly terraced area beneath a hemlock
As a whole, when evaluating animal suitability for your systems, keep in mind that the most sensible animals in a homestead geared to be adaptable to a rapidly changing world should be chosen based on the criteria below. And keep in mind that trying various animals is often the only way to find hidden synergies and constraints in a specific animal’s interaction with your unique system. Each site’s conditions are different enough that no solution found on another site will be wholly adaptable to your own. Find the closest examples, and learn from them, then try, tweak, and try some more. In all likelihood it will take a number of years to establish a synergistic animal aspect to your system. Criteria and considerations for selecting animals in a functioning permaculture include:
• Input-output ratio: The most outputs, in both quality and quantity, relative to inputs should be a primary determinant of an animal’s suitability. This aspect includes time, often forgotten as a crucial input (see below). This aspect is contextual and requires an understanding of how the farm/homestead fits into its surroundings. An output such as meat or fiber, for instance, may have a huge value if your neighbors want it, even if you do not. Or your local community may not want or need any animal products from you, and their outputs are only valuable if they can be used on-site.
• Likeability: What animals do you get along with the best, pay most attention to, are naturally inclined to observe and relate to? Those, all other aspects being equal, will always do better on your site than those you feel no connection with—simply for utilitarian reasons: You can’t care for someone you aren’t attentive to as well as someone you are. Domestic animals, like people, thrive based on their connections and the degree to which they are cared for. Care means something different to each animal as well. Care for a beef cow is good grass, lots of room, and good water but does not involve tons of human contact. Care for a milking sheep involves more human contact as they run into more problems healthwise that require human care.
• Infrastructure needs: These range from a dry space for the toughest grazers, which can spend all winter out in deep snow, to goats, which do best with some cover from even mild, warm rainstorms. Pairing your infrastructure with the needs of the animal is key.
• Soil needs: Are you starting with good-quality agricultural soil or a beat-up subsoil slope?
• Vegetation needs: Do you need to grow the vegetation you already have on site (e.g., good pasture forages), or do you need to change the composition of plants radically (abandoned field or young forest)? The more you need to change composition, the greater animal and human impact you’ll need, the greater the work and time frame involved.
• Health needs: This aspect should be considered under “Input-output ratio” above but is so crucial and oft-missed that I’ve listed it separately. I am amazed how many people endeavoring to carry out a self-reliant homestead and farm (even those doing full grass-fed and refusing to use grain) think little of the medicinal and veterinary needs of their animals. The need for wormer, vaccines, birthing aid, disease management, and other specialized or time-consuming medical needs of an animal vary enormously by species. This is a primary reason I view sheep as transitional for my farm and not viable at this scale or even remotely close to this scale—they need too much health maintenance inputs (simply in time alone). This plays especially into the next aspect. . . .

One of the many “happy accidents” on the farm: The discovery that chickens guard sheep against fly infestation, made by grazing them together. This sheep was found with fly strike two weeks after being separated from these chickens after an entire summer of fly avoidance while cohabitating with the poultry.
• Time needs: This is the most often overlooked selection consideration I run into. How much time is the animal going to need daily, yearly, and in special (or likely) circumstances? Sheep, for instance, don’t need much maintenance if nothing goes wrong, but they are parasite prone, and often things do go wrong from a parasite standpoint. Then the time suck of such an animal really starts to hit home. Time is your most valuable asset in a functional home/farm system, and it’s limited, so choose to apply it wisely. Nothing in the system short of another human being or infrastructure emergency can suck up the kind of time that a sick, injured, or otherwise problem animal can—not a fruit tree, or a berry bush, or a vegetable bed. Animals are a big commitment, and when they have problems, the devotion needed for that part of the system goes through the roof.
Thus there is a certain social robustness needed in the human management of a human ecosystem before animals should be introduced to it. You need a reservoir of time from which to draw when an animal has a problem, and the larger the animal, the more of them you have, the kind of animal, and the health of their home all determine the consequences of such an occurrence. We have experienced a spectacular variation of this as we’ve kept ducks, chickens, and sheep—and their attendant needs in that order.
Ducks: The Water-Loving, (More) Vegetable-Friendly Chicken
Our best success on the animal front has been with ducks, bar none. Our flock has consisted of from four to fifteen birds at any given time, with nearly all females and up to two drakes (males) of four different breeds. Early on in site development, we started growing vegetables. Given our wet ground and abundant clover, that led to massive slug populations, which in turn led us to ducks. As is always the case in permaculture, when some species is a “problem,” we ask, “What eats it?” Ducks eat slugs, and fast. With the introduction of ducks our slug problem disappeared (we also reduced some of the heavy garden mulching we were doing), and we began to get eggs—a nutrient-dense and nearly free yield.
The input-output balance for ducks on this piece of land in its current state is phenomenal. We raise between four and fifteen ducks a year on two to four bags of grain, with all other inputs derived from their free-range foraging. The grain is only used to get them through the winter, and we hope to experiment with fodder crops for the ducks that we can raise ourselves, which might include corn, amaranth, or another grain such as rice. Carol Deppe’s The Resilient Gardener covers fodder crop raising thoroughly, and I’d recommend checking it out if this is of interest to you.

The gang of runner ducks moving through the farm with typical camaraderie.
We started our duck flock three years ago in the spring by ordering the one-day-old ducklings from Murray McMurray Hatchery in the Midwestern United States. All the ducks arrived in good condition, and we have since gotten one more round from them. At the time of writing, we are waiting on another round of ducks from a supplier in Oregon that conserves and breeds Ancona ducks, which are renowned for their foraging skills and general vigor. We hope to crossbreed the ducks we have so far (Indian Runner, Welsh Harlequin, Gold Star Hybrid, and Khaki Campbell) with the Anconas to begin eventually to arrive at a duck most suited to this piece of land. Without knowing the species mix this will be, we can specify the traits of this ideal desired duck:
• Active forager
• Cold hardy and healthy; low maintenance
• Good layer but decent meat producer
• Good mothering instinct (so we can perpetuate the flock)
• Good predator awareness
• Flightlessness or general disinterest in flying

Raising baby ducks with the help of azolla, a powerful nitrogen-fixing fern containing 24 percent protein that can double its weight every seven days
The ideal bird is, of course, not a reality but a goal. Much like the quest for the perfect disease-resistant, vigorous, fast-growing, huge, luscious tomato, so, too, is the world of animal breeding. In all breeding and animal selection, we must prioritize and at times compromise. For us the compromise is in the meat-producing aspect of the breed, as that is a secondary and even tertiary goal to eggs, slug reduction, and fertility production/cycling. Foraging is a crucial trait, and all breeds we’ve had seem very adept at the fine art of billing around through grass, leaves, and water digging out slugs, snails, and probably many things we can never figure out because we are unable to observe them closely enough.
When researching ducks you’ll find that some are rated as fantastic foragers, while others are poor in this job. I think this rating system is somewhat misleading, as I’ve never seen a hungry duck that doesn’t walk around looking for and finding food. (Same with chickens—more on that in a moment.) Much of how an animal behaves—especially its tendency for forage—is highly based on how much it is fed, the land it has access to, and how it is raised. All of our ducks have always foraged without prompting. This brings me to an important point that bears mention: animal breeding tends to be overemphasized when it comes to this or that “special” breed. While breed characteristics are real, it is often the differences in management that are the most effective way of integrating animals into a farm. A farm that manages a “poor” breed of animal well is better off than one that manages a special heritage breed poorly.
I also never feed any of our animals as much as “the literature” typically recommends—with one notable exception: pregnant sheep. With this approach even our meat birds have never been underweight and are much healthier and more active at harvest than is typical of their breed (last year the crop was Cornish Giants).
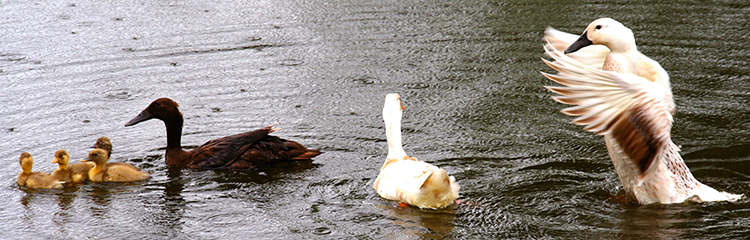
Cocoa Chanel and her babies, McQuacken II, and Willa enjoying the middle pond in the rain.
Cold and general hardiness of any breed of animal (and plant for that matter) is of prime concern for us in this intensive and complex permaculture system. It is far too easy and common to be devoting proportionally unbalanced amounts of resources to specific components of the system, and animals, in particular, can be resource sinks (the opposite of what any component in a functioning ecosystem should be). For us, sheep fit this category to some extent—more on that below. All the ducks we’ve used seem extremely cold hardy—we’ve never had a cold-related problem in temperatures as low as –20°F in most winters, using the protection of a barn open on one side to the weather in one year and a small insulated hay-bale bunker in the other two years.
Of the couple of dozen ducks we’ve had on-site, we’ve only had one real health-related problem—a foot injury from the Welsh Harlequin named Willa Cather stepping on a sharp object (likely due to dogs chasing her). All in all, the ducks have proven to be as maintenance-free as I can imagine an animal—no medicine, no special coddling, just a nice nest at night and predator protection, and 90 percent of the work is going out to collect the eggs in the morning.
While we do not focus on egg-laying specifically, the breeds we’ve used seem to be good layers, providing on average about an egg a day per female for two-thirds to three-quarters of the year. It has been impractical to tell with our current and past setups who is actually laying, so I cannot comment on the laying performance of one breed versus another.
That brings up a good point—the differences between breeds actually seem slight as a whole. All forage well, all are flightless, all go in at night without prodding, all are relatively predator aware as well. The male Indian Runner seems somewhat more predator aware than others, however, and is often seen scanning the sky for birds of prey while the others are foraging around him. Runners are also the fastest bird so are likely to get out of a predator’s way faster than others, making them safer only if in a flock of slower birds, their speed still being far too slow to outrun a fox, a weasel, or a coyote. Any predator protection a duck has—which is slight to begin with—is not truly found in running, however; more so in flying. My ducks do fly if charged by a dog or scared up quickly, but the larger breeds of Harlequin and Campbell seem slower on the draw than the more nimble Runner.
All our ducks have shown a strong and surprising disinterest in flying, even though they could all fly to New York State if they liked. The few times I’ve seen them actually take flight with more than a large bound I have been impressed with their ability and the strange lack of using it. This is helpful because we like to manage what ponds they have access to at different times of year. If they flew, no fence—especially the small 18" high metal 2"–4" varieties we use—would keep them out.
One notable difference between breeds does seem to be in mothering instinct, with two different Indian Runners showing greater tendency to go broody (sit on eggs) reliably. Currently, we have a chocolate runner, Cocoa Chanel, which has been tending a clutch of about a dozen eggs for nearly three weeks, with ducklings just now emerging. She is a strong mother, staying on eggs all day, only sprinting out each evening when the other ducks come into the barn to furiously forage some food for about ten minutes. She covers the clutch with hay and runs around quacking while she searches for food as if to ward off potential egg eaters from the nest she just left temporarily.
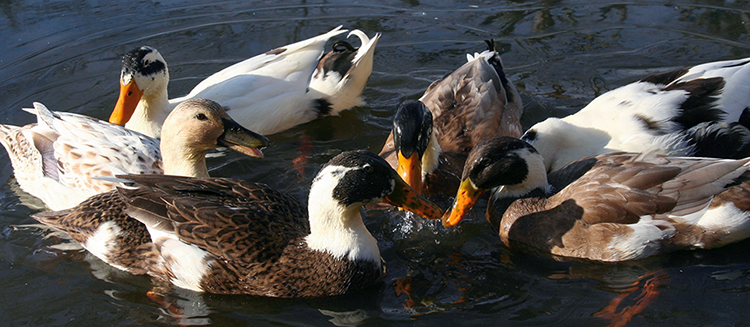
Willa, Amore, Luna, Pax, Bandit, and Happy
The challenges we’ve run into with ducks thus far are threefold: seed starting and vegetable integration, nutrification of water systems (but a good thing when in the right location such as crucial fertility for the rice production), and predator protection. Ducks love to poop in water and, indeed, seem to hit the eject button whenever they get floating. They also love to tear up aquatic plants and seem to favor plants only when in water, compared to when they are on land. For these reasons they really make a mess of water systems, which in general we like to have low in nutrients for raising fish and for swimming. This requires a calm pond with little edge disturbance where we promote wetland plants and no extra nutrients to be added to the ponds. Ducks also love to eat seed and will disturb small seedlings inadvertently with their feet.
Until this last year I always told people how great ducks were in terms of not disturbing established veggies. Well, scratch that one from the list of positives! In general this has been true, but this year we have experienced a few weeks of the opposite conditions. We had the driest, hottest summer in a long while here in Vermont, and by late July the ducks started eating full-grown cabbage leaves and messing with some other established veggies. The damage was not nearly what a chicken can do, but it made me realize, again, that simply because an animal has never done something before does not mean it won’t happen in the future. I surmise that the slug population withered away this summer, and by midseason there simply was a major food shortage for the ducks. Like any other animal, they had to seek alternatives to their usual approach, which meant switching from slugs, snails, and other small creatures to veggies, in part.

We have found that raising ducks outdoors in fresh air and a more natural environment from as young an age as possible is very helpful. They can be put outdoors in very warm wind-protected microclimates for brief periods of time within the first week of being born.
We have found a need to keep them out of newly seeded veggie gardens (a good reason for using transplants), cover cropped beds, and ponds. At the same time we promote their use of small pools, which the ponds feed occasionally, for fertigation uses. (See the “Keyline Agriculture and Fertigation” section later in this chapter.) Because of their flightless tendencies, we’ve had success keeping ducks out of ponds and vegetable gardens with one-foot- to eighteen-inch-high chicken wire fencing lightly staked with fiber posts, wood stakes, or small saplings sections. This fence goes in quickly, lasts a long time, and can be pulled up easily in the winter. Ducks could barrel over the fence if they really wanted to, but it simply redirects them. They also have enough land—ranging over three or so acres of swales, pools, sometimes ponds and perennial planting areas—to be content and find enough food. If we blocked many of the routes they take while free ranging throughout their day, they would certainly get used to simply trampling or hopping over the one-foot-high fence—so it’s more of an encourager/discourager than anything else.
That said, such fencing takes time, is an input, and is not failproof. Ideally, an animal system would require no fencing—that seems to be a concept rather than a reality, however; I’ve never seen a truly free-range animal system with veggies and small perennials being produced in the same area. The ducks’ range does seem to vary greatly across the course of the year and enlarges with the number of individuals present and over time—the longer the ducks occupy the site, the more comfortable they get pushing their range ever farther. Adding dogs to the site also seems to expand their comfort zone and range accordingly.

Cocoa Chanel, a particularly feisty Indian Runner, and her new babies that were born on the farm. We helped her hatch them by sneaking away new eggs each day after a clutch of twelve was formed.
Ducks, in general, are about as perfect an animal for this farm and homestead as we could hope for, and as such are the reference point for us when thinking of how well other animals fit into the socio-ecosystem here. The only other animals we’ve kept for any length of time pale in comparison to the sensibility of keeping ducks in this landscape.
Chickens
We have not kept chickens for long periods of time, only to raise ten- to fourteen-week meat birds for two years and once, a few years ago, for eggs. However, in that small period we’ve learned some interesting things about chickens that I’ve never found in books on the subject, and some of which are counter to the common wisdom. These areas of surprise for me (having read up on them a bit before diving in) have included pest management, fattening the animals for slaughter, understory management, using mobile shelters with the birds, and using animals on pasture and in the vegetable garden.
Pest Management
We’ve had little to no success with chickens eating “June drops” under our plum trees to reduce curculio infestation. This was a big reason we got chickens initially. Also, birds under fruit trees—great idea in theory and sometimes in practice, but some chickens can make their way into roosting in low branches and will break them if the trees are young.
Fattening
The prevailing numbers for amount of grain needed to raise a given meat bird are not accurate (big surprise). We raised Cornish Giants one year in twelve weeks on less than half a bag of grain per bird, with birds weighing in at seven pounds or more finish weight. These birds also were also decent foragers during their whole lives and mobile and walking well at slaughter time, counter to what is standard for the breed.
A major surprise with this “industrial” poor-foraging bird also became apparent. Because these birds get so big and thus are unable to range far distances, they actually have an advantage in a complex polyculture: You can keep them in certain zones without intense fencing needs. This is a huge advantage. This year we raised Kosher Kings—lithe, serious foragers. This means they need serious fencing since they cover large distances (moving from a nice pasture zone into our zone 1 veggies with ease) and they fly, easily leaping two- to three-foot fences. The Cornish Giants could be fed in areas we wanted to disturb and fertilize and would only migrate away from those zones lazily, generally staying where they were needed. The Kosher Kings found their way into the worst locations constantly and proved to be many times more work for the result.
I will probably not go back to one of the highly recommended “free rangers” with our current setup and can’t imagine how they would be effective in an intense polyculture without major fencing infrastructure and time related to fence management and moving the flock. What an incredible surprise this discovery has been for us—that a nonheirloom breed of bird known for poor foraging abilities was actually much more suited to our farm than those known to be great in free-ranging situations. Again, free ranging is an idea, not a reality, in a polyculture that’s not loaded with fencing. I must note that the Cornish Giants were fine foragers—they found lots of bugs and had a great scratching ability; they just applied it to more localized areas—a great benefit for the permaculture homestead. Also, after eating a couple dozen Cornish Giants and a dozen Kosher Kings, I cannot say that one breed tasted better than the other.
Understory Management
Unlike larger grazing animals, chickens have been perfect for grazing zone 1 intensive gardens, including the common vegetable bed cleanup and under raspberries, perennial flower patches, currants, gooseberries, and so on. Tossing some grain into these areas encourages a rampant scratching, feeding, weeding, and fertilizing of these hard-to-tend zones, with the chickens doing a combination of great work for you while feeding themselves (aside from the small grain input). I would consider a free-ranging laying flock as a pretty optimal solution to the seemingly endless challenge of how to deal with grass encroachment into the basal areas of perennial plants. Chickens are the perfect size to do this job, and unlike ducks, their scratching nature and abilities, along with their insect-eating capacity, match this need perfectly.

The “Dawn Treader”—our mobile chicken nighttime housing and weather protection. It probably would work great on lower angled, smoother land—the small percentage of land that is “agriculture land” in this region.
Pasture Renovation
Here, chickens are a scratching, fertilizing, seedbed-making machine. A primary reason we are doing meat birds for our second year in a row was the sward of grass in about a one-eighth-acre area in zone 1 where last year’s meat birds spent their last week of life. Despite being an area filled during house construction, composed of formerly patchy horrible soil, this area greened up into the thickest sward of clover, vetch, and grasses I’ve ever seen on the property. I realized come May of this year that this was the work of chickens. I decided that we couldn’t not run meat birds again—the land-restoration service they provided was simply bar none. I think this is largely due to the seedbed-making service they yield through the scratching effect—in combination with their manuring (with very rich droppings), the way in which they transform land to produce a super dense sward of forage is astounding.
We are running forty meat birds this year in rotational grazing via electro-netting with a movable coop for nighttime protection and shade to bring this incredibly restorative influence to the larger property acreage. According to one of our clients who has run many chickens for a number of years on formerly poor pasture, chickens also up the pH of soil quite rapidly, thus reducing or eliminating liming needs.§§§§
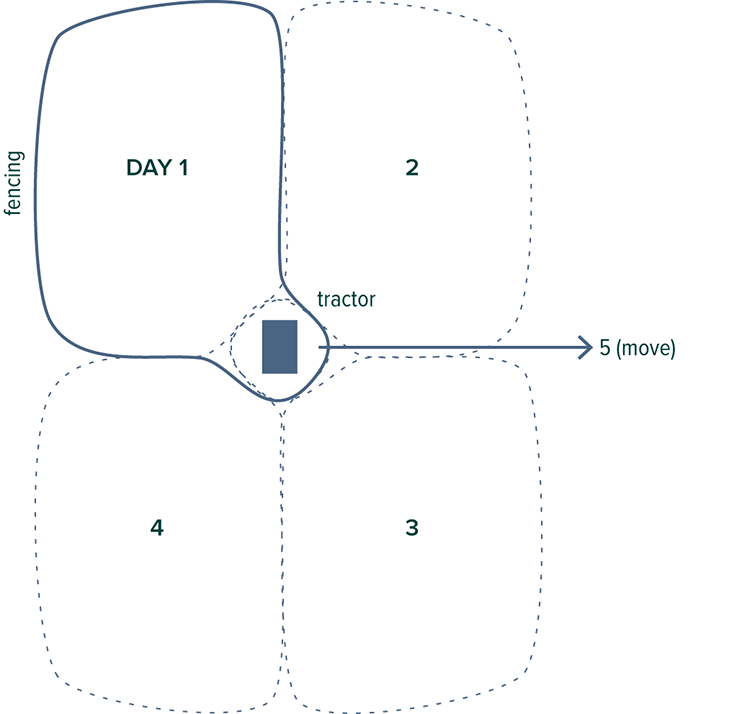
The general movement pattern for grazing chickens in our fields using the mobile coop and electro-net.
In or Near Vegetable Gardens
Simply put, don’t do it, unless you have fencing. We’ve found that chickens and vegetables are simply not compatible without a lot of work—like goats and young trees. They oppose one another and are not mutualistic. Like goats, which are the antithesis of a tree, chickens are the antithesis of vegetables. Vegetables are tender and require newly disturbed or worked soil; chickens love to scratch such areas, thus uprooting veggie starts. Chickens eat vegetables, ducks do not. So the challenge for us was simple: Either fence the chickens or fence the vegetable beds. We took the latter path in our last meat-bird cycle. This season we plan to rotate chickens for pasture renovation in electro-netting, then free range them in zone 1 for final fattening in the last week.
Dogs: Guardians and Companions
Akira and Jangles hanging out with Levon, the newly arrived lamb
Starting four years ago with Akira, we began keeping dogs at the homestead. A primary motivation, beyond companionship, was to keep deer away from our perennial plantings in zones 2, 3, and 4. While having Akira here has proven enormously helpful in that regard, it has not been without effort, and some deer pressure remains on trees in the further reaches of the farm site. Deer are smarter than we often give them credit for, and at the end of the winter, when they are very hungry, they venture into the farm, even as close as zone 2 areas at times, to snack on our tree crop buds. If Akira is not outside or is sleeping or has not been traversing these areas much, they will become emboldened over several weeks and do some damage.
Having dogs is one thing; distributing their presence across the landscape is another. Some dogs will do this on their own, while Akira, being a female home-oriented dog, does not. Despite being raised with many walks around the property edge, she has never become a dog to wander all but zone 1 and 2 on her own, with forays into zone 4 and 5 near the house to defecate. Due primarily to the continued deer pressure and the need to distribute a canine presence farther into the landscape, we acquired a second dog named Jangles in the spring of 2012. We’re planning on his male nature to help expand the dog range on-site and hope, also, that his propensity for wandering will draw Akira farther out into the site. After almost a year, this instinctual drive is showing itself and he already ranges much further out than Akira, but still stays generally on the property. He, we hope, will also be a good mouser to keep the rodent populations down and be as alert a bird-watcher as Akira.
Our dogs have lived up to their breed description as being incredibly attentive, trainable, and loyal, as well as gentle and easily trained to protect and tend to livestock on the farm.¶¶¶¶ They are not, clearly, a livestock guardian dog, the values of which could be used on this farm from time to time. Their greatest single functional value beyond being blessed, loving companions is their ability to keep birds of prey away from the ducks and chickens; they are also good at general farm watching to reduce crime (they bark whenever anyone is near), and simply their presence keeps deer out of zones 2, 3, and sometimes 4. They have also proven effective at reducing groundhog damage to gardens, as their primary resting area is in the zone 1 gardens, thus providing a serious deterrent to groundhogs coming into this area. While they would be hard-pressed to catch and kill a groundhog, they give chase at any sight of them.
Sometimes Akira will chase the ducks but just briefly and for fun.
The most important lesson I’ve learned with dogs on the farm is the need for their presence and attention. Merely having a dog guarantees nothing; the dog must be outside in the right place at the right time with the right instinct and the right training to offer the service you’d like him or her to provide. I will be working harder to raise our new male dog as more of an outdoors dog than our first female. Gratefully, her instincts are to guard, so getting some of this service has come easily. She tends to pick high spots to rest where she can see and hear much of the inner area of the site. She is attentive to the sounds ducks and chickens make and knows an alarm call when she hears one. One shrill “quack” that is beyond the volume or tone of the ducks’ normal conversation will send Akira sprinting and bounding in the air toward the ducks, looking up in the sky and across the landscape to see what the fuss is about. More than once this has sent a bird of prey flapping to another location.
Sheep
One of the most nutrient dense of all foods to be produced here at the homestead: sheep’s milk
We’ve raised sheep for almost three years now in an effort to reduce the heaviest brush in our abused and abandoned fields while building soil and producing better forages, which will offer more yields of meat, milk, fiber, and soil in the long run. Sheep are challenging to fence (not as bad as goats but much more difficult than cows) and require electro-net or at least four strands of wire or line. Their influences have been significant but not without a lot of work in the process. From moving their electro-netting, water, battery, and charger every day or two to checking in on them and challenges associated with lambing, perennial plant damage, predator control, and a score of common diseases, sheep are a problem-prone farm animal relative to many others.
Fly-strike, parasites, foot rot, clostridium, tetanus, bloat, mastitis, prolapse, and various mineral deficiencies are just a select few of the most common health issues sheep experience, unlike cows, ducks, and chickens, which are much lower maintenance. Look up “sheep diseases,” and you’ll literally find multiple-pages-long A to Z lists. This makes sheep a much more difficult proposition and less functional as a whole than other animals, unless you’re a sheep farmer.
This does not mean sheep aren’t a viable short-term tool for land restoration and transition—here they have done good work, and our pastures, only recently laden with brush, fern, and moss, are starting to look somewhat grassy. Could this transformation be accomplished more readily and with less work? Probably, but I am not sure, as we have not tried any other ruminants. I have a feeling that cows and chickens might be a better combination and require less stringent time-intensive fencing, and we plan to experiment with them next year.
Grazing and Perennial Food Crop Integration
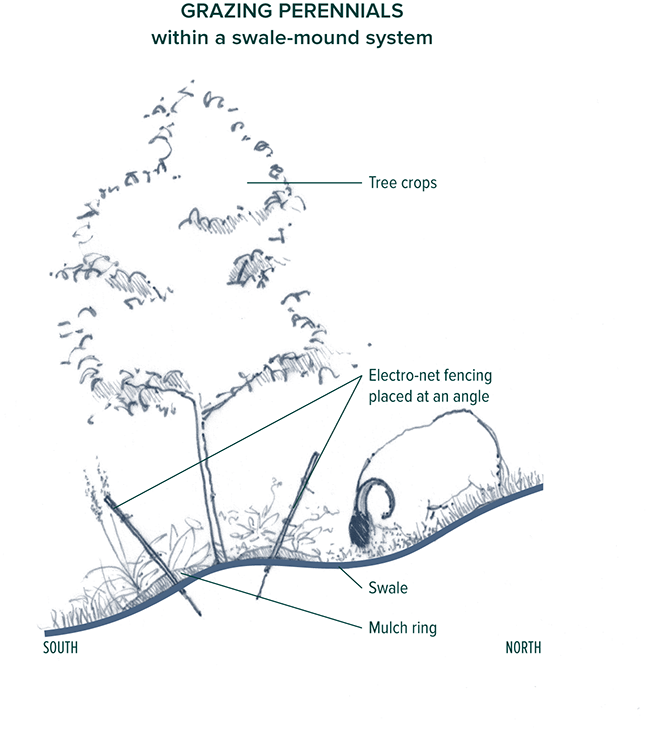
The usual way we fence movable electro-net around our swale-planted tree and berry crops when grazing the area
Developing a synergy between growing soil, animals, and plants has become perhaps the primary land optimization challenge for the WSRF. The challenge is simple but was unforeseen in the early years of this homestead farm. This challenge occurs because of a few basic processes and goals.
1. This part of the world wants to be forest; trees will grow on almost all pieces of land if left unmanaged.
2. Land wants to grow grass on the way to being forest or if it is grazed by animals.
3. We need annual and perennial plant crops in the system for food, medicine, and fuel.
4. We need animals in the system for fertility enhancement and cycling along with food, fiber, and medicine. Plants will suffer in the short and especially long term because of fertility shortages if we don’t grow animals.
So therein lie some basic design problems. Having open land requires animals because simply mowing does not cycle fertility well and produces few synergies (most a one-way flow of resources). Growing perennial plant crops requires grass management in the understory because in this part of the world the areas beneath perennial plants will grow grasses and other herbaceous perennials at least until they are shaded out. So, even if you don’t want to grow animals, you need to either mulch or mow the understory—grasses will slow drastically the rate of perennial plant growth.
Thus, in the early years we mulched heavily and did some scything. However, we soon realized that it was unrealistic for both labor and material sourcing reasons to keep up with such a level of mulching as the planting areas of the farm kept growing. It was impossible to get that much land mulched enough to keep the grasses back for long enough to establish healthy perennial crops. Mowing with a scythe or motorized equipment was fine for harvesting hay, but we needed to cycle fertility back into the soil—only animals do that well.
So after a few years we realized the need for animals to graze the perennial areas (on top of their easy-to-recognize need to restore degraded field). The design solution emerging from this is simple in goal: cycle understory through animals; challenging in process: keep said animals from damaging perennials. Unfortunately, this is not a simple task; most grazing animals love perennial plants as well or will at least do some damage to them while grazing an understory. Our attempted solutions to this challenge have involved sheep, goats, chickens, and ducks, along with people armed with weed whackers, scythes, and backpack sprayers. I can claim no total success at this challenge, having arrived at multiple ways to achieve the desired result but all requiring more labor than is realistic to apply over the long haul at the scale of this farm. I will now explain our attempted solutions, with their results and next steps.
Graze Away from Perennials, and Mow Understory with a Scythe
This is reliable and predictable, but the biomass must be removed and composted or used for mulch. That’s fine in an area with decent soil but is not good for building soil—it’s extractive of fertility. This has the disadvantage of providing singular yields via direct and heavy but healthy labor. We have done this for a few years and are reducing the number of times that we take this approach lately, but we still perform this approach in zones 1 and 2.
Graze Away from Perennials, and Mow with a String Trimmer
This is also reliable and predictable and has the advantage of being able to cut areas that are hard to access by scythe (inner corners and the like where a scythe swing or arc is impossible or impractical), along with the positive of chopping up the biomass such that it can be left in place to decompose. This has the obvious disadvantage of requiring a breakable machine running off-site inputs and negative health effects from running it. This also has the disadvantage of providing singular yields via direct and not ideal labor. We have done this for a few years and are reducing the number of times we take this approach lately, but we still perform this approach in zones 1 and 2.
Grazing Paddocks That Include Perennial Plantings
But we spray each planting with deer repellent to keep animals from browsing too hard. This works great! And it’s terribly labor intensive. This could be very practical at the right scale with the right labor available but not for the WSRF as of yet.
Grazing Paddocks That Include Limited Perennial Crops
This list includes only hazelnut, seaberry, other species, and tree crops that are unpalatable enough or tall enough to avoid serious browse harm. This works well but is tricky—relying upon timing of animals in paddock, the individual habits of those in the paddock (not just species and breed), what the animals had eaten in their last paddock, and time of year, among other factors. This is a good solution if you have crops of the right size and species but requires constant vigilance, as their habits and other factors are always in flux.
For instance, our sheep didn’t touch hazelnut bark or leaves last year when they were fenced in with a hazelnut hedge in August. This year we fenced them in to the same area in May; they went right for the succulent young hazelnut leaves. So do they like young hazelnut leaves or were they simply in need of that type of nourishment? Unknown as of yet, but that shows the kind of dynamic factors at play with animals—they are not predictable. And predictability becomes of new value when you return to a paddock a day later to see that they’ve reduced the entire year’s growth of one of your crops (or worse when they girdle trees) that they weren’t “supposed” to eat and never did before.
We plan to keep using this system when possible but have learned to watch them for a few minutes to see if they feel like eating the crop they aren’t “supposed” to eat normally. We have found with seaberry and some other crops that they will eat the perennial but only after they’ve exhausted other forages and browse, so it’s all about timing for movement, as is often the case but hard to do precisely. We are leaning ever more to larger plants such as seaberry and elderberry because of the need to graze nearly the entire landscape—size is a reliable way to manage browse levels: If the plant is more than five or six feet tall, animal browse (except goats, for the most part) can only get so bad if the animals are small and moved often. Some browse stress on the plants can actually be beneficial as well.
Grazing Paddocks with Perennial Crops Fenced Out
This works great, is reliable, and avoids browse damage but is labor intensive and sometimes impossible to do, given existing perennial plant layout. Grazeability was not a design parameter for the farm when we started planting, but now it is. We made a lot of spaces that are hard to fence neatly as a result. Think hedges, not patches.
Grazing Paddocks Include Perennial Crops, but They Are Fenced Permanently
This works great! But it is expensive and labor intensive to set up. It’s also hard to prune, harvest, mulch, check basal areas, weed, and otherwise maintain the plant. We’ve done this primarily with metal 2"–4" tree cages with two stakes on either end woven through the mesh. We use four-foot-tall fences of twelve to fifteen feet in length to make circles around each tree or shrub. These reliably keep deer away as well.
The primary impediment to this is cost—such a system is often much more expensive than the plant at about $2 per stake and $12 to $15 for the metal, plus labor. This summer we will be trying to permanently fence existing plantings within paddocks by using electric polywire of either one or two strands strung between fiber posts, the way many fence cows around here. This will likely work very well but is only workable when fencing a line or hedge of plants, not individuals.
Graze Animals That Only Forage, Not Browse
The simplest solution of all. We plan to try geese for this, and it will likely work but not in brushy areas, as geese only like relatively fine, succulent forages. I am still looking for the mini cow that stands only two feet tall, can’t reach up high, and hates all perennial leaves but can eat a wide variety of forage and is low maintenance and weather hardy.
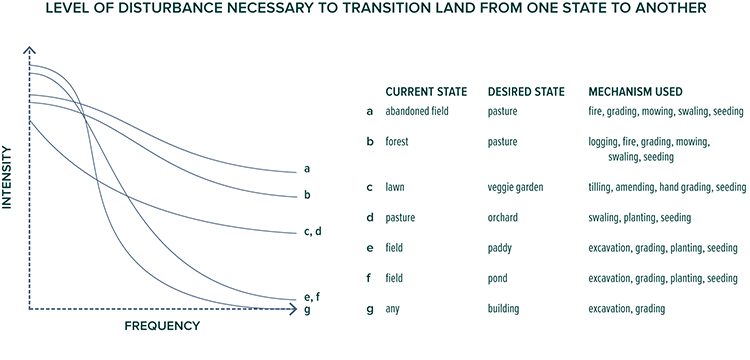
Usually, the more degraded a piece of land in this climate, the more powerful, careful, and oftentimes frequent the disturbance necessary to heal it—very counterintuitive. Note that seeding is a form of disturbance.

The overall approach to water management at the farm always involves lengthening the distance water must travel before it leaves the site.
Keyline Agriculture and Fertigation
Keyline activities, such as plowing and ditching, convey water from the valleys, where it collects, toward the ridges, which are the driest areas of the landscape. As discussed earlier, keyline agriculture was conceived of in the drylands of eastern Australia, largely by P. A. Yeomans, and it is especially powerful for regenerating arid lands. However, it probably has strong applications in cold climates, where the combination of soil compaction, wet-dry rhythm of weather, and steep sloping land creates water-limiting conditions where precipitation moves across, not into, the soil. If drought conditions become more consistent, keyline approaches will also be crucial for lower-angle landscapes.
The biological climax and dieback action described in the tall-grass grazing section above is probably the most potent soil-building tool for application across very large areas of the planet, but its effectiveness can be limited by soil compaction and especially by water availability. Soil compaction, fortunately, can be addressed by subsoil plowing via a Yeomans-style keyline plow. Other keyline methods of agriculture are aimed at water capture so that the root-dieback action can occur in lands where significant slopes cause water to run off so quickly that only minimal amounts actually enter the soil.
This water-managing aspect of keyline agriculture is foundational and addresses the inconsistencies in water availability across a field. To understand the importance of pulsing water into a landscape when the weather would not naturally do so, you should know that many landscapes are periodically in a period of drought—even places that receive forty to sixty or more inches of rain per year. If and when that rain is cyclical, as it is in most continental climates (not as it is in some maritime climates), even high-rainfall areas that never see true drought experience periodic drought lasting a couple of weeks at a time during the growing season. This short-term droughting greatly limits plant growth and root penetration, thus greatly limiting the productivity of pasture and the amount of soil building action that can occur. Pulsing water into a field at times when plants are just about to enter a limiting phase of growth because of drought (drought stress) reduces this slowing of the system.
At its fullest extent keylining involves storing water high in the landscape, usually via a pond; subsoil plowing (which loosens the soil rather than turning it, as does a moldboard plow) in a slightly downward-trending pattern from the valleys out toward the ridges of a field, bringing water from the wettest areas to the driest, and flooding the landscape after a grazing rotation, distributing the manure/bioinoculants across and into the landscape. Think of a rain or flooding event washing nourishment across and into the landscape.
Since roots only want to penetrate relatively loose soil where oxygen and water are present, keyline agriculture leads with the water, mechanically allowing water to enter areas of the soil not previously available. Water leads, roots follow, soil organic matter is deposited, and carbon is banked in the soil. Flood prevention, climate stabilization, farm fertility, drought resistance, crop nutrient density, and myriad other benefits result. Deep, healthy soils support resilient ecologies and culture—most other functions can only be built atop its solid foundation.
At the WSRF we employ keyline approaches by utilizing several keyline ditches (I consider a ditch a channel conveying water, while a swale holds it on true contour) that are angled at a 1 to 3 percent grade from the primary valleys toward the single primary ridge on the ten acres. These ditches catch both surface water from snowmelt and rain along with, occasionally, overflows from the ponds. These pond overflows are occasional because we do not want to soak the fields below the keyline ditches all the time, just intermittently to achieve the more moist/less moist cycle, not a saturated/dry–saturated/dry cycle typical and suboptimal. (See “water management” drawing for specifics on this.)
To achieve the intermittent function, we open and close the pond overflows with lumps of clayey soil placed into one side or the other of the water channels. Damming up the keyline ditch causes water to flow more directly downhill from the ponds, while damming up the “natural” downhill flow causes water to more slowly flow along a slight downhill path out toward the ridges. This simple “valve” is free and unbreakable. When the water flows toward the ridges, it is, in all but the most severe rain events, infiltrated before it actually hits the ridge. In this capacity you can think of the landscape as a water-absorbing net that is activated or can be “turned on” to full capacity by putting a shovel load of clayey soil in a water channel. When in the “on” position, the landscape is equipped to absorb all storms up to four to six inches without letting most of the water flowing into the site on the surface and onto it from the sky go off-site.
The keyline ditches at the WSRF are between three and four years old and have been built over a staggered period of time. Interestingly, they function in similar yet different ways in the two main locations they occupy—the central part of the site and the northern central edge of the site. The former location is the driest part of the site, which is underlain by ledge covered only in zero to twelve inches of silty subsoil. The latter location is perennially damp, and for eight to ten months a year, the water table is within a few inches of the surface or at the surface. When this bottom wet keyline ditch is in such a wet condition, it is simply a nutrient-distribution channel bringing excess nutrients from areas upslope—mainly the barnyard zone—across a wide area planted in perennials and growing pasture in the lower field.
In the droughty area the keyline ditch percolates water very quickly, providing what I like to call “curtain fertigation,” in which water and nutrients are swept down the ditch, quickly migrating into the slope as the ditch travels the length of the ridge. This operates like a curtain drain in reverse and fertilizes the formerly dry slope as it waters it.***** The productivity of that slope since the keyline ditch has gone in is astounding, having gone from an area that did not produce enough biomass to warrant a mowing, a scything, or grazing for over ten years to an area that can now be grazed at least three times in a year. By managing water in a keyline manner and through on contour swales in this same area, we’ve managed to increase the productivity in this dry, infertile, ledgy acre by at least thirty times its former condition.
Leach Field Cropping: Making the Most of a Faulty System
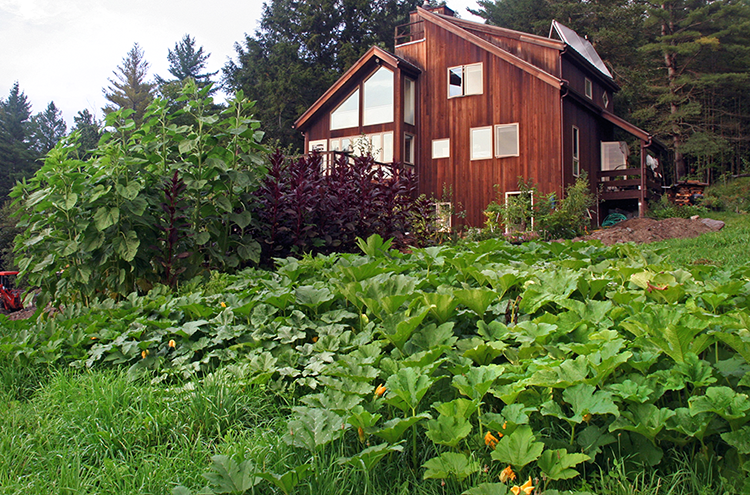
Leach fields can be some of the most productive spaces on a property—they don’t lack for nutrients!
Cycling fertility optimally on-site entails that we scavenge all possible sources of organic matter and fertility with an eye particularly focused on the lowest hanging fruit. Where are the easiest, most practical sources of fertility? Cycling existing nutrients that are now “lost” or underutilized is the most effective starting point. Luckily, such nutrients are literally in the front yard. Since “plugging the leaks” is usually the most effective starting point for optimizing a system, ensuring that all fertility loops within a site are closed (cycled and not lost) is a good place to start. Landfilling food scraps, cardboard, and other organic matter; tossing animal manures over the bank; and other ways by which people discard potentially valuable nutrients represent leaks in the would-be soil-building system. Plugging such leaks requires cycling nutrients on-site and turning waste into food and is the foundation for a viable and effective soil-building system.
Obvious nutrient sources are well known and utilized by many, from food scraps to garden residues (plant parts, immature fruits, and so on), lawn clippings, leaves, and other yard debris. All of these should be turned back into soil, of course, as quickly and thoroughly as possible via composting or by feeding animals. There are, however, other sources of fertility often overlooked on the homestead site, the most potent of which are the nutrients we ourselves emit on a daily basis. Human effluent can be captured by a composting toilet or humanure system, in a urine watering can, or, most commonly, by an in-ground septic system.
Aside from solid waste and heating, a typical septic system represents the greatest loss of energy and nutrients from a typical homestead. Modern septic systems are the product of well-meaning regulation gone awry. A high proportion of septic systems don’t function as they are intended to, because of clogged main lines, and operate for decades in a seemingly functional state while varying amounts of untreated wastewater leak into the local watershed. If you can smell your leach field at any time across the year, it’s leaking untreated black water, most likely into the nearest river. Leach is what these systems were designed for, and leach they do, silently seeping valuable nutrients and water away from the site and into the watershed, where they do only harm.
Even when septic systems function as intended, they are grossly unsustainable, consuming priceless nutrients and water while producing nothing valuable on the other end. They prop up bureaucracy and industries from petroleum to plastics while simultaneously leaching value from the home economy as the People pay Industry to take our fertility from us. Indeed, the modern septic system and leach field perpetuates an anemic citizenry and empire.
Recapturing much of the concentrated nutrients and water from the home septic system simply involves growing plants in the leach field, which can be harvested, composted, and returned to the soil as fertilizer. Such “fertility farming” should be applied where nutrients are excessive in the landscape—for example, sewage treatment areas and fertilizer runoff zones. Fertility farming and bioremediation go hand in hand to counteract the industrial economy, which tends to mix nutrients and toxins together. Gardening or farming your leach field can take many forms, and we have yet to figure out the optimal ways of using these increasingly archaic systems (composting toilets and humanure piles are the most appropriate ways to harness human nutrients).
Depending on what is most needed in the system, and on the history of the leach field, one can grow either food or fertility crops on the leach field. For biomass production fertility crops such as grasses or comfrey are allowed to grow tall, then harvested with a scythe and used as a compost amendment or a mulch around vegetable beds and fruit or nut trees or as animal fodder. Food crops should be plants that do not produce on-ground or in-ground fruits such as squash or root vegetables. Unless you know the history of the field’s inputs and can be sure that it contains no heavy metals or other bioaccumulated toxins, it is safest to grow only fertility crops.
If you do grow food crops, bear this in mind: Plants cannot move bacteria and other organic pathogens through their tissues, so you can’t get E. coli from sunflower seeds or tomatoes perched above your leach field. Plants can bioaccumulate heavy metals (usually in their tissues and not seeds, though research is inconclusive) and other inorganic compounds. If in doubt, consider testing the plants grown in your leach field.
At the WSRF we have experimented with a variety of plants on the leach field, including squash, corn, amaranth, and sunflower. We were surprised during the first year of production in our leach field that despite amazing growth (and later realized that because of amazing growth) the plants never matured seed. Sunflower and corn just grew taller each week but never produced seed. We realized at the end of the season that it was likely too much nitrogen in constant supply keeping the plants in a vegetative phase constantly—great for beauty but not for eating. The squash, however, seemed to do fine and even stored pretty well, so the following year we planted only squash. This year we’ll just be scything the field for biomass to add to our compost piles. Next year we’ll likely do squash or amaranth again, as both of those proved viable in such constant nitrogen environments. Before producing value on your leach field, the following points should be kept in mind:
• Use “heavy feeders” (plants that require lots of nitrogen): Corn, squash, sunflowers, and grasses are all good selections.
• Don’t use trees or other deep-rooting perennials, as they can, reportedly, clog up the distribution pipes and can topple over, exposing the field’s inner components and causing damage.
• Consider forage crops such as sunflowers or corn if you keep animals.
• Don’t cultivate or dig deeply in the leach field.
• Plant the field early, as high nitrogen loading in the field can significantly delay flowering. You may need to grow multiple, successive years of heavy-feeding crops before nitrogen levels are low enough (nice problem to have!) for flowering to come on time.
• Keeping urine out of the leach field and saving it for direct fertigation use during the growing season is one easy way to avoid the nutrient loss of the septic system. Human urine contains a near-perfect spectrum of plant nutrients (not surprising, given the coevolution of humans and plants) that, when watered down at a ratio of 1:10 to 1:40, is ideal plant food for the vegetative stage of growth.
• Think of the leach field as a transitional and salvage resource. A composting toilet is far more regenerative and affordable over the long haul, requires little to no energy to operate, is totally maintainable, requires no heavy equipment or dump-truck loads of material to construct, and allows the use of 100 percent of its inputs. If you’re building new, consider putting the $10,000 to $25,000 required by a leach field to better use, such as more insulation for your building, tools, a masonry oven, reskilling courses, and countless other useful post-oil resources.
Taken as a whole the strategies above can be combined in unlimited ways—along with others that may be more suitable to your site—to capture and cycle as much fertile, soil-making energy and materials as possible on your site. Soil fertility enhancement, along with and built upon the even more foundational basis of a healthy water system, is a precursor to resiliency over the long haul. It is also the foundation upon which a regenerative and healthy human-land system is built. These strategies need to be experimented with on each site and will emerge to synergize in unpredictable ways—always at least slightly differently from one site to another.
The good news is that the results come surely and sometimes quickly—give your efforts three growing seasons. If you don’t see results within that time frame (or sometimes a lot less!), then change your approach radically. Some systems will respond more quickly than others—for example, developing a lush pasture should visibly be happening within three years, whereas soil enhancement and woody plant growth from chop-and-drop nitrogen-fixing plant guilding will likely take longer. Remember to stack the approaches you take as well: Combine them; never rely on one approach to increasing fertility if possible. Hard work, proper positioning of elements, vigilant management and some patience will no doubt yield visible (and tasteable) differences in the revitalization and productivity of your landscape.
Witnessing these and health increases also happens to be one of the most rewarding endeavors of all—like watching your child surmount some challenge that previously stymied her; seeing the system’s fertility and vigor increase has often given me the acute feeling that the system is increasingly able to be more productive, resilient, and beautiful than I ever thought it would. The land’s ability to perpetuate this cycle of health—truly the essence of reproduction and fertility—becomes clear. It can take you by stunning and joyful surprise.
**** More on this can be found here: http://agroforestry.net/overstory/overstory86.html.
†††† It takes time for a nitrogen-fixing plant to actually convert atmospheric N into soil N, so turning an N-fixing cover crop in before this process happens is a common mistake.
‡‡‡‡ Masanobu Fukuoka was a renowned farm innovator living in Japan. His experiments with “natural farming” and a particularly Taoist approach of letting nature do as much as possible—a lot like permaculture—received international acclaim over the years as his success in growing high yields with minimal inputs was astounding. I regard him as a particularly important reference because of the nuanced way in which he practiced successional plantings.
§§§§ Increase in pH from chicken grazing is one of the few items in this book that we have not actually tested, but we have noticed evidence of this. Additionally, a client’s nearby farm reports this to be the case where they free range hundreds of birds each year in a CSA.
¶¶¶¶ The breed of our dogs has been deliberately left out in an effort to help preserve the breed’s value, which results in large part from an absence of overbreeding, resulting from a lack of popularity of the breed.
***** Rate of percolation varies greatly with soil type. Ideally, you can infiltrate a gallon or two per minute for every hundred or two hundred feet of ditch if you are working with a handful of acres or so. The more land you are attempting to fertigate and drought proof, the slower infiltration you want. Our relatively tight clayey soils generally allow us to convey water a long way along a ditch. Sandy soils make it difficult to convey water and easily end up draining too much water in one location in the keyline system described above. In that case, puddling the swale in over time and tightening up some of the soils with animal action can help.