
Adaptive Fuel and Shelter

How the inside of a woodstove should look during an efficient slow but complete burn
On the coldest morning of the year, the thermometer read –17°F. I was pleasantly surprised—actually, almost elated—because you wouldn’t know it inside my small home. It was still totally cozy, not a draft and comfortable enough to be barefoot on a concrete floor while making tea. The building had dropped three degrees all night from 66°F to 63°F, with the only heat source being a small (~30,000 Btu/hour) firebox running for maybe a third of the night. This was the building’s fourth winter, so it is still in its initial testing phase. But, so far the results have been pleasantly surprising.
I’ve lived nearly my entire life in the very cold climate of the northeastern United States, and for about fifteen years of this time, I’ve heated with wood. I am familiar with the deep cold of winter, and being concerned with energy use, I’ve made it a habit for many years to observe the heat requirements of the various buildings I’ve lived in. So far, spending time in this building has been a novel experience. It’s astounding just how little energy a building can get by on in a cold-climate winter relative to what we consider normal.
For instance, an average home in Vermont that heats with wood requires about five to seven cords of dry hardwood per year (if using wood alone) to maintain a fluctuating temperature of 50 to 65°F, with prevalent drafts and uncomfortably cold corners throughout the home. For the past two winters the building I write this from has been heated on less than one cord of red maple and birch (relatively poor firewood) to maintain an average temperature of about 62°F with zero drafts and no cold corners. Granted, this building is smaller than your average home at fifteen hundred square feet—call it 40 percent smaller (twenty-five hundred square feet being the average used above).
So comparing apples to apples it’s safe to say that a well-designed and -constructed home can be heated for about a third of that of a typical house. If fuelwood costs about $200 per cord (the current going rate in my area), figure you’ll save two cords per year or $400. In ten years that’s $4,000. Can one build a well-insulated tight home for $4,000 more than a typical leaky drafty home? No, but that’s at current fuelwood (energy) rates—and they’re only on the rise. If you are not using wood, you would be saving twice that amount (oil, around here, costs about twice as much for the same amount of heat), or about $8,000 over ten years. Again, these are conservative numbers and don’t take into account price spikes, which will continue to happen and to which oil and gas are vulnerable but wood, from one’s own woodlot, is not. The value of your comfort is another matter entirely, not easily represented in dollars.
The amount of work required to heat the Whole Systems Design studio and workshop used in the above example has been stunningly low. Inhabiting the building has been equally high in enjoyment and comfort. The systems we used in its design and construction were relatively simple, and the management needs of the building have also been low. But as with any wood-heated building, managing it requires more mindfulness than is generally needed by your average home.
Using Wood for Your Main Heat Source
Table 6.1: Species Heat Values
|
Species |
Lbs/Cord |
MBtu/Cord |
|
Osage Orange (Hedge) |
4,728 |
32.9 |
|
Hickory, Shagbark |
4,327 |
27.7 |
|
Eastern Hornbeam |
4,267 |
27.3 |
|
Ironwood |
4,016 |
27.1 |
|
Beech, Blue |
3,890 |
26.8 |
|
Birch, Black |
3,890 |
26.8 |
|
Locust, Black |
3,890 |
26.8 |
|
Hickory, Bitternut |
3,832 |
26.7 |
|
Locust, Honey |
3,832 |
26.7 |
|
Apple |
4,100 |
26.5 |
|
Mulberry |
3,712 |
25.8 |
|
Oak, White |
4,012 |
25.7 |
|
Beech, High |
3,757 |
24.0 |
|
Maple, Sugar |
3,757 |
24.0 |
|
Oak, Red |
3,757 |
24.0 |
|
Ash, White |
3,689 |
23.6 |
|
Birch, Yellow |
3,689 |
23.6 |
|
Elm, Red |
3,112 |
21.6 |
|
Coffeetree, Kentucky |
3,112 |
21.6 |
|
Hackberry |
3,247 |
20.8 |
|
Tamarack |
3,247 |
20.8 |
|
Birch, Gray |
3,179 |
20.3 |
|
Birch, Paper |
3,179 |
20.3 |
|
Birch, White |
3,179 |
20.3 |
|
Walnut, Black |
3,192 |
20.2 |
|
Cherry |
3,120 |
20.0 |
|
Ash, Green |
2,880 |
19.9 |
|
Cherry, Black |
2,880 |
19.9 |
|
Elm, American |
3,052 |
19.5 |
|
Sycamore |
2,808 |
19.5 |
|
Ash, Black |
2,992 |
19.1 |
|
Maple, Red |
2,924 |
18.7 |
|
Fir, Douglas |
2,900 |
18.1 |
|
Boxelder |
2,797 |
17.9 |
|
Alder, Red |
2,710 |
17.2 |
|
Pine, Jack |
2,669 |
17.1 |
|
Pine, Norway |
2,669 |
17.1 |
|
Pine, Pitch |
2,669 |
17.1 |
|
Catalpa |
2,360 |
16.4 |
|
Hemlock |
2,482 |
15.9 |
|
Spruce, Black |
2,482 |
15.9 |
|
Pine, Ponderosa |
2,380 |
15.2 |
|
Aspen |
2,290 |
14.7 |
|
Butternut |
2,100 |
14.5 |
|
Spruce |
2,100 |
14.5 |
|
Willow |
2,100 |
14.5 |
|
Fir, Balsam |
2,236 |
14.3 |
|
Pine, White (Eastern, Western) |
2,236 |
14.3 |
|
Fir, Concolor (White) |
2,104 |
14.1 |
|
Basswood |
2,108 |
13.8 |
|
Buckeye, Ohio |
1,984 |
13.8 |
|
Cottonwood |
2,108 |
13.5 |
|
Cedar, White |
1,913 |
12.2 |
In the forested cool- and cold-climate regions of the world, wood is the only sustainable and seasonally reliable source of heat that most of us can afford. Superinsulated passive solar homes are great, and if you live in one, you’re exceptionally fortunate, but you’ll still need some wood. And then there are the rest of us, who live in 99.9 percent of the other homes and can’t afford a $10,000 to $75,000 complete thermal retrofit.
Step 1 is to secure a firewood source—either your own woodlot or that of a close friend and neighbor with a large one. Remember that not all wood is created equal—see table 6.1 for an overview of the actual heat offered by a given volume of wood across various species. Growing and harvesting the densest, fastest-producing fuels is the most effective way to reach fuelwood self-reliance. Step 2 is to process your firewood—fell, haul, buck, split, stack. This last step is where most of us tend to go wrong. Traveling around Vermont, I see more people slowly rotting their wood than quickly drying it. A stack of wood against the north side of a house with a tarp over it is an ideal way to grow mushrooms, but it won’t yield wood fit for your stove, although many people burn such wood year after smoky year. I will now give an overview of why it’s hard to dry wood well and what it actually requires, putting you one step closer to local self-reliance.
Selecting, Processing, and Drying Wood

A young hardwood stand typical of about three acres at the homestead—thus the need to plant more fuelwood
In selecting the best fuel for heating, it’s important to remember the basic goal: getting the most energy from the forest (or field), dried, next to the woodstove with the least amount of energy expenditure and frustration. This is not a simple equation and varies from site to site because of the wood available, its condition (how knot-free it is), its accessibility, and the tools at hand (whether you have a wood splitter, for instance). On most locations the following considerations should be taken into account to determine how you can transform the solar energy stored in standing trees into heat for your home as effectively as possible.
Forest Management
If you are cutting your own firewood, the question starts with silviculture. What trees should be cut to promote the health of the forest at large and the long-term growth of the most fuelwood, building materials, and other desired yields, such as wildlife habitat? This first part of the firewood chain of processing is the silvicultural end, where your decision as to which tree to fell in the woodlot determines the future development of that forest.
For firewood we generally want to choose trees that are unsuitable for building (sawlogs or poles), as those straight and “clear” trees are less common in the forest. Once we’ve located the cordwood trees—nice curvy, knotty, or otherwise “defective” individuals—we then determine which ones are of a size ready to be processed and which trees, once taken down, will promote the net growth of the forest the most. We always want to manage for overall net productivity—how to get the most Btus per acre (other important variables such as habitat aside for the moment), and in the woodlot that means managing the sunlight entering the system; we can view this as forest-canopy management.
In selecting wood, density is of prime concern, as density gives the best indication as to the amount of heat that can be produced. The denser the wood, the greater the amount of molecules the wood contains; the more energy embodied in the wood, the greater the heat output the wood can create. Generally, the slowest growing tree species produce the densest wood. This is not surprising when you think that an oak, for instance, puts more molecules into the same volume than a poplar. That usually takes more time, with the notable exceptions of black locust and osage orange. (See chapter five for much more on the exceptional utility of black locust.) In the northern forest of the United States, the best fuelwood commonly available in forests includes hickory, hop hornbeam, locust, oak, sugar maple, beech, yellow birch, and ash. See table 6.1 for a comparison of heat values of different species.
Felling a Tree
Felling is easily one of the most dangerous activities that also happens to be a normal part of homesteading. While felling is not within our scope to cover at any depth here and is covered very well in books and through workshops, the following are aspects I have found particularly useful in my experiences with logging over the past ten years. I fell trees with a 036 Stihl chain saw wearing Kevlar chaps, mountain boots, and a chain-saw helmet. I use wedges (two to three per large tree, one or none for small trees) and aim to fell the tree with the chain saw off and set aside, using an ax and a wedge to lever the tree over. This is the safest method I’ve seen and allows for a high degree of control. On occasion, I will throw a rope up in a tree and pull tension via people, my truck, an excavator, or a pulley system/come-along if a tree is heavily leaning in a bad direction.
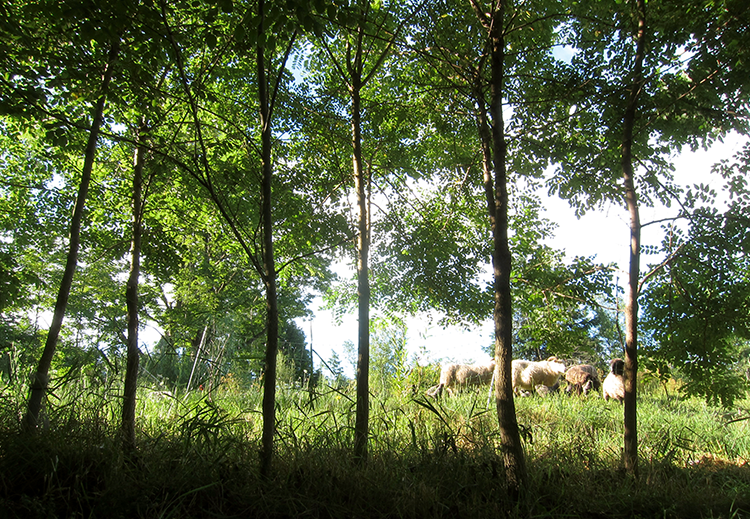
Silvopasture in action: grazing the fuelwood hedges at the Whole Systems Design testing ground
I like to keep a backup saw on hand in case I run out of fuel amidst a difficult cut, or in the event I pinch a bar, which happens rarely if you are good and careful but eventually happens to everyone. I use mostly waste vegetable oil for my bar-and-chain oil and in five years or so of use have never experienced problems with it such as clogged filters or hot bars. A chain saw is one of the most crucial pieces of equipment in the modern homestead—ranking alongside a screw gun, a drill, a hammer, and an ax, so it pays to be well versed in its use and upkeep, and if you can afford to, own at least two saws and many spare parts.
I am no logging expert and would highly recommend that those new to chain sawing (or who are even experienced but not highly trained) take a Game of Logging or similar hands-on course. There’s no other activity as likely to get you maimed or killed on your land than using a chain saw and felling trees, so learning the right way is crucial—this is one area where experimenting should be kept to a bare minimum.
Chain Saw: The Most Important Gas-Powered Tool?
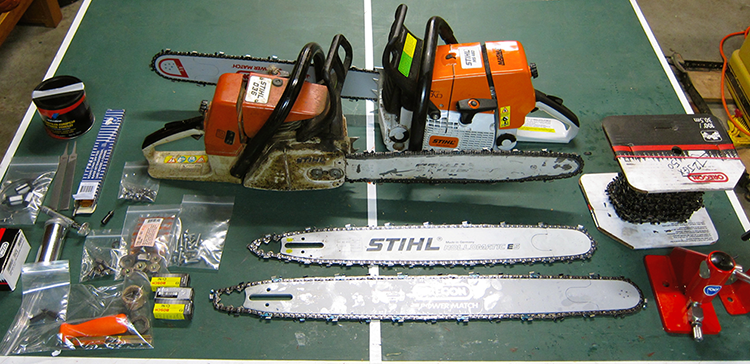
The most important tools and parts to have on hand so you can keep your rapid wood-cutting capacity going for as long as possible if the global flow of parts stops or ceases for a time
Hauling Your Wood
After the impact on the land system, the next level of decision making involves accessibility and hauling. A cord of wood weighs between four thousand and six thousand pounds wet in the forest. There is no other regular aspect of homesteading or small-scale farming in cold climates that involves the active movement of so much material (aside from construction projects), so you want to be extremely efficient with all aspects of moving this mass from the woodlot to the bucking and splitting area and from there to where it is stacked.
Good firewood management is a refined art of bulk materials hauling and storage. There are numerous methods for moving wood, and each site demands a customized approach. However, some basic principles apply no matter the situation. Hauling full-length logs—twenty to forty feet—from the forest to the processing area is almost always better than bucking into rounds in the woods. This process—skidding logs—can be done with horse, skidder, tractor, excavator, or anything that hauls well over usually rough ground.
I skidded my logs for five years with a tractor and no skidding winch (a superhandy but expensive attachment that holds the butt of the logs off the ground so they don’t catch). That worked okay if the ground was completely solid, but I always took extreme care on my sloping land to avoid flipping the machine. Now, I haul with my compact excavator, and while it’s very slow, it can haul a massive amount of logs at once, which more than makes up for its lack of speed. Also, the digging bucket can be used to lift the butt ends of the logs just enough to avoid their catching on the ground, serving like a skidding winch on a tractor or normal winch on a skidder.
Table 6.2: Wood Consumption—Weight Moved‡‡‡‡‡‡‡
|
Cords burned |
lbs moved per day |
lbs moved per year |
|
1 |
22 |
12,000 |
|
2 |
44 |
24,000 |
|
3 |
67 |
36,000 |
|
4 |
89 |
48,000 |
|
5 |
111 |
60,000 |
|
6 |
133 |
72,000 |
|
7 |
156 |
84,000 |
|
8 |
178 |
96,000 |
Given that wood is heavy and that it must be moved multiple times in its journey from standing tree to the woodstove, reducing fuelwood consumption is one of the most strategic ways to reduce labor on the cold-climate homestead.
My ideal rig (aside from a draft horse, mule, or ox, which will hopefully be eventual—but requires major skill development), which I have yet to devise, would likely be a cobbed-together forwarder in the form of the compact excavator’s hauling a large and beefy trailer on very large and wide flotation tires. The trailer would get loaded with the excavator, then hauled behind it. In Scandinavia, where logging is far more evolved compared to in the States, forwarders are standard practice and work in such a way that they allow logs to remain clean (no rocks and mud from dragging) and, even more importantly, the forest to sustain less damage in the process.
Bucking and Splitting Firewood
Once the logs have been hauled to the landing/processing area, they must be cut into rounds. Rounds are determined by your stove or burner size, typically fourteen to twenty inches. If you need a mix and are not sure which size because you might change stoves in the future or because varying sizes are needed for multiple stoves on-site, it’s always best to cut to the smallest length so it can be used in all stoves.
My cookstoves take fifteen- to sixteen-inch logs or smaller, which is relatively short and more difficult to stack than eighteen or twenty-two-inch-plus cordwood, which the house stove takes, but to be safe and to know that most cordwood on-site will fit the cookstoves, I cut a majority of wood to fifteen inches or slightly smaller. I do not measure with a stick or tape measure but get used to the size needed by using the stove. Measuring is tedious and is unnecessary if you pay attention to the cordwood each stove needs.
When possible, I stack logs parallel well off the ground and cut all the ones I can access easily without cutting the bottom logs. This is one way to avoid having the saw nicking the ground, which is crucial to saving your chain and getting firewood processed quickly. One split second touching a stone, and you need to stop and sharpen your chain, which slows up the rhythm and eats up expensive chain. A peavey is an incredibly handy tool for rolling logs that gets used often when you are managing large logs during bucking. It’s common to cut through the log two-thirds of the way, then roll it over and cut the remaining third—thus more easily avoiding the dreaded saw-ground contact.
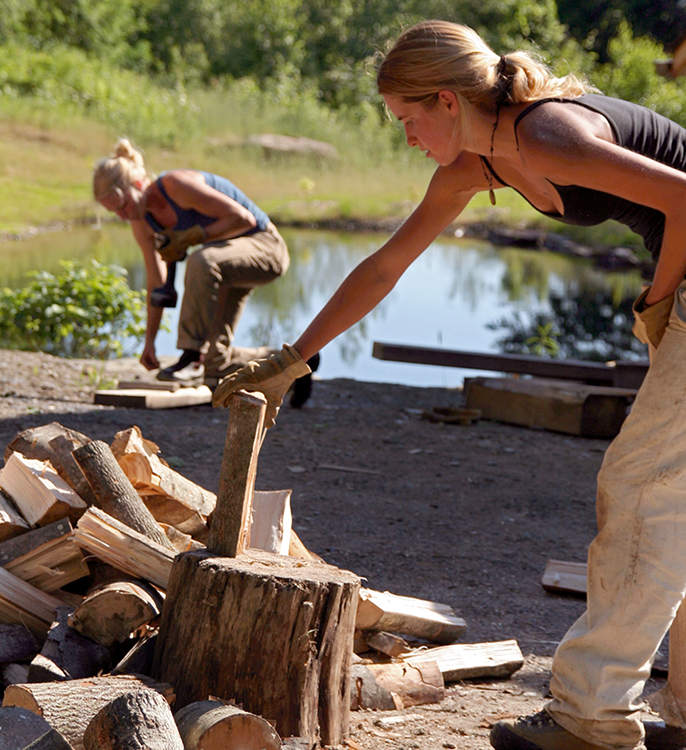
Splitting wood: one of the few near-constant jobs in a cold-climate homestead. Fortunately, it’s highly enjoyable and good exercise.
I love splitting wood by hand. It’s second only to scything tall wet grass on a summer morning as far as homestead “work” goes. I can split wood for hours a day on most winter days and feel better off for having done it. If practiced well, it seems to be a meditation that can be good for the body and mind and which, of course, produces a satisfying yield. Having just recently used a very efficient flywheel-based log splitter after splitting by hand for ten years or so, I can now see the advantages of mechanized splitting.
Yet I remain interested only in splitting by hand so long as I am processing wood for a few efficient buildings or less. I can easily buck and split a cord in part of a day, and if I have much of the day and conditions are good (hard ground, clear logs, and nothing breaks), I can get a cord or so, felled off the stump, limbed, hauled, bucked, split and stacked. If the logs are knotty, everything changes, and I am pushing through the splitting process using wedges for many of the rounds. This is not nearly as fun and slows the process down by three to five times, easily. So clear logs are a blessing—and not always something you will have in abundance, so get used to wedges and sledges.
Techniques and preferences for efficient hand-splitting are numerous, but I’ll offer the approaches that I have had good results from over the years. When starting with good clear rounds, I split them on large, very short “splitting stumps” using relatively light axes—I like something between a felling ax and a maul in weight and with a fairly fat flair to help open up the round and discourage the head from getting stuck in the wood. Fiskars makes a decent modern cheap version (though the handle is not replaceable), and Gränsfors Bruks and Mueller make nice more traditional hand-forged versions.
You can swing a light ax all day, whereas a heavy maul tires one easily in short order—though they do have a role in particular woods and grains. I use a 3.5- and a 4-pound ax nearly all the time. I almost always prefer an ax with wedges over a maul and might for tough woods, but again, certain situations allow a maul to be very effective. Please note that “maul” is a misnomer, because it’s not intended to crush wood fibers, only to split them. I prefer to call it what it truly is, a very heavy splitting ax or an ax with a widely flared head.
I split what I can from a pile with a light ax and then go at the remaining pieces with a sledge and a wedge, often with an ax that can be pounded (it needs to have a hardened poll for this purpose or you’ll mushroom the head). Swinging the ax into the difficult round, then pounding the head through the round (standing at least partly perpendicular, not parallel to the ax handle or you’ll bust your knuckles!) works particularly well. Often, this will open the round up, and a wedge can be inserted, which can then be alternately pounded on with the ax.
I also use a hand-powered splitter, purchased from Northern Tool a couple of years ago, which is good for the very difficult rounds. It’s slow and has some design flaws, which could get fixed with a welder (the wedge is too short), but it does the trick of busting open superstubborn rounds. Every now and then a log of exceptionally clear easy-splitting wood such as ash will allow you to split before bucking each round. When this happens you can get a ton of work done rapidly.
I discovered this while splitting clear ash in Massachusetts about five years ago. There were four- to six-foot-long logs on the ground, and I had slammed an ax into an end of one, golf-swing style, to rest the ax while taking a break. I noticed a hairline crack shoot down the log as the ax sunk. Instantly, I realized that these logs could get split this way, and I tried. Sure enough, I walked around the pile swinging the ax like I was on a fairway playing golf, each log splitting significantly from the strikes. Later, bucking was magical—each slice of the saw yielded presplit cordwood, which fell away from the saw cut ready to be stacked.

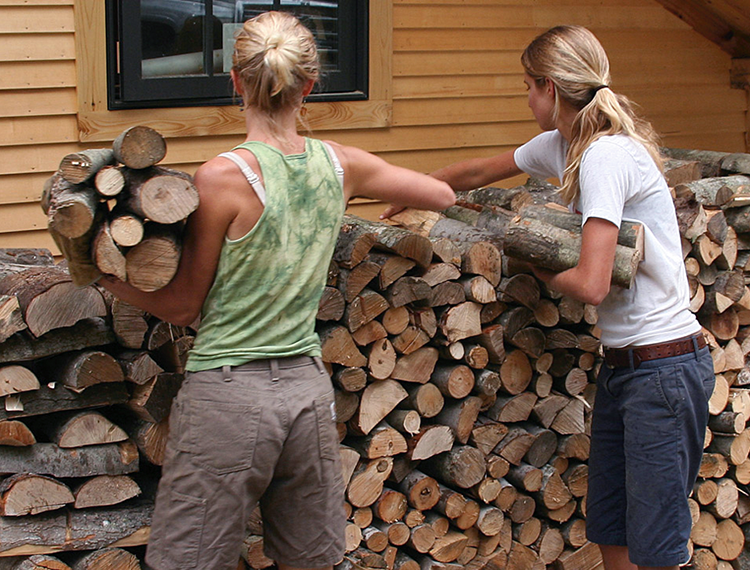
A well-made stack (not pile) of wood is crucial to actually having dry wood to burn. And dry wood is crucial to heating one’s home optimally.
Drying Your Firewood
Wood wants to be wet. In fact it’s the only typical raw material that holds more water than good soil (usually 120 to 200 percent of its dry weight). The cells in a tree’s wood have such a stubborn grasp on water (it’s their life currency) that they only release it fast enough to avoid rotting under specific conditions—and it’s in these conditions that you want your fuelwood. To make things even more difficult, these conditions are hard to come by in a humid, cold climate: Throw a hundred pieces of wood from a plane flying over New England, and ninety-nine of them (or probably all one hundred) will begin rotting within a handful of months.
This is why finding a large supply of dead wood to burn in the woods is often impossible—the fungi get to it first. Burning green wood (more than about 20 percent moisture content, depending on species) is a bad idea because it promotes creosote buildup in the chimney, is hard to keep ignited (while at the same time keeping airflow through the stove to a minimum), reduces heat output by 20 to 70 percent (causing one to need one and a half to three times as much wood for the same amount of heat), emits much more air pollution, and is heavier to process. The only tree in our Northern Forest that is burnable in close to its green state is American ash because of its exceptionally low standing moisture content.
It’s safe to say that most people where I live burn wood that is far greener than it should be and get a correspondingly low amount of heat value from the wood while also getting more creosote buildup in the chimney, moving more mass than they need to, and tending to a more difficult fire. There are two reasons for such commonplace burning of suboptimal, wet wood: lack of drying time and poor wood storage.
The average wood-heated home in northern New England requires five to six cords of wood per year to heat—that’s fifteen to twenty thousand pounds of material to move each year, twice (at least). So ensuring that your wood processing from forest to stove is as efficient as possible is important.
Under average conditions it takes about one year or more to dry sixteen-inch cordwood thoroughly. Under good conditions cordwood will dry within five to seven warm-season months. Under the best of conditions (very sunny; lots of airflow; tall, thin stacks; and stacked with lots of air space between the billets), one could dry wood adequately for efficient burning in three to four warm-season months if the billets (pieces of cordwood) are in very short lengths (fourteen inches or less) and split on most or all sides. Even small billets that are unsplit take a very long time to dry, as the bark holds moisture in the wood very effectively.
Remember that wood only truly dries in a cold, humid climate between April and November, when temperatures are above 40°F and humidity levels are relatively low. A well-sited and -built wood stack does most of its work from July through September with high heat and low humidity. If, like most people, you find yourself needing to rapidly dry a small amount of wood, piling it near the stove for a week or two before burning it can remove as much moisture (especially in small billets) as months of drying—as well as humidify your house. Having the wood near the stove for even just a few days before burning can polish off the remaining excess moisture of marginally dry wood and is an oft-used strategy.
The soundest approach to properly heating with wood is to put it up well in the autumn or winter a year or more before it will be burned. This requires a surprising amount of space dedicated to wood drying: about 128 square feet for the four cords typical (minimum) of most home needs—that’s one stack four feet high by four feet wide by thirty-two feet long per year, two of them at the beginning of winter. In addition to food gardens, the life-after-cheap-oil front yard will be dedicated to wood storage—easily a car parking space’s worth of wood—more if your home isn’t very well insulated or your stove burns inefficiently.
Skillfully drying firewood (or building lumber) requires managing the moisture factors—precipitation, temperature, and air movement—through the proper location and construction of a wood stack. Optimal wood drying and storage sites are:
• Easily accessible to sled, cart, truck, or tractor
• Off the ground
• In a warm, sunny area (against a south-facing wall can be ideal)
• In an area with good airflow
• Near the point of use
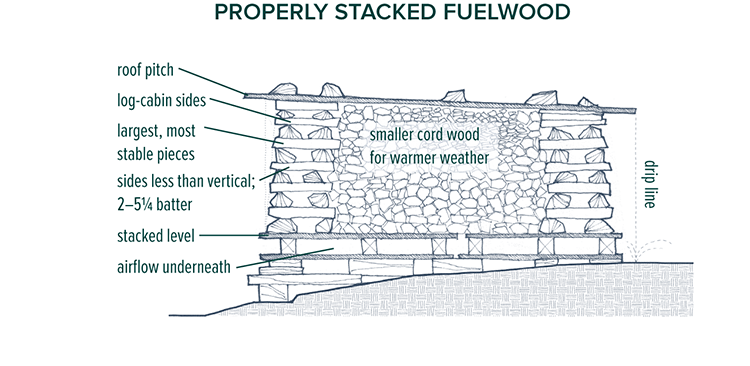
Wood rots if stored carelessly and/or under tarps. A cleanly built and sturdy stack with scrap-plywood or -metal roofing is the best method aside from shed/barn storage.
Proper construction of your fuelwood stack (you’re crafting a stack, not making a pile here) involves the same things as any building: a stable foundation, stable shape (not too tall for the width), solid connections (the way the wood stacks against itself), and a sound roof. A solid foundation can usually be made by propping up pallets or 2 × 4s to form a wide, level surface with plenty of support points. Ensure air access underneath the stack. Remember that the bottom layers are most likely going to get wet in snowy weather as it drifts against the pile and by lower airflow volumes and wetter air near the ground. Ideally, you burn the top three-quarters of the pile, then restack the remaining one-quarter on top of another stack for the following year.
Stable connections between the layers of cordwood are made by ensuring that the wood is of a uniform length—usually sixteen inches or eighteen inches, that the wood is layered up neatly and flatly, and that any retaining of the walls (see figure 6-08) is rock solid. A sound roof is best made out of anything impervious, large, flat, and rigid, such as scrap plywood or, best of all, scrap metal roofing. Ensure that the roofing is pitched and drains water away from any area that would backsplash onto the wood. Drying wood under a tarp seems like a fine idea until you try it. When you do, you realize how hard it is to keep the wind from removing or misaligning it and snow from forming depressions in it so that water slowly percolates into the pile. If you must use a tarp, heavy canvas or rubber tarps are infinitely more workable than light poly tarps.
Compost Hot Water Heating System (Jean Pain Mound)

The woody water-heating compost mound steaming away on a winter’s morning with 155ºF temperatures inside on a 10ºF day
Burning Firewood
Heating with wood is so typical in some areas that many people tend to think it’s easy and simple, like jogging. But just like jogging it can be done poorly for a lifetime without your knowing it. Mastering the task of burning firewood involves keen observation and continual experimentation to understand the interaction between your wood and the combustion system you use (stove and chimney). At the Whole Systems Research Farm, all our buildings are heated by woodstoves—all of which are cast iron except the sauna burner, which is steel. While we have wanted to build a masonry oven for years, the recent addition of two wood cookstoves, which also heat water with incredible effectiveness and allow both stovetop cooking and baking along with space heating, has back-burnered the masonry oven plans for a while. So, for the purposes of this chapter the focus is wood heating with a traditional woodstove, covering the tricks and techniques I have found for making the system as optimized as possible. The wood heat system on a homestead can be broken down into the following areas:
1. Fuel properties: density and moisture
2. Firebox arrangement
3. Airflow
4. Burner design and stove selection
The characteristics of your fuel are fundamental to the performance of the entire system. You can save yourself about 30 percent on time if you process very dense wood such as hickory, hop hornbeam, or locust. Starting with dry, dense wood, the next order of operations is optimal arrangement in your burner. The ideal arrangement depends on the following factors: amount of coals present, draft of stove and chimney and airflow entering the stove, moisture content of the wood, size of the wood, and surface area of the wood. For instance, when starting a fire with no coals present, you want an open, high-airflow configuration, which promotes the fire as much as possible. This setup burns down quickly, of course. So once the fire is going and you have a bed of coals, you can start adding wood in such a way as to reduce surface area and slow down burning—by placing firewood parallel with one another in the firebox.
This is all very intuitive, of course, but is worth pointing out for those new to the art. An all-night burn is most often achieved by loading in a small number of very large billets and placing them parallel with one another so the whole fuel charge is most like a single block of wood. Dialing down the stove in combination with that arrangement will yield a slow burn in all but the leakiest of stoves. The airflow in your system is most heavily determined by the draft created. The draft is the movement of air from the interior of the building through the stove and up the chimney. The fastest drafts are created by straight, hot (interior or insulated) chimneys. The longer they are, the more draft is created, within reason. Poor draft situations are common and often are the result of 90- or 45-degree bends in the system and exterior or cold chimneys.
These situations can be dangerous in the long run because of the way they promote creosote buildup and the resulting chimney fires. A good draft with very dry wood that is burned very hot from time to time in a firebox that is not smoldered often can reliably create a situation where chimney cleaning is never necessary. You should always check your chimney each year, but if you burn effectively in a well-designed setup, you will find your stovepipe surprisingly clean. I check once per year and have never needed to clean my stovepipes, but I am very careful to almost never smolder the fire. I also do a “cleaning burn” every few weeks, in which I let a lot of air into the stove and rage the fire with small dry pieces of kindling for a few minutes while the stovepipe gets very hot (400° to 600°F). I then damp the stove down before things get dangerously hot. This tends to burn off any creosote that may have started to form on the interior of the chimney before it gets to dangerous levels.
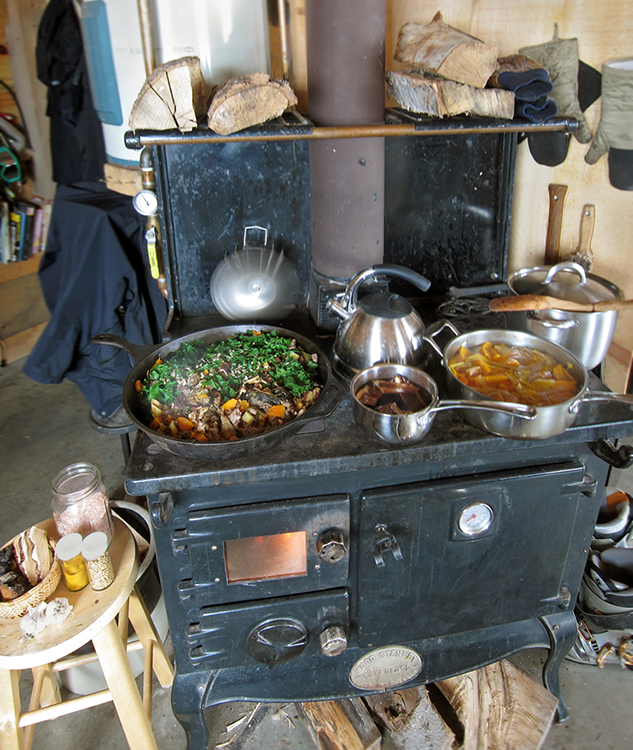
The homestead’s most important power plant is our wood cookstove. It is pictured here in typical midwinter action performing multiple functions simultaneously: boiling tea water; cooking a multiday meal of venison, lamb, squash, potato, seaweed, shiitake, sunflower seed, kale, and garlic; boiling gone-by squash for the ducks; baking cookies; simmering chaga-reishi chai for desert; heating all the hot water needed by two people for bathing and dishes; and heating fifteen-hundred square feet of space to 72°F on a 20°F day.
When you are selecting a wood burner, the following points should be kept in mind:
• Airtightness: Is it nearly 100 percent airtight? It should be. You can check by hooking the stove up to a chimney and, with a fire going, dialing the stove completely down, then holding a candle or lighter next to all possible air inlets. If any indication of air being drawn into the stove is present, it’s not airtight. The problem with having a leaky stove (which many of them are, especially old ones) is twofold. You end up with a stove that you can’t keep a long burn in—maybe three to five hours at best, and you end up burning inefficiently, always feeding more air through the stove than necessary.
It’s important to note that the most efficient fire is one in which the minimal amount of air is allowed through the stove to keep a very hot flame (bluish) alive. Any more airflow beyond this is cold air you’ve unnecessarily brought through your heated building. Unfortunately, it’s hard to check how airtight a stove is in the showroom, so ideally, you would get to a stove in action beforehand in a friend’s or neighbor’s home.
• Construction: Cast iron lasts the longest and should provide a serviceable stove for lifetimes if it’s taken care of. Steel tends to weaken and rust over time. A glass door in the firebox is more than just an aesthetic consideration; it allows you to see how the fire is behaving and adjust airflow and wood arrangement accordingly. Without a window into the firebox, it’s nearly impossible to achieve optimal burning conditions because you’re guessing to some extent as to the condition of the fire. You can’t simply check by opening the door of the stove, because as soon as you do, the airflow situation is immediately changed.
Aside from airtightness, insulation and reburning abilities are important. Modern stove makers have begun to understand that a hot firebox is crucial for a complete burn—at least half of the heat in wood is contained in gases that only ignite at 1,000°F or higher. To achieve this crucial hot firebox temperature, insulation is very helpful. I would not consider a new stove that is not well insulated. I have been extremely impressed with my Morsø small stove of about 35,000 Btus, which can hold coals for literally sixteen hours if it’s dialed down well.
However, there are some pretty efficient old stoves out there that, because of their design, can achieve very hot firebox temps—the Jøtul 118 is a good example of a very simple stove that does so. My wood cookstove, a Waterford Stanley, was not airtight from the factory but with some additions of ceramic insulation can hold coals for a short night if loaded fully before bedtime.
Most modern stoves feature ways of reburning the volatile gases mentioned above. This approach has replaced the once-common catalytic converter. Having owned a Hearthstone Harvest, which cost over $300 in catalytic maintenance and never ran very well to begin with, I would caution you to avoid catalytic stoves at all costs. Catalysts are notorious for breaking and going bad from ash contamination. Luckily, the new stoves (or some old ones) that can reburn volatile gases (via recirculation) are commonly available.
• Size: It’s very common to oversize a woodstove, and there’s no better way to waste wood—aside from drying it poorly—than to use a stove that kicks out more heat than you need. It’s like a vehicle—an eight-cylinder truck is great for hauling something, but if you want to coast along with high miles per gallon, you want a very small engine. Think of your home as something that should coast. I have friends who have an enormous stove that can easily get their home to 80 degrees. That’s nice when you need to heat the home up quickly after being away, but the rest of the time it’s very inefficient. You want to go with the smallest stove you can to heat your space.
Calculating the heat loss of the home can help you do this, as can using the advice of someone well versed in homes and stoves. My office/shop heats with a 30,000-Btu stove (max), and it’s fifteen hundred square feet of well-insulated passive solar space but is not superinsulated or superpassively designed. The 1970s house on this property heats, barely, with a 55,000-Btu stove, and it is eighteen hundred square feet.
Making Biochar in Your Woodstove

Woodstove coals

Biochar coals
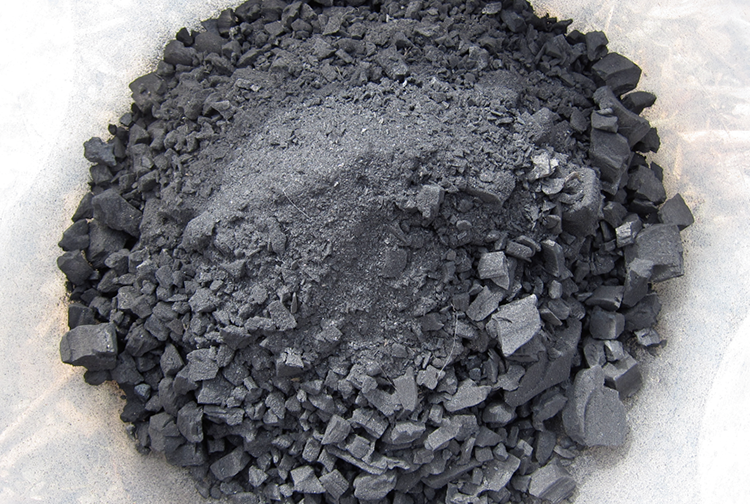
Biochar crushed
Adaptive Shelter
It’s fitting that much of this section (and much of the book) is written in my favorite setting for office work—the balcony of the Whole Systems Design studio. It’s a southwest-facing nook about 4'–10' in size. A third of it is set into the interior of the studio, with two-thirds of it cantilevered out into the sunny, south-facing side of the building. This configuration provides solar access and wind protection simultaneously, providing an enhanced microclimate that extends my enjoyment of the outdoors across the year.
Today it’s a brisk 14°F, with light winds and mostly sunny skies. I am warm enough to type comfortably, so long as the sun misses the clouds, while enjoying views of the Mad River Valley and soaking up the rare mid-January sunshine. It’s a perfect place in which to ponder what’s behind a highly functional dwelling that is built and managed to be as resilient as possible for a future of continual and often rapid change.
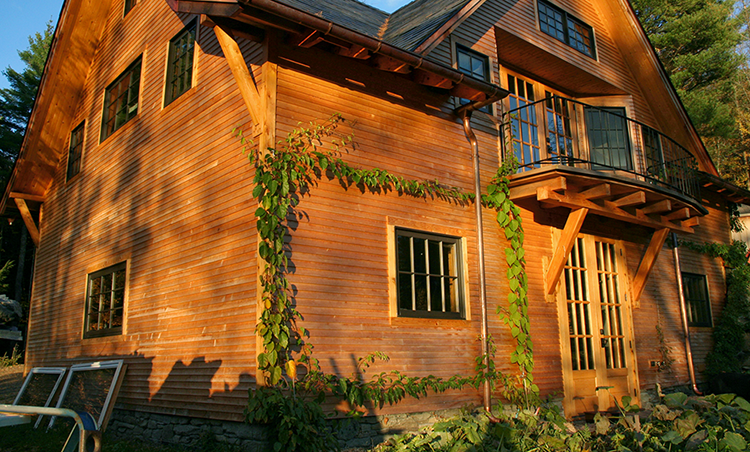
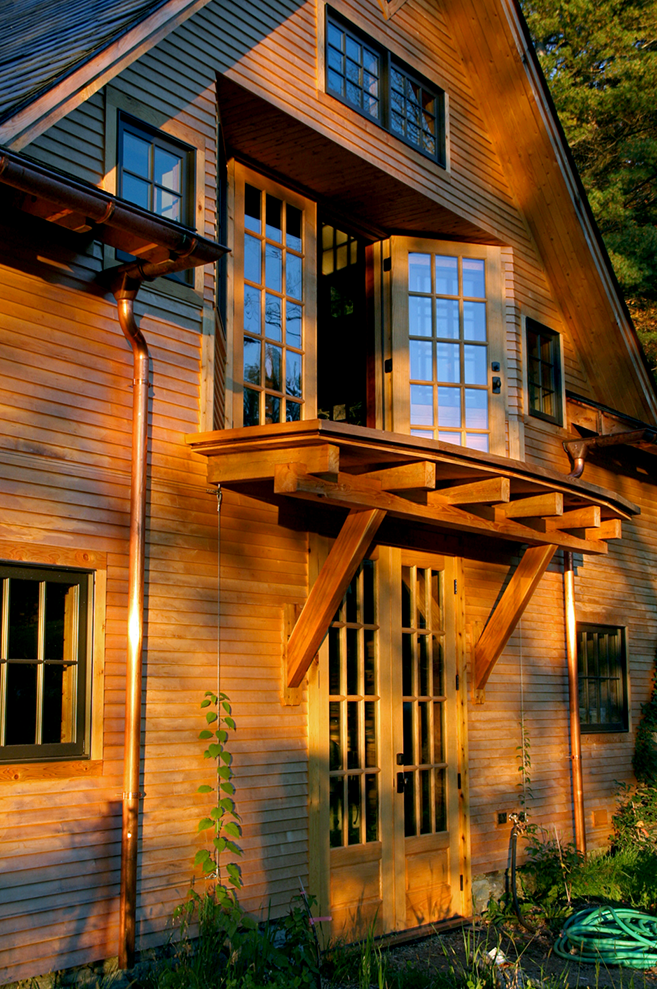
The Whole Systems Design,LLC studio and workshop Photograph courtesy of Whole Systems Design, LLC
The first point to note in the process of understanding, designing, making, and managing shelter is the amorphous nature of it. Shelter is composed of varying degrees of protection from outdoor elements including wind, rain, snow, light, and darkness—it is not, necessarily, a building. The most successful buildings are designed and built around existing and constructed (or planted) spatial elements that offer sheltering values. In other words, a new building should not have to produce 100 percent of its sheltering value from blank space, providing all of that value from its walls and roof alone.
A well-designed building is set into existing sheltering elements in the landscape—a hillside, a south-facing wall of trees, a bedrock outcrop—and extends those sheltering influences farther into the interior of the structure. “Passive solar landscaping,” in addition to passive solar house design, is one term that helps us understand this concept. A passive solar house embedded within a passive solar landscape will outperform the same house constructed in a typical suboptimized setting. The point here is that context should be the starting point for all building design, just as it is for the development of biological systems such as a vegetable garden, an orchard, or a fish pond. It’s often easier to forget this when locating and making a building than when laying out a vegetable garden.
This section provides an overview of how we design and develop highly functional adaptable shelter. It is broken down into the following components: design and construction; siting and orientation; foundation, frame, walls, roof; mechanical systems; and nutrient cycling.

The sauna and an outdoor bedroom at Whole Systems Design’s farm Photograph courtesy of Whole Systems Design, LLC
Design and Construction
The WSD studio/shop was designed to be a high-functioning space but also to balance the necessary technical components of a high-performance building made for a cold climate. By “balance” I mean that we sought to achieve a result that enhanced the occupants’ experience across all aspects of building design. For instance, the building should lend a relaxed feeling of light and warmth and harmony with its surroundings while also being thermally efficient. It should improve the outdoor space around it while also itself being “green” in materials. It should be easy to heat and cool, and not feel like a heating or cooling machine. In other words, the building’s materials and form need to enhance all variables related to its use, not be oriented too heavily toward one alone.
That’s the fatal error in many modern approaches to “green” buildings: A building needs to be more than an efficient machine—after all, no one wants to live in a mechanical contraption. I have been studying and walking through highly engineered eco-groovy homes for more than a decade, and almost none of them have felt like high-quality space to me. Certainly, the most insulated or most solar or most lighting-efficient among them did not. The few gems that I have experienced were shelters that balanced their design goals, turning them from potential competing aspects into synergistic ones. Those buildings did this harmoniously and create spaces that are unified within themselves and within the site. Remember, while a building requires engineering, it is not simply an engineering feat alone.
There was another goal beyond the balancing of all goals that also organized our design: to make a highly durable, very long-lasting structure that needs as little maintenance and renovation work as possible for as long as possible. “Build it once” was our mantra. See the sidebar “Entropy, Resiliency, and Regeneration” in this chapter for the reasoning behind the need to make our construction projects based on durability above most other goals.
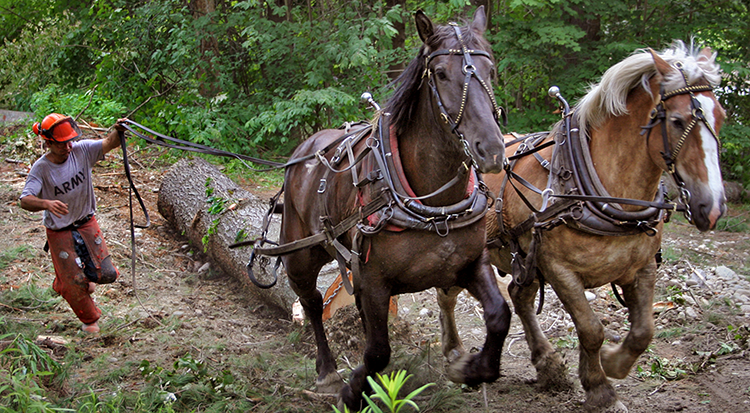
Horse logging was used to harvest all the timbers for the Whole Systems Design studio from the farm property.
Building Is an Ecological Act
The Whole Systems Design studio was also conceived as an outgrowth of the site. Its design seeks to connect spaces within the site, to enhance those spaces, and to serve as a room within the landscape itself. Look around, and you’ll notice that all good buildings do this. Many famous modern buildings—even if they represent a novel work in and of themselves—often do not do this, however. And those structures don’t last over time as a result—cultures don’t maintain buildings that do not improve the space in which they are embedded (see Stewart Brand’s How Buildings Learn, among other works, for more on this idea).
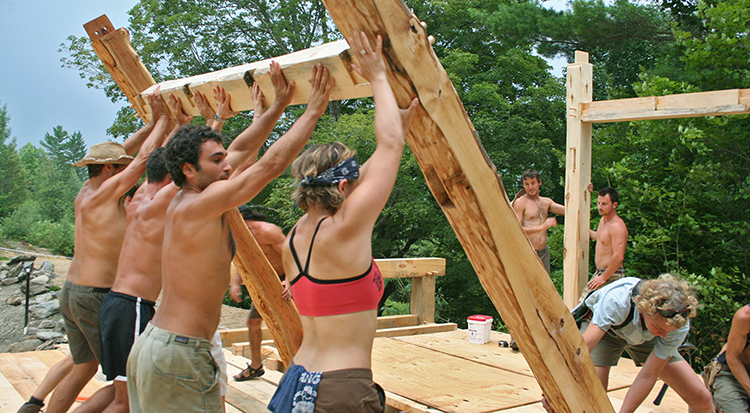
The timber frames on-site were hand-raised when practical—always an incredibly rewarding experience.
In studying and making buildings over the last half of my life, I’ve come to believe that there are two basic approaches to architectural design: (1) work from the inside out, using an idea or image as the organizing framework (most “architecture”), or (2) work from the place—the site, inward toward the space composing the building itself. A brief story illustrates the former approach well and why I quit architecture school.
I had started graduate school in architecture and was sitting in my freshman year studio listening to our second assignment. The professor described the design challenge: “Conceive of a home and yard for a writer. The house needs to be a specific size, between twelve hundred and sixteen hundred square feet, it can only be two floors, it must have a main entrance on the road side and a fence of six feet tall around the yard. Everything else is up to your design discretion.”
He then opened the room to questions. After a few others spoke up, I raised my hand. “You didn’t say where this building was located. Is it here in the cold Northeast or in the tropics? Also, which way is south, and is it in a dry or wet climate?” The professor, visibly annoyed, replied, “That stuff doesn’t matter! It’s the space that matters, the relationship between figure and ground; just worry about that, about how you develop the positive and negative space and the architecture of the solution. Don’t worry about where it is; that’s irrelevant.” I quit the program within a few weeks.
And “where it is” has become the underlying factor of our design work from which all solutions stem, married with the factors of the client: place and people and how they interact in synergy. This is no different a design approach from the way in which we approach design problems in the landscape; only the medium is different—it’s dead instead of living—and that makes certain aspects of the system work far more easily; the building doesn’t grow in size over time, for instance. And certain aspects are less inspiring: The day a building is finished is the day it begins to decay.
Siting, Orientation, and Layout
Whole Systems Design’s office nearing completion with the “human solar oven” balcony facing south-southwest over the pond
After reasonable access, good water, and solar access is established, the task of locating the dwelling within a homestead is the linchpin. Get this wrong, and the rest of the site is forever constrained. Get it right, and the site can work in synergy with highly functional interaction between spaces, all pivoting off the central zone 1 anchor that is the dwelling. The primary challenge addressed on many of my site consultations is house locating. Several patterns emerge repeatedly here, no matter the property; I have noted these below. We can think of these as a designer’s checklist for locating a dwelling optimally on a piece of land. As you read through them, please remember that on many locations, especially in hilly or mountainous regions, there are often only one or two good dwelling sites, at best. More often you are choosing between several not-so-great spots for building. However, on a good property you will be able to sift through most (usually not all) of the following criteria during the process of elimination that represents sound decision making for siting a building.
Reasonable Access
Can you get to it? Sounds simple enough, but it’s not. There are innumerable great spots on which to build if you could only get to them reasonably. If getting to one “reasonably” means making a road up with a steep—15 percent or so—grade, you should seriously consider another location. If it requires vehicle access across a 20 percent slope, forget it. Yes, the landscape is filled with such driveways, and yes, they will be unaffordable to maintain in a world where oil (read gravel and machine hauling) is expensive or less available. Such steep driveways become riddled with impassable ruts in a few years and deep gullies after that. Many an old roadbed is now an intermittent stream.
Can you maintain the driveway by hand with a wheelbarrow? It’s worth asking that question—even though it’s a tough one. In general you need to be well below a 10 percent grade to achieve a perpetually maintainable accessway that can be relatively erosion-free—not to mention the snow and ice shenanigans that a slope over 10 percent causes. Note: In a very dry climate, steeper grades become more reasonable—the wetter it is and the more intense the rain events that occur, the lower the grade that should be developed.
After slope comes the consideration of length. The shorter the driveway you need to build and maintain, the better—all things being equal, of course. But I’d rather have a four-hundred-yard-long 2 percent access than a fifty-yard 12 percent grade in a heartbeat—the former would be easier to negotiate in winter and a fraction of the maintenance time and costs. My driveway ranges from 1 to 4 percent grade and has never needed a gravel addition to it in the ten years I’ve lived on-site. Driving carefully to avoid rut creation is also important.
Driveway to the North
Save the best sun-drenched zones for gardens and people, not cars. A garage on the south side of a house is a type I error, which often makes it worth ditching an otherwise good house buy. You cannot fix this level of suboptimization without major renovation, and not renovating is an ongoing problem, because walking far from the house to reach the sunshine is a heavy cost to pay. The ideal is to have your sunny, most intensive zone 1 gardens beginning immediately next to the home on the south side, adjacent to a door from the kitchen. If that’s not possible, you want it to be as close to this layout as you can develop.

It pays to stay below 10 to 15 percent grade when possible with all driveway and road developments.
Microclimate Development

The general pattern for optimizing outdoor uses on all sides of a building in cold climates. Prioritize your south-facing outdoor spaces very carefully.
How will the location, form, and materials to be used affect the climate of the site around the proposed structure? All buildings make certain areas cold and certain areas warmer. They protect certain areas from wind and sometimes increase airflow in other zones. Buildings always influence the lighting and moisture variations on a site as well. How you intentionally harness these influences is crucial to the successful integration of a building within a landscape.
All successful buildings in cold climates create positive microclimates by (a) accessing sunlight, (b) storing that heat in massive materials such as stone and water, and (c) protecting spaces from wind. Primary questions within microclimate enhancement include these: Where is the easiest place to create a strong sun trap? Are there knolls or large banks of mature trees that can shelter the building? Windbreaks are easy to plant but take time to develop and are crucial to have solidly established to the north of most buildings; certainly, this includes dwelling and animal barns.
Where do I want to increase the warmth of a space, and what space do I want to cool? A pattern always worth applying can be termed “southern hot spot, northern cold spot.” It’s safe to say that in almost all situations you want your zone 1 gardens to begin immediately south of the dwelling, utilizing that warmest of locations intensively. South-facing corners of built elements that are protected from wind are the most powerful warm microclimates created on a site: Place the most important and intensive food-production and outdoor human-use spaces there.
Additionally, designing a dwelling such that it allows “living across the solar day” is crucial to human productivity, enjoyment, and health. I follow the sun during my days working the homestead: breakfast or tea on the east-facing entrance steps that have warmed early; lunch in the south-facing midday spaces (or in shade in the high summer); dinner on the west-facing house deck. Remember that in cold climates you only need shade for a small proportion of the year, and cool shade is usually much easier to come by than protected sun-drenched, warm outdoor spaces. It’s the latter spaces that need to be thought about from the very beginning of site layout if you want enjoyable outdoor use across the seasons.

Cornelius Murphy enjoying the view from the Whole Systems Design balcony, an intentionally warm microclimate that is also rain protected. Note how each level of doors is protected by the roof above them—these double as summer shade providers when the sun is high.
Low Enough to Gravity-Feed Water
Often buildings are located above key water sources, thus eliminating the possibility for perpetual, free access to water in the home, barn, shed. Don’t make this mistake if you can avoid it. And yes, this often means locating your water source before siting your building.
Utilize and Alter Slope
If the site is a mix of flat and slope, use the slope for a dwelling (or barn). Having ground-level access on two floors is hugely valuable. Saving the often-rare flat ground for gardens is crucial. A building doesn’t need flat ground—get out of the looking-for-a-tent-site mentality that most of us are conditioned to thinking within. I’ve been on countless site consultations with clients looking for good house locations where I was walked from one flat spot to the next, each time being asked, “What do you think of this?”
Find a slope to build your place into if you have the opportunity, and you’ll also have a major solar-thermal and earth-thermal advantage, as well as ease of dual floor-grade access. I’ve also seen the same error played out over and over again by bulldozer-loving contractors flattening building sites before construction. A little terracing and a sloping site can be just as accessible as a flat one, while being higher performing, more beautiful, and optimally fitting within a site. Additionally, most house construction entails the use of heavy machinery and grade changes. Position the building such that its immediate outdoor spaces benefit from these slope alterations. Most often this comes in the form of allowing the building excavation to form a terrace on which south-facing garden space and an outdoor room is developed and on which a north-facing accessway is developed.
Sightline Leveraged and Buffered
Will the location of the building offer good surveillance of the rest of the site? This can be a hard criterion to judge before construction begins but is an important consideration when multiple good home sites are present on a property (not often the case!). A small rise or knolltop is an obvious choice and can be a good one, if all other aspects are taken into account. Views from the building to the surrounding area, as well as views to the structure from the surrounding area, can be considered under this heading as well.
Consider sightlines within the property to be views having a value beyond aesthetics: Who’s eating the chickens? What birds are stealing the fruit off the peaches? Where’s the dog or the child? Seeing provides instant awareness—the more you can see at once on your homestead, the better. In some locations, especially near roads and other buildings, sightline buffering is crucial. We all have seen the classic bad example of a house at a T-intersection that gets lit up with each passing car’s headlights. This can easily happen even in a rural area if a house is located just in the wrong spot in relation to a road bend or rise.
Be sure to experience the site and building locations within the site at various times of day and, ideally, across the season before finalizing decisions. I once conducted a property evaluation in Vermont for a couple from New York City who was about to put a binding offer on a large piece of land. The property was at least three-quarters of a mile from an interstate highway that you could not see from the property during the day. I visited the site without them and was impressed by its beauty and features. It was perfect for their goals—a better fit, actually, than almost any other property I’ve evaluated for people.
On my way back from the site, I looked in my rearview mirror while getting on the highway and noticed a rise about half a mile back, in a spot that could, if things lined up just right, pitch headlights upward and straight at the property I had just visited. I called up the client when I got home and told them the property was as ideal as they come—except the one concern about the highway headlight potential. “Have you been there at night?” I asked them. They had not.
The next day I got an e-mail from the wife, who said she had a strong feeling that she needed to see the place at night before placing the offer, so she drove up from New York City after work, arriving in the middle of the night. As she walked into the field above the house, the pasture above her was lit up intermittently with each passing northbound vehicle on Interstate 89, more than three-quarters of a mile away. They never placed the offer and found land a few months later in a different part of the state.
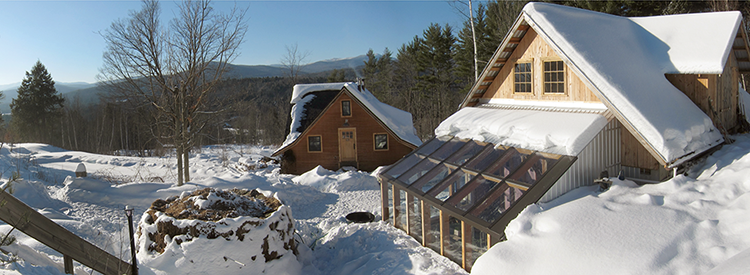
The Whole Systems Design barn-intergrated greenhouse nearing completion Photograph courtesy of Whole Systems Design, LLC
Face the Midday Sun—Not Always South
Another mistake made over and over again: architects orienting the building dead solar south. Sounds counterintuitive, I know. But think about the effects of slope and topography. In many hilly locations the effective solar day is not exactly between sunrise and sunset times. Put another way, the sun comes up late on a west-facing slope and goes down late as well. Such a slope has a late solar day. The opposite is true for an easterly-oriented site. This can be affected by both the general slope and by local topographic features such as knolls, which hide the sun early or late in the day. You must design around these if you want to optimize the sun’s precious value.
Solar south is not always the optimal solar orientation—that must be found for each site on a case-by-case basis through observation. At our research farm site, we orient buildings south-southwest for optimal solar gain and immediate outdoor space optimization, given our west-facing slope in general. Also worth noting is that western sun is warmer than eastern sun, so if it’s a toss-up, orient farther toward the west for solar gain.
Soundscape
This is not usually a major criterion to be sure, but it should be considered on every site. “What influences the soundscape of this exact spot versus this one here? Are they positive sounds? When do they occur: often, according to season, or at each rush hour?” These and other questions used to identify what audible influences on the building location can be crucial and sometimes vary greatly across a site of less than five or ten acres, most certainly on larger parcels.
Road noise is easy to underestimate; I did not understand this when I bought my place ten years ago and figured it would be relatively quiet in terms of car noise. Not even close. A cliff on the far side of a quiet state highway, which is nearly half a mile away, acts as a sounding board, sending vehicle noise back at my site. Small sheltered depressions within the site, behind bedrock outcroppings to the west, offer some reprieve from this noise. I can tell if it’s a weekday or weekend every morning by this noise, even though most people arriving on this site would think they are in the middle of nowhere.
Interstate highways generate noise that travels incredible distances when the topography allows for it and conversely can be buffered in very short distances when a knoll or ridge deflects the sound. Only earth, rock, and wooden fences or similar materials significantly affect sound transmission; tree planting does little unless it is very dense and wide—although it can help a lot when covered in snow.
Positive soundscape should also be considered for its ability to mask negative sounds—examples include waterfalls, brooks, frogs on a pond, and wind in coniferous trees. It’s worth recognizing that when inside a very well built and insulated home the outside soundscape is often muted heavily and of little consequence. It’s more often important to consider these effects in the outdoor living environment, where “white noise” can make a huge difference.
Spatial Design for Security
Spatial design can greatly create or reduce one’s security—especially from an awareness perspective, meaning one does not necessarily need to erect blockades; that is, knowing that someone is coming onto your property can be more effective than a huge fence. Most of the design aspects below are hard to achieve all the time, especially in a site or house as is, not built from scratch.
Site: Leverage a Strong Position
The areas we use the most on-site should be higher in elevation than areas where people who would do harm to us or the site are most likely to come from. Land above your zones 1 and 2 should be “hardened” to the extent practical: people deterred from circulation through it, via built fence, guard animals, brushy areas, live fences, rocks, steep ledge, and so on.
You should be able to hear activity at the site boundaries from high-use areas. This is especially true where people are most likely to enter, such as your driveway. Here’s an example of a bad situation: Your kitchen or workshop has a wall between you and the driveway entrance; because of noise in those spaces, someone could enter in a diesel truck and you wouldn’t know until he knocked on or bashed in your front door.
Foundation, Roof, Frame, Walls
There is much available on this topic in print and via the web, so this will be brief and limited to the areas where our experimenting has added new information to the common literature or where our experience conflicts with commonly understood theory about these aspects of construction. Our approach is always one of making sure built components are absolutely as durable and modular as possible; in no area of construction is this overarching approach more important or consequential than in the primary building elements of foundation, roof, frame, and walls.
Foundation
In making the foundation for a building, I would add two specific pieces of advice to the immense amount of information available on the subject: (1) Extend the foundation walls (stem walls) higher above grade than is often done, and (2) go deeper than is typical in your area for frost stability.§§§§§§§ These two approaches will help ensure that your foundation supports as durable a building as possible.
Let’s start this discussion with a simple fact: The most common and serious problems in cold-humid-climate buildings have occurred at the interface of the foundation and frame. I have worked as a carpenter doing demolition and reconstruction work and have evaluated dozens of old buildings in my consulting work for clients. I cannot emphasize enough the need to focus on this area first. It doesn’t make sense to evaluate other aspects of the building, though important they may be, before this; go into the basement right off the bat, and look at the corners of the building and the tops of foundation walls. Rot in this location is all too common even on modern buildings. The result of this problem is expensive and labor intensive in repair since it’s at the base of the building.
Constructing a foundation wall that extends high (called a stem wall when above grade) above the ground level upon which snow piles up is the easiest way to ensure a long-lasting structure. This costs more—that’s why it’s not done in our disposable world of “get it up as fast and cheaply as possible.” But compromising on this aspect of construction will cost you far more in the long run. When involved with building design, I like to specify stem walls of at least fourteen inches, preferably eighteen inches or more. The stem wall of our studio-workshop is about fourteen inches, which is the minimum I would recommend—there are areas where snow does pile against the wall above this point, but the water detailing in the wall itself should preclude this problem. Insulating against the cold of this stem wall is a challenge, but a surmountable one, and involves stepping the wall back toward the interior of the building to achieve full insulation value in this area.
Going deeper than the typical frost penetration depth (four feet in my area) is another form of cheap insurance against aberrant winters in which cold is as severe as it has ever been but snow cover (insulation) is nonexistent. Nature plays by few rules, and there’s no guarantee that frost won’t penetrate five feet deep in one winter with typical cold and lack of snow cover. That’s all it would take to heave a building—and a building heaved by frost is the worst thing (barring freak events) to happen to a building aside from fire or roof collapse. Foundation movement is to be avoided at all costs.
There are many options to explore for protecting a foundation from frost as well, beyond just going deeply. We have only experimented with two of these approaches, and I would leave this aspect to the many good resources and experts available for shallow frost-protected and other foundation strategies. The point remains: Whichever method you choose, be very conservative about reducing the possibility for frost penetration, and plan for weather patterns that may not be normal for your area. You can’t easily redo the foundation later in the building’s life, so building it to be adaptive to all possible climate and other scenarios is good prudence.
Your Roof: Steep, Simple, Strong, Steel (or Slate)
The same goes for the roof: Be conservative, and plan for abnormality in weather patterns. Next to the foundation, the roof is the most common source of problems and the scene of many needless issues. There are many resources in the literature on high-performance, long-term roof systems, but the following points are often missing from the discussion and are based on our own direct experience:
A good roof boils down to this approach: Keep it steep to shed snow in cold climates (unless you want to bet the farm that the past hundred years of snowfall patterns will stay the same for the next hundred?). Getting the snow off the roof is crucial to avoid dangerous and damaging snow loading. The idea that snow is good insulation is asinine, because it implies that enough heat is escaping the roof for the snow to function as insulation. A well-insulated roof is cold and does not let enough heat out to allow for snow to serve as insulation.
To shed snow reliably in all conditions (including the dreaded icing-then-snowing event, which is very sticky), you need to make a roof that is at least 12:12 pitch (45 degrees) or steeper and composed of steel or slate. An asphalt roof will hold snow reliably on nearly all angles but vertical (and then it’s a wall, not a roof!). A simple roof means avoiding valleys if at all possible. Valleys are always the weakest point in a roof—hence, the vernacular tradition in all cold snow climates is to avoid them.
Take heed of this wisdom. Some building designs will necessitate a valley, but minimizing them is important, and if you do choose to make one, detail it impeccably with wide flashing and careful lapping of all roofing. “Strong” is pretty self-explanatory, but if in doubt, beef it up. Steepness always adds strength, all things being equal, as rafters act more like posts (in compression) with steepening of angles. A simple roofline is also, of course, easier to build and repair. Every change in pitch, ridge, or especially valley is an opportunity for leaks and snow holding that are not present in a single steep plane.
Single steep planes are your friend in snowy country. Using steel or slate—it’s a no brainer: Slate will last easily a hundred years or two hundred if it’s good quality and maintained well. Steel can last fifty easily, if you spot paint the rusty spots every few years. Both shed snow very well. Both are immensely serviceable after they are done functioning on the structure they were originally installed onto—they can be reused as shed roofing, tile, or to cover cordwood stacks. Asphalt as roofing should simply be against code in all climates. Avoid asphalt—there’s simply no need for it! If your budget or time frame or labor do not allow for slate (the best roof choice) or standing seam metal (next best), then choose steel roofing. Basic metal roofing will last at least as long as asphalt, be more leakproof, and shed snow, and instead of filling a dumpster when it’s riddled with rust or holes, it can serve crucial functions as wood stack roofing, shed roofing, or animal pen fence mending, among others.
Wood shingles can make some sense if you have a resource of splittable rot-resistant wood such as cedar or white oak (large, clear white oak) and can be highly sustainable as a locally available resource. However, it holds snow very well and is prone to leaking. In the long term locally sourced and made shingles will again return as a primary roofing, but while slate and steel are available, you might as well take advantage of their superiority.
Frame and Walls
Wall and structure framing options are many and, again, covered well in the available literature. I would add the following to the deep and broad information available on the subject for this climate.
• Sensibility of a timber frame
• Larsen truss framing
• Insulating choices and tips
The debate on the function, sustainability, and overall practicality of a post-and-beam frame in this climate continues to rage on, for good reason. A stud-wall-framed building is usually cheaper and as fast to build as a comparable one made with a timber frame. After all, in a cold climate one must balloon frame (surround) the timber frame with an insulated wall, rather than fill in between the timbers with insulation. The latter is a viable strategy only in a much warmer climate. So a timber frame here means building two frames, one for structure and one to hold the insulation. It’s easy to see the merits of avoiding the timber frame as outlined above, so I want to point out reasons to actually choose a timber frame.
The first is aesthetics; seeing the structure at work is almost universally desirable by building occupants and for good reason. This value cannot be quantified, but its influence on the enjoyment of the building is undeniable and potent. The second is also somewhat indirect in terms of the actual building value it offers and has to do with process. Felling trees, milling (or hewing or working in the round), then cutting joinery and raising a frame is an ages-old process that can utilize material closer to its raw state than constructing a house from sticks milled one after another, each the same as the last. The rewards of this process, the skills it requires, and the result achieved cannot be attained by the stick-built approach.
My take on the timber-frame versus stick-built debate is that if you are determined to do the most economical thing but still love the values of a timber frame, then stick-frame the exterior walls but use posts and beams for the interior structure. This approach is eminently practical and yields a highly functional, beautiful result.

The Whole Systems Design studio before move-in, with roughly 95 percent of the materials by volume used in construction sourced within seventy-five miles of the site and more than 75 percent of the wood sourced on-site.
A light, gusseted frame (Larsen truss) within a timber frame structure has worked pretty well for us. A Larsen truss is a small-member framing system in which an inner and outer post are joined with gussets. In our case we used two 2" × 3" posts of softwood separated by a two-inch air gap (thermal break), held together every handful of feet by half-inch plywood gussets. It has performed very well thermally but is a bit light structurally for holding the windows and doors—they rattle a bit more than desired when the wall is bumped into or doors are slammed. It was also very difficult to fill the crucial thermal break (air space) within the wall itself, leading us to feel that a staggered-stud wall of, say, 2"–4" posts used to form an eight-inch or greater wall would be more ideal and easier to spray cellulose into.
The big advantage to a Larsen truss is the ability to use very small dimensioned material to make a wall assembly with a solid thermal break—allowing a landscape with nonmature trees to offer a yield of dimensioned lumber that’s usable for walls. You can mill 2" × 3" studs from tiny trees—slightly tedious maybe, but doable. Again, staggered studs would probably be our choice next time, and we would likely shoot for a ten-inch wall instead of an eight-inch assembly.
Cellulose was our insulation of choice for the shop/studio, and we’ve had no problems so far. I like cellulose for its ease of use, relatively low toxicity, sustainability, resistance to mice, and, perhaps most importantly, its ease of modification. It’s guaranteed that you’ll need to modify an insulated wall at some point in the building’s lifetime. You’ll need to send a cable or waterline through, add a vent or window, expand the structure, fix a leaking pipe, or retrieve a wire. When you do so with cellulose, it’s easy: Pull out the material, put it in a bag, and stuff it back in when done.
Spray foam? Forget about it. You’ll have to wreck most of the materials used in the wall when modifying a wall that is foamed. Additionally, foam is not a viable material in my mind purely from a toxicity standpoint and lack of sustainability in production. Foam board is one of the few instances when a toxic material serves a seriously important function, such as when insulating spaces below grade, as in foundation work or root cellars.
I would not choose to use straw in this climate, but I know some good builders who seem to have success with it. The best straw-bale buildings I have seen in this region are smartly done, with the bale walls starting very high on top of stem walls that are at least eighteen inches to two feet high. Foam or cellulose is used lower down in the wall. One issue I have with bales is the need for very thick walls to accommodate both the relatively low R-value of straw (in bale form) and the dimension of a bale. The thinner the wall, the better from a building livability standpoint, as they allow much more light into the interior. A thick stone or bale wall of, say, sixteen inches must have bigger windows and more glazing to be equally bright in comparison with a cellulose- or wool-insulated building with walls of, say, ten or twelve inches. We chose to go for a relatively thin wall (eight inches) and still achieve very high performance of about one cord per year to heat fifteen hundred square feet of space in a very cold climate with negligible passive solar gain.
An important additional point needs to be made about windows. All things being equal, it is more efficient and economical to use a smaller number of large windows than to use many small windows. This is an often-neglected fact, I think, because people fail to realize the insulation value lost in areas around each window frame. The window, of course, has a very low R-value, but so does the framing around each window; you give up R-value with a much wider area than the window itself. Proportionally, you will get more light for less heat loss with bigger windows in smaller quantity. It’s also much less expensive if you are paying for labor, as windows are time intensive to install. Larger windows can often provide deeper light penetration into a building as well (if they are vertically elongated); that’s why schoolhouses have very tall windows and can often offer a better connection to the outdoor environment.
Mechanical Systems
From a resiliency standpoint, the fewer mechanical systems the better. It’s that simple. Every system with moving parts will break and will need to be repaired, or in a time when specialized parts may not be available easily, the system may need to be abandoned for a simpler one. In a well-constructed home, the weak links, resiliency-wise, are the mechanical systems. A maximally resilient home reduces the number and complexity of mechanical systems and uses the most fixable systems when mechanisms are necessary. Let’s start with why we need mechanical systems. Briefly, they are commonly related to the following:
• Lighting, communications, computing
• Heating and cooking
• Air movement (including ventilation)
• Water distribution
Achieving a high level of resiliency involves assessing each of these independently and identifying ways of providing the services we need from each of these systems through the simplest, most fixable, passive, and durable means possible.
Table 6.3: Comparing Mechanical Systems
|
Service |
Typical System |
Resilient System |
|
Light, daytime |
Electric lights |
Daylit via windows |
|
Light, nighttime |
CFL/incandescent |
LED, task-oriented |
|
Communications, written |
|
E-mail? |
|
Communications, verbal |
Cell phone or landline |
Landline, spoken |
|
Heat, space |
Automated furnace |
Woodstove |
|
Heat, water |
Furnace |
Woodstove |
|
Cooking, stovetop |
Gas or electric range |
Wood cookstove |
|
Cooking, baking |
Gas or electric oven |
Wood cookstove |
|
Air circulation |
Electric fan |
Heat source location optimization, open floor plan |
|
Ventilation |
Electric fan |
Passive vents (high and low) |
Lighting and Communications
These are corollary building functions and not limited to the built environment on a site, but given their technical nature and inherent need for protection from the elements, they fit within the building resiliency focus of this chapter. It is easy to downplay the need for lighting and communications in hard-core resiliency thinking and planning: Under rapidly changing and sometimes emergency conditions, one can easily assume that food, clothing, heat, shelter, water, security are the most basic needs; I sure have until recently.
However, the last time we went without power for several days, I realized how important artificial lighting and communications are, and how much better positioned we are to help our neighbors, if we have power when most people have none. Nighttime lighting allows one to work, fix things, house and support people in ways not possible in the dark. If you’re in the dark when the sun sets, all cooking, fixing, socializing, and other crucial functions cease. Doing these activities under a headlamp or with a flashlight is possible but limiting.
In our studio/shop we have developed a baseline of lighting systems in LED bulbs that have a low enough load such that when the grid is down a small backup power system of two deep-cycle batteries can illuminate the building’s interior for at least a week between battery chargings if they are used frugally and selectively. Wiring the building with more rather than fewer lighting circuits allows controlling what areas are lit selectively, correlating to a reduced electric use by allowing the user to choose to light only those areas in which she will be working.
It’s also important to note that LEDs are extremely focused in their light output, so task-oriented lighting strategies are the directive in their use. You do not get generalized space lighting with most LEDs but can get high-quality focused light with the screw-in Sylvania bulbs we use. For more generalized light we find that a string or two of six- to nine-watt LED Christmas lights are just the ticket to provide general light in a space so we can walk around and see where we are going.
To lower the electric load further, we can supplement lighting needs by running Coleman white-gas lanterns, which throw off a range of light according to need, from low task-based amounts to an intense quantity that allows a large area of work to be conducted. White gas stores for very long periods of time, so it is a good choice for such a use. Supplementing these sources are a few boxes of long-burning candles, which, of course, last indefinitely and offer low-intensity light for general space illumination.
The same two-battery backup system we use for lighting has two other uses: power for communications and cordless tool (drill, impact driver, cell phone) charging. The last time we lost power was from a snowstorm. Such climate-related events often knock out power but leave phone and cable lines in working order. That means for those of us on cable or DSL, the Internet is still accessible if you have the power to run the modem and computer. Fortunately, these are very low loads and can easily be met for days to weeks with small backup power systems.
Why is maintaining Internet access such an important thing, given that you can’t eat it and it doesn’t keep you fed or watered? The web is an easy and fast source of weather and other news events. Knowing the latest developments concerning a storm track, a flu outbreak, a nuclear release or other toxic spill, or many other likely events that affect our lives is crucial. The only ways to find these out are through direct word of mouth, the radio, the phone, or the Internet. Since redundancy is key to resiliency, having multiple lines of such communication and information access is key. During the latest power outage, I was able to plug my laptop, modem, and router into my backup power system and access the Internet for days with no battery charging from the generator necessary before the grid came back up. During this time I could see what other weather events we could expect and plan around them accordingly. In various other scenarios this information could be more valuable than we might imagine.
The other two aspects of communications related to the building system we use are a multiband solar- and hand-powered radio and phones. Both of these can operate independently of a functioning electric grid, and the radio can operate independently of any external electric power source as well. We have replaced our two cordless phones with corded versions that need no plug-in (just a working phone line). These have the added advantage of much lower electromagnetic radiation (EMR) emission that reduces their negative impact on human health. Between this communications triad of Internet, phone (landline and cell), and radio, we are likely to be able to at least receive (if not send) information from the larger world about current events that are necessary to plan around in various disturbances to fragile systems such as the electric grid.
We have a fourth communications source that’s usable only for local transmission of information—handheld two-way radios by Motorola, which are handy for us around the farm. In addition to the Motorolas, I also have one CB radio, which can pick up regional signals of information. I plan to supplement the CB with a second handheld device so that if necessary I could communicate with another person in this general area (within a mile or two) in a cell-tower-down situation. All of these hold charges for long periods of time and can be recharged via generator, deep-cycle battery, or solar-panel fence-charging backup source.
The Woodstove
The woodstove has become the logical power center of my own resilient homestead. It’s nearly impossible to break a wood-powered heating system, and if it does break down, it’s easily repairable by low-tech, often on-site means. Aside from stored food and potable water access, it is a dry stack of fuelwood under cover and a woodstove in a well-insulated building that covers your most basic needs for survival and thrival across a wide range of bumpy conditions. I cannot see a scenario in which a cold-climate home should be without the simple power and utility of a wood-burning stove.
Over the last handful of years, we have taken the basic woodstove to some of the logical extents of this technology’s capability, including heating all of our domestic hot water. Our firebox is rated to about 35,000 Btus of which about 25 to 35 percent goes to heating the hot water in the stainless steel jacket at the back of the firebox. This heated water thermosiphons into the hot water tank requiring no pump—if the power fails we can still run the stove and have hot water. Our wood cookstove not only heats fifteen-hundred square feet of space, but heats all of our hot water, bakes and boils our meals, dries clothes, and provides firelight—all on less than two cords per year. The colder it gets outside the more hot water we have. During warmer times of year in the fall and spring we put one charge of wood in the stove just to make enough hot water for bathing; this also helps keep the space from being too humid and gives us a clothes-drying option while taking the chill off. We use simple solar hot water showers and the pond and river for bathing in the warmest four to five months of the year.
We also have solar hot water on site, which works well when we have cloudless days (rare in the winter). But solar hot water with it’s electric requirements, pumps, and many parts (in addition to its large cost) does not come close to the resiliency of a wood-powered water heating system. In a much sunnier climate, solar hot water starts to make a lot of sense if you have the money and a consistent electrical supply—though you can make very inexpensive solar hot water systems if you are in a very hot climate.
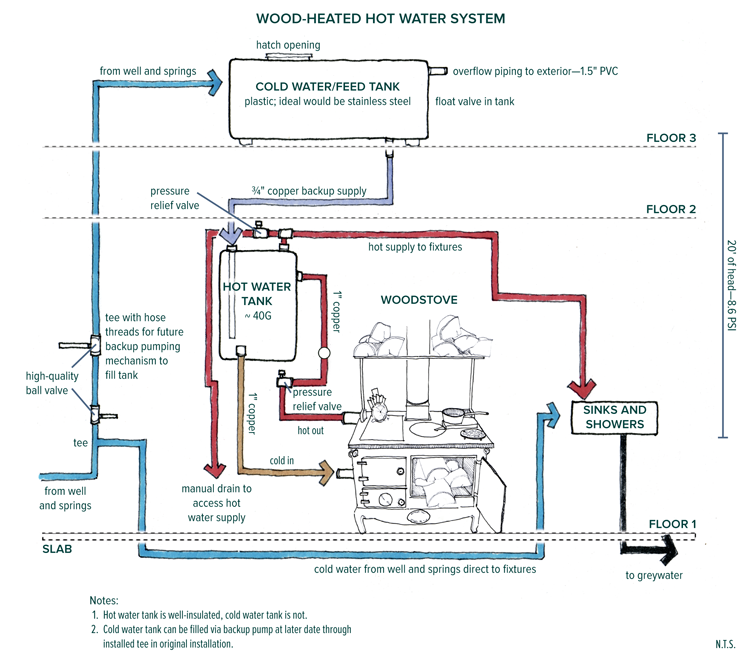
The generation 1.0 as-built plan for our woodstove-powered hot water systems—working exceedingly well, though improvements are likely; for instance, by adding some cold-water-outlet at varied heights in the tank
Ventilation and Moisture Management
Tightly constructed, well-insulated buildings need significant venting of humid indoor air to avoid moisture (and future rot) problems associated with a buildup of moisture into liquid water within wall and roof cavities. Indoor air humidity must stay below 40 percent and preferably closer to 25 to 35 percent to avoid water buildup in the insulated cavities, as humid air moves outward toward drier, colder air and condenses.
This condensation is the hidden killer of many tight buildings. You can get your foundation, walls, and roof all correctly detailed (and that’s difficult enough in the cold-humid regions of the world) but still lose the battle against moisture management in a long-term durable building if moisture is allowed to condense inside your walls and roof. The typical approach to achieving this ventilation is to install heat recovery ventilation units (HRVs) during construction. These units send humid, warm indoor air to the exterior while bringing in cold, dry outdoor air. In the process they exchange some heat in the indoor air with the outdoor, air providing an efficient way to vent the building—without losing all heat present in the indoor air.
We have chosen to forgo this active fan-based ventilation in the WSD studio/shop in favor of a nonelectric, passive, and manual approach to ventilating the building. Now in our third winter, we have performed enough moisture testing and heat-consumption measuring to determine that this approach is working very well. In our second winter we measured interior cavity moisture by drilling holes at different elevations in likely problem areas (where wall plates meet the roof, tops of walls, peaks of the roof, and so on) and inserted a moisture-sensing probe at three depths across the wall profile. We found all three readings in every test hole (over twenty of them) to result in 5.9 to 9.8 percent moisture content, well within acceptability.
Our ventilation approach is simply to open windows slightly at the top of the building and provide some measure of air infiltration at the lowest levels of the building.¶¶¶¶¶¶¶ This creates a passive air movement (“stack effect”) that quickly moves air through the building from low to high locations. We apply this technique whenever we are in the building and generating humidity (breathing, cooking, washing, and so forth). While we give up a measure of efficiency by losing all the heat present in the air leaving the building, we gain the advantage of having an unbreakable, completely no-electric-load means of ventilating the structure. Given that we use about one and a half to two cords of wood per year to heat the fifteen-hundred-square-foot interior and all of the domestic hot water, we do not feel as if the heat consumption disadvantage is worth spending the money, electricity, and time (in replacing the fan or other breakable aspects of the unit) on. If we did use an HRV, we could probably knock that number down maybe a third of a cord or so. Would that be worth the trade?
Figure that it’s about $1,500 to $2,000 in parts and installation to get the HRV in. Figure another $50 a year in electric usage to operate it and another $100 to $500 every ten years to fix broken parts associated with it. That one-third cord of wood is worth $50 to $70 in current value. Then there’s the time factor of dealing with another set of moving parts in the building. There’s also the input and impact of manufacturing the HRV and its components along with the nuclear, coal, or other power production to run it. The answer to whether an HRV is worth it or not is ultimately a judgment call, and one that in my opinion seems less worthwhile than I thought it might be, after living in the building for three years.
I was skeptical about the decision to forgo an HRV during construction, so we designed in the ducting necessary to install a unit later without having to rip open a wall and incur fairly major time or money expense. Fortunately, the need for an HRV seems less each year I use the structure. As a rule, the simplest solution is always the best, and this is a great example of this principle in action.
One other moisture-management challenge is worth focusing on: foundation-frame interfaces. As I inspect landscapes and buildings around New England, I always see buildings in various stages of decay. Nearly always, the area of structures in the worst condition (unless the roof has failed) is where the foundation and walls or first-floor plane interact.
There are two challenges that are exceptionally tricky to get right for the long haul in this regard. First is wood framing and concrete or stone connections. These almost always rot faster than the rest of the building, especially in the case of concrete as opposed to stone, when used as a foundation, because concrete constantly wicks any moisture it is in contact with, whereas stone does not convey it nearly as well. So a concrete footing sitting below the seasonally and massively fluctuating water table will bring that moisture up vertically many feet if it extends that far. That moisture then comes into contact with the building framed atop this footing. That’s where you look first when inspecting the structural integrity of a building in a cold climate—and work there is especially expensive.
The second, just as common, problem area—and one much harder to avoid—is a wood-framed wall next to a stone or concrete retaining wall, or a wood-framed floor above a basement or cellar. In both cases the problem arises between cool, humid areas and drier, warmer conditioned space. Such a juxtaposition of spaces is impossible to avoid in cold climates, and it raises a very difficult situation where, at the very least, mold is likely to form and where, more commonly, full-on rot happens. It’s only in the most well-designed and detailed buildings that no problems emerge here over time, and even those require vigilant inspection to ensure that this stays the case from year to year.
Inspection is best done during winter and in early spring, when the contrast between temperatures and humidities is highest and when the water table rises the most (surging humidity in the foundation-contact areas). Old buildings often avoided disastrous consequences in this area of buildings, not because they were necessarily designed or built well but mostly because ventilation levels were so high because of poor insulation. Older buildings also stacked the odds in their favor by use of higher-quality materials than we have today, at least in terms of wood—such as chestnut and old-growth, rot-resistant woods. New, second, third, and fourth-growth pine, for instance, is far inferior to old-growth pine, which is actually quite strong and rot resistant. Today you’d never consider pine to have any rot resistance, which is true for today’s pine, but not of the pine our grandfathers used.
Much of the mold, rot, and attendant air-quality problems of modern buildings are because of their tightness, coupled with poor detailing. Tight buildings necessitate impeccable design and detailing when it comes to dealing with moisture, and in no place is moisture more commonly a problem than at the earth-building interface (roofs are probably the second most common areas—I always start at the bottom and top of buildings when inspecting, then look at the middle). Getting around problems at the ground-structure interface in a tight, well-insulated building requires that we keep as much moisture out as possible via site and foundation drainage, use of concrete sealer, plastic sheeting, and foam board, then promote adequate ventilation to remove any excess humidity that still remains or is generated.
This one-two approach is crucial, because you can never control water with 100 percent assurance; you can only put the odds in your favor via multiple backups. To drive this point home, I’ve known at least two instances in Vermont where springs formed just uphill and underneath a building during the first ten years of its lifespan, both times creating major moisture problems for the structure. This climate is incredibly wet during certain periods of time; couple that with enormous contrasts in both temperature and humidity from indoors to outdoors, and you’ve got one of the most challenging climates in the world in which to make a long-lasting building.
It’s not in the scope of this book to go into design detail as to how exactly to get through this moisture challenge—there is some good information, amidst the significant misinformation out there on this topic. I simply want to alert the reader to this fundamental challenge in creating resilient, long-term buildings that won’t need massive work to repair in the future and offer the general strategies for dealing with this challenge.
Water: Passive Supply for the Resilient Home
Before electricity and the means to drill a deep well, no one went to the trouble of developing a whole farmstead before locating a free-flowing and quality water source uphill of the development location (main house and barn/animals/gardens). When you find an old cellar hole in New England, you know there is—or was—a good spring uphill of that location. There are still pieces of land available that have such a basic resource in place, but they are increasingly hard to find.
In more modern times drilled wells and electric pumps have allowed us to develop almost anywhere in the landscape, even where the water supply is three to five hundred feet, sometimes even six hundred or more feet, below the ground. Our lives are then beholden to the complicated and fragile chain of events, parts, and energy required to constantly bring that water to the surface and pressurize it in our homes.
The WSD studio/shop building was constructed with access to the typical conventional water source in rural locations—a drilled well with a submersible pump located at the bottom of it. As mentioned, this is a brittle system vulnerable at numerous failure points, ranging from pump breakage to grid failure to waterline rupture. You can’t make parts for the pump locally, and the entire chain of distribution for replacing a pump or its parts is convoluted, global, and fragile. It will be disrupted, you can count on that. I hope this won’t be when your well pump fails, but who wants to make such a gamble when it comes to such a basic need as water?
As in all other systems, we seek a more durable and resilient approach. So in keeping with the principle of replacing a complicated active system with a simpler, passive one wherever possible, we have provided a backup gravity water source to the WSD studio/shop over the past year, consisting of a water tank that is maintained at full and is only used in a grid-down situation. We will also be adding a full spring-fed source to this system in the coming summer. When this spring-fed source comes online, the backup tank (in the attic of the building) still functions as a double-backup gravity-fed source in the event that the spring dries up for a period of time or freezes.
Water supply to the home can be divided into three approaches:
1. Pump-based: from a drilled or hand-dug well with no storage
2. Pump-based: from a well but with storage providing gravity feed for building
3. Gravity-fed: from a spring or shallow well uphill of the building with enough flow for constant supply to building

The most resilient home water systems are often only possible if the property’s features allow for it—springs uphill of a home site being a top priority in land selection.
Of course, approach 3 is the most resilient approach and is the ideal scenario you want to develop if you are looking to create a home from a new piece of land. For most of us on an existing piece of land that does not happen to be a good old farm, however, we have a retrofit job on our hands with the goal of moving from approach 1 to approach 2 or, ideally, approach 3 when possible. Getting to a full gravity-fed system is not always possible, as it requires a significant water source uphill of the building. However, the second approach is always possible to some extent and is most often the kind of system we consult clients on in retrofitting into their current homes and farms.
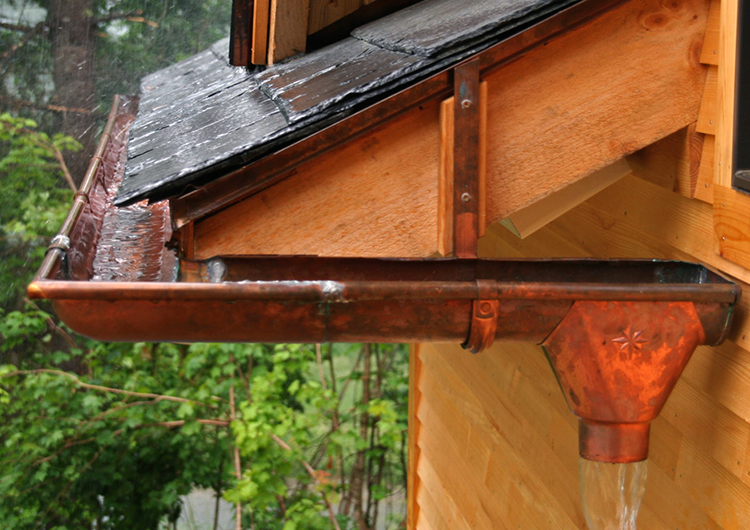
This copper-gutter “drop” connects to a copper downspout that feeds a pond and can be connected to drinking-water storage. Slate and copper combine to offer completely potable water from our roof and also last a century or two.
Nutrient Cycling
The typical approach to handling nutrients in modern homes is as senseless as it is unresilient. And as with all nonadaptive systems, it represents a one-way flow of materials, nutrients, and energy. In the case of the rural modern home, it looks like this: food bought at the grocery store—food consumed—food excreted into drinking water—nutrients flushed under the front yard to grow grass.
In the more typical suburban or urban setting, you can replace the front yard with an even more wasteful situation: the sewage treatment plant. Here, we apply enormous amounts of energy and chemicals to the nutrients before flushing them once again, this time into the nearest lake or ocean. In ten thousand years of civilization, one would think we would have come further than this take-make-waste conveyor belt. The nutrient-flow system in the modern home is a legally enforced and highly efficient system for transporting topsoil and drinking water into the world’s rivers, lakes, and oceans using fossil fuel and chemicals every step of the way. Along with the use of the automobile and consumption of nonfood products, this system of nutrient flow through our homes represents the most rapid method ever invented of replacing valuable resources with waste.
Of consequence to the modern resiliency-focused individual is not only the destructiveness of this system but the wasted values it represents. The nutrients we consume in the form of food need to become food again as rapidly as possible if we are to perpetuate a cycle of fertility and health on both our landscape and the planet. How to cycle these nutrients rapidly back into soil, plants, animals, and ourselves is the design challenge. The following strategies distill methods for capturing and harnessing this fertility as potently as possible:
• Composting solid nutrients: humanure
• Fertigation through urination
• Composting food scraps
• Potentizing the results
We have found that the easiest and highest-leverage actions for aligning our buildings with an optimized cycle of fertility on the homestead is to use composting toilets and whenever possible divert urine (watered down) into plant roots in the garden, orchard, paddies, and pasture. The best intersecting technologies between a home and the nutrient flows in the larger landscape of the home are a composting toilet and a five-gallon bucket or similar, in which to urinate when the weather is cold. When the weather is nicer, it is best to urinate outdoors either directly at the base of plants (assuming significant soil moisture is present) that need a fertility boost or into a container, then dilute the mix before watering plants. Watering your compost piles with urine-rich liquid is also a great way to accelerate the decomposition action in most piles that run short of nitrogen at times.
The woodstove enters the nutrient flow web because of its carbon-cycling functions and ability to produce ash and char. Both of these products are carbon rich and thus pair perfectly as sponges to absorb and carry the nitrogen-rich effluent generated by the building’s occupants. By combining the N and C nutrient streams from people and wood burner(s), we can create a durable, nutrient-rich soil that is optimized to promote plant health in the landscape.
I will not go into composting toilet details here because of the immense amount of literature available on the subject. I would only add that we are developing ways to eliminate the common need for a constant electrical load in the form of a fan for ventilation. We use an old Clivus Multrum that requires no moving parts. We are in the process of developing a stack-effect (convection loop) ventilation system where the pile can be slightly aerated and the air vented to the top of the building without backflowing up through the bowl. A fan that turns on only when the lid is lifted will probably play into the final design, because it is very difficult to achieve a correctly ventilating system (in through the bowl, not out through the bowl) while the lid of the toilet is open.
There are many makes and models of composting toilets on the market with varying degrees of breakability and complexity, from electrical fans to hand-cranking aeration systems. As with all technical systems, we are interested in the simplest method that will get the job done, even if it takes more time to do so—just as the pile takes longer to compost. Who wants to go into the humanure pile to fix the hand crank when it breaks, which is guaranteed to happen? The same goes for the fan or other moving parts. They will all break, so plan on that.
We must remember that resilient homes and farms require highly complex biological systems but are burdened by and made brittle by complex technical systems. The abiotic systems must be as simple as possible.
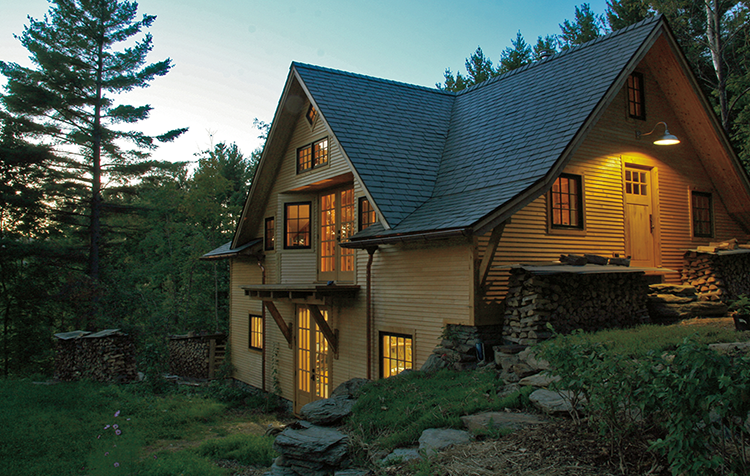
The Whole Systems Design studio shop with a 150-year-life-span slate roof
††††††† I am not speaking in terms of primitive needs here, but of modern homesteads and farms. For a real shit-hit-the-fan scenario or in a wilderness type of setting, the tool list shifts to knife, axe, fire, and the like.
‡‡‡‡‡‡‡ Pounds per day weight averaged across the entire heating season. Pounds per year weight does not include skidding/hauling/delivery to the processing site, assumed to be moving cordwood 3x per year from stacking to hauling to burning. Data is based on 400 lbs in a cord of wood and 180 days in a heating season.
§§§§§§§ Insulating foundation walls by frost protecting with foam board is often as effective and less expensive than digging deeper foundations.
¶¶¶¶¶¶¶ We open windows at the gable end of the east and west side of the buildings. While these are near the top of the building, they are not at the exact highest point. In retrospect there should also be a cupola in the building that can vent air from the absolutely highest point in the structure, which, I am realizing over time, is very important and the basis of that design element in vernacular architecture the world over.